technical data Seat Arona 2017 Owner's Manual
[x] Cancel search | Manufacturer: SEAT, Model Year: 2017, Model line: Arona, Model: Seat Arona 2017Pages: 308, PDF Size: 6.66 MB
Page 2 of 308
SEAT S.A. is permanently concerned about continuous development of its t\
ypes and models. For this reason we ask you to under-
stand, that at any given time, changes regarding shape, equipment and te\
chnique may take place on the car delivered. For this reason
no right at all may derive based on the data, drawings and descriptions \
in this current handbook.
All texts, illustrations and standards in this handbook are based on the\
status of information at the time of printing. Except for error
or omission, the information included in the current handbook is valid a\
s of the date of closing print.
Re-printing, copying or translating, whether total or partial is not all\
owed unless SEAT allows it in written form.
SEAT reserves all rights in accordance with the “Copyright” Act.
All rights on changes are reserved.
❀This paper has been manufactured using bleached non-chlorine cellulose.
© SEAT S.A. - Reprint: 15.07.17
About this manual
This manual contains a description of the
equipment supplied with the vehicle at the
time this manual was published. Some of the
units described herein will not be available
until a later date or are only available in cer -
tain markets.
Because this is a general manual for the
ARONA , some of the equipment and functions
that are described in this manual are not in-
cluded in all types or variants of the model;
they may vary or be modi�ed depending on
the technical requirements and on the mar -
ket; this is in no way deceptive advertising.
The illustrations are intended as a general
guide and may vary from the equipment �tted
in your vehicle in some details.
The steering indications (left, right, forward,
reverse) appearing in this manual refer to the
normal driving movements of the vehicle ex -
cept when otherwise indicated.
The audiovisual material only is intended to
help users to understand certain car function -
alities better. It does not replace the instruc -
tion manual. Please use the instruction manu -
al to obtain more comprehensive information
and indications.
The equipment marked with an aster -
isk* is �tted as standard only in certain
versions, and is only supplied as op -
tional extras for some versions, or are
only offered in certain countries.
® All registered marks are indicated with
®. Although the copyright symbol does
not appear, it is a copyrighted mark.
>> The section is continued on the follow -
ing page.
Important warnings on a given page
Detailed contents on a given page
General information on a given page
Emergency information on a given page
WARNING
Texts preceded by this symbol contain infor -
mation on safety. They warn you about possi -
ble dangers of accident or injury.
CAUTION
Texts with this symbol draw your attention to
potential sources of damage to your vehicle.
For the sake of the environment
Texts preceded by this symbol contain rele-
vant information concerning environmental
protection.
Note
Texts preceded by this symbol contain additio -
nal information.
This manual is divided into six large parts,
which are:
1. The essentials
2. Safety
3. Emergencies
4. Operation
5. Tips
6. Technical data
At the end of this manual, there is a detailed
alphabetical index that will help you quickly
�nd the information you require.
Page 8 of 308
Table of Contents
Manual gearbox . . . . . . . . . . . . . . . . . . . . . . . . . 183
Automatic gearbox/DSG automatic gear-
bo x*
. . . . . . . . . . . . . . . . . . . . . . . . . . . . . . . . . . . 183
Ge
ar-change indicator . . . . . . . . . . . . . . . . . . . . 190
Run-in and economical driving . . . . . . . . . . . . . 191
Engine management and exhaust gas purifica-
tion syst
em . . . . . . . . . . . . . . . . . . . . . . . . . . . . . 193
Driving tips . . . . . . . . . . . . . . . . . . . . . . . . . . . . . 195
Driver assistance systems . . . . . . . . . . . . . . . . . 196
Start-Stop System* . . . . . . . . . . . . . . . . . . . . . . . 196
Cruise control system (CCS)* . . . . . . . . . . . . . . . 198
Speed limiter . . . . . . . . . . . . . . . . . . . . . . . . . . . 200
Area monitoring system (Front Assist) includ-
ing City
emergency braking and pedestrian
monitoring* . . . . . . . . . . . . . . . . . . . . . . . . . . . . 203
Adaptive Cruise Control ACC* . . . . . . . . . . . . . . 209
Blind spot detector (BSD) with parking assis-
tance (RCT
A)* . . . . . . . . . . . . . . . . . . . . . . . . . . . 220
SEAT Drive Profile* . . . . . . . . . . . . . . . . . . . . . . . 225
Fatigue detection (break recommendation)* . . 227
Park Assist* . . . . . . . . . . . . . . . . . . . . . . . . . . . . 228
Parking aid . . . . . . . . . . . . . . . . . . . . . . . . . . . . . 236
Rear Assist “Rear View Camera”* . . . . . . . . . . . 242
Towing bracket device . . . . . . . . . . . . . . . . . . . . 245
Towing bracket device* . . . . . . . . . . . . . . . . . . . 245
Trailer towing . . . . . . . . . . . . . . . . . . . . . . . . . . . 250
Advice . . . . . . . . . . . . . . . . . . . . . . . . . . . . . . . . 255
Care and maintenance . . . . . . . . . . . . . . . . . . . . 255
Accessories and modifications to the vehi-
cle
. . . . . . . . . . . . . . . . . . . . . . . . . . . . . . . . . . . . 255
Care and cleaning . . . . . . . . . . . . . . . . . . . . . . . 256
Care of the vehicle exterior . . . . . . . . . . . . . . . . 257
Caring for the vehicle interior . . . . . . . . . . . . . . 262
Checking and refilling levels . . . . . . . . . . . . . . . 265
Refuelling . . . . . . . . . . . . . . . . . . . . . . . . . . . . . . 265
Fuel . . . . . . . . . . . . . . . . . . . . . . . . . . . . . . . . . . . 265
Working in the engine compartment . . . . . . . . 267 Engine oil . . . . . . . . . . . . . . . . . . . . . . . . . . . . . . 270
Cooling system . . . . . . . . . . . . . . . . . . . . . . . . . . 273
Brake fluid . . . . . . . . . . . . . . . . . . . . . . . . . . . . . 275
Windscreen washer reservoir . . . . . . . . . . . . . . 276
Vehicle battery . . . . . . . . . . . . . . . . . . . . . . . . . . 276
Wheels
. . . . . . . . . . . . . . . . . . . . . . . . . . . . . . . . 278
Wheels and tyres . . . . . . . . . . . . . . . . . . . . . . . . 278
Spare wheel (temporary spare wheel)* . . . . . . 283
Winter service . . . . . . . . . . . . . . . . . . . . . . . . . . . 284
Technical data . . . . . . . . . . . . . . . . . . . . . . . . 285
Technical specifications . . . . . . . . . . . . . . . . . . 285
Important information . . . . . . . . . . . . . . . . . . . . 285
Information on fuel consumption . . . . . . . . . . . 286
Trailer mode . . . . . . . . . . . . . . . . . . . . . . . . . . . . 286
Wheels . . . . . . . . . . . . . . . . . . . . . . . . . . . . . . . . 287
Engine data . . . . . . . . . . . . . . . . . . . . . . . . . . . . . 288
Dimensions . . . . . . . . . . . . . . . . . . . . . . . . . . . . . 290
Index . . . . . . . . . . . . . . . . . . . . . . . . . . . . . . . . . 293
6
Page 73 of 308
Safe driving
Safety
Saf e driv
in
g
Safety first! This chapter contains important information,
tips, s
ug
gestions and warnings that you
should read and consider for both your own
safety and for your passengers' safety. WARNING
● This m
anual contains important informa-
tion about the operation of the vehicle, both
for the driver and the passengers. The other
sections of the on-board documentation also
contain further information that you should
be aware of for your own safety and for the
safety of your passengers.
● Ensure that the on-board documentation is
kept in the
vehicle at all times. This is espe-
cially important when lending or selling the
vehicle to another person. Advice about driving
B ef or
e setting off For your own safety and the safety of your
p
a
s
sengers, always note the following points
before every trip: –
Make s
ure that the vehicle's lights and turn
signals are working properly.
– Check tyre pressure.
– Ensure that all windows provide a clear and
good v
iew of the surroundings.
– Ensure that all luggage is correctly secured
›››
page 152.
– Make sure that no objects can interfere
with the pedal
s.
– Adjust front seat, head restraint and mir-
rors
properly according to your size.
– Ensure that the passenger in the central
rear se
at always has the head restraint in
the correct position for use.
– Instruct passengers to adjust the head re-
straints
according to their height.
– Protect children with appropriate child
seats and pr
operly applied seat belts
››› page 88.
– Assume the correct sitting position. Instruct
your pa
ssengers also to assume a proper
sitting position ››› page 72.
– Fasten your seat belt securely. Instruct your
pas
sengers also to fasten their seat belts
properly ››› page 77. What affects driving safety? As a driver, you are responsible for yourself
and y
our p
assengers. When your concentra-
tion or driving safety is affected by any cir-
cumstance, you endanger yourself as well as
others on the road ››› , for this reason:
– Always pay attention to traffic and do not
get di
stracted by passengers or telephone
calls.
– Never drive when your driving ability is im-
paired (e.
g. by medication, alcohol, drugs).
– Observe traffic laws and speed limits.
– Always reduce your speed as appropriate
for r o
ad, traffic and weather conditions.
– When travelling long distances, take
break
s regularly - at least every two hours.
– If possible, avoid driving when you are tired
or stre
ssed. WARNING
When driving safety is impaired during a trip,
the risk of
injury and accidents increases. Safety equipment
Never put your safety or the safety of your
p
a
s
sengers in danger. In the event of an acci-
dent, the safety equipment may reduce the »
71
Technical data
Advice
Operation
Emergencies
Safety
Page 75 of 308
Safe driving
●
Adjus t
the driver's seat so that there is at
least 25 cm distance between the centre of
the chest and the centre of the steering
wheel ››› Fig. 91. If distance is less than 25
cm, the airbag system may not protect you
properly.
● If your physical constitution prevents you
from maint
aining the minimum distance of 25
cm, contact a specialised workshop. The
workshop will help you decide if special spe-
cific modifications are necessary.
● When driving, always hold the steering
wheel with both h
ands on the outside of the
ring at the 9 o'clock and 3 o'clock positions.
This reduces the risk of injury when the driver
airbag is triggered.
● Never hold the steering wheel at the 12
o'clock
position, or in any other manner (e.g.
in the centre of the steering wheel). In such
cases, if the airbag is triggered, you may sus-
tain injuries to the arms, hands and head.
● To reduce the risk of injury to the driver
during sud
den braking manoeuvres or an ac-
cident, never drive with the backrest tilted far
back! The airbag system and seat belts can
only provide optimal protection when the
backrest is in an upright position and the
driver is wearing his or her seat belt correct-
ly.
● Adjust the head restraint properly to ach-
ieve optima
l protection. Adjusting the steering wheel position
Read the additional information carefully
›› ›
page 20 WARNING
● Never a dju
st the position of the steering
wheel when the vehicle is moving, as this
could cause an accident.
● Move the lever up firmly so the steering
wheel pos
ition does not accidentally change
during driving. risk of accident!
● Make sure you are capable of reaching and
firmly ho
lding the upper part of the steering
wheel: risk of accident!
● If you adjust the steering wheel so that it
points t
owards your face, the driver airbag
will not protect you properly in the event of
an accident. Make sure that the steering
wheel points towards your chest. Correct sitting position for front pas-
sen
g
er For your own safety and to reduce the risk of
injur
y
in the ev
ent of an accident, we recom-
mend the following adjustments for the front
passenger:
– Move the front passenger seat back as far
as po
ssible ››› .–
Mo v
e the se
at backrest to an upright posi-
tion so that your back rests completely
against it.
– Adjust the head restraint so that its upper
edge is
at the same level as the top of your
head, or as close as possible to the same
level as the top of your head ››› page 75.
– Always keep both feet in the footwell in
front of
the front passenger seat.
– Fasten your seat belt securely ›››
page 77.
It is possible to deactivate the front passen-
ger airbag in exceptional circumstances
››› page 86.
Adjusting the front passenger seat
››› page 18. WARNING
● An incorr ect
sitting position of the front
passenger can lead to severe injuries.
● Adjust the front passenger seat so that
there is
at least 25 cm between your chest
and the dash panel. If distance is less than
25 cm, the airbag system may not protect you
properly.
● If your physical constitution prevents you
from maint
aining the minimum distance of 25
cm, contact a specialised workshop. The
workshop will help you decide if special spe-
cific modifications are necessary. » 73
Technical data
Advice
Operation
Emergencies
Safety
Page 77 of 308
Safe driving
WARNING
● Any inc
orrect sitting position increases the
risk of severe injuries.
● Sitting in an incorrect position exposes the
vehicl
e occupants to severe injuries if airbags
are triggered, by striking a vehicle occupant
who has assumed an incorrect sitting posi-
tion.
● Before the vehicle moves, assume the prop-
er sitting po
sition and maintain it throughout
the trip. Before every trip, instruct your pas-
sengers to sit properly and to stay in this po-
sition during the trip ››› page 72, Correct posi-
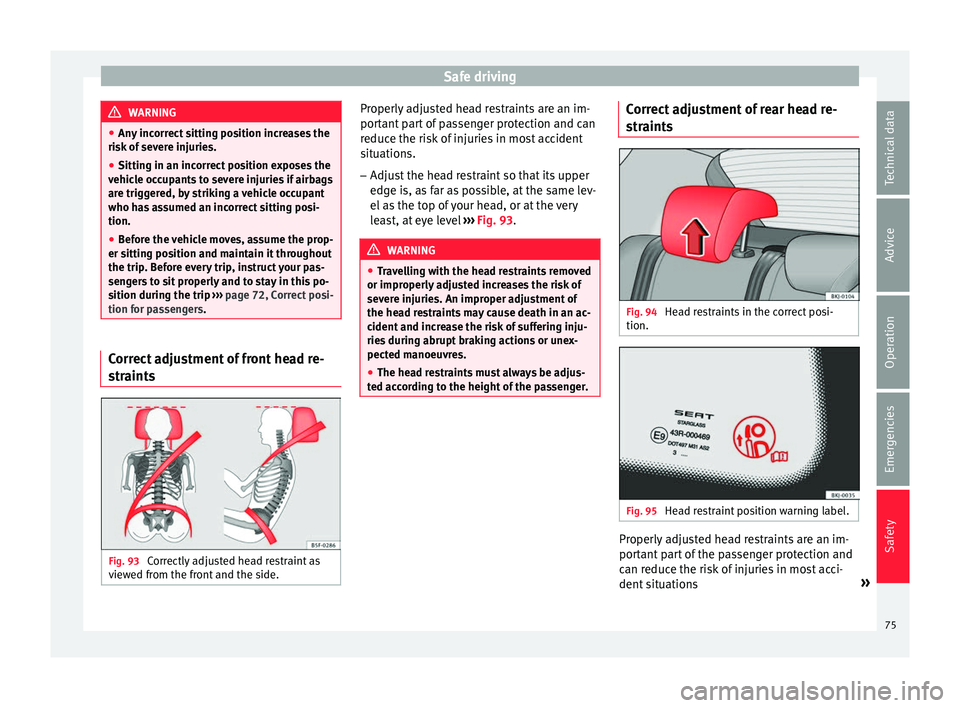
tion for passengers. Correct adjustment of front head re-
s
tr
aint
s Fig. 93
Correctly adjusted head restraint as
v iew
ed fr
om the front and the side. Properly adjusted head restraints are an im-
por
t
ant
part of passenger protection and can
reduce the risk of injuries in most accident
situations.
– Adjust the head restraint so that its upper
edge is, a
s far as possible, at the same lev-
el as the top of your head, or at the very
least, at eye level ››› Fig. 93. WARNING
● Trav
elling with the head restraints removed
or improperly adjusted increases the risk of
severe injuries. An improper adjustment of
the head restraints may cause death in an ac-
cident and increase the risk of suffering inju-
ries during abrupt braking actions or unex-
pected manoeuvres.
● The head restraints must always be adjus-
ted acc
ording to the height of the passenger. Correct adjustment of rear head re-
s
tr
aint
s Fig. 94
Head restraints in the correct posi-
tion. Fig. 95
Head restraint position warning label. Properly adjusted head restraints are an im-
por
t
ant
part of the passenger protection and
can reduce the risk of injuries in most acci-
dent situations »
75
Technical data
Advice
Operation
Emergencies
Safety
Page 79 of 308
Seat belts
Seat belts
Wh y
w
ear a seat belt?
Number of seats Your vehicle has
five se
ats, two in the front
and three in the rear. Each seat is equipped
with a three-point seat belt. WARNING
● Never tr an
sport more than the permitted
amount of people in your vehicle.
● Every vehicle occupant must properly fas-
ten and we
ar the seat belt belonging to his or
her seat. Children must be protected with an
appropriate child restraint system. Seat belt lamp*
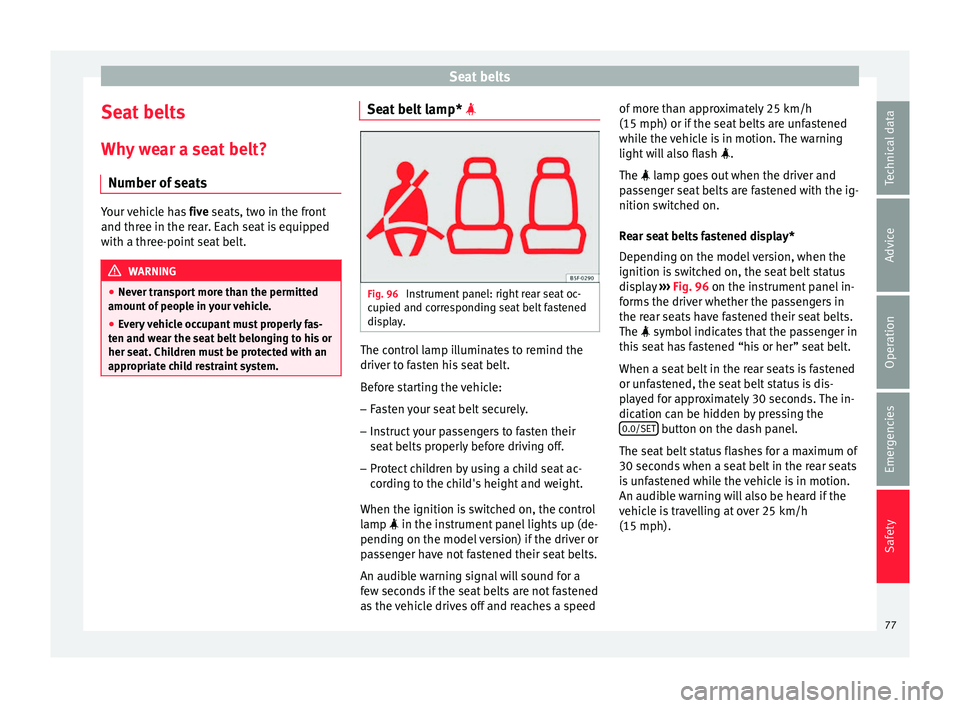
Fig. 96
Instrument panel: right rear seat oc-
c upied and c
orr
esponding seat belt fastened
display. The control lamp illuminates to remind the
driv
er t
o f
asten his seat belt.
Before starting the vehicle: – Fasten your seat belt securely.
– Instruct your passengers to fasten their
seat belts
properly before driving off.
– Protect children by using a child seat ac-
cordin
g to the child's height and weight.
When the ignition is switched on, the control
lamp in the instrument panel lights up (de-
pending on the model version) if the driver or
passenger have not fastened their seat belts.
An audible warning signal will sound for a
few seconds if the seat belts are not fastened
as the vehicle drives off and reaches a speed of more than approximately 25 km/h
(15 mph) or if the seat
belts are unfastened
while the vehicle is in motion. The warning
light will also flash .
The lamp goes out when the driver and
passenger seat belts are fastened with the ig-
nition switched on.
Rear seat belts fastened display*
Depending on the model version, when the
ignition is switched on, the seat belt status
display ››› Fig. 96 on the instrument panel in-
forms the driver whether the passengers in
the rear seats have fastened their seat belts.
The symbol indicates that the passenger in
this seat has fastened “his or her” seat belt.
When a seat belt in the rear seats is fastened
or unfastened, the seat belt status is dis-
played for approximately 30 seconds. The in-
dication can be hidden by pressing the 0.0/SET button on the dash panel.
The se at
belt
status flashes for a maximum of
30 seconds when a seat belt in the rear seats
is unfastened while the vehicle is in motion.
An audible warning will also be heard if the
vehicle is travelling at over 25 km/h
(15 mph).
77
Technical data
Advice
Operation
Emergencies
Safety
Page 81 of 308

Seat belts
●
The slot in the se
at belt buckle must not be
blocked with paper or other objects, as this
can prevent the latch plate from engaging se-
curely.
● Never use seat belt clips, fastening rings or
simil
ar items to alter the position of the belt
webbing.
● Frayed or torn seat belts or damage to the
connections, belt
retractors or parts of the
buckle could cause severe injuries in the
event of an accident. Therefore, you must
check the condition of all seat belts at regular
intervals.
● Seat belts which have been worn in an acci-
dent and str
etched must be replaced by a
specialised workshop. Renewal may be nec-
essary even if there is no apparent damage.
The belt anchorage should also be checked.
● Do not attempt to repair a damaged seat
belt y
ourself. The seat belts must not be re-
moved or modified in any way.
● The belts must be kept clean, otherwise the
retract
ors may not work properly. Head-on collisions and the laws of
ph
y
s
ics Fig. 98
A driver not wearing a seat belt is
thr o
wn f
orward violently. Fig. 99
The unbelted passenger in the rear
se at
i
s thrown forward violently, hitting the
driver who is wearing a seat belt. It is easy to explain how the laws of physics
w
ork
in the c
ase of a head-on collision: when
a vehicle starts moving, a type of energy called “kinetic energy” is created both in the
pas
sengers and inside the vehicle.
The amount of “kinetic energy” depends on
the speed of the vehicle and the weight of
the vehicle and its passengers. The higher
the speed and the greater the weight, the
more energy there is to be “absorbed” in an
accident.
The most significant factor, however, is the
speed of the vehicle. If the speed doubles
from 25 km/h (15 mph) to 50 km/h
(30 mph), for example, the corresponding ki-
netic energy is multiplied by four.
Because the vehicle occupants in our exam-
ple are not restrained by seat belts, in the
event of crashing against a wall, all of the oc-
cupants' kinetic energy will be absorbed
solely by said impact.
Even at speeds of 30 km/h (19 mph) to
50 km/h (30 mph), the forces acting on bod-
ies in a collision can easily exceed one tonne
(1000 kg). At greater speed these forces are
even higher.
Vehicle occupants not wearing seat belts are
not “attached” to the vehicle. In a head-on
collision, they will move forward at the same
speed their vehicle was travelling just before
the impact. This example applies not only to
head-on collisions, but to all accidents and
collisions. »
79
Technical data
Advice
Operation
Emergencies
Safety
Page 83 of 308

Seat belts
The seat belts are equipped with an automat-
ic r
etr
actor on the shoulder strap. Full free-
dom of movement is permitted when the
shoulder belt is pulled slowly. However, dur-
ing sudden braking, during travel in steep
areas or bends and during acceleration, the
automatic retractor on the shoulder belt is
locked.
The automatic belt retractors on the front
seats are fitted with seat belt tensioners
››› page 81.
Releasing the seat belt ● Press the red button on the belt buckle
›››
Fig. 100. The latch plate is released and
springs out ››› .
● Guide the belt back by hand so that it rolls
up e a
s
ily and the trim is not damaged.
Positioning seat belts
Seat belts offer their maximum protection on-
ly when they are properly positioned. WARNING
● The seat belt
s offer best protection only
when the backrests are in an upright position
and the seat belts have been fastened prop-
erly.
● Never put the latch plate in the buckle of
another seat. If
you do this, the seat belt will
not protect you properly and the risk of injury
is increased. ●
Never u nb
uckle a seat belt while the vehi-
cle is in motion. If you do, you increase the
risk of sustaining severe or fatal injuries.
● An incorrectly worn seat belt can cause se-
vere injurie
s in the event of an accident.
● The shoulder part of the seat belt must lie
on the centre of
the shoulder, never across
the neck. The seat belt must lie flat and fit
comfortably on the torso
● The lap part of the seat belt must lie across
the pelvis, nev
er across the stomach. The
seat belt must lie flat and fit comfortably on
the pelvis Pull the belt tight if necessary to
take up any slack.
● For pregnant women, the lap part of the
seat belt
must lie as low as possible over the
pelvis, never across the stomach, and always
lie flat so that no pressure is exerted on the
abdomen ››› Fig. 101.
● Always engage the retractor lock when you
are securin
g a child seat in group 0, 0+ or 1
››› page 88.
● Read and observe the warnings ›››
page 78. Belt pretensioners*
Ho w the se
at
belt tensioner works Read the additional information carefully
› ›
›
page 20 The seat belts for the front and side rear oc-
cupants
are equipped with belt tensioners.
The belt tensioners are activated by sensors,
although only in severe head-on and lateral
collisions. This retracts and tightens the seat
belts, reducing the forward motion of the oc-
cupants.
The belt tensioners will not be triggered in
the event of minor collisions, if the vehicle
overturns, or in accidents where no major
forces act on the vehicle. Note
● If the se at
belt tensioners are triggered, a
fine dust is produced. This is normal and it is
not an indication of fire in the vehicle.
● The relevant safety requirements must be
obser
ved when the vehicle or components of
the system are scrapped. Specialised work-
shops are familiar with these regulations,
which are also available to you. Service and disposal of belt tension-
er
s The belt tensioners are components of the
se
at
belts
that are installed in the seats of
your vehicle. If you work on the belt tension-
ers or remove and install parts of the system
when performing other repair work, the seat
belt may be damaged. The consequence may
be that, in the event of an accident, the belt »
81
Technical data
Advice
Operation
Emergencies
Safety
Page 85 of 308
Airbag system
travel on the rear seat. Never transport
chi
l
dren in the vehicle if they are not restrain-
ed or the restraint system is not appropriate
for their age, size or weight.
● If you are not wearing a seat belt, or if you
lean f
orward or to the side while travelling or
assume an incorrect sitting position, there is
a substantially increased risk of injury. This
increased risk of injury will be further in-
creased if you are struck by an inflating air-
bag.
● To reduce the risk of injury from an inflating
airbag, alw
ays wear the seat belt properly.
● Always adjust the front seats properly. Description of airbag system
Read the additional information carefully
› ›
›
page 20.
The airbag system is not a substitute for the
seat belts. The airbag system offers addition-
al protection for the driver and passenger in
combination with the seat belts.
The airbag system mainly comprises (as per
vehicle equipment): ● an electronic control and monitoring sys-
tem (contr
ol unit)
● frontal airbags for driver and passenger,
● side airbags,
● curtain airbags, ●
a contro
l lamp on the dash panel
››› page 84.
● key-operated switch for front passenger air-
bag,
● a contr
ol lamp for disabling/enabling the
front p
assenger airbag.
The airbag system operation is monitored
electronically. The airbag control lamp will il-
luminate for a few seconds every time the ig-
nition is switched on (self-diagnosis).
There is a fault in the system if the control
lamp :
● does not light up when the ignition is
switc
hed on ››› page 84,
● turns off after 4 seconds after the ignition
is sw
itched on,
● turns off and then lights up again after the
ignition is sw
itched on,
● illuminates or flashes while the vehicle is
movin
g.
The airbag system is not triggered if:
● the ignition is switched off
● there is a minor frontal collision
● there is a minor side collision
● there is a rear-end collision
● the vehicle turns over. WARNING
● The seat belt
s and airbags can only provide
maximum protection if the occupants are
seated correctly ››› page 72, Correct position
for passengers.
● If a fault has occurred in the airbag system,
have the sy
stem checked immediately by a
specialised workshop. Otherwise, during a
frontal collision the system might not trigger
correctly or may fail to trigger at all. Airbag activation
The airbags deploy extremely rapidly, within
thou
s
andths
of a second, to provide addi-
tional protection in the event of an accident.
A fine dust may develop when the airbag de-
ploys. This is normal and it is not an indica-
tion of fire in the vehicle.
The airbag system is only ready to function
when the ignition is on.
In special accidents instances, several air-
bags may activate at the same time.
In the event of minor head-on and side colli-
sions, rear-end collisions, overturning or roll-
over of the vehicle, airbags do not activate.
Activation factors
The conditions that lead to the airbag system
activating in each situation cannot be gener-
alised. Some factors play an important role, »
83
Technical data
Advice
Operation
Emergencies
Safety
Page 87 of 308

Airbag system
seated correctly
››› page 72, Correct position
for passengers.
● The deployment space between the front
pas
sengers and the airbags must not in any
case be occupied by other passenger, pets
and objects.
● The airbags provide protection for just one
accident; r
eplace them once they have de-
ployed.
● It is also important not to attach any ob-
jects
such as cup holders or telephone
mountings to the surfaces covering the air-
bag units.
● Do not attempt to modify components of
the airbag sys
tem in any way.Side airbags*
Read the additional information carefully
› ›
›
page 22. WARNING
● If y
ou do not wear a seat belt, if you lean
forward, or are not seated correctly while the
vehicle is in motion, you are at a greater risk
of injury if the side airbag system is triggered
in an accident.
● In order for the side airbags to provide their
maximum pr
otection, the prescribed sitting
position must always be maintained with
seat belts fastened while travelling. ●
Occ up
ants of the outer seats must never
carry any objects or pets in the deployment
space between them and the airbags, or al-
low children or other passengers to travel in
this position. It is also important not to at-
tach any accessories (such as cup holders) to
the doors. This would impair the protection
offered by the side airbags.
● The built-in coat hooks should be used only
for lightweight
clothing. Do not leave any
heavy or sharp-edged objects in the pockets.
● Great forces, such as hard blows or kicks,
must
not be exerted upon the backrest bol-
ster because the system may be damaged. In
this case, the side airbags would not be trig-
gered.
● Under no circumstances should protective
cov
ers be fitted over seats with side airbags
unless the covers have been approved for use
in your vehicle. Because the airbag deploys
from the side of the backrest, the use of con-
ventional seat covers would obstruct the side
airbag, seriously reducing the airbag's effec-
tiveness.
● Any damage to the original seat upholstery
or around the se
ams of the side airbag units
must be repaired immediately by a special-
ised workshop.
● The airbags provide protection for just one
accident; r
eplace them once they have de-
ployed.
● Any work on the side airbag system or re-
mova
l and installation of the airbag compo-
nents for other repairs (such as removal of
the front seat) should only be performed by a specialised workshop. Otherwise, faults may
occ
ur durin
g the airbag system operation.
● Do not attempt to modify components of
the airbag sys
tem in any way.
● The side and head airbags are managed
through sensor
s located in the interior of the
front doors. To ensure the correct operation of
the side and curtain (head) airbags neither
the doors nor the door panels should be
modified in any way (e.g. fitting loudspeak-
ers). If the front door is damaged, the airbag
system may not work correctly. All work car-
ried out on the front door must be done in a
specialised workshop.
● In a side-on collision the side airbags will
not work
if the sensors do not correctly meas-
ure the pressure increase on the interior of
the doors, due to air escaping through the
areas with holes or openings in the door pan-
el.
● Never drive if the interior door panels have
been remov
ed or if the panels have not been
correctly fitted.
● Never drive the vehicle if the loudspeakers
in the door panels
have been removed, un-
less the holes left by the loudspeakers have
been closed properly.
● Always check that the openings are closed
or cov
ered if additional loudspeakers or other
equipment are fitted inside the door panels.
● Any work carried out to the doors should be
made in an authori
sed specialised workshop. 85
Technical data
Advice
Operation
Emergencies
Safety