spare wheel Seat Arona 2018 User Guide
[x] Cancel search | Manufacturer: SEAT, Model Year: 2018, Model line: Arona, Model: Seat Arona 2018Pages: 316, PDF Size: 6.77 MB
Page 285 of 316
Wheels
The position of the battery is shown in the
c orr
e
sponding engine compartment diagram
››› page 275.
The “magic eye” indicator, located on the top
of the battery changes colour, depending on
the charge state and electrolyte level of the
battery.
There are two different colours:
● Black: correct charge status.
● Transparent/clear yellow: the battery must
be repl
aced. Contact a specialised workshop.
Charging or changing the battery The battery is maintenance-free and is
c
hec
k
ed during the inspection service. All
work on the vehicle battery requires special-
ist knowledge.
If you often drive short distances or if the ve-
hicle is not driven for long periods, the bat-
tery should be checked by a specialised
workshop between the scheduled services.
If the battery has discharged and you have
problems starting the vehicle, the battery
might be damaged. If this happens, we rec-
ommend you have the vehicle battery
checked by a Technical Service where it will
be re-charged or replaced. Charging the battery
The vehic
le battery should be charged by a
specialised workshop only, as batteries us-
ing special technology have been installed
and they must be charged in a controlled en-
vironment.
Replacing a vehicle battery
The battery has been developed to suit the
conditions of its location and has special
safety features.
Genuine SEAT batteries meet the mainte-
nance, performance and safety specifications
of your vehicle. WARNING
● We r ec
ommend you use only maintenance-
free or cycle free leak-proof batteries which
comply with standards T 825 06 and
VW 7 50 73. This standard applies as of
2001.
● Before starting any work on the batteries,
you mus
t read and observe the warnings
››› in Symbols and warnings on handling
the batt er
y on page 281. For the sake of the environment
Batteries contain toxic substances such as
su lphuric
acid and lead. They must be dis-
posed of appropriately and must not be dis-
posed of with ordinary household waste. Wheels
Wheel s
and ty
res
General notes Avoiding damage
– If you have to drive over a kerb or similar
ob s
tacle, drive very slowly and at a right
angle.
– Keep grease, oil and fuel off the tyres.
– Inspect the tyres regularly for damage
(cuts, c r
acks or blisters, etc.). Remove any
foreign objects embedded in the treads.
Storing tyres
– When you remove the tyres, mark them in
order to m
aintain the same direction of ro-
tation when they are installed again.
– When removed, the wheels and/or tyres
should be s
tored in a cool, dry and prefera-
bly dark location.
– Store tyres in a vertical position, if they are
not fitted on wheel
rims.
New tyres
New tyres must be run in ›››
page 197.
The tread depth of new tyres may vary, ac-
cording to the type and make of tyre and the
tread pattern. »
283
Technical data
Advice
Operation
Emergencies
Safety
Page 288 of 316
Advice
For the sake of the environment
Under-inflated tyres will increase fuel con-
sumption. New tyres and wheels
New tyres and wheels have to be run in.
The tyr
e
s and wheel rims are an essential
part of the vehicle's design. Those approved
by SEAT are specially matched to the charac-
teristics of the vehicle and make a major con-
tribution to good road-holding and safe han-
dling ››› .
T y
r
es should be replaced at least in pairs and
not individually (i.e. both front tyres or both
rear tyres together). A knowledge of tyre des-
ignations makes it easier to choose the cor-
rect tyres. Radial tyres have the tyre designa-
tions marked on the sidewall, for example:
195/55 R16 91V
This contains the following information:
Tyre width in mm
Height/width ratio in %
Tyre construction: Radial
Rim diameter in inches
Load rating code
Speed rating
195
55
R
16
91
V The tyres could also have the following infor-
mation:
● A direction of
rotation symbol
● “Reinforced” denotes heavy-duty tyres.
The manufact
uring date is also indicated on
the tyre sidewall (possibly only on the outer
side of the wheel).
“DOT... 1116...” means, for example, that the
tyre was produced in the 11th week of 2016.
We recommend that work on tyres and
wheels be carried out by a Technical Service.
They are familiar with the procedure and
have the necessary special tools and spare
parts as well as the proper facilities for dis-
posing of the old tyres.
Any technical service has full information on
the technical requirements when installing or
changing tyres, wheels or wheel trims. WARNING
● We r ec
ommend that you use only wheels
and tyres which have been approved by SEAT
for your model. Failure to do so could impair
vehicle handling. Risk of accident.
● Avoid running the vehicle on tyres that are
more than 6
years old. If you have no alterna-
tive, you should drive slowly and with extra
care at all times.
● Never use old tyres or those with an un-
known “his
tory of use”. ●
If wheel trims
are retrofitted, you must en-
sure that the flow of air to the brakes is not
restricted. This could cause the brake system
to overheat.
● All four wheels must be fitted with radial
tyre
s of the same type, size (rolling circumfer-
ence) and the same tread pattern. For the sake of the environment
Old tyres must be disposed of according to
the l aw
s in the country concerned. Note
● A S EA
T Service Centre should be consulted
to find out whether wheels or tyres of differ-
ent sizes to those originally fitted by SEAT
can be fitted, and to find out about the com-
binations allowed between the front axle
(axle 1) and the rear axle (axle 2).
● For technical reasons, it is not generally
poss
ible to use the wheels from other vehi-
cles. This can also apply to wheels of the
same model. The use of wheels or tyres
which have not been approved by SEAT for
use with your model may invalidate the vehi-
cle's type approval for use on public roads.
● If the spare tyre is not the same as the
tyre
s that are mounted on the vehicle (e.g.
winter tyres) you should only use the spare
tyre for a short period of time and drive with
extra care. Refit the normal road wheel as
soon as possible. 286
Page 289 of 316
Wheels
Wheel bolts The design of wheel bolts is matched to the
rims. If diff
er
ent wheel rims are fitted, the
correct wheel bolts with the right length and
correctly shaped bolt heads must be used.
This ensures that wheels are fitted securely
and that the brake system functions correctly.
In certain circumstances, you should not use
wheel bolts from a different vehicle, even if it
is the same model ››› page 259. WARNING
If the wheel bolts are not tightened correctly,
the wheel c ou
ld become loose while driving.
Risk of accident.
● The wheel bolts must be clean and turn
eas
ily. Never apply grease or oil to them.
● Use only wheel bolts which belong to the
wheel.
● If the pr
escribed torque of the wheel bolts
is t
oo low, they could loosen whilst the vehi-
cle is in motion. Risk of accident! If the tight-
ening torque is too high, the wheel bolts and
threads can be damaged. CAUTION
The prescribed tightening torque for wheel
bolt s
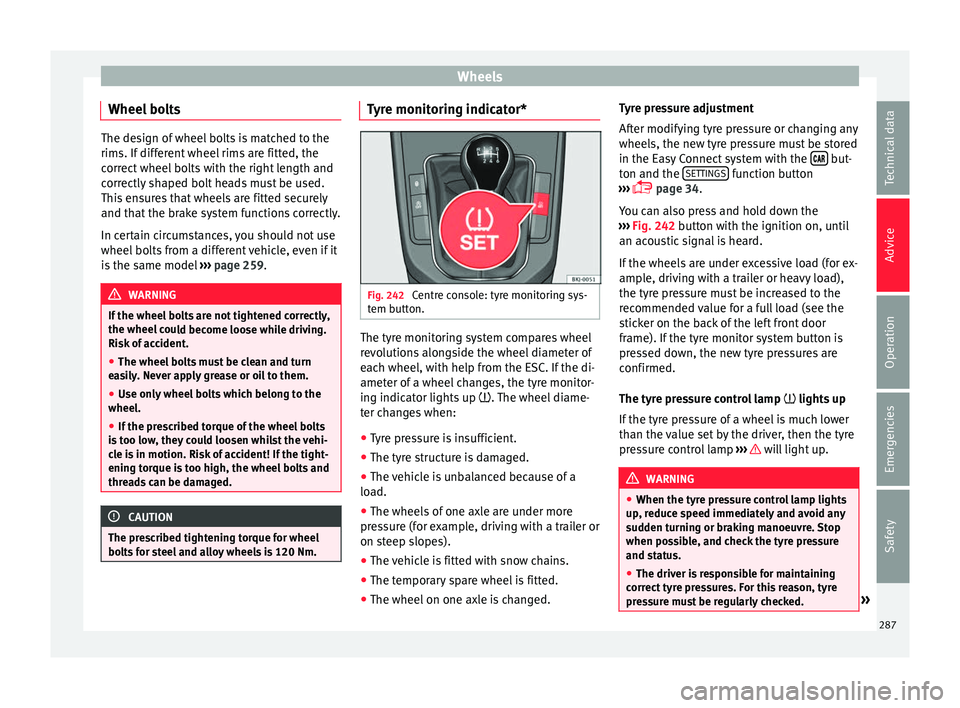
for steel and alloy wheels is 120 Nm. Tyre monitoring indicator*
Fig. 242
Centre console: tyre monitoring sys-
t em b
utt
on. The tyre monitoring system compares wheel
r
ev
o
lutions alongside the wheel diameter of
each wheel, with help from the ESC. If the di-
ameter of a wheel changes, the tyre monitor-
ing indicator lights up . The wheel diame-
ter changes when:
● Tyre pressure is insufficient.
● The tyre structure is damaged.
● The vehicle is unbalanced because of a
load.
● The wheel
s of one axle are under more
pres
sure (for example, driving with a trailer or
on steep slopes).
● The vehicle is fitted with snow chains.
● The temporary spare wheel is fitted.
● The wheel on one axle is changed. Tyre pressure adjustment
After modif
ying tyre pressure or changing any
wheels, the new tyre pressure must be stored
in the Easy Connect system with the but-
t on and the S
ET
TINGS function button
› ›
›
page 34.
You can also press and hold down the
››› Fig. 242 button with the ignition on, until
an acoustic signal is heard.
If the wheels are under excessive load (for ex-
ample, driving with a trailer or heavy load),
the tyre pressure must be increased to the
recommended value for a full load (see the
sticker on the back of the left front door
frame). If the tyre monitor system button is
pressed down, the new tyre pressures are
confirmed.
The tyre pressure control lamp lights up
If the tyre pressure of a wheel is much lower
than the value set by the driver, then the tyre
pressure control lamp ››› will light up.
WARNING
● When the tyr e pr
essure control lamp lights
up, reduce speed immediately and avoid any
sudden turning or braking manoeuvre. Stop
when possible, and check the tyre pressure
and status.
● The driver is responsible for maintaining
correct
tyre pressures. For this reason, tyre
pressure must be regularly checked. » 287
Technical data
Advice
Operation
Emergencies
Safety
Page 290 of 316
Advice
●
Under cer t
ain circumstances (e.g. when
driving in a sporty manner, in winter condi-
tions or on a dirt track) the tyre control lamp
may light up belatedly or may function incor-
rectly. Note
If the battery is disconnected, the yellow
w arnin g l
amp lights up after turning the
ignition on. This should turn off after a brief
journey. Spare wheel (temporary spare
wheel)*
Loc
ation and u
se of the temporary
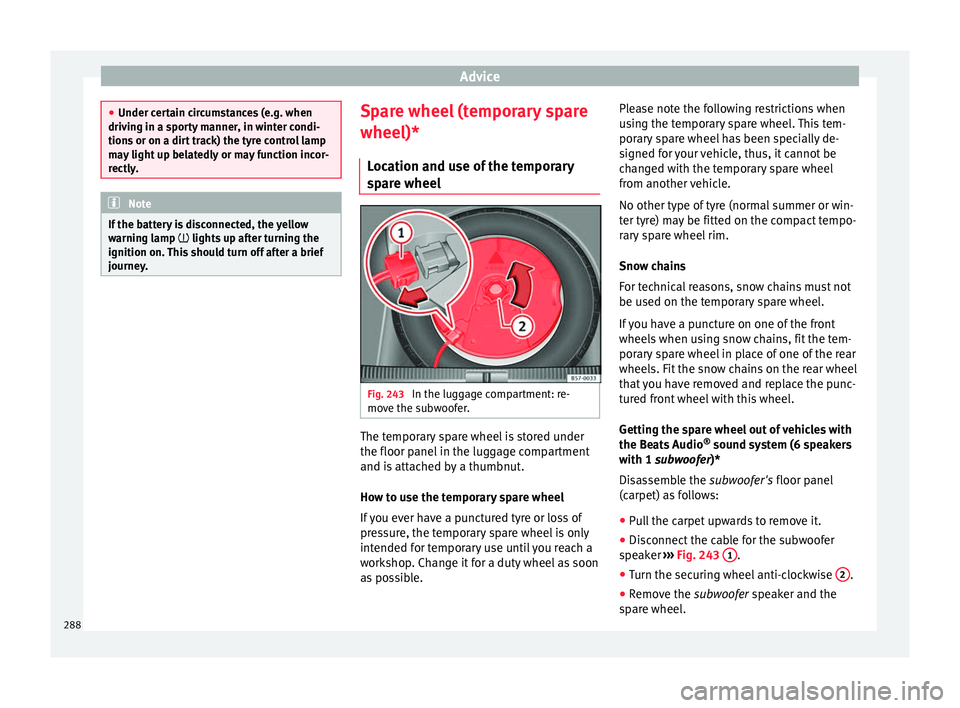
spare wheel Fig. 243
In the luggage compartment: re-
mo v
e the s
ubwoofer. The temporary spare wheel is stored under
the floor p
anel
in the lug
gage compartment
and is attached by a thumbnut.
How to use the temporary spare wheel
If you ever have a punctured tyre or loss of
pressure, the temporary spare wheel is only
intended for temporary use until you reach a
workshop. Change it for a duty wheel as soon
as possible. Please note the following restrictions when
usin
g the temporary spare wheel. This tem-
porary spare wheel has been specially de-
signed for your vehicle, thus, it cannot be
changed with the temporary spare wheel
from another vehicle.
No other type of tyre (normal summer or win-
ter tyre) may be fitted on the compact tempo-
rary spare wheel rim.
Snow chains
For technical reasons, snow chains must not
be used on the temporary spare wheel.
If you have a puncture on one of the front
wheels when using snow chains, fit the tem-
porary spare wheel in place of one of the rear
wheels. Fit the snow chains on the rear wheel
that you have removed and replace the punc-
tured front wheel with this wheel.
Getting the spare wheel out of vehicles with
the Beats Audio ®
sound system (6 speakers
with 1 subwoofer)*
Disassemble the subwoofer's floor panel
(carpet) as follows:
● Pull the carpet upwards to remove it.
● Disconnect the cable for the subwoofer
speak
er ›››
Fig. 243 1 .
● Turn the securing wheel anti-clockwise 2 .
● Remove the s ub
woofer
speaker and the
spare wheel.
288
Page 291 of 316
Wheels
● When r ep
l
acing the spare wheel, place the
subwoofer speaker in the direction indicated
by the arrow and with the word “FRONT” fac-
ing forward.
● Reconnect the speaker cable and firmly ro-
tate the sec
uring wheel clockwise so that the
subwoofer system and wheel are firmly in
place.
Removing the 16” temporary spare wheel
(without subwoofer)
● Remove the luggage compartment variable
floor to acc
ess the wheel and the tools
››› page 161.
● Loosen the strap that secures the box by
pres
sing on the buckle.
● Remove the toolbox.
● Turn the securing wheel anti-clockwise and
remov
e it.
● Press the thread and turn it 90° clockwise
or anti-clock
wise and remove it.
● Pull on the front part of the spare wheel to
remov
e it. WARNING
● Aft er fittin
g the temporary spare wheel,
check the tyre pressures as soon as possible.
Failure to do so may cause an accident. The
tyre pressure is listed on the back of the left
front door frame. ●
Do not driv e at
over 80 km/h (50 mph)
when the temporary spare wheel is fitted on
the vehicle: risk of accident!
● Avoid heavy acceleration, hard braking and
fas
t cornering: risk of accident!
● Never use more than one temporary spare
wheel at the s
ame time, risk of accident.
● No other type of tyre (normal summer or
winter ty
re) may be fitted on the compact
temporary spare wheel rim. Winter service
W int
er ty
res In winter conditions winter tyres will consid-
er
ab
ly
improve the vehicle's handling. The
design of summer tyres (width, rubber com-
pound, tread pattern) gives less grip on ice
and snow.
Winter tyres must be inflated to a pressure of
0.2 bar (2.9 psi/20 kPa) higher than the pres-
sures specified for summer tyres (see the
sticker on the back of the left front door
frame).
Winter tyres must be fitted on all four wheels.
Information on permitted winter tyre sizes
can be found in the vehicle's registration
documentation. Use only radial winter tyres. All tyre sizes listed in the vehicle documenta-
tion also app
ly to winter tyres.
Winter tyres lose their effectiveness when the
tread is worn down to a depth of 4 mm.
The speed rating code ››› page 286, New
tyres and wheels determines the following
speed limits for winter tyres: ››› max. 160 km/h (99 mph)
m
ax. 180 km/h (112 mph)
m ax. 190 km/h (118 mph)
m
ax. 210 km/h (130 mph)
In some countries, vehicles which can exceed
the speed rating of the fitted tyre must have
an appropriate sticker in the driver's field of
view. These stickers are available from your
technical service. The legal requirements of
each country must be followed.
Do not have winter tyres fitted for unnecessa-
rily long periods. Vehicles with summer tyres
handle better when the roads are free of
snow and ice.
If you have a flat tyre, please refer to the
notes on the spare wheel ››› page 286, New
tyres and wheels . WARNING
The maximum speed for the winter tyres must
not be e x
ceeded. Otherwise, this could lead
to damage and risk of accident. » Q
S
T
H
289
Technical data
Advice
Operation
Emergencies
Safety
Page 294 of 316
Technical data
Vehicle data label
The d at
a s
ticker is placed on the inside of the
spare wheel well, in the boot and on the rear
cover of the Maintenance Programme.
The following information is provided on the
vehicle data sticker: ››› Fig. 244
Vehicle identification number (chassis
number)
Vehicle type, model, capacity, engine
type, finish, engine power and gearbox
type
Engine code, gearbox code, external
paint code and internal equipment code
Optional extras and PR numbers
Identifying letters
The identifying letters of the engine can be
viewed on the instrument panel when the en-
gine is switched off and the ignition is on.
● Hold down the button 0.0/SET on the dash
p anel
f
or more than 15 seconds.
Information on fuel consump-
tion Fuel c
onsumption Approved consumption values are derived
fr
om me
a
surements performed or supervised
1 2
3
4 by certified EU laboratories, according to the
l
e
gi
slation in force at the time (for more infor-
mation, see the Publications Office of the Eu-
ropean Union on the EUR-Lex website: © Eu-
ropean Union, http://eur-lex.europa.eu/) and
apply to the specified vehicle characteristics.
The values relating to fuel consumption and
CO 2 emissions can be found in the documen-
tation provided to the purchaser of the vehi-
cle at the time of purchase.
Fuel consumption and CO 2 emissions depend
on the equipment/features of each individual
vehicle, as well as on the driving style, road
conditions, traffic conditions, environmental
conditions, load or number of passengers. Note
In practice, and considering all the factors
mentioned here, c on
sumption values can dif-
fer from those calculated in the current Euro-
pean regulations. Weights
Kerb weight refers to the basic model with a
f
uel
t
ank filled to 90% capacity and without
optional extras. The figure quoted includes
75 kg to allow for the weight of the driver.
Special versions, optional equipment fittings
or retro-fitting accessories will increase the
weight of the vehicle ››› . WARNING
● Ple a
se note that the centre of gravity may
shift when transporting heavy objects; this
may affect vehicle handling and lead to an ac-
cident. Always adjust your speed and driving
style to suit road conditions and require-
ments.
● Never exceed the gross axle weight rating
or the gros
s vehicle weight rating. If the per-
missible axle load or the permissible total
weight is exceeded, the driving characteris-
tics of the vehicle may change, leading to ac-
cidents, injuries and damage to the vehicle. Trailer mode
Tr
ai
ler weights The trailer weights and drawbar loads ap-
pr
o
v
ed are selected in intensive trials accord-
ing to precisely defined criteria. The ap-
proved trailer weights are valid for vehicles in
the EU for maximum speeds of 80 km/h (50
mph) (in certain circumstances up to 100
km/h (62 mph)). The figures may be different
in other countries. All data in the official vehi-
cle documentation takes precedence over
these data at all times ››› .
292
Page 306 of 316
Index
Diesel particulate filter malf
u
nction . . . . . . . . . . . . . . . . . . . . . . . . . . . . 200
Digital clock . . . . . . . . . . . . . . . . . . . . . . . . . . . . . 118
Dimensions . . . . . . . . . . . . . . . . . . . . . . . . . . . . . . 299
Direction of rotation tyres . . . . . . . . . . . . . . . . . . . . . . . . . . . . . . . . . . . 69
Display . . . . . . . . . . . . . . . . . . . . . . . . . . . . 117, 118
Display messages speed limiter . . . . . . . . . . . . . . . . . . . . . . . . . . . 207
Disposal belt tensioners . . . . . . . . . . . . . . . . . . . . . . . . . . 85
Distance control see Adaptive cruise control . . . . . . . . . . . . . . . 214
Door cylinder . . . . . . . . . . . . . . . . . . . . . . . . . . . . . 15
Door handle . . . . . . . . . . . . . . . . . . . . . . . . . . . . . . 15 de-icing . . . . . . . . . . . . . . . . . . . . . . . . . . . . . . . 264
Door lock . . . . . . . . . . . . . . . . . . . . . . . . . . . . . . . . . 15 de-icing . . . . . . . . . . . . . . . . . . . . . . . . . . . . . . . 264
Door lock cylinder de-icing . . . . . . . . . . . . . . . . . . . . . . . . . . . . . . . 264
Door release lever . . . . . . . . . . . . . . . . . . . . . . . . 115
Doors childproof locks . . . . . . . . . . . . . . . . . . . . . . . . 138
opening and closing . . . . . . . . . . . . . . . . . . . . . 15
Downhill speed control . . . . . . . . . . . . . . . . . . . . 193
Downhill speed control function . . . . . . . . . . . . . 193
Driver see Correct sitting position . . . . . . . . . 76, 77, 78
Driver-side general instrument panel left-hand drive . . . . . . . . . . . . . . . . . . . . . . . . . . . 9
right-hand drive . . . . . . . . . . . . . . . . . . . . . . . . . 10
Driver information system additional consumers . . . . . . . . . . . . . . . . . . . . 42
assist systems . . . . . . . . . . . . . . . . . . . . . . . . . . 40
bonnet, rear lid and doors open . . . . . . . . . . . . 40
engine oil temperature . . . . . . . . . . . . . . . . . . . . 42
gear-change indicator . . . . . . . . . . . . . . . . . . . . 41 journey data . . . . . . . . . . . . . . . . . . . . . . . . . . . . 38
menu . . . . . . . . . . . . . . . . . . . . . . . . . . . . . . . . . . 38
operation
. . . . . . . . . . . . . . . . . . . . . . . . . . . . . . . 37
outside temperature . . . . . . . . . . . . . . . . . . . . . . 41
saving tips . . . . . . . . . . . . . . . . . . . . . . . . . . . . . . 42
service intervals . . . . . . . . . . . . . . . . . . . . . . . . . 43
speed warning . . . . . . . . . . . . . . . . . . . . . . . . . . 42
warning and information messages . . . . . . . . . 41
Driving driving abroad . . . . . . . . . . . . . . . . . . . . . . . . . 201
driving through water . . . . . . . . . . . . . . . . . . . . 202
economic . . . . . . . . . . . . . . . . . . . . . . . . . . . . . 198
safe . . . . . . . . . . . . . . . . . . . . . . . . . . . . . . . . . . . 75
with a trailer . . . . . . . . . . . . . . . . . . 254, 256, 257
with trailer . . . . . . . . . . . . . . . . . . . . . . . . . . . . . 249
Driving abroad headlights . . . . . . . . . . . . . . . . . . . . . . . . . . . . . 201
petrol . . . . . . . . . . . . . . . . . . . . . . . . . . . . . . . . . 201
Driving data data summary . . . . . . . . . . . . . . . . . . . . . . . . . . . 39
Driving mode . . . . . . . . . . . . . . . . . . . . . . . . . . . . 230
Driving on flooded roads . . . . . . . . . . . . . . . . . . . 202
Driving profile . . . . . . . . . . . . . . . . . . . . . . . . . . . . 230
DSG . . . . . . . . . . . . . . . . . . . . . . . . . . . . . . . . . . . . 188
Duplicate keys . . . . . . . . . . . . . . . . . . . . . . . . . . . 130
Dust and pollen filter . . . . . . . . . . . . . . . . . . . . . . 164
Dynamic lights range control . . . . . . . . . . . . . . . . 147
E E10 see Ethanol (fuel) . . . . . . . . . . . . . . . . . . . . . . . 269
Easy Connect . . . . . . . . . . . . . . . . . . . . . . . . 34, 122
EDL see Electronic differential lock . . . . . . . . . . . . . 184
EDS . . . . . . . . . . . . . . . . . . . . . . . . . . . . . . . . . . . . 184 Efficiency program
addition al consumers . . . . . . . . . . . . . . . . . . . . 42
saving tips . . . . . . . . . . . . . . . . . . . . . . . . . . . . . . 42
Electrical power socket . . . . . . . . . . . . . . . . . . . . 157
Electrical socket trailer . . . . . . . . . . . . . . . . . . . . . . . . . . . . . . . . . 255
Electric windows . . . . . . . . . . . . . . . . . . . . . . 18, 141 convenience opening and closing . . . . . . . . . 142
Electrolyte . . . . . . . . . . . . . . . . . . . . . . . . . . . . . . . 282
Electronic differential lock . . . . . . . . . 181, 183, 184 control lamp . . . . . . . . . . . . . . . . . . . . . . 184, 185
Electronic differential lock (XDS) . . . . . . . . . . . . . 186
Electronic immobiliser . . . . . . . . . . . . . . . . . . . . . . 15
Electronic Stability Control (ESC) . . . . . . . 181, 183
Emergencies . . . . . . . . . . . . . . . . . . . . . . . . . . . . . . 97 automatic gearbox emergency program . . . . . 194
bulbs . . . . . . . . . . . . . . . . . . . . . . . . . . . . . . . . . . 63
changing a wheel . . . . . . . . . . . . . . . . . . . . . . . . 65
changing the battery . . . . . . . . . . . . . . . . . . . . 283
emergency towing of the vehicle . . . . . . . . . . . . 70
emergency warning triangle . . . . . . . . . . . . . . . 97
fire extinguisher . . . . . . . . . . . . . . . . . . . . . . . . . 97
first-aid kit . . . . . . . . . . . . . . . . . . . . . . . . . . . . . . 97
fuses . . . . . . . . . . . . . . . . . . . . . . . . . . . . . . . . . . 62
hazard warning lights . . . . . . . . . . . . . . . . . . . 147
jump leads . . . . . . . . . . . . . . . . . . . . . . . . . . . . . 71
puncture . . . . . . . . . . . . . . . . . . . . . . . . . . . . . . . 64
replacing a blown fuse . . . . . . . . . . . . . . . . . . . . 62
Spare wheel . . . . . . . . . . . . . . . . . . . . . . . . . . . 288
vehicle tools . . . . . . . . . . . . . . . . . . . . . . . . . . . . 97
Emergency braking assistance system indications on the display . . . . . . . . . . . . . . . . 210
malfunction . . . . . . . . . . . . . . . . . . . . . . . . . . . . 212
operating . . . . . . . . . . . . . . . . . . . . . . . . . . . . . . 213
radar sensor . . . . . . . . . . . . . . . . . . . . . . . . . . . 212
switching off temporarily . . . . . . . . . . . . . . . . . 214
system limitations . . . . . . . . . . . . . . . . . . . . . . 214
304
Page 312 of 316
Index
Selector lever (automatic gearbox) malf
u
nction . . . . . . . . . . . . . . . . . . . . . . . . . . . . 189
manual release mechanism . . . . . . . . . . . . . . . . 50
positions . . . . . . . . . . . . . . . . . . . . . . . . . . . . . . 188
Service intervals . . . . . . . . . . . . . . . . . . . . . . . . . . . 43
Service notification: read . . . . . . . . . . . . . . . . . . . . 44
Side airbags description . . . . . . . . . . . . . . . . . . . . . . . . . . . . . 22
safety instructions . . . . . . . . . . . . . . . . . . . . . . . 88
Signal lever . . . . . . . . . . . . . . . . . . . . . . . . . . . . . . . 32
Snow chains . . . . . . . . . . . . . . . . . . . . . . . . . . . . . . 70
Spanner symbol . . . . . . . . . . . . . . . . . . . . . . . . . . . 43
Spare wheel . . . . . . . . . . . . . . . . . . . . . . . . . . . . . 288
Special characteristics tow-starting . . . . . . . . . . . . . . . . . . . . . . . . . . . . 101
Speed limiter . . . . . . . . . . . . . . . . . . . . . . . . . . . . 207 control lamp . . . . . . . . . . . . . . . . . . . . . . . . . . . 207
display message . . . . . . . . . . . . . . . . . . . . . . . . 207
operate . . . . . . . . . . . . . . . . . . . . . . . . . . . . . . . 208
warning lamp . . . . . . . . . . . . . . . . . . . . . . . . . . 207
Speed warning . . . . . . . . . . . . . . . . . . . . . . . . . . . . 42
Speed warning device . . . . . . . . . . . . . . . . . . . . . . 42
Sport Mode . . . . . . . . . . . . . . . . . . . . . . . . . . . . . . 183
Start-Stop . . . . . . . . . . . . . . . . . . . . . . . . . . . . . . . 202
Start-Stop system driver messages . . . . . . . . . . . . . . . . . . . . . . . . 205
lamps . . . . . . . . . . . . . . . . . . . . . . . . . . . . . . . . 203
operation . . . . . . . . . . . . . . . . . . . . . . . . . . . . . . 202
starting and stopping the engine . . . . . . . . . . 203
switching off and on . . . . . . . . . . . . . . . . . . . . . 205
the engine does not switch off . . . . . . . . . . . . 204
the engine starts by itself . . . . . . . . . . . . . . . . 204
Starter button . . . . . . . . . . . . . . . . . . . . . . . . . . . . 176
Starting the engine . . . . . . . . . . . . . . . . . . 173, 174 after the fuel tank has run dry . . . . . . . . . . . . . 174
diesel . . . . . . . . . . . . . . . . . . . . . . . . . . . . . . . . . 174
petrol . . . . . . . . . . . . . . . . . . . . . . . . . . . . . . . . . 173 Starting the vehicle . . . . . . . . . . . . . . . . . . . . . . . . 31
Steel wheel
rims
cleaning . . . . . . . . . . . . . . . . . . . . . . . . . . . . . . 265
Steering . . . . . . . . . . . . . . . . . . . . . . . . . . . . 77, 195 control lamp . . . . . . . . . . . . . . . . . . . . . . . . . . . 196
electromechanical . . . . . . . . . . . . . . . . . . . . . . 197
power . . . . . . . . . . . . . . . . . . . . . . . . . . . . . . . . 197
power-assisted steering . . . . . . . . . . . . . . . . . . 197
steering column lock . . . . . . . . . . . . . . . . . . . . 196
Steering wheel adjustment . . . . . . . . . . . . . . . . . . . . . . . . . . . . . 20
gear shift paddles (automatic gearbox) . . . . . 190
Steering wheel controls . . . . . . . . . . . . . . . . . . . . 124
Steering wheel height adjustment . . . . . . . . . . . . 77
Storage compartments . . . . . . . . . . . . . . . . . . . . 156 of front door panel . . . . . . . . . . . . . . . . . . . . . . 156
on the front passenger side . . . . . . . . . . . . . . . 156
right front seat . . . . . . . . . . . . . . . . . . . . . . . . . 156
storage pocket in the seat . . . . . . . . . . . . . . . . 156
Sun visors . . . . . . . . . . . . . . . . . . . . . . . . . . . . . . . 149
Switch hazard warning lights . . . . . . . . . . . . . . . . . . . 147
Switching off the engine . . . . . . . . . . . . . . . . . . . 175
Switching off the lights . . . . . . . . . . . . . . . . . . . . 143
Switching on the lights . . . . . . . . . . . . . . . . . . . . 143
Switching the ignition on and off . . . . . . . . 31, 173
System Easy Connect . . . . . . . . . . . . . . . . . . . . . . 122
T Taking care of your vehicle . . . . . . . . . . . . . . . . . 260 interior . . . . . . . . . . . . . . . . . . . . . . . . . . . . . . . . 266
Technical data roof load . . . . . . . . . . . . . . . . . . . . . . . . . . . . . . 163
Technical modifications . . . . . . . . . . . . . . . . . . . . 259
Technical specifications . . . . . . . . . . . . . . . . . . . . 291 Temperature display
engine oil . . . . . . . . . . . . . . . . . . . . . . . . . . . . . . 42
outside temperature . . . . . . . . . . . . . . . . . . . . . . 41
Temporary spare wheel . . . . . . . . . . . . . . . . . . . . 288
Textiles: cleaning . . . . . . . . . . . . . . . . . . . . . . . . . 266
Tightening torque wheel bolts . . . . . . . . . . . . . . . . . . . . . . . . . . . . . 69
Tightening torque of wheel bolts . . . . . . . . . . . . 293
Tiptronic (automatic gearbox) . . . . . . . . . . 188, 190
Tire Mobility Set . . . . . . . . . . . . . . . . . . . . . . . . . . . 64 inflating a tyre . . . . . . . . . . . . . . . . . . . . . . . . . . . 99
sealing a tyre . . . . . . . . . . . . . . . . . . . . . . . . . . . 99
Top speed . . . . . . . . . . . . . . . . . . . . . . . . . . . . . . . . 42
Top Tether . . . . . . . . . . . . . . . . . . . . . . . . . . . . . 27, 30
Top Tether system . . . . . . . . . . . . . . . . . . . . . . 27, 30
Tow-starting . . . . . . . . . . . . . . . . . . . . . . . . . 71, 100
Tow-starting the engine . . . . . . . . . . . . . . . . . . . . 101
Towing blind spot detector (BSD) . . . . . . . . . . . . . . . . 229
special characteristics . . . . . . . . . . . . . . . . . . . 229
Towing a trailer . . . . . . . . . . . . . . . . . . . . . . . . . . . 254
Towing bracket retrofitting . . . . . . . . . . . . . . . . . . . . . . . . . . . . . 257
Towing bracket device . . . . . . . . . . . . . . . . . . . . . 249 ball coupling . . . . . . . . . . . . . . . . . . . . . . . . . . . 255
description . . . . . . . . . . . . . . . . . . . . . . . . . . . . 249
Towing device bracket operation and care . . . . . . . . . . . . . . . . . . . . . . 253
Towing the vehicle . . . . . . . . . . . . . . . . . . . . 70, 100
Towline anchorage . . . . . . . . . . . . . . . . . . . . . . . . . 70 rear . . . . . . . . . . . . . . . . . . . . . . . . . . . . . . . . . . 102
Tow rope . . . . . . . . . . . . . . . . . . . . . . . . . . . . . . . . 254
Traction control system . . . . . . . . . . . 181, 182, 183 control lamp . . . . . . . . . . . . . . . . . . . . . . . . . . . 182
Trailer . . . . . . . . . . . . . . . . . . . . . . . . . . . . . . . . . . 249 connecting . . . . . . . . . . . . . . . . . . . . . . . 255, 256
driving with a trailer . . . . . . . . . . . . . . . . . . . . . 256
310