key Seat Ateca 2016 Owner's Guide
[x] Cancel search | Manufacturer: SEAT, Model Year: 2016, Model line: Ateca, Model: Seat Ateca 2016Pages: 328, PDF Size: 6.32 MB
Page 106 of 328
Operation
● St ar
t-Stop system status display
››› page 188.
● Active cylinder management display
(ACT ®
)* ›
›› page 185
● Signs recognised by the traffic signal de-
tection sy
stem ››› page 228
● Low consumption driving status (ECO)
››
› page 104
● Identifying letters on engine (MKB).
Dis
tance travelled
The odometer registers the total distance
travelled by the car.
The odometer (trip ) shows the distance
travelled since the last odometer reset. The
last digit of the trip recorder indicates distan-
ces of 100 metres or one tenths of a mile.
● Briefly press the button ››
› Fig. 115 4 to re-
set the trip r
ecorder to 0.
● Keep the button 4 pressed for about 3
sec ond
s and the previous value will be dis-
played.
Time
● To set the time, keep the button ››
› Fig. 115
4 pressed for more than 3 seconds to select
the hour or minut e di
splay.
● To continue setting the time, press the up-
per or low
er part of the button 4 . Hold but-ton down to scroll through the numbers
quic
k
ly.
● Press the button 4 again in order to finish
settin g the time.
The time c
an also be set via the key and
Set up function button in the Easy Connect
sy s
tem ››› page 108.
Compass
With the ignition on and the navigation sys-
tem on, the cardinal point corresponding to
the direction of travel of the vehicle is dis-
played on the instrument panel.
Selector lever position
The selected gear is displayed on the side of
the selector lever and on the instrument pan-
el display. In positions D and S, and with the
Tiptronic, the corresponding gear is also dis-
played.
Recommended gear (manual gearbox)
The recommended gear in order to save fuel
is displayed on the instrument panel while
you are driving ›››
page 31.
Second speed display (mph or km/h)
In addition to the speedometer, the speed
can also be displayed in a different unit of
measurement (in miles or in km per hour). This option cannot be deactivated in models
des
tined for countries in which the second
speed must always be visible.
The second speed display can be adjusted in
the Easy Connect system via the key and
the Set
up function button
››
› page 108.
Speed warning
When the speed setting is exceeded, this will
be indicated on the instrument panel display.
This is very useful, for example when using
winter tyres that are not designed for driving
at the maximum speed of the vehicle
››› page 35.
The speed warning settings can be adjusted
in the Easy Connect system via the key
and the Set
up function button
››
› page 108.
Start-Stop operating display
Updated information relating to the status is
displayed on the instrument panel
››› page 188.
Low consumption driving status (ECO)*
Depending on the equipment, when driving,
the “ECO ” display appears on the instrument
panel when the vehicle is in low consump-
tion status due to active cylinder manage-
ment (ACT ®
)* ›››
page 185.
104
Page 114 of 328
Operation
Opening and closing C entr
al locking system
Description Read the additional information carefully
› ›
› page 9
The vehicle can be locked and unlocked via
the central locking system. There are several
methods, depending on the vehicle equip-
ment:
● key with remote control ›
›
›
page 114 ,
● lock on driver door (emergency opening
››
› page 9) or
● interior central locking switch ››
›
page 115.
Unlocking one side of the vehicle only
When you lock the vehicle with the key, the
doors and the rear lid are locked. When you
open the door, you can either unlock only the
driver door, or all the vehicle doors. To select
the required option, use Easy Connect*
››› page 115.
Automatic locking (Auto Lock)*
The Auto Lock function locks the doors and
the rear lid when the vehicle exceeds a speed
of about 15 km/h (9 mph). The vehicle is unlocked again when the igni-
tion key
is removed. Alternatively, the vehicle
can also be unlocked via the central locking
switch or by pulling one of the inside door
handles. The Auto Lock function can be
switched on and off on the sound system or
on the Easy Connect* system ››› page 115.
In the event of an accident in which the air-
bags inflate, the doors will be automatically
unlocked to facilitate access and assistance.
Anti-theft alarm system*
If the anti-theft alarm system senses interfer-
ence with the vehicle it triggers an audible
and visible alarm.
The anti-theft alarm system is automatically
switched on when locking the vehicle. It
switches off when the vehicle is unlocked
from a distance.
When the driver door is unlocked with the
key, you should switch on the ignition within
15 seconds. Otherwise the alarm will be trig-
gered. On some export versions, the alarm is
triggered immediately when you open a door.
To deactivate the alarm, press the button on the remote control key, or switch on the
ignition. Af
t
er a certain time, the alarm will
automatically switch off.
Switch off the vehicle interior monitoring and
tow-away protection if you wish to prevent the alarm from being triggered accidentally
››
› page 123.
Turn signals
The turn signals will flash twice when the ve-
hicle is unlocked and once when the vehicle
is locked.
If it does not flash, this indicates that one of
the doors, the rear lid or the bonnet is not
closed correctly.
Accidental lock-out
The central locking system prevents you from
being locked out of the vehicle in the follow-
ing situations: ● If the driver door is open, the vehicle can-
not be loc
ked with the central locking switch
››› page 115.
Lock the vehicle with the remote control key,
when all the doors and the rear lid have been
closed. This prevents the accidental locking
of the vehicle. WARNING
Do not leave anyone (especially children) in
the v
ehicle if it is locked from the outside and
the anti-theft security system* is enabled, as
the doors and windows cannot then be
opened from the inside. Locked doors could
delay assistance in an emergency, potentially
putting lives at risk. 112
Page 115 of 328
Opening and closing
Note
● Nev er l
eave any valuable items in the vehi-
cle unattended. Even a locked vehicle is not a
safe.
● If the diode on the driver door sill lights up
for about
30 seconds when the vehicle is
locked, the central locking system or anti-
theft alarm* is not working properly. You
should have the fault repaired at a SEAT Offi-
cial Service or specialised workshop.
● The vehicle interior monitoring of the anti-
theft
alarm* system will only function as in-
tended if the windows and the sunroof* are
closed. Car key
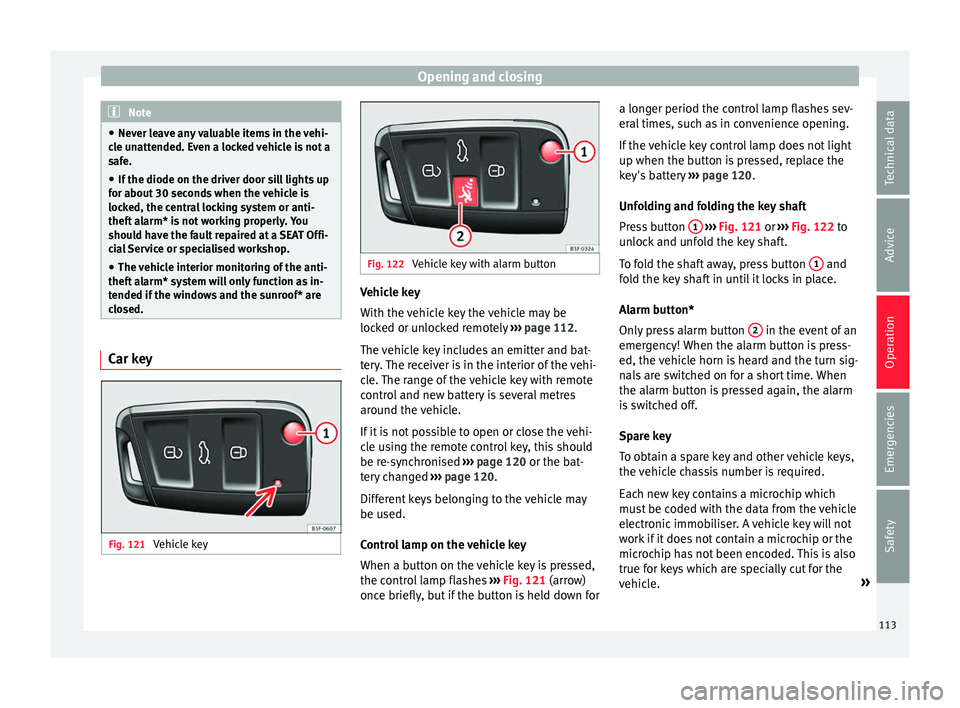
Fig. 121
Vehicle key Fig. 122
Vehicle key with alarm button Vehicle key
W
ith the
vehicle key the vehicle may be
locked or unlocked remotely ››› page 112.
The vehicle key includes an emitter and bat-
tery. The receiver is in the interior of the vehi-
cle. The range of the vehicle key with remote
control and new battery is several metres around the vehicle.
If it is not possible to open or close the vehi-
cle using the remote control key, this should
be re-synchronised ››› page 120 or the bat-
tery changed ››› page 120.
Different keys belonging to the vehicle may
be used.
Control lamp on the vehicle key
When a button on the vehicle key is pressed,
the control lamp flashes ››› Fig. 121 (arrow)
once briefly, but if the button is held down for a longer period the control lamp flashes sev-
eral
times, such as in convenience opening.
If the vehicle key control lamp does not light
up when the button is pressed, replace the
key's battery ››› page 120.
Unfolding and folding the key shaft
Press button 1
› ››
Fig. 121
or ››› Fig. 122 to
unlock and unfold the key shaft.
To fold the shaft away, press button 1 and
f o
ld the key shaft in until it locks in place.
Alarm button*
Only press alarm button 2 in the event of an
emer g
ency! When the alarm button is press-
ed, the vehicle horn is heard and the turn sig-
nals are switched on for a short time. When
the alarm button is pressed again, the alarm
is switched off.
Spare key
To obtain a spare key and other vehicle keys,
the vehicle chassis number is required.
Each new key contains a microchip which
must be coded with the data from the vehicle
electronic immobiliser. A vehicle key will not
work if it does not contain a microchip or the
microchip has not been encoded. This is also
true for keys which are specially cut for the
vehicle. »
113
Technical data
Advice
Operation
Emergencies
Safety
Page 116 of 328
Operation
The vehicle keys or new spare keys can be
o bt
ained from a SEAT Official Service, a spe-
cialised workshop or an approved key service
qualified to create this kind of key.
New keys or spare keys must be synchron-
ised before use ››› page 120. CAUTION
All of the vehicle keys contain electronic com-
ponent s. Pr
otect them from damage, impacts
and humidity. Note
● On ly
use the key button when you require
the corresponding function. Pushing the but-
ton unnecessarily could accidentally unlock
the vehicle or trigger the alarm. It is also pos-
sible even when you are outside the radius of
action.
● Key operation can be greatly influenced by
ov
erlapping radio signals close to the vehicle
working in the same range of frequencies, for
example, radio transmitters or mobile tele-
phones.
● Obstacles between the remote control and
the v
ehicle, bad weather conditions and dis-
charged batteries can considerably reduce
the range of the remote control.
● If the buttons of the vehicle key are press-
ed ››
› Fig. 121 or ››› Fig. 122 or one of the cen-
tral locking buttons ››› page 115 is pressed
repeatedly in short succession, the central
locking briefly disconnects as protection against overloading. The vehicle is then un-
loc
k
ed. Lock it if necessary. Unlocking/Locking by remote control
Read the additional information carefully
› ›
› page 9
The vehicle will be locked again automatical-
ly if you do not open one of the doors or the
rear lid within 30 seconds after unlocking the
car. This function prevents the vehicle from
remaining unlocked if the unlocking button is
pressed by mistake. This does not apply if
you press the button for at least one sec-
ond.
In v
ehicles with a security central locking
feature (selective unlocking of side doors)
››› page 114, when the button is pressed
onc e, on
ly the driver door and the fuel tank
flap are unlocked. When the button is press-
ed a second time, all the vehicle doors are
unlocked. WARNING
Observe the safety warnings ››
› in Descrip-
tion on p ag
e 112. Note
● Do not u
se the remote control key until the
vehicle is visible. ●
Other f u
nctions of the remote control key
››› page 127, Convenience opening/closing. Selective unlocking system
The selective unlocking system allows you to
on
ly
unlock the driver door and the fuel tank
flap. All other doors and the rear lid remain
locked.
Unlocking the driver door and tank flap
– Press button on the remote control key
onc e
, or turn the key once to open.
Unlocking all the doors, the rear lid and the
tank flap simultaneously.
– Within 5 seconds, press button on the
r emot
e control key twice, or turn the key to
open twice within 5 seconds.
The anti-theft security system* and the anti-
theft alarm* are immediately disabled if you
unlock only the driver door, without unlock-
ing the other doors.
In vehicles with Easy Connect*, you can pro-
gramme the security central locking system
directly ››› page 115.
114
Page 117 of 328
Opening and closing
Programming the central locking sys-
t em You can use Easy Connect* to select which
door
s
are unlocked with the central locking
system. Using the radio or the Easy Connect*
system, you can select whether the vehicle
automatically closes with the “Auto Lock”
programme at speeds of more than 15 km/h
(9 mph).
Programming the unlocking of the doors (ve-
hicles with Easy Connect)
– Select: control button Systems or Vehi-
cle systems > Vehicle settings >
Central locking > Unlocking doors .
Pr ogr
amming the Auto Lock (vehicles with
radio)
– Select: SETUP button > control button
Central locking > Locking while
driving .
Pr ogr
amming the Auto Lock (vehicles with
Easy Connect)
– Select: control button Systems or Vehi-
cle systems > Vehicle settings >
Locking while driving .
Unlocking doors You c
an choose to un-
lock all the doors or only the driver door
when you unlock the vehicle. In all the op-
tions, the fuel tank flap is also unlocked. With the Driver
setting, when
you press the
button on the remote control key only the
door on the driv er's
side is unlocked. If that
button is pressed twice, the rest of the doors
and the rear lid will be unlocked.
In vehicles with a conventional key, turn the
key in the door lock, in the direction of open-
ing, twice within 2 seconds.
If the button is pressed, all the vehicle
door s
are locked. At the same time, a confir-
mation signal* is heard.
Auto Lock /Locking while driving . If
you select on, all the vehicle doors are
locked at speeds above 15 km/h (9 mph).
Central locking switch Read the additional information carefully
› ›
› page 9
Please note the following when using the
central locking switch to lock your vehicle:
● It is not possible to open the doors or the
re
ar lid from the outside (for safety reasons,
e.g. when stopped at traffic lights).
● The LED in the central locking switch lights
up when all
the doors are closed and locked.
● You can open the doors individually from
the ins
ide by pulling the inside door handle. ●
In the event
of an accident in which the air-
bags inflate, doors locked from the inside will
be automatically unlocked to facilitate access
and assistance. WARNING
● The c entr
al locking switch also operates
when the ignition is switched off and auto-
matically locks all the vehicle doors when the
button is pressed.
● The central locking switch does not operate
if the
vehicle is locked from the outside and
the anti-theft security system is switched on.
● Locked doors could delay assistance in an
emerg
ency, potentially putting lives at risk.
Do not leave anyone, especially children, in
the vehicle. Note
Your vehicle will lock automatically when it
r e
aches a speed of about 15 km/h (9 mph)
(Auto Lock) ››› page 112. You can unlock the
vehicle again using button on the central
loc k
ing switch. 115
Technical data
Advice
Operation
Emergencies
Safety
Page 118 of 328
Operation
Unlocking and locking the vehicle
w ith K
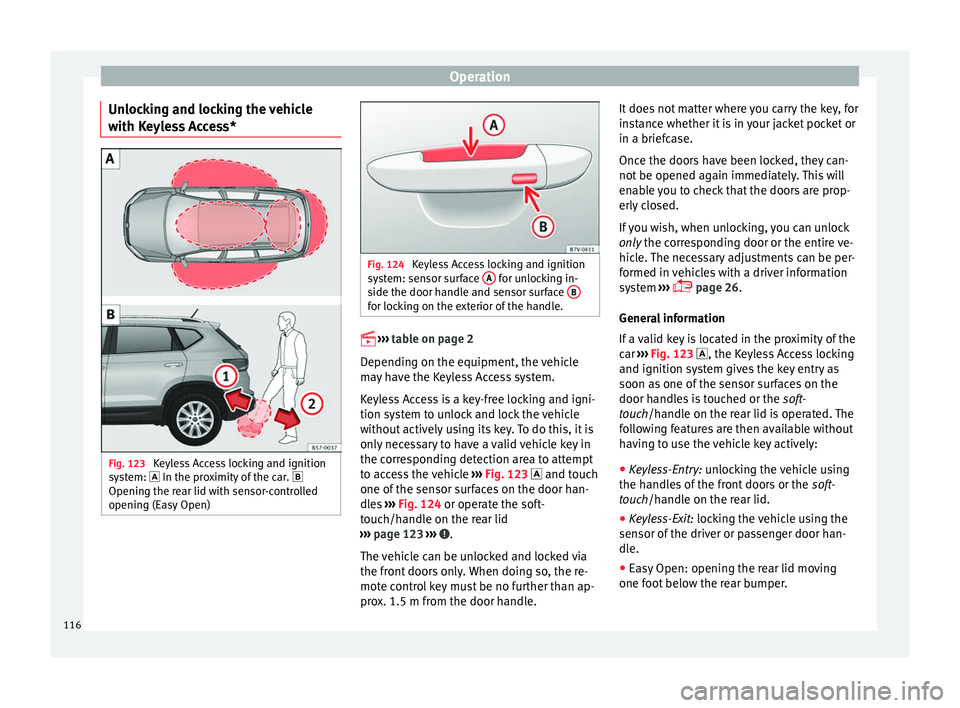
eyless Access* Fig. 123
Keyless Access locking and ignition
sy s
tem: In the proximity of the car.
Opening the rear lid with sensor-controlled
opening (Easy Open) Fig. 124
Keyless Access locking and ignition
sy s
tem: sensor surface A for unlocking in-
s ide the door h
andle and sensor surface B for locking on the exterior of the handle.
›
›
›
table on page 2
Depending on the equipment, the vehicle
may have the Keyless Access system.
Keyless Access is a key-free locking and igni-
tion system to unlock and lock the vehicle
without actively using its key. To do this, it is
only necessary to have a valid vehicle key in
the corresponding detection area to attempt
to access the vehicle ››› Fig. 123 and touch
one of the sensor surfaces on the door han-
dles ››› Fig. 124 or operate the soft-
touch/handle on the rear lid
››› page 123 ››› .
The v
ehicle can be unlocked and locked via
the front doors only. When doing so, the re-
mote control key must be no further than ap-
prox. 1.5 m from the door handle. It does not matter where you carry the key, for
ins
tance whether it is in your jacket pocket or
in a briefcase.
Once the doors have been locked, they can-
not be opened again immediately. This will
enable you to check that the doors are prop-
erly closed.
If you wish, when unlocking, you can unlock
only the corresponding door or the entire ve-
hicle. The necessary adjustments can be per-
formed in vehicles with a driver information
system ›››
page 26.
General information
If a valid key is located in the proximity of the
car ››› Fig. 123 , the Keyless Access locking
and ignition system gives the key entry as
soon as one of the sensor surfaces on the
door handles is touched or the soft-
touch/handle on the rear lid is operated. The
following features are then available without
having to use the vehicle key actively:
● Keyless-Entry: un
locking the vehicle using
the handles of the front doors or the soft-
touch/handle on the rear lid.
● Keyless-Exit: lock
ing the vehicle using the
sensor of the driver or passenger door han-
dle.
● Easy Open: opening the rear lid moving
one foot
below the rear bumper.
116
Page 119 of 328
Opening and closing
● Pr e
ss & Drive: keyless starting of the en-
gine with the starter button ››› page 165.
The central locking and locking systems oper-
ate in the same way as a normal locking and
unlocking system. Only the controls change.
Unlocking the vehicle is confirmed with a
double flash of the indicator lights; locking
by a single flash.
If the vehicle is locked and then all doors and
the rear lid are closed leaving the last key
used inside the vehicle and none outside,
the vehicle will not lock immediately. All the
vehicle's indicator lights will flash four times.
The vehicle will lock again after a few sec-
onds if you fail to open any door or the rear
lid.
If you unlock the vehicle but fail to open any
door or the rear lid, the vehicle will lock again
after a few seconds.
Unlocking and opening the doors (Keyless-
Entry)
● Hold one of the front door handles. In do-
ing thi
s, the sensor surface ››› Fig. 124 A (ar-
r o
w) is touched on the handle and the vehi-
cle unlocks.
● Open the door.
On v
ehicles with selective opening or info-
tainment system configuration, pulling the
door handle twice will unlock all doors. On vehicles without a “Safe” system: locking
and un
locking doors (Keyless-Exit)
● Switch the ignition off.
● Close the driver's door.
● Touch the locking sensor surface B (arrow)
of the h
andle of one of the front doors once.
The door being operated must be closed.
On vehicles with a “Safe” system: locking
and unlocking doors (Keyless-Exit)
● Switch the ignition off.
● Close the driver's door.
● Touch the sensor surface B (arrow) of the
h andl
e of one of the front doors once. The ve-
hicle locks with the “Safe” system
››› page 119. The door being operated must
be closed.
● Touch the sensor surface B (arrow) of the
h andl
e of one of the front doors twice to lock
the vehicle without activating the “Safe” se-
curity system ››› page 119.
Unlocking and locking the rear lid
When the vehicle is locked, the rear lid auto-
matically unlocks on opening if ››› Fig. 123
there is a valid vehicle key in the proximity.
Open or close the rear lid normally.
After closing, the rear lid locks automatically.
If the complete vehicle is unlocked, the rear
lid will not lock automatically after closing it. Opening the rear lid with sensor-controlled
opening (E
asy Open)
If there is a valid vehicle key in the proximity
of ››› Fig. 123 the rear lid, it is possible to
unlock and open or close it moving one foot
in the area of the sensors ››› Fig. 123 loca-
ted under the rear bumper.
● Switch the ignition off.
● Stand in front of the rear bumper, in the
middl
e.
● With a brisk movement, bring your foot and
low
er leg as close as you can to the bumper.
The lower part of the leg needs to be close to
the upper sensor area and your foot to the
lower sensor area ››› Fig. 123 1 .
● Quickly remove your foot and lower leg
fr om the sen
sor areas ››› Fig. 123 2 . The
r e
ar lid opens automatically.
● If the rear lid fails to open, repeat the pro-
cedur
e after a few seconds.
The third brake light flashes once to show the
boot has opened with the Easy Open func-
tion.
The rear lid can be closed with another foot
movement similar to the opening one (provi-
ded a valid vehicle key is in the proximity of
the rear lid).
When closed, the rear lid automatically locks
if the vehicle has been locked beforehand
and there is no valid key inside. »
117
Technical data
Advice
Operation
Emergencies
Safety
Page 120 of 328
Operation
While the rear lid is in motion (either opening
or c lo
sing), it can be stopped with another
foot movement similar to the opening one
(provided a valid vehicle key is in the proxim-
ity of the rear lid).
The Easy Open feature is not available or only
has limited availability in the following situa-
tions (examples):
● If the rear bumper is very dirty.
● If the rear bumper is wet with salt water,
e.g. af
ter having driven on gritted roads.
● If the electrical unlocking tow hitch is not
co
vered.
● If the vehicle has been equipped at a later
time with a t
ow bracket.
In the event of heavy rain, the Easy Open fea-
ture may take a little longer to open the boot
or automatically disable to avoid the boot
opening by accident, e.g. when the rain falls.
The Easy Open function may be connected
and disconnected permanently in the info-
tainment system by pressing the
S
ETUP and
Openin
g and c
losing
› ››
page 26 func-
tion buttons.
What happens when locking the vehicle with
a second key
If there is a vehicle key inside the vehicle and
it is locked from the outside with a second
vehicle key, the key inside the vehicle is
blocked for engine ignition ››› page 165. In order to enable engine ignition, the button
on the key
inside the vehicle needs to be
pr e
ssed.
Automatically disabling sensors
If the vehicle is not locked or unlocked for a
long period of time, the proximity sensors on
the passenger doors are automatically disa-
bled.
If one of the sensor surfaces on the door han-
dles is often activated in a unusual manner
with the vehicle locked (e.g. by the branches
of a bush rubbing against it), all proximity
sensors are disabled for a certain period of
time.
Sensors will again be enabled: ● After a time.
● OR: if the vehicle is unlocked with the but-
t
on on the key.
● OR: if the rear lid is open.
● OR:
if the vehicle is unlocked manually with
the k
ey.
Convenience functions
To close all the electric windows and the
glass roof using the convenience function,
keep a finger for a few seconds on the lock-
ing sensor surface ››› Fig. 124 B (arrow) of
the door h andl
e until the windows and roof
have closed. The doors may be opened
by
touching the
sensor surface of the door handle depending
on the settings that have been activated in
the infotainment system with the
S
ETUP and
Openin
g and c
losing function buttons.
WARNING
If there is a valid key in the proximity of the
r e
ar lid, in some cases the Easy Open func-
tion may be accidentally turned on and the
rear lid will open, for example, when sweep-
ing under the rear bumper, when directing a
water jet or high pressure steam to the area
or when carrying out maintenance work or re-
pairs in that area. If accidentally opened, the
rear lid could injure somebody situated in its
area of operation or cause material damage.
● Therefore, always make sure that there is
no un
supervised valid key in the area near
the rear lid.
● Before carrying out any maintenance or re-
pair w
ork on the vehicle, always disable the
Easy Open feature on the infotainment sys-
tem.
● Before washing the vehicle, always disable
the Ea
sy Open feature on the infotainment
system.
● Before attaching a bicycle rack or a trailer
››
› page 255, always disable the Easy Open
feature on the information system. 118
Page 121 of 328
Opening and closing
CAUTION
The sensor surfaces on the door handles
c ou
ld engage if hit with a water jet or high
pressure steam if there is a valid vehicle key
in the proximity. If at least one of the win-
dows is open and the sensor surface B on
one of the h
andles permanently activates, all
windows will close. If the water jet or steam
is briefly moved away from the sensor surface A (arrow) on one of the handles and then
point ed at
it again, all the windows will prob-
ably open ››› page 118. Note
● If the
vehicle battery has little or no charge,
or the vehicle key battery is almost or entire-
ly out of charge, you will probably not be able
to lock or unlock the vehicle with the Keyless
Access system. The vehicle can be unlocked
or locked manually ››› page 85.
● To control the proper locking of the vehicle,
the rel
ease function is disabled for approx. 2
seconds.
● If the message Keyless access system
faulty is
displayed on the screen of the
dash panel, abnormalities may occur in the
operation of the Keyless Access system. Con-
tact a specialised workshop. SEAT recom-
mends visiting a SEAT dealership for this.
● Depending on the function set on the info-
tainment
system for the mirrors, the exterior
mirrors will unfold and the surround lighting
will come on when unlocking the vehicle us- ing the sensor surface on the driver and pas-
sen
g
er door handles ››› page 141.
● If there is no valid key inside the vehicle or
the sys
tem fails to detect one, a warning will
display on the dash panel screen. This could
happen if any other radio frequency signal in-
terferes with the key signal (e.g. from a mo-
bile device accessory) or if the key is covered
by another object (e.g. an aluminium case).
● If the sensors are very dirty, e.g. have a lay-
er of s
alt, how the sensors on the door han-
dles operate may be affected. In this case,
clean the vehicle.
● If the vehicle is equipped with an automatic
ge
arbox, it may only be locked in the gear
stick is in position P. Anti-theft security system (Safelock)*
The following message is displayed on the in-
s
trument
panel to remind the driver that
when the vehicle is closed from the outside,
the anti-theft security system is switched on. Do not forget the Safelock.
Please see Instruction Manual . The
vehicle cannot be opened from inside. This
makes it more difficult for unauthorised per-
sons to break into the vehicle ››› in De-
s c
ription on page 112.
The anti-theft security system can be switch-
ed off each time the vehicle is locked: ●
Turn the k
ey a second time to the lock posi-
tion, in the door lock, within two seconds. If
necessary, remove the protective cover on
the driver door handle ›››
page 9 or else
● Press on the remote control key for a
sec ond time
within 2 seconds.
The flashing frequency of the diode in the
door sill immediately confirms the process.
Initially, the diode flashes in a fast sequence
for a brief period, then it stops for approxi-
mately 30 seconds and, lastly continues
flashing slowly.
119Technical data
Advice
Operation
Emergencies
Safety
Page 122 of 328
Operation
Replacing the battery Fig. 125
Vehicle key: opening the battery
c omp
artment Fig. 126
Vehicle key: removing the battery SEAT recommends you ask a specialised
w
ork
shop to replace the battery.
The battery is located to the rear of the vehi-
cle key, under a cover. Changing the battery
● Unfold the vehicle key blade ››
› page 113.
● Remove the cover from the back of the ve-
hicl
e key ››› Fig. 125 in the direction of the ar-
row ››› .
● Extract the battery from the compartment
u s
ing a suitable thin object ››› Fig. 126.
● Place the new battery in the compartment
as
shown ››› Fig. 126, pressing in the oppo-
site direction to that shown by the arrow
››› .
● Fit the cover as shown ››
› Fig. 125 , pressing
it onto the vehicle key casing in the opposite
direction to that shown by the arrow until it
clicks into place. CAUTION
● If the b
attery is not changed correctly, the
vehicle key may be damaged.
● Use of unsuitable batteries may damage
the v
ehicle key. For this reason, always re-
place the dead battery with another of the
same voltage, size and specifications.
● When fitting the battery, check that the po-
larity
is correct. For the sake of the environment
Please dispose of your used batteries correct-
ly and w
ith respect for the environment. Synchronising the vehicle key
If the button
is pressed frequently outside
of the
vehicle range, it is possible that the ve-
hicle can no longer be locked or unlocked us-
ing the key. In this case, the key must be re-
synchronised as described below:
● Unfold the vehicle key blade ››
› page 113.
● If necessary, remove the cover from the
driver door l
ever ›››
page 9.
● Press the button on the vehicle key. For
thi s, it
must remain with the vehicle.
● Open the vehicle within one minute using
the k ey
blade. The key has been synchron-
ised.
● If necessary, fit the cap.
Childproof lock Fig. 127
Childproof lock on the left hand side
door .120