tow Seat Ateca 2018 Repair Manual
[x] Cancel search | Manufacturer: SEAT, Model Year: 2018, Model line: Ateca, Model: Seat Ateca 2018Pages: 348, PDF Size: 7.32 MB
Page 278 of 348
Operation
country in question. The exterior mirrors
shou l
d be a
djusted before you start driving
and must provide a sufficient field of vision
at the rear.
Trailer maximum electricity consumption
ConsumersEurope, Asia, Africa, South America and
Central AmericaAustralia
Brake lights (total)84 Watts108 Watts
Turn signal (on each
side)42 Watts54 Watts
Side lights (on each
side)50 Watts100 Watts
Reverse lights (in
total)42 Watts54 Watts
Rear fog light42 Watts54 Watts
Never exceed the values indicated! WARNING
If the towing bracket is wrongly fitted or is
not the right one, the tr
ailer could become
detached from the vehicle and cause serious
injury. CAUTION
● If the r e
ar lights of the trailer are not cor-
rectly connected, the vehicle's electronic sys-
tem may be damaged.
● If the trailer absorbs excessive electric cur-
rent, the v
ehicle's electronic system may be
damaged.
● Never connect the trailer's electric system
directly t
o the electrical connections of the
tail lights or any other power sources. Only
use the connections intended for providing
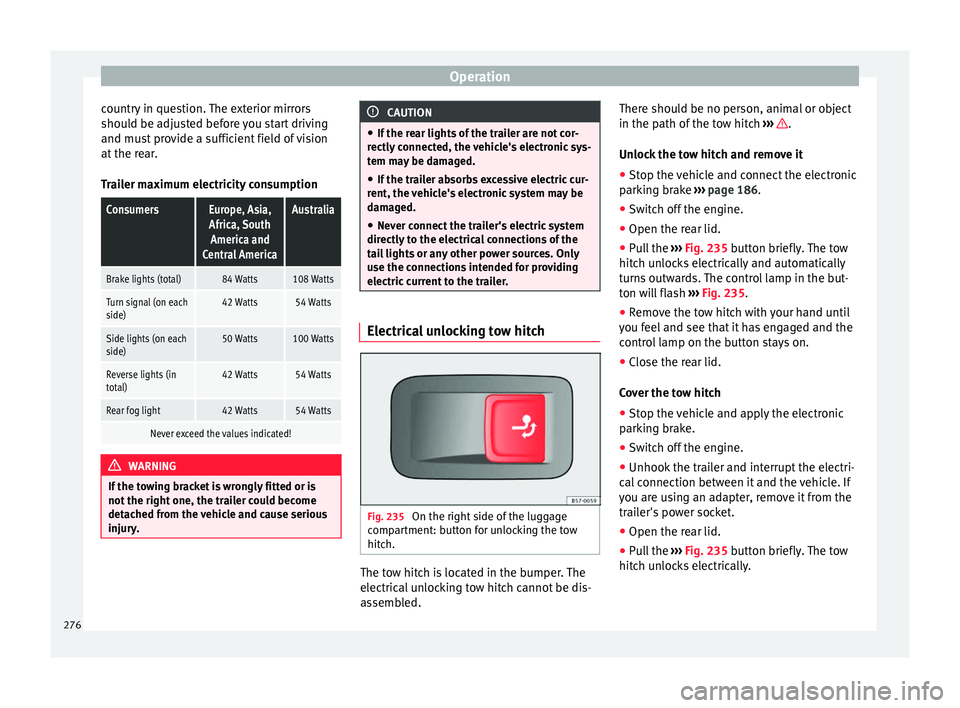
electric current to the trailer. Electrical unlocking tow hitch
Fig. 235
On the right side of the luggage
c omp
ar
tment: button for unlocking the tow
hitch. The tow hitch is located in the bumper. The
el
ectric al
unlocking tow hitch cannot be dis-
assembled. There should be no person, animal or object
in the path of the t
ow hitch ››› .
Un loc
k
the tow hitch and remove it
● Stop the vehicle and connect the electronic
parkin
g brake ››› page 186.
● Switch off the engine.
● Open the rear lid.
● Pull the ››› Fig. 235 b
utton briefly. The tow
hitch unlocks electrically and automatically
turns outwards. The control lamp in the but-
ton will flash ››› Fig. 235.
● Remove the tow hitch with your hand until
you feel
and see that it has engaged and the
control lamp on the button stays on.
● Close the rear lid.
Cov
er the tow hitch
● Stop the vehicle and apply the electronic
parkin
g brake.
● Switch off the engine.
● Unhook the trailer and interrupt the electri-
cal c
onnection between it and the vehicle. If
you are using an adapter, remove it from the
trailer's power socket.
● Open the rear lid.
● Pull the ››› Fig. 235
button briefly. The tow
hitch unlocks electrically.
276
Page 279 of 348
Towing bracket device*
● Turn the t
o
w hitch under the bumper with
your hand until you feel and see that it en-
gages and the control lamp on the ››› Fig. 235
button stays on.
● Close the rear lid.
Meanin
g of control lamp
● If the warning light of the button ›››
Fig. 235
is flashing , this means that the tow hitch has
not been attached properly or is damaged
››› .
● If the warning lamp st
a
ys on with the rear
lid open, the tow hitch is correctly in place
both when engaged and when covered.
● The control lamp of the button will go off
appro
x. 1 minute after closing the rear lid. WARNING
Undue use of the towing bracket may cause
injury and ac
cidents.
● Only use the tow hitch if it is properly en-
gaged.
● A
lways ensure that no person, animal or
obj
ect is to be found in the path of the tow
hitch.
● Never use a tool or instrument while the
tow hit
ch is moving.
● Never press the ›››
Fig. 235 button when
there is a trailer hooked to the vehicle or
when a carrier system or other accessories
are mounted on the tow hitch. ●
If the t o
w hitch is not attached properly, do
not use it. Instead, go to a specialised work-
shop and have the towing bracket checked.
● If you detect any fault in the electrical sys-
tem or in the to
wing bracket, contact a speci-
alised workshop and ask them to check it.
● If the ball has a diameter of less than 49
mm at any
one point, do not use the towing
bracket under any circumstances. CAUTION
If you clean the vehicle with high-pressure or
s te
am devices, do not point the jet directly
towards the retractable tow hitch or the trail-
er power socket, as this may damage the
joints or remove the grease necessary for lu-
brication. Note
At extremely low temperatures, the tow hitch
ma y
be impossible to use. In this case, place
the vehicle in a warmer location (for example,
a garage). Fitting a bicycle carrier on the retract-
ab
le t
ow hitch The maximum allowed weight of the carrier
sy
s
t
em, including the load, is 75 kg. The car-
rier system should not protrude more than
700 mm backwards from the spherical head.
Only carrier systems on which up to 3 bikes can be mounted are allowed. Heavier bicy-
cle
s must be mounted as close to the vehicle
as possible (tow hitch). WARNING
The incorrect use of the tow hitch with a bicy-
cl e r
ack mounted on the tow hitch can cause
accidents and injury.
● Never exceed the maximum weight or the
limits indic
ated above.
● The bicycle rack may not be mounted to the
neck of
the hitch below the ball because, due
to the shape of the neck and depending on
the rack model, the rack could be incorrectly
mounted on the vehicle.
● Always read and take the manufacturer as-
sembly in
structions into account. CAUTION
If the maximum weight and limits indicated
abov e ar
e exceeded, the vehicle may suffer
considerable damage.
● Never exceed the values indicated! Note
SEAT recommends removing, as far as possi-
bl e, a
ll removable parts of the bicycles before
setting off. These parts include, for example,
baskets and saddlebags, child seats or bat-
teries. This improves aerodynamics and the
centre of gravity of the rack system. 277
Technical data
Advice
Operation
Emergencies
Safety
Page 280 of 348

Operation
Hooking up and connecting a trailer Fig. 236
Schematic diagram: assignment of
the pins of the trailer's power socket.
Key to the Fig. 236:
PinMeaning
1Left turn signal
2Rear fog light
3Earth for pins 1, 2, 4, 5, 6, 7 and 8
4Right turn signal
5Rear light, right
6Brake lights
7Rear light, left
8Reverse lights
9Permanent live
10Live charge cable
11Earth for pin 10
Key to the Fig. 236:
PinMeaning
12Unassigned
13Earth for pin 9 Trailer power socket
The v
ehic
le is fitted with a 13-pole power
socket for the electrical connection between
the trailer and the vehicle. With the engine
running, electrical devices on the trailer re-
ceive power from the electrical connection
(pin 9 and pin 10 of the trailer power socket).
If the system detects that a trailer has been
connected electrically, the electrical equip-
ment on the trailer will receive voltage
through this connection (pins 9 and 10). Pin
9 has a permanent live. This powers, for ex-
ample, the trailer's interior lighting. Electrical
devices such as a fridge in a caravan only re-
ceive electrical power if the engine is running
(through pin 10).
To avoid overloading the electrical system,
you cannot connect the ground wires of pin
3, pin 11 or pin 13.
If the trailer has a 7-contact connector , you
will need to use an adapter cable. In this case
the function corresponding to pin 10 will not
be available. Tow rope
The to
w r
ope must always be securely fixed
to the towing vehicle and loose enough so
that the vehicle can handle turns smoothly.
However, make sure that the cable does not
rub on the ground while driving.
Trailer rear lights
Always check the trailer's rear lights to en-
sure they are working correctly and that they
comply with the relevant safety regulations.
Make sure that the maximum permissible
power that can be absorbed by the trailer is
not exceeded ››› page 276.
Connection to the anti-theft system
The trailer is included in the anti-theft system
if the following conditions are met: ● If the vehicle is factory-equipped with an
anti-theft al
arm and towing bracket.
● If the trailer is electrically connected to the
tow
ing vehicle through the trailer power
socket.
● If the electrical systems of the vehicle and
trail
er are in perfect condition and have no
faults or damage.
● If the vehicle is locked with the key and the
anti-theft al
arm is activated.
When the vehicle is locked, the alarm is trig-
gered if the electrical connection with the
trailer is cut off.
278
Page 281 of 348
Towing bracket device*
Before hitching or unhitching a trailer, always
t urn off
the anti-thef
t alarm. Otherwise, the
tilt sensor could cause the alarm to go off.
Trailers with LED rear lights
For technical reasons, trailers fitted with LED
rear lights cannot be connected to the anti-
theft alarm system.
When the vehicle is locked, the alarm does
not go off when the electrical connection with
the trailer is cut if it has rear lights with light-
emitting diodes.
If the Eco driving profile was selected when
hitching the trailer, this will automatically
switch to the Normal profile. If the system
cannot detect the attached trailer or if the
towing bracket has been retrofitted by an au-
to repair shop other than SEAT, you must
manually select the Normal profile before you
start driving with a trailer attached. To recon-
nect the Eco profile once the trailer has been
unhitched, switch the ignition off and back
on once. WARNING
If the cables are improperly or incorrectly
connect ed, it
may lead to an excessive
amount of current supplied to the trailer,
which can cause abnormalities in the entire
vehicle electronic system, as well as acci-
dents and serious injuries. ●
Ens ur
e that any repairs that need to be car-
ried out on the electrical system are carried
out by a specialised workshop.
● Never connect the trailer's electric system
directly t
o the electrical connections of the
tail lights or any other power sources. WARNING
Contact between the pins of the trailer power
soc ket
can cause short circuits, overloading
of the electrical system or failure of the light-
ing system, and consequently can cause acci-
dents and serious injuries.
● Never connect the pins of the trailer power
socket
to each other.
● Make sure any work on bent pins is carried
out by
a specialised workshop. CAUTION
Do not leave the trailer connected to the vehi-
cl e when p
arked; place it on its support
wheel or its supports. If the vehicle rises or
falls due, for example, to a variation of the
load or a burst tyre, increased pressure will
be placed on the towing bracket and the trail-
er, and both the vehicle and the trailer can be
damaged. Note
● In ca se of
malfunctioning of the electrical
systems of the vehicle or trailer, as well as of the anti-theft system, have these checked out
by
a s
pecialised workshop.
● If the trailer accessories consume energy
through the pow
er socket to the trailer and
the engine is turned off, the battery will dis-
charge.
● If the vehicle battery is running low, the
electrica
l connection with the trailer will be
automatically cut. Loading a trailer
Technically permissible maximum trailer
w
eight
and
vertical load on the coupling de-
vice
The technically permissible maximum trailer
weight is the weight that the vehicle can tow
››› . The vertical load on the coupling load
i s
e
xerted vertically from above on the tow
hitch of the towing bracket ››› page 319.
The information on the maximum trailer
weight and vertical load on the coupling de-
vice contained in the type plate of the towing
bracket are experimental values only. The
correct figures for your specific model, which
may be lower than these figures, are given in
the vehicle documentation. The information
in the vehicle documentation takes prece-
dence at all times. »
279
Technical data
Advice
Operation
Emergencies
Safety
Page 282 of 348
Operation
To promote safety while driving, SEAT recom-
mend s
m
aking the most of the maximum ver-
tical load technically permissible on the cou-
pling device ››› page 273. An insufficient ver-
tical load has a negative influence on the be-
haviour of both the vehicle and trailer.
The vertical load increases the weight on the
rear axle, reducing the vehicle's carrying ca-
pacity.
Gross combination weight of the towing ve-
hicle and trailer
The gross combination weight is the actual
weight of the loaded vehicle plus the actual
weight of the loaded trailer.
In some countries trailers are classified into
distinct categories. SEAT recommends ob-
taining information from a specialised work-
shop regarding which type of trailer is most
suitable for your vehicle.
Trailer loading
The weight of the towing vehicle and trailer
must be balanced. In order to do this, the
load must be as close as possible to the max-
imum vertical load technically permissible on
the coupling point, and it must be evenly dis-
tributed between the back and front of the
trailer:
● Distribute loads in the trailer so that heavy
obj
ects are as near to the axle as possible or
above it. ●
Secure the tr
ailer load properly.
Tyre pressure
Set the tyre pressure of the trailer tyres in ac-
cordance with the trailer manufacturer's rec-
ommendations.
When towing a trailer, inflate the tyres of the
towing vehicle with the maximum allowable
pressure ››› page 308. WARNING
If the maximum permissible axle weight, the
max imum lo
ad technically permissible on the
coupling point, the maximum authorised ve-
hicle weight or the gross combination weight
of the towing vehicle and trailer are excee-
ded, accidents and serious injuries may oc-
cur.
● Never exceed the values indicated!
● The actual weight on the front and rear
axle
s must never exceed the maximum per-
missible axle weight. The weight on the front
and rear axles must never exceed the maxi-
mum permissible weight. WARNING
A shift in weight could jeopardize the stabili-
ty and sec urity
of the towing vehicle and
trailer, which could lead to accidents and se-
rious injuries.
● Always load the trailer correctly. ●
Alw a
ys secure the load properly using belts
or straps that are suitable and in good condi-
tion. Driving with a trailer
Adjusting the headlights
When to
w
ing a trailer, the front part of the ve-
hicle could lift up, and if the dipped beams
are on, this could dazzle other drivers. Use
the headlight range control to lower the cone
of light. If you do not have headlight range
control, have the headlights adjusted by a
specialised workshop.
Special characteristics of driving with a trail-
er
● If your trailer has an overru
n brake, brake
gently at first and then rapidly. This will pre-
vent the jerking that can be caused by the
locking of trailer wheels.
● Due to the gross combination weight of the
tow
ing vehicle and trailer, the braking dis-
tance increases.
● When going down a slope, go into a lower
gear (if
using a manual gearbox or the tip-
tronic automatic gearbox mode) to take ad-
vantage of the braking power provided by the
engine. Otherwise, the braking system could
overheat and even fail.
280
Page 283 of 348
Towing bracket device*
● The tr ai
l
er weight, as well as the gross com-
bination weight of the towing vehicle and
trailer, change the centre of gravity and the
properties of the vehicle.
● If the towing vehicle is empty and the trail-
er is lo
aded, then the load distribution is in-
correct. Under these conditions, drive slowly
and with extra caution.
Hill starts with a trailer
Depending on the slope of the hill and the
combination weight of the towing vehicle
and trailer, the vehicle might start rolling
backwards slightly when you first start up.
For hill-starting with a trailer, do the follow-
ing:
● Press and hold the brake pedal.
● Press the button t
o disconnect the elec-
tronic parking brake ››› page 186.
● If the vehicle is equipped with a manual
gearbo
x, push the clutch pedal all the way
down.
● Put the vehicle into first gear or turn the se-
lector l
ever to position D/S ››› page 192.
● Pull out the button and ho
ld it in that
position to stop the towing vehicle and trailer
with the electronic parking brake.
● Release the brake pedal.
● Start driving slowly. To do this, in the case
of a manual
gearbox, slowly release the
clutch pedal. ●
Do not rel
ease the button until the en-
gine has sufficient force to start driving. WARNING
If a trailer is pulled incorrectly, this may lead
to lo s
s of control of the vehicle and serious
injury.
● Driving with a trailer and transporting
heavy or l
arge objects will change the vehicle
handling and braking distances.
● Always drive cautiously and carefully.
Brake e
arlier than usual.
● Adapt your speed and driving style at all
times t
o suit visibility, weather, road and traf-
fic conditions. Slow down, especially when
driving down hills or slopes.
● Accelerate with particular care and caution.
Avoid s
udden braking and manoeuvres.
● Take great care when overtaking. Reduce
speed immediat
ely if you notice that the trail-
er is swaying, however slightly.
● Never attempt to “straighten” the towing
vehicl
e and trailer while accelerating.
● Take into account the speed limit for vehi-
cle
s with a trailer, as it could be lower than
for vehicles without a trailer. Stabilisation of the towing vehicle
and tr
ai
l
er The stabilisation of the towing vehicle and
trai
l
er together is an additional function of
the electronic stability control (ESC).
If the system detects that the trailer is sway-
ing, it intervenes automatically with the driv-
er steering recommendation to reduce the
swaying of the trailer.
Requirements for the stabilisation of the
towing vehicle and trailer
● The vehicle is factory-equipped with a tow-
ing br ac
ket or has been retro-fitted with a
compatible towing bracket.
● The ESC and ASR are active. The control
lamp or is
not lit up on the instrument
panel.
● The trailer is electrically connected to the
tow
ing vehicle through the trailer power
socket.
● The vehicle is travelling at over 60 km/h
(appro
x. 37 mph).
● The maximum vertical load technically per-
miss
ible is being utilised on the coupling de-
vice.
● The trailer has a rigid draw bar.
● If the trailer has brakes, it must be equip-
ped with a mech
anical overrun brake. »
281
Technical data
Advice
Operation
Emergencies
Safety
Page 284 of 348
Operation
WARNING
The enhanced security provided by the elec-
tric s t
ability control of the towing vehicle and
trailer should not lead you to take any risks
that could compromise your safety.
● Adapt your speed and driving style at all
times t
o suit visibility, weather, road and traf-
fic conditions.
● Accelerate with caution when the road is
slipper
y.
● When adjusting any settings, stop acceler-
ating. WARNING
The electric stability control for the towing
vehic l
e and trailer may not correctly detect all
driving conditions.
● When the ESC is switched off, the stabilisa-
tion of the to
wing vehicle and trailer is also
switched off.
● The stability system does not always detect
light and un
stable trailers, so it may not sta-
bilise these correctly.
● When driving on slippery surfaces with
poor grip, the trai
ler can even interfere with
the stability system.
● Trailers with a high centre of gravity can tip
even without
having previously swayed.
● If a trailer is not attached, but the trailer
power soc
ket is connected (e.g. installation
of a bicycle rack with lights), repeated auto- matic braking may occur in extreme driving
condition
s. Retrofitting a towing bracket
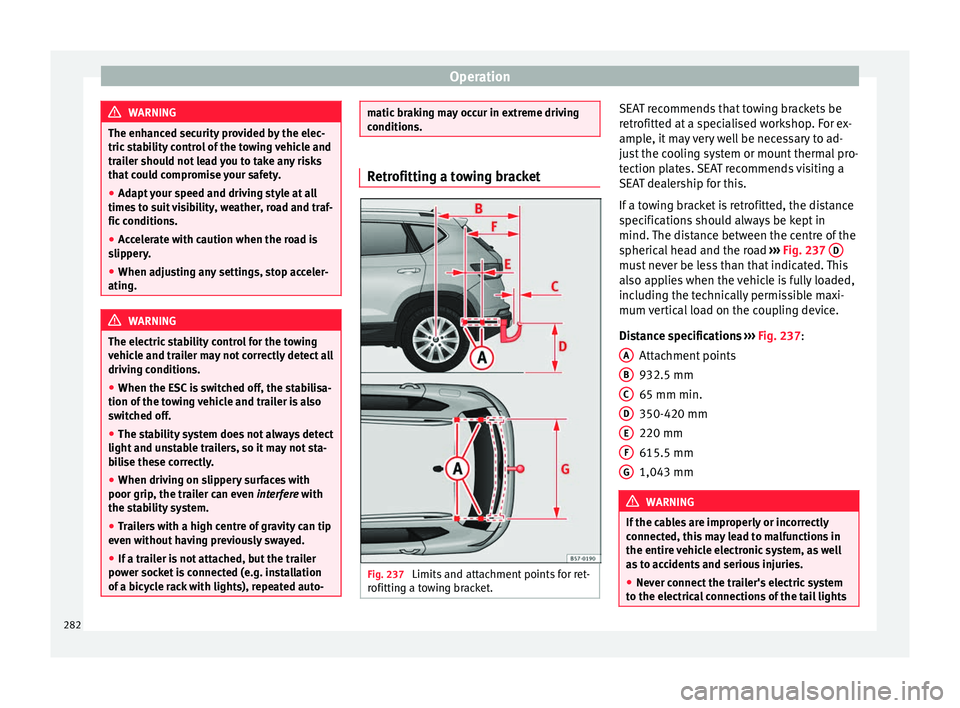
Fig. 237
Limits and attachment points for ret-
r ofittin g a t
owing bracket. SEAT recommends that towing brackets be
r
etr
ofitt
ed at a specialised workshop. For ex-
ample, it may very well be necessary to ad-
just the cooling system or mount thermal pro-
tection plates. SEAT recommends visiting a
SEAT dealership for this.
If a towing bracket is retrofitted, the distance
specifications should always be kept in
mind. The distance between the centre of the
spherical head and the road ››› Fig. 237 D must never be less than that indicated. This
al
so ap
p
lies when the vehicle is fully loaded,
including the technically permissible maxi-
mum vertical load on the coupling device.
Distance specifications ››› Fig. 237:
Attachment points
932.5 mm
65 mm min.
350-420 mm
220 mm
615.5 mm
1,043 mm WARNING
If the cables are improperly or incorrectly
connect ed, thi
s may lead to malfunctions in
the entire vehicle electronic system, as well
as to accidents and serious injuries.
● Never connect the trailer's electric system
to the electric
al connections of the tail lights A
B
C
D
E
F
G
282
Page 285 of 348
Towing bracket device*
or any other unsuitable power sources. Only
use s
uit
able connectors to connect the trail-
er.
● The towing bracket should be retrofitted
only at
a specialised workshop. WARNING
If the towing bracket is badly fitted or unsuit-
ab le, the tr
ailer may separate from the vehi-
cle while driving. This could cause serious ac-
cidents and fatal injuries. Note
Only use towing brackets that have been ap-
pro v
ed by SEAT for the model in question. 283
Technical data
Advice
Operation
Emergencies
Safety
Page 321 of 348
Technical specifications
Trailer mode Tr
ai
ler weights Trailer weight
The trai
l
er weights and drawbar loads ap-
proved are selected in intensive trials accord-
ing to precisely defined criteria. The ap-
proved trailer weights are valid for vehicles in
the EU for maximum speeds of 80 km/h (50
mph) (in certain circumstances up to 100
km/h (62 mph)). The figures may be different
in other countries. All data in the official vehi-
cle documentation takes precedence over
these data at all times ››› .
Dr a
wb
ar loads
The maximum permitted drawbar load on the
ball joint of the towing bracket must not ex-
ceed 88 kg.
In the interest of road safety, we recommend
that you always tow approaching the maxi-
mum drawbar load. The response of the trail-
er on the road will be poor, if the drawbar
load is too small.
If the maximum permissible drawbar load
cannot be met (e.g. with small, empty and
light-weight single axle trailers or tandem
axle trailers with a wheelbase of less than 1
metre), a minimum of 4% of the actual trailer
weight is legally required for the drawbar
load. WARNING
● For s af
ety reasons, you should not drive at
speeds above 80 km/h (50 mph) when towing
a trailer. This also applies in countries where
higher speeds are permitted.
● Never exceed the maximum trailer weights
or the drawb
ar load. If the permissible axle
load or the permissible total weight is excee-
ded, the driving characteristics of the vehicle
may change, leading to accidents, injuries
and damage to the vehicle. Wheels
Ty
r
e pressure, snow chains and wheel
bolts Tyre pressure
The s
tic
k
er with the tyre pressure values can
be found on the back of the left front door
frame. The tyre pressure values given there
are for cold tyres. The slightly raised pres-
sures of warm tyres must not be reduced.
››› The pressure for win
t
er
tyres is 0.2 bar
(2.9 psi / 20 kPa) higher than that of summer
tyres.
Snow chains
Snow chains may be fitted only to the front
wheels, and only for the following tyres:
215/60 R16Chains with links of maximum 15 mm
215/55 R17Chains with links of maximum 15 mm
215/50 R18Chains with links of maximum 15 mm
Other dimensions do not allow chains Wheel bolts
Aft
er the wheel
s have been changed, the
tightening torque of the wheel bolts should
be checked as soon as possible with a torque
wrench ››› . The tightening torque for steel
and allo y
wheels is 140 Nm. WARNING
● Check the ty
re pressure at least once per
month. Checking the tyre pressure is very im-
portant. If the tyre pressure is too high or too
low, there is an increased danger of accidents
- particularly at high speeds.
● If the tightening torque of the wheel bolts
is t
oo low, they could loosen while the vehi-
cle is in motion. Risk of accident! If the tight-
ening torque is too high, the wheel bolts and
threads can be damaged. Note
We recommend that you ask your Technical
Serv ic
e for information about appropriate
wheel, tyre and snow chain size. 319
Technical data
Advice
Operation
Emergencies
Safety
Page 331 of 348
Index
Index
A
ABS se
e
Anti-lock brake system . . . . . . . . . . . . . . . 189
ACC . . . . . . . . . . . . . . . . . . . . . . . . . . . . . . . . . . . . 221 radar sensor . . . . . . . . . . . . . . . . . . . . . . . . . . . 223
Accessories . . . . . . . . . . . . . . . . . . . . . . . . . 162, 284
Adaptive cruise control . . . . . . . . . . . . . . . . . . . . 221 function for preventing overtaking in an insidelane . . . . . . . . . . . . . . . . . . . . . . . . . . . . . . . . 227
indications on the display . . . . . . . . . . . . . . . . 222
malfunction . . . . . . . . . . . . . . . . . . . . . . . . . . . . 222
radar sensor . . . . . . . . . . . . . . . . . . . . . . . . . . . 223
special driving situations . . . . . . . . . . . . . . . . . 228
warning and control lamp . . . . . . . . . . . . . . . . 222
Adaptive Cruise Control deactivating temporarily . . . . . . . . . . . . . . . . . 227
operating . . . . . . . . . . . . . . . . . . . . . . . . . . . . . . 224
AdBlue information . . . . . . . . . . . . . . . . . . . . . . . . . . . . 295
maximum filling capacity . . . . . . . . . . . . . . . . . 295
refilling . . . . . . . . . . . . . . . . . . . . . . . . . . . . . . . 295
specification . . . . . . . . . . . . . . . . . . . . . . . . . . . 295
tank capacity . . . . . . . . . . . . . . . . . . . . . . . . . . . 295
Additional consumers (efficiency program) . . . . . 42
Adjusting front head restraints . . . . . . . . . . . . . . . . . . . . . . 77
front seats . . . . . . . . . . . . . . . . . . . . . . . . . . . . . 156
lights . . . . . . . . . . . . . . . . . . . . . . . . . . . . . . . . . 151
rear head restraints . . . . . . . . . . . . . . . . . . . . . 157
seats . . . . . . . . . . . . . . . . . . . . . . . . . . . . . . . . . . 74
Adjusting the head restraints front head restraints . . . . . . . . . . . . . . . . . . . . . 157 Adjustment
CAR menu . . . . . . . . . . . . . . . . . . . . . . . . . . . . . 120
fr
ont head restraints . . . . . . . . . . . . . . . . . . . . . 157
rear head restraints . . . . . . . . . . . . . . . . . . . . . . 77
Airbag covers . . . . . . . . . . . . . . . . . . . . . . . . . . . . . 21
Airbags . . . . . . . . . . . . . . . . . . . . . . . . . . . . . . . . . . 84 description . . . . . . . . . . . . . . . . . . . . . . . . . . . . . 85
Airbag system . . . . . . . . . . . . . . . . . . . . . . . . . . 21, 84 activation . . . . . . . . . . . . . . . . . . . . . . . . . . . . . . 85
control lamp . . . . . . . . . . . . . . . . . . . . . . . . . . . . 89
deactivation of front airbag . . . . . . . . . . . . . . . . 88
description . . . . . . . . . . . . . . . . . . . . . . . . . . . . . 85
front airbags . . . . . . . . . . . . . . . . . . . . . . . . . 21, 86
functioning . . . . . . . . . . . . . . . . . . . . . . . . . . . . . 85
head-protection airbags . . . . . . . . . . . . . . . . . . 24
knee airbags . . . . . . . . . . . . . . . . . . . . . . . . . . . . 23
side airbags . . . . . . . . . . . . . . . . . . . . . . . . . . . . 23
Air conditioning auxiliary heater . . . . . . . . . . . . . . . . . . . . . . . . . 177
Climatronic . . . . . . . . . . . . . . . . . . . . . . . . 51, 170
heated windscreen . . . . . . . . . . . . . . . . . . . . . . 175
heating and fresh air . . . . . . . . . . . . . . . . . . . . . 54
manual air conditioning . . . . . . . . . . . . . . . . . . . 53
user instructions . . . . . . . . . . . . . . . . . . . . . . . . 173
Air outlets . . . . . . . . . . . . . . . . . . . . . . . . . . . . . . . 174
Air recirculation . . . . . . . . . . . . . . . . . . . . . . . . . . 174
Alcantara: cleaning . . . . . . . . . . . . . . . . . . . . . . . 291
Ambient lighting . . . . . . . . . . . . . . . . . . . . . . . . . 152
Anti-freeze . . . . . . . . . . . . . . . . . . . . . . . . . . . . . . . 58
Anti-lock brake system . . . . . . . . . . . . . . . . . . . . . 189
Anti-puncture . . . . . . . . . . . . . . . . . . . . . . . . . . 63, 95
Anti-puncture kit . . . . . . . . . . . . . . . . . . . . . . . . 63, 95 check after 10 minutes . . . . . . . . . . . . . . . . . . . . 97
Anti-puncture set . . . . . . . . . . . . . . . . . . . . . . . . . . 95
Anti-slip regulation . . . . . . . . . . . . . . . . . . . . . . . 189 Anti-theft alarm . . . . . . . . . . . . . . . . . . . . . 125, 134
trail er . . . . . . . . . . . . . . . . . . . . . . . . . . . . . . . . . 279
vehicle interior monitoring and anti-tow pro- tection . . . . . . . . . . . . . . . . . . . . . . . . . . . . . . 136
Anti-theft security system . . . . . . . . . . 15, 125, 133
Anti-theft system trailer . . . . . . . . . . . . . . . . . . . . . . . . . . . . . . . . . 278
Anti-tow protection . . . . . . . . . . . . . . . . . . . . . . . 136
Anti-trap function sun blind (sunroof) . . . . . . . . . . . . . . . . . . . . . . 143
sunroof . . . . . . . . . . . . . . . . . . . . . . . . . . . . . . . 143
Area view system (Top View Camera) special characteristics . . . . . . . . . . . . . . . . . . . 268
Aspects to note before setting off . . . . . . . . . . . . . 73
Assistance systems ACC . . . . . . . . . . . . . . . . . . . . . . . . . . . . . . . . . . 221
adaptive cruise control . . . . . . . . . . . . . . . . . . . 221
Auto Hold function . . . . . . . . . . . . . . . . . . . . . . 211
blind spot detector (BSD) with parking assis-tance (RCTA) . . . . . . . . . . . . . . . . . . . . . . . . . 237
cruise control system . . . . . . . . . . . . . . . . . . . . 212
Emergency Assist . . . . . . . . . . . . . . . . . . . . . . . 234
emergency brake assist (Front Assist) . . . . . . . 217
fatigue detection . . . . . . . . . . . . . . . . . . . . . . . 248
Hill Descent Control . . . . . . . . . . . . . . . . . . . . . 210
Park Assist . . . . . . . . . . . . . . . . . . . . . . . . . . . . 249
parking assistance (RCTA) . . . . . . . . . . . . . . . . 237
parking system Plus . . . . . . . . . . . . . . . . . . . . . 257
Rear parking aid . . . . . . . . . . . . . . . . . . . . . . . . 262
speed limiter . . . . . . . . . . . . . . . . . . . . . . . . . . . 214
Top View Camera . . . . . . . . . . . . . . . . . . . . . . . 265
traffic jam assist . . . . . . . . . . . . . . . . . . . . . . . . 233
traffic sign detection system . . . . . . . . . . . . . . 245
tyre monitoring . . . . . . . . . . . . . . . . . . . . . . . . . 312
tyre monitoring indicator . . . . . . . . . . . . . . . . . 313
tyre monitoring systems . . . . . . . . . . . . . . . . . 311
Assisted starting . . . . . . . . . . . . . . . . . . . . . . . . . . 69
329