sunroof Seat Ateca 2018 Owner's Manual
[x] Cancel search | Manufacturer: SEAT, Model Year: 2018, Model line: Ateca, Model: Seat Ateca 2018Pages: 348, PDF Size: 7.32 MB
Page 7 of 348
Table of Contents
Table of Contents
The e s
senti
als . . . . . . . . . . . . . . . . . . . . . . . . 7
Exterior view . . . . . . . . . . . . . . . . . . . . . . . . . . . . 7
Exterior view . . . . . . . . . . . . . . . . . . . . . . . . . . . . 8
Driver-side general instrument panel (left-
hand drive) . . . . . . . . . . . . . . . . . . . . . . . . . . . . .
9
Driver-side general instrument panel (right-
hand drive) . . . . . . . . . . . . . . . . . . . . . . . . . . . . .
10
Centre console . . . . . . . . . . . . . . . . . . . . . . . . . . 11
Passenger-side general instrument panel (left-
hand drive) . . . . . . . . . . . . . . . . . . . . . . . . . . . . .
12
Passenger-side general instrument panel
(right-hand driv
e) . . . . . . . . . . . . . . . . . . . . . . . . 13
Interior view . . . . . . . . . . . . . . . . . . . . . . . . . . . . 14
How it works . . . . . . . . . . . . . . . . . . . . . . . . . . . . 15
Unlocking and locking . . . . . . . . . . . . . . . . . . . . 15
Before driving . . . . . . . . . . . . . . . . . . . . . . . . . . . 18
Airbags . . . . . . . . . . . . . . . . . . . . . . . . . . . . . . . . 21
Child seats . . . . . . . . . . . . . . . . . . . . . . . . . . . . . 24
Starting the vehicle . . . . . . . . . . . . . . . . . . . . . . 30
Lights and visibility . . . . . . . . . . . . . . . . . . . . . . 30
Easy Connect . . . . . . . . . . . . . . . . . . . . . . . . . . . 33
Driver information System . . . . . . . . . . . . . . . . . 36
Status display . . . . . . . . . . . . . . . . . . . . . . . . . . . 40
Cruise control . . . . . . . . . . . . . . . . . . . . . . . . . . . 44
Warning lamps . . . . . . . . . . . . . . . . . . . . . . . . . . 46
Gearbox lever . . . . . . . . . . . . . . . . . . . . . . . . . . . 49
Air conditioning . . . . . . . . . . . . . . . . . . . . . . . . . 51
Fluid Level control . . . . . . . . . . . . . . . . . . . . . . . 56
Emergencies . . . . . . . . . . . . . . . . . . . . . . . . . . . . 61
Fuses . . . . . . . . . . . . . . . . . . . . . . . . . . . . . . . . . . 61
Bulbs . . . . . . . . . . . . . . . . . . . . . . . . . . . . . . . . . . 62
Action in the event of a puncture . . . . . . . . . . . 62
Changing a wheel . . . . . . . . . . . . . . . . . . . . . . . 64
Snow chains . . . . . . . . . . . . . . . . . . . . . . . . . . . . 67
Emergency towing of the vehicle . . . . . . . . . . . 68 How to jump start . . . . . . . . . . . . . . . . . . . . . . . . 69
Changing the wiper blades . . . . . . . . . . . . . . . . 71
Safety . . . . . . . . . . . . . . . . . . . . . . . . . . . . . . . . 73
Safe driving . . . . . . . . . . . . . . . . . . . . . . . . . . . . 73
Safety first! . . . . . . . . . . . . . . . . . . . . . . . . . . . . . 73
Advice about driving . . . . . . . . . . . . . . . . . . . . . 73
Correct position of the vehicle occupants . . . . 74
Pedal area . . . . . . . . . . . . . . . . . . . . . . . . . . . . . . 78
Seat belts . . . . . . . . . . . . . . . . . . . . . . . . . . . . . . 79
Why wear a seat belt . . . . . . . . . . . . . . . . . . . . . 79
How to properly adjust your seatbelt . . . . . . . . 82
Seat belt tensioners . . . . . . . . . . . . . . . . . . . . . . 83
Airbag system . . . . . . . . . . . . . . . . . . . . . . . . . . 84
Brief introduction . . . . . . . . . . . . . . . . . . . . . . . . 84
Airbag safety instructions . . . . . . . . . . . . . . . . . 86
Deactivating airbags . . . . . . . . . . . . . . . . . . . . . 88
Transporting children safely . . . . . . . . . . . . . . . 90
Safety for children . . . . . . . . . . . . . . . . . . . . . . . 90
Child seats . . . . . . . . . . . . . . . . . . . . . . . . . . . . . 91
Event Data Recorder . . . . . . . . . . . . . . . . . . . . . . 94
Description and operation . . . . . . . . . . . . . . . . . 94
Emergencies . . . . . . . . . . . . . . . . . . . . . . . . . . 95
Self-help . . . . . . . . . . . . . . . . . . . . . . . . . . . . . . . 95
Vehicle tool kit, anti-puncture kit* . . . . . . . . . . 95
Tyre repair . . . . . . . . . . . . . . . . . . . . . . . . . . . . . . 95
Manual unlocking/locking . . . . . . . . . . . . . . . . . 97
Changing the windscreen wiper blades . . . . . . 97
Tow-starting and towing . . . . . . . . . . . . . . . . . . 98
Fuses and bulbs . . . . . . . . . . . . . . . . . . . . . . . . . 102
Fuses . . . . . . . . . . . . . . . . . . . . . . . . . . . . . . . . . . 102
Changing a bulb . . . . . . . . . . . . . . . . . . . . . . . . . 106
Change the front bulbs . . . . . . . . . . . . . . . . . . . 107
Change the rear bulbs . . . . . . . . . . . . . . . . . . . . 109
Side turn signals . . . . . . . . . . . . . . . . . . . . . . . . 111 Operation
. . . . . . . . . . . . . . . . . . . . . . . . . . . . . 113
Controls and displays . . . . . . . . . . . . . . . . . . . . 113
General instrument panel . . . . . . . . . . . . . . . . . 112
Instruments and warning/control lamps . . . . . 114
Instruments . . . . . . . . . . . . . . . . . . . . . . . . . . . . 114
Control lamps . . . . . . . . . . . . . . . . . . . . . . . . . . . 119
Introduction to the Easy Connect system* . . . . 120
System settings (CAR)* . . . . . . . . . . . . . . . . . . . 120
Communications and multimedia . . . . . . . . . . . 121
Controls on the steering wheel* . . . . . . . . . . . . 121
Multimedia . . . . . . . . . . . . . . . . . . . . . . . . . . . . . 123
Opening and closing . . . . . . . . . . . . . . . . . . . . . 125
Central locking . . . . . . . . . . . . . . . . . . . . . . . . . . 125
Anti-theft alarm system* . . . . . . . . . . . . . . . . . . 134
Rear lid (luggage compartment) . . . . . . . . . . . . 137
Controls for the windows . . . . . . . . . . . . . . . . . . 139
Sunroof* . . . . . . . . . . . . . . . . . . . . . . . . . . . . . . . 141
Lights and visibility . . . . . . . . . . . . . . . . . . . . . . 144
Lights . . . . . . . . . . . . . . . . . . . . . . . . . . . . . . . . . 144
Visibility . . . . . . . . . . . . . . . . . . . . . . . . . . . . . . . 152
Windscreen wiper and window wiper sys-
tems . . . . . . . . . . . . . . . . . . . . . . . . . . . . . . . . . . 153 Mirr
or . . . . . . . . . . . . . . . . . . . . . . . . . . . . . . . . . 155
Seats and head restraints . . . . . . . . . . . . . . . . . 156
Adjusting the seats and headrests . . . . . . . . . . 156
Seat functions . . . . . . . . . . . . . . . . . . . . . . . . . . 158
Transport and practical equipment . . . . . . . . . 160
Storage compartments . . . . . . . . . . . . . . . . . . . 160
Storing objects . . . . . . . . . . . . . . . . . . . . . . . . . . 162
Roof carrier* . . . . . . . . . . . . . . . . . . . . . . . . . . . . 168
Air conditioning . . . . . . . . . . . . . . . . . . . . . . . . . 170
Heating, ventilation and cooling . . . . . . . . . . . . 170
Auxiliary heater (additional heater)* . . . . . . . . 177
Driving . . . . . . . . . . . . . . . . . . . . . . . . . . . . . . . . 181
Starting and stopping the engine . . . . . . . . . . . 181
Braking and parking . . . . . . . . . . . . . . . . . . . . . 186
Manual gearbox . . . . . . . . . . . . . . . . . . . . . . . . . 192
5
Page 20 of 348
The essentials
● The bonnet c
an be opened. R
elease the
bonnet stay and secure it in the fixture de-
signed for this in the bonnet.
››› in Working in the engine compart-
ment on page 299
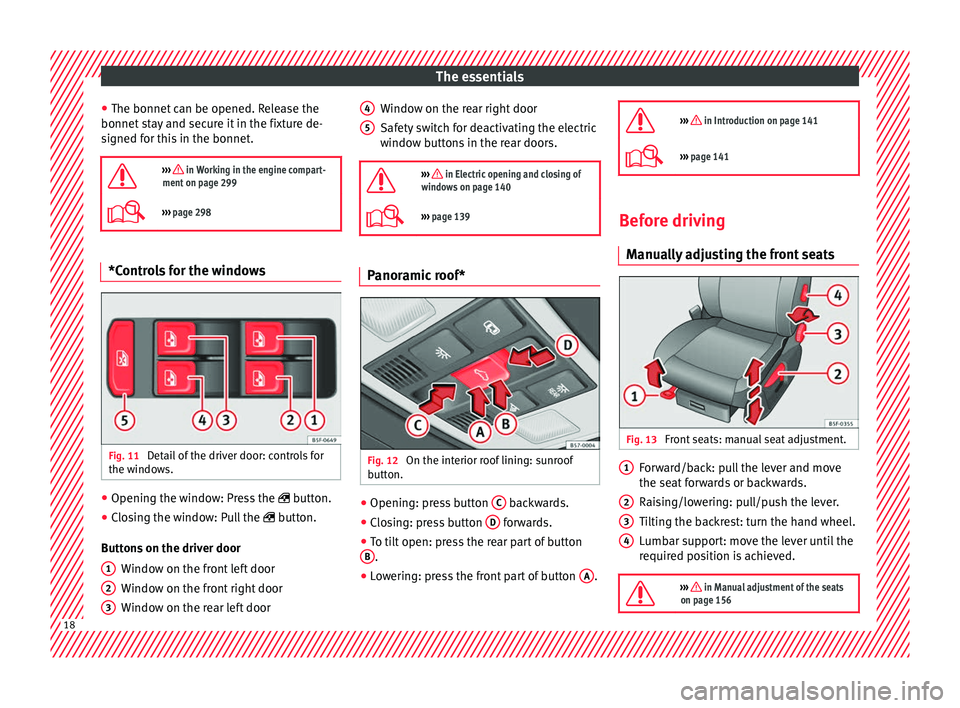
››› page 298 *Controls for the windows
Fig. 11
Detail of the driver door: controls for
the w indow
s. ●
Opening the window: Press the butt
on.
● C
losing the window: Pull the button.
B
uttons on the driver door Window on the front left door
Window on the front right door
Window on the rear left door
1 2
3 Window on the rear right door
Saf
ety
sw
itch for deactivating the electric
window buttons in the rear doors.
››› in Electric opening and closing of
windows on page 140
››› page 139 Panoramic roof*
Fig. 12
On the interior roof lining: sunroof
b utt
on. ●
Opening: press button C backwards.
● Closing: press button D forwards.
● To tilt open: press the rear part of button
B .
● Lowering: press the front part of button A .
4 5
››› in Introduction on page 141
›››
page 141 Before driving
M anua
l
ly adjusting the front seats Fig. 13
Front seats: manual seat adjustment. Forward/back: pull the lever and move
the se
at
f
orwards or backwards.
Raising/lowering: pull/push the lever.
Tilting the backrest: turn the hand wheel.
Lumbar support: move the lever until the
required position is achieved.
››› in Manual adjustment of the seats
on page 156 1
2
3
4
18
Page 107 of 348
Fuses and bulbsNo.Consumers/Amps
23Electric sunroof30
24Right lights40
25Left door30
26Heated seats30
27Interior light30
28Trailer25
32Control unit for parking aid, front
camera and radar7.5/10
33Airbag5
34Reverse switch, climate sensor,
electrochromic mirror, rear power
sockets (USB)7.5
35Diagnosis, headlight control unit,
headlight adjuster10
36Right LED headlight7.5
37Left LED headlight7.5
38Trailer25
39Right door30
4012V socket20
42Central locking40
43SEAT Sound, beats sound CAN
and MOST.30
44Trailer15
No.Consumers/Amps
45Electric driver's seat15
47Rear window wiper15
49Starter motor; clutch sensor5
50Electric rear lid40
52Driving mode.15
53Heated rear window30
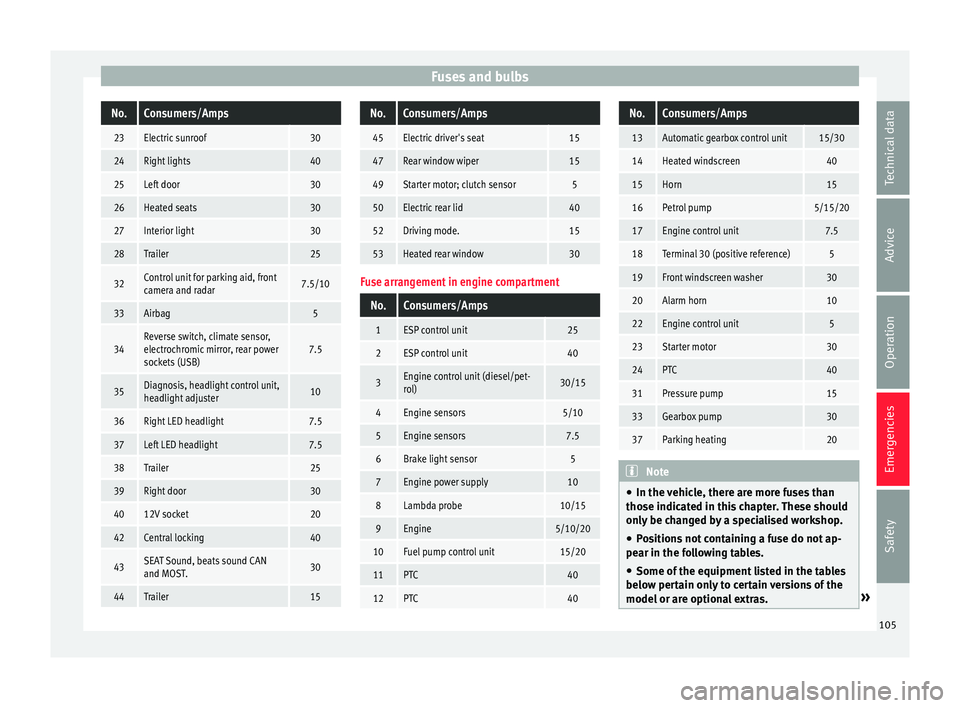
Fuse arrangement in engine compartment
No.Consumers/Amps
1ESP control unit25
2ESP control unit40
3Engine control unit (diesel/pet-
rol)30/15
4Engine sensors5/10
5Engine sensors7.5
6Brake light sensor5
7Engine power supply10
8Lambda probe10/15
9Engine5/10/20
10Fuel pump control unit15/20
11PTC40
12PTC40
No.Consumers/Amps
13Automatic gearbox control unit15/30
14Heated windscreen40
15Horn15
16Petrol pump5/15/20
17Engine control unit7.5
18Terminal 30 (positive reference)5
19Front windscreen washer30
20Alarm horn10
22Engine control unit5
23Starter motor30
24PTC40
31Pressure pump15
33Gearbox pump30
37Parking heating20
Note
● In the v ehic
le, there are more fuses than
those indicated in this chapter. These should
only be changed by a specialised workshop.
● Positions not containing a fuse do not ap-
pear in the fo
llowing tables.
● Some of the equipment listed in the tables
below pert
ain only to certain versions of the
model or are optional extras. » 105
Technical data
Advice
Operation
Emergencies
Safety
Page 128 of 348
Operation
Note
● Never l e
ave any valuable items in the vehi-
cle unattended. Even a locked vehicle is not a
safe.
● If the diode on the driver door sill lights up
for about 30 sec
onds when the vehicle is
locked, the central locking system or anti-
theft alarm* is not working properly. You
should have the fault repaired at a SEAT Offi-
cial Service or specialised workshop.
● The vehicle interior monitoring of the anti-
theft a
larm* system will only function as in-
tended if the windows and the sunroof* are
closed. Car key
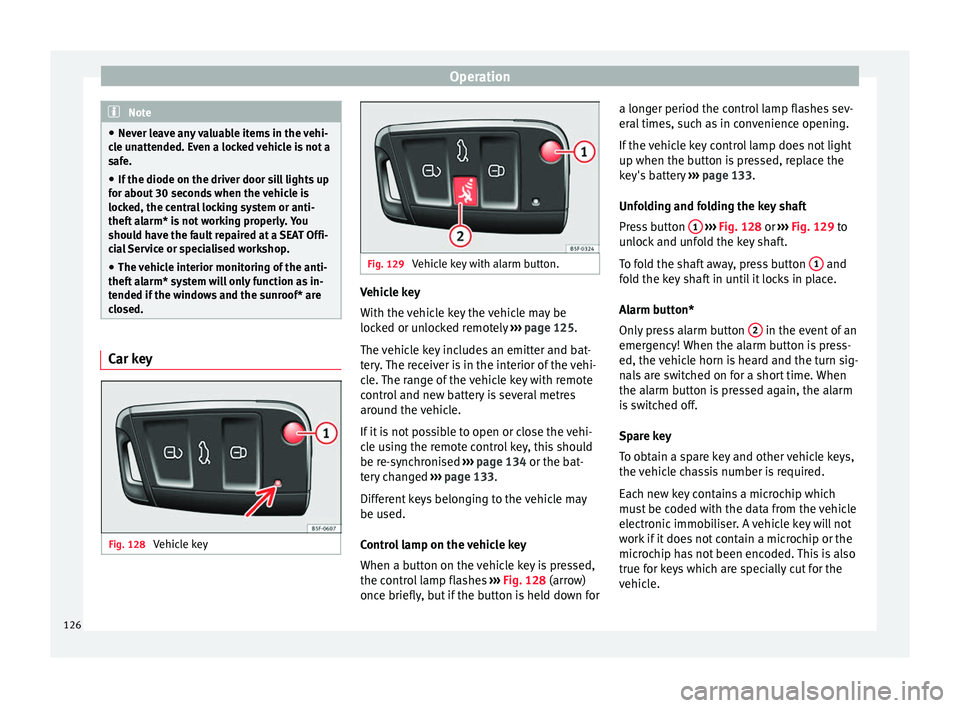
Fig. 128
Vehicle key Fig. 129
Vehicle key with alarm button. Vehicle key
W
ith the
v
ehicle key the vehicle may be
locked or unlocked remotely ››› page 125.
The vehicle key includes an emitter and bat-
tery. The receiver is in the interior of the vehi-
cle. The range of the vehicle key with remote
control and new battery is several metres
around the vehicle.
If it is not possible to open or close the vehi-
cle using the remote control key, this should
be re-synchronised ››› page 134 or the bat-
tery changed ››› page 133.
Different keys belonging to the vehicle may
be used.
Control lamp on the vehicle key
When a button on the vehicle key is pressed,
the control lamp flashes ››› Fig. 128 (arrow)
once briefly, but if the button is held down for a longer period the control lamp flashes sev-
eral time
s, such as in convenience opening.
If the vehicle key control lamp does not light
up when the button is pressed, replace the
key's battery ››› page 133.
Unfolding and folding the key shaft
Press button 1
› ››
Fig. 128
or ›
›› Fig. 129 to
unlock and unfold the key shaft.
To fold the shaft away, press button 1 and
f o
l
d the key shaft in until it locks in place.
Alarm button*
Only press alarm button 2 in the event of an
emer g
ency!
When the alarm button is press-
ed, the vehicle horn is heard and the turn sig-
nals are switched on for a short time. When
the alarm button is pressed again, the alarm
is switched off.
Spare key
To obtain a spare key and other vehicle keys,
the vehicle chassis number is required.
Each new key contains a microchip which
must be coded with the data from the vehicle
electronic immobiliser. A vehicle key will not
work if it does not contain a microchip or the
microchip has not been encoded. This is also
true for keys which are specially cut for the
vehicle.
126
Page 138 of 348
Operation
– Pr e
s
s the button on the remote control
twice. The volumetric sensor and tilt sen-
sors will be deactivated. The alarm system remains activated.
The vehicle interior monitoring and the anti-
tow system are automatically switched on
again next time the vehicle is locked.
The vehicle interior monitoring and anti-tow
sensor (tilt sensor) are automatically switch-
ed on when the anti-theft alarm is switched
on. In order to activate it, all the doors and
the rear lid must be closed.
If you wish to switch off the vehicle interior
monitoring and the anti-tow system, it must
be done each time that the vehicle is locked;
if not, they will be automatically switched on.
The vehicle interior monitoring and the anti-
tow system should be switched off if animals
are left inside the locked vehicle (otherwise,
their movements will trigger the alarm) or
when, for example, the vehicle is transported
or has to be towed with only one axle on the
ground.
False alarms
Interior monitoring will only operate correctly
if the vehicle is completely closed. Please ob-
serve related legal requirements.
The following cases may cause a false alarm:
● Open windows (partially or fully). ●
Panoramic/ti lting sunroof open (partially or
completely).
● Movement of objects inside the vehicle,
such a
s loose papers, items hanging from
the rear vision mirror (air fresheners), etc. Note
● If the v
ehicle is relocked and the alarm is
activated without the volumetric sensor func-
tion, relocking will activate the alarm with all
its functions, except the volumetric sensor.
This function is reactivated when the alarm is
switched on again, unless it is deliberately
switched off.
● If the alarm has been triggered by the volu-
metric sensor
, this will be indicated by a
flashing of the warning lamp on the driver
door when the vehicle is opened. The flash is
different to the flash indicating the alarm is
activated.
● The vibration of a mobile phone left inside
the vehic
le may cause the vehicle interior
monitoring alarm to trigger, as both sensors
react to movements and shakes inside the ve-
hicle.
● If on activating the alarm, any door or the
rear lid i
s open, only the alarm will be activa-
ted. The vehicle interior monitoring and the
anti-tow system will only be activated once
all the doors are closed (including the rear
lid). Deactivating the vehicle interior moni-
t
orin
g and anti-t
ow system* When the vehicle is locked, the alarm will be
trigg
er
ed if movements are detected in the
interior (e.g. by animals) or if the vehicle's in-
clination is changed (e.g. during transport).
You can prevent the alarm from being trig-
gered accidentally by switching off the vehi-
cle interior monitoring and/or tow-away pro-
tection.
● To switch off the interior monitoring and
to w-
away protection, switch off the ignition
and, using the Infotainment system, select: button >
S
ET
TINGS function button > Open-
in g and c
lo
sing > Central locking > Switch off
alarm.
● When the vehicle is locked now, the vehicle
interior monitorin
g and the tow-away protec-
tion are switched off until the next time the
door is opened.
If the anti-theft security system (Safelock)*
››› page 133 is switched off, the vehicle interi-
or monitoring and the tow-away protection
are automatically switched off. WARNING
Observe the safety warnings ›››
in Descrip-
tion on pag e 125
. 136
Page 143 of 348
Opening and closing
windows have reached the required posi-
tion.
C on
v
enience close function
– Press and hold the button on the r
emote
control key until all the windows are closed
››› , or
– Lock the driver's door with the key and hold
the k ey
in the
itat>lock position un-
til all the windows are closed
Programming convenience opening in the
Easy Connect*
– Select: button > SETTINGS
fu
nction
b
utton > Opening and closing > Open-
ing the window by holding down
button or > Front window on/off .WARNING
● Never c lo
se the windows without due care
or proper control. There is a risk of suffering
injury.
● For safety reasons, you should only use the
remote c
ontrol open and close functions with-
in about 2 metres of the vehicle. To avoid in-
juries, always keep an eye on the windows
when pressing the button to close them. The
windows stop moving as soon as the button
is released. One-touch opening and closing
One-touch opening and closing means you
do not h
av
e to hold down the button.
Buttons ››› Fig. 139 1 ,
2 ,
3 and
4 have
two po s
itions for opening windows and two
for closing them. This makes it easier to open
and close windows to the desired position.
One-touch closing
– Pull up the window button briefly up to the
second pos
ition. The window closes fully.
One-touch opening
– Push down the window button briefly up to
the second po s
ition. The window opens
fully.
Resetting one-touch opening and closing
The automatic open and close function will
not work if the battery has been temporarily
disconnected. The function can be restored
as follows:
– Close the window as far as it will go by lift-
ing and hol
ding the electric window switch.
– Release the switch and then lift it again for
1 second. Thi
s will re-enable the automatic
function.
If you push (or pull) a button to the first
stage, the window will open (or close) until
you release the button. If you push or lift the button briefly to the second stage, the win-
dow wi
ll open (one-touch opening) or close
(one-touch closing) automatically. If you op-
erate the button while the window is opening
or closing, it stops at this position.
Sunroof*
Introduction The sunroof consists of two glass parts. The
re
ar p
art is fixed and cannot be opened. It al-
so has a sun blind. WARNING
If the sunroof is used negligently or without
pa y
ing due attention, it can cause serious in-
jury.
● Open or close the sunroof and the sun blind
only when no one i
s in their path of move-
ment.
● Never leave any key inside the vehicle
when exitin
g.
● Never leave a child or any other person who
may
need help in the vehicle, especially if
they have access to the vehicle key. If using
they key unattended, they could lock the ve-
hicle, start the engine, switch on the ignition
and activate the sunroof.
● After switching off, it is still possible to
open or close the s
unroof during a short » 141
Technical data
Advice
Operation
Emergencies
Safety
Page 144 of 348
Operation
space of time provided that neither the driver
nor pa
s
senger door is opened. CAUTION
● To pr ev
ent damage, during winter tempera-
tures remove any ice or snow that might be
on the car roof before opening the sunroof or
adjusting the tilt position.
● Before leaving the vehicle or in case of rain-
fal
l, always close the sunroof. With the sun-
roof open or in a tilted position, water can en-
ter the interior and can cause considerable
damage to the electrical system. As a result,
other damage can occur in the vehicle. Note
● Le av
es and other loose objects that accu-
mulate on the sunroof rails should be regular-
ly cleaned away either by hand or with a vac-
uum.
● If the sunroof does not work correctly, the
anti-trap fu
nction will not work either. Con-
tact a specialised workshop. Opening and closing the sunroof
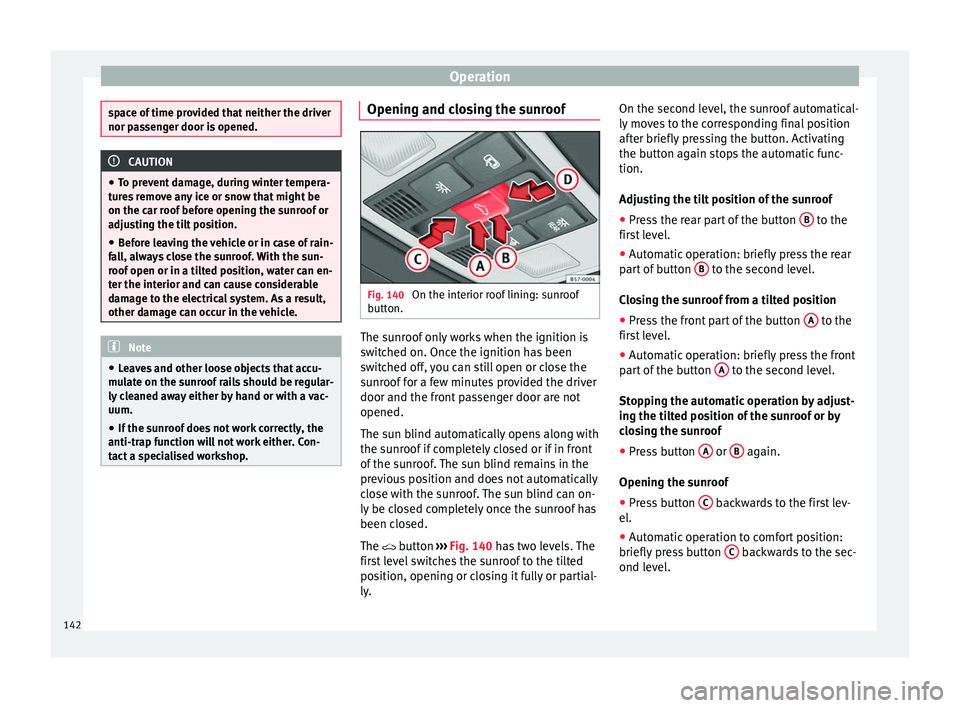
Fig. 140
On the interior roof lining: sunroof
b utt
on. The sunroof only works when the ignition is
sw
it
c
hed on. Once the ignition has been
switched off, you can still open or close the
sunroof for a few minutes provided the driver
door and the front passenger door are not
opened.
The sun blind automatically opens along with
the sunroof if completely closed or if in front
of the sunroof. The sun blind remains in the
previous position and does not automatically
close with the sunroof. The sun blind can on-
ly be closed completely once the sunroof has
been closed.
The button ›››
Fig. 140 has two levels. The
first level switches the sunroof to the tilted
position, opening or closing it fully or partial-
ly. On the second level, the sunroof automatical-
ly mov
es to the corresponding final position
after briefly pressing the button. Activating
the button again stops the automatic func-
tion.
Adjusting the tilt position of the sunroof
● Press the rear part of the button B to the
fir s
t
level.
● Automatic operation: briefly press the rear
part
of button B to the second level.
C lo
s
ing the sunroof from a tilted position
● Press the front part of the button A to the
fir s
t
level.
● Automatic operation: briefly press the front
part
of the button A to the second level.
St op
pin
g the automatic operation by adjust-
ing the tilted position of the sunroof or by
closing the sunroof
● Press button A or
B again.
Openin g the s
u
nroof
● Press button C backwards to the first lev-
el .
● Aut om
atic operation to comfort position:
briefly pre
ss button C backwards to the sec-
ond l ev
el
.
142
Page 145 of 348
Opening and closing
Closing the sunroof
● Press button D forwards to the first level.
● Automatic operation: briefly press button
D forwards to the second level.
St op
pin
g the automatic operation during the
opening or closing
● Press button C or
D again.
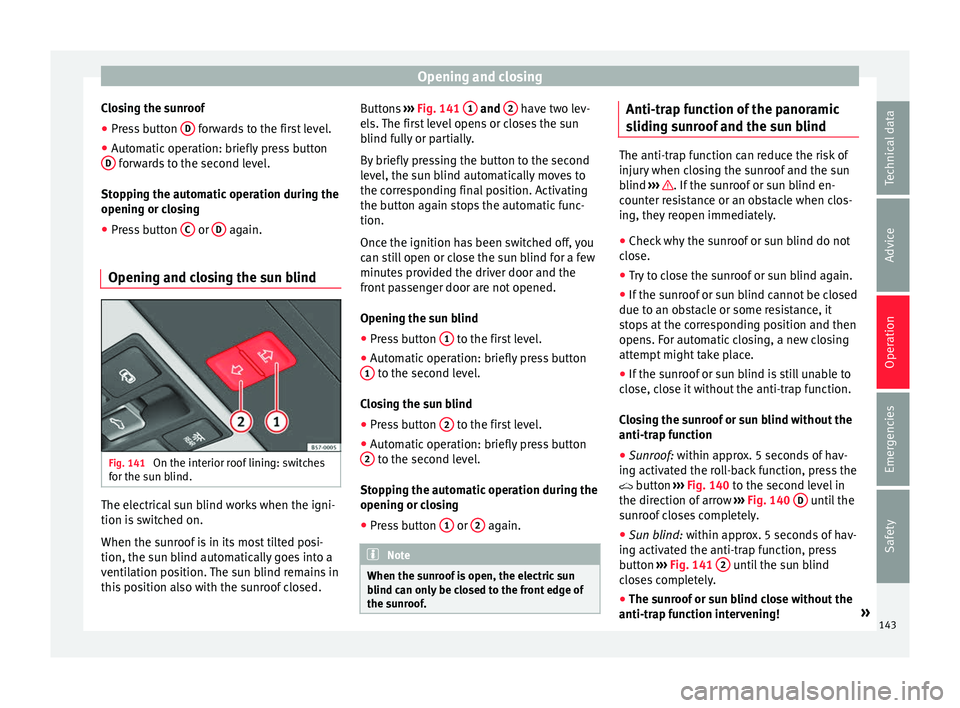
Opening and closing the sun blind Fig. 141
On the interior roof lining: switches
f or the s
u
n blind. The electrical sun blind works when the igni-
tion i
s
sw
itched on.
When the sunroof is in its most tilted posi-
tion, the sun blind automatically goes into a
ventilation position. The sun blind remains in
this position also with the sunroof closed. Buttons
››› Fig. 141 1 and
2 have two lev-
el s.
The fir
st level opens or closes the sun
blind fully or partially.
By briefly pressing the button to the second
level, the sun blind automatically moves to
the corresponding final position. Activating
the button again stops the automatic func-
tion.
Once the ignition has been switched off, you
can still open or close the sun blind for a few
minutes provided the driver door and the
front passenger door are not opened.
Opening the sun blind
● Press button 1 to the first level.
● Automatic operation: briefly press button
1 to the second level.
C lo
s
ing the sun blind
● Press button 2 to the first level.
● Automatic operation: briefly press button
2 to the second level.
St op
pin
g the automatic operation during the
opening or closing
● Press button 1 or
2 again.
Note
When the sunroof is open, the electric sun
blind c an on
ly be closed to the front edge of
the sunroof. Anti-trap function of the panoramic
s
lidin
g s
unroof and the sun blind The anti-trap function can reduce the risk of
injury
when c
losing the sunroof and the sun
blind ››› . If the sunroof or sun blind en-
cou nt
er resistance or an obstacle when clos-
ing, they reopen immediately.
● Check why the sunroof or sun blind do not
close.
● T
ry to close the sunroof or sun blind again.
● If the sunroof or sun blind cannot be closed
due to an o b
stacle or some resistance, it
stops at the corresponding position and then
opens. For automatic closing, a new closing
attempt might take place.
● If the sunroof or sun blind is still unable to
close, c
lose it without the anti-trap function.
Closing the sunroof or sun blind without the
anti-trap function
● Sunroof: within approx. 5 seconds of hav-
ing activ
ated the roll-back function, press the
button ›››
Fig. 140 to the second level in
the direction of arrow ›››
Fig. 140 D until the
s u
nr
oof closes completely.
● Sun blind: within appr
ox. 5 seconds of hav-
ing activated the anti-trap function, press
button ›››
Fig. 141 2 until the sun blind
c lo se
s completely.
● The sunroof or sun blind close without the
anti-trap fu
nction intervening! »
143
Technical data
Advice
Operation
Emergencies
Safety
Page 146 of 348
Operation
● If the s
u
nroof or sun blind will still not
close, visit a specialised workshop. WARNING
Closing the sunroof or sun blind without the
anti-trap f u
nction can cause serious injuries.
● Always be careful when closing the sunroof
and sun b
lind.
● No person should ever remain in the way of
the sunr
oof or sun blind, especially when
closing without the anti-trap function.
● The anti-trap function does not prevent fin-
gers
or other parts of the body from becom-
ing trapped against the roof frame and inju-
ries occurring. Lights and visibility
Light s
R el
ated video Fig. 142
Vehicle lights Side light and dipped beam headlight
Read the additional information carefully
› ›
›
page 30
The driver is personally responsible for the
correct use and adjustment of the lights in all
situations.
Audible warnings to advise the driver that
the lights have not been switched off
If the key is not in the ignition and the driver
door is open, an audible warning signal is
heard in the following cases: this is a remind-
er to turn off the lights. ●
When the parkin
g light is on ››› page 145.
● When the light switch is in position or
. WARNING
The side lights or daytime running lights are
not bright enough t
o illuminate the road
ahead and to ensure that other road users are
able to see you.
● Always use your dipped beam head lights if
it is
raining or if visibility is poor. WARNING
If the headlights are set too high and not
used c orr
ectly, there is a risk of dazzling or
distracting other road users. This could result
in a serious accident.
● Always make sure that the headlights are
correctly
adjusted. Note
The legal requirements regarding the use of
vehic l
e lights in each country must be ob-
served. 144
Page 175 of 348
Air conditioningFunction button: Function
It enables activation and deactivation of
the PureAir and opens the submenu.
Air conditioning user instructions
The interior cooling system only works when
the engine i
s
running and fan is switched on.
The air conditioner operates most effectively
with the windows and the panoramic sliding
sunroof closed. However, if the vehicle has
heated up after standing in the sun for some
time, the air inside can be cooled more quick-
ly by opening the windows and the panoram-
ic sliding sunroof briefly.
Climatronic: change the temperature unit on
the screen of the radio or on the factory-fit-
ted navigation system
Changing the temperature display from Cel-
sius to Fahrenheit on radio or on the factory- fitted navigation system is done using the
menu on the ins
trument
panel
››› page 36.
The cooling system cannot be activated
If the air conditioning system cannot be
switched on, this may be caused by the fol-
lowing:
● The engine is not running.
● The fan is switched off.
● The air conditioner fuse has blown.
● The outside temperature is lower than ap-
prox
imately +3°C (+38°F).
● The air conditioner compressor has been
temporari
ly switched off because the engine
coolant temperature is too high.
● Another fault in the vehicle. Have the air
conditioner chec
ked by a specialised work-
shop. Special Characteristics
If the humidity and t
emperature outside the
vehicle are high, condensation can drip off
the evaporator in the cooling system and
form a pool underneath the vehicle. This is
normal and does not indicate a leak! Note
After starting the engine, any residual humid-
ity in the air c onditioner c
ould mist over the
windscreen. Switch on the defrost function as
soon as possible to clear the windscreen of
condensation. 173
Technical data
Advice
Operation
Emergencies
Safety