warning Seat Ateca XL 2006 Owner's Manual
[x] Cancel search | Manufacturer: SEAT, Model Year: 2006, Model line: Ateca XL, Model: Seat Ateca XL 2006Pages: 288, PDF Size: 9.08 MB
Page 145 of 288
Seats and stowage143
Safety First
Operating instructions
Tips and Maintenance
Te c h n i c a l D a t a
Electrical sockets
Electrical equipment can be connected to any of the 12 volt
sockets.
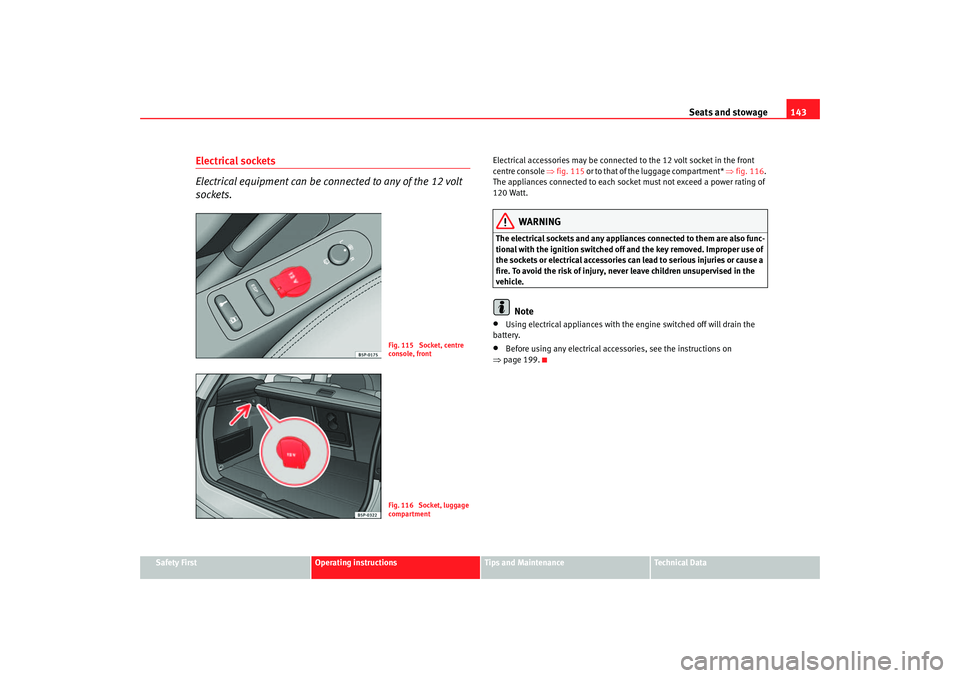
Electrical accessories may be connected to the 12 volt socket in the front
centre console ⇒fig. 115 or to that of the luggage compartment* ⇒fig. 116 .
The appliances connected to each socket must not exceed a power rating of
120 Watt.
WARNING
The electrical sockets and any appliances connected to them are also func-
tional with the ignition switched off and the key removed. Improper use of
the sockets or electrical accessories can lead to serious injuries or cause a
fire. To avoid the risk of injury, never leave children unsupervised in the
vehicle.
Note
•
Using electrical appliances with the engine switched off will drain the
battery.
•
Before using any electrical accessories, see the instructions on
⇒ page 199.
Fig. 115 Socket, centre
console, frontFig. 116 Socket, luggage
compartment
AlteaXL_ingles_02_06 Seite 143 Dienstag, 1. August 2006 11:11 11
Page 147 of 288
Seats and stowage145
Safety First
Operating instructions
Tips and Maintenance
Te c h n i c a l D a t a
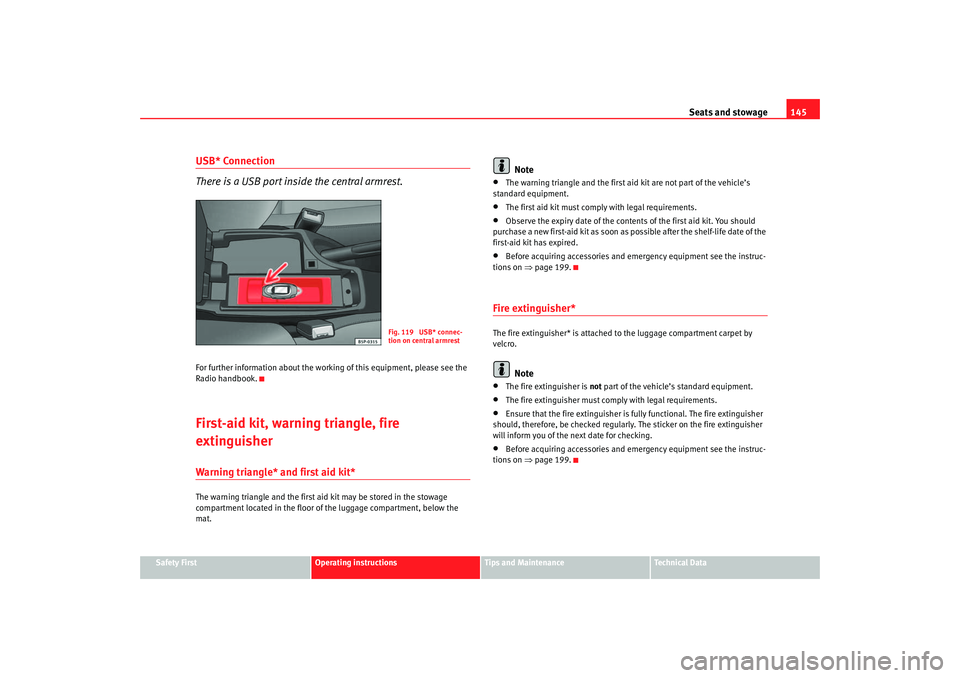
USB* Connection
There is a USB port inside the central armrest.For further information about the work ing of this equipment, please see the
Radio handbook.First-aid kit, warning triangle, fire
extinguisherWarning triangle* and first aid kit*The warning triangle and the first aid kit may be stored in the stowage
compartment located in the floor of the luggage compartment, below the
mat.
Note
•
The warning triangle and the first aid kit are not part of the vehicle’s
standard equipment.
•
The first aid kit must comply with legal requirements.
•
Observe the expiry date of the conten ts of the first aid kit. You should
purchase a new first-aid kit as soon as possible after the shelf-life date of the
first-aid kit has expired.
•
Before acquiring accessories and em ergency equipment see the instruc-
tions on ⇒page 199.
Fire extinguisher* The fire extinguisher* is attached to the luggage compartment carpet by
velcro.
Note
•
The fire extinguisher is not part of the vehicle’s standard equipment.
•
The fire extinguisher must comp ly with legal requirements.
•
Ensure that the fire extinguisher is fully functional. The fire extinguisher
should, therefore, be checked regularly. The sticker on the fire extinguisher
will inform you of the next date for checking.
•
Before acquiring accessories and em ergency equipment see the instruc-
tions on ⇒page 199.
Fig. 119 USB* connec-
tion on central armrest
AlteaXL_ingles_02_06 Seite 145 Dienstag, 1. August 2006 11:11 11
Page 148 of 288
Seats and stowage
146Luggage compartmentStowing luggage
All luggage must be securely stowed.Please observe the following points to ensure the vehicle handles
well at all times:
– Distribute the load as evenly as possible.
– Place heavy objects as far forward in the luggage compartment
as possible.
– Secure luggage in the luggage compartment with suitable straps on the fastening rings*.
WARNING
•
Loose luggage and other loose items in the vehicle can cause serious
injuries.
•
Loose objects in the luggage compartment can suddenly move and
change the way the vehicle handles.
•
During sudden manoeuvres or accidents, loose objects in the
passenger compartment can be flung forward, injuring vehicle occupants.
•
Always store objects in the luggage compartment and secure with suit-
able straps. This is especially important for heavy objects.
•
When you transport heavy objects, always keep in mind that a change
in the centre of gravity can also cause changes in vehicle handling.
•
Please observe information on safe driving ⇒page 7, “Safe driving”.
Caution
Hard objects on the shelf could chafe against the wires of the heating
element in the rear window and cause damage.
Note
The ventilation slots in front of the rear side windows must not be covered as
this would prevent stale air being extracted from the vehicle.
AlteaXL_ingles_02_06 Seite 146 Dienstag, 1. August 2006 11:11 11
Page 149 of 288
Seats and stowage147
Safety First
Operating instructions
Tips and Maintenance
Te c h n i c a l D a t a
Retractible luggage compartment cover
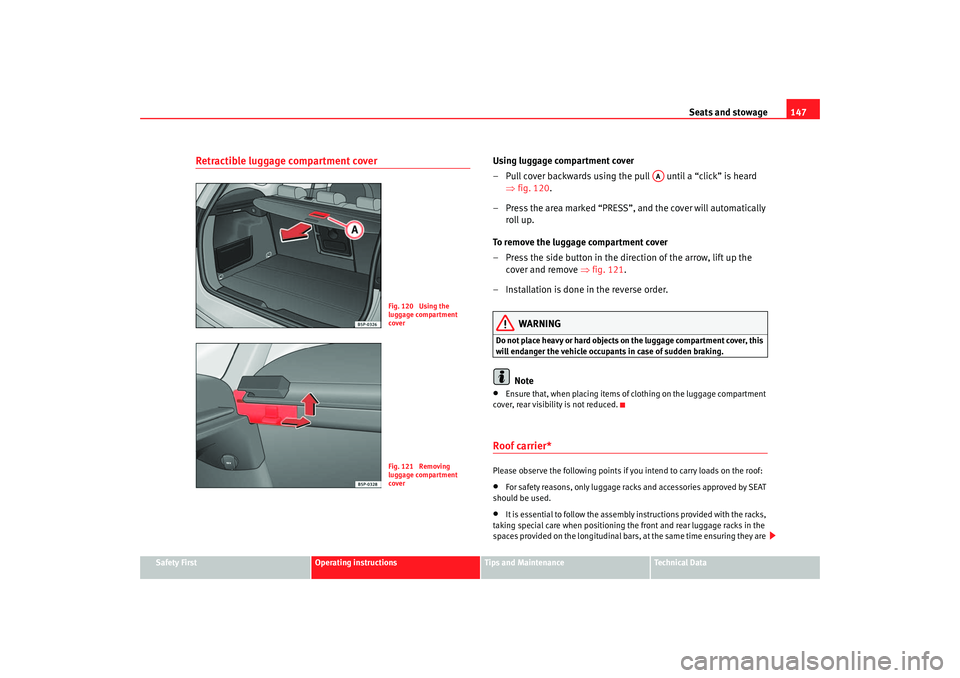
Using luggage compartment cover
– Pull cover backwards using the pull until a “click” is heard
⇒fig. 120.
– Press the area marked “PRESS”, and the cover will automatically roll up.
To remove the luggage compartment cover
– Press the side button in the dire ction of the arrow, lift up the
cover and remove ⇒ fig. 121.
– Installation is done in the reverse order.
WARNING
Do not place heavy or hard objects on the luggage compartment cover, this
will endanger the vehicle occupants in case of sudden braking.
Note
•
Ensure that, when placing items of clothing on the luggage compartment
cover, rear visibility is not reduced.
Roof carrier*Please observe the following points if you intend to carry loads on the roof:•
For safety reasons, only luggage racks and accessories approved by SEAT
should be used.
•
It is essential to follow the assembly instructions provided with the racks,
taking special care when positioning the front and rear luggage racks in the
spaces provided on the longitudinal bars, at the same time ensuring they are
Fig. 120 Using the
luggage compartment
coverFig. 121 Removing
luggage compartment
cover
AA
AlteaXL_ingles_02_06 Seite 147 Dienstag, 1. August 2006 11:11 11
Page 152 of 288

Heating, Ventilation and Air conditioning
150With low ambient temperatures, the air recirculation increases the effective-
ness of the heating system by heating the air inside the passenger compart-
ment rather than the ambient air.
Air distribution
Control for setting the flow of air in the required direction. – Air distribution towards the windsc reen. Air recirculation is, for safety
reasons, not possible in this position. – Air distribution to the upper body. – Air distribution to footwell – Air distribution to the windscreen and the foot well.
Blower
The air flow can be set at four speeds with the control . The air flow should
always be set at the lowest speed when driving slowly.
WARNING
•
For road safety all windows must be clear of ice, snow, and condensa-
tion. This is essential to ensure good visibility. Please familiarise yourself
with the correct operation of the heat ing and ventilation system, including
the anti-fog/defrost functions for the windows.
•
In air recirculation mode, no ambient air enters the vehicle interior. The
windows can quickly fog over if the heating is switched off. Therefore, you
should never leave the air recirculation mode switched on for longer
periods, as this increases the risk of an accident.Note
Please observe the general notes ⇒page 158.
A4
A5
AlteaXL_ingles_02_06 Seite 150 Dienstag, 1. August 2006 11:11 11
Page 153 of 288

Heating, Ventilation and Air conditioning 151
Safety First
Operating instructions
Tips and Maintenance
Te c h n i c a l D a t a
Climatic*Control switchesThe climatic or semi-automatic air conditioning system only works
when the engine is running and the turbine is switched on.
– Using the controls ⇒fig. 123 and and the control you
can set the temperature, air distribution and the air flow.
– To switch a function on or off, press the appropriate button , or . When the function is activated, the display window in
the lower corner of the button is lit.
Temperature selector ⇒page 152
Button – Heating, ventilation and air-conditioning system on/off
⇒ page 152 Button – Rear window heating. The heating will be switched off auto-
matically approximately
20 minutes after switching on. It can also be
switched off beforehand by pushing the button.
Button – Air recirculation mode ⇒page 153
Air distribution control ⇒page 152
Blower switch. There are four speed settings for the air flow. The air flow
should always be set at the lowe st speed when driving slowly.
WARNING
For road safety all windows must be clear of ice, snow, and condensation.
This is essential to ensure good visibility. Please familiarise yourself with
the correct operation of the heating and ventilation system, including the
anti-fog/defrost functions for the windows.
Fig. 123 On the dash panel: Climatic controls
A1
A5
A6A2
A3
A4
A1A2
AC
A3
A4
A5A6
AlteaXL_ingles_02_06 Seite 151 Dienstag, 1. August 2006 11:11 11
Page 156 of 288
Heating, Ventilation and Air conditioning
154Air recirculation mode ⇒page 153, fig. 125 prevents strong odours in
the outside air from entering the vehicle interior, for example when passing
through a tunnel or in queuing traffic.
With low ambient temperatures, the air recirculation increases the effective-
ness of the heating system by heating the air inside the passenger compart-
ment rather than the ambient air.
With high ambient temperatures, the air recirculation increases the effective-
ness of the air conditioning system by cooling the air inside the passenger
compartment rather than the ambient air. For reasons of safety, air recirculation is
not possible when the control for air
distribution is set to the windscreen setting
.
WARNING
In air recirculation mode, no ambient air enters the vehicle interior. If the
air conditioning system is switched off, the windows can quickly mist over.
Therefore, you should never leave the air recirculation mode switched on
for longer periods, as this increases the risk of an accident.
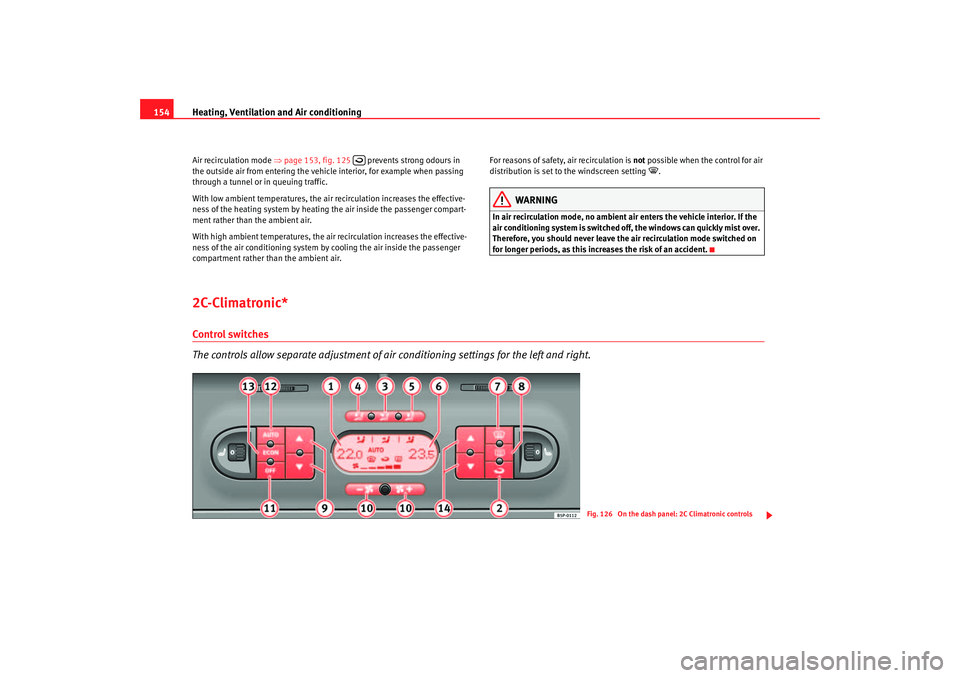
2C-Climatronic*Control switches
The controls allow separate adjustment of air conditioning settings for the left and right.
Fig. 126 On the dash panel: 2C Climatronic controls
AlteaXL_ingles_02_06 Seite 154 Dienstag, 1. August 2006 11:11 11
Page 157 of 288

Heating, Ventilation and Air conditioning 155
Safety First
Operating instructions
Tips and Maintenance
Te c h n i c a l D a t a
The air conditioning system only works when the engine is running
and the blower is switched on.
– Press the temperature control buttons ⇒page 154, fig. 126
or in order to adjust the temperature on the left hand side or
the right hand side respectively.
– The functions will be switched on when the buttons are pressed. When these functions are activated, they are indicated in the
display. Also, the de-icing and re ar heated window functions will
turn on along with their corres ponding yellow symbol. Press the
button again to switch off the function.The temperature can be adjusted separately for the left and right sides of the
vehicle interior.
Display of the selected interior temperature for the left side.
Button – Manual air recirculation mode
Button – Central air distribution
Button – Downward air distribution
Button – Upward air distribution
Display of the selected interior temperature for the right side.
Button – defrost function for the windscreen. The air drawn in from
outside the vehicle is directed at the windscreen. The air recirculation
mode, if switched on, will be switched off as soon as the defrost function
is swit ched on. At tempera t
ures over 3°C, the air conditio
ning system
will be switched on automatically and the blower speed will be increased
by one level in order to dry the air. The button lights up yellow and the
symbol appears in the display.
Button – Rear window heating. The heating will be switched off auto-
matically approximately 20 minutes after switching on. However, it may
be turned off by pushing the button. The button lights up yellow and the
symbol appears in the display.
Temperature selector for the left side ⇒page 155 Blower control
⇒page 156
Button – Switches the 2C-Climatronic on and off ⇒page 156
Button – Automatic temperature, ventilation and air distribution
control ⇒page 155
Button – Switches heating, ventilation and air-conditioning
system off
Temperature selector for the right side ⇒page 155
WARNING
For road safety all windows must be clear of ice, snow, and condensation.
This is essential to ensure good visibility. Please familiarise yourself with
the correct operation of the heating and ventilation system, including the
anti-fog/defrost functions for the windows.
Note
Please observe the general notes ⇒page 158.Automatic mode
In automatic mode air temperatur e, air flow and distribution
are automatically regulated so that a specified temperature is
attained as quickly as possible and then maintained.The temperature can be adjusted separately for the left and right
sides of the vehicle interior.
Switching on automatic mode
– Press the button ⇒page 154, fig. 126 . “AUTO” is shown
on the display.
A9
A14
A1A2
A3
A4
A5
A6A7
A8
A9
A10A11
OFF
A12
AUTO
A13
ECON
A14
AUTO
AlteaXL_ingles_02_06 Seite 155 Dienstag, 1. August 2006 11:11 11
Page 159 of 288
Heating, Ventilation and Air conditioning 157
Safety First
Operating instructions
Tips and Maintenance
Te c h n i c a l D a t a
Temperature
There are separate temperature selectors for the left and right sides of the
vehicle interior. The selected temperature is displayed above the selector. It
is possible to select interior tem
peratures from +16°C (61°F) to +29.5°C
(86°F). These are approximate temperat ures and the actual temperature may
be slightly higher or lower depending on the ambient conditions.
If a temperature below 16°C (61°F) is selected, the display switches to LO. In
this setting the system runs at maximum cooling output and the temperature
is not regulated.
If a temperature above 29.5°C (86°F) is selected the display switches to HI. In
this setting the system runs at maximum heating output and the temperature
is not regulated.
Blower
The air flow may be adjusted freely using the control . Always have the
blower running at a low setting to ensure a constant flow of fresh air into the
vehicle. Pushing the button
to the minimum -1, tu rns the Climatronic off.
Air distribution
The air distribution is adjusted using the buttons , and . It is also
possible to open and close some of the air vents separately.
Switching the air conditioning system on and off
Pressing the button switches off the air conditioning system to save
fuel. The temperature continues to be regulated. The set temperature can
then only be reached if it is higher than the ambient temperature.
Air recirculation mode
Air recirculation mode prevents fumes or unpleasant smells
from entering the vehicle.– Press the button ⇒page 156, fig. 127 to switch air recir-
culation mode on or off. It is switched on if the following symbol
appears in the display
.
Air recirculation mode prevents strong odours in the ambient air from
entering the vehicle interior, for example when passing through a tunnel or in
queuing traffic.
With low ambient temperatures, the air recirculation increases the effective-
ness of the heating system by heating the air inside the passenger compart-
ment rather than the ambient air.
With high ambient temperatures, the air recirculation increases the effective-
ness of the air conditioning system by cooling the air inside the passenger
compartment rather than the ambient air.
For reasons of safety, air recirculation is not possible when the control for air
distribution is set to the windscreen setting
.
WARNING
In air recirculation mode, no ambient air enters the vehicle interior. If the
air conditioning system is switched off, the windows can quickly mist over.
Therefore, you should never leave the air recirculation mode switched on
for longer periods, as this increases the risk of an accident.
A10
ECON
A2
AlteaXL_ingles_02_06 Seite 157 Dienstag, 1. August 2006 11:11 11
Page 161 of 288

Driving159
Safety First
Operating instructions
Tips and Maintenance
Te c h n i c a l D a t a
DrivingSteeringAdjusting the steering wheel position
The height and reach of the steering wheel can be freely
adjusted to suit the driver.
– Adjust the driver seat to the correct position.
– Push the lever under the steering column ⇒fig. 128 down
⇒ .
– Adjust the steering wheel in this way until the correct position is set ⇒fig. 129 .
– Then push the lever up again firmly ⇒.
WARNING
•
Incorrect use of the steering column adjustment function and an incor-
rect seating position can result in serious injury.
•
To avoid accidents, the steering column should be adjusted only when
the vehicle is stationary. Risk of accident.
Fig. 128 Adjusting the
steering wheel position
Fig. 129 Proper sitting
position for driver
AlteaXL_ingles_02_06 Seite 159 Dienstag, 1. August 2006 11:11 11