check engine Seat Exeo 2009 Owner's Guide
[x] Cancel search | Manufacturer: SEAT, Model Year: 2009, Model line: Exeo, Model: Seat Exeo 2009Pages: 310, PDF Size: 8.54 MB
Page 196 of 310

Trailer towing
194Trailer towingTrailer towingTechnical requirements
The towing bracket must meet certain technical requirements.Your car is intended mainly for transporting passengers and luggage.
However, if suitably equipped, it can also be used to tow a trailer or caravan.
If your vehicle has been factory -supplied with a towing bracket, all of the
necessary technical and legal aspects for trailing towing have been taking
into account during manufacturing.
Your vehicle is fitted with a 13-pole socket for the electrical connection
between the trailer and the vehicle. If the trailer has a 7-pole connector you
can use an adapter cable. This can be purchased from any SEAT Dealer.
If a towing bracket is to be fitted after the car is purchased, this must be done
according to the instructions of the towing bracket manufacturer
⇒ page 203.
WARNING
If a towing bracket is retrofitted, the installation should be carried out by a
specialist garage.•Particularly in high outdoor temperatures, it is not possible to drive up
long steep gradients without a suitable cooling system. The engine would
heat up.•Incorrect installation can result in a safety risk!
Notes on towing
There are a number of points which need to be checked before
towing a trailer or caravan.– Observe the maximum permitted trailer weights ⇒page 289.Trailer weights
Never exceed the maximum permitted trailer weights.
If you do not load the trailer up to the maximum permitted trailer weight, you
can then climb correspondingly steeper gradients.
The maximum trailer weights listed are only applicable for altitudes up to
1,000 m above sea level. With increa sing altitude the engine power and
therefore the vehicle's climbing ability are impaired because of the reduced
air density. The maximum trailer weight has to be reduced accordingly. The
weight of the car and trailer must be reduced by about 10% for every subse-
quent 1000 m (or part thereof). This figure refers to the combined weight of
the (loaded) vehicle and (loaded) trailer.
The figures for the draw bar weight that appear on the identification plate of
the towing bracket are for certification purposes only. The correct figures for
your specific model, which may be lower than these figures for the towing
bracket, are given in the registration documents and on ⇒page 282. Also
refer to ⇒page 289.
Distributing the load
Distribute loads in the trailer so that heavy objects are as near to the axle as
possible. Loads carried in the trailer must be secured to prevent them
moving.
Exeo_EN.book Seite 194 Freitag, 28. August 2009 10:14 10
Page 197 of 310
Trailer towing195
Safety First
Controls and equipment
Practical tips
Technical Data
Where possible, operate the trailer with the maximum permitted
draw bar
weight on the ball joint of the towing bracket, but do not exceed the specified
limit.
Tyre pressure
Check the tyre pressures on your car, and adjust for “full load” conditions
(refer to the sticker listing the tyre pressures on the door pillar). It may also be
necessary to adjust the tyre pressures on the trailer according to the recom-
mendations of the trailer manufacturer.
Exterior mirrors
Check whether you can see enough of the road behind the trailer with the
standard mirrors. If this is not the case you should have additional mirrors
fitted. The two exterior mirrors should be fitted on folding arms. Adjust the
mirrors to give sufficient rear vision.
Headlights
Before starting a journey, check the headlight beam settings with the trailer
hitched up. If necessary, alter the height of the headlight beams by means of
the headlight range control. See ⇒page 119.
Power supply
When you remove the ignition key, the power supply to the trailer is inter-
rupted.
Removable ball joint coupling
Vehicles with a factory-fitted towing bracket are equipped with a removable
ball joint coupling. This is stored in the spare wheel well in the luggage
compartment together with the necessary fitting instructions.
Note
If you frequently tow, we recommend you also have vehicle ser viced between
services.
Notes on towing
Towing a trailer involves additional attention by the driver.Weight distribution
The weight distribution of a loaded trailer with an unladen vehicle is very
unfavourable. However, if this cannot be avoided, drive extra slowly to allow
for the unbalanced weight distribution.
Speed
The stability of the car and trailer is reduced with increasing speed. Therefore,
it is advisable not to drive at the maximum permissible speed in an unfavour-
able road, weather or wind conditions. This especially applies when driving
downhill.
You should always reduce speed immediately if the trailer shows the slightest
sign of swaying . Never try to stop the “snaking” by increasing speed.
Anticipate hazards and brake in good time. If towing a trailer with an inertia
brake , first brake gently and then more severely. This will prevent brake
tapping by the trailer wheels when they lock. Select a low gear in due course
before going down a steep downhill. This enables you to use the engine
braking to slow down the vehicle.
Swaying and pitching can be reduced by stabiliser aids. We recommend
having stabiliser aids installed when towing trailers with a high trailer load.
They can be purchased and installed at a Dealer.
Reheating
When climbing long hills in hot weather with the engine running fast in low
gear, you should keep an eye on the coolant temperature gauge ⇒page 60.
Reduce speed immediately if the needle moves to the right end of the scale.
If the temperature warning light
in the instrument cluster should start
flashing, stop the car and let the engine cool down by running it at idling
speed for a few minutes.
Exeo_EN.book Seite 195 Freitag, 28. August 2009 10:14 10
Page 212 of 310
Your vehicle maintenance and cleaning
210Steel wheel rims– Clean steel wheel rims regularly using a separate sponge.Use an industrial cleanser to remove brake dust. Any damage to the paint on
steel wheel rims should be repaired before starting to rust.
WARNING
•Never wash tyres with a cylindrical jet. Even at large spraying distances
and short cleaning times, visible and invisible damage can occur to the
tyres. This may cause an accident.•Water, ice and salt on the brakes can reduce braking efficiency. Risk of
accident. Directly after washing, avoid sudden and sharp braking. “Dry”
⇒ page 189 the brakes by braking several times.
Cleaning alloy wheel rimsEvery two weeks
– Wash salt and brake dust from alloy wheels.
– Use an acid free detergent to clean the wheel rims.
Every three months
– Apply a hard wax compound to the wheels.Alloy wheels require regular attention to preserve their appearance. If road
salt and brake dust are not often removed, the aluminium finish will be
impaired.
Always use an acid-free detergent for alloy wheel rims. Car polish or other abrasive agents should not be used. If the protective
coating is damaged, e.g. by stone impact, the damaged area should be
repaired immediately.
WARNING
•Never wash tyres with a cylindrical jet. Even at large spraying distances
and short cleaning times, visible and invisible damage can occur to the
tyres. This may cause an accident.•Water, ice and salt on the brakes can reduce braking efficiency. Risk of
accident. Directly after washing, avoid sudden and sharp braking. “Dry”
⇒ page 189 the brakes by braking several times.
Underbody maintenance
The vehicle underbody is coated to protect it from chemical
and mechanical damage.The protective coating can be damaged when driving. We recommend you to
check the protective coating under the body and on the running gear, and
reinstated if necessary, before and after the winter season.
We recommend you to go to your Authorised Service Centre to carry out repair
work and additional anti-corrosion work.
WARNING
Do not apply underseal or anti-corrosion coatings to the exhaust pipes,
catalytic converter or the heat shields on the exhaust system. The heat of
the exhaust system or the engine could cause them to ignite! Fire hazard.
Exeo_EN.book Seite 210 Freitag, 28. August 2009 10:14 10
Page 219 of 310
Checking and refilling levels217
Safety First
Controls and equipment
Practical tips
Technical Data
−
Insert the fuel nozzle into the mouth of the canister as far as
possible.
− If the spare fuel canister is made of metal, the filling nozzle must be
in contact with the canister during filling. This helps prevent an electro-
static charge building up.
− Never spill fuel in the vehicle or in the luggage compartment. Fuel
vapours are explosive. Danger of death.
Caution
•Fuel spills should be removed from the paintwork immediately.•Never run the tank completely dry. An irregular fuel supply could cause
misfiring. As a result, unburnt fuel could enter the catalytic converter and
cause damage.•When filling the fuel tank after having run it completely dry on a vehicle
with a diesel engine the ignition must be switched on for at least 30 seconds
without starting the engine. When you then start the engine it may take
longer than normal (up to one minute) for the engine to start firing. This is due
to the fact that the fuel system has to purge itself of air before starting.For the sake of the environment
Do not try to put in more fuel after the automatic filler nozzle has switched off;
this may cause the fuel to overflow if it becomes warm.
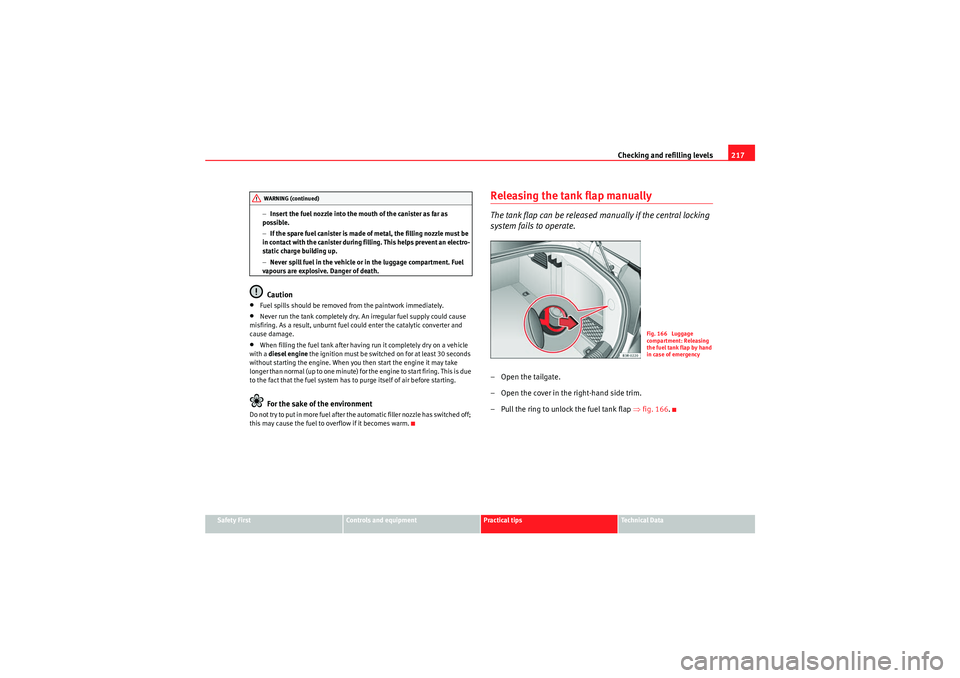
Releasing the tank flap manuallyThe tank flap can be released manually if the central locking
system fails to operate.–Open the tailgate.
– Open the cover in the right-hand side trim.
– Pull the ring to unlock the fuel tank flap ⇒fig. 166 .
WARNING (continued)
Fig. 166 Luggage
compartment: Releasing
the fuel tank flap by hand
in case of emergency
Exeo_EN.book Seite 217 Freitag, 28. August 2009 10:14 10
Page 220 of 310
Checking and refilling levels
218PetrolPetrol types
The recommended fuel types are listed on a sticker inside the
fuel tank flap.Only unleaded petrol, corresponding to the standard DIN EN 228 , may be
used for vehicles with catalytic converters (EN = “European Standard”).
Fuel types are differentiated by the octane rating, e.g: 91, 95, 98 RON (RON
= “Regulation Octane Number, unit for determining the knock resistance of
petrol”). You may use petrol with a higher octane number than the one recom-
mended for your engine. However, this has no advantage in terms of fuel
consumption and engine power.
The correct fuel type for your vehicle is given in the technical table for the
engine. Section “Technical Data”
Caution
•Petrol that follows EN 228 may be mixed with small quantities of ethanol.
However, the so-called “bioethanol fuels” available at commercial establish-
ments, e.g. with reference E50 or E85, which contain a high percentage of
ethanol, may not be used, as they will damage the fuel system.•Even one tankful of leaded fuel would permanently impair the efficiency
of the catalytic converter.•High engine speed and full throttle can damage the engine when using
petrol with an octane rating lower than the correct grade for the engine.For the sake of the environment
Just one full tank of leaded fuel would seriously impair the efficiency of the
catalytic converter.
Petrol additives
Petrol additives improve the quality of the petrol.The quality of the petrol influences running behaviour, performance and
service life of the engine. For this reason, you should use good quality petrol
containing additives. These additives will help to prevent corrosion, keep the
fuel system clean and prevent deposits from building up in the engine.
If good quality petrol with additives is not available or engine problems occur,
the required additives must be added during refuelling.DieselDiesel*Diesel fuel must correspond to DIN EN 590 (EN = “European standard”). It
must have a cetane number (CN) of at least 51. The cetane number indicates
the ignition quality of the diesel fuel.
Notes on refuelling ⇒page 216.Biodiesel*The biodiesel fuel must comply with the DIN EN 14.214 (FAME) Standard.•Biodiesel is a methyl ester obtained from rapeseed oil.•DIN is the German abbreviation for “ Deutsches Institut für N ormung e.V.”,
the German standards institute.•EN means European Norm.•FAME is the English abbreviation for “ Fatty Acid Methyl Ester”.
Exeo_EN.book Seite 218 Freitag, 28. August 2009 10:14 10
Page 221 of 310
Checking and refilling levels219
Safety First
Controls and equipment
Practical tips
Technical Data
Your Authorised Service Centre can also be consulted to know if the vehicle
has been prepared for biodiesel use.
Things to note about RME fuel (biodiesel)
•The performance of a vehicle using biodiesel maybe somewhat reduced.•Fuel consumption of a vehicle using biodiesel may be slightly higher.•RME fuel is resistant to the cold down to approx. -10°C.•At temperatures below -10°C, we recommend using winter diesel fuel.•Your vehicle is designed to be refuelled with up to a maximum of 7%
biodiesel blend, in accordance with the DIN 51628 standard.Caution
•RME fuel can damage the fuel system in vehicles which are not suitably
adjusted.•If you decide to use biodiesel in your vehicle, please use only RME fuel
which is DIN E 14.214 compliant.•If you use biodiesel that does not meet the required standard, the fuel
filter could become clogged.Note
•In case of low exterior temperatures and a fuel biodiesel percentage of
higher than 50%, an increase in gas emission may occur during operation of
the independent heating.•The fuel filter may become clogged when fuel is changed to biodiesel. For
this reason, we recommend you that, when having run 300 or 400 km after a
fuel change, the fuel filter change must also be done. Also note the instruc-
tions in the Inspection and Maintenance plan.•If the vehicle is to remain parked for more than about two weeks, we
recommend filling the fuel tank with biodiesel and driving about 50 km in
order to avoid damage to the injection system.
Winter driving
Diesel can thicken in winter.Winter-grade diesel
When using summer-grade diesel fuel, difficulties may be experienced at
sub-zero temperatures because the fuel thickens due to wax separation.
Therefore, winter-grade diesel fuel is available in some countries during the
cold months. It can be used at temperatures as low as -22°C.
In countries with different climatic conditions the diesel fuel generally sold
has different temperature characteristics. Check with an Authorised Service
Centre or filling stations in the country concerned regarding the type of diesel
fuels available.
Filter pre-heater
Your vehicle is fitted with a fuel filter pre-heater, making it well equipped for
operation in winter. This ensures that the fuel system remains operational to
approx. -24°C, provided you use winter-grade diesel which is safe to -15°C.
However, if the fuel has waxed to such an extent that the engine will not start
at temperatures of under -24°C, simply place the vehicle in a warm place for
a while.
Caution
Do not mix fuel additives (“thinners”, or similar additives) with diesel fuel.
Exeo_EN.book Seite 219 Freitag, 28. August 2009 10:14 10
Page 223 of 310
Checking and refilling levels221
Safety First
Controls and equipment
Practical tips
Technical Data
WARNING
Never open the bonnet if you see steam or drips of coolant being released
from t he engine com par t ment . Fail ure to com ply could resul t in burns . Wait
until no steam or coolant can be seen before opening the bonnet.Work in the engine compartment
Extra caution is necessary when working on components in
the engine compartment.Always be aware of the danger of injury and scalding as well as the risk of
accident or even fire when working in the engine compartment (e.g. when
checking and refilling fluids). Therefore, always observe the warnings listed
below and follow all general safety precautions. The engine compartment of
any motor vehicle is a potentially hazardous area ⇒
WARNING
•Switch the engine off.•Remove the ignition key.•Apply handbrake firmly.•If your vehicle is equipped with a manual gearbox, place the gearshift
lever in neutral. If you are driving an automatic vehicle, place the selector
lever in the position P.•Wait for the engine to cool down.•Children should not be allowed to approach the engine compartment•Never spill liquids involved in vehicle operations on the engine
compartment, as these may catch fire (e.g. anti-freeze containing liquid
coolant).
•Take care not to cause short circuits in the electrical system, especially
when working on the battery.•Never touch the radiator fan while the engine is hot, as the fan could
start up suddenly.•Never open the expansion tank when the engine is hot. The cooling
system is under pressure.•Protect face, hands and arms from any hot steam or hot liquid coolant
released by covering the cap with a large, thick rag when opening the
expansion tank.•If any tests have to be performed with the engine running, there is an
extra safety risk from the rotating parts, such as the drive belts, alternator
and radiator fan, etc., and from the high-voltage ignition system.•Observe the following additional warnings if work on the fuel system or
the electrical system is necessary:
−Always disconnect the battery.
− Do not smoke.
− Never work near open flames
− Always keep an approved fire extinguisher immediately available.Caution
When topping up fluids, make sure the correct fluid is put into the correct
filler opening. This can otherwise cause serious malfunctions or engine
damage.
For the sake of the environment
Inspect the ground underneath your vehicle regularly so that any leaks are
detected at an early stage. If you find spots of oil or other fluids, have your
vehicle inspected in the garage.
WARNING (continued)
Exeo_EN.book Seite 221 Freitag, 28. August 2009 10:14 10
Page 224 of 310
Checking and refilling levels
222
NoteOn right-hand drive vehicles some of the containers/ reservoirs mentioned
below are located on the other side of the engine compartment.Closing the bonnet– To close the bonnet, pull it down to overcome the spring pres- sure.
– Leave the bonnet secured in the locking part. Do not tighten
⇒ .
WARNING
•For safety reasons the bonnet must always be completely closed when
the vehicle is moving. After closing it always check that it is properly
secured. The bonnet must be flush with the adjacent body panels.•Should you notice that the bonnet is not safely secured when the
vehicle is moving, stop the vehicle immediately and close the bonnet.
Failure to do so could result in an accident.
Engine oilGeneral notesWe recommend that the oil change should be performed by an Authorised
Service Centre or a qualified workshop, according to the Maintenance
Program. The correct oil specifications for your engine are listed in the
⇒page 223,
“Oil properties”.
Check that the specifications quoted (VW standards) appear on the container
either singly or in combination with other specifications.
Flexible maintenance intervals (Extended Service Intervals*)
Special lubricating oils ⇒page 223 have been developed in the framework
of the SEAT “Extended Service Intervals” ⇒Booklet “Maintenance Program”
This type of oil must be used if you intend to take advantage of the prolonga-
tion of the maintenance intervals in the framework of the “Extended Service
Intervals” program.
•Do not mix the LongLife oil with oil intended for fixed service intervals, as
the requirements for the extended service intervals are then no longer guar-
anteed.•Only in exceptional circumstances, if the engine oil level is too low
⇒ page 224 and LongLife oil is not available, it is permitted to top up (once)
with oil for fixed service intervals ⇒ page 223 (up to a maximum of 0.5
litres).
Fixed service intervals*
If “Extended Service Intervals” are not applied to your vehicle, you can use
oils for fixed service intervals ⇒ page 223. In this case, your vehicle must be
serviced after a fixed interval of 1 year / 15,000 km (10,000 miles) (see the
Maintenance Program).•In exceptional circumstances, if the engine oil level is too low
⇒ page 224 and you cannot obtain the oil specified for your vehicle, you can
put in a small quantity of oil conforming to the specification ACEA A2 or
ACEA A3 (petrol engines) or ACEA B3 or ACEA B4 (diesel engines) (up to 0.5l).
Vehicles with diesel particulate filter*
The Maintenance Program states whether your vehicle is fitted with a diesel
particulate filter.
Exeo_EN.book Seite 222 Freitag, 28. August 2009 10:14 10
Page 225 of 310
Checking and refilling levels223
Safety First
Controls and equipment
Practical tips
Technical Data
•Vehicles with a diesel particulate filter must only b e fille d with VW 507 00
engine oil.•Avoid mixing this oil with other engine oils.•Only in exceptional circumstances, if the engine oil level is too low
⇒ page 224 and you cannot obtain the oil specified for your vehicle, can you
put in a small quantity of oil (once) conforming to the VW 506 00, VW 506 01,
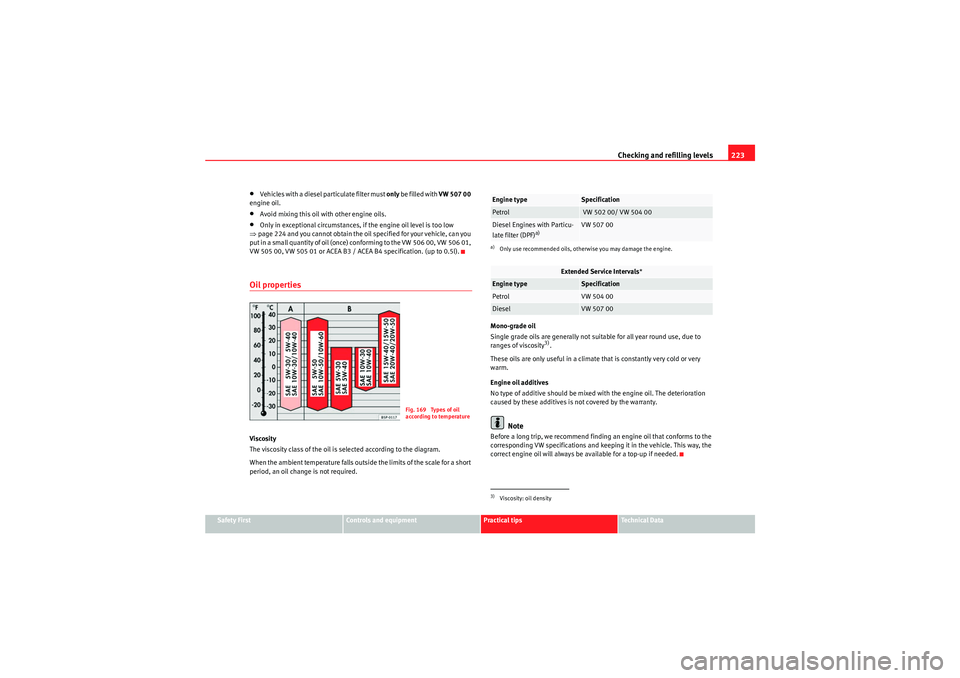
VW 505 00, VW 505 01 or ACEA B3 / ACEA B4 specification. (up to 0.5l).Oil propertiesViscosity
The viscosity class of the oil is selected according to the diagram.
When the ambient temperature falls outside the limits of the scale for a short
period, an oil change is not required. Mono-grade oil
Single grade oils are generally not suitable for all year round use, due to
ranges of viscosity
3).
These oils are only useful in a climate that is constantly very cold or very
warm.
Engine oil additives
No type of additive should be mixed with the engine oil. The deterioration
caused by these additives is not covered by the warranty.
Note
Before a long trip, we recommend finding an engine oil that conforms to the
corresponding VW specifications and keeping it in the vehicle. This way, the
correct engine oil will always be available for a top-up if needed.
Fig. 169 Types of oil
according to temperature
Engine type
Specification
Petrol
VW 502 00/ VW 504 00
Diesel Engines with Particu-
late filter (DPF)
a)
a)Only use recommended oils, otherwise you may damage the engine.
VW 507 00
Extended Service Intervals *
Engine type
Specification
Petrol
VW 504 00
Diesel
VW 507 00
3)Viscosity: oil density
Exeo_EN.book Seite 223 Freitag, 28. August 2009 10:14 10
Page 226 of 310
Checking and refilling levels
224Checking the oil levelChecking oil level
– Park the vehicle in a horizontal position.
– Briefly run the engine at idle speed until the service temperature
is reached then stop.
– Wait two minutes.
– Pull out the dipstick. Wipe the dipstick with a clean cloth and insert it again, pushing it in as far as it will go.
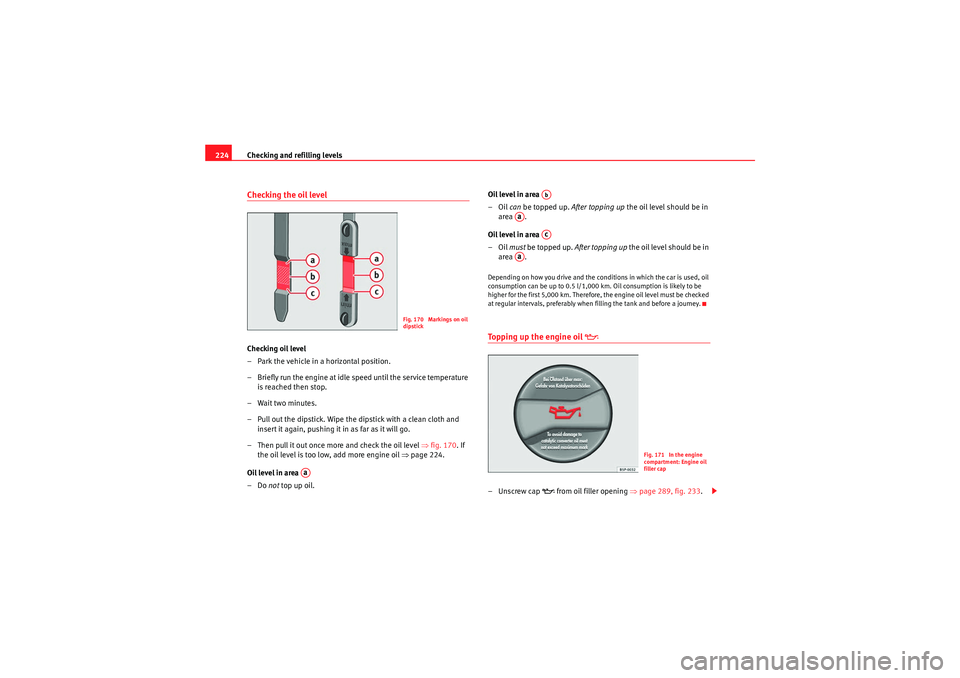
– Then pull it out once more and check the oil level ⇒fig. 170 . If
the oil level is too low, add more engine oil ⇒page 224.
Oil level in area
–Do not top up oil. Oil level in area
–Oil
can be topped up. After topping up the oil level should be in
area .
Oil level in area
–Oil must be topped up. After topping up the oil level should be in
area .
Depending on how you drive and the conditions in which the car is used, oil
consumption can be up to 0.5 l/1,000 km. Oil consumption is likely to be
higher for the first 5,000 km. Therefore, the engine oil level must be checked
at regular intervals, preferably when filling the tank and before a journey.Topping up the engine oil
–Unscrew cap
from oil filler opening ⇒page 289, fig. 233 .
Fig. 170 Markings on oil
dipstick
Aa
Ab
Aa
Ac
Aa
Fig. 171 In the engine
compartment: Engine oil
filler cap
Exeo_EN.book Seite 224 Freitag, 28. August 2009 10:14 10