technical Seat Exeo 2011 Owner's manual
[x] Cancel search | Manufacturer: SEAT, Model Year: 2011, Model line: Exeo, Model: Seat Exeo 2011Pages: 313, PDF Size: 5.02 MB
Page 194 of 313
192Driving and the environment
WARNING (Continued)
● On steep slopes, if brakes are excessively used, they will overheat.
Before driving down a long steep slope, it is advisable to reduce speed
and change down into a lower gear or range (depending on the type of
transmission). This makes use of engine braking and relieves the brakes.
● Never let the brakes “drag” by applying light pressure. Continuous
braking will cause the brakes to overheat and the braking distance will
increase. Apply and then release the brakes alternately.
● Never let the vehicle run with the engine switched off. The braking
distance is increased considerably when the brake servo is not active.
● If the brake fluid loses its viscosity and is subjected to heavy use, va-
pour bubbles can form in the brake system. This reduces the efficiency of
the brakes.
● Non-standard or damaged front spoilers could restrict the airflow to
the brakes and cause them to overheat. Before purchasing accessories
please observe the relevant instructions ⇒ page 215, Technical modifi-
cations.
● If a brake circuit fails, the braking distance will be increased consider-
ably. Contact a specialised workshop immediately and avoid unnecessa-
ry journeys.
Exhaust gas purification system Catalytic converter*
To maintain the useful life of the catalytic converter
– Use only unleaded petrol with petrol engines, as lead damages
the catalytic converter.
– Do not let the fuel get too low in the tank. –
For engine oil changes, do not replenish with too much engine
oil ⇒ page 224.
– Never tow the vehicle to start it, use jump leads if necessary
⇒ page 280.
If you notice misfiring, uneven running or loss of power when the vehicle is
moving, reduce speed immediately and have the vehicle inspected at the
nearest specialised workshop. In general, the exhaust gas warning lamp
will light up when any of the described symptoms occur ⇒ page 66. If this
happens, unburnt fuel can enter the exhaust system and escape into the en-
vironment. The catalytic converter can also be damaged by overheating.
WARNING
The catalytic converter reaches very high temperatures! There is a risk of
fire.
● Never park where the catalytic converter could come into contact with
dry grass or flammable materials under the vehicle.
● Do not apply additional underseal or anti-corrosion coatings to the
exhaust pipes, catalytic converter or the heat shields on the exhaust sys-
tem. These materials could catch fire when the vehicle is being driven.
CAUTION
Never run the fuel tank completely dry because the irregularity of the fuel
supply may cause ignition problems. This allows unburnt fuel to enter the
exhaust system, which could cause overheating and damage the catalytic
converter.
For the sake of the environment
Even when the emission control system is working perfectly, there may be a
smell of sulphur from the exhaust gas under some conditions. This depends
on the sulphur content of the fuel used. Quite often the problem can be
solved by changing to another brand of fuel.
Page 195 of 313

193
Driving and the environment
Diesel engine particulate filter*
The diesel engine particulate filter eliminates soot produced
by burning diesel.
The diesel engine particulate filter eliminates most of the soot from the ex-
haust gas system. Under normal driving conditions, the filter cleans itself. If
the driving conditions do not allow the filter to clean itself (for example,
multiple short trips) the filter will be obstructed by dust and pollen and the
indicator for the diesel engine particulate filter indicator will light up.
This does not represent a fault, it is a warning that indicates that the filter
has not been able to regenerate automatically and that you must carry out a
cleaning cycle, as indicated in ⇒ page 80.
WARNING
● The diesel engine particulate filter may reach extremely high temper-
atures; the vehicle should be parked so that the exhaust pipe does not
come into contact with flammable materials underneath the vehicle. Oth-
erwise there is a risk of fire.
CAUTION
● Your vehicle is not designed to use biodiesel fuel. Never, under any cir-
cumstances refuel with biodiesel. The use of biodiesel fuel could damage
the engine and the fuel system. The addition of biodiesel to diesel by the
diesel producer in accordance with standard EN 590 is authorised and will
not cause damage to the engine or the fuel system.
● Using diesel fuel with a high sulphur content may significantly reduce
the working life of the diesel particulate filter. Your Authorised Service Cen-
tre will be able to tell you which countries have diesel with a high sulphur
content. Economical and environmentally friendly
driving
Economical and environmentally friendly driving
Fuel consumption, environmental pollution and wear to the engine, brakes
and tyres depends in large part on your driving style. By adopting an eco-
nomical driving style and anticipating the traffic situation ahead, you can
easily reduce fuel consumption by 10-15%. Some tips on how to help you
reduce pollution while saving money are listed below.
Drive anticipating the traffic situation
A vehicle uses most fuel when accelerating. When you anticipate the situa-
tion, you have to brake less often and, thus, accelerate less. If it is possible,
let the vehicle roll with a
gear engaged, for example, if you see a red light
ahead. The braking effect achieved in this way helps to reduce the wear of
brakes and tyres; emissions and fuel consumption are reduced to zero (dis-
connection due to inertia).
Change gear early to save energy
An effective way of saving fuel is to change up quickly through the gears.
Running the engine at high rpm in the lower gears uses an unnecessary
amount of fuel.
Manual gearbox: Change from first to second gear as quickly as possible.
We recommend that, whenever possible, you change to a higher gear upon
reaching 2000 rpm. Follow the “recommended gear” indication that ap-
pears on the instrument panel ⇒ page 73.
Avoid driving at high speed
We advise you not to drive at the top speed permitted by the vehicle. Fuel
consumption, exhaust emissions and noise levels all increase very rapidly
at higher speeds. Driving at moderate speeds will help to save fuel.
Safety FirstOperating InstructionsPractical TipsTechnical Specifications
Page 197 of 313

195
Driving and the environment
Environmental friendliness
Environmental protection is a top priority in the design, choice of materials
and production of your new Seat.
Design measures for economical recycling
● Joints and connections designed for easy dismantling
● Modular construction to facilitate dismantling
● Increased use of single-grade materials
● Plastic parts and elastomers are marked in accordance with ISO 1043,
ISO 11469 and ISO 1629
Choice of materials
● Nearly all materials used can be recycled
● Similar types of plastics grouped together for easy recycling
● Recycled materials used in manufacture
● Reduction of volatile compounds in plastics
● CFC-free refrigerant in air conditioner
Compliance with prohibited materials regulation : cadmium, lead, mercury,
chrome VI.
Manufacturing methods
● Use of recycled material for manufacturing plastic parts
● Solvent-free cavity sealing
● Solvent-free wax for protecting the vehicles in transit
● Solvent-free adhesives
● No CFCs used in production
● Surplus materials used extensively for energy conversion and building
materials
● Overall water consumption reduced
● Heat recovery systems
● The use of water-soluble paints Driving abroad
Observations
To drive abroad, the following must be taken into consideration:
● For vehicles fitted with a catalytic converter ensure that unleaded petrol
is available for the journey. See the chapter “Refuelling”. Automobile organ-
isations will have information about service station networks selling unlea-
ded fuel.
● In some countries, it is possible that your vehicle model is not sold, and
therefore spare parts are not available or the Authorised Services can only
carry out limited repairs.
SEAT importers and distributors will gladly provide information about the
technical preparations that you vehicle requires and also about necessary
maintenance and repair possibilities.
Adhesive strips for headlights
If you have to drive a right-hand drive vehicle in a left-hand drive country, or
vice versa, the asymmetric dipped beam headlights will dazzle oncoming
traffic.
To prevent dazzling, you must apply stickers to certain parts of the head-
light lenses. Further information is available at your Authorised Service Cen-
tre.
In vehicles with adaptive headlights, the rotation system must previously be
disconnected. To do this, please go to a specialised workshop.
Safety FirstOperating InstructionsPractical TipsTechnical Specifications
Page 198 of 313
196Trailer towing
Trailer towing
Trailer towing
Technical requirements
The towing bracket must meet certain technical require-
ments.
Your vehicle is intended mainly for transporting passengers and luggage.
However, if suitably equipped, it can also be used to tow a trailer or cara-
van.
If your vehicle has been factory-supplied with a towing bracket, all of the
necessary technical and legal aspects for trailing towing have been taking
into account during manufacturing.
Your vehicle is fitted with a 13-pole socket for the electrical connection be-
tween the trailer and the vehicle. If the trailer has a 7-pole connector you
can use an adapter cable. This can be purchased at an Authorised Service.
If a towing bracket is to be fitted after the vehicle is purchased, this must be
done according to the instructions of the towing bracket manufacturer
⇒ page 204.
WARNING
If a towing bracket is retrofitted, the installation should be carried out by
a qualified workshop.
● Particularly in high outdoor temperatures, it is not possible to drive
up long steep gradients without a suitable cooling system. The engine
would heat up.
● Incorrect installation can result in a safety risk!
Notes on towing
There are a number of points which need to be checked be-
fore towing a trailer or caravan.
– Observe the maximum permitted trailer weights ⇒ page 290.
Trailer weight
Never exceed the maximum permitted trailer weight.
If you do not load the trailer up to the maximum permitted trailer weight,
you can then climb correspondingly steeper gradients.
The maximum trailer weights listed are only applicable for altitudes up to
1000 m above sea level. With increasing altitude the engine power and
therefore the vehicle's climbing ability are impaired because of the reduced
air density. The maximum trailer weight has to be reduced accordingly. The
weight of the vehicle and trailer must be reduced by about 10% for every
subsequent 1000 m (or part thereof). This figure refers to the combined
weight of the (loaded) vehicle and (loaded) trailer.
The figures for the drawbar load that appear on the identification plate of
the towing bracket are for certification purposes only. The correct figures for
your specific model, which may be lower than these figures for the towing
bracket, are given in the registration documents and on ⇒ page 283. Also
refer to ⇒ page 290.
Distributing the load
Distribute loads in the trailer so that heavy objects are as near to the axle as
possible. Loads carried in the trailer must be secured to prevent them mov-
ing.
Page 199 of 313
197
Trailer towing
Where possible, operate the trailer with the maximum permitted drawbar
load on the ball joint of the towing bracket, but do not exceed the specified
limit.
Tyre pressure
Check the tyre pressures on your vehicle, and adjust for “full load” condi-
tions (refer to the sticker listing the tyre pressures on the door pillar). It may
also be necessary to adjust the tyre pressures on the trailer according to the
recommendations of the trailer manufacturer.
Exterior mirrors
Check whether you can see enough of the road behind the trailer with the
standard mirrors. If this is not the case you should have additional mirrors
fitted. The two exterior mirrors should be fitted on folding arms. Adjust the
mirrors to give sufficient rear vision.
Headlights
Before starting a journey, check the headlight beam settings with the trailer
hitched up. If necessary, alter the height of the headlight beams by means
of the headlight range control. See ⇒ page 119.
Power supply
When you remove the ignition key, the power supply to the trailer is inter-
rupted.
Removable ball joint coupling
Vehicles with a factory-fitted towing bracket are equipped with a removable
ball joint coupling. This is stored in the spare wheel well in the luggage
compartment together with the necessary fitting instructions.
Note
If you frequently tow, we recommend you also have the vehicle serviced be-
tween services. Notes on towing
Towing a trailer involves additional attention by the driver.
Weight distribution
The weight distribution of a loaded trailer with an unladen vehicle is very
unfavourable. However, if this cannot be avoided, drive extra slow to allow
for the unbalanced weight distribution.
Speed
The stability of the vehicle and trailer is reduced with increasing speed.
Therefore, it is advisable not to drive at the maximum permissible speed in
unfavourable road, weather or wind conditions. This especially applies
when driving downhill.
You should always reduce speed immediately if the trailer shows the slight-
est sign of swaying. Never try to stabilise the trailer by accelerating.
Anticipate hazards and brake in good time. If towing a trailer with an inertia
brake, first brake gently and then harder. This will prevent brake tapping by
the trailer wheels when they lock. Select a low gear in due course before go-
ing down a steep downhill. This enables you to use the engine braking to
slow down the vehicle.
Swaying and pitching can be reduced by stabiliser aids. We recommend
having stabiliser aids installed when towing trailers with a high trailer
weight. They can be purchased and installed at a Technical Service.
Reheating
When climbing long hills in hot weather with the engine running fast in low
gear, you should keep an eye on the coolant temperature gauge ⇒ page 60.
Reduce speed immediately if the needle moves to the right end of the scale.
If the temperature warning lamp in the instrument panel should start
flashing, stop the vehicle and let the engine cool down by running it at
idling speed for a few minutes.
Safety FirstOperating InstructionsPractical TipsTechnical Specifications
Page 201 of 313
199
Trailer towing
Removable towing bracket Introduction
Special care is required when fitting and removing the tow-
ing bracket.
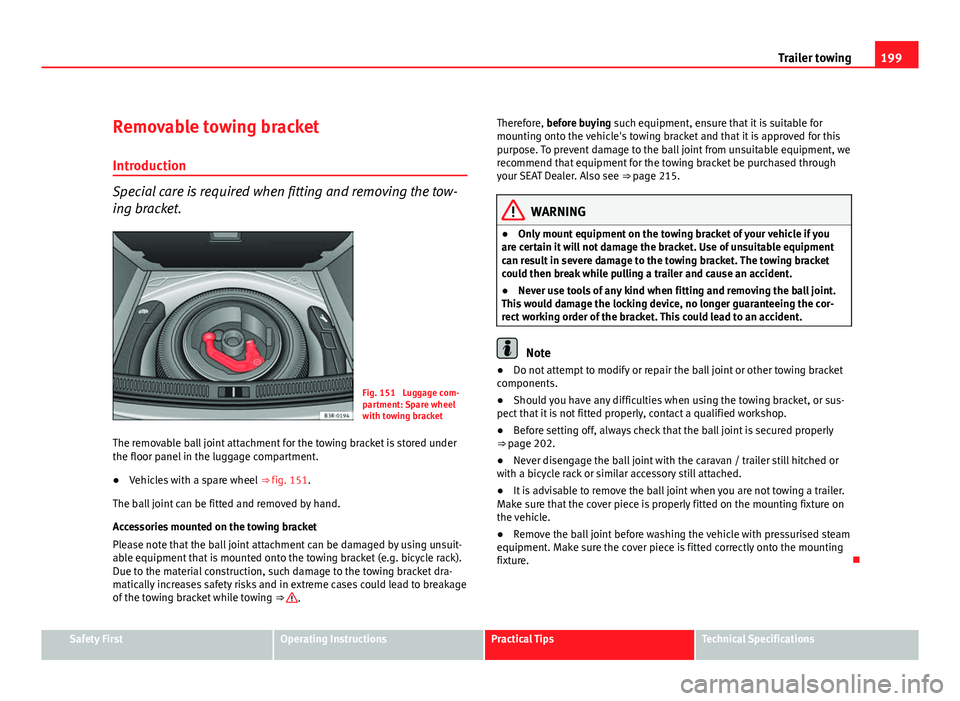
Fig. 151 Luggage com-
partment: Spare wheel
with towing bracket
The removable ball joint attachment for the towing bracket is stored under
the floor panel in the luggage compartment.
● Vehicles with a spare wheel ⇒ fig. 151.
The ball joint can be fitted and removed by hand.
Accessories mounted on the towing bracket
Please note that the ball joint attachment can be damaged by using unsuit-
able equipment that is mounted onto the towing bracket (e.g. bicycle rack).
Due to the material construction, such damage to the towing bracket dra-
matically increases safety risks and in extreme cases could lead to breakage
of the towing bracket while towing ⇒
. Therefore, before buying such equipment, ensure that it is suitable for
mounting onto the vehicle's towing bracket and that it is approved for this
purpose. To prevent damage to the ball joint from unsuitable equipment, we
recommend that equipment for the towing bracket be purchased through
your SEAT Dealer. Also see
⇒ page 215.
WARNING
● Only mount equipment on the towing bracket of your vehicle if you
are certain it will not damage the bracket. Use of unsuitable equipment
can result in severe damage to the towing bracket. The towing bracket
could then break while pulling a trailer and cause an accident.
● Never use tools of any kind when fitting and removing the ball joint.
This would damage the locking device, no longer guaranteeing the cor-
rect working order of the bracket. This could lead to an accident.
Note
● Do not attempt to modify or repair the ball joint or other towing bracket
components.
● Should you have any difficulties when using the towing bracket, or sus-
pect that it is not fitted properly, contact a qualified workshop.
● Before setting off, always check that the ball joint is secured properly
⇒ page 202.
● Never disengage the ball joint with the caravan / trailer still hitched or
with a bicycle rack or similar accessory still attached.
● It is advisable to remove the ball joint when you are not towing a trailer.
Make sure that the cover piece is properly fitted on the mounting fixture on
the vehicle.
● Remove the ball joint before washing the vehicle with pressurised steam
equipment. Make sure the cover piece is fitted correctly onto the mounting
fixture.
Safety FirstOperating InstructionsPractical TipsTechnical Specifications
Page 203 of 313
201
Trailer towing
Make sure the ball joint is clean and undamaged
– Check the locking pin A
, release pin B, shaft section C and
knob D ⇒ fig. 153 on the ball joint to make sure they are clean
and undamaged.
The spring mechanism inside the ball joint must be in the ready
position
– Check that the red marking A
⇒ fig. 154 on the knob is inside
the black zone marked on the ball joint.
– Check that the locking pin B
is inside the holes in the shaft
section of the ball joint.
– Check that the knob protrudes visibly from the ball joint, so that
there is a clear gap C
between the knob and the ball joint.
The ball joint can only be installed if the internal spring mechanism is in the
ready position.
Cont ⇒ page 201, Fitting the ball joint (step 3). Fitting the ball joint (step 3)
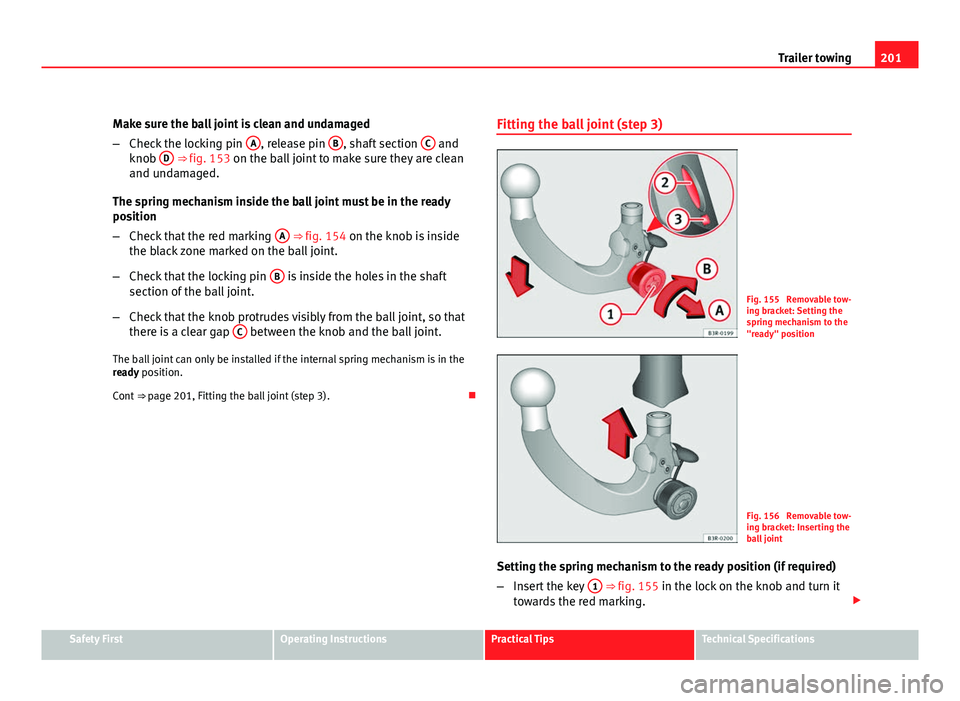
Fig. 155 Removable tow-
ing bracket: Setting the
spring mechanism to the
"ready" position
Fig. 156 Removable tow-
ing bracket: Inserting the
ball joint
Setting the spring mechanism to the ready position (if required)
– Insert the key 1
⇒ fig. 155 in the lock on the knob and turn it
towards the red marking.
Safety FirstOperating InstructionsPractical TipsTechnical Specifications
Page 205 of 313
203
Trailer towing
– Check that the knob is directly against the ball joint, so that
there is no gap between the knob and the ball joint -arrow-.
– Check that the ball joint is locked and the key is removed so
that the knob cannot be pulled out ⇒
.
– Check that the ball joint fits tightly in the mounting fixture (try
moving it about to check).
Towing socket
– To plug in the electrical connection for the trailer, pull down the
socket below the bumper ⇒ fig. 158.
If the safety check is not satisfactory, the ball joint must be fitted again
properly.
WARNING
To avoid accidents, the ball joint must meet all the safety requirements
listed in the safety check. The towing bracket must not be used if any one
of these requirements is not met. If this is the case, you should contact a
qualified workshop.
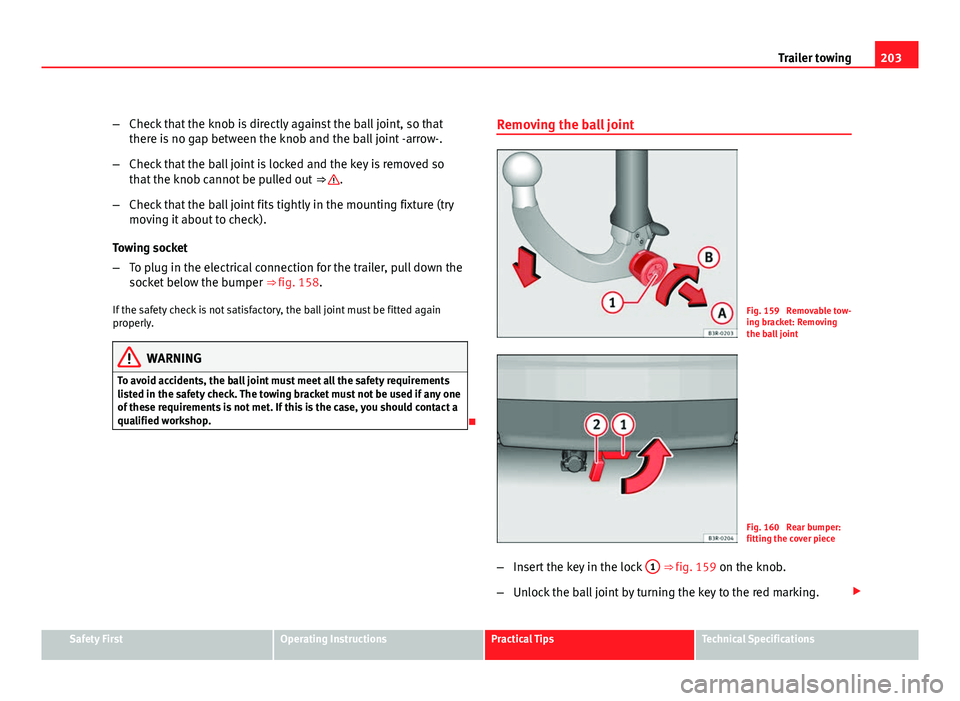
Removing the ball joint
Fig. 159 Removable tow-
ing bracket: Removing
the ball joint
Fig. 160 Rear bumper:
fitting the cover piece
– Insert the key in the lock 1
⇒ fig. 159 on the knob.
– Unlock the ball joint by turning the key to the red marking.
Safety FirstOperating InstructionsPractical TipsTechnical Specifications
Page 207 of 313
205
Trailer towing
If a towing bracket is to be fitted after the vehicle is purchased, this must be
completed according to the instructions of the towing bracket manufacturer.
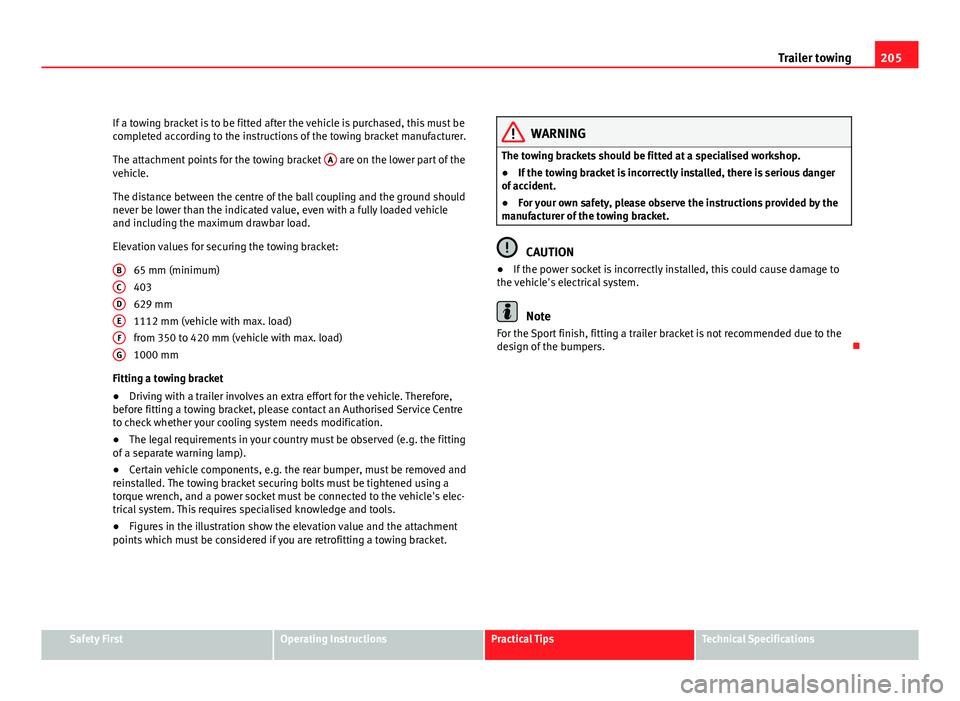
The attachment points for the towing bracket A
are on the lower part of the
vehicle.
The distance between the centre of the ball coupling and the ground should
never be lower than the indicated value, even with a fully loaded vehicle
and including the maximum drawbar load.
Elevation values for securing the towing bracket:
65 mm (minimum)
403
629 mm
1112 mm (vehicle with max. load)
from 350 to 420 mm (vehicle with max. load)
1000 mm
Fitting a towing bracket
● Driving with a trailer involves an extra effort for the vehicle. Therefore,
before fitting a towing bracket, please contact an Authorised Service Centre
to check whether your cooling system needs modification.
● The legal requirements in your country must be observed (e.g. the fitting
of a separate warning lamp).
● Certain vehicle components, e.g. the rear bumper, must be removed and
reinstalled. The towing bracket securing bolts must be tightened using a
torque wrench, and a power socket must be connected to the vehicle's elec-
trical system. This requires specialised knowledge and tools.
● Figures in the illustration show the elevation value and the attachment
points which must be considered if you are retrofitting a towing bracket. B
CDEFG
WARNING
The towing brackets should be fitted at a specialised workshop.
● If the towing bracket is incorrectly installed, there is serious danger
of accident.
● For your own safety, please observe the instructions provided by the
manufacturer of the towing bracket.
CAUTION
● If the power socket is incorrectly installed, this could cause damage to
the vehicle's electrical system.
Note
For the Sport finish, fitting a trailer bracket is not recommended due to the
design of the bumpers.
Safety FirstOperating InstructionsPractical TipsTechnical Specifications
Page 209 of 313
207
Vehicle maintenance and cleaning
Care of the vehicle exterior Automatic car wash tunnel
The vehicle can normally be washed without problem in an
automatic car wash.
The vehicle paintwork is so durable that the vehicle can normally be washed
without problems in an automatic car wash tunnel. However, the paintwork
wear depends to a large extent on the kind of the car wash tunnel, the
brushes used, its water filtering and the type of cleaning and preservative
products.
Before going through a vehicle wash, be sure to take the usual precautions
such as closing the windows and sunroof.
If the vehicle has special accessories such as spoilers or a roof rack or two-
way radio aerial, etc., it is advisable to consult the car wash tunnel operator.
After washing, the brakes could take some time to respond as the brake
discs and pads could be wet, or even frozen in winter. Dry the brakes by
braking several times.
WARNING
Water, ice and salt on the brakes can reduce braking efficiency. Risk of
accident.
Washing by hand
Vehicle washing
– First soften the dirt and rinse it off with water. –
Clean your vehicle from top to bottom with a soft sponge, a
glove or a brush. Use very light pressure.
– Rinse the sponge or glove often with clean water.
– Special car shampoo should only be used for very stubborn dirt.
– Leave the wheels, sill panels etc. until last, using a different
sponge or glove.
– Rinse the vehicle thoroughly with water.
– Dry the vehicle surface gently with a chamois leather.
– In cold temperature, dry the rubber seals and their surfaces to
prevent them from freezing. Apply silicone spray to the rubber
seals.
After washing the vehicle
– After washing, avoid sudden and sharp braking. “Dry” the
brakes by braking several times ⇒ page 191, Braking capacity
and braking distance.
WARNING
● Wash your vehicle with the ignition switched off.
● Protect your hands and arms from cuts on sharp metal edges when
cleaning the underbody, the inside of the wheel housings etc. Risk of in-
jury.
● Water, ice and salt on the brakes can reduce braking efficiency. Risk
of accident.
Safety FirstOperating InstructionsPractical TipsTechnical Specifications