warning light Seat Exeo 2011 Workshop Manual
[x] Cancel search | Manufacturer: SEAT, Model Year: 2011, Model line: Exeo, Model: Seat Exeo 2011Pages: 313, PDF Size: 5.02 MB
Page 152 of 313
150Seats and storage compartments
WARNING
The electrical sockets and, therefore, any appliances connected to them
will only work when the ignition is switched on.
CAUTION
Always use the correct type of plugs to avoid damaging the sockets.
Note
The use of electrical appliances with the engine switched off will cause a
battery discharge.
230 volt socket for Europlug*
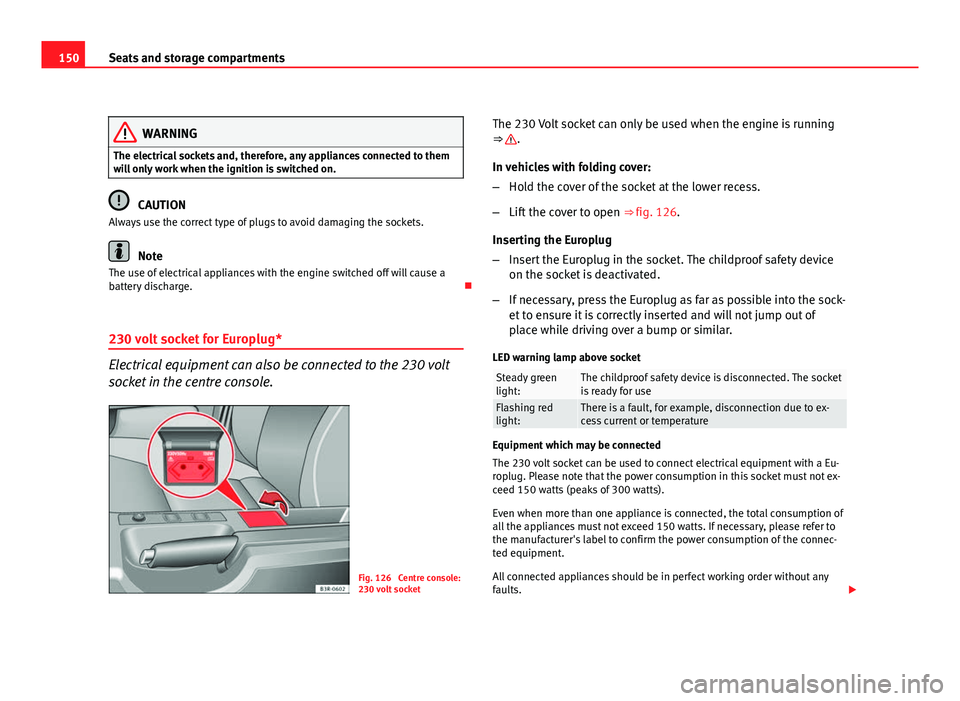
Electrical equipment can also be connected to the 230 volt
socket in the centre console.
Fig. 126 Centre console:
230 volt socket The 230 Volt socket can only be used when the engine is running
⇒
.
In vehicles with folding cover:
– Hold the cover of the socket at the lower recess.
– Lift the cover to open ⇒ fig. 126.
Inserting the Europlug
– Insert the Europlug in the socket. The childproof safety device
on the socket is deactivated.
– If necessary, press the Europlug as far as possible into the sock-
et to ensure it is correctly inserted and will not jump out of
place while driving over a bump or similar.
LED warning lamp above socket
Steady green
light:The childproof safety device is disconnected. The socket
is ready for use
Flashing red
light:There is a fault, for example, disconnection due to ex-
cess current or temperature
Equipment which may be connected
The 230 volt socket can be used to connect electrical equipment with a Eu-
roplug. Please note that the power consumption in this socket must not ex-
ceed 150 watts (peaks of 300 watts).
Even when more than one appliance is connected, the total consumption of
all the appliances must not exceed 150 watts. If necessary, please refer to
the manufacturer's label to confirm the power consumption of the connec-
ted equipment.
All connected appliances should be in perfect working order without any
faults.
Page 154 of 313
152Seats and storage compartments
Compartments
Overview
There are several storage compartments at various points in
the vehicle.
Your vehicle has the following storage compartments:
First-aid kit* Emergency triangle* Glove compartment⇒ page 152Storage compartment in the centre console On-board documentation compartment* Compartments in the door trims⇒ page 153Coat hooks⇒ page 153Rear shelf⇒ page 143Side storage compartment in luggage com-
partment
Some of the compartments listed are only provided in certain models or are
optional extras. Glove compartment
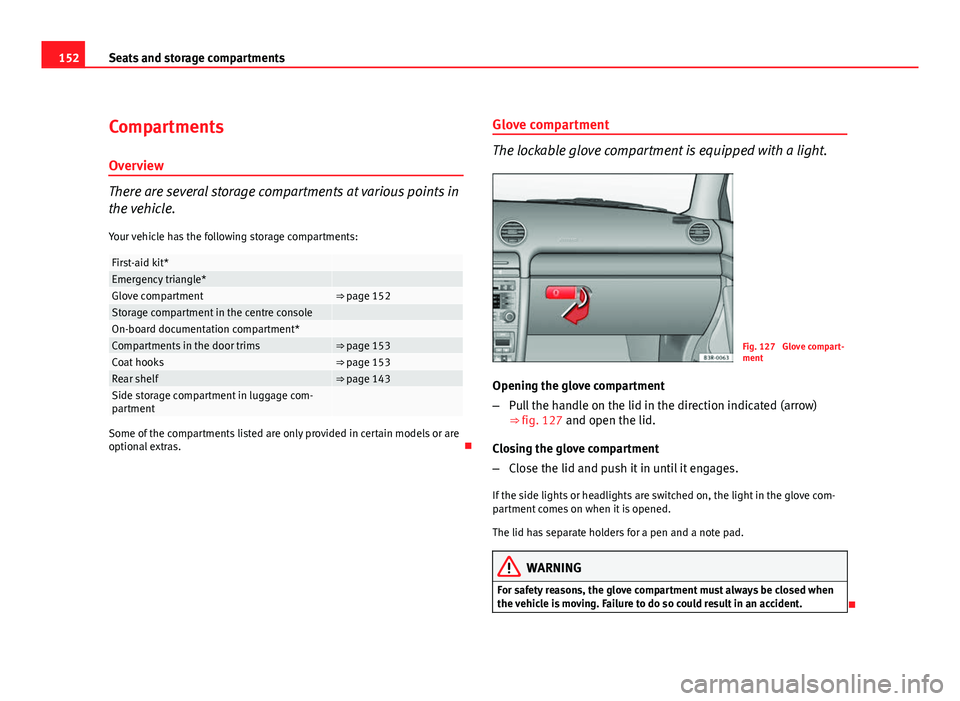
The lockable glove compartment is equipped with a light.
Fig. 127 Glove compart-
ment
Opening the glove compartment
– Pull the handle on the lid in the direction indicated (arrow)
⇒ fig. 127 and open the lid.
Closing the glove compartment
– Close the lid and push it in until it engages.
If the side lights or headlights are switched on, the light in the glove com-
partment comes on when it is opened.
The lid has separate holders for a pen and a note pad.
WARNING
For safety reasons, the glove compartment must always be closed when
the vehicle is moving. Failure to do so could result in an accident.
Page 155 of 313

153
Seats and storage compartments
Compartments in the door trim
Storage compartments are provided in the door trims.
Fig. 128 Door trim with
storage compartment
WARNING
The storage compartments in the door trims should only be used to store
small objects. Make sure that they are stored safely inside the compart-
ment, as they might otherwise impair the protection offered by the side
airbags.
Coat hooks
There is a coat hook above each of the rear doors.
Fig. 129 Area above the
rear doors: Coat hooks
WARNING
● Please make sure that any items of clothing hanging from the coat
hooks do not obstruct your view to the rear.
● The coat hooks should only be used for lightweight clothing. Do not
leave any heavy or sharp objects in the pockets.
● Do not use clothes hangers to hang up the clothing, as this could in-
terfere with the function of the head-protection airbags*.
Safety FirstOperating InstructionsPractical TipsTechnical Specifications
Page 168 of 313
166Driving
The Electronic Stability Programme (ESP) contains the electronic differential
lock (EDL) and the traction control system (TCS). The ESP function works to-
gether with the ABS. If a fault in the ABS occurs, both warning lamps light
up, but if the ESP fails, only the ESP warning lamp lights up.
The ESP is started automatically when the engine is started.
The ESP switch deactivates both TCS and ESP functions. The ESP, in spite of
being deactivated, will always self-connect when necessary if brakes are be-
ing used.
The TCS can be deactivated when in cases where wheel sliding is desirable.
For example:
● When driving with snow chains.
● When driving in deep snow or on loose surfaces.
● When the vehicle is stuck, to rock it backwards and forwards.
Next, the button should be pressed to reactivate the TCS.
When does the lamp light up or flash
●
On switching the ignition on, it lights up for about two seconds to carry
out a function control.
● The warning lamp will start flashing when the vehicle is moving if the
ESP or the TCS is activated.
● It will light up continuously if there is a malfunction in the ESP.
WARNING
● The Electronic Stability Programme (ESP) cannot defy the laws of
physics. This should be kept in mind, particularly on slippery and wet
roads and when towing a trailer.
● Always adapt your driving style to suit the condition of the roads and
the traffic situation. Do not let the extra safety afforded by ESP tempt you
into taking any risks when driving, as this can cause accidents.
● Please refer to the corresponding warning notes on ESP in
⇒ page 184, Intelligent technology.
Ignition lock Ignition key positions
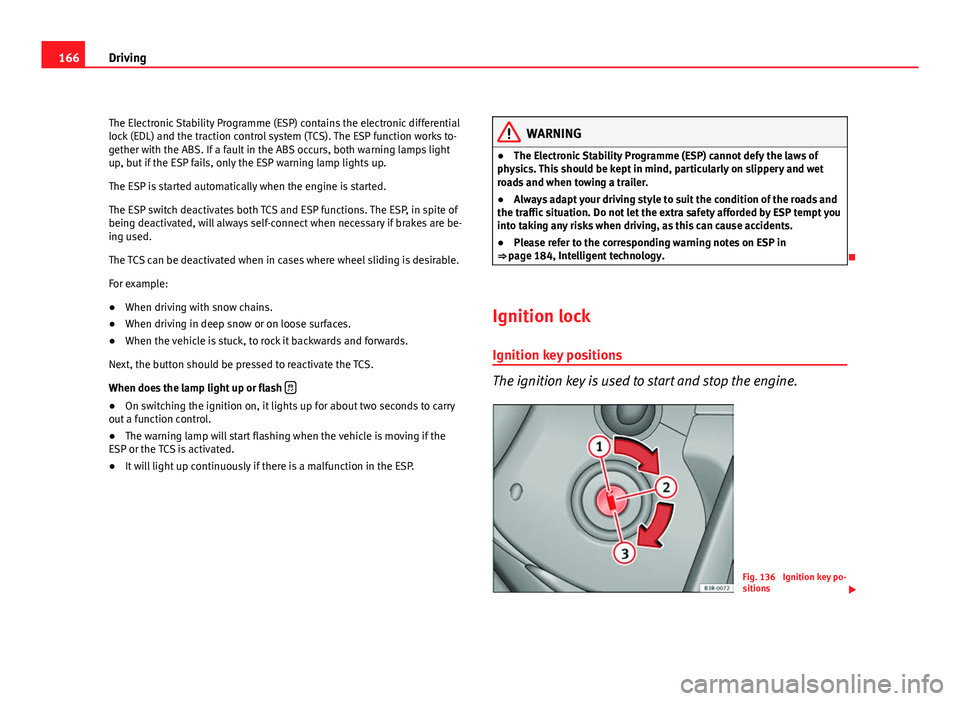
The ignition key is used to start and stop the engine.
Fig. 136 Ignition key po-
sitions
Page 170 of 313
168Driving
Vehicles with a petrol engine:
–Use the foot brake.
– Manual gearbox: Push the clutch pedal all the way down.
– Move the gear lever into neutral (automatic gearbox: selector
lever to P or N) ⇒
.
– Turn the ignition key to position 3
without pressing the accel-
erator.
– Release the ignition key as soon as the engine starts (the start-
er motor must not be allowed to run on with the engine).
Vehicles with a diesel engine:
– Use the foot brake.
– Manual gearbox: Push the clutch pedal all the way down. Other-
wise, the engine will not start.
– Move the gear lever into neutral (automatic gearbox: selector
lever to P or N) ⇒
.
– Turn the ignition key to position 2
. The pre-heating indicator
light comes on while the glow plugs are preheating.
– When the indicator light
goes out, turn the ignition key to
position 3
. Do not press the accelerator.
– Having completed the previous action the key can be released
immediately, it will return to position 2
and the engine will
have started.
When starting a very cold engine, it may be a little noisy for the first few sec-
onds until oil pressure has built up in the hydraulic valve compensators.
This is quite normal, and no cause for concern. If the engine fails to start straight away, stop after 10 seconds and try again
after about half a minute.
Glow plug system*
To assist starting at low temperatures,
diesel engines are equipped with a
glow plug preheating system. The preheating time depends on the coolant
temperature and the outside temperature. Start the engine as soon as the
glow plug indicator light goes out.
When the engine is warm or at outside temperatures above +8 °C, the glow
plug indicator light will only come on for about one second. This means that
the engine can be started immediately.
If the engine will not start...
● ⇒ page 280
● ⇒ page 283
● ⇒ page 217, Refuelling
WARNING
Never run the engine in confined spaces, as the exhaust gases are poi-
sonous.
CAUTION
Avoid high engine speeds, full throttle and extreme load conditions until
the engine has reached its normal operating temperature, otherwise this
can damage the engine.
For the sake of the environment
Do not warm up the engine by running the engine with the vehicle station-
ary. Start immediately. This will help avoid unnecessary exhaust emissions.
Page 171 of 313

169
Driving
Stopping the engine
– Turn the ignition key to position 1 ⇒ fig. 137.
WARNING
● Never switch the engine off until the vehicle is stationary.
● The brake servo and the power steering system work only when the
engine is running. You need more strength to steer and brake the vehicle
when the engine is switched off. Given that you will be unable to steer
and brake as usual, this could lead to a risk of accidents and injuries.
CAUTION
If the engine has been running under high load for a long time, there is a
risk of heat building up in the engine compartment after the engine has
been switched off; this could cause engine damage. Therefore, you should
let the engine idle for approximately 2 minutes before you switch it off.
Note
After the engine is switched off the radiator fan may run on for up to 10 mi-
nutes, even if the ignition is switched off. It may also start running again af-
ter some time if the coolant temperature rises due to a build-up of heat un-
der the bonnet, or if the engine is already warm and the engine compart-
ment is heated up further by direct sunlight. Handbrake
Handbrake
The handbrake should be applied firmly to prevent the vehi-
cle from accidentally rolling away.
Fig. 138 Detailed view of
the centre console: Hand-
brake on
Applying the handbrake
– Pull the handbrake lever up all the way.
Releasing the handbrake
– Pull the lever up slightly and at the same time press in the re-
lease button ⇒ fig. 138 -arrow-.
– Keep the release button pressed and push the lever all the way
down ⇒
.
If you drive by mistake with the handbrake still applied, you will hear a
warning buzzer and the display will show the message:
Safety FirstOperating InstructionsPractical TipsTechnical Specifications
Page 172 of 313
170Driving
Handbrake on
The handbrake warning switches on after driving for 3 seconds at speeds
above 5 km/h.
The handbrake warning lamp lights up when the handbrake is applied
with the ignition on.
WARNING
Please note that the handbrake should be released all the way. If it is on-
ly partially released, this will cause rear brakes overheating, which can
impair the function of the brake system and could lead to an accident.
CAUTION
Once the vehicle has come to a standstill, always apply the handbrake firm-
ly and then, on a manual gearbox, engage a gear, or select P on an auto-
matic.
Parking
The following points will ensure there is no risk of the vehi-
cle rolling away accidentally after it is parked:
– Use the foot brake to stop the vehicle.
– Apply the handbrake firmly.
– Switch the engine off.
– On a manual gearbox engage 1st gear or on an automatic move
the selector lever to P ⇒
. When parking on slopes:
Turn the steering wheel so that the, if the vehicle moves, it will do so to-
wards the curb.
WARNING
● Do not leave anyone (especially children) in the vehicle when it is
locked. Locked doors could delay assistance in an emergency, potentially
putting lives at risk.
● Never leave children unsupervised in the vehicle. They could release
e.g. the handbrake or gear lever, moving the vehicle and causing an acci-
dent.
Parking aid acoustic system General notes
Various systems are available to help you when parking or manoeuvring in
tight spaces, depending on the equipment fitted on your vehicle.
The SEAT Parking System gives an acoustic warning if there are any obsta-
cles behind your vehicle ⇒ page 171.
When you are parking, SEAT Parking System Plus warns you acoustically
and optically about obstacles in front of and behind the vehicle
⇒ page 171.
Note
To ensure the acoustic parking aid works properly, the sensors must be kept
clean and free of snow and ice.
Page 174 of 313
172Driving
Activating/Deactivating
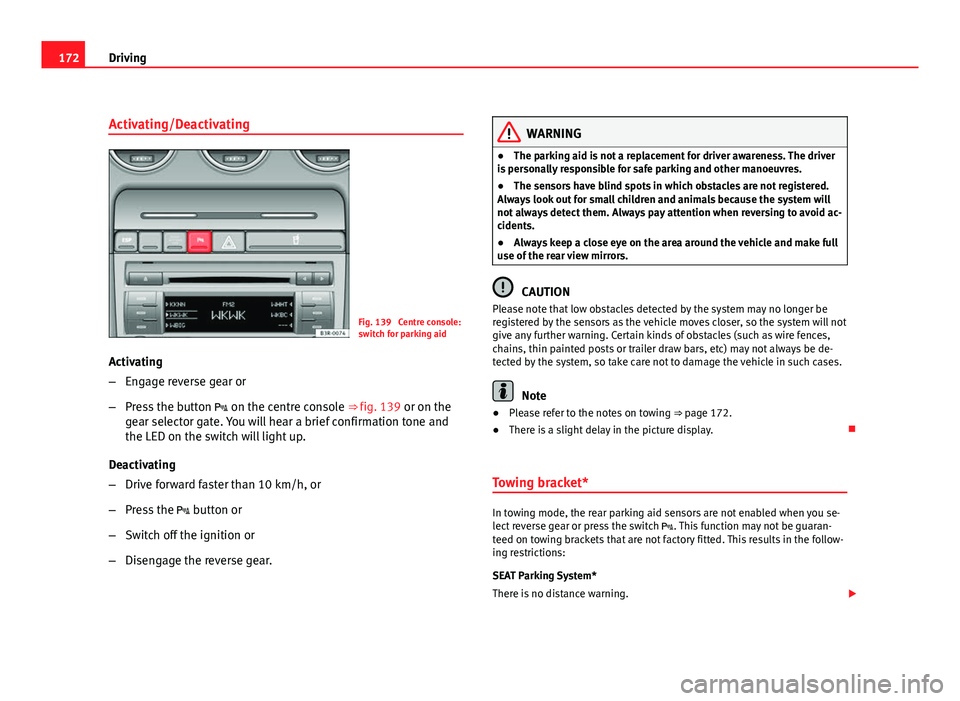
Fig. 139 Centre console:
switch for parking aid
Activating
– Engage reverse gear or
– Press the button on the centre console ⇒ fig. 139 or on the
gear selector gate. You will hear a brief confirmation tone and
the LED on the switch will light up.
Deactivating
– Drive forward faster than 10 km/h, or
– Press the button or
– Switch off the ignition or
– Disengage the reverse gear.
WARNING
● The parking aid is not a replacement for driver awareness. The driver
is personally responsible for safe parking and other manoeuvres.
● The sensors have blind spots in which obstacles are not registered.
Always look out for small children and animals because the system will
not always detect them. Always pay attention when reversing to avoid ac-
cidents.
● Always keep a close eye on the area around the vehicle and make full
use of the rear view mirrors.
CAUTION
Please note that low obstacles detected by the system may no longer be
registered by the sensors as the vehicle moves closer, so the system will not
give any further warning. Certain kinds of obstacles (such as wire fences,
chains, thin painted posts or trailer draw bars, etc) may not always be de-
tected by the system, so take care not to damage the vehicle in such cases.
Note
● Please refer to the notes on towing ⇒ page 172.
● There is a slight delay in the picture display.
Towing bracket*
In towing mode, the rear parking aid sensors are not enabled when you se-
lect reverse gear or press the switch . This function may not be guaran-
teed on towing brackets that are not factory fitted. This results in the follow-
ing restrictions:
SEAT Parking System*
There is no distance warning.
Page 175 of 313
173
Driving
SEAT Parking System Plus*
There is no rear distance warning. The system will still give a warning when
obstacles are detected while driving forward.
Fault messages*
If you hear a long beep for a few seconds and the LED on the button*
starts flashing when you switch on the parking aid, a system fault has oc-
curred. Please have the fault corrected by a Dealer or qualified workshop.
Note
If the fault is not corrected before you switch off the ignition, it will only be
indicated by the flashing LED on the switch * the next time you switch on
the parking aid.
Cruise speed* (Cruise control system)
Introduction
The cruise control system allows you to maintain a constant
speed. Using this system, any speed over 30 km/h can be kept constant, as long as
the engine power allows it. This is subject to power output and braking abil-
ity of the engine. This helps to reduce fatigue, especially on long journeys.
The indicator lamp on the instrument panel lights up when the cruise
control system is operating.
WARNING
For safety reasons, the cruise control system should not be used in dense
traffic or poor road conditions (with ice, slippery surfaces, loose grit or
gravel), as this could cause an accident.
CAUTION
In vehicles with a manual gearbox: do not go into neutral if the device is en-
abled without previously releasing the clutch, as the engine will increase its
revs and, under certain conditions, could break down.
Note
The cruise control cannot maintain a constant speed when travelling down
steep hills. The vehicle tends to accelerate under its own weight. Change
down to a lower gear or use the foot brake to slow the vehicle.
Safety FirstOperating InstructionsPractical TipsTechnical Specifications
Page 178 of 313
176Driving
Manual gearbox
Driving with a manual gearbox
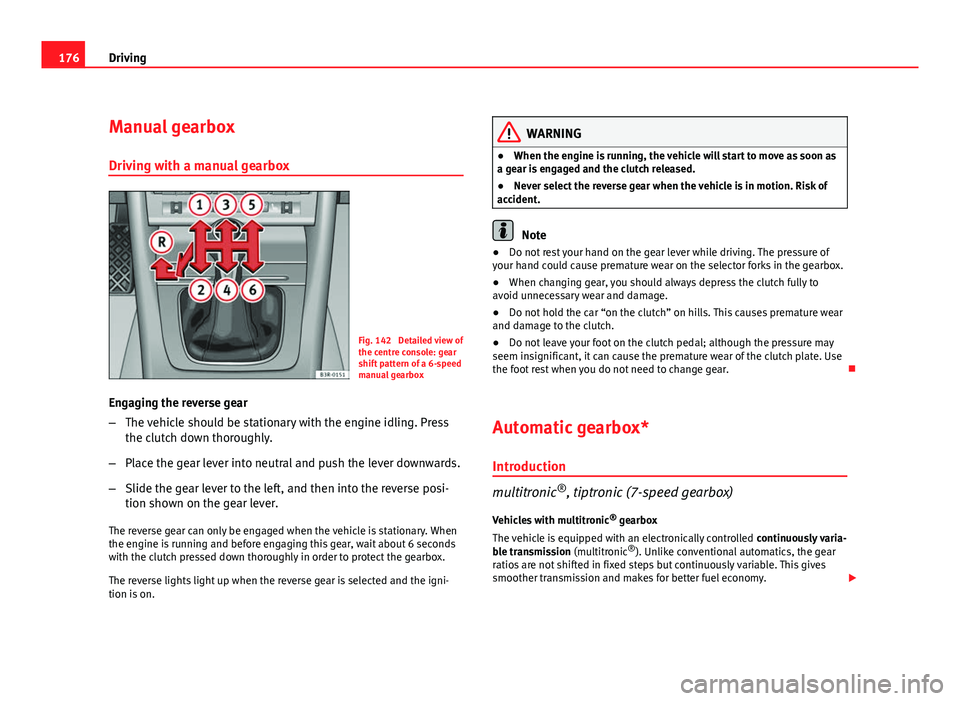
Fig. 142 Detailed view of
the centre console: gear
shift pattern of a 6-speed
manual gearbox
Engaging the reverse gear
– The vehicle should be stationary with the engine idling. Press
the clutch down thoroughly.
– Place the gear lever into neutral and push the lever downwards.
– Slide the gear lever to the left, and then into the reverse posi-
tion shown on the gear lever.
The reverse gear can only be engaged when the vehicle is stationary. When
the engine is running and before engaging this gear, wait about 6 seconds
with the clutch pressed down thoroughly in order to protect the gearbox.
The reverse lights light up when the reverse gear is selected and the igni-
tion is on.
WARNING
● When the engine is running, the vehicle will start to move as soon as
a gear is engaged and the clutch released.
● Never select the reverse gear when the vehicle is in motion. Risk of
accident.
Note
● Do not rest your hand on the gear lever while driving. The pressure of
your hand could cause premature wear on the selector forks in the gearbox.
● When changing gear, you should always depress the clutch fully to
avoid unnecessary wear and damage.
● Do not hold the car “on the clutch” on hills. This causes premature wear
and damage to the clutch.
● Do not leave your foot on the clutch pedal; although the pressure may
seem insignificant, it can cause the premature wear of the clutch plate. Use
the foot rest when you do not need to change gear.
Automatic gearbox* Introduction
multitronic ®
, tiptronic (7-speed gearbox)
Vehicles with multitronic ®
gearbox
The vehicle is equipped with an electronically controlled continuously varia-
ble transmission (multitronic ®
). Unlike conventional automatics, the gear
ratios are not shifted in fixed steps but continuously variable. This gives
smoother transmission and makes for better fuel economy.