technical specifications Seat Exeo 2013 Owner's Guide
[x] Cancel search | Manufacturer: SEAT, Model Year: 2013, Model line: Exeo, Model: Seat Exeo 2013Pages: 319, PDF Size: 4.81 MB
Page 45 of 319
43
Airbag system
WARNING (Continued)
● Any work on the curtain airbag system or removal and installation of
the airbag components for other repairs (such as removal of the roof lin-
ing) should only be performed by a specialised workshop. Otherwise,
faults may occur during the airbag system operation.
● Do not attempt to modify components of the airbag system in any
way.
● The side and head airbags are managed through sensors located in
the interior of the front doors. To ensure the correct operation of the side
and head airbags neither the doors nor the door panels should be modi-
fied in any way (e.g. fitting loudspeakers). If the front door is damaged,
the airbag system may not work correctly. All work carried out on the
front door must be done in a specialised workshop.
Safety FirstOperating instructionsPractical TipsTechnical Specifications
Page 47 of 319
45
Airbag system
– Check that the control lamp on the instrument panel ⇒ Fig. 29
does not light up when the ignition is switched on ⇒
.
WARNING
● The driver is responsible for the proper position of the key-operated
switch.
● You should only deactivate the front passenger front airbag when, in
exceptional cases, you have to use a rear-facing child seat on the front
passenger seat ⇒ page 46, Child safety.
● Never install a child seat facing backwards on the front passenger
seat unless the front passenger front airbag has been disabled. Other-
wise, there is a risk of death. If under exceptional circumstances it is nec-
essary to transport a child in a rear-facing child seat on the front passen-
ger seat, you must always disable the front passenger front airbag.
● As soon as the child seat is no longer needed on the front passenger
seat, enable the front passenger front airbag again.
● Only deactivate the front passenger front airbag when the ignition is
off, otherwise a fault may occur in the airbag system, which could cause
the airbag to not deploy properly or not deploy at all.
WARNING (Continued)
● When the front passenger front airbag is deactivated, if the control
lamp AIRBAG OFF is not continuously lit up, there may be a fault in the
airbag system:
–Have the airbag system inspected immediately by a specialised
workshop.
– Do not use a child seat on the front passenger seat! The front pas-
senger front airbag could be triggered despite the fact that there is a
fault in the system and, as a result, a child could sustain serious or
fatal injuries.
– It is unpredictable whether the front passenger airbag will deploy
in the event of an accident. Warn all your passengers of this.
● When using the ignition key to activate/deactivate the front passen-
ger front airbag, only the front passenger airbag will be activated/deacti-
vated. The side airbag and head airbag on the passenger side will remain
active.
Safety FirstOperating instructionsPractical TipsTechnical Specifications
Page 49 of 319
47
Child safety
WARNING
● Never install a child seat facing backwards on the front passenger
seat unless the front passenger front airbag has been disabled. Risk of
potentially fatal injuries to the child! However, if it is necessary, in excep-
tional cases, to transport a child in the front passenger seat, the front
passenger front airbag must always be disabled ⇒ page 44, Deactivating
airbags. If the passenger seat has a height adjustment option, move it to
the highest position.
● For those vehicles that do not include a key lock switch to deactivate
the airbag, the vehicle must be taken to a Technical Service.
● All vehicle occupants, especially children, must assume the proper
sitting position and be properly belted in while travelling.
● Never hold children or babies on your lap, this can result in potential-
ly fatal injuries to the child!
● Never allow a child to be transported in a vehicle without being prop-
erly secured, or to stand up or kneel on a seat while travelling. In an acci-
dent, the child could be flung through the vehicle, causing possibly fatal
injuries to themselves and to the other vehicle occupants.
● If children assume an improper sitting position when the vehicle is
moving, they expose themselves to greater risk of injury in the event of a
sudden braking manoeuvre or in an accident. This is particularly impor-
tant if the child is travelling on the front passenger seat and the airbag
system is triggered in an accident; as this could cause serious injury or
even death.
● A suitable child seat can protect your child!
● Never leave an unsupervised child alone on a child seat or in the vehi-
cle.
● Depending on weather conditions, it may become extremely hot or
cold inside the vehicle. This can be fatal.WARNING (Continued)
● Children who are less than 1.5 metres tall must not wear a normal
seat belt without a child seat, as this could cause injuries to the abdomi-
nal and neck areas during a sudden braking manoeuvre or in an accident.
● Do not allow the seat belt to become twisted or jammed, or to rub on
any sharp edges.
● Incorrectly worn seat belts can cause injuries even in a minor colli-
sion or in sudden braking manoeuvres.
● The seat belt provides maximum protection only when the seat belt is
properly positioned ⇒ page 23, Seat belts.
● Only one child may occupy a child seat ⇒ page 48, Child seats.
Safety FirstOperating instructionsPractical TipsTechnical Specifications
Page 51 of 319
49
Child safety
Group 1 child seats
A suitable child seat and a correctly adjusted seat belt can
help you to protect your child.
Fig. 31 A category 1 for-
ward-facing child seat fit-
ted on the rear seat
Child seats using the ISOFIX system or seats in which the child faces the
rear of the vehicle are most appropriate for babies and small children
weighing between 9 and 18 kg.
Follow the manufacturer's instructions and observe any statutory require-
ments when installing and using child seats.
We recommend you to always include the manufacturer's Child Seat Instruc-
tion Manual together with the on-board documentation.
WARNING
Read and always observe information and warnings concerning the use
of child seats ⇒
in Safety notes on using child seats on page 47.Group 2 and 3 child seats
A suitable child seat and a correctly adjusted seat belt can
help you to protect your child.
Fig. 32 Forward-facing
child seat installed on
rear seat
Follow the manufacturer's instructions and observe any statutory require-
ments when installing and using child seats.
We recommend you to always include the manufacturer's Child Seat Instruc-
tion Manual together with the on-board documentation.
Group 2 child seats
Children under 7 years of age weighing between 15 and 25 kg are best pro-
tected by group 2 child seats together with properly adjusted seat belts.
Group 3 child seats
Children over 7 years of age weighing between 22 and 36 kg but less than
1.5 metres tall are best protected by child seats with head restraints togeth-
er with properly worn seat belts ⇒ Fig. 32.
Safety FirstOperating instructionsPractical TipsTechnical Specifications
Page 53 of 319
51
Child safety
Securing child seats
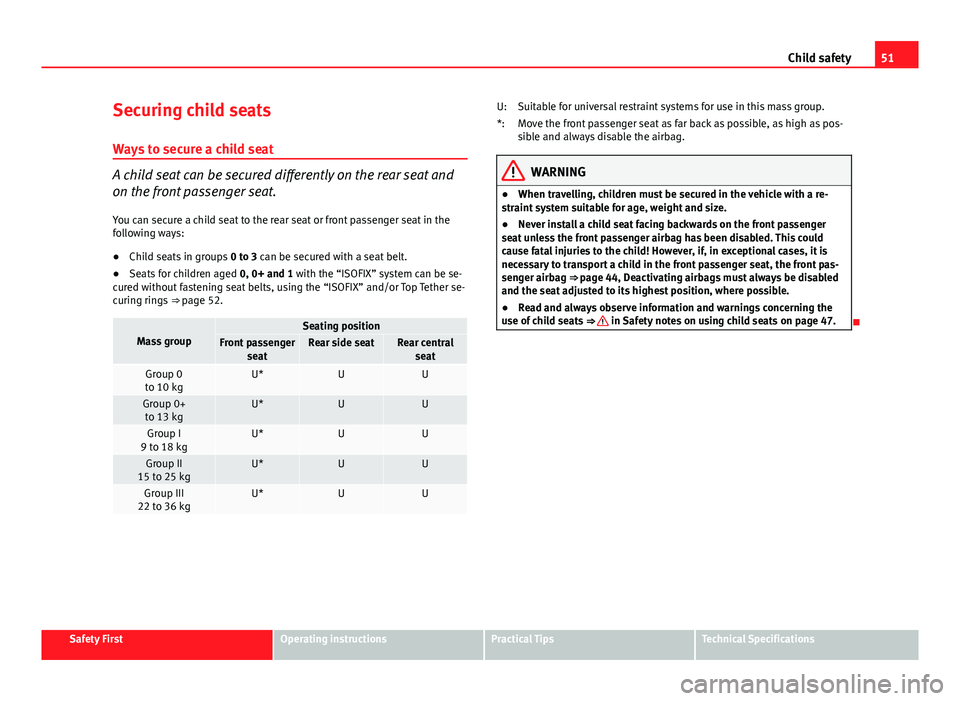
Ways to secure a child seat
A child seat can be secured differently on the rear seat and
on the front passenger seat. You can secure a child seat to the rear seat or front passenger seat in the
following ways:
● Child seats in groups 0 to 3 can be secured with a seat belt.
● Seats for children aged 0, 0+ and 1 with the “ISOFIX” system can be se-
cured without fastening seat belts, using the “ISOFIX” and/or Top Tether se-
curing rings ⇒ page 52.
Mass groupSeating positionFront passenger
seatRear side seatRear centralseat
Group 0
to 10 kgU*UU
Group 0+ to 13 kgU*UU
Group I
9 to 18 kgU*UU
Group II
15 to 25 kgU*UU
Group III
22 to 36 kgU*UU
Suitable for universal restraint systems for use in this mass group.
Move the front passenger seat as far back as possible, as high as pos-
sible and always disable the airbag.
WARNING
● When travelling, children must be secured in the vehicle with a re-
straint system suitable for age, weight and size.
● Never install a child seat facing backwards on the front passenger
seat unless the front passenger airbag has been disabled. This could
cause fatal injuries to the child! However, if, in exceptional cases, it is
necessary to transport a child in the front passenger seat, the front pas-
senger airbag ⇒ page 44, Deactivating airbags must always be disabled
and the seat adjusted to its highest position, where possible.
● Read and always observe information and warnings concerning the
use of child seats ⇒
in Safety notes on using child seats on page 47.
U:
*:
Safety FirstOperating instructionsPractical TipsTechnical Specifications
Page 55 of 319
53
Child safety
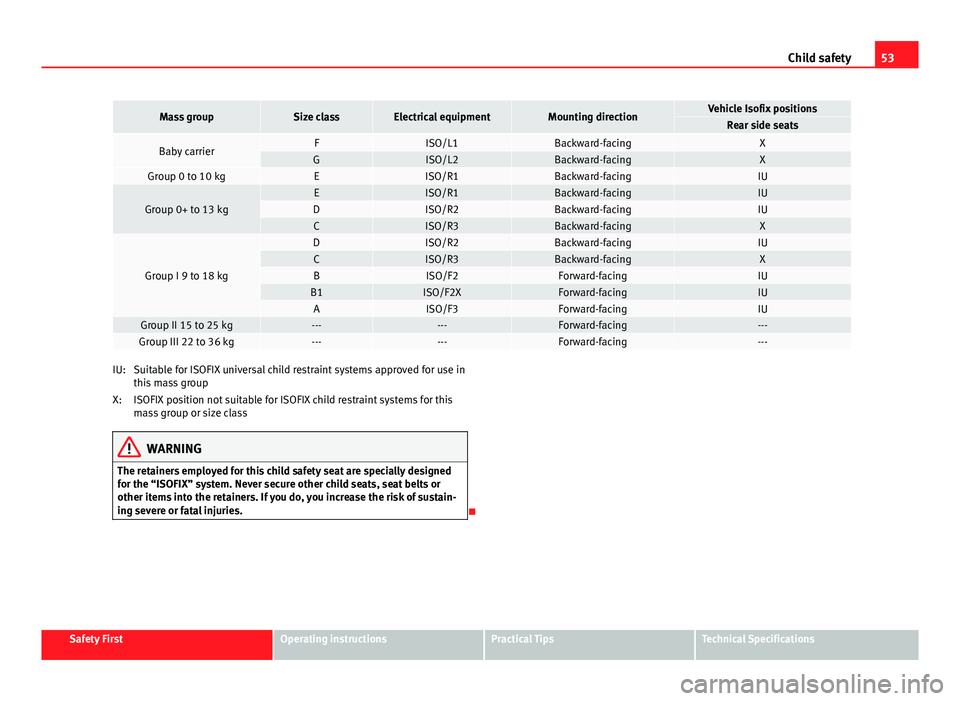
Mass groupSize classElectrical equipmentMounting directionVehicle Isofix positionsRear side seats
Baby carrierFISO/L1Backward-facingXGISO/L2Backward-facingXGroup 0 to 10 kgEISO/R1Backward-facingIU
Group 0+ to 13 kgEISO/R1Backward-facingIUDISO/R2Backward-facingIUCISO/R3Backward-facingX
Group I 9 to 18 kg
DISO/R2Backward-facingIUCISO/R3Backward-facingXBISO/F2Forward-facingIUB1ISO/F2XForward-facingIUAISO/F3Forward-facingIUGroup II 15 to 25 kg------Forward-facing---Group III 22 to 36 kg------Forward-facing---
Suitable for ISOFIX universal child restraint systems approved for use in
this mass group
ISOFIX position not suitable for ISOFIX child restraint systems for this
mass group or size class
WARNING
The retainers employed for this child safety seat are specially designed
for the “ISOFIX” system. Never secure other child seats, seat belts or
other items into the retainers. If you do, you increase the risk of sustain-
ing severe or fatal injuries.
IU:
X:
Safety FirstOperating instructionsPractical TipsTechnical Specifications
Page 57 of 319
55
Child safety
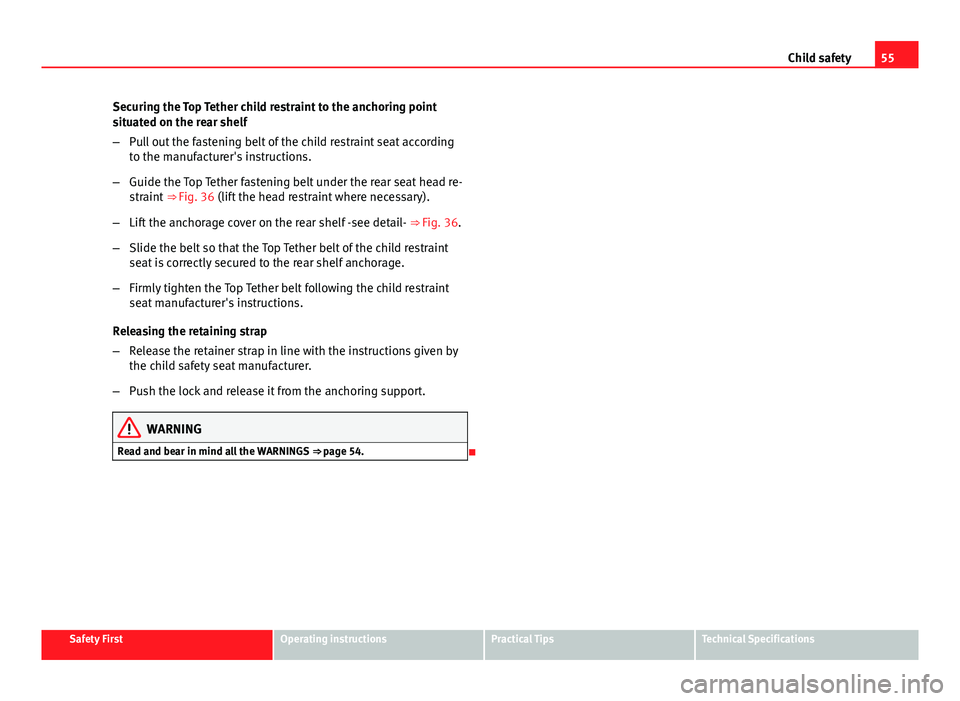
Securing the Top Tether child restraint to the anchoring point
situated on the rear shelf
– Pull out the fastening belt of the child restraint seat according
to the manufacturer's instructions.
– Guide the Top Tether fastening belt under the rear seat head re-
straint ⇒ Fig. 36 (lift the head restraint where necessary).
– Lift the anchorage cover on the rear shelf -see detail- ⇒ Fig. 36.
– Slide the belt so that the Top Tether belt of the child restraint
seat is correctly secured to the rear shelf anchorage.
– Firmly tighten the Top Tether belt following the child restraint
seat manufacturer's instructions.
Releasing the retaining strap
– Release the retainer strap in line with the instructions given by
the child safety seat manufacturer.
– Push the lock and release it from the anchoring support.
WARNING
Read and bear in mind all the WARNINGS ⇒ page 54.
Safety FirstOperating instructionsPractical TipsTechnical Specifications
Page 59 of 319
57
Cockpit
Operating instructions Cockpit
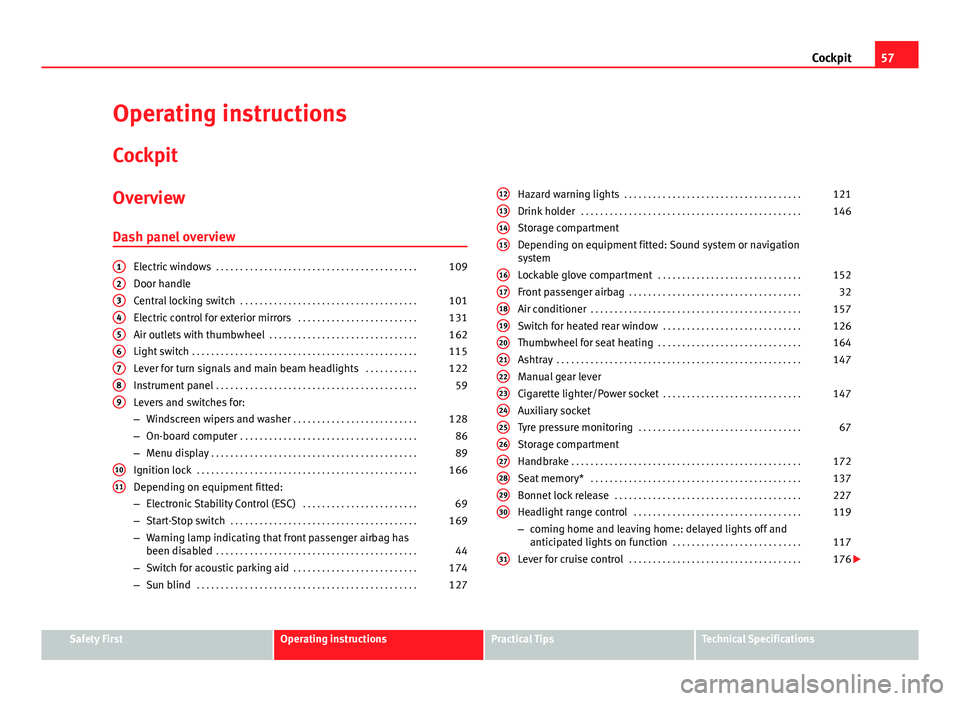
Overview Dash panel overview
Electric windows . . . . . . . . . . . . . . . . . . . . . . . . . . . . . . . . . . . . . . . . . . 109
Door handle
Central locking switch . . . . . . . . . . . . . . . . . . . . . . . . . . . . . . . . . . . . . 101
Electric control for exterior mirrors . . . . . . . . . . . . . . . . . . . . . . . . .131
Air outlets with thumbwheel . . . . . . . . . . . . . . . . . . . . . . . . . . . . . . . 162
Light switch . . . . . . . . . . . . . . . . . . . . . . . . . . . . . . . . . . . . . . . . . . . . . . . 115
Lever for turn signals and main beam headlights . . . . . . . . . . .122
Instrument panel . . . . . . . . . . . . . . . . . . . . . . . . . . . . . . . . . . . . . . . . . . 59
Levers and switches for:
– Windscreen wipers and washer . . . . . . . . . . . . . . . . . . . . . . . . . . 128
– On-board computer . . . . . . . . . . . . . . . . . . . . . . . . . . . . . . . . . . . . . 86
– Menu display . . . . . . . . . . . . . . . . . . . . . . . . . . . . . . . . . . . . . . . . . . . 89
Ignition lock . . . . . . . . . . . . . . . . . . . . . . . . . . . . . . . . . . . . . . . . . . . . . . 166
Depending on equipment fitted:
– Electronic Stability Control (ESC) . . . . . . . . . . . . . . . . . . . . . . . .69
– Start-Stop switch . . . . . . . . . . . . . . . . . . . . . . . . . . . . . . . . . . . . . . . 169
– Warning lamp indicating that front passenger airbag has
been disabled . . . . . . . . . . . . . . . . . . . . . . . . . . . . . . . . . . . . . . . . . . 44
– Switch for acoustic parking aid . . . . . . . . . . . . . . . . . . . . . . . . . . 174
– Sun blind . . . . . . . . . . . . . . . . . . . . . . . . . . . . . . . . . . . . . . . . . . . . . . 127
123456789
1011
Hazard warning lights
. . . . . . . . . . . . . . . . . . . . . . . . . . . . . . . . . . . . . 121
Drink holder . . . . . . . . . . . . . . . . . . . . . . . . . . . . . . . . . . . . . . . . . . . . . . 146
Storage compartment
Depending on equipment fitted: Sound system or navigation
system
Lockable glove compartment . . . . . . . . . . . . . . . . . . . . . . . . . . . . . . 152
Front passenger airbag . . . . . . . . . . . . . . . . . . . . . . . . . . . . . . . . . . . . 32
Air conditioner . . . . . . . . . . . . . . . . . . . . . . . . . . . . . . . . . . . . . . . . . . . . 157
Switch for heated rear window . . . . . . . . . . . . . . . . . . . . . . . . . . . . . 126
Thumbwheel for seat heating . . . . . . . . . . . . . . . . . . . . . . . . . . . . . . 164
Ashtray . . . . . . . . . . . . . . . . . . . . . . . . . . . . . . . . . . . . . . . . . . . . . . . . . . . 147
Manual gear lever
Cigarette lighter/Power socket . . . . . . . . . . . . . . . . . . . . . . . . . . . . . 147
Auxiliary socket
Tyre pressure monitoring . . . . . . . . . . . . . . . . . . . . . . . . . . . . . . . . . . 67
Storage compartment
Handbrake . . . . . . . . . . . . . . . . . . . . . . . . . . . . . . . . . . . . . . . . . . . . . . . . 172
Seat memory* . . . . . . . . . . . . . . . . . . . . . . . . . . . . . . . . . . . . . . . . . . . . 137
Bonnet lock release . . . . . . . . . . . . . . . . . . . . . . . . . . . . . . . . . . . . . . . 227
Headlight range control . . . . . . . . . . . . . . . . . . . . . . . . . . . . . . . . . . . 119
– coming home and leaving home: delayed lights off and
anticipated lights on function . . . . . . . . . . . . . . . . . . . . . . . . . . . 117
Lever for cruise control . . . . . . . . . . . . . . . . . . . . . . . . . . . . . . . . . . . . 176
12131415
161718192021222324252627282930
31
Safety FirstOperating instructionsPractical TipsTechnical Specifications
Page 61 of 319
59
Cockpit
Instruments Instrument panel overview
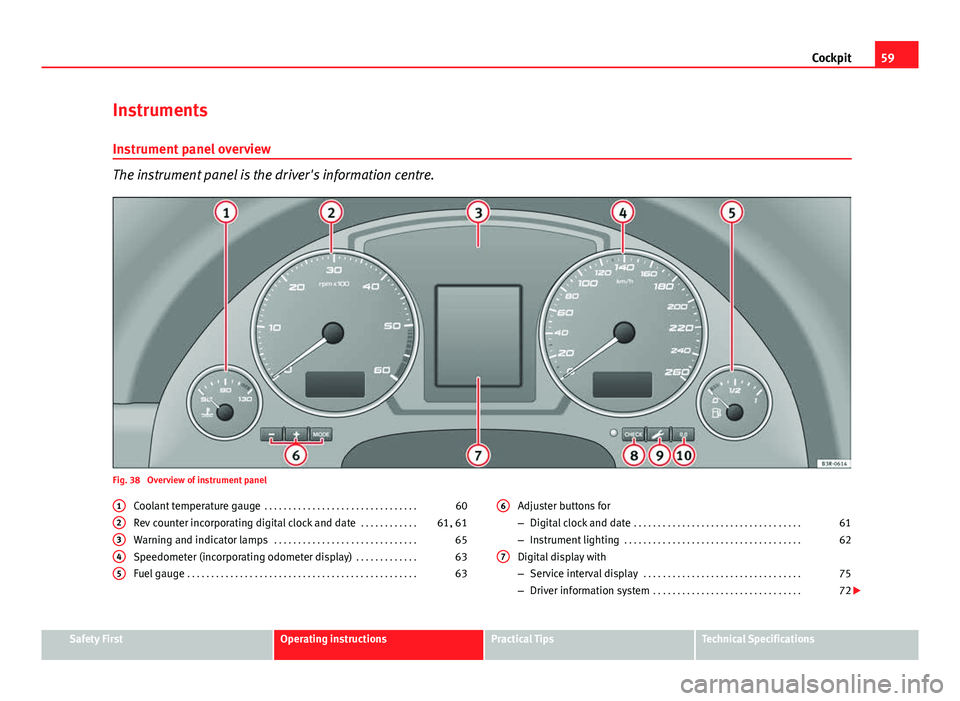
The instrument panel is the driver's information centre.
Fig. 38 Overview of instrument panel Coolant temperature gauge . . . . . . . . . . . . . . . . . . . . . . . . . . . . . . . . 60
Rev counter incorporating digital clock and date . . . . . . . . . . . .61, 61
Warning and indicator lamps . . . . . . . . . . . . . . . . . . . . . . . . . . . . . . 65
Speedometer (incorporating odometer display) . . . . . . . . . . . . .63
Fuel gauge . . . . . . . . . . . . . . . . . . . . . . . . . . . . . . . . . . . . . . . . . . . . . . . . 63
1
2345
Adjuster buttons for
–
Digital clock and date . . . . . . . . . . . . . . . . . . . . . . . . . . . . . . . . . . . 61
– Instrument lighting . . . . . . . . . . . . . . . . . . . . . . . . . . . . . . . . . . . . . 62
Digital display with
– Service interval display . . . . . . . . . . . . . . . . . . . . . . . . . . . . . . . . . 75
– Driver information system . . . . . . . . . . . . . . . . . . . . . . . . . . . . . . . 72
6
7
Safety FirstOperating instructionsPractical TipsTechnical Specifications
Page 63 of 319
61
Cockpit
Rev counter
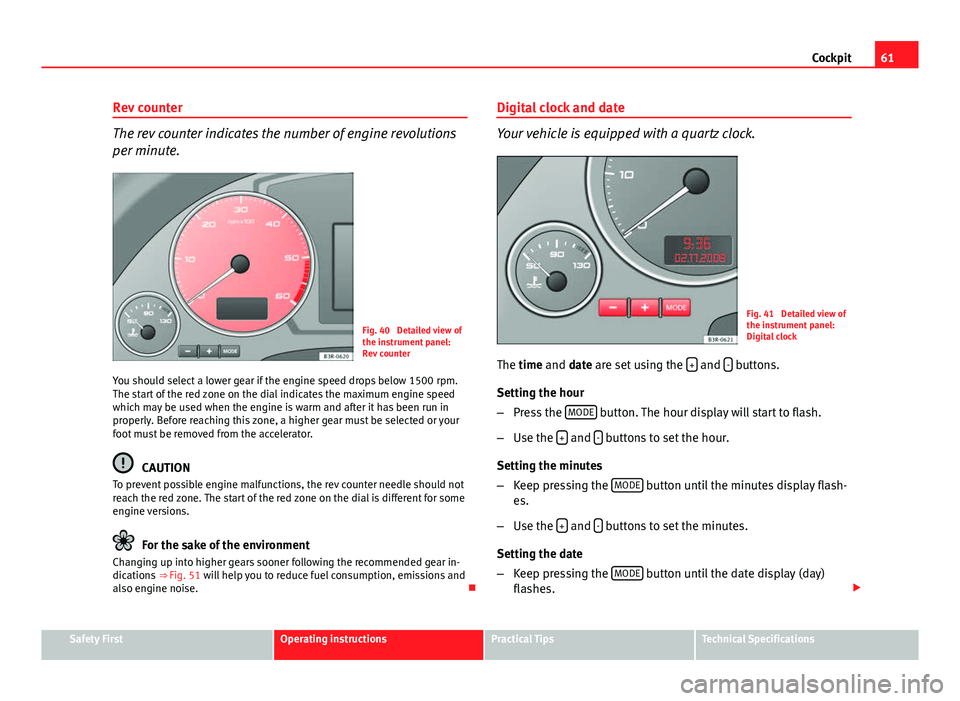
The rev counter indicates the number of engine revolutions
per minute.
Fig. 40 Detailed view of
the instrument panel:
Rev counter
You should select a lower gear if the engine speed drops below 1500 rpm.
The start of the red zone on the dial indicates the maximum engine speed
which may be used when the engine is warm and after it has been run in
properly. Before reaching this zone, a higher gear must be selected or your
foot must be removed from the accelerator.
CAUTION
To prevent possible engine malfunctions, the rev counter needle should not
reach the red zone. The start of the red zone on the dial is different for some
engine versions.
For the sake of the environment
Changing up into higher gears sooner following the recommended gear in-
dications ⇒ Fig. 51 will help you to reduce fuel consumption, emissions and
also engine noise. Digital clock and date
Your vehicle is equipped with a quartz clock.
Fig. 41 Detailed view of
the instrument panel:
Digital clock
The time and date are set using the +
and - buttons.
Setting the hour
– Press the MODE
button. The hour display will start to flash.
– Use the +
and - buttons to set the hour.
Setting the minutes
– Keep pressing the MODE
button until the minutes display flash-
es.
– Use the +
and - buttons to set the minutes.
Setting the date
– Keep pressing the MODE
button until the date display (day)
flashes.
Safety FirstOperating instructionsPractical TipsTechnical Specifications