ESP Seat Exeo ST 2013 Workshop Manual
[x] Cancel search | Manufacturer: SEAT, Model Year: 2013, Model line: Exeo ST, Model: Seat Exeo ST 2013Pages: 327, PDF Size: 5.07 MB
Page 254 of 327
252Wheels and tyres
2. The tyre pressures should only be checked when the tyres are
cold. The slightly raised pressures of warm tyres must not be re-
duced.
3. Adjust the tyre pressure to the load you are carrying.
Tyre pressure
The correct tyre pressure is especially important at high speeds. The pres-
sure should therefore be checked at least once a month and before starting
a journey.
The sticker with the tyre pressure values can be found on the inside of the
fuel tank flap. The tyre pressure values given are for cold tyres. Do not re-
duce the slightly raised pressures of warm tyres ⇒
.
WARNING
● Check the tyre pressure at least once per month. Checking the tyre
pressure is very important. If the tyre pressure is too high or too low,
there is an increased danger of accidents - particularly at high speeds.
● A tyre can easily burst if the pressure is too low, causing an accident!
● At continuously high speeds, a tyre with insufficient pressure flexes
more. In this way it becomes too hot, and this can cause tread separation
and tyre blow-out. Always observe the recommended tyre pressures.
● If the tyre pressure is too low or too high, the tyres will wear prema-
turely and the vehicle will not handle well. Risk of accident!
For the sake of the environment
Under-inflated tyres will increase fuel consumption. Tyre pressure monitoring*
The tyre pressure monitoring system constantly checks the
pressure of the tyres.
The system warns the driver in the event of a loss of pressure by means of
symbols and messages in the instrument panel display.
Note that tyre pressure also depends on tyre temperature. Tyre pressure in-
creases about 0.1 bar for each 10 °C in tyre temperature increase. The tyre
heats up while the vehicle is being driven and the tyre pressure will rise ac-
cordingly. For this reason, you should only adjust the tyre pressures when
they are cold (i.e. approximately at ambient temperature).
To ensure that the tyre pressure monitoring system works reliably, you
should check and, if necessary, adjust the tyre pressures at regular intervals
and store the correct pressures (reference values) in the system.
A tyre pressure information label is attached to the inside of the fuel tank
flap.
WARNING
● Never adjust tyre pressure when the tyres are hot. This may damage
or even burst the tyres. Risk of accident!
● An insufficiently inflated tyre flexes a lot more at high speeds and
causes significant heating of the tyre. Under these conditions, the tyre
bead may be released or the tyre may burst. Risk of accident!
For the sake of the environment
Under-inflated tyres lead to increased fuel consumption and tyre wear.
Page 256 of 327
254Wheels and tyres
Tyre pressure warning lamp on
When you switch on the ignition, the tyre pressure warning lamp will
light up for about 2 seconds. There is a fault in the system if the indicator
stays on permanently after switching on the ignition. The instrument panel
also display TMPS (Tyre Pressure Monitoring System). Please contact the
nearest specialised workshop as soon as possible.
The tyre pressure warning lamp lights up if the tyre pressure on one or
more wheels is significantly lower than the tyre pressure setting which was
confirmed by the driver ⇒
.
WARNING
● If the tyre pressure warning lamp lights up you must slow down
immediately and avoid any severe braking or steering manoeuvres. Stop
the vehicle as soon as possible and check the tyres and their pressure.
● The driver is responsible for maintaining correct tyre pressures.
Therefore, the tyre pressure must be regularly checked.
● Under certain conditions (e.g. driving at high speeds, on ice and snow
or on poor road surfaces) the tyre pressure warning lamp may not light
up immediately or not at all.
● Please ask your Technical Service or specialised workshop whether
run-flat tyres can be used on your vehicle. Fitting this type of tyre in an
undue manner could lead to your driving licence being taken away from
you. Furthermore, it may led to damage to the vehicle or, under certain
circumstances, may cause accidents.
● If you change normal tyres for run-flat tyres or vice versa, the control
unit must be reprogrammed by the Technical Service or a specialised
workshop.
Note
If you did not press the button for the tyre pressure monitoring system to
confirm a new tyre pressure setting after making changes to the tyre pres-
sures or changing one or more wheels, the warning lamp may light up
although the tyre pressures are correct. In this case, stop the vehicle as
soon as possible and, after examining the tyres, press the button for the
tyre pressure monitoring system.
Page 257 of 327

255
Wheels and tyres
Tyre useful life
The useful life of tyres is dependent on tyre pressure, driving
style and fitting.
Fig. 191 Tyre tread wear
indicators
Fig. 192 Diagram for
changing wheels Wear indicators
The original tyres on your vehicle have 1.6 mm high “tread wear indicators”
⇒ Fig. 191, running across the tread. Depending on the make, there will be
6 to 8 of them evenly spaced around the tyre. Markings on the tyre sidewall
(for instance the letters “TWI” or other symbols) indicate the positions of
the tread wear indicators. The minimum tread depth required by law is
1.6 mm (measured in the tread grooves next to the tread wear indicators).
Worn tyres must be replaced. Different figures may apply in export countries
⇒
.
Tyre pressure
Under-inflation or over-inflation will reduce the life of the tyres considerably
and also impair the vehicle's handling. The inflation pressures are listed on
a sticker on the inside of the fuel tank flap.
Correct inflation pressures are very important, especially at high speeds.
The pressure should therefore be checked at least once a month and before
starting any long journey.
Tyre pressure monitoring (RKA+)*
Monitoring of the tyre pressures is based on the tyre pressures you have
stored. The tyre pressure monitoring system cannot function as intended if
you store tyre pressure settings for a normal load, but then drive with the
vehicle fully laden. The tyre pressure must be adapted to the actual load
and stored accordingly in the tyre pressure monitoring system ⇒ page 253.
Driving style
Fast cornering, heavy acceleration and hard braking all increase tyre wear.
Changing wheels around
If the front tyres are worn considerably more than the rear ones it is advisa-
ble to change them around as shown ⇒ Fig. 192. The useful life of all the
tyres will then be about the same time.
Safety FirstOperating instructionsPractical TipsTechnical Specifications
Page 276 of 327
274If and when
Preparation
● Switch off the ignition, lights and all electrical equipment.
● Open the corresponding fuse box ⇒ page 273.
Identifying a blown fuse
A fuse is blown if its metal strip is ruptured ⇒ Fig. 204.
Point a lamp at the fuse. This will make it easier to see if the fuse is blown.
To replace a fuse
● Remove the fuse.
● Replace the blown fuse by one with an identical amperage rating (same
colour and markings) and identical size ⇒
.
● Replace the cover again or close the fuse box lid.
CAUTION
If you replace a fuse with higher-rating fuse, you could cause damage to an-
other part of the electrical system.
Bulbs
General information
You can change the following bulbs for exterior lights yourself:
● Main headlights: all bulbs (except xenon headlights)
● Tail lights: all bulbs
● Side turn signal bulb
The following bulbs can only be changed by a specialised workshop:●
Main headlights: Xenon* bulb ⇒ page 281
● Front fog lights: Bulb
As a rule, you require a certain degree of practical skill to change defective
bulbs. This applies in particular to those bulbs which are only accessible
from the engine compartment.
If in doubt, we recommend that you have defective bulbs changed by a spe-
cialised workshop or qualified mechanic.
If you do decide to change bulbs in the engine compartment yourself, be
aware of the safety risks involved ⇒ page 235 ⇒
in Types of bulbs on
page 275.
The name of many of the lamps fitted by SEAT ends in "LL". This means Long
Life. These lamps are used for functions with a long service time (dipped
beam, side lights, daylight driving, etc.). This does not apply to lamps with
a shorter service time (turn signals, etc.). A lamp with the same name ex-
cept for the last two letters, "LL“ or “SLL”, is compatible, but will have a
service life of approximately half of the LongLife lamps.
When replacing lamp bulbs, the same type of bulb as originally fitted
should always be used where possible.
Page 277 of 327

275
If and when
Changing bulbs. Halogen headlights Types of bulbs
You must only replace a bulb with a bulb of the same type. The name can be
found on the base of the bulb holder.
BulbTypeDipped beam headlights (halogen)12 V/55 W (H7 LL)Main beam headlights12 V/55 W (H1)Turn signal12 V/21 W (PY21W)Side lights12 V/5 W (W5W LL)
WARNING
● Take particular care when working on components in the engine com-
partment if the engine is warm. Risk of burns.
● Bulbs are highly sensitive to pressure. The glass can break when you
touch the bulb, causing injury.
● The high voltage element of gas discharge bulbs* (xenon light) must
be handled correctly. Otherwise, there is a risk of death.
● When changing bulbs, please take care not to injure yourself on sharp
parts in the headlight housing.
CAUTION
● Remove the ignition key before working on the electric system. Other-
wise, a short circuit could occur.
● Switch off the lights or parking lights before you change a bulb.
For the sake of the environment
Please ask your specialist retailer how to dispose of used bulbs in the prop-
er manner.
Note
● Depending on weather conditions (cold or wet), the front lights, the fog
lights, the tail lights and the turn signals may be temporarily misted. This
has no influence on the useful life of the lighting system. By switching on
the lights, the area through which the beam of light is projected will quickly
be demisted. However, the edges may continue to be misted.
● Please check at regular intervals that all lighting (especially the exterior
lighting) on your vehicle is functioning properly. This is not only in the inter-
est of your own safety, but also in that of all other road users.
● Before changing a bulb, make sure you have the correct new bulb.
● Do not touch the glass part of the bulb with your bare hands, use a cloth
or paper towel instead. Otherwise, the fingerprints left on the glass will va-
porise as a result of the heat generated by the bulb, they will be deposited
on the reflector and will impair its surface.
Safety FirstOperating instructionsPractical TipsTechnical Specifications
Page 284 of 327
282If and when
● Main headlight lamps: Xenon ⇒
lights.
● Sources of the DRL (daylight) light unit and position.
WARNING
● Take particular care when working on components in the engine com-
partment if the engine is warm. Risk of burns.
● Bulbs are highly sensitive to pressure. The glass can break when you
touch the bulb, causing injury.
● The high voltage element of gas discharge bulbs* (xenon light) must
be handled correctly. Otherwise, there is a risk of death.
● When changing bulbs, please take care not to injure yourself on sharp
parts in the headlight housing.
CAUTION
● Remove the ignition key before working on the electric system. Other-
wise, a short circuit could occur.
● Switch off the lights or parking lights before you change a bulb.
For the sake of the environment
Please ask your specialist retailer how to dispose of used bulbs in the prop-
er manner.
Note
● Depending on weather conditions (cold or wet), the front lights, the fog
lights, the tail lights and the turn signals may be temporarily misted. This
has no influence on the useful life of the lighting system. By switching on
the lights, the area through which the beam of light is projected will quickly
be demisted. However, the edges may continue to be misted.
● Please check at regular intervals that all lighting (especially the exterior
lighting) on your vehicle is functioning properly. This is not only in the inter-
est of your own safety, but also in that of all other road users. ●
Before changing a bulb, make sure you have the correct new bulb.
● Do not touch the glass part of the bulb with your bare hands, use a cloth
or paper towel instead. Otherwise, the fingerprints left on the glass will va-
porise as a result of the heat generated by the bulb, they will be deposited
on the reflector and will impair its surface.
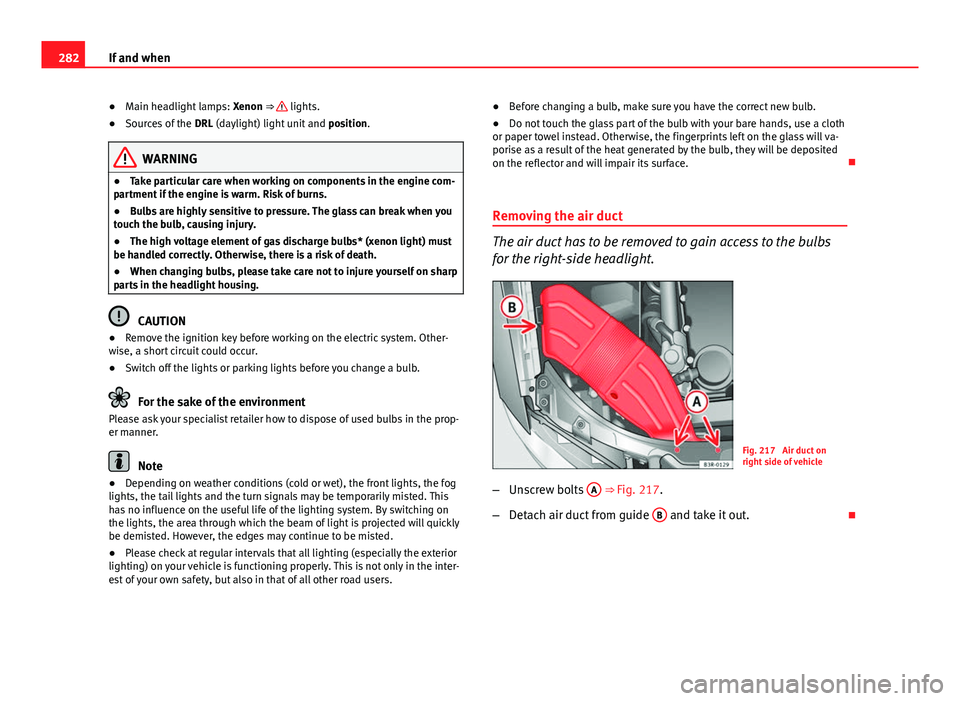
Removing the air duct
The air duct has to be removed to gain access to the bulbs
for the right-side headlight.
Fig. 217 Air duct on
right side of vehicle
– Unscrew bolts A
⇒ Fig. 217.
– Detach air duct from guide B
and take it out.
Page 301 of 327
299
If and when
Towing and tow-starting
Tow-starting
The use of jump leads is preferable to tow-starting.
We recommend that you do not tow-start your vehicle. Jump-start-
ing is preferable ⇒ page 295.
However, if your vehicle has to be tow-started:
– Engage the 2nd or the 3rd gear.
– Keep the clutch pressed down.
– Switch the ignition on.
– Once both vehicles are moving, release the clutch.
– As soon as the engine starts, press the clutch and move the
gear lever into neutral. This helps to prevent driving into the
towing vehicle.
WARNING
The risk of accidents is high when tow-starting. The vehicle being towed
can easily collide with the towing vehicle.
CAUTION
When tow-starting, fuel could enter the catalytic converter and damage it. General notes
Please observe the following points if you use a tow rope:
Notes for the driver of the towing vehicle
–
Drive slowly at first until the tow rope is taut. Then accelerate
gradually.
– Begin and change gears cautiously. If you are driving an auto-
matic vehicle, accelerate gently.
– Remember that the brake servo and power steering are not
working in the vehicle you are towing. Brake sooner than nor-
mal and pressing the pedal gently.
Notes for the driver of the towed vehicle
– Ensure that the tow rope remains taut at all times when towing.
Tow rope or tow bar
It is easier and safer to tow a vehicle with a tow bar. You should only use a
tow rope if you do not have a tow bar.
A tow rope should be slightly elastic to reduce the loading on both vehicles.
It is advisable to use a tow rope made of synthetic fibre or similarly elastic
material.
Attach the tow rope or the tow bar only to the towline anchorages provided
or a towing bracket.
Driving style
Towing requires some experience, especially when using a tow rope. Both
drivers should be familiar with the technique required for towing. Inexper-
ienced drivers should not attempt to tow.
Safety FirstOperating instructionsPractical TipsTechnical Specifications
Page 307 of 327
305
Description of specifications
Towing a trailer Trailer weights
Trailer weight
The trailer weights and drawbar loads approved are selected in intensive tri-
als according to precisely defined criteria. The approved trailer weights are
valid for vehicles in the EU for maximum speeds of 80 km/h (50 mph) (in
certain circumstances up to 100 km/h (60 mph). The figures may be differ-
ent in other countries. All data in the official vehicle documentation takes
precedence over these data at all times ⇒
.
Drawbar loads
The maximum permitted drawbar load on the ball joint of the towing bracket
must not exceed 75 kg.
In the interest of road safety, we recommend that you always tow approach-
ing the maximum drawbar load. The response of the trailer on the road will
be poor if the drawbar load is too small.
If the maximum permissible drawbar load cannot be met (e.g. with small,
empty and light-weight single axle trailers or tandem axle trailers with a
wheelbase of less than 1 metre), a minimum of 4% of the actual trailer
weight is legally required for the drawbar load.
WARNING
● For safety reasons, do not exceed the 80 km/h (50 mph) limit. This is
also valid in countries where higher speeds are permitted.
● Never exceed the maximum trailer weights or the drawbar load. If the
permissible axle load or the permissible total weight is exceeded, the
driving characteristics of the vehicle may change, leading to accidents,
injuries and damage to the vehicle.
Wheels
Tyre pressure, snow chains, wheel bolts
Tyre pressures
The sticker with the tyre pressure values can be found on the inside of the
fuel tank flap. The tyre pressure values given there are for cold tyres. The
slightly raised pressures of warm tyres must not be reduced. ⇒
Snow chains
Snow chains may be fitted only to the front wheels.
Consult the section “wheels” of this manual.
Wheel bolts
After the wheels have been changed, the tightening torque of the wheel
bolts should be checked as soon as possible with a torque wrench ⇒
.
The tightening torque for steel and alloy wheels is 120 Nm.
WARNING
● Check the tyre pressure at least once per month. Checking the tyre
pressure is very important. If the tyre pressure is too high or too low,
there is an increased danger of accidents, particularly at high speeds.
● If the tightening torque of the wheel bolts is too low, they could loos-
en while the vehicle is in motion. Risk of accident! If the tightening tor-
que is too high, the wheel bolts and threads can be damaged.
Note
We recommend that you ask your Technical Service for information about
appropriate wheel, tyre and snow chain size.
Safety FirstOperating instructionsPractical TipsTechnical Specifications