esp Seat Ibiza 2017 Edition 11.17 Service Manual
[x] Cancel search | Manufacturer: SEAT, Model Year: 2017, Model line: Ibiza, Model: Seat Ibiza 2017Pages: 312, PDF Size: 6.51 MB
Page 175 of 312
Air conditioning
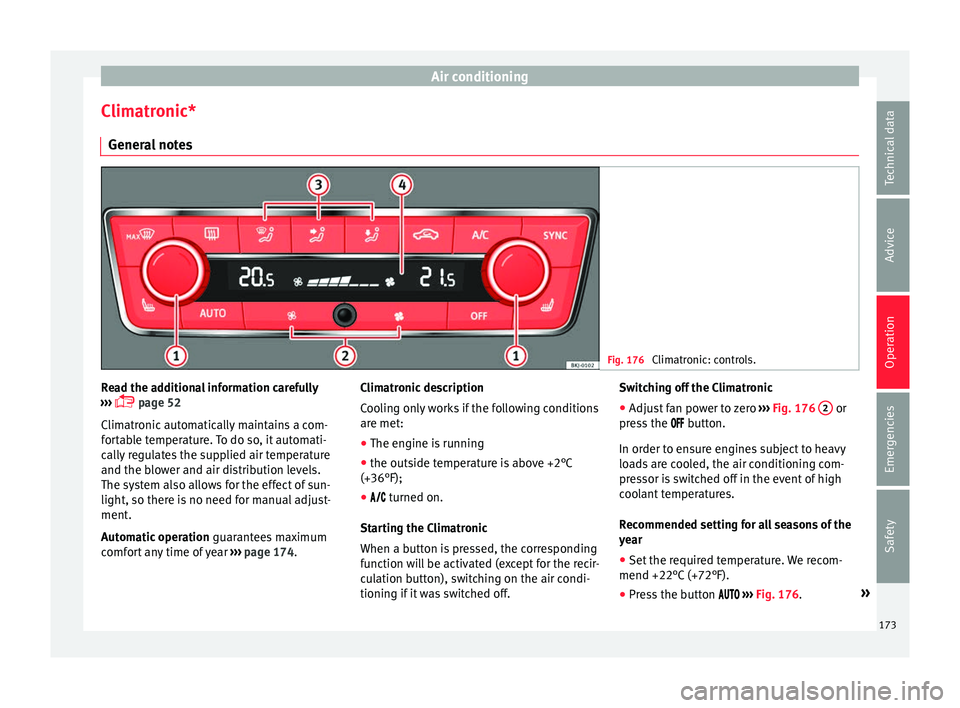
Climatronic* Gener a
l
notes Fig. 176
Climatronic: controls. Read the additional information carefully
› ›
›
page 52
Climatronic automatically maintains a com-
fortable temperature. To do so, it automati-
cally regulates the supplied air temperature
and the blower and air distribution levels.
The system also allows for the effect of sun-
light, so there is no need for manual adjust-
ment.
Automatic operation guarantees maximum
comfort any time of year ››› page 174. Climatronic description
Coolin
g only works if the following conditions
are met:
● The engine is running
● the outside temperature is above +2°C
(+36°F);
● turned on.
Star
ting the Climatronic
When a button is pressed, the corresponding
function will be activated (except for the recir-
culation button), switching on the air condi-
tioning if it was switched off. Switching off the Climatronic
●
Adjust fan power to zero ›››
Fig. 176 2 or
pr e
s
s the button.
In order to ensure engines subject to heavy
loads are cooled, the air conditioning com-
pressor is switched off in the event of high
coolant temperatures.
Recommended setting for all seasons of the
year
● Set the required temperature. We recom-
mend +22°C (+72°F).
● Pre
ss the button ››
› Fig. 176. »
173
Technical data
Advice
Operation
Emergencies
Safety
Page 176 of 312
Operation
● Adju s
t
the vents so that the air flow is di-
rected slightly upwards.
Change between degrees Centigrade and de-
grees Fahrenheit
The units of degrees can be changed via the
Easy Connect system using the button
and the f u
nction b
utton SETTINGS >
Units > Temperature .
Automatic mode
Automatic mode is used to maintain a con-
stant temperature and demist the windows
inside the vehicle.
● Set a interior temperature between +16°C
(+64°F) and +29°C (+84°F).
● Adjus
t the vents so that the air flow is di-
rected s
lightly upwards.
● Press the butt
on, AUTO is displayed on
the screen.
Automatic mode is switched off by pressing
the air distribution buttons or increasing or
decreasing the blower speed. However, the
temperature remains regulated.
Adjusting the temperature
● When you switch on the ignition, control 1›››
Fig. 176 can be u sed t
o set the required in-
terior temperature. It is possible to select interior temperatures
from +16°C
(+64°F) t
o +29°C (+84°F). In this
range the temperature is regulated automati-
cally. If a temperature below +16°C (+64°F) is
selected, “LO” is displayed on the screen. If a
temperature above +29°C (+84°F) is selected,
“HI” is displayed on the screen. At both ex-
tremes, Climatronic works at maximum cool-
ing or heating power, respectively. The tem-
perature is not regulated.
In the event of prolonged, irregular distribu-
tion of the air flow from the outlets (particu-
larly the footwells) and significant differen-
ces in temperature, e.g. on leaving the vehi-
cle, sensitive people may catch cold.
Fan regulation
Climatronic automatically regulates blower
speed according to the interior temperature.
It is possible, however, to set the blower
speed to suit requirements.
● Press the 2 buttons to increase or reduce
f an s
peed.
C
limatronic will switch off when the blower
switches off.
Turn on windscreen defrost
● Press the button ›››
Fig. 176. Switching off windscreen defrosting
●
Press the button sev
eral times or
press the button.
The temperature is regulated automatically.
The air output from the vents ››› Fig. 173 2 is increased.
WARNING
Read and observe the safety warnings ›››
in
Genera l
notes on page 166. Note
● A v i
sit to the specialised service once a
year is recommended to clean the Climatronic
system.
● The interior temperature sensor is at the
bottom. Do not c
over it with stickers or the
like, as this could have a negative effect on
Climatronic operations. 174
Page 177 of 312
Driving
Driving St ar
tin
g and stopping the en-
gine
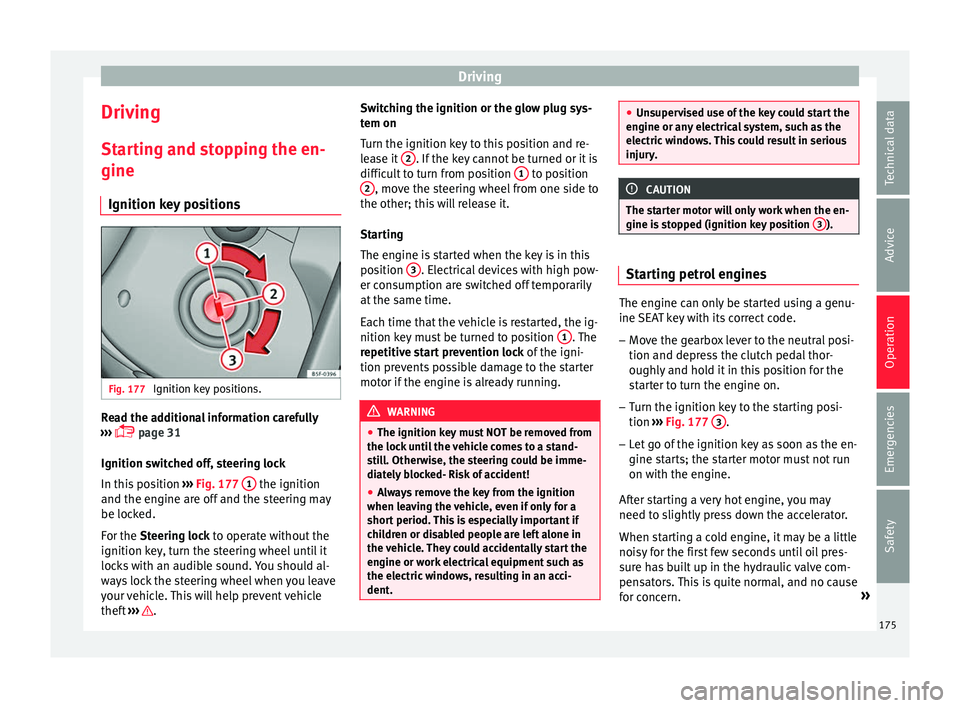
Ignition key positions Fig. 177
Ignition key positions. Read the additional information carefully
› ›
›
page 31
Ignition switched off, steering lock
In this position ››› Fig. 177 1 the ignition
and the en gine ar
e off
and the steering may
be locked.
For the Steering lock to operate without the
ignition key, turn the steering wheel until it
locks with an audible sound. You should al-
ways lock the steering wheel when you leave
your vehicle. This will help prevent vehicle
theft ››› . Switching the ignition or the glow plug sys-
t
em on
T urn the ignition k
ey to this position and re-
lease it 2 . If the key cannot be turned or it is
diffic u
lt
to turn from position 1 to position
2 , move the steering wheel from one side to
the other; thi s
w
ill release it.
Starting
The engine is started when the key is in this
position 3 . Electrical devices with high pow-
er c on
s
umption are switched off temporarily
at the same time.
Each time that the vehicle is restarted, the ig-
nition key must be turned to position 1 . The
r epetitiv
e s
tart prevention lock of the igni-
tion prevents possible damage to the starter
motor if the engine is already running. WARNING
● The ignition key mu
st NOT be removed from
the lock until the vehicle comes to a stand-
still. Otherwise, the steering could be imme-
diately blocked- Risk of accident!
● Always remove the key from the ignition
when leav
ing the vehicle, even if only for a
short period. This is especially important if
children or disabled people are left alone in
the vehicle. They could accidentally start the
engine or work electrical equipment such as
the electric windows, resulting in an acci-
dent. ●
Uns uper
vised use of the key could start the
engine or any electrical system, such as the
electric windows. This could result in serious
injury. CAUTION
The starter motor will only work when the en-
gine i s s
topped (ignition key position 3 ).
Starting petrol engines
The engine can only be started using a genu-
ine
S
EA
T key with its correct code.
– Move the gearbox lever to the neutral posi-
tion and depres
s the clutch pedal thor-
oughly and hold it in this position for the
starter to turn the engine on.
– Turn the ignition key to the starting posi-
tion ›››
Fig. 177 3 .
– Let go of the ignition key as soon as the en-
gine s t
ar
ts; the starter motor must not run
on with the engine.
After starting a very hot engine, you may
need to slightly press down the accelerator.
When starting a cold engine, it may be a little
noisy for the first few seconds until oil pres-
sure has built up in the hydraulic valve com-
pensators. This is quite normal, and no cause
for concern. »
175
Technical data
Advice
Operation
Emergencies
Safety
Page 188 of 312
Operation
the
button and the
S
ET
TINGS and
E SC
System function buttons.
WARNING
You should switch on the ESC Sport mode on-
ly if the tr
affic conditions and your driving
ability allow you to do so safely: risk of skid-
ding!
● With ESC in Sport mode, the stabilising
function w
ill be limited to allow for a sportier
drive. The driving wheels could spin and the
vehicle could skid. Note
If the ASR is disconnected or the ESC’s Sport
mode is sel
ected, cruise control* will be
switched off. Electronic differential lock (EDS)*
The EDL operates along with the ABS in vehi-
c
l
e
s equipped with Electronic Stability Con-
trol (ESC)*.
EDL helps the vehicle to start moving, accel-
erate and climb a gradient in slippery condi-
tions where this may otherwise be difficult or
even impossible.
It uses the ABS sensors to monitor the speed
of the driven wheels.
At speeds of up to approximately 80 km/h
(50 mph), it is able to balance out differences in the speed of the driven wheels of approxi-
mately
100 rpm/min caused by a partially
slippery road surface. It does this by braking
the wheel which has lost traction and distrib-
uting more driving force to the other driven
wheel via the differential.
To prevent the disc brake of the braking
wheel from overheating, the EDL cuts out au-
tomatically if subjected to excessive loads.
The vehicle will continue to function normally
without EDL. For this reason, the driver is not
informed that the EDL has been switched off.
The EDL will switch on again automatically
when the brake has cooled down.
Control lamp
A malfunction in the EDL is indicated by the
ESC control lamp . Take the vehicle to a
specialised workshop as soon as possible. WARNING
● When acc el
erating on a slippery surface,
for example on ice and snow, press the accel-
erator carefully. Despite EDL, the driven
wheels may start to spin. This could impair
the vehicle's stability.
● Always adapt your driving style to suit road
conditions
and the traffic situation. Do not let
the extra safety afforded by EDL tempt you in-
to taking any risks when driving, this can
cause accidents. CAUTION
Modifications to the vehicle (e.g. to the en-
gine, the brak e sy
stem, running gear or any
components affecting the wheels and tyres)
could affect the efficiency of the EDL
››› page 247. Hydraulic Brake Assist (HBA)*
The function (Hydraulic Brake Assist HBA) is
only
inc
luded in vehicles with ESC.
In an emergency, most drivers brake in time,
but not with maximum force. This results in
unnecessarily long braking distances.
This is when the brake assist system comes
into action. When pressing the brake pedal
rapidly, the assistant interprets it as an emer-
gency. It very quickly builds up the full brake
pressure so that the ABS can be activated
more quickly and efficiently, thus reducing
braking distance.
Do not reduce the pressure on the brake ped-
al, since the brake assist system switches off
automatically as soon as you release the
brake.
Automatic hazard warning lights activation
The brake lights flash automatically to indi-
cate that the vehicle is braking suddenly or in
an emergency situation. If the emergency
braking continues until the vehicle comes to
186
Page 194 of 312
Operation
Interlock button
The int erloc
k
button on the selector lever
handle prevents the driver from inadvertently
engaging certain gears. Press the button in
to disengage the selector lever lock.
Safety interlock for ignition key
Once the ignition has been turned off, the
key may be removed only if the gear selector
is in position P. While the key is not in the ig-
nition, the selector lever is locked in position
P. Note
● If the sel ect
or lever lock does not engage,
there is a fault. The transmission is interrup-
ted to prevent the vehicle from accidentally
moving. Follow the procedure below in order
for the selector lever lock to engage again:
–With a 6-speed gearbox: press the brake
pedal and release it again.
– With a 7-speed gearbox: press the brake
pedal. Move the selector lever to posi-
tion P or N and subsequently engage a
gear.
● Despite a gear being engaged, the vehicle
does not
move forwards or back. Proceed to
the next mode:
– When the vehicle does not move in the
required direction, the system may not
have the gear range correctly engaged.
Press the brake pedal and engage the
gear range again. –
If the v
ehicle still does not move in the
required direction, there is a system mal-
function. Seek specialist assistance and
have the system checked. Engaging gears with the triptonic
mode*
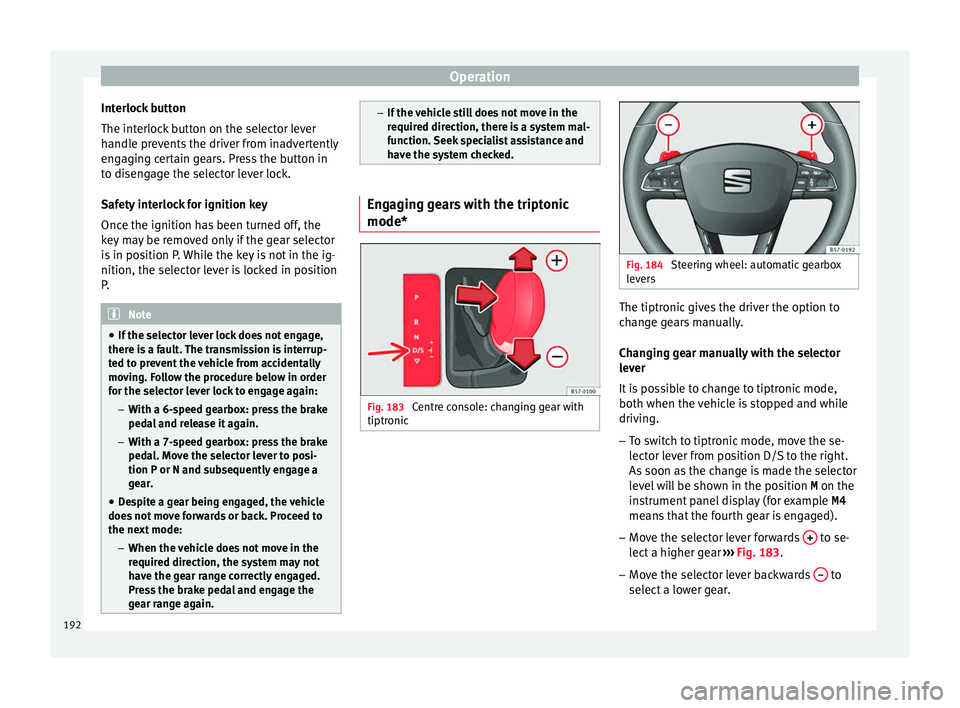
Fig. 183
Centre console: changing gear with
tiptr onic Fig. 184
Steering wheel: automatic gearbox
lev er
s The tiptronic gives the driver the option to
c
h
an
ge gears manually.
Changing gear manually with the selector
lever
It is possible to change to tiptronic mode,
both when the vehicle is stopped and while
driving.
– To switch to tiptronic mode, move the se-
lector l
ever from position D/S to the right.
As soon as the change is made the selector
level will be shown in the position M on the
instrument panel display (for example M4
means that the fourth gear is engaged).
– Move the selector lever forwards + to se-
l ect
a higher g
ear ››› Fig. 183.
– Move the selector lever backwards – to
sel ect
a lo
wer gear.
192
Page 196 of 312
Operation
WARNING
Observe the safety warnings ››› in Selector
lev er po
sitions on page 191.
● Never allow the brake to rub and do not use
the brake ped
al too often or for long periods.
Constant braking causes overheating in the
brakes. This could significantly reduce brak-
ing power, increase braking distance or even
result in the total failure of the brake system.
● To avoid rolling back on gradients always
hold the
vehicle with the footbrake or hand-
brake if you have to stop. CAUTION
● If y
ou stop the vehicle on a gradient, do not
attempt to stop it from rolling by depressing
the accelerator when a gear has been selec-
ted. This could cause overheating and dam-
age the automatic gearbox. Apply the hand-
brake firmly or press the brake pedal in order
to prevent the vehicle from rolling back.
● If you allow the car to roll with the selector
lever in po
sition N with the engine switched
off, the automatic gearbox will be damaged
as it will not be lubricated.
● In certain driving situations or traffic condi-
tions, suc
h as frequently starting, prolonged
“creeping” of the vehicle or traffic jams with
continuous stoppages, the gearbox could overheat causing damage! If the warning
lamp
lights up, stop the vehicle as soon as
possible and wait for the gearbox to cool
››› page 196. Kick-down feature
The kick-down feature allows maximum ac-
cel
er
ation to be reached.
When the accelerator pedal is pressed right
down past the point of resistance at full throt-
tle, the gearbox will shift down to a lower
gear, depending on road speed and engine
speed. The upshift to the next higher gear is
delayed until the engine reaches maximum
rpm. WARNING
Please note that if the road surface is slip-
pery or w
et, the kick-down feature could
cause the driving wheels to spin, which could
result in skidding. Launch control program
3 Valid for vehicles: with Launch-Control/6-Speed
D SG w
ith diesel engines superior to 125 kW and pet-
rol engines superior to 140 kW.
The Launch control programme enables maxi-
mum acceleration.
Important: the engine must have reached op-
erating temperature and the steering wheel
must not be turned.
The engine speed for launch-control is differ-
ent on petrol and diesel engines. To use the
launch-control you must disconnect the anti-
slip regulation (ASR) through the Easy Con-
nect system menu ›››
page 123. The warning
lamp will stay switched on or will flash
slowly depending on whether or not the vehi-
cle has a driver information system*.
On vehicles with the driver information sys-
tem, the ESC lamp lights up permanently and
the corresponding text message Stability
control deactivated (temporary) ap-
pears on the instrument panel to indicate the
deactivation status.
– When the engine is running, switch off the
traction c ontr
ol (ASR)1)
. 1)
Vehicles without driver information system: the
warnin g l
amp flashes slowly/Vehicles with driver in-
formation system: the warning lamp stays on.
194
Page 199 of 312
Driving
Take the vehicle to a specialised workshop
and h av
e the f
ault repaired without delay.
Gearbox: System fault! You
can continue driving in D until
switching off the engine
Stop the vehicle in a safe place well away
from moving traffic. Seek specialist assis-
tance. Gearbox: too hot. Adapt your
driving accordingly
Continue driving at moderate speeds. When
the warning lamp switches off, you can con-
tinue driving in a normal manner. Gearbox: press the brake and
engage a gear again.
If the fault was caused by a gearbox with a
high temperature, this driver message will be
displayed when the gearbox has cooled
again.
Gear-change indicator
Selecting the optim
al gearWhile driving, and depending on vehicle
equipment, the in
s
trument
panel display may
show a recommendation with the gear num-
ber that would be advisable to save fuel. In vehicles with an
automatic gear
box, the
selector lever must be in the tiptronic posi-
tion ››› page 192.
No recommendation will appear if the opti-
mal gear is already engaged. The current
gear will be displayed.
DisplayMeaning
The optimal gear is selected.
Changing to a higher gear is recom-
mended.
Changing to a lower gear is recom-
mended.
Information regarding the “cleanliness” of
the die
sel
p
articulate filter
The exhaust system manager detects that the
diesel particulate filter is nearly saturated
and contributes to self-cleaning by recom-
mending the optimal gear. For this reason, it
might be necessary to drive for a short time
at a high rpm. WARNING
The gear change indicator is only an auxiliary
fu nction and in no c
ase should be a substi-
tute for careful driving.
● The responsibility of choosing the correct
gear dependin
g on the situation (e.g. over-
taking, driving up or down a slope or towing a
trailer) lies with the driver. For the sake of the environment
Selecting the correct gear can help to save
fuel . Note
The recommended gear indication turns off
when the clut c
h pedal is pressed in vehicles
with manual gearbox or when the selector
lever is removed from the tiptronic position in
vehicles with an automatic gearbox. Steering
Intr oduction The power steering is not hydraulic but elec-
tr
omec
h
anical. The advantage of this steer-
ing is that it foes not need flexible hydraulic
pipes, hydraulic oil, pump, filter or other
parts. The electromechanical system saves
fuel. Whereas a hydraulic system needs con-
tinuous oil pressure, electromechanical
steering only needs power when it is used.
In vehicles with electromechanical steering,
the assisted steering function automatically
adjusts according to vehicle speed, steering
wheel torque and wheel orientation. The
power steering only works when the engine
is running. »
197
Technical data
Advice
Operation
Emergencies
Safety
Page 200 of 312
Operation
WARNING
If the power steering does not work, you will
need much mor e s
trength to turn the wheel.
This has a considerable effect on vehicle
safety.
● The power steering only works when the
engine is
running.
● Never allow the vehicle to move when the
engine is
switched off.
● Never remove the key from the ignition
while the
vehicle is moving. The steering lock
could be engaged and vehicle steering would
not work. Note
The ignition of the vehicle being towed must
be swit c
hed on to prevent the steering wheel
from locking and also to allow the use of the
turn signals, horn, windscreen wipers and
washers. Control lamp
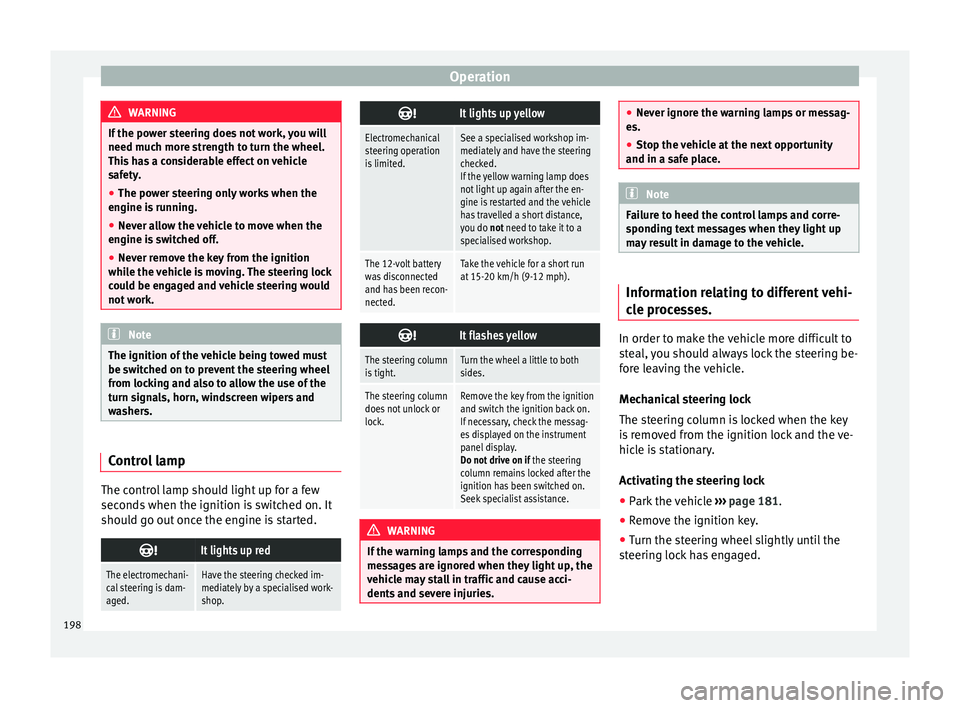
The control lamp should light up for a few
sec
ond
s
when the ignition is switched on. It
should go out once the engine is started.
It lights up red
The electromechani-
cal steering is dam-
aged.Have the steering checked im-
mediately by a specialised work-
shop.
It lights up yellow
Electromechanical
steering operation
is limited.See a specialised workshop im-
mediately and have the steering
checked.
If the yellow warning lamp does
not light up again after the en-
gine is restarted and the vehicle
has travelled a short distance,
you do not need to take it to a
specialised workshop.
The 12-volt battery
was disconnected
and has been recon-
nected.Take the vehicle for a short run
at 15-20 km/h (9-12 mph).
It flashes yellow
The steering column
is tight.Turn the wheel a little to both
sides.
The steering column
does not unlock or
lock.Remove the key from the ignition
and switch the ignition back on.
If necessary, check the messag-
es displayed on the instrument
panel display.
Do not drive on if
the steering
column remains locked after the
ignition has been switched on.
Seek specialist assistance. WARNING
If the warning lamps and the corresponding
mes s
ages are ignored when they light up, the
vehicle may stall in traffic and cause acci-
dents and severe injuries. ●
Never ignor e the w
arning lamps or messag-
es.
● Stop the vehicle at the next opportunity
and in a safe p
lace. Note
Failure to heed the control lamps and corre-
s pondin g t
ext messages when they light up
may result in damage to the vehicle. Information relating to different vehi-
c
l
e pr
ocesses. In order to make the vehicle more difficult to
s
t
e
al, you should always lock the steering be-
fore leaving the vehicle.
Mechanical steering lock
The steering column is locked when the key
is removed from the ignition lock and the ve-
hicle is stationary.
Activating the steering lock
● Park the vehicle ›››
page 181.
● Remove the ignition key.
● Turn the steering wheel slightly until the
steerin
g lock has engaged.
198
Page 201 of 312
Driving
Deactivating the steering lock
● Turn the steering wheel slightly to release
the loc k.
● Inser
t the key in the ignition lock.
● Hold the steering wheel in this position
and switc
h on the ignition.
Electromechanical steering
In vehicles with electromechanical steering,
the assisted steering function automatically
adjusts according to vehicle speed, steering
wheel torque and wheel orientation. The
power steering only works when the engine
is running.
You should take into account that you will
need considerably more power than normal
to steer the vehicle if the power steering is
not working correctly or at all.
Power-assisted steering
Power-assisted steering helps the driver in
critical situations. In counter-steering, it as-
sists by applying additional torque ››› .
WARNING
Power-assisted steering, together with the
ESC, help s
the driver to control vehicle steer-
ing in critical situations. However, the driver
is ultimately responsible for steering the ve-
hicle at all times. Power-assisted steering
does not remove this responsibility. Run-in and economical driving
R u
nnin
g in a new engine The engine needs to be run-in over the first
1500 km (900 mil
e
s).
For the first 1,000 kilometres (600 miles)
– Do not drive at speeds of more than 2/3
the maximum s
peed.
– Do not accelerate hard.
– Avoid high engine revolutions.
– Do not tow a trailer.
From 1,000 k i
lometres (600 miles) to 1,500
kilometres (900 miles)
– Speeds can be gradual
ly increased to the
maximum road speed or maximum permis-
sible engine speed (rpm).
During its first few hours of running, the in-
ternal friction in the engine is greater than
later on, when all the moving parts have bed-
ded in. For the sake of the environment
If the engine is run in gently, its life will be in-
cr e
ased and its oil consumption reduced. Running in tyres and brake pads
New tyres should be run in carefully for the
firs
t
500 km (300 miles) and new brake pads
should be run in carefully for the first 200 km
(125 miles).
During the first 200 km (125 miles) you have
to compensate for the reduced braking effect
by applying more pressure to the brake ped-
al. In case of a sharp braking, the braking
distance will be longer with new brake pads
than with brake pads which have been run-
in. WARNING
● At fir s
t, new tyres do not give maximum
grip, and require running-in. This may cause
an accident. Drive particularly carefully in the
first 500 km (300 miles).
● New brake pads must be “run in” and do
not hav
e the correct friction properties during
the first 200 km (125 miles). However, the re-
duced braking capacity may be compensated
by pressing on the brake pedal a little harder. Environmental compatibility
Environmental protection is a top priority in
the de
s
ign, c
hoice of materials and manufac-
ture of your new SEAT. »
199
Technical data
Advice
Operation
Emergencies
Safety
Page 203 of 312
Driving
exhaust emissions and noise levels all in-
c r
e
ase very rapidly at higher speeds. Driving
at moderate speeds will help to save fuel.
Avoid idling
It is worthwhile switching off the engine
when waiting in a traffic jam, at level cross-
ings or at traffic lights with a long red phase.
The fuel saved after only 30 - 40 seconds is
greater than the amount of fuel needed to re-
start the engine.
The engine takes a long time to warm up
when it is idling. Mechanical wear and pollu-
tant emissions are also especially high dur-
ing this initial warm-up phase. It is therefore
best to drive off immediately after starting
the engine. Avoid running the engine at high
speed.
Periodic maintenance
Periodic maintenance work guarantees that,
before beginning a journey, you will not con-
sume more than the required amount of fuel.
A well-serviced engine gives you the benefit
of improved fuel efficiency as well as maxi-
mum reliability and an enhanced resale val-
ue.
A badly serviced engine can consume up to
10% more fuel than necessary. Avoid short journeys
To reduc
e the consumption and emission of
polluting exhaust gases, the engine and the
exhaust gas filtration systems should reach
the optimum operating temperature.
With the engine cold, fuel consumption is
proportionally higher. The engine does not
warm up and fuel consumption does not nor-
malise until having driven approximately four
kilometres (2.5 miles). This is why we recom-
mend avoiding short trips whenever possi-
ble.
Maintain the correct tyre pressures
Bear in mind that keeping the tyres at an ad-
equate pressure saves fuel. If the tyre pres-
sure is just one bar (14.5 psi/100 kPa) too
low, fuel consumption can increase by as
much as 5%. Due to the greater rolling resist-
ance, under-inflation also increases tyre wear
wear and impairs handling.
The tyre pressures should always be checked
when the tyres are cold.
Do not use winter tyres all year round as they
increase fuel consumption by up to 10%.
Avoid unnecessary weight
Given that every kilo of extra weight will in-
crease the fuel consumption, it is advisable
to always check the luggage compartment to
make sure that no unnecessary loads are be-
ing transported. A roof rack is often left in place for the sake
of con
venience, even when it is no longer
needed. At a speed of 100 km/h (62 mph)
and 120 km/h (75 mph) your vehicle will use
about 12% more fuel as a result of the extra
wind resistance caused by the roof rack even
when it is not in use.
Save electricity
The engine activates the alternator, which
produces electricity. With the need for elec-
tricity, fuel consumption also increases. Be-
cause of this, always turn off electrical devi-
ces when you do not need them. Examples of
devices that use a lot of electricity are: the
blower at high speeds, the rear window heat-
ing or the seat heaters*. Note
● If y
our vehicle has Start-Stop, it is not rec-
ommended that you switch this function off.
● It is recommended that you close
the win-
dows when driving at more than 60 km/h
(37 mph).
● Do not drive with your foot resting on the
clutc
h pedal,, as the pressure can make the
plate spin, more fuel will be used and it can
burn the clutch plate lining, causing a serious
fault.
● Do not hold the car on a hill with the clutch,
use the foot
brake or hand brake, using the
latter to start. The fuel consumption will be » 201
Technical data
Advice
Operation
Emergencies
Safety