fog light Seat Ibiza SC 2011 Owner's manual
[x] Cancel search | Manufacturer: SEAT, Model Year: 2011, Model line: Ibiza SC, Model: Seat Ibiza SC 2011Pages: 278, PDF Size: 3.92 MB
Page 6 of 278
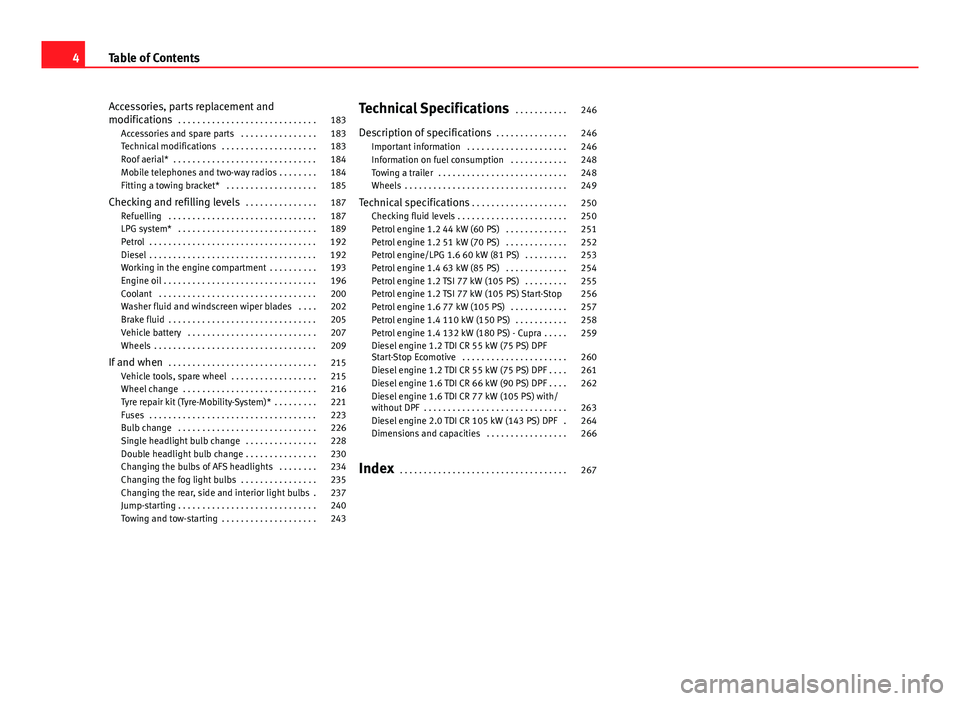
Accessories, parts replacement and
modifications . . . . . . . . . . . . . . . . . . . . . . . . . . . . . 183
Accessories and spare parts . . . . . . . . . . . . . . . . 183
Technical modifications . . . . . . . . . . . . . . . . . . . . 183
Roof aerial* . . . . . . . . . . . . . . . . . . . . . . . . . . . . . . 184
Mobile telephones and two-way radios . . . . . . . . 184
Fitting a towing bracket* . . . . . . . . . . . . . . . . . . . 185
Checking and refilling levels . . . . . . . . . . . . . . . 187
Refuelling . . . . . . . . . . . . . . . . . . . . . . . . . . . . . . . 187
LPG system* . . . . . . . . . . . . . . . . . . . . . . . . . . . . . 189
Petrol . . . . . . . . . . . . . . . . . . . . . . . . . . . . . . . . . . . 192
Diesel . . . . . . . . . . . . . . . . . . . . . . . . . . . . . . . . . . . 192
Working in the engine compartment . . . . . . . . . . 193
Engine oil . . . . . . . . . . . . . . . . . . . . . . . . . . . . . . . . 196
Coolant . . . . . . . . . . . . . . . . . . . . . . . . . . . . . . . . . 200
Washer fluid and windscreen wiper blades . . . . 202
Brake fluid . . . . . . . . . . . . . . . . . . . . . . . . . . . . . . . 205
Vehicle battery . . . . . . . . . . . . . . . . . . . . . . . . . . . 207
Wheels . . . . . . . . . . . . . . . . . . . . . . . . . . . . . . . . . . 209
If and when . . . . . . . . . . . . . . . . . . . . . . . . . . . . . . . 215
Vehicle tools, spare wheel . . . . . . . . . . . . . . . . . . 215
Wheel change . . . . . . . . . . . . . . . . . . . . . . . . . . . . 216
Tyre repair kit (Tyre-Mobility-System)* . . . . . . . . . 221
Fuses . . . . . . . . . . . . . . . . . . . . . . . . . . . . . . . . . . . 223
Bulb change . . . . . . . . . . . . . . . . . . . . . . . . . . . . . 226
Single headlight bulb change . . . . . . . . . . . . . . . 228
Double headlight bulb change . . . . . . . . . . . . . . . 230
Changing the bulbs of AFS headlights . . . . . . . . 234
Changing the fog light bulbs . . . . . . . . . . . . . . . . 235
Changing the rear, side and interior light bulbs . 237
Jump-starting . . . . . . . . . . . . . . . . . . . . . . . . . . . . . 240
Towing and tow-starting . . . . . . . . . . . . . . . . . . . . 243 Technical Specifications
. . . . . . . . . . . 246
Description of specifications . . . . . . . . . . . . . . . 246
Important information . . . . . . . . . . . . . . . . . . . . . 246
Information on fuel consumption . . . . . . . . . . . . 248
Towing a trailer . . . . . . . . . . . . . . . . . . . . . . . . . . . 248
Wheels . . . . . . . . . . . . . . . . . . . . . . . . . . . . . . . . . . 249
Technical specifications . . . . . . . . . . . . . . . . . . . . 250
Checking fluid levels . . . . . . . . . . . . . . . . . . . . . . . 250
Petrol engine 1.2 44 kW (60 PS) . . . . . . . . . . . . . 251
Petrol engine 1.2 51 kW (70 PS) . . . . . . . . . . . . . 252
Petrol engine/LPG 1.6 60 kW (81 PS) . . . . . . . . . 253
Petrol engine 1.4 63 kW (85 PS) . . . . . . . . . . . . . 254
Petrol engine 1.2 TSI 77 kW (105 PS) . . . . . . . . . 255
Petrol engine 1.2 TSI 77 kW (105 PS) Start-Stop 256
Petrol engine 1.6 77 kW (105 PS) . . . . . . . . . . . . 257
Petrol engine 1.4 110 kW (150 PS) . . . . . . . . . . . 258
Petrol engine 1.4 132 kW (180 PS) - Cupra . . . . . 259
Diesel engine 1.2 TDI CR 55 kW (75 PS) DPF
Start-Stop Ecomotive . . . . . . . . . . . . . . . . . . . . . . 260
Diesel engine 1.2 TDI CR 55 kW (75 PS) DPF . . . . 261
Diesel engine 1.6 TDI CR 66 kW (90 PS) DPF . . . . 262
Diesel engine 1.6 TDI CR 77 kW (105 PS) with/
without DPF . . . . . . . . . . . . . . . . . . . . . . . . . . . . . . 263
Diesel engine 2.0 TDI CR 105 kW (143 PS) DPF . 264
Dimensions and capacities . . . . . . . . . . . . . . . . . 266
Index . . . . . . . . . . . . . . . . . . . . . . . . . . . . . . . . . . . 267
4Table of Contents
Page 64 of 278
62Cockpit
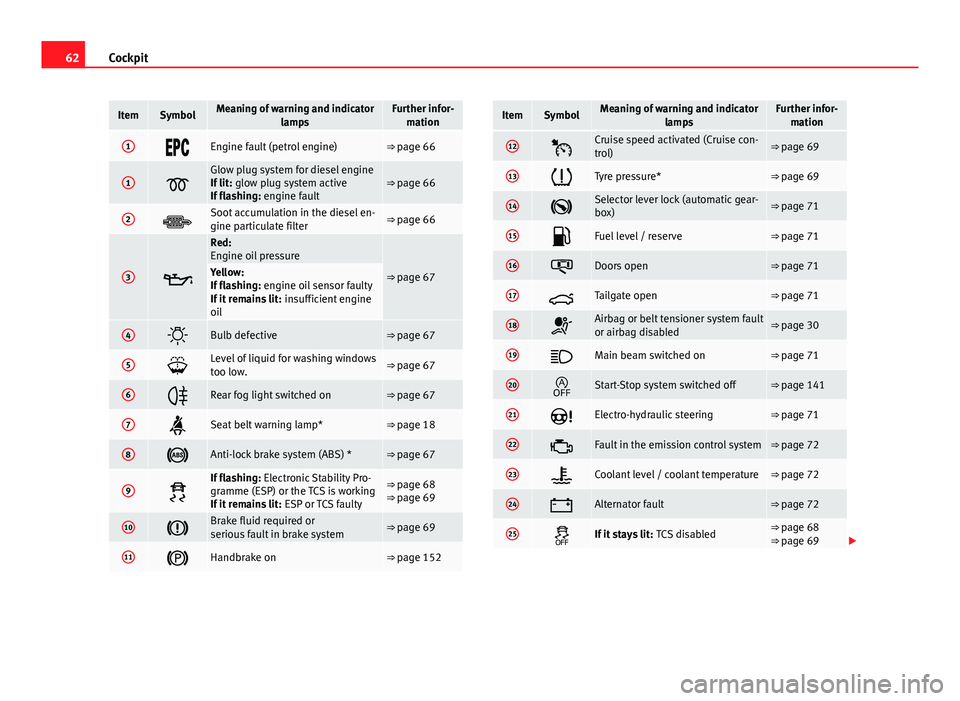
ItemSymbolMeaning of warning and indicator
lampsFurther infor-mation
1Engine fault (petrol engine)⇒ page 66
1Glow plug system for diesel engine
If lit: glow plug system active
If flashing: engine fault⇒ page 66
2Soot accumulation in the diesel en-
gine particulate filter⇒ page 66
3
Red:
Engine oil pressure
⇒ page 67Yellow:
If flashing: engine oil sensor faulty
If it remains lit: insufficient engine
oil
4Bulb defective⇒ page 67
5Level of liquid for washing windows
too low.⇒ page 67
6Rear fog light switched on⇒ page 67
7Seat belt warning lamp*⇒ page 18
8Anti-lock brake system (ABS) *⇒ page 67
9
If flashing: Electronic Stability Pro-
gramme (ESP) or the TCS is working
If it remains lit: ESP or TCS faulty⇒ page 68
⇒ page 69
10Brake fluid required or
serious fault in brake system⇒ page 69
11Handbrake on⇒ page 152
ItemSymbolMeaning of warning and indicator
lampsFurther infor-mation
12Cruise speed activated (Cruise con-
trol)⇒ page 69
13Tyre pressure*⇒ page 69
14Selector lever lock (automatic gear-
box)⇒ page 71
15Fuel level / reserve⇒ page 71
16Doors open⇒ page 71
17Tailgate open⇒ page 71
18Airbag or belt tensioner system fault
or airbag disabled⇒ page 30
19Main beam switched on⇒ page 71
20Start-Stop system switched off⇒ page 141
21Electro-hydraulic steering⇒ page 71
22Fault in the emission control system⇒ page 72
23Coolant level / coolant temperature⇒ page 72
24Alternator fault⇒ page 72
25If it stays lit: TCS disabled⇒ page 68
⇒ page 69
Page 69 of 278
67
Cockpit
WARNING
● Always drive according to the road weather conditions, the terrain
and traffic. Driving recommendations should never lead to illegal ma-
noeuvres in surrounding traffic.
● The diesel engine particulate filter may reach extremely high temper-
atures; it should not enter into contact with flammable materials under-
neath the vehicle. Otherwise there is a risk of fire.
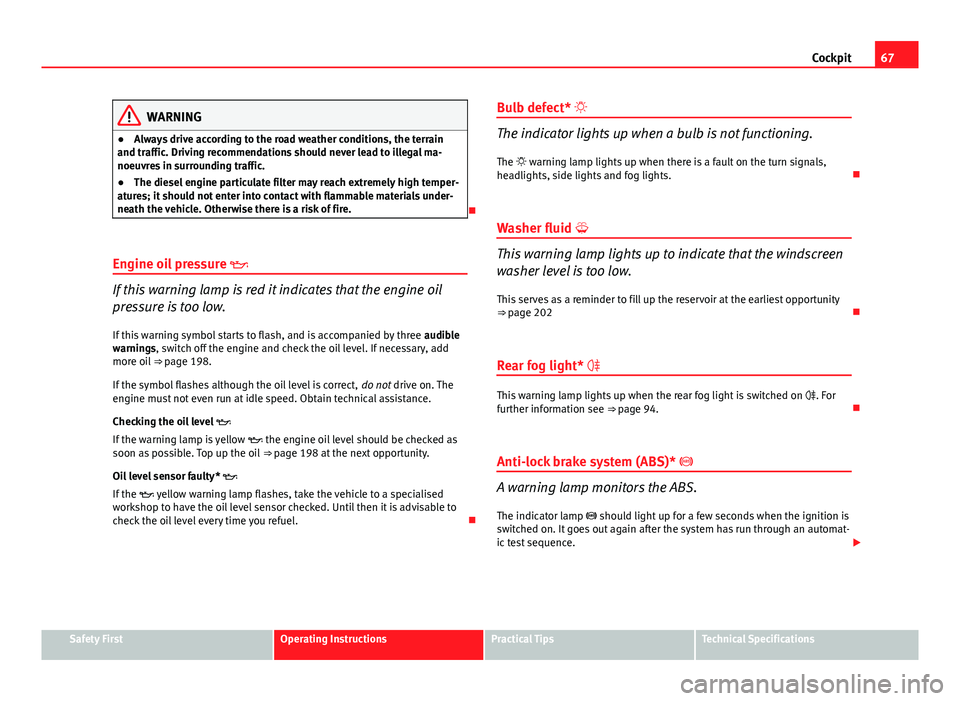
Engine oil pressure
If this warning lamp is red it indicates that the engine oil
pressure is too low.
If this warning symbol starts to flash, and is accompanied by three audible
warnings, switch off the engine and check the oil level. If necessary, add
more oil ⇒ page 198.
If the symbol flashes although the oil level is correct, do not drive on. The
engine must not even run at idle speed. Obtain technical assistance.
Checking the oil level
If the warning lamp is yellow the engine oil level should be checked as
soon as possible. Top up the oil ⇒ page 198 at the next opportunity.
Oil level sensor faulty*
If the yellow warning lamp flashes, take the vehicle to a specialised
workshop to have the oil level sensor checked. Until then it is advisable to
check the oil level every time you refuel. Bulb defect*
The indicator lights up when a bulb is not functioning.
The warning lamp lights up when there is a fault on the turn signals,
headlights, side lights and fog lights.
Washer fluid
This warning lamp lights up to indicate that the windscreen
washer level is too low. This serves as a reminder to fill up the reservoir at the earliest opportunity
⇒ page 202
Rear fog light*
This warning lamp lights up when the rear fog light is switched on . For
further information see ⇒ page 94.
Anti-lock brake system (ABS)*
A warning lamp monitors the ABS.
The indicator lamp should light up for a few seconds when the ignition is
switched on. It goes out again after the system has run through an automat-
ic test sequence.
Safety FirstOperating InstructionsPractical TipsTechnical Specifications
Page 90 of 278
88Unlocking and locking
WARNING
● Always close the tailgate properly. Risk of accident or injury.
● The tailgate must not be opened when the reverse or rear fog lights
are lit. This may damage the tail lights
● Do not close the tailgate by pushing it down with your hand on the
rear window. The glass could smash. Risk of injury!
● Ensure the tailgate is locked after closing it. If not, it may open unex-
pectedly while driving.
● Never allow children to play in or around the vehicle. A locked vehicle
can be subjected to extremely high and low temperatures, depending on
the time of year, thus causing serious injuries/illness. It could even have
fatal consequences. Close and lock both the tailgate and all the other
doors when you are not using the vehicle.
● Closing the tailgate without observing and ensuring it is clear could
cause serious injury to you and to third parties. Make sure that no one is
in the path of the tailgate.
● Never drive with the tailgate open or half-closed, exhaust gases may
penetrate into the interior of the vehicle. Danger of poisoning!
● If you only open the tailgate, do not leave the key inside. The vehicle
will not be opened if the key is left inside.
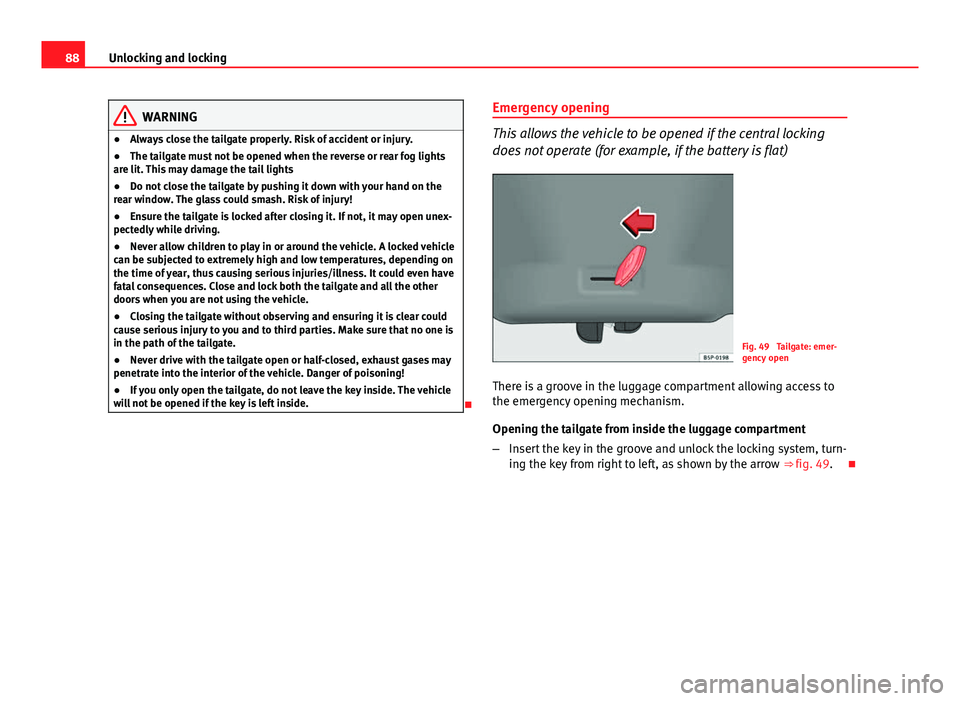
Emergency opening
This allows the vehicle to be opened if the central locking
does not operate (for example, if the battery is flat)
Fig. 49 Tailgate: emer-
gency open
There is a groove in the luggage compartment allowing access to
the emergency opening mechanism.
Opening the tailgate from inside the luggage compartment
– Insert the key in the groove and unlock the locking system, turn-
ing the key from right to left, as shown by the arrow ⇒ fig. 49.
Page 96 of 278
94Lights and visibility
Lights and visibility
Lights Switching lights on and off
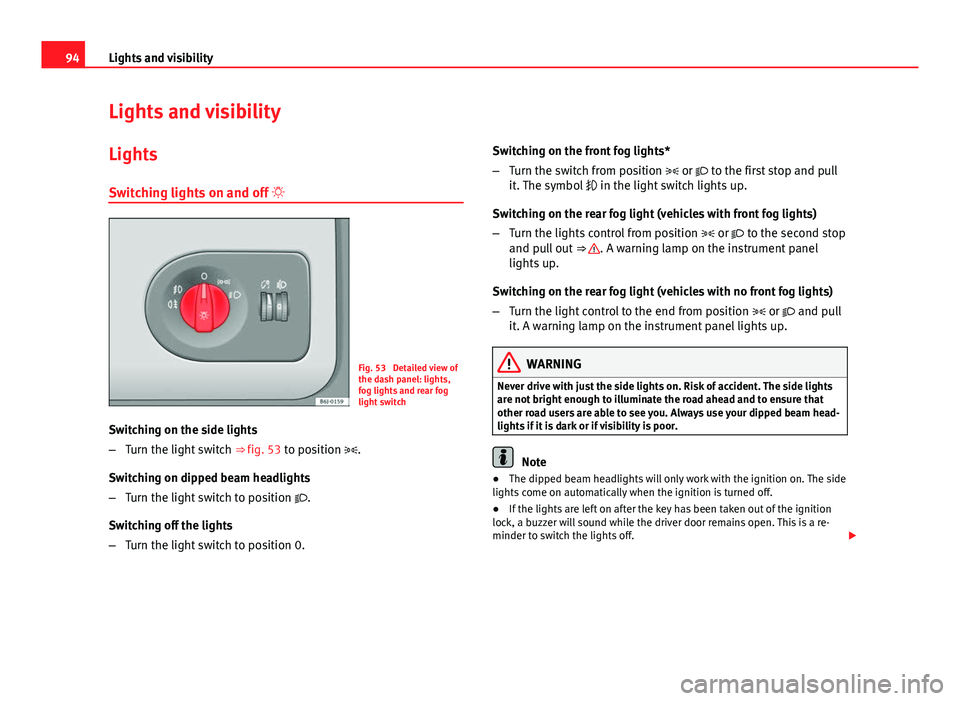
Fig. 53 Detailed view of
the dash panel: lights,
fog lights and rear fog
light switch
Switching on the side lights
– Turn the light switch ⇒ fig. 53 to position .
Switching on dipped beam headlights
– Turn the light switch to position .
Switching off the lights
– Turn the light switch to position 0. Switching on the front fog lights*
–
Turn the switch from position or to the first stop and pull
it. The symbol in the light switch lights up.
Switching on the rear fog light (vehicles with front fog lights)
– Turn the lights control from position or to the second stop
and pull out ⇒
. A warning lamp on the instrument panel
lights up.
Switching on the rear fog light (vehicles with no front fog lights)
– Turn the light control to the end from position or and pull
it. A warning lamp on the instrument panel lights up.
WARNING
Never drive with just the side lights on. Risk of accident. The side lights
are not bright enough to illuminate the road ahead and to ensure that
other road users are able to see you. Always use your dipped beam head-
lights if it is dark or if visibility is poor.
Note
● The dipped beam headlights will only work with the ignition on. The side
lights come on automatically when the ignition is turned off.
● If the lights are left on after the key has been taken out of the ignition
lock, a buzzer will sound while the driver door remains open. This is a re-
minder to switch the lights off.
Page 97 of 278
95
Lights and visibility
● The rear fog light is so bright that it can dazzle drivers behind you. You
should use the rear fog light only when visibility is very poor.
● The use of the lighting described here is subject to the relevant statutory
requirements.
Automatic lighting*
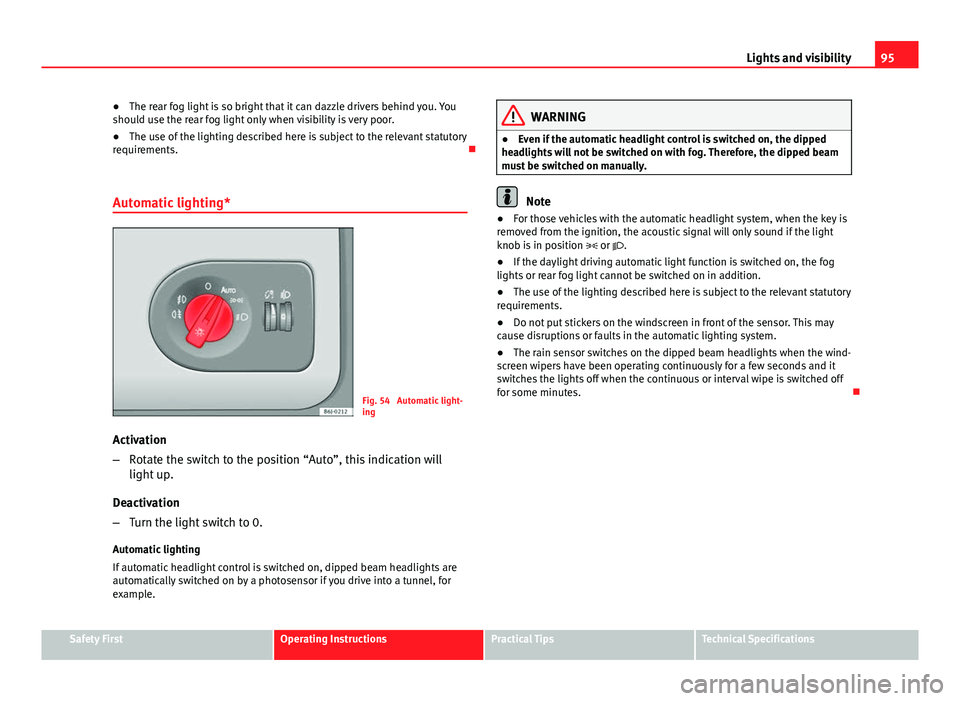
Fig. 54 Automatic light-
ing
Activation
– Rotate the switch to the position “Auto”, this indication will
light up.
Deactivation
– Turn the light switch to 0.
Automatic lighting
If automatic headlight control is switched on, dipped beam headlights are
automatically switched on by a photosensor if you drive into a tunnel, for
example.
WARNING
● Even if the automatic headlight control is switched on, the dipped
headlights will not be switched on with fog. Therefore, the dipped beam
must be switched on manually.
Note
● For those vehicles with the automatic headlight system, when the key is
removed from the ignition, the acoustic signal will only sound if the light
knob is in position or .
● If the daylight driving automatic light function is switched on, the fog
lights or rear fog light cannot be switched on in addition.
● The use of the lighting described here is subject to the relevant statutory
requirements.
● Do not put stickers on the windscreen in front of the sensor. This may
cause disruptions or faults in the automatic lighting system.
● The rain sensor switches on the dipped beam headlights when the wind-
screen wipers have been operating continuously for a few seconds and it
switches the lights off when the continuous or interval wipe is switched off
for some minutes.
Safety FirstOperating InstructionsPractical TipsTechnical Specifications
Page 99 of 278
97
Lights and visibility
Adaptive headlights* (for driving round bends)
When driving around bends, the headlights will light the
most important areas of the road.
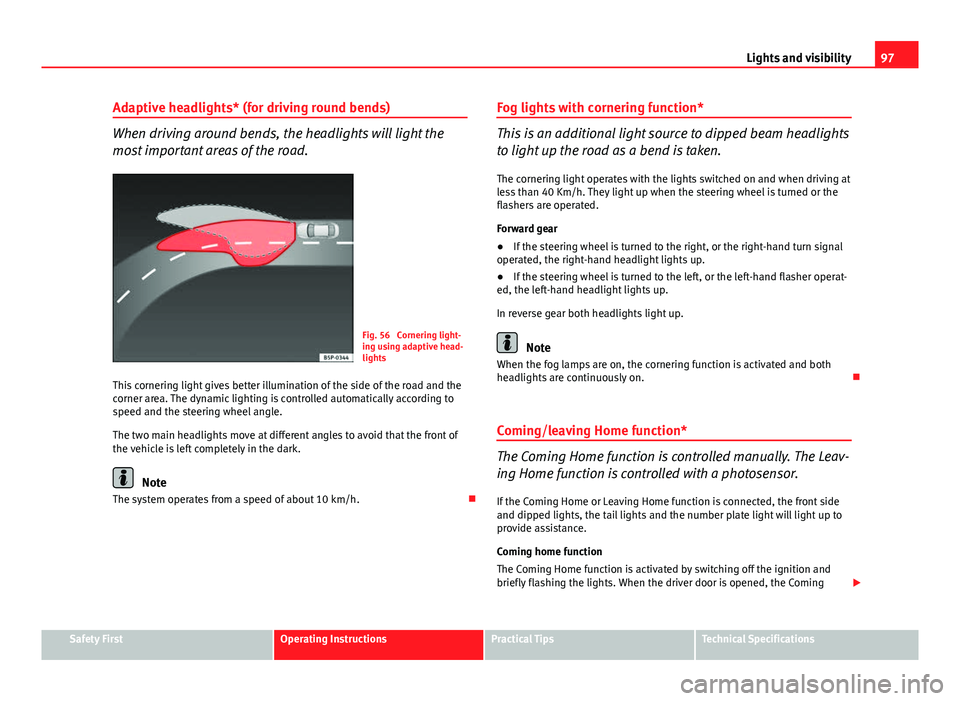
Fig. 56 Cornering light-
ing using adaptive head-
lights
This cornering light gives better illumination of the side of the road and the
corner area. The dynamic lighting is controlled automatically according to
speed and the steering wheel angle.
The two main headlights move at different angles to avoid that the front of
the vehicle is left completely in the dark.
Note
The system operates from a speed of about 10 km/h. Fog lights with cornering function*
This is an additional light source to dipped beam headlights
to light up the road as a bend is taken.
The cornering light operates with the lights switched on and when driving at
less than 40 Km/h. They light up when the steering wheel is turned or the
flashers are operated.
Forward gear
● If the steering wheel is turned to the right, or the right-hand turn signal
operated, the right-hand headlight lights up.
● If the steering wheel is turned to the left, or the left-hand flasher operat-
ed, the left-hand headlight lights up.
In reverse gear both headlights light up.
Note
When the fog lamps are on, the cornering function is activated and both
headlights are continuously on.
Coming/leaving Home function*
The Coming Home function is controlled manually. The Leav-
ing Home function is controlled with a photosensor.
If the Coming Home or Leaving Home function is connected, the front side
and dipped lights, the tail lights and the number plate light will light up to
provide assistance.
Coming home function
The Coming Home function is activated by switching off the ignition and
briefly flashing the lights. When the driver door is opened, the Coming
Safety FirstOperating InstructionsPractical TipsTechnical Specifications
Page 131 of 278
129
Air conditioning
WARNING
For your safety, the windows should never be fogged up or covered with
snow or ice. This is essential to ensure good visibility. Please familiarise
yourself with the correct operation of the heating and ventilation system,
including the demist/defrost functions for the windows.
Note
Please consider the general notes.
Vehicle interior heating or cooling system
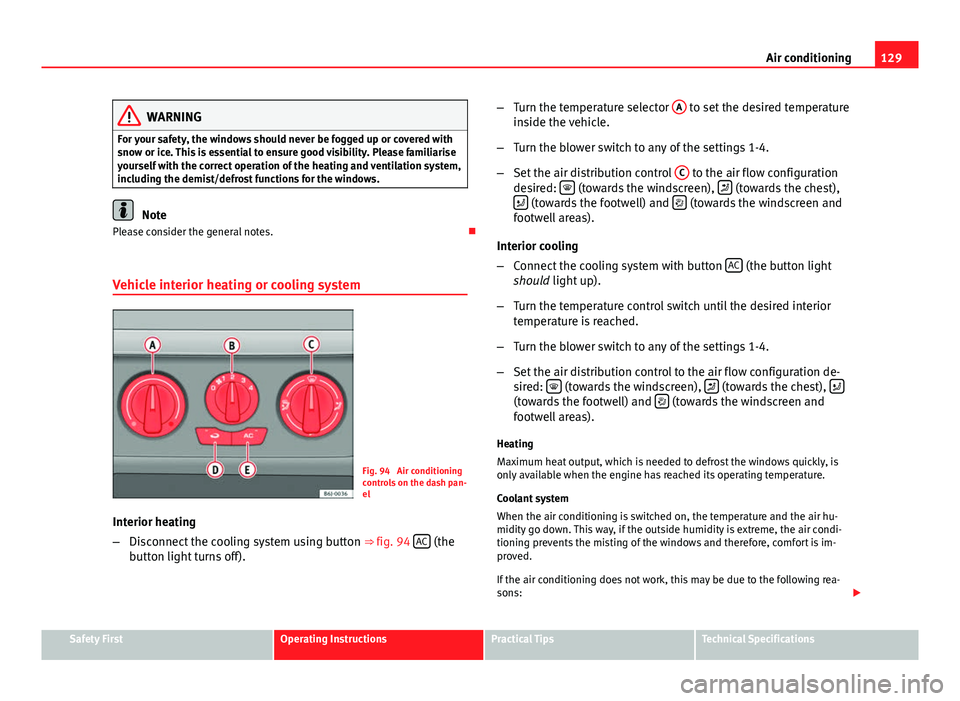
Fig. 94 Air conditioning
controls on the dash pan-
el
Interior heating
– Disconnect the cooling system using button ⇒ fig. 94 AC
(the
button light turns off). –
Turn the temperature selector A
to set the desired temperature
inside the vehicle.
– Turn the blower switch to any of the settings 1-4.
– Set the air distribution control C
to the air flow configuration
desired: (towards the windscreen), (towards the chest),
(towards the footwell) and (towards the windscreen and
footwell areas).
Interior cooling
– Connect the cooling system with button AC
(the button light
should light up).
– Turn the temperature control switch until the desired interior
temperature is reached.
– Turn the blower switch to any of the settings 1-4.
– Set the air distribution control to the air flow configuration de-
sired:
(towards the windscreen), (towards the chest), (towards the footwell) and (towards the windscreen and
footwell areas).
Heating
Maximum heat output, which is needed to defrost the windows quickly, is
only available when the engine has reached its operating temperature.
Coolant system
When the air conditioning is switched on, the temperature and the air hu-
midity go down. This way, if the outside humidity is extreme, the air condi-
tioning prevents the misting of the windows and therefore, comfort is im-
proved.
If the air conditioning does not work, this may be due to the following rea-
sons:
Safety FirstOperating InstructionsPractical TipsTechnical Specifications
Page 226 of 278
224If and when
Note
● If a newly replaced fuse blows again after a short time, the electrical sys-
tem must be checked by a specialised workshop as soon as possible.
● If you replace a fuse with higher-rating fuse, you could cause damage to
another location in the electrical system.
● Always keep some spare fuses in the vehicle. These are available from
SEAT dealers.
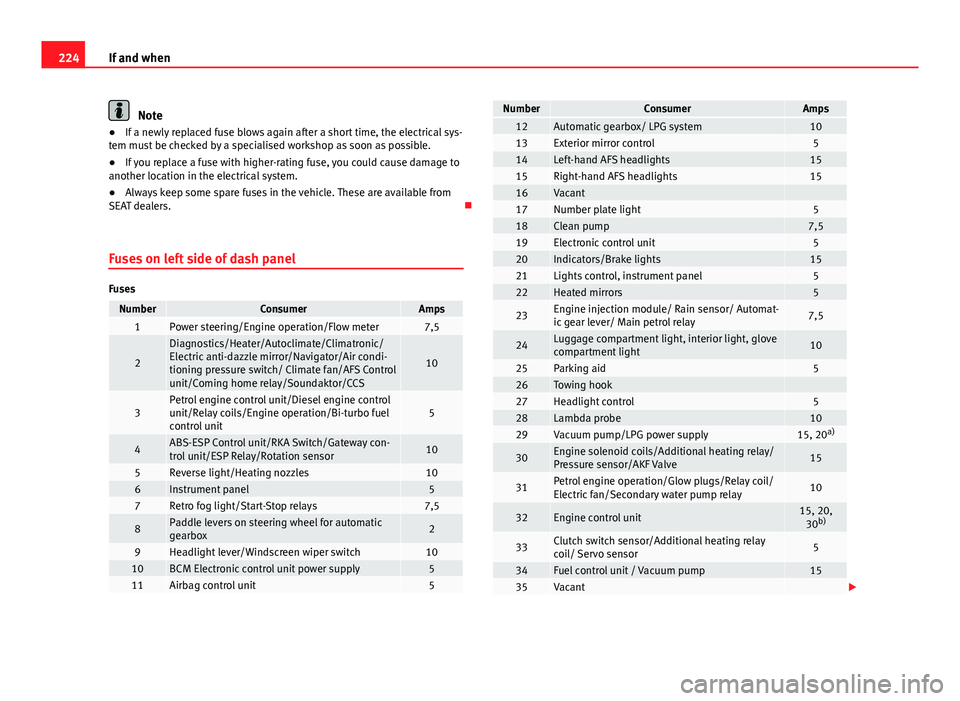
Fuses on left side of dash panel
Fuses
NumberConsumerAmps1Power steering/Engine operation/Flow meter7,5
2
Diagnostics/Heater/Autoclimate/Climatronic/
Electric anti-dazzle mirror/Navigator/Air condi-
tioning pressure switch/ Climate fan/AFS Control
unit/Coming home relay/Soundaktor/CCS
10
3Petrol engine control unit/Diesel engine control
unit/Relay coils/Engine operation/Bi-turbo fuel
control unit5
4ABS-ESP Control unit/RKA Switch/Gateway con-
trol unit/ESP Relay/Rotation sensor10
5Reverse light/Heating nozzles106Instrument panel57Retro fog light/Start-Stop relays7,5
8Paddle levers on steering wheel for automatic
gearbox2
9Headlight lever/Windscreen wiper switch1010BCM Electronic control unit power supply511Airbag control unit5
NumberConsumerAmps12Automatic gearbox/ LPG system1013Exterior mirror control514Left-hand AFS headlights1515Right-hand AFS headlights1516Vacant 17Number plate light518Clean pump7,519Electronic control unit520Indicators/Brake lights1521Lights control, instrument panel522Heated mirrors5
23Engine injection module/ Rain sensor/ Automat-
ic gear lever/ Main petrol relay7,5
24Luggage compartment light, interior light, glove
compartment light10
25Parking aid526Towing hook 27Headlight control528Lambda probe1029Vacuum pump/LPG power supply15, 20 a)
30Engine solenoid coils/Additional heating relay/
Pressure sensor/AKF Valve15
31Petrol engine operation/Glow plugs/Relay coil/
Electric fan/Secondary water pump relay10
32Engine control unit15, 20,
30 b)
33Clutch switch sensor/Additional heating relay
coil/ Servo sensor5
34Fuel control unit / Vacuum pump1535Vacant
Page 227 of 278
225
If and when
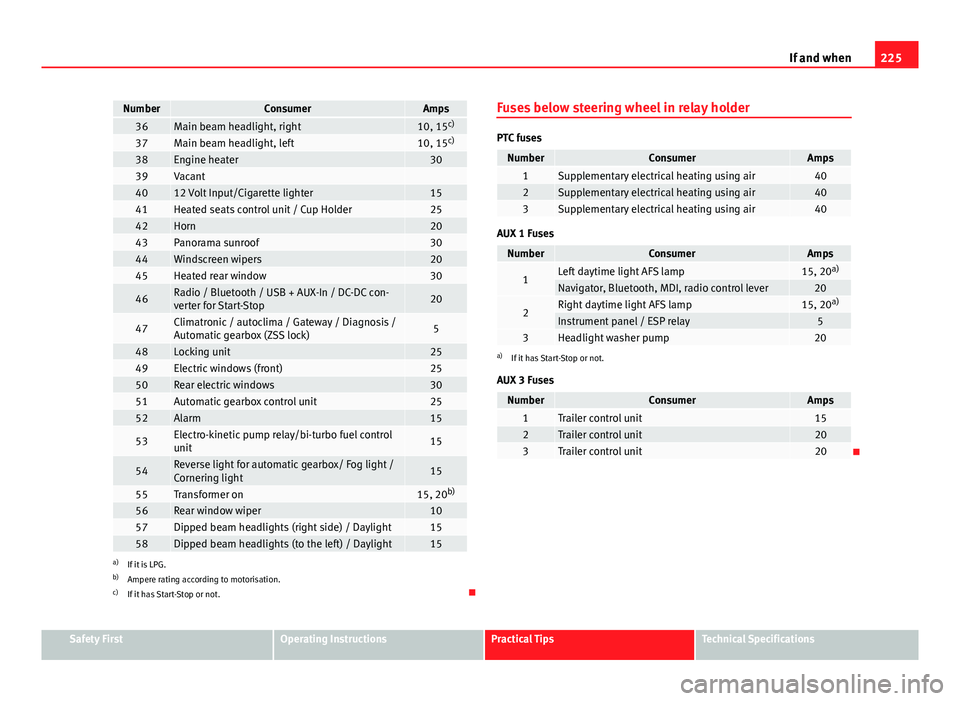
NumberConsumerAmps36Main beam headlight, right10, 15 c)37Main beam headlight, left10, 15c)38Engine heater3039Vacant 4012 Volt Input/Cigarette lighter1541Heated seats control unit / Cup Holder2542Horn2043Panorama sunroof3044Windscreen wipers2045Heated rear window30
46Radio / Bluetooth / USB + AUX-In / DC-DC con-
verter for Start-Stop20
47Climatronic / autoclima / Gateway / Diagnosis /
Automatic gearbox (ZSS lock)5
48Locking unit2549Electric windows (front)2550Rear electric windows3051Automatic gearbox control unit2552Alarm15
53Electro-kinetic pump relay/bi-turbo fuel control
unit15
54Reverse light for automatic gearbox/ Fog light /
Cornering light15
55Transformer on15, 20b)56Rear window wiper1057Dipped beam headlights (right side) / Daylight1558Dipped beam headlights (to the left) / Daylight15a)
If it is LPG.
b) Ampere rating according to motorisation.
c) If it has Start-Stop or not. Fuses below steering wheel in relay holder
PTC fuses
NumberConsumerAmps1Supplementary electrical heating using air402Supplementary electrical heating using air403Supplementary electrical heating using air40
AUX 1 Fuses
NumberConsumerAmps
1Left daytime light AFS lamp15, 20
a)Navigator, Bluetooth, MDI, radio control lever20
2Right daytime light AFS lamp15, 20a)Instrument panel / ESP relay53Headlight washer pump20a)
If it has Start-Stop or not.
AUX 3 Fuses
NumberConsumerAmps1Trailer control unit152Trailer control unit203Trailer control unit20
Safety FirstOperating InstructionsPractical TipsTechnical Specifications