change wheel Seat Ibiza ST 2012 User Guide
[x] Cancel search | Manufacturer: SEAT, Model Year: 2012, Model line: Ibiza ST, Model: Seat Ibiza ST 2012Pages: 282, PDF Size: 3.77 MB
Page 220 of 282
218Checking and refilling levels
Tyre useful life
The useful life of tyres is dependent on tyre pressure, driving
style and fitting.
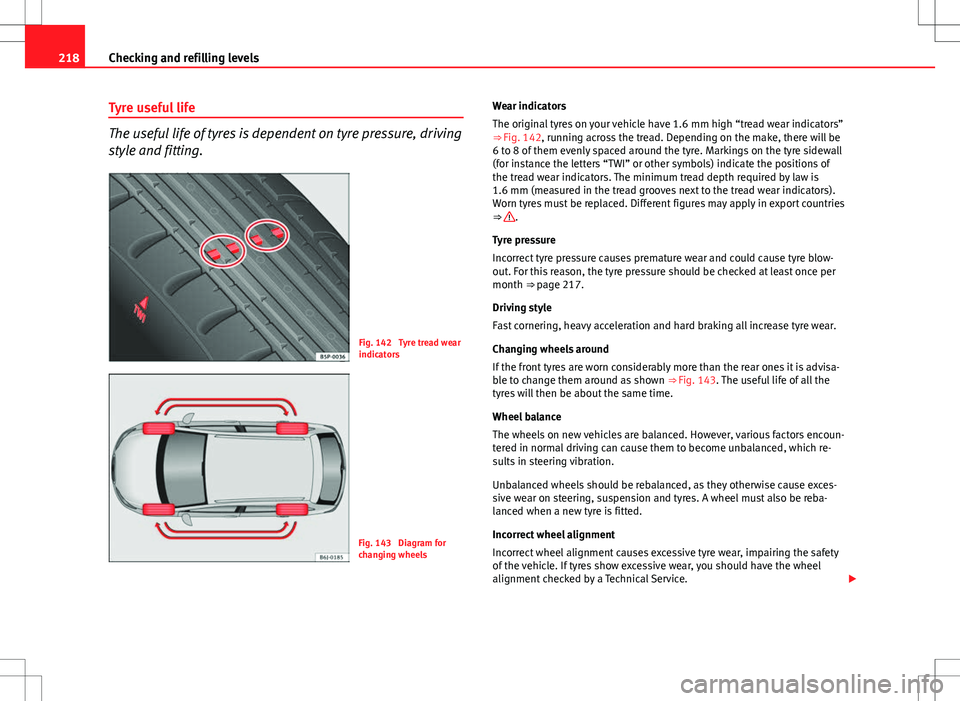
Fig. 142 Tyre tread wear
indicators
Fig. 143 Diagram for
changing wheels Wear indicators
The original tyres on your vehicle have 1.6 mm high “tread wear indicators”
⇒ Fig. 142, running across the tread. Depending on the make, there will be
6 to 8 of them evenly spaced around the tyre. Markings on the tyre sidewall
(for instance the letters “TWI” or other symbols) indicate the positions of
the tread wear indicators. The minimum tread depth required by law is
1.6 mm (measured in the tread grooves next to the tread wear indicators).
Worn tyres must be replaced. Different figures may apply in export countries
⇒
.
Tyre pressure
Incorrect tyre pressure causes premature wear and could cause tyre blow-
out. For this reason, the tyre pressure should be checked at least once per
month ⇒ page 217.
Driving style
Fast cornering, heavy acceleration and hard braking all increase tyre wear.
Changing wheels around
If the front tyres are worn considerably more than the rear ones it is advisa-
ble to change them around as shown ⇒ Fig. 143. The useful life of all the
tyres will then be about the same time.
Wheel balance
The wheels on new vehicles are balanced. However, various factors encoun-
tered in normal driving can cause them to become unbalanced, which re-
sults in steering vibration.
Unbalanced wheels should be rebalanced, as they otherwise cause exces-
sive wear on steering, suspension and tyres. A wheel must also be reba-
lanced when a new tyre is fitted.
Incorrect wheel alignment
Incorrect wheel alignment causes excessive tyre wear, impairing the safety
of the vehicle. If tyres show excessive wear, you should have the wheel
alignment checked by a Technical Service.
Page 225 of 282
223
If and when
If and when
Vehicle tools, spare wheel
Vehicle Tools
The vehicle tools are located under the floor panel in the
luggage compartment. – Lift luggage compartment floor panel.
– Take the vehicle tools out of the vehicle.
The vehicle tool kit includes:
● Jack*
● Hook to remove integral* trim and screw caps.
● Box spanner for wheel bolts*
● Towline anchorage*
● Adapter for the anti-theft wheel bolts*
Some of the items listed are only provided in certain model versions, or are
optional extras.
WARNING
● The factory-supplied jack is only designed for changing wheels on
this model. On no account attempt to use it for lifting heavier vehicles or
other loads. Risk of injury.
● Use the jack only on a firm, level ground.
WARNING (Continued)
● Never start the engine when the vehicle is on the jack. Risk of acci-
dent.
● If work is to be carried out underneath the vehicle, this must be se-
cured by suitable means. Otherwise, there is a risk of injury.
Spare wheel (temporary spare wheel)*
The spare wheel (temporary spare wheel) must only be used
for the minimum necessary time.
The temporary spare wheel is stored under the floor panel in the luggage
compartment and is attached by a thumbnut.
How to use the temporary spare wheel
If you ever have a punctured tyre or loss of pressure, the temporary spare
wheel is only intended for temporary use until you reach a workshop.
Change it for a duty wheel as soon as possible.
Please note the following restrictions when using the temporary spare
wheel. This temporary spare wheel has been specially designed for your ve-
hicle, thus, it cannot be changed with the temporary spare wheel from an-
other vehicle.
No other type of tyre (normal summer or winter tyre) may be fitted on the
compact temporary spare wheel rim.
Snow chains
For technical reasons, snow chains must not be used on the compact tem-
porary spare wheel.
Safety FirstOperating InstructionsPractical TipsTechnical Specifications
Page 226 of 282
224If and when
If you have a puncture on one of the front wheels when using snow chains,
fit the compact temporary spare wheel in place of one of the rear wheels.
You can then attach the snow chains to the wheel taken from the rear and
use this wheel to replace the punctured front wheel.
WARNING
● The tyre pressures must be checked and corrected as soon as possi-
ble after fitting the temporary spare wheel.
● Do not drive faster than 80 km/h (50 mph). Higher speeds can cause
an accident.
● Avoid heavy acceleration, hard braking and fast cornering. Risk of ac-
cident.
● Never use more than one temporary spare wheel at the same time,
risk of accident.
● No other type of tyre (normal summer or winter tyre) may be fitted on
the compact temporary spare wheel rim.
Tyre repair kit*
The tyre repair kit (for vehicles not including a temporary
spare wheel) is stored under the floor panel in the luggage
compartment. Your vehicle is equipped with the Tyre Mobility System “Tyre repair kit”.
The tyre repair kit consists of a container with sealing product to repair the
puncture and a compressor to generate the required tyre pressure. The kit
will reliably seal punctures up to a size of about 4 mm caused by the pene-
tration of a foreign body into the tyre.
Note
● Seek professional assistance if the repair of a tyre puncture is not possi-
ble with the sealing product.
Wheel change Preparation work
What you must do before changing a wheel.
– If you have a flat tyre or puncture, park the vehicle as far away
from the flow of traffic as possible. Choose a location that is as
level as possible.
– All vehicle occupants should leave the vehicle. They should
wait in a safe area (for instance behind the roadside crash barri-
er).
– Switch the engine off. Switch the hazard warning lights on and
place the warning triangles in position.
– Apply the handbrake firmly.
– Engage the first gear , or put the selector lever to position P for
those vehicles with an automatic gearbox.
– If you are towing a trailer, unhitch it from your vehicle.
– Take the vehicle tools and the spare wheel out of the luggage
compartment.
Page 227 of 282
225
If and when
WARNING
Switch on the hazard warning lights and place the warning triangles in
position. This is for your own safety and also warns other road users.
CAUTION
If you have to change the wheel on a slope, it is essential to lock the parallel
wheel on the same axle as that to be changed, with a wedge or similar in
order to immobilise the vehicle.
Note
Please observe legal requirements when doing so.
Changing a wheel
Change the wheel as described below
– Remove the hub caps or the integral trim .
– Slacken the wheel bolts .
– Raise the vehicle with the jack at the corresponding point.
– Remove the wheel and then fit the spare wheel.
– Lower the vehicle.
– Tighten the wheel bolts firmly with the box spanner.
– Replace the hub cap. After changing a wheel
After changing the wheel there are still tasks to complete.
– Put the tools and jack back in the luggage compartment.
– Place the wheel with the defective tyre in the luggage compart-
ment and secure it.
– Check the tyre pressure of the newly fitted tyre as soon as pos-
sible.
– Have the tightening torque of the wheel bolts checked as soon
as possible with a torque wrench. The prescribed torque must
be 120 Nm.
Note
● If you notice that the wheel bolts are corroded and difficult to turn when
changing a wheel, they must be replaced before having the wheel bolt tight-
ening torque checked.
● For safety reasons, drive at moderate speeds until the wheel bolt tight-
ening torque has been checked.
Safety FirstOperating InstructionsPractical TipsTechnical Specifications
Page 229 of 282
227
If and when
WARNING
Loosen the wheel bolts only about one turn before raising the vehicle
with the jack, otherwise there is a risk of accident.
Note
● If the wheel bolt is very tight, you may be able to loosen it by pushing
down the end of the spanner carefully with your foot. Hold on to the vehicle
for support and take care not to slip.
Raising the vehicle
In order to remove the wheel, the vehicle must be raised
with a jack.
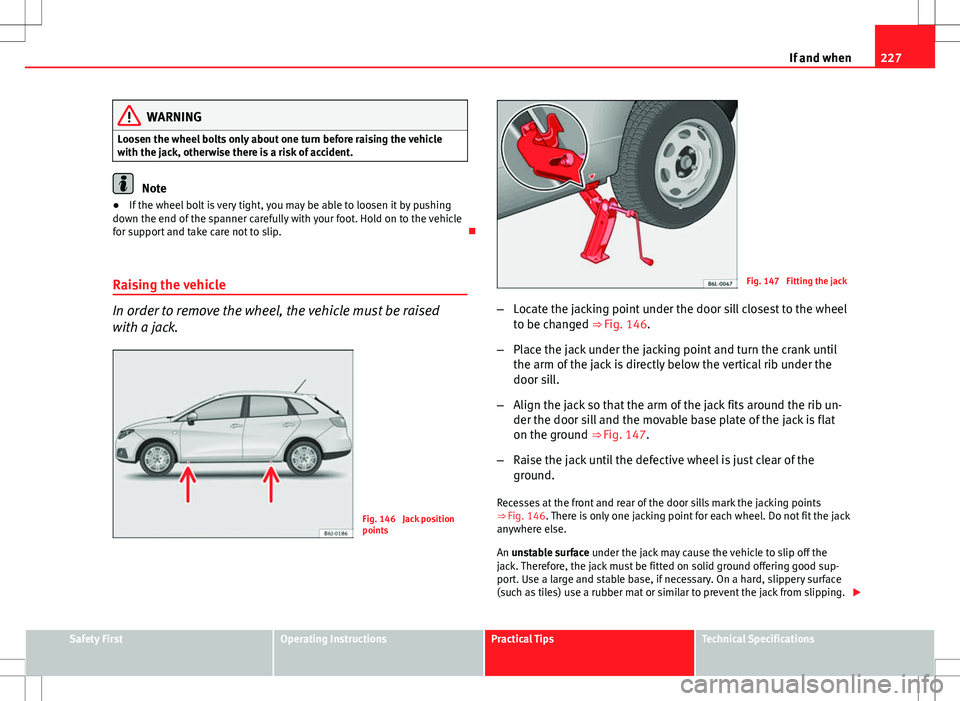
Fig. 146 Jack position
points
Fig. 147 Fitting the jack
– Locate the jacking point under the door sill closest to the wheel
to be changed ⇒ Fig. 146.
– Place the jack under the jacking point and turn the crank until
the arm of the jack is directly below the vertical rib under the
door sill.
– Align the jack so that the arm of the jack fits around the rib un-
der the door sill and the movable base plate of the jack is flat
on the ground ⇒ Fig. 147.
– Raise the jack until the defective wheel is just clear of the
ground.
Recesses at the front and rear of the door sills mark the jacking points
⇒ Fig. 146. There is only one jacking point for each wheel. Do not fit the jack
anywhere else.
An unstable surface under the jack may cause the vehicle to slip off the
jack. Therefore, the jack must be fitted on solid ground offering good sup-
port. Use a large and stable base, if necessary. On a hard, slippery surface
(such as tiles) use a rubber mat or similar to prevent the jack from slipping.
Safety FirstOperating InstructionsPractical TipsTechnical Specifications
Page 230 of 282
228If and when
WARNING
● Take all precautions so that the base of the jack does not slip. Failure
to do so could result in an accident.
● The vehicle can be damaged if the jack is not applied at the correct
jacking points. There is also a risk of injury since the jack can slip off
suddenly if it is not properly engaged.
Removing and fitting the wheel
For removal and fitting the wheel, the following tasks must
be completed.
After loosening the wheel bolts and raising the vehicle with the
jack, change the wheel as described below:
Removing a wheel
– Unscrew the wheel bolts using the box spanner and place them
on a clean surface.
Fitting a wheel
– Screw on the wheel bolts and tighten slightly with the box
spanner.
The wheel bolts should be clean and easily screwed. Before fitting the spare
wheel, inspect the wheel condition and hub mounting surfaces. These sur-
faces must be clean before fitting the wheel.
If tyres with a specific direction of rotation are fitted, note the direction of
rotation. Anti-theft wheel bolts*
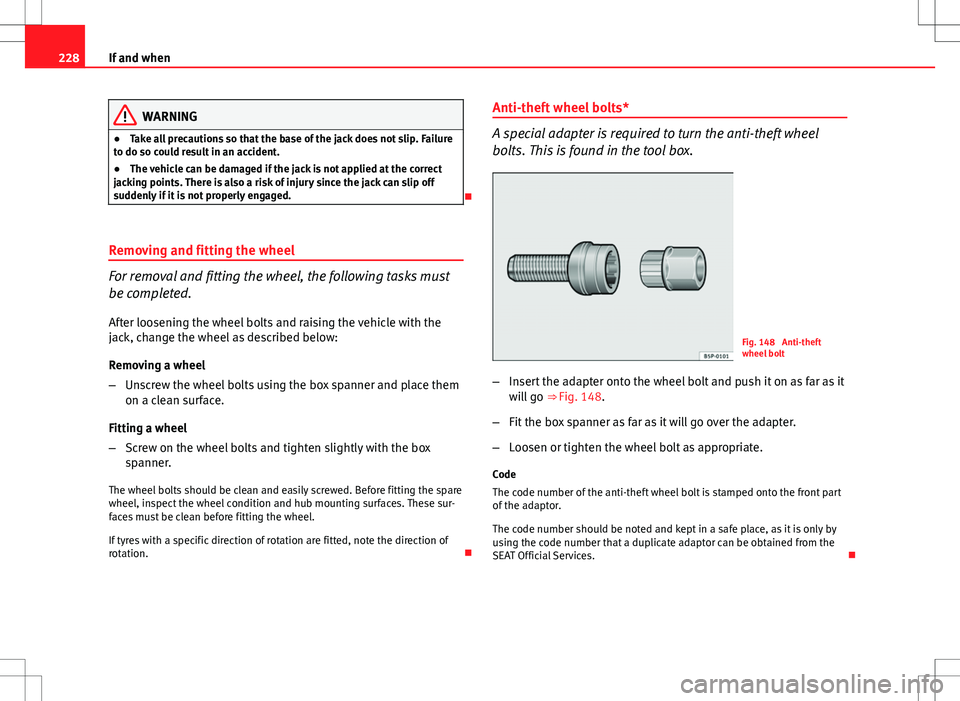
A special adapter is required to turn the anti-theft wheel
bolts. This is found in the tool box.
Fig. 148 Anti-theft
wheel bolt
– Insert the adapter onto the wheel bolt and push it on as far as it
will go ⇒ Fig. 148.
– Fit the box spanner as far as it will go over the adapter.
– Loosen or tighten the wheel bolt as appropriate.
Code
The code number of the anti-theft wheel bolt is stamped onto the front part
of the adaptor.
The code number should be noted and kept in a safe place, as it is only by
using the code number that a duplicate adaptor can be obtained from the
SEAT Official Services.
Page 231 of 282
229
If and when
Tyres with directional tread pattern
Tyres with directional tread pattern must be fitted so that
they rotate in the correct direction. A directional tread pattern can be identified by arrows on the sidewall that
point in the direction of rotation. Always note the direction of rotation indi-
cated when fitting the wheel. This is important so that these tyres can give
maximum grip and avoid excessive noise, tread wear and aquaplaning.
If, in an emergency, you have to fit the spare wheel so it rotates in the wrong
direction, you must drive extremely carefully. The tyre will not give optimum
performance. This is particularly important when driving on wet roads.
To benefit from the advantages of tyres with this type of tread pattern, the
defective tyre should be replaced as soon as possible so that all tyres again
rotate in the correct direction.
Tyre repair kit (Tyre-Mobility-System)*
General information and safety notes
Your vehicle is equipped with a tyre repair kit: the Tyre Mobility System.
In the event of a tyre puncture, a sealing product and an air compressor are
located in the luggage compartment under the floor panel.
The Tyre Mobility System will reliably seal punctures caused by the penetra-
tion of a foreign body of up to about 4 mm in diameter.
It is not necessary to remove the foreign body from the tyre.
Instructions for the sealing product are located on the sealing product con-
tainer. It also contains the instructions for using the compressor.
WARNING
● Do not attempt to repair a puncture with the sealing product if the
tyre has been damaged by driving the vehicle after the tyre has lost its
air.
● Always observe warnings and follow safety instructions concerning
compressor and sealing compound carefully.
● Do not drive faster than 80 km/h (50 mph), avoid heavy acceleration,
hard braking and fast cornering.
● Tyres which have been repaired with sealing compound are only suit-
able for temporary use over a short period. Therefore, please drive care-
fully to the next available specialised workshop.
For the sake of the environment
If you have to dispose of a sealant can, go to a specialised waste service or
to a SEAT Technical Service, where the product can be recycled in an appro-
priate waste container.
Note
● If sealing product should leak out, leave it to dry. This way you can pull it
off like a piece of foil.
● Observe the expiry date stated on the sealing compound can. Have the
sealing compound exchanged by a specialised workshop.
● Seek professional assistance if the repair of a tyre puncture is not possi-
ble with the sealing product.
Safety FirstOperating InstructionsPractical TipsTechnical Specifications
Page 259 of 282
257
Description of specifications
Information on fuel consumption
Fuel consumption
The consumption and emission details shown on the vehicle
data sticker differ from one vehicle to another. The vehicle fuel consumption and CO 2 emissions can be consulted on the
vehicle data sticker in the spare wheel well, inside the luggage compart-
ment and on the rear cover of the Maintenance Programme.
The fuel consumption and CO 2 emission values refer to the weight category
assigned to your vehicle according to the engine and gearbox combination,
as well as the specific equipment fitted, and is only used to compare be-
tween the different models.
The fuel consumption and CO 2 emissions do not depend only on the per-
formance of the vehicle, they can also differ from the established values de-
pending on other factors such as driving style, road conditions, traffic con-
ditions, environmental conditions, load and number of passengers.
Calculation of fuel consumption
The consumption values have been calculated based on measurements per-
formed or supervised by certified CE laboratories according to the latest ver-
sion of directives 715/2007/EC and 80/1268/CEE (for more information
consult the European Union Publications Office at EUR-Lex: © European Un-
ion, http://eur-lex.europa.eu/en/index.htm) and are valid for the kerb
weight indicated for the vehicle.
Note
In practice, and considering all the factors mentioned here, consumption
values can differ from those calculated in the current European regulations. Weights
Kerb weight refers to the basic model with a fuel tank filled to 90% capacity
and without optional extras. The figure quoted includes 75 kg to allow for
the weight of the driver.
For special versions and optional equipment fittings or for the addition of
accessories, the weight of the vehicle will increase
⇒
.
WARNING
● Please note that the centre of gravity may shift when transporting
heavy objects; this may affect vehicle handling and lead to an accident.
Always adjust your speed and driving style to suit road conditions and re-
quirements.
● Never exceed the gross axle weight rating or the gross vehicle weight
rating. If the allowed axle load or the allowed total weight is exceeded,
the driving characteristics of the vehicle may change, leading to acci-
dents, injuries and damage to the vehicle.
Towing a trailer Trailer weights
Trailer weight
The trailer weights and drawbar loads approved are selected in intensive tri-
als according to precisely defined criteria. The approved trailer weights are
valid for vehicles in the EU for maximum speeds of 80 km/h (50 mph) (in
certain circumstances up to 100 km/h (60 mph)). The figures may be differ-
ent in other countries. All data in the official vehicle documentation takes
precedence over these data at all times ⇒
.
Safety FirstOperating InstructionsPractical TipsTechnical Specifications
Page 260 of 282
258Description of specifications
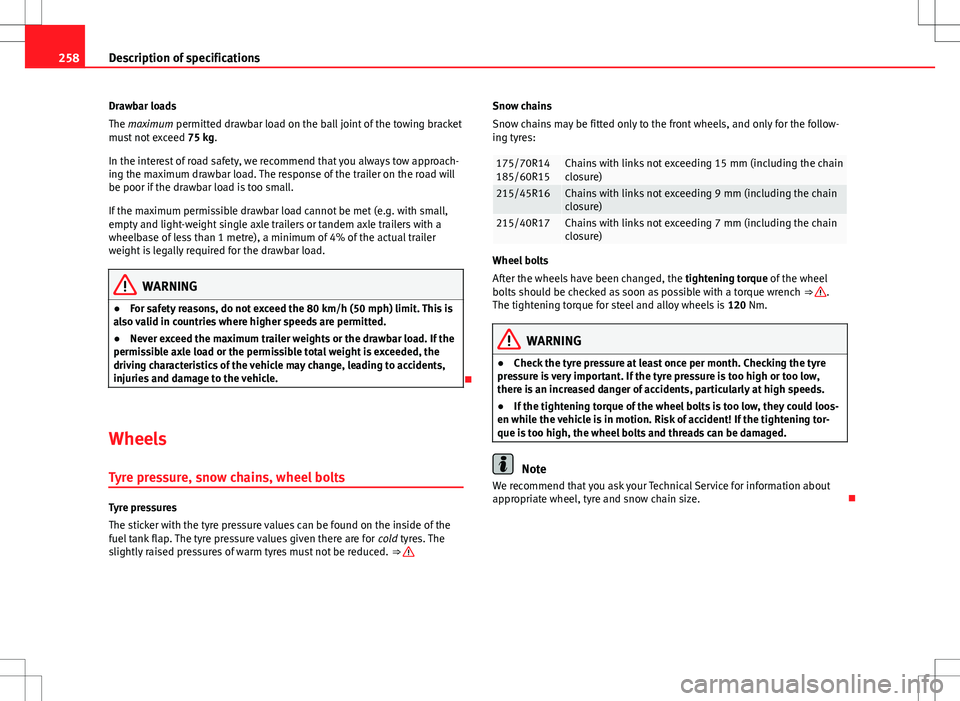
Drawbar loads
The maximum permitted drawbar load on the ball joint of the towing bracket
must not exceed 75 kg.
In the interest of road safety, we recommend that you always tow approach-
ing the maximum drawbar load. The response of the trailer on the road will
be poor if the drawbar load is too small.
If the maximum permissible drawbar load cannot be met (e.g. with small,
empty and light-weight single axle trailers or tandem axle trailers with a
wheelbase of less than 1 metre), a minimum of 4% of the actual trailer
weight is legally required for the drawbar load.
WARNING
● For safety reasons, do not exceed the 80 km/h (50 mph) limit. This is
also valid in countries where higher speeds are permitted.
● Never exceed the maximum trailer weights or the drawbar load. If the
permissible axle load or the permissible total weight is exceeded, the
driving characteristics of the vehicle may change, leading to accidents,
injuries and damage to the vehicle.
Wheels
Tyre pressure, snow chains, wheel bolts
Tyre pressures
The sticker with the tyre pressure values can be found on the inside of the
fuel tank flap. The tyre pressure values given there are for cold tyres. The
slightly raised pressures of warm tyres must not be reduced. ⇒
Snow chains
Snow chains may be fitted only to the front wheels, and only for the follow-
ing tyres:
175/70R14
185/60R15Chains with links not exceeding 15 mm (including the chain
closure)
215/45R16Chains with links not exceeding 9 mm (including the chain
closure)
215/40R17Chains with links not exceeding 7 mm (including the chain
closure)
Wheel bolts
After the wheels have been changed, the tightening torque of the wheel
bolts should be checked as soon as possible with a torque wrench ⇒
.
The tightening torque for steel and alloy wheels is 120 Nm.
WARNING
● Check the tyre pressure at least once per month. Checking the tyre
pressure is very important. If the tyre pressure is too high or too low,
there is an increased danger of accidents, particularly at high speeds.
● If the tightening torque of the wheel bolts is too low, they could loos-
en while the vehicle is in motion. Risk of accident! If the tightening tor-
que is too high, the wheel bolts and threads can be damaged.
Note
We recommend that you ask your Technical Service for information about
appropriate wheel, tyre and snow chain size.
Page 272 of 282
270Technical specifications
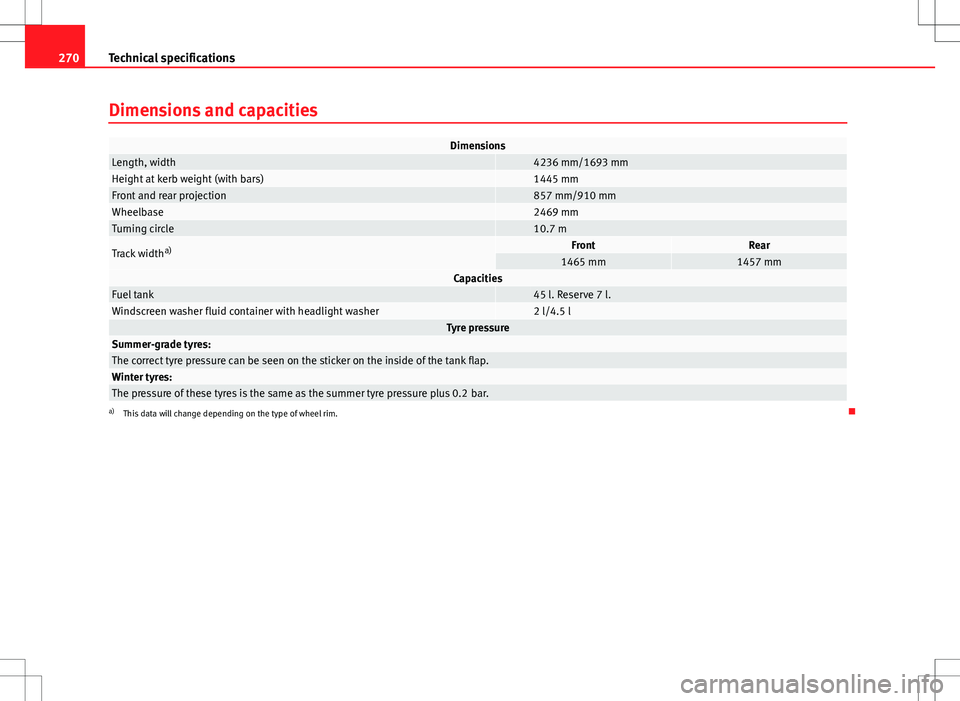
Dimensions and capacities
DimensionsLength, width 4236 mm/1693 mmHeight at kerb weight (with bars) 1445 mmFront and rear projection 857 mm/910 mmWheelbase 2469 mmTurning circle 10.7 m
Track width a)FrontRear1465 mm1457 mmCapacitiesFuel tank 45 l. Reserve 7 l.Windscreen washer fluid container with headlight washer 2 l/4.5 lTyre pressureSummer-grade tyres:The correct tyre pressure can be seen on the sticker on the inside of the tank flap.Winter tyres:The pressure of these tyres is the same as the summer tyre pressure plus 0.2 bar.a)
This data will change depending on the type of wheel rim.