Seat Ibiza ST 2012 Owner's manual
Manufacturer: SEAT, Model Year: 2012, Model line: Ibiza ST, Model: Seat Ibiza ST 2012Pages: 282, PDF Size: 3.77 MB
Page 191 of 282
189
Vehicle maintenance and cleaning
etc. so a degree of care is required in everyday use and when looking after
the leather.
Dust and grit in the pores and seams can scratch and damage the surface. If
the vehicle is under solar radiation for long periods, the leather should be
protected to prevent it from fading. However, slight colour variations in
high-quality natural leather are normal.
CAUTION
● Do not use solvents, wax polish, shoe cream, spot removers or similar
products on leather.
● To avoid damage, stubborn stains should be removed by a specialised
workshop.
Seat belt cleaning
A dirty belt may not work properly.
Check all seat belts regularly and keep them clean.
Seat belt cleaning
– Pull the dirty seat belt right out and unroll it.
– Clean dirty seat belts with a gentle soap solution.
– Allow it to dry.
– Do not roll the seat belt up until it is dry.
If large stains form on the belts, it will not retract correctly into the automat-
ic belt retractor.
WARNING
● Do not use chemical cleaning agents on the seat belts, as this can im-
pair the strength of the webbing. Ensure that seat belts do not come into
contact with corrosive fluids.
● Check the condition of the seat belts at regular intervals. If you notice
that the belt webbing, fittings, retractor mechanism or buckle of any of
the belts is damaged, the belt must be replaced by a specialised work-
shop.
● Do not attempt to repair a damaged seat belt yourself. The seat belts
must not be removed or modified in any way.
CAUTION
After cleaning, allow seat belts to dry completely before rolling them up.
Otherwise, the belt retractors could become damaged.
Safety FirstOperating InstructionsPractical TipsTechnical Specifications
Page 192 of 282
190Accessories, replacement of parts and modifications
Accessories, replacement of parts and modifications
Accessories and spare parts
Always consult a SEAT dealership before purchasing acces-
sories and parts.
Your vehicle is designed to offer a high standard of active and passive safe-
ty.
Before purchasing accessories and parts, and before making technical
changes to your vehicle, we recommend you to consult your SEAT Technical
Service.
SEAT dealerships will be happy to provide you with the latest information
about the use, legal requirements and recommendations from the manufac-
turer regarding accessories and parts.
We recommend you use only SEAT Approved Accessories®
and SEAT Ap-
proved Spare Parts ®
. This way, SEAT can guarantee that the product in
question is suitable, reliable and safe. SEAT Technical Services have the
necessary experience and facilities to ensure that parts are correctly and
professionally installed.
Despite a continuous observation of the market, SEAT is not able to assess
the reliability, safety and suitability of those parts SEAT has not approved.
For this reason, SEAT cannot assume responsibility for any non-genuine
parts used, even if these parts have been approved by an official testing
agency or are covered by an official approval certificate.
Any equipment subsequently installed which has a direct effect on the driv-
er's control of the vehicle (e.g. cruise control system or electronically-con-
trolled suspension) must be approved by SEAT and bear the e mark (the Eu-
ropean Union's authorisation symbol). If any
additional electrical components are fitted which do not serve to con-
trol the vehicle itself (e.g. refrigerator box, laptop or ventilator fan), these
must bear the CE mark (European Union manufacturer conformity declara-
tion).
WARNING
Accessories, for example telephone holders or cup holders, should never
be fitted on the covers, or within the working range, of the airbags. Oth-
erwise, there is a danger of injury if the airbag is triggered in an accident.
Technical modifications
Modifications must always be carried out according to our
specifications.
Unauthorised modifications to the electronic components or software in the
vehicle may cause malfunctions. Due to the way the electronic components
are linked together in networks, other indirect systems may be affected by
the faults. This can seriously impair safety, lead to excessive wear of compo-
nents, and also invalidate your vehicle registration documents.
The SEAT Technical Service cannot be held liable for any damage caused by
modifications and/or work incorrectly performed.
For this reason, we recommend having all work performed by a SEAT Techni-
cal Service using SEAT Original Spare Parts ®
.
Page 193 of 282
191
Accessories, replacement of parts and modifications
WARNING
Incorrectly performed modifications or other kind of work on your vehicle
can lead to malfunctions and cause accidents.
Roof aerial*
The vehicle can be fitted with a foldable* and anti-theft* roof aerial, which
can be folded backwards, when, for example, going through an automatic
carwash.
To fold
Unscrew the aerial rod, tilting it backwards into a horizontal position and
then screw in again.
To return to working position
Continue in the reverse order to the previous instruction.
CAUTION
If an automatic car wash tunnel is used, before entering the tunnel, put the
aerial down parallel to the roof and do not tighten to avoid damage.
Mobile telephones and two-way radios
You will require an external aerial for mobile phones and
two-way radios. SEAT has approved for your vehicle the use of mobile telephones and two-
way radios providing under the following conditions: ●
The correct installation of an external aerial,
● transmitting power of maximum 10 watts.
The optimal reach of the equipment is only achieved with an external aerial.
First consult your Technical Service if you wish to use a mobile telephone or
a two-way radio with a transmitting power output in excess of 10 watts.
Here you will receive information concerning the technical possibilities for
retrofitting this equipment.
Mobile telephones and two-way radios should be only fitted by a special-
ised workshop, for example a SEAT dealership.
WARNING
● Always concentrate primarily on driving. If you are distracted while
driving you could have an accident.
● Never attach the telephone mountings to the surfaces covering the
airbag units or within the range of the airbags. There is a high danger of
injury if the airbag is triggered.
● Using your mobile telephones or two-way radios in the vehicle with-
out an external aerial, electromagnetic radiation in the vehicle could ex-
ceed authorised limits. This also may occur to external aerials that have
not been correctly installed.
CAUTION
Failure to consider the above-mentioned conditions could cause the elec-
tronics to malfunction. The most common causes of faults are:
● no external aerial,
● external aerial incorrectly installed,
● transmitting power output in excess of 10 watts.
Safety FirstOperating InstructionsPractical TipsTechnical Specifications
Page 194 of 282
192Accessories, replacement of parts and modifications
Note
Please observe the operating instructions of your mobile telephone/two-
way radio.
Fitting a towing bracket*
It is possible to fit a towing bracket to the rear of the vehicle.
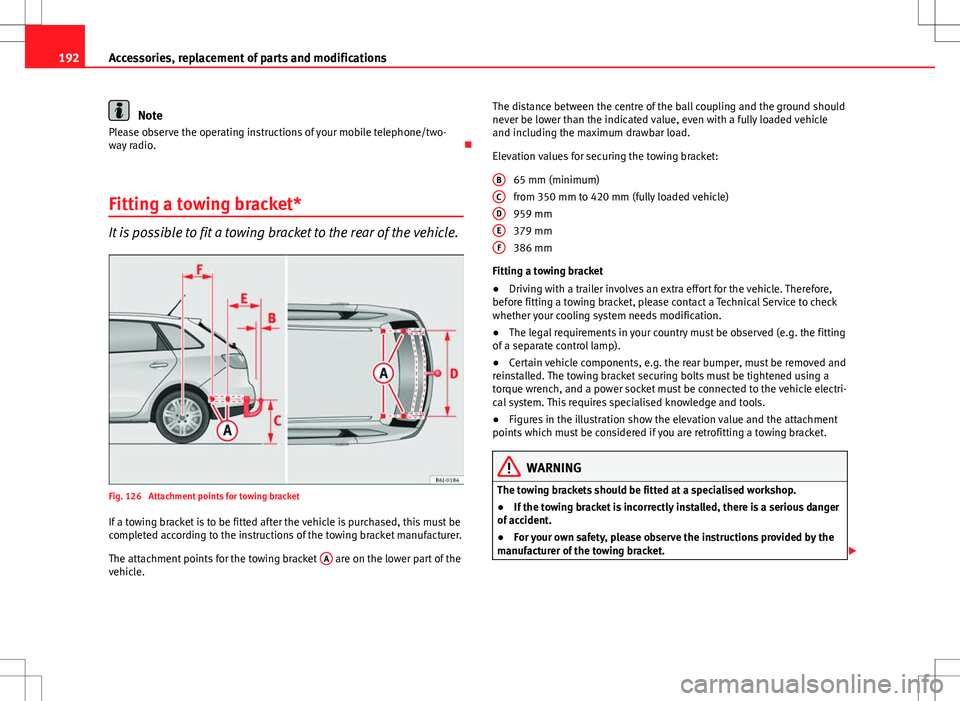
Fig. 126 Attachment points for towing bracket If a towing bracket is to be fitted after the vehicle is purchased, this must be
completed according to the instructions of the towing bracket manufacturer.
The attachment points for the towing bracket A
are on the lower part of the
vehicle. The distance between the centre of the ball coupling and the ground should
never be lower than the indicated value, even with a fully loaded vehicle
and including the maximum drawbar load.
Elevation values for securing the towing bracket:
65 mm (minimum)
from 350 mm to 420 mm (fully loaded vehicle)
959 mm
379 mm
386 mm
Fitting a towing bracket
● Driving with a trailer involves an extra effort for the vehicle. Therefore,
before fitting a towing bracket, please contact a Technical Service to check
whether your cooling system needs modification.
● The legal requirements in your country must be observed (e.g. the fitting
of a separate control lamp).
● Certain vehicle components, e.g. the rear bumper, must be removed and
reinstalled. The towing bracket securing bolts must be tightened using a
torque wrench, and a power socket must be connected to the vehicle electri-
cal system. This requires specialised knowledge and tools.
● Figures in the illustration show the elevation value and the attachment
points which must be considered if you are retrofitting a towing bracket.
WARNING
The towing brackets should be fitted at a specialised workshop.
● If the towing bracket is incorrectly installed, there is a serious danger
of accident.
● For your own safety, please observe the instructions provided by the
manufacturer of the towing bracket.
BCDEF
Page 195 of 282
193
Accessories, replacement of parts and modifications
CAUTION
● If the power socket is incorrectly installed, this could cause damage to
the vehicle electrical system.
Note
● SEAT recommends that the towing hooks be fitted at a specialised work-
shop. In certain versions this may entail fitting a heat insulating plate,
which is why it is recommended that you go to a SEAT dealership. In the
event that the plate is not installed correctly, SEAT is exempt from any liabil-
ity.
● Due to the specific design of the exhaust, the fitting of a conventional
towing hook is not recommended for some sportier versions. Please consult
your Technical Service.
Safety FirstOperating InstructionsPractical TipsTechnical Specifications
Page 196 of 282
194Checking and refilling levels
Checking and refilling levels
Refuelling
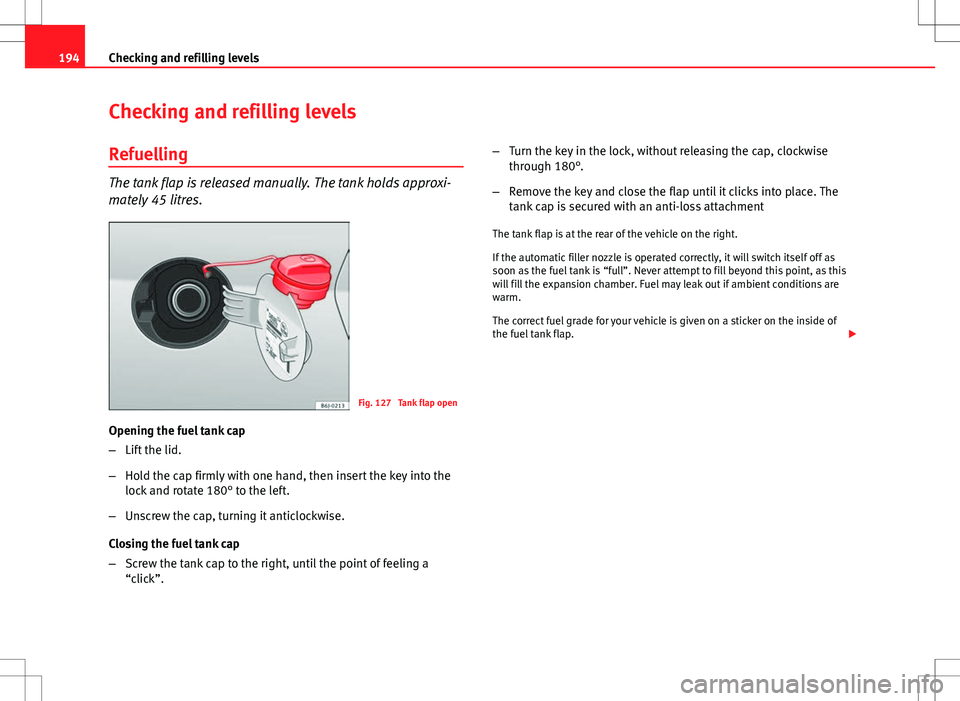
The tank flap is released manually. The tank holds approxi-
mately 45 litres.
Fig. 127 Tank flap open
Opening the fuel tank cap
– Lift the lid.
– Hold the cap firmly with one hand, then insert the key into the
lock and rotate 180° to the left.
– Unscrew the cap, turning it anticlockwise.
Closing the fuel tank cap
– Screw the tank cap to the right, until the point of feeling a
“click”. –
Turn the key in the lock, without releasing the cap, clockwise
through 180°.
– Remove the key and close the flap until it clicks into place. The
tank cap is secured with an anti-loss attachment
The tank flap is at the rear of the vehicle on the right.
If the automatic filler nozzle is operated correctly, it will switch itself off as
soon as the fuel tank is “full”. Never attempt to fill beyond this point, as this
will fill the expansion chamber. Fuel may leak out if ambient conditions are
warm.
The correct fuel grade for your vehicle is given on a sticker on the inside of
the fuel tank flap.
Page 197 of 282
195
Checking and refilling levels
WARNING
● Fuel is highly flammable and can cause serious burns and other inju-
ries.
–Never smoke or use an open flame when filling the fuel tank of the
vehicle, or a spare fuel canister, with fuel. This is an explosion haz-
ard.
– Follow legal requirements for the use of spare fuel canisters.
– For safety reasons we do not recommend carrying a spare fuel can-
ister in the vehicle. The canister could be damaged in an accident and
leak.
● If, in exceptional circumstances, you have to carry a spare fuel canis-
ter, please observe the following points:
–Never fill the spare fuel canister inside the vehicle or on it. An elec-
trostatic charge could build up during filling, causing the fuel fumes
to ignite. This could cause an explosion. Always place the canister on
the ground to fill it.
– Insert the fuel nozzle into the mouth of the canister as far as possi-
ble.
– If the spare fuel canister is made of metal, the filling nozzle must
be in contact with the canister during filling. This helps prevent an
electrostatic charge building up.
– Never spill fuel in the vehicle or in the luggage compartment. Fuel
vapours are explosive. Danger of death.
CAUTION
● Fuel spills should be removed from the paintwork immediately.
● Never run the tank completely dry. An irregular fuel supply could cause
misfiring. As a result, unburnt fuel could enter the catalytic converter and
cause damage.
● When filling the fuel tank after having run it completely dry on a vehicle
with a diesel engine the ignition must be switched on for at least 30 sec-
onds without starting the engine. When you then start the engine it may take longer than normal (up to one minute) for the engine to start firing.
This is due to the fact that the fuel system has to purge itself of air before
starting.
For the sake of the environment
Do not try to put in more fuel after the automatic filler nozzle has switched
off; this may cause the fuel to overflow if it becomes warm.
Safety FirstOperating InstructionsPractical TipsTechnical Specifications
Page 198 of 282
196Checking and refilling levels
LPG system*
Refuelling with LPG
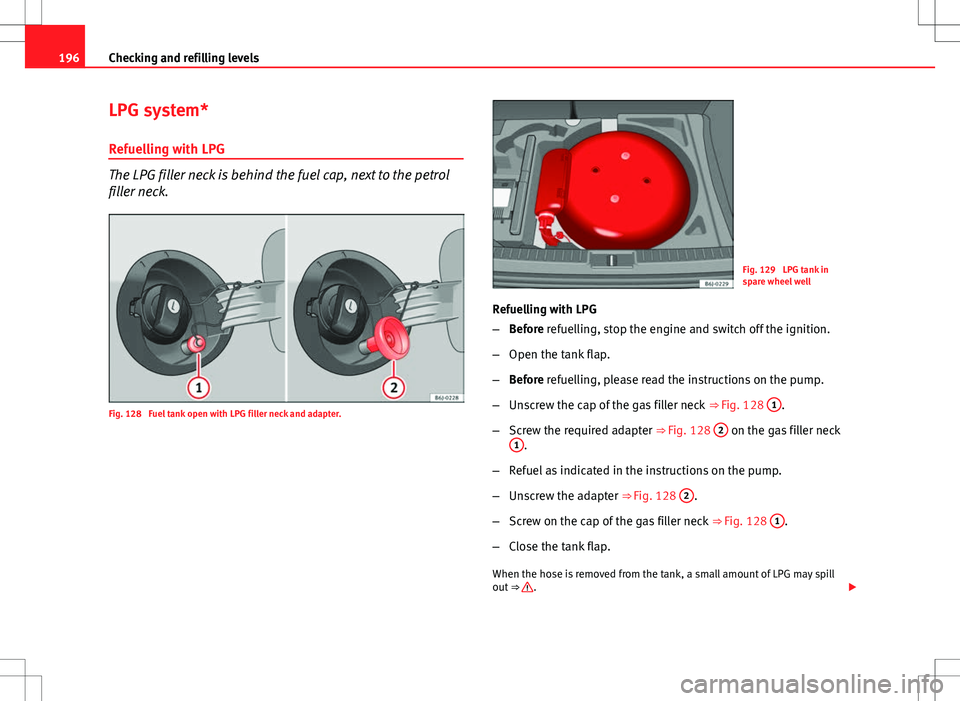
The LPG filler neck is behind the fuel cap, next to the petrol
filler neck.
Fig. 128 Fuel tank open with LPG filler neck and adapter.
Fig. 129 LPG tank in
spare wheel well
Refuelling with LPG
– Before refuelling, stop the engine and switch off the ignition.
– Open the tank flap.
– Before refuelling, please read the instructions on the pump.
– Unscrew the cap of the gas filler neck ⇒ Fig. 128 1
.
– Screw the required adapter ⇒ Fig. 128 2
on the gas filler neck
1.
– Refuel as indicated in the instructions on the pump.
– Unscrew the adapter ⇒ Fig. 128 2
.
– Screw on the cap of the gas filler neck ⇒ Fig. 128 1
.
– Close the tank flap.
When the hose is removed from the tank, a small amount of LPG may spill
out ⇒
.
Page 199 of 282
197
Checking and refilling levels
The LPG tank ⇒ Fig. 129 in the spare wheel well has a capacity of 52.8 li-
tres. If the outside temperatures are very low, it may not be possible to com-
pletely fill the LPG tank.
Pump attachments
There are a variety of types of LPG pump, and the methods of use may vary.
Therefore, let the pump operator fill the tank when refuelling for the first
time or fill from another pump.
Noises when refuelling with LPG
When refuelling with LPG, noises may be heard. These noises are insignifi-
cant.
WARNING
Failure to refuel or handle LPG in the correct way could result in a fire,
cause an explosion or lead to injuries.
● LPG is a highly explosive and inflammable substance. It may cause
severe burns and other injury.
● Switch off the engine before refuelling.
● Always switch off mobile phones and any other radiophony applian-
ces, as electromagnetic waves may produce sparks and cause a fire.
● Do not remain in the vehicle while refuelling. If it is absolutely neces-
sary to enter the vehicle, close the door and touch a metal surface before
touching the attachment again. This will prevent the generation of static
electricity and any possible fires while refuelling.
● Small quantities of LPG may leak out after refuelling. If LPG comes in-
to contact with skin, there is a risk of freezing.
● Do not smoke and always keep bare flames away from the tank during
refuelling. Failure to do so may lead to an explosion.
Adapter for the liquid petroleum gas (LPG) filler neck
An adapter is required due to the existence of a range of
pumps with different nozzles.
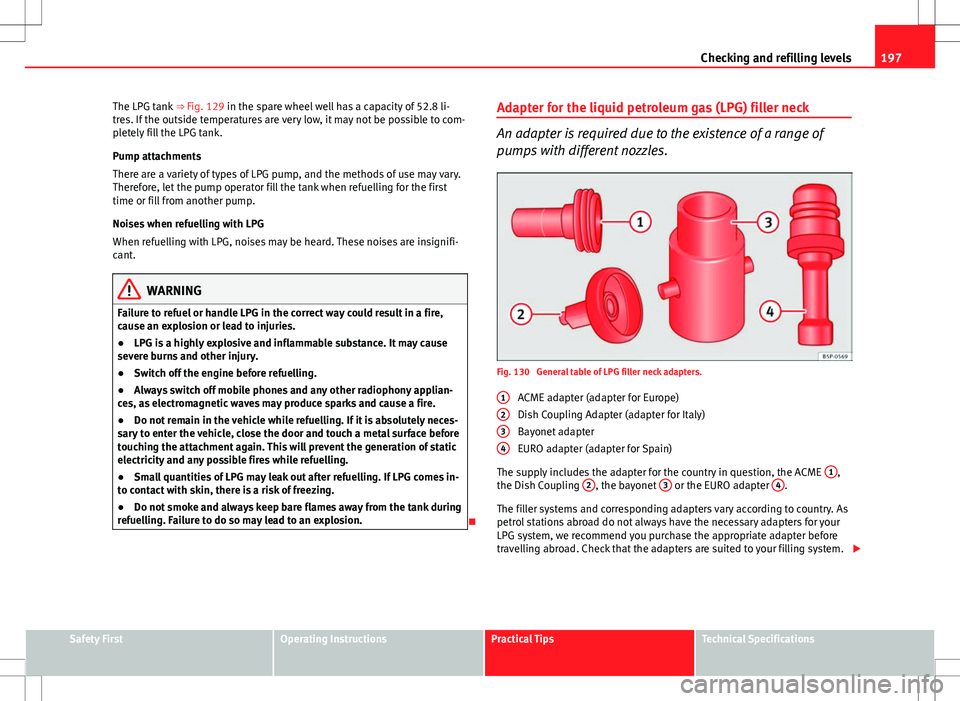
Fig. 130 General table of LPG filler neck adapters.
ACME adapter (adapter for Europe)
Dish Coupling Adapter (adapter for Italy)
Bayonet adapter
EURO adapter (adapter for Spain)
The supply includes the adapter for the country in question, the ACME 1
,
the Dish Coupling 2, the bayonet 3 or the EURO adapter 4.
The filler systems and corresponding adapters vary according to country. As
petrol stations abroad do not always have the necessary adapters for your
LPG system, we recommend you purchase the appropriate adapter before
travelling abroad. Check that the adapters are suited to your filling system.
1
234
Safety FirstOperating InstructionsPractical TipsTechnical Specifications
Page 200 of 282
198Checking and refilling levels
Note
The four most common types of adapter in Europe are the ACME adapter 1,
the Dish Coupling adapter 2, the bayonet adapter 3 and the EURO adapt-
er 4. On the whole, we recommend you carry all four adapters in your vehi-
cle, as some countries use more than one type of filling system. The intro-
duction of a single system (Euronozzle) throughout Europe is being studied.
LPG fuel
LPG is an alternative vehicle fuel and is a blend of propane and butane.
The success of LPG is due to the strict regulations concerning exhaust gas
emissions. Compared to other fossil fuels, LPG is characterised by its re-
duced emissions.
LPG quality and consumption
Quality requirements for LPG are regulated for all Europe in DIN EN 589 and
permit the use of LPG throughout Europe.
A difference is drawn between winter gas and summer gas. Winter gas has a
higher proportion of propane gas. As a result, the driving range of winter
gas may be lower (due to increased consumption) than that of summer gas.
LPG supplier network
The number of LPG pumps is constantly increasing.
Lists of existing LPG pumps may be found on Internet.
LPG safety
A series of collision tests performed on this vehicle while running with LPG
have confirmed its high level of safety. The safety of the LPG system guarantees operation without risk. The follow-
ing safety measures have been adopted:
●
The LPG tank has a solenoid valve which closes automatically when the
engine is switched off (ignition off) or when running on petrol.
● A solenoid type main valve disconnects the supply of gas to the engine
compartment when the engine is switched off or running on petrol.
● A safety valve in the LPG tank with pipes to the outside prevents the gas
from entering the vehicle interior.
● All anchorage points and materials have been designed to ensure the
maximum possible levels of safety.
The condition of the LPG system should be checked regularly to guarantee
safe driving conditions ⇒
. These checks are included in the Maintenance
Programme.
WARNING
● If there is a smell of gas or a suspected leak, stop the vehicle immedi-
ately and switch off the ignition. Open the doors to ventilate the vehicle.
Do not carry on driving! Take the vehicle to a specialised workshop and
have the fault repaired.
● Immediately extinguish any cigarettes and remove from the vehicle
any objects which might produce a spark or cause a fire, and switch off
immediately if gas is smelt or a leak is detected.
● LPG tanks are subject to pressure and must be checked regularly. The
owner of the vehicle must check that these services are performed cor-
rectly.
● When parking the vehicle in a closed area (for example in a garage),
make sure that there is adequate ventilation, either natural or mechani-
cal, to neutralise the LPG in the event of a leak.
Note
For any fault in the LPG system, please refer to the SEAT web page, which
lists the workshops authorised to repair these faults.