seats Seat Ibiza ST 2016 Owner's Guide
[x] Cancel search | Manufacturer: SEAT, Model Year: 2016, Model line: Ibiza ST, Model: Seat Ibiza ST 2016Pages: 252, PDF Size: 5.56 MB
Page 75 of 252
Transporting children safely
●
Never al lo
w a child to be transported in a
vehicle without being properly secured, or to
stand up or kneel on a seat while travelling.
In an accident, the child could be flung
through the vehicle, causing possibly fatal in-
juries to themselves and to the other vehicle
occupants.
● If children assume an improper sitting posi-
tion when the vehicl
e is moving, they expose
themselves to greater risk of injury in the
event of a sudden braking manoeuvre or in an
accident. This is particularly important if the
child is travelling on the front passenger seat
and the airbag system is triggered in an acci-
dent; as this could cause serious injury or
even death.
● A suitable child seat can protect your child!
● Never leave a child alone in the child seat
or inside the v
ehicle because depending on
the season, very high temperatures may be
reached inside a parked vehicle, which could
be fatal.
● Children who are less than 1.5 metres tall
must not
wear a normal seat belt without a
child seat, as this could cause injuries to the
abdominal and neck areas during a sudden
braking manoeuvre or in an accident.
● Do not allow the seat belt to become twis-
ted and the seat belt
should be properly in
place ››› page 61.
● Only one child may occupy a child seat
››› p
age 73, Child seats. ●
When a chil d se
at is mounted in the rear
seats, the door child-proof lock should be ac-
tivated ››› page 110. Child seats
Safety in s
tructions Read the additional information carefully
›››
p
age 16. WARNING
When travelling, children must be secured in
the vehic l
e with a restraint system suitable
for age, weight and size.
● Read and always observe information and
warnings
concerning the use of child seats
››› page 72. WARNING
The retaining rings are designed only for use
with “ISOFIX” and Top T
ether* system child
seats.
● Never secure other child seats that do not
have the “ISOFIX” or Top
Tether* system, or
retaining belts or objects to the fastening
rings - this can result in potentially fatal inju-
ries to the child.
● Ensure that the child seat is secured cor-
rectly us
ing the “ISOFIX” and Top Tether* se-
curing rings. WARNING
An undue installation of the safety seat will
incre a
se the risk of injury in the event of a
crash.
● Never tie the retainer strap to a hook in the
luggage c
ompartment.
● Never secure or tie luggage or other items
to the lower anc
horages (ISOFIX) or the upper
ones (Top Tether). Categorisation of child seats into
gr
oup
s Only use child seats that are officially ap-
pr
o
ved and s
uitable for the child.
Child seats are subject to the regulation ECE-
R 44. ECE-R stands for: Economic Commis-
sion for Europe Regulation.
The child seats are grouped into 5 catego-
ries:
Group 0: Up to 10 kg (up to around 9
months)
Group 0+: Up to 13 kg (up to around 18
months)
Group 1: from 9 to 18 kg (up to approx. 4
years old)
Group 2: from 15 to 25 kg (up to approx. 7
years old) »
73
Technical data
Advice
Operation
Emergencies
Safety
Page 76 of 252
Safety
Group 3: Fr om 22 to 36 kg (over around 7
y e ar
s old)
Child seats that have been tested and ap-
proved under the ECE R44 standard bear the
test mark on the seat (the letter E in a circle
with the test number below it).
Follow the manufacturer's instructions and
observe any statutory requirements when in-
stalling and using child seats.
We recommend you to always include the
manufacturer's Child Seat Instruction Manual
together with the on-board documentation.
SEAT recommends you use child seats from
the Original Accessories Catalogue . These
child seats have been designed and tested
for use in SEAT vehicles. You can find the
right child seat for your model and age group
at SEAT dealers. WARNING
Read and always observe information and
warning s
concerning the use of child seats
››› page 72.74
Page 84 of 252
EmergenciesNo.Consumer/Amps
3Power C63 (30 Power)30
4PTC Relay (Engine glow)50
5Left pillar connector A pin 22 (motor
for closing window on driver's side)30
6For closing back left window (motor)30
7Horn20
9Panoramic roof30
10Active suspension7.5
11Headlight washer system relay30
12MIB display5
13(RL-15) SIDO Kl.15 supply (inputs 29
and 55)30
14
Removing ignition key, diagnostics,
headlight lever (flashers), switching
on dipped /side beams (rotating
lights)
7.5
15Air and heat control (supply)7.5Automatic gearbox lever
16Instrument panel5
17Dwa Sensor, Alarm horn7.5
23Dual windscreen cleaner pump7.5
24Engine heater, heating control box
(supply)30
2612V Relay socket20
No.Consumer/Amps
27Rear window wiper motor15
28Lighter20
29Airbag control unit, airbag deactiva-
tion warning lamp10
30
Reverse, Mirror joysticks, RKA, switch-
ing on heated seats, int. pressure A.C,
heating A.C. controls (supply), electro-
chromic mirror, PDC control, switching
on front and rear fog lights (rotating
lights).
7.5
31Petrol gauge5
32
AFS headlights, headlight regulator
(signal and adjustment), LWR Cent, di-
agnostics, front headlight lever
(switch on), Dimmer (headlight adjust-
ment)
7.5
33Start-Stop relay, clutch sensor5
34Heated jets5
35Soundaktor control feed, GRA feed,
Kühlerlüfter central feed5
36Heated seats10
37Additional diagnostics10
38Right hand lights A/66 feed40
39ABS Pump (rear battery)40
41Heated rear window30
42Passenger side window controls30
No.Consumer/Amps
43Rear right window control30
44Reversing camera10
45Windscreen wiper feed lever, diagnos-
tics10
46Additional electric socket for luggage
compartment20
47ABS Ventil (rear battery)25
49
EKP TDI relay (fuel pump feed)30
EKP MPI relay (fuel pump feed)20
TFSI pump gauge control15
50Multimedia Radio (power supply)20
51Heated mirrors10
53Rain sensor5
5430 ZAS (ignition switch)5
55Heated seats10
Control box 2
No.Consumer/Amps
1Lambda sensors15
2
Vacuum pump motor20
Pre-wired motor (coolant pump, varia-
ble valve distributor, active carbon
solenoid valve filter, pressure valve,
secondary air inlet valve)
10
82
Page 97 of 252
Controls and displays
Operation
C ontr
ol
s and displays
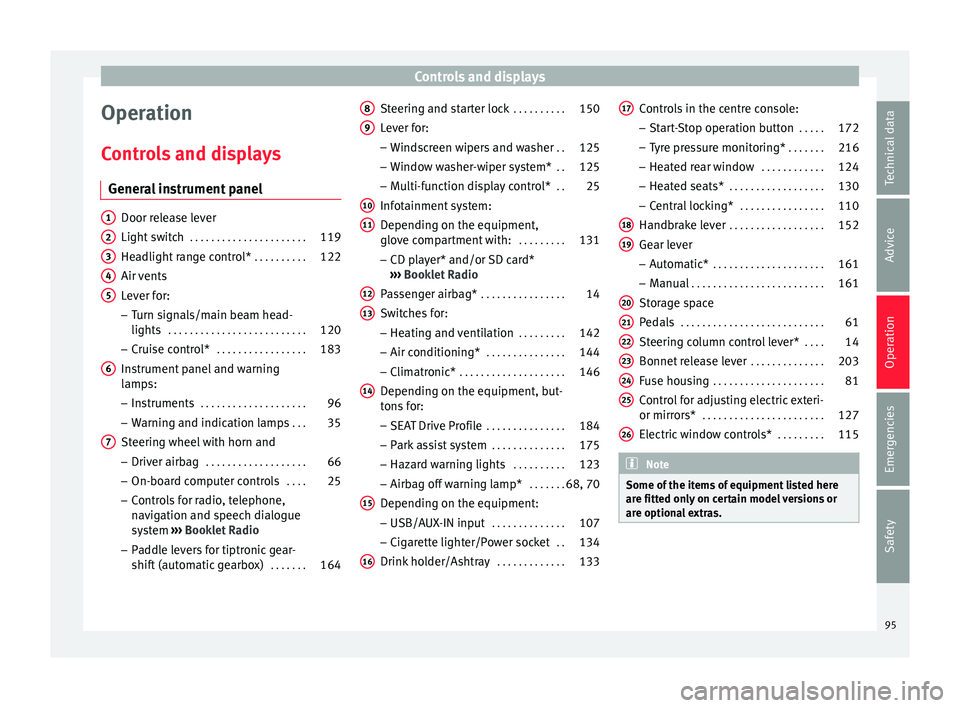
General instrument panel Door release lever
Light swit
c
h . . . . . . . . . . . . . . . . . . . . . . 119
Headlight range control* . . . . . . . . . .122
Air vents
Lever for:
– T
urn signals/main beam head-
lights . . . . . . . . . . . . . . . . . . . . . . . . . . 120
– Cruise c ontr
ol* . . . . . . . . . . . . . . . . . 183
Instrument panel and warning
lamps:
– Ins
truments . . . . . . . . . . . . . . . . . . . . 96
– Warning and indic ation l
amps . . . 35
Steering wheel with horn and – Driver airbag . . . . . . . . . . . . . . . . . . . 66
– On-board comp
uter controls . . . .25
– Control
s for radio, telephone,
navigation and speech dialogue
system ›››
Booklet Radio
– Paddle levers for tiptronic gear-
shift (automatic gearbox) . . . . . . .164
1 2
3
4
5
6
7 Steering and starter lock
. . . . . . . . . .150
Lever for: – Wind
sc
reen wipers and washer . .125
– Window wa
sher-wiper system* . .125
– Multi-fu
nction display control* . .25
Infotainment system:
Depending on the equipment,
glov
e compartment with: . . . . . . . . .131
– CD play
er* and/or SD card*
››› Booklet Radio
Passenger airbag* . . . . . . . . . . . . . . . . 14
Switches for:
– Heating and v
entilation . . . . . . . . . 142
– Air conditioning* . . . . . . . . . . . . . . . 144
– Clim
atronic* . . . . . . . . . . . . . . . . . . . . 146
D
epending on the equipment, but-
tons f
or:
– SEAT Drive Profile . . . . . . . . . . . . . . . 184
– Park a s
sist system . . . . . . . . . . . . . . 175
– Hazard warnin
g lights . . . . . . . . . . 123
– Airbag off warnin
g lamp* . . . . . . .68, 70
Depending on the equipment:
– USB/AUX-IN inp ut . . . . . . . . . . . . . . 107
– C
igar ett
e lighter/Power socket . .134
Drink holder/Ashtray . . . . . . . . . . . . .133
8 9
10
11
12
13
14
15
16 Controls in the centre console:
– St ar
t-
Stop operation button . . . . .172
– Tyre pr
essure monitoring* . . . . . . .216
– Heated re
ar window . . . . . . . . . . . . 124
– Heated seats* . . . . . . . . . . . . . . . . . . 130
– C
entral loc
king* . . . . . . . . . . . . . . . . 110
Handbrake lever . . . . . . . . . . . . . . . . . . 152
Gear lever – Automatic* . . . . . . . . . . . . . . . . . . . . . 161
– Manual . . . . . . . . . . . . . . . . . . . . . . . . . 161
St
orag
e space
Pedals . . . . . . . . . . . . . . . . . . . . . . . . . . . 61
St
eering column control lever* . . . .14
Bonnet release lever . . . . . . . . . . . . . .203
Fuse housing . . . . . . . . . . . . . . . . . . . . . 81
Control for adjusting electric exteri-
or mirrors* . . . . . . . . . . . . . . . . . . . . . . . 127
Electric
window controls* . . . . . . . . .115 Note
Some of the items of equipment listed here
are fitted on ly
on certain model versions or
are optional extras. 17
18
19
20
21
22
23
24
25
26
95
Technical data
Advice
Operation
Emergencies
Safety
Page 130 of 252
Operation
●
If pos s
ible, use the rear vision mirror to es-
timate distances to vehicles behind you.
● Make sure that you do not get your finger
trapped between the mirr
or and the mirror
base when folding back the mirrors. Risk of
injury! For the sake of the environment
The exterior mirror heating should be switch-
ed off when it i s
no longer needed. Other-
wise, it is an unnecessary fuel waste. Note
● If the electric a
l adjustment ever fails to op-
erate, the mirrors can be adjusted by hand by
lightly pressing the edge of the mirror glass.
● In vehicles with electric exterior mirrors,
the follo
wing points should be observed: if,
due to an external force (e.g. being knocked
while manoeuvring), the adjustment of the
mirror housing is altered, the mirror will have
to be fully folded electrically. Do not readjust
the rear vision mirror housing by hand, as
this will interfere with the mirror adjuster
function.
● The rear vision mirrors can be adjusted sep-
arately or s
imultaneously, as described
above.
● The fold-in function on the exterior mirrors
will
not activate at speeds over 40 km/h
(25 mph). Seats and head restraints
Adju
s
tin g the se
at and head re-
straints
Adjusting the front seats Read the additional information carefully
›››
p
age 12 WARNING
The safe driving chapter contains important
information, tip s, s
uggestions and warnings
that you should read and observe for your
own safety and the safety of your passengers
››› page 56. WARNING
● Never adju s
t the driver or front passenger
seat while the vehicle is in motion. While ad-
justing your seat, you will assume an incor-
rect sitting position. Risk of accidents. Adjust
the driver or front passenger seat only when
the vehicle is stationary.
● To reduce the risk of injury to the driver and
front pa
ssenger in case of a sudden braking
or an accident, never drive with the backrest
tilted towards the rear. The maximum protec-
tion of the seat belt can be achieved only
when the backrests are in an upright position
and the driver and front passenger have prop-
erly adjusted their seat belts. The further the backrests are tilted to the rear, the greater
the risk of
injur
y due to improper positioning
of the belt web!
● Exercise caution when securing the seat
height into for
wards/backwards position. In-
juries can be caused if the seat height is ad-
justed without due care and attention.
● To move the seat forwards and backwards,
pull
upwards and not sideways on the lever,
as the force exerted on it in that direction
could damage it. Folding and lifting the backrest of the
fr
ont
seat
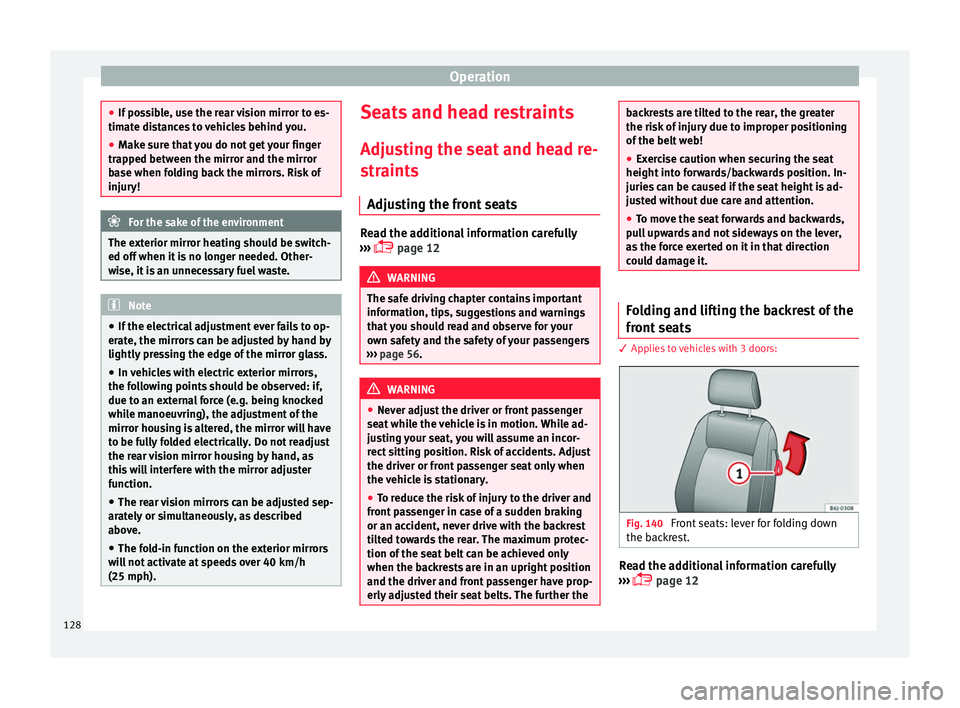
s 3 Applies to vehicles with 3 doors:
Fig. 140
Front seats: lever for folding down
the b ac
kr
est. Read the additional information carefully
› ›
›
p
age 12
128
Page 131 of 252
Seats and head restraints
Vehicles without the Easy-Entry function
– To f old the backrest, pull the lever 1 up-
w ar
ds
and push the backrest forwards.
– To unfold the backrest, push it back.
Vehicl
es with the Easy-Entry function
– To fold the backrest, pull the lever 1 up-
w ar
ds
and push the backrest forwards. You
can push the seat forwards at the same
time to make entry to the rear seats easier.
– To unfold the backrest, first move the seat
compl
etely back.
The Easy-Entry function facilitates the access
to the vehicle rear seats. Before lifting the
backrest, return the seat to the original posi-
tion. The seat inserts when the backrest is lif-
ted. Adjusting or disassembling the head
restr
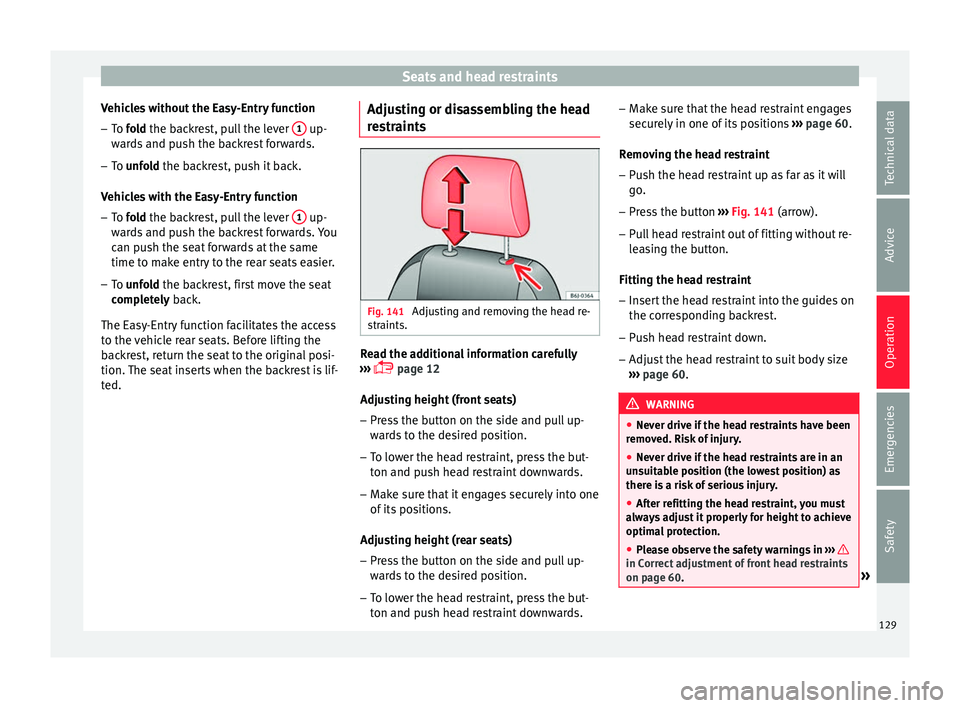
aints Fig. 141
Adjusting and removing the head re-
s tr
aints. Read the additional information carefully
› ›
›
p
age 12
Adjusting height (front seats)
– Press the button on the side and pull up-
wards
to the desired position.
– To lower the head restraint, press the but-
ton and push he
ad restraint downwards.
– Make sure that it engages securely into one
of its pos
itions.
Adjusting height (rear seats)
– Press the button on the side and pull up-
wards
to the desired position.
– To lower the head restraint, press the but-
ton and push he
ad restraint downwards. –
Make sur
e that the head restraint engages
securely in one of its positions ››› page 60.
Removing the head restraint – Push the head restraint up as far as it will
go.
– Pre
ss the button ››› Fig. 141
(arrow).
– Pull head restraint out of fitting without re-
leas
ing the button.
Fitting the head restraint
– Insert the head restraint into the guides on
the corres
ponding backrest.
– Push head restraint down.
– Adjust the head restraint to suit body size
››› p
age 60. WARNING
● Never drive if the he
ad restraints have been
removed. Risk of injury.
● Never drive if the head restraints are in an
unsuit
able position (the lowest position) as
there is a risk of serious injury.
● After refitting the head restraint, you must
alway
s adjust it properly for height to achieve
optimal protection.
● Please observe the safety warnings in ››› in Correct adjustment of front head restraints
on page 60
. » 129
Technical data
Advice
Operation
Emergencies
Safety
Page 132 of 252
Operation
Note
● To fit and r emo
ve the rear head restraints,
gently tilt the seat backrest forwards.
● When fitting the head restraints again, in-
sert the tube
s as far as possible into the
guides without pressing the button. Seat functions
Heated se at
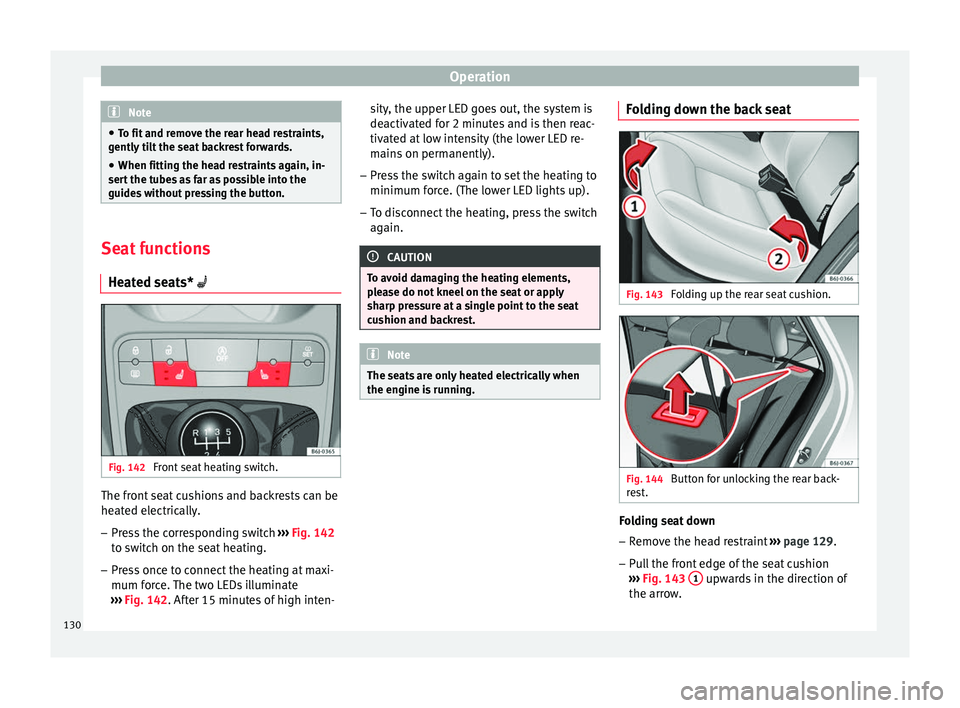
s* Fig. 142
Front seat heating switch. The front seat cushions and backrests can be
he
at
ed el ectric
ally.
– Press the corresponding switch ››› Fig. 142
t
o switch on the seat heating.
– Press once to connect the heating at maxi-
mum force.
The two LEDs illuminate
››› Fig. 142. After 15 minutes of high inten- sity, the upper LED goes out, the system is
deactivated f
or 2 minutes and is then reac-
tivated at low intensity (the lower LED re-
mains on permanently).
– Press the switch again to set the heating to
minimum force. (The lo
wer LED lights up).
– To disconnect the heating, press the switch
again. CAUTION
To avoid damaging the heating elements,
ple a
se do not kneel on the seat or apply
sharp pressure at a single point to the seat
cushion and backrest. Note
The seats are only heated electrically when
the engine is ru
nning. Folding down the back seat
Fig. 143
Folding up the rear seat cushion. Fig. 144
Button for unlocking the rear back-
r e
st
. Folding seat down
– Remove the head restraint ››
›
p
age 129.
– Pull the front edge of the seat cushion
››› Fig. 143
1 upwards in the direction of
the arr o
w .
130
Page 133 of 252
Transport and practical equipment
– Lif t
the c u
shion 2 forwards in the direc-
tion of the arr
ow
.
– Pull the release button ››› Fig. 144 in the di-
r
ection of the arrow and fold the backrest
forwards.
– Insert the head restraints in the spaces on
the rear of the se
at cushion which are visi-
ble when the seat cushion is lowered.
Folding seat forward
– Remove the head restraints from the
space
s in the seat cushion.
– Lift the backrest, and before securing it, re-
place the he
ad restraints in the seat cush-
ion, and then click the seat correctly onto
the locking rails.
– Once the backrest is locked, pull on the
central se
at belt or directly on the backrest
to check that the backrest has properly en-
gaged in position.
– Check that the position lever is in neutral
position.
– Lo
wer the cushion and push it backwards
below the seat belt
buckles.
– Press the front part of the cushion down-
wards.
On s
plit rear seats*, the backrest and cush-
ion can be lowered and raised respectively in
two sections. WARNING
● Plea se be c
areful when folding back the
backrest! Injuries can be caused if the seat
height is adjusted without due care and at-
tention.
● Do no trap or damage seat belts when rais-
ing the back
rest.
● After raising the backrest, check it has en-
gaged properly
in position. Do this by pulling
on the central seat belt or directly on the
backrest and check that the position lever is
in the neutral position.
● The three point automatic seat belt only
works c
orrectly when the backrest of the cen-
tral seat is correctly engaged. Transport and practical
equipment
Pr actic
al
equipment
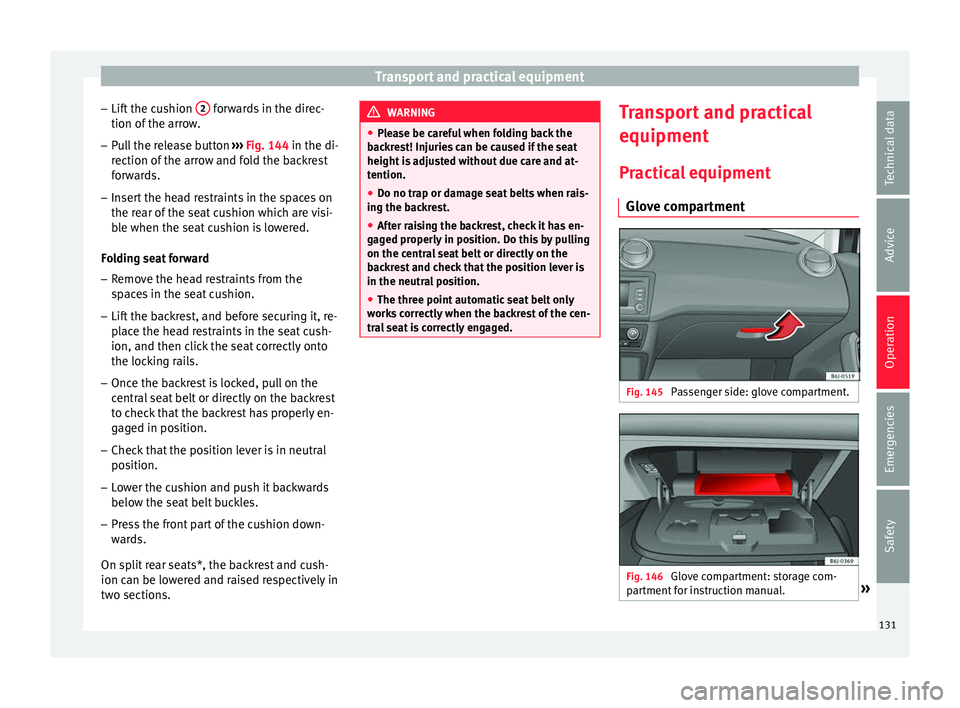
Glove compartment Fig. 145
Passenger side: glove compartment. Fig. 146
Glove compartment: storage com-
p ar tment
f
or instruction manual. » 131
Technical data
Advice
Operation
Emergencies
Safety
Page 134 of 252
Operation
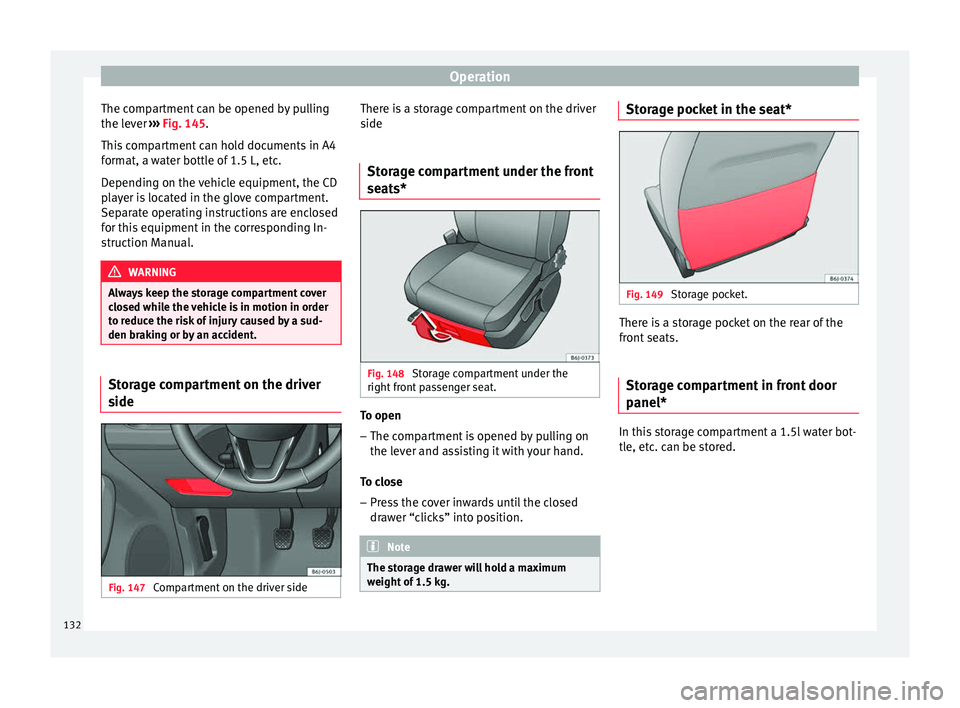
The compartment can be opened by pulling
the l ev
er ››
› Fig. 145.
This compartment can hold documents in A4
format, a water bottle of 1.5 L, etc.
Depending on the vehicle equipment, the CD
player is located in the glove compartment.
Separate operating instructions are enclosed
for this equipment in the corresponding In-
struction Manual. WARNING
Always keep the storage compartment cover
closed whi l
e the vehicle is in motion in order
to reduce the risk of injury caused by a sud-
den braking or by an accident. Storage compartment on the driver
s
ide Fig. 147
Compartment on the driver side There is a storage compartment on the driver
s
ide
St orag
e compartment under the front
seats* Fig. 148
Storage compartment under the
right fr
ont p
assenger seat. To open
– The compartment is opened by pulling on
the l ev
er and a s
sisting it with your hand.
To close – Press the cover inwards until the closed
drawer “c
licks” into position. Note
The storage drawer will hold a maximum
weight of 1.5 k
g. Storage pocket in the seat*
Fig. 149
Storage pocket. There is a storage pocket on the rear of the
fr
ont
seats.
St
orage compartment in front door
panel* In this storage compartment a 1.5l water bot-
tl
e, et
c. c
an be stored.
132
Page 139 of 252
Transport and practical equipment
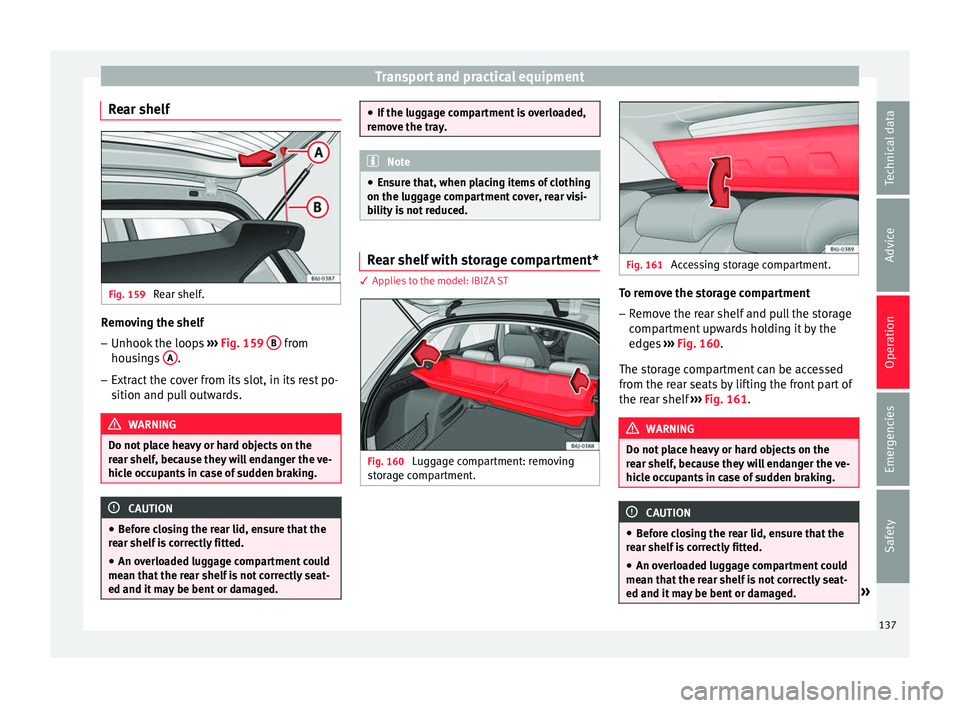
Rear shelf Fig. 159
Rear shelf. Removing the shelf
–
Unhook the loops ››
›
Fig. 159 B from
hou s
in g
s A .
– Extract the cover from its slot, in its rest po-
sition and p
ul
l outwards. WARNING
Do not place heavy or hard objects on the
rear shelf , bec
ause they will endanger the ve-
hicle occupants in case of sudden braking. CAUTION
● Befor e c
losing the rear lid, ensure that the
rear shelf is correctly fitted.
● An overloaded luggage compartment could
mean that the r
ear shelf is not correctly seat-
ed and it may be bent or damaged. ●
If the lugg ag
e compartment is overloaded,
remove the tray. Note
● En sur e th
at, when placing items of clothing
on the luggage compartment cover, rear visi-
bility is not reduced. Rear shelf with storage compartment*
3 Ap
plies to the model: IBIZA ST Fig. 160
Luggage compartment: removing
s t
or ag
e compartment. Fig. 161
Accessing storage compartment. To remove the storage compartment
– Remove the rear shelf and pull the storage
comp
artment
upwards holding it by the
edges ››› Fig. 160.
The storage compartment can be accessed
from the rear seats by lifting the front part of
the rear shelf ››› Fig. 161. WARNING
Do not place heavy or hard objects on the
rear shelf , bec
ause they will endanger the ve-
hicle occupants in case of sudden braking. CAUTION
● Befor e c
losing the rear lid, ensure that the
rear shelf is correctly fitted.
● An overloaded luggage compartment could
mean that the r
ear shelf is not correctly seat-
ed and it may be bent or damaged. » 137
Technical data
Advice
Operation
Emergencies
Safety