oil filter Seat Ibiza ST 2016 Owner's manual
[x] Cancel search | Manufacturer: SEAT, Model Year: 2016, Model line: Ibiza ST, Model: Seat Ibiza ST 2016Pages: 252, PDF Size: 5.56 MB
Page 39 of 252
The essentials
Fault in the battery.›››
page
210
Driving light totally or partially
faulty.›››
page
83
Fault in the cornering light sys-
tem.››› page
118
Diesel particulate filter blocked›››
page
170
Level of windscreen washer fluid
too low.›››
page
210
Flashing: Fault in the oil level de-
tection. Control manually.›››
page
204
Ignition: Insufficient engine oil.
Fault in the gearbox.›››
page
166
Immobiliser active.›››
page
150
Service interval display›››
page
33
Mobile telephone is connected
via Bluetooth to the original tele-
phone device.›››
Book-
let Radio
or
››› Book-
let Navi-
gation
system
Mobile telephone battery charge
meter. Available only for devices
pre-installed in factory.
Freezing warning. The outside
temperature is lower than +4 °C
(+39 °F).›››
page
27
Start-Stop system activated.›››
page
172
Start-Stop system unavailable.
Low consumption driving status›››
page
27 On the instrument panel
Fig. 44
Warning lamp for disabling the front
p a
ssen
ger airbag.
Front passenger front airbag is
disabled (
).
››› page
66
››› in Warning symbols on page 101
›››
page 100 Gearbox lever
M anua
l g
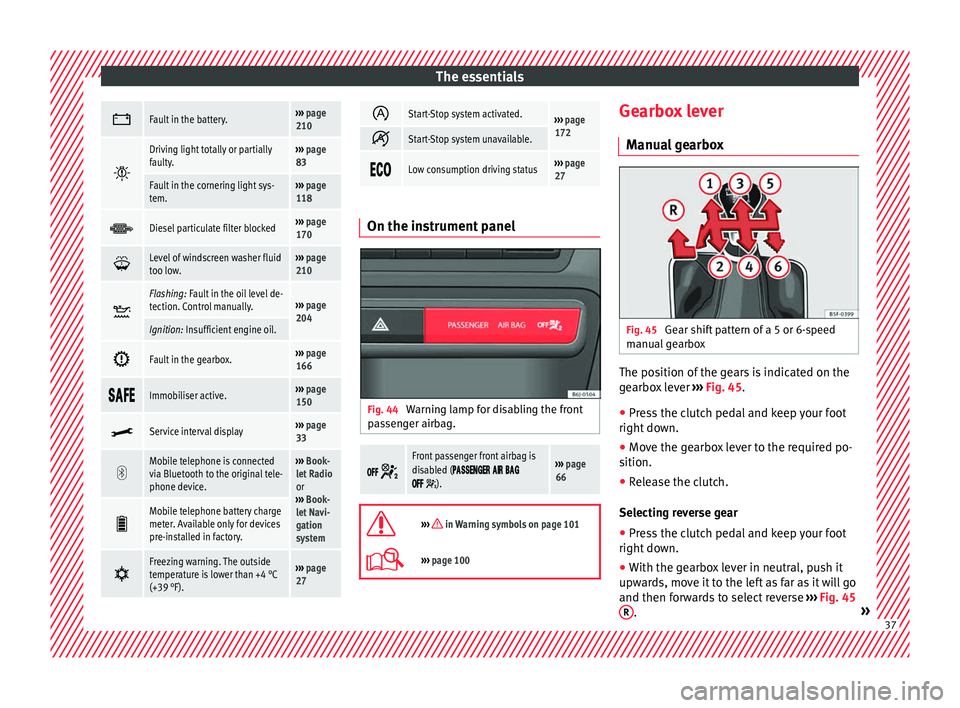
earbox Fig. 45
Gear shift pattern of a 5 or 6-speed
m anual
ge
arbox The position of the gears is indicated on the
g
e
arbo x
lever ››› Fig. 45.
● Press the clutch pedal and keep your foot
right down.
● Mov
e the gearbox lever to the required po-
sition.
● Rele
ase the clutch.
Selecting rev
erse gear
● Press the clutch pedal and keep your foot
right down.
● With the g
earbox lever in neutral, push it
upward
s, move it to the left as far as it will go
and then forwards to select reverse ››› Fig. 45
R .
» 37
Page 43 of 252
The essentials
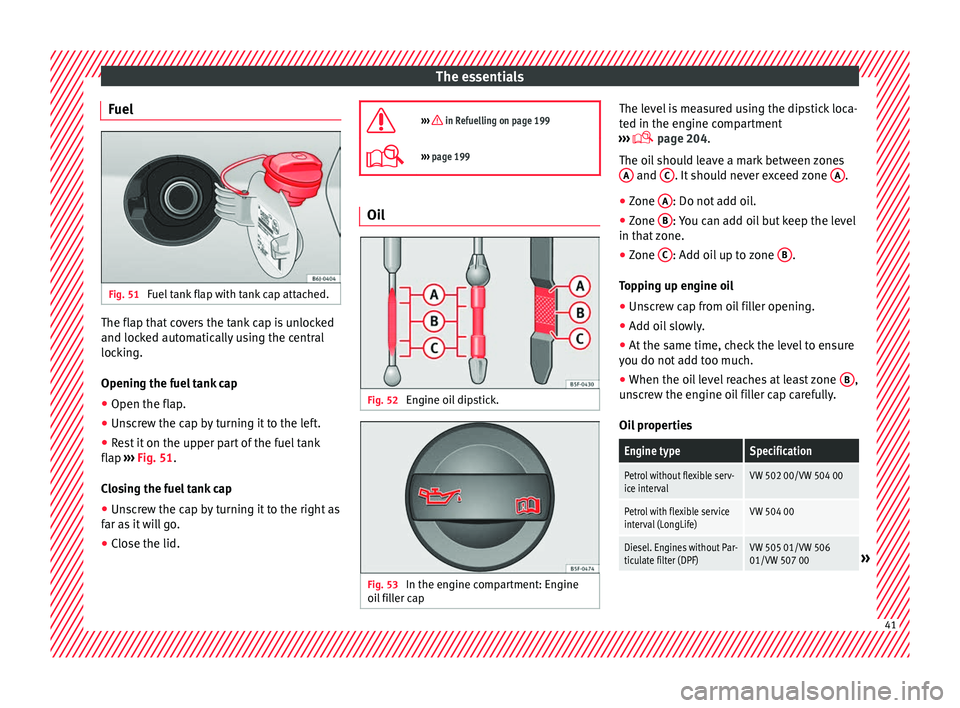
Fuel Fig. 51
Fuel tank flap with tank cap attached. The flap that covers the tank cap is unlocked
and loc
k
ed aut om
atically using the central
locking.
Opening the fuel tank cap
● Open the flap.
● Unscrew the cap by turning it to the left.
● Rest it on the upper part of the fuel tank
flap ›››
Fig. 51.
Closing the fuel tank cap
● Unscrew the cap by turning it to the right as
far as it
will go.
● Close the lid.
››› in Refuelling on page 199
›››
page 199 Oil
Fig. 52
Engine oil dipstick. Fig. 53
In the engine compartment: Engine
oi l
fi l
ler cap The level is measured using the dipstick loca-
t
ed in the en
gine comp
artment
››› page 204.
The oil should leave a mark between zones A and
C . It should never exceed zone
A .
● Zone A : Do not add oil.
● Zone B : You can add oil but keep the level
in th at
z
one.
● Zone C : Add oil up to zone
B .
T op
pin g up en
gine oil
● Unscrew cap from oil filler opening.
● Add oil slowly.
● At the same time, check the level to ensure
you do not ad
d too much.
● When the oil level reaches at least zone B ,
u n
sc
rew the engine oil filler cap carefully.
Oil properties
Engine typeSpecification
Petrol without flexible serv-
ice intervalVW 502 00/VW 504 00
Petrol with flexible service
interval (LongLife)VW 504 00
Diesel. Engines without Par-
ticulate filter (DPF)VW 505 01/VW 506
01/VW 507 00» 41
Page 44 of 252
The essentialsEngine typeSpecification
Diesel. Particulate Filter En-
gines (DPF).
With or without flexible
service interval (with and
without LongLife)
a)VW 507 00
a)
Only use recommended oils, otherwise you may damage the
engine.
Engine oil additives
No type of additive should be mixed with the
engine oil. The deterioration caused by these
additives is not covered by the warranty.
››› in Changing engine oil on page 207
››› page 204 Coolant
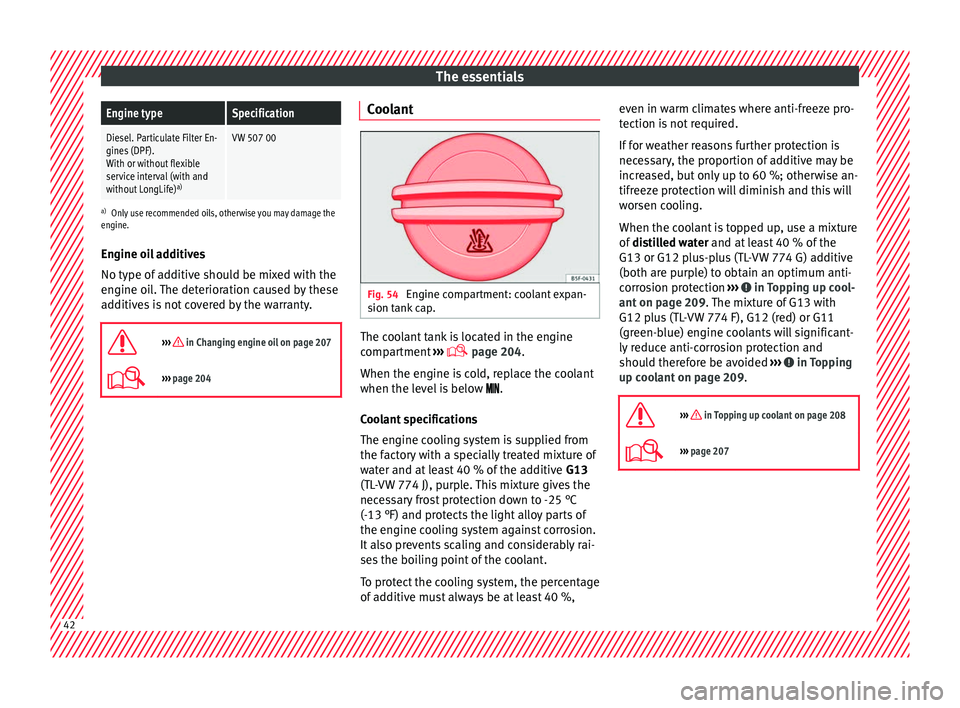
Fig. 54
Engine compartment: coolant expan-
s ion t
ank c
ap. The coolant tank is located in the engine
c
omp
artment
›››
page 204.
When the engine is cold, replace the coolant
when the level is below .
Coolant specifications
The engine cooling system is supplied from
the factory with a specially treated mixture of
water and at least 40 % of the additive G13
(TL-VW 774 J), purple. This mixture gives the
necessary frost protection down to -25 °C
(-13 °F) and protects the light alloy parts of
the engine cooling system against corrosion.
It also prevents scaling and considerably rai-
ses the boiling point of the coolant.
To protect the cooling system, the percentage
of additive must always be at least 40 %, even in warm climates where anti-freeze pro-
tection is not
required.
If for weather reasons further protection is
necessary, the proportion of additive may be
increased, but only up to 60 %; otherwise an-
tifreeze protection will diminish and this will
worsen cooling.
When the coolant is topped up, use a mixture
of distilled water and at least 40 % of the
G13 or G12 plus-plus (TL-VW 774 G) additive
(both are purple) to obtain an optimum anti-
corrosion protection ››› in Topping up cool-
ant on p ag
e 209 .
The mixture of G13 with
G12 plus (TL-VW 774 F), G12 (red) or G11
(green-blue) engine coolants will significant-
ly reduce anti-corrosion protection and
should therefore be avoided ››› in Topping
up c oo
lant on p
age 209.
››› in Topping up coolant on page 208
››› page 207 42
Page 150 of 252
Operation
It is possible, however, to set the blower
s peed t
o suit
requirements.
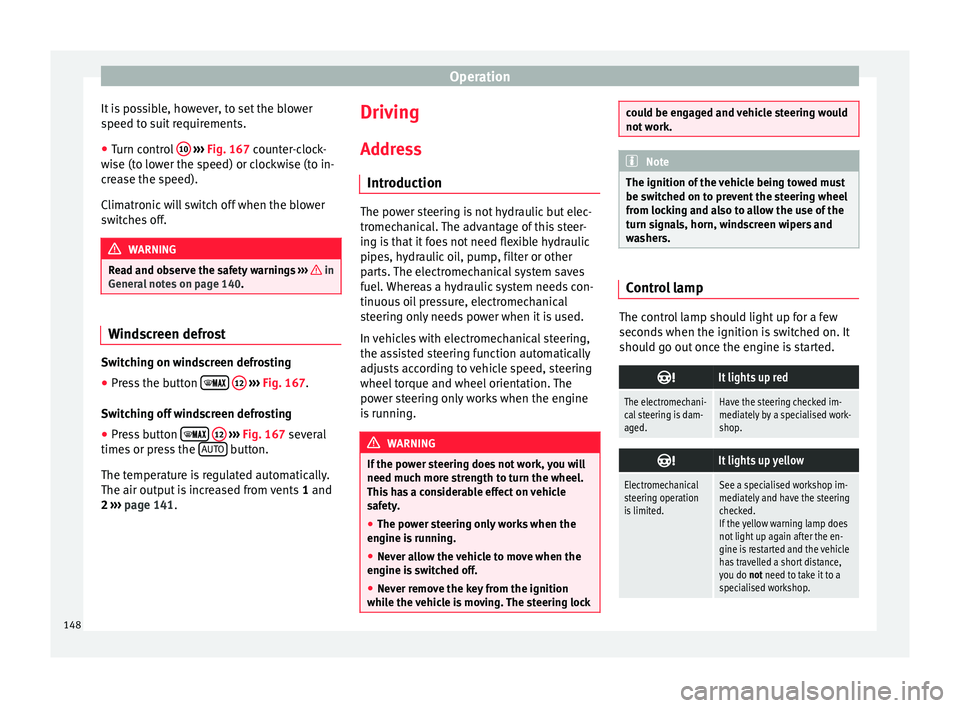
● Turn control 10
› ››
Fig. 167
cou
nter-clock-
wise (to lower the speed) or clockwise (to in-
crease the speed).
Climatronic will switch off when the blower
switches off. WARNING
Read and observe the safety warnings ››› in
General not
es on page 140. Windscreen defrost
Switching on windscreen defrosting
●
Press the button
12
› ›
›
Fig. 167
.
Switching off windscreen defrosting
● Press button
12
› ›
›
Fig. 167
several
times or press the AUTO button.
The t emper
atur
e is regulated automatically.
The air output is increased from vents 1 and
2 ›››
page 141. Driving
Ad dr
es
s
Introduction The power steering is not hydraulic but elec-
tromech
anic
al. The advantage of this steer-
ing is that it foes not need flexible hydraulic
pipes, hydraulic oil, pump, filter or other
parts. The electromechanical system saves
fuel. Whereas a hydraulic system needs con-
tinuous oil pressure, electromechanical
steering only needs power when it is used.
In vehicles with electromechanical steering,
the assisted steering function automatically
adjusts according to vehicle speed, steering
wheel torque and wheel orientation. The
power steering only works when the engine
is running. WARNING
If the power steering does not work, you will
need much more s tr
ength to turn the wheel.
This has a considerable effect on vehicle
safety.
● The power steering only works when the
engine is ru
nning.
● Never allow the vehicle to move when the
engine is sw
itched off.
● Never remove the key from the ignition
while the v
ehicle is moving. The steering lock could be engaged and vehicle steering would
not work.
Note
The ignition of the vehicle being towed must
be sw itched on t
o prevent the steering wheel
from locking and also to allow the use of the
turn signals, horn, windscreen wipers and
washers. Control lamp
The control lamp should light up for a few
sec
ond
s when the ignition i
s switched on. It
should go out once the engine is started.
It lights up red
The electromechani-
cal steering is dam-
aged.Have the steering checked im-
mediately by a specialised work-
shop.
It lights up yellow
Electromechanical
steering operation
is limited.See a specialised workshop im-
mediately and have the steering
checked.
If the yellow warning lamp does
not light up again after the en-
gine is restarted and the vehicle
has travelled a short distance,
you do not need to take it to a
specialised workshop. 148
Page 172 of 252
Operation
Catalytic converter To maintain the useful life of the catalytic
conv
er
ter
– Use only unleaded petrol with petrol en-
gines, as l
ead damages the catalytic con-
verter.
– Do not let the fuel get too low in the tank.
– For engine oil changes, do not replenish
with too much en
gine oil ››› page 206, Top-
ping up engine oil.
– Never tow the vehicle to start it, use jump
lea d
s if necessary ›››
page 52.
If you notice misfiring, uneven running or
loss of power when the vehicle is moving, re-
duce speed immediately and have the vehi-
cle inspected at the nearest specialised
workshop. In general, the exhaust warning
lamp will light up when any of the described
symptoms occur ›››
page 100. If this hap-
pens, unburnt fuel can enter the exhaust sys-
tem and escape into the environment. The
catalytic converter can also be damaged by
overheating. CAUTION
Never run the fuel tank completely dry be-
cause the irr e
gularity of the fuel supply may
cause ignition problems. This allows unburnt
fuel to enter the exhaust system, which could
cause overheating and damage the catalytic
converter. For the sake of the environment
Even when the emission control system is
workin g per
fectly, there may be a smell of
sulphur from the exhaust gas under some
conditions. This depends on the sulphur con-
tent of the fuel used. Quite often the problem
can be solved by changing to another brand
of fuel. Diesel engine particulate filter*
Fig. 173
Vehicle data sticker on back cover of
the M aint
enanc
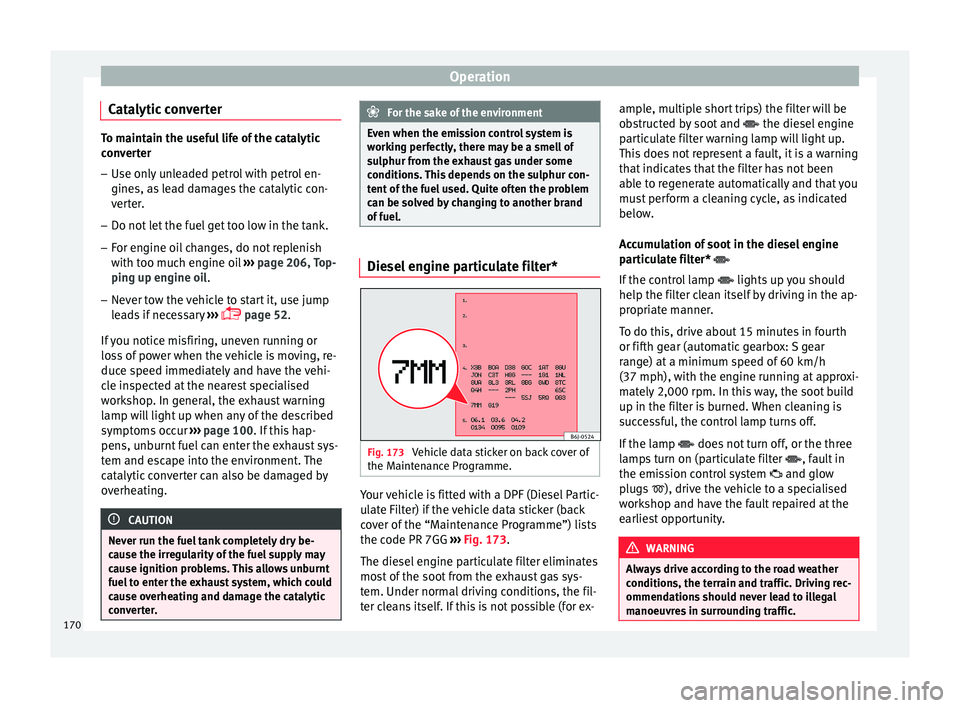
e Programme. Your vehicle is fitted with a DPF (Diesel Partic-
u
l
at e Fi
lter) if the vehicle data sticker (back
cover of the “Maintenance Programme”) lists
the code PR 7GG ››› Fig. 173.
The diesel engine particulate filter eliminates
most of the soot from the exhaust gas sys-
tem. Under normal driving conditions, the fil-
ter cleans itself. If this is not possible (for ex- ample, multiple short trips) the filter will be
obstruct
ed by soot and the diesel engine
particulate filter warning lamp will light up.
This does not represent a fault, it is a warning
that indicates that the filter has not been
able to regenerate automatically and that you
must perform a cleaning cycle, as indicated
below.
Accumulation of soot in the diesel engine
particulate filter*
If the control lamp lights up you should
help the filter clean itself by driving in the ap-
propriate manner.
To do this, drive about 15 minutes in fourth
or fifth gear (automatic gearbox: S gear
range) at a minimum speed of 60 km/h
(37 mph), with the engine running at approxi-
mately 2,000 rpm. In this way, the soot build
up in the filter is burned. When cleaning is
successful, the control lamp turns off.
If the lamp does not turn off, or the three
lamps turn on (particulate filter , fault in
the emission control system and glow
plugs ), drive the vehicle to a specialised
workshop and have the fault repaired at the
earliest opportunity. WARNING
Always drive according to the road weather
conditions, the t err
ain and traffic. Driving rec-
ommendations should never lead to illegal
manoeuvres in surrounding traffic. 170
Page 194 of 252
Advice
Products for vehicle maintenance
C ar
-car
e products are available in your Tech-
nical Services. Keep the product instructions
until you have used them up. WARNING
● Car-c ar
e products can be toxic. Because of
this, they must always be kept closed in their
original container. Keep them out of the reach
of children. Failure to comply could result in
poisoning.
● Always read and observe the instructions
and warnings
on the package before using
car-care products. Improper use could cause
health problems or damage the vehicle. The
use of certain products may produce noxious
vapours; they should be used in well ventila-
ted areas.
● Never use fuel, turpentine, engine oil, nail
varnish remo
ver or other volatile fluids.
These are toxic and highly flammable. Risk of
fire and explosion.
● Before washing your vehicle, or carrying
out any m
aintenance, switch the engine off,
apply the handbrake firmly and remove the
key from the ignition. CAUTION
Never attempt to remove dirt, mud or dust if
the surf ac
e of the vehicle is dry. Never use a
dry cloth or sponge for cleaning purposes.
This could damage the paintwork or the win-
dows of your vehicle. Soak dirt, mud or dust
with plenty of water. For the sake of the environment
● When purc h
asing car care products, try to
select ones that are not harmful to the envi-
ronment.
● The waste from car-care products should
not be dispo
sed of with ordinary household
waste. Observe the disposal information on
the package. Care of the vehicle exterior
Automatic c
ar wash tunnel The vehicle paintwork is so durable that the
v
ehic
le c
an normally be washed without
problems in an automatic car wash tunnel.
However, the paintwork wear depends to a
large extent on the kind of the car wash tun-
nel, the brushes used, its water filtering and
the type of cleaning and preservative prod-
ucts.
Before going through a car wash, be sure to
take the usual precautions such as closing
the windows and sunroof. There is nothing to
note apart from that.
If the vehicle has special accessories such as
spoilers or a roof rack or two-way radio aerial,
etc., it is advisable to consult the car wash
tunnel operator first. After washing, the brakes
could take some
time to respond as the brake discs and pads
could be wet, or even frozen in winter. “Dry”
the brakes by braking several times. WARNING
Water, ice and salt on the brake system can
reduce br ak
ing effectiveness. Risk of acci-
dent. CAUTION
Before putting the vehicle through the car
wash, do not tight
en the aerial if it is folded
because it can be damaged. Hand-washing
Vehicle washing
– First soften the dirt and rinse it off with wa-
ter
.
– Cl
ean your vehicle from top to bottom with
a soft spon
ge, a glove or a brush. Use very
light pressure.
– Rinse the sponge or glove often with clean
water.
– S
pecial car shampoo should only be used
for ver
y stubborn dirt.
– Leave the wheels, sill panels etc. until last,
using a diff
erent sponge or glove.
192
Page 203 of 252
Checking and refilling levels
Note
● You ma y
use petrol with a high octane num-
ber than the one recommended for your
engine.
● In those countries where unleaded petrol is
not avail
able, you may refuel with a fuel with
a low lead content. Diesel fuel
Please note the information on the inside of
the f
uel
tank
flap.
We recommend the use of diesel fuel which
complies to European standard EN 590. If
diesel fuel which meets European standard
EN 590 is not available, the Cetane number
(CZ) must, at minimum, be 51. If the engine
is equipped with a particulate filter, the sul-
phur content of the fuel must be below 50
parts per million.
Winter-grade diesel
Summer fuel becomes thicker in winter and it
is more difficult to start the engine. For this
reason, petrol stations in some countries al-
so offer winter diesel with improved fluidity
when cold (winter-grade diesel). Water in the fuel filter
1)
If your
vehicle has a diesel engine and is
equipped with a fuel filter with a water sepa-
rator, the instrument panel may display the
following warning: Water in the
fuel filter. If this is the case, take the
vehicle to a specialised workshop so that
they can drain the fuel filter. CAUTION
● The vehic l
e is not designed for the use of
FAME fuel (biodiesel). The fuel system would
be damaged if you used biodiesel.
● Do not mix fuel additives, the so-called
“thinners”, petrol
or similar additives with
diesel fuel.
● If poor-quality diesel fuel is used, it may be
necess
ary to drain the fuel filter more fre-
quently than is specified in the Maintenance
Programme. We recommend having this done
by a specialised workshop. If water is allowed
to collect in the filter, this can cause engine
performance problems. Working in the engine compart-
ment
saf
ety not
es for work in the engine
compartment Read the additional information carefully
›››
p
age 10
Before starting any work on the engine or in
the engine compartment:
1. Switch off the engine and remove the key from the ignition.
2. Ap p
ly the handbrake.
3. Move the gear lever to neutral or the selec- tor lever t
o position P.
4. Wait for the engine to cool down.
5. Keep children away from the vehicle.
6. Raise the bonnet ›››
p
age 203.
You should not do any work in the engine
compartment unless you know exactly how to
carry out the jobs and have the correct tools!
Have the work carried out by a specialised
workshop if you are uncertain.
All service fluids and consumables, e.g. cool-
ant, engine oil, spark plugs and batteries, »1)
Valid for the market: Algeria.
201
Technical data
Advice
Operation
Emergencies
Safety
Page 207 of 252
Checking and refilling levels
The specifications (VW standards) set out in
the f o
llo
wing page should appear on the con-
tainer of the service oil; when the container
displays the specific standards for petrol and
diesel engines together, it means that the oil
can be used for both types of engines.
We recommend that the oil change indicated
in the Maintenance Programme, be per-
formed by a technical service or specialised
workshop.
The correct oil specifications for your engine
are listed in the ›››
page 41.
Service intervals
Service intervals can be flexible (LongLife
service) or fixed (dependent on time/dis-
tance travelled).
If the PR code that appears on the back of the
Maintenance Programme booklet is PR QI6,
this means that your vehicle has the LongLife
service program. If it lists the codes QI1, QI2,
QI3, QI4 or QI7, the interval service is de-
pendent on the time/distance travelled.
Flexible service intervals (LongLife service
intervals*)
Special oils and processes have been devel-
oped which, depending on the characteris-
tics and individual driving profiles, enable
the extension of the oil change service (Long-
Life service intervals). Because this oil is essential for extending the
service int
ervals, it must only be used ob-
serving the following indications:
● Avoid mixing it with oil for fixed service in-
terval
s.
● Only in exceptional circumstances, if the
engine oil l
evel is too low ››› page 206 and
LongLife oil is not available, it is permitted to
top up (once) with oil for fixed service inter-
vals ›››
page 41 (up to a maximum of 0.5
litres).
Fixed service intervals*
If your vehicle does not have the “LongLife
service interval” or it has been disabled (by
request), you may use oils for fixed service
intervals, which also appear in
››› page 41. In this case, your vehicle
must be serviced after a fixed interval of 1
year/15,000 km (10,000 miles)(whatever
comes first) ››› Booklet Maintenance Pro-
gramme.
● In exceptional circumstances, if the engine
oil lev
el is too low ››› page 206 and you can-
not obtain the oil specified for your vehicle,
you can add a small quantity of oil conform-
ing to the specification ACEA A2 or ACEA A3
(petrol engines) or ACEA B3 or ACEA B4 (die-
sel engines) (up to 0.5 l). Vehicles with diesel particulate filter*
The Maintenanc
e Programme states whether
your vehicle is fitted with a diesel particulate
filter.
Only VW 507 00 engine oil, with reduced ash
formation, may be used in diesel engines
equipped with particulate filter. Using other
types of oil will cause a higher soot concen-
tration and reduce the life of the DPF. There-
fore:
● Avoid mixing this oil with other engine oils.
● Only in exceptional circumstances, if the
engine oil l
evel is too low ››› page 206 and
you cannot obtain the oil specified for your
vehicle, you can use a small quantity of oil
(once) conforming to the VW 506 00,
VW 506 01, VW 505 00, VW 505 01 or
ACEA B3/ACEA B4 specification. (up to 0.5 l). Note
Before a long trip, we recommend finding an
engine oil th
at conforms to the correspond-
ing VW specifications and recommend keep-
ing it in the vehicle. This way, the correct en-
gine oil will always be available for a top-up if
needed. Warning lamp
If this warning lamp
is
r ed it
indicates
that the engine oil pressure is too low. »
205
Technical data
Advice
Operation
Emergencies
Safety
Page 209 of 252
Checking and refilling levels
WARNING
Oil is highly inflammable! Ensure that no oil
comes int
o contact with hot engine compo-
nents when topping up. CAUTION
If the oil level is above the area A do not
star t
the engine. This could result in damage
to the engine and catalytic converter. Contact
a specialised workshop. For the sake of the environment
The oil level must never be above area A .
Otherwi se oi
l can be drawn in through the
crankcase breather and escape into the at-
mosphere via the exhaust system. Changing engine oil
Read the additional information carefully
› ›
›
p
age 41
The engine oil must be changed at the inter-
vals given in the service schedule.
We recommend that you have the engine oil
changed by a Technical Service.
The oil change intervals are shown in the
Maintenance Programme. WARNING
Only change the engine oil yourself if you
have the s pec
ialist knowledge required!
● Before opening the bonnet, read and ob-
serve the warnin
gs ››› page 201, safety notes
for work in the engine compartment .
● Wait for the engine to cool down. Hot oil
may c
ause burn injuries.
● Wear eye protection to avoid injuries, such
as acid b
urns, caused by splashes of oil.
● When removing the oil drain plug with your
fingers, k
eep your arm horizontal to help pre-
vent oil from running down your arm.
● Wash your skin thoroughly if it comes into
contact w
ith engine oil.
● Engine oil is poisonous! Used oil must be
stored in a s
afe place out of the reach of chil-
dren. CAUTION
No additives should be used with engine oil.
This c ou
ld result in engine damage. Any dam-
age caused by the use of such additives
would not be covered by the factory warranty. For the sake of the environment
● Becau se of
disposal problems and the spe-
cial tools and specialist knowledge required,
we recommend that you have the engine oil
and filter changed by a Technical Service. ●
Never pour oil do
wn drains or into the
ground.
● Use a suitable container when draining the
used oil. It
must be large enough to hold all
the engine oil. Cooling system
Contro l
lamp There is a fault if:
● The l amp does not go out again after a
f ew sec ond
s.
● The lamp lights up or flashes while the
vehicl
e is running, and three acoustic warn-
ing signals are emitted ››› .
Thi s
me an
s that either the coolant level is too
low or the coolant temperature is too high.
Coolant temperature too high
If the lamp lights up, stop the vehicle,
turn off the engine and wait for it to cool
down. Check the coolant level.
If the coolant level is correct, the overheating
may be caused by a malfunction of the radia-
tor fan. Check the radiator fan fuse and have
it replaced if necessary ››› page 81.
If the control lamp lights up again after driv-
ing on for a short distance, stop the vehicle»
207
Technical data
Advice
Operation
Emergencies
Safety
Page 239 of 252
Index
Closing . . . . . . . . . . . . . . . . . . . . . . . . . . . . . . . . . 107 bonnet . . . . . . . . . . . . . . . . . . . . . . . . . . . . . . . .
203
ti ltin g p
anoramic roof . . . . . . . . . . . . . . . . . . . . 117
windows . . . . . . . . . . . . . . . . . . . . . . . . . . . . . . 115
Windows . . . . . . . . . . . . . . . . . . . . . . . . . . . . . . 115
Coming Home . . . . . . . . . . . . . . . . . . . . . . . . . . . . 121
Coming Home Function . . . . . . . . . . . . . . . . . . . . 121
Contact key . . . . . . . . . . . . . . . . . . . . . . . . . . . . . . 150
Control and warning lamps alternator . . . . . . . . . . . . . . . . . . . . . . . . . . . . . 211
Anti-lock brake system (ABS) . . . . . . . . . . . . . . 159
ASR . . . . . . . . . . . . . . . . . . . . . . . . . . . . . . . . . . 156
braking system . . . . . . . . . . . . . . . . . . . . . . . . . 153
coolant . . . . . . . . . . . . . . . . . . . . . . . . . . . . . . . 207
diesel particulate filter . . . . . . . . . . . . . . 169, 170
EDL . . . . . . . . . . . . . . . . . . . . . . . . . . . . . . . . . . 158
emission control . . . . . . . . . . . . . . . . . . . . . . . . 171
engine oil . . . . . . . . . . . . . . . . . . . . . . . . . . . . . 205
ESC . . . . . . . . . . . . . . . . . . . . . . . . . . . . . . . . . . 155
instrument panel . . . . . . . . . . . . . . . . . . . . . . . . 37
lights . . . . . . . . . . . . . . . . . . . . . . . . . . . . . . . . . 118
steering column lock . . . . . . . . . . . . . . . . . . . . 148
windscreen washer fluid . . . . . . . . . . . . . . . . . 125
Controls and displays General instrument panel . . . . . . . . . . . . . . . . . 95
Controls on the steering wheel Operating the audio system . . . . . . . . . . . . . . 104
operating the telephone and audio system . . 105
Convenience closing tilting panoramic sunroof . . . . . . . . . . . . . . . . 118
windows . . . . . . . . . . . . . . . . . . . . . . . . . . . . . . 117
Convenience opening windows . . . . . . . . . . . . . . . . . . . . . . . . . . . . . . 117
Coolant checking level . . . . . . . . . . . . . . . . . . . . . . . . . . 208
Coolant level control lamp . . . . . . . . . . . . . . . . . . . . . . . . . . . 207 Coolant temperature
control lamp . . . . . . . . . . . . . . . . . . . . . . . . . . . 207
Safety instructions . . . . . . . . . . . . . . . . . . . . . . 208
cooling system checking coolant . . . . . . . . . . . . . . . . . . . . . . . 208
Cooling system checking coolant . . . . . . . . . . . . . . . . . . . . . . . 207
Coolant temperature gauge . . . . . . . . . . . . . . . . 99
topping up coolant . . . . . . . . . . . . . . . . . 207, 208
Correct position . . . . . . . . . . . . . . . . . . . . . . . . . . . 57
Correct sitting position front passenger . . . . . . . . . . . . . . . . . . . . . . . . . 58
rear seat passengers . . . . . . . . . . . . . . . . . . . . . 59
Cruise control . . . . . . . . . . . . . . . . . . . . . . . . 34, 183 adjusting the stored speed . . . . . . . . . . . . . . . 184
complete deactivation . . . . . . . . . . . . . . . . . . . 184
control lamp . . . . . . . . . . . . . . . . . . . . . . . . . . . 183
temporary deactivation . . . . . . . . . . . . . . . . . . 184
Current . . . . . . . . . . . . . . . . . . . . . . . . . . . . . . . . . 134
D Dangers in not using the seat belt . . . . . . . . . . . . 63
Dash panel . . . . . . . . . . . . . . . . . . . . . . . . . . . . . . . 35
Data sticker . . . . . . . . . . . . . . . . . . . . . . . . . . . . . . 219
Deactivating the front passenger front airbag . . . 15
Deactivation of front airbag . . . . . . . . . . . . . . . . . . 70
Diesel diesel particulate filter . . . . . . . . . . . . . . . . . . . 169
refuelling . . . . . . . . . . . . . . . . . . . . . . . . . . . . . . 201
Diesel engine particulate filter . . . . . . . . . . . . . . 170
Diesel particulate filter malfunction . . . . . . . . . . . . . . . . . . . . . . . . . . . . 169
Digital clock . . . . . . . . . . . . . . . . . . . . . . . . . . . . . . 96
Dimensions . . . . . . . . . . . . . . . . . . . . . . . . . . . . . . 234
Direction of rotation tyres . . . . . . . . . . . . . . . . . . . . . . . . . . . . . . . . . . . 49
Display . . . . . . . . . . . . . . . . . . . . . . . . . . . . . . . 96, 97 Disposal
Seat belt t ensioners . . . . . . . . . . . . . . . . . . . . . . 66
Door handle de-icing . . . . . . . . . . . . . . . . . . . . . . . . . . . . . . . 195
Door lock de-icing . . . . . . . . . . . . . . . . . . . . . . . . . . . . . . . 195
Door lock cylinder de-icing . . . . . . . . . . . . . . . . . . . . . . . . . . . . . . . 195
Door release lever . . . . . . . . . . . . . . . . . . . . . . . . . 95
Doors Childproof locks . . . . . . . . . . . . . . . . . . . . . . . . 110
opening and closing . . . . . . . . . . . . . . . . . . . . . . 9
Double headlight bulbs . . . . . . . . . . . . . . . . . . . . . 85
Driver see Correct sitting position . . . . . . . . . 57, 58, 59
Driver information system additional electrical appliances . . . . . . . . . . . . 31
assist systems . . . . . . . . . . . . . . . . . . . . . . . . . . 29
bonnet, rear lid and doors open . . . . . . . . . . . . 28
engine oil temperature . . . . . . . . . . . . . . . . . . . . 31
gear-change indicator . . . . . . . . . . . . . . . . . . . . 28
journey data . . . . . . . . . . . . . . . . . . . . . . . . . . . . 29
menu . . . . . . . . . . . . . . . . . . . . . . . . . . . . . . . . . . 27
operation . . . . . . . . . . . . . . . . . . . . . . . . . . . . . . . 25
outside temperature . . . . . . . . . . . . . . . . . . . . . . 27
saving tips . . . . . . . . . . . . . . . . . . . . . . . . . . . . . . 31
service intervals . . . . . . . . . . . . . . . . . . . . . . . . . 33
speed warning . . . . . . . . . . . . . . . . . . . . . . . . . . 32
timer . . . . . . . . . . . . . . . . . . . . . . . . . . . . . . . . . . 31
warning and information messages . . . . . . . . . 29
Driving driving abroad . . . . . . . . . . . . . . . . . . . . . . . . . 171
driving through water . . . . . . . . . . . . . . . . . . . . 172
economical driving . . . . . . . . . . . . . . . . . . . . . . 168
With a trailer . . . . . . . . . . . . . . . . . . . . . . . . . . . 187
237