maintenance Seat Leon 5D 2006 Maintenance programme
[x] Cancel search | Manufacturer: SEAT, Model Year: 2006, Model line: Leon 5D, Model: Seat Leon 5D 2006Pages: 292, PDF Size: 8.86 MB
Page 219 of 292

Checking and refilling levels217
Safety First
Operating instructions
Tips and Maintenance
Te c h n i c a l D a t a
WARNING
There is a serious danger of accidents if a tyre bursts during driving!•
The tyres must be replaced at the latest when the tread is worn down to
the tread wear indicators. Failure to do so could result in an accident. Worn
tyres do not grip well at high speeds on wet roads. There is also a greater
risk of “aquaplaning”.
•
At continuously high speeds, a tyre with insufficient pressure flexes
more. This causes it to overheat. This can cause tread separation and tyre
blow-out. Risk of accident. Always observe the recommended tyre pres-
sures.
•
If tyres show excessive wear, you should have the running gear checked
by an Authorised Service Centre.
•
Keep chemicals such as oil, fuel and brake fluid away from tyres.
•
Damaged wheels and tyres must be replaced immediately!For the sake of the environment
Under-inflated tyres will increase fuel consumption.Puncture-proof tyres*
Puncture-proof tyres will usually allow the vehicle to continue
even when one of the tyres has a puncture.Vehicles that are factory-fitted with puncture-proof tyres
20)
indicate
on the instrument panel when there is a loss of tyre pressure. Driving on puncture-proof tyres (emergency use)
– Leave the ESP/TCS (electronic stabilisation programme)
switched on, or switch on.
– Drive carefully and at moderate speed (80 km/h maximum).
– Avoid sharp turns and rapid manouevres.
– Avoid driving over obstacles (for example, kerbs) or potholes.
– If the ESP/TCS is frequently activated, check whether there is smoke coming from the tyres or a smell of rubber, or if the vehicle
vibrates or rattles. If this is the case, stop the vehicle.
Puncture-proof tyres are marked on the tyre wall as follows: “DSST”,
“Eufonia”, “RFT”, “ROF”, “RSC”, “SSR” or “ZP”.
The tyre walls of this type of tyre are reinforced. When the tyres lose air, the
tyre walls keep the tyre up (emergency use).
Loss of air pressure in the tyre is shown on the instrument panel. The vehicle
may still be driven for at least 80 km and, under ideal conditions (for example,
no load) further.
The faulty tyre should be replaced as soon as possible. The tyre rim should be
checked for damage at a specialised workshop and replaced as necessary.
We recommend you contact your Authorised Service Centre. If more than one
tyre is being used under emergency co nditions, this reduces the distance
which can be travelled.
Starting driving in emergency conditions
When the loss in tyre pressure is displayed on the instrument panel, this
implies that at least one tyre is being driven in emergency conditions ⇒.
End of emergency operation
Do not drive on if:
20)Depending upon version and country.
leon_ingles Seite 217 Donnerstag, 24. August 2006 1:56 13
Page 221 of 292

Checking and refilling levels219
Safety First
Operating instructions
Tips and Maintenance
Te c h n i c a l D a t a
WARNING
•
We recommend that you use only wheels and tyres that have been
approved by SEAT for your model. Fa ilure to do so could impair vehicle
handling. Risk of accident.
•
Avoid running the vehicle on tyres that are more than six years old. If
you have no alternative, you should drive slowly and with extra care at all
times.
•
Never use old tyres or those with an unknown “history of use”.
•
If wheel trims are retrofitted, you must ensure that the flow of air to the
brakes is not restricted. This could cause them to overheat.
•
All four wheels must be fitted with radial tyres of the same type, size
(rolling circumference) and the same tread pattern.For the sake of the environment
Old tyres must be disposed of according to the laws in the country concerned.
Note
•
For technical reasons, it is not generally possible to use the wheels from
other vehicles. This can also apply to wheels of the same model. The use of
wheels or tyres which have not been approved by SEAT for use with your
model may invalidate the vehicle's type approval for use on public roads.
•
If the spare tyre is not the same as the tyres that are mounted on the
vehicle - for example with winter tyres - you should only use the spare tyre for
a short period of time and drive with extra care. Refit the normal road wheel
as soon as possible.
Wheel bolts
Wheel bolts must be tightened to the correct torque.The design of wheel bolts is matched to the rims. If different wheel rims are
fitted, the correct wheel bolts with the right length and correctly shaped bolt
heads must be used. This ensures that wheels are fitted securely and that the
brake system functions correctly.
In certain circumstances, you may not use wheel bolts from a different car -
even if it is the same model ⇒page 191.
WARNING
If the wheel bolts are not tightened correctly, the wheel could become
loose while driving. Risk of accident.•
The wheel bolts must be clean and turn easily. Never apply grease or oil
to them.
•
Use only wheel bolts which belong to the wheel.
•
If the prescribed torque of the wheel bolts is too low, they could loosen
whilst the vehicle is in motion. Risk of accident! If the tightening torque is
too high, the wheel bolts and threads could be damaged.Caution
The prescribed torque for wheel bolts for steel and alloy wheels is 120 Nm.
leon_ingles Seite 219 Donnerstag, 24. August 2006 1:56 13
Page 223 of 292

Checking and refilling levels221
Safety First
Operating instructions
Tips and Maintenance
Te c h n i c a l D a t a
Note
In some countries, the speed limit for using snow chains is 50 km/h. The legal
requirements of the country should be followed.
leon_ingles Seite 221 Donnerstag, 24. August 2006 1:56 13
Page 225 of 292

If and when223
Safety First
Operating instructions
Tips and Maintenance
Te c h n i c a l D a t a
Compact temporary spare wheel*
The compact temporary spare wheel (spare wheel for vehicles
with no puncture repair kit) should only be used when really
necessary.The temporary spare wheel is stored under the floor panel in the luggage
compartment and is attached by a thumbnut.
How to use the compact temporary spare wheel
Should you ever have a punctured tyre, the compact temporary spare wheel
is only intended for temporary use until you can reach a workshop. The
standard-size road wheel should be replaced as soon as possible.
Please note the following restrictions when using the compact temporary
spare wheel. This spare wheel has been specially designed for your vehicle,
thus, it cannot be changed with th e spare wheel from another vehicle.
No other type of tyre (normal summer or winter tyre) may be fitted on the
compact temporary spare wheel rim. Snow chains
For technical reasons, snow chains must not
be used on the compact tempo-
rary spare wheel.
If you should have a puncture on one of the front wheels when using snow
chains, fit the compact temporary spare in place of one of the rear wheels.
You can then attach the snow chains to the wheel taken from the rear and use
this wheel to replace the punctured front wheel.
WARNING
•
The tyre pressures must be checked and corrected as soon as possible.
The tyre pressure for the spare wheel is 4.2 bar. Failure to do so could result
in an accident.
•
Do not drive faster than 80 km/h. High er speeds can cause an accident.
•
Avoid heavy acceleration, hard braking and fast cornering, risk of acci-
dent.
•
Never use two or more compact spare tyres at the same time, risk of
accident.
•
No other type of tyre (normal summer or winter tyre) may be fitted on
the compact temporary spare wheel rim.Note
•
Emergency wheels must never be used on vehicles fitted with Brembo
brakes. These vehicles are supplied with a tyre repair kit.
Tyre repair kit*
The tyre repair kit (for vehicles not including a spare wheel) is
stored under the floor panel in the luggage compartment.Your vehicle is equipped with the Tyre Mobility System “Tyre repair kit”.
Fig. 153 Luggage
compartment. Access to
the spare wheel
leon_ingles Seite 223 Donnerstag, 24. August 2006 1:56 13
Page 227 of 292

If and when225
Safety First
Operating instructions
Tips and Maintenance
Te c h n i c a l D a t a
– Tighten the wheel bolts firmly in diagonal sequence with the box
spanner
–Replace the hub cap.After changing a wheel
After changing the wheel there are still tasks to complete.– Put the tools and jack back in the luggage compartment.
– Place the wheel with the defective tyre in the luggage compart-
ment and secure it.
– Check the tyre pressure of the newly fitted tyre as soon as
possible.
– Have the tightening torque of the wheel bolts checked as soon as possible with a torque wrench. The prescribed torque is 120 Nm.
Note•
If you notice that the wheel bolts are corroded and difficult to turn when
changing a wheel, they must be replaced before having the wheel bolt torque
checked.
•
In the interest of safety, drive at moderate speeds until the wheel bolt
torque has been checked.
Wheel trims
The wheel trims must be removed to gain access to the wheel
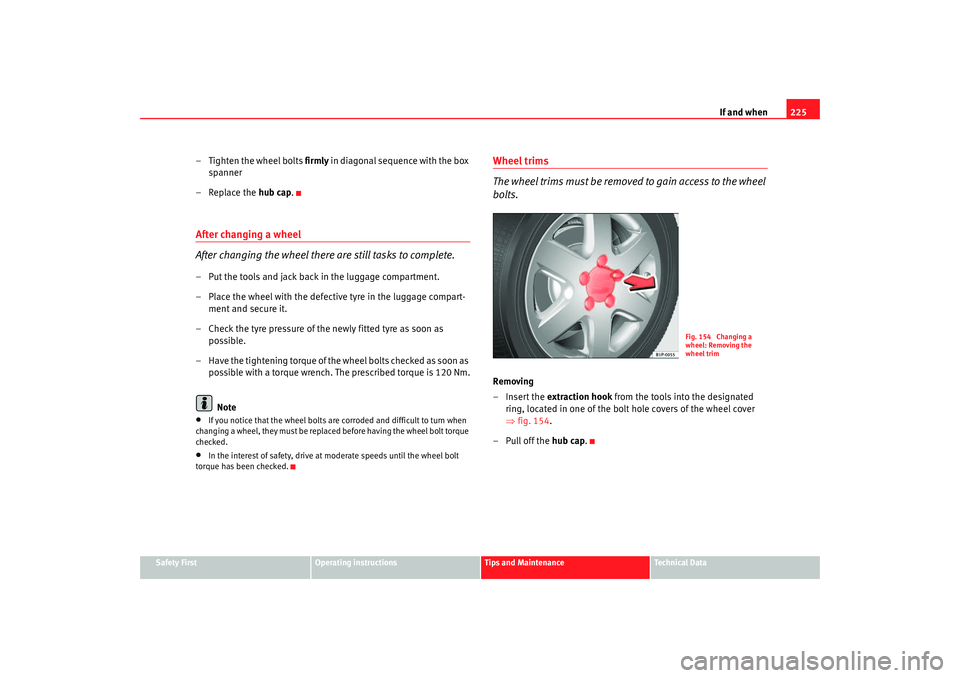
bolts.Removing
–Insert the extraction hook from the tools into the designated ring, located in one of the bolt hole covers of the wheel cover
⇒fig. 154.
–Pull off the hub cap .
Fig. 154 Changing a
wheel: Removing the
wheel trim
leon_ingles Seite 225 Donnerstag, 24. August 2006 1:56 13
Page 229 of 292

If and when227
Safety First
Operating instructions
Tips and Maintenance
Te c h n i c a l D a t a
WARNING
Loosen the wheel bolts only about one tu rn before raising the vehicle with
the jack, loosening the wheel bolts more than one turn can result in an acci-
dent.
Note
•
Do not use the hexagonal socket in th e screwdriver handle to loosen or
tighten the wheel bolts.
•
If the wheel bolt is very tight, you may be able to loosen it by pushing
down the end of the spanner carefully with your foot. Hold on to the vehicle
for support and take care not to slip.
leon_ingles Seite 227 Donnerstag, 24. August 2006 1:56 13
Page 231 of 292

If and when229
Safety First
Operating instructions
Tips and Maintenance
Te c h n i c a l D a t a
Removing and fitting the wheel
For removing and fitting the wheel, the following tasks must
be completed.Change the wheel as described below after loosening the wheel
bolts and raising the vehicle with the jack.
Removing a wheel
– Unscrew the bolts using the hexagonal tool in the handle of the
screwdriver (vehicle tool) and place them on a clean surface
⇒ fig. 158 .
Fitting a wheel
– Screw in the wheel bolts and tighten them lightly using the hexagonal socket in the screwdriver handle.
The wheel bolts should be clean and turn easily. Before fitting the spare
wheel, inspect the condition of the wheel and hub mounting surfaces. These
surfaces must be clean before fitting the wheel.
The hexagonal socket in the screwdriver handle makes it easier to turn the
wheel bolts when they are loose. The reversible screwdriver blade should be
removed when the tool is used for this purpose.
If tyres with a specific direction of ro tation are fitted, note the direction of
rotation.
Note
Do not use the hexagonal socket in the screwdriver handle to loosen or
tighten the wheel bolts.Anti-theft wheel bolts
A special adapter is required to turn the anti-theft wheel
bolts.
Fig. 158 Wheel change:
Hexagon socket in screw-
driver handle to turn the
wheel bolts after they
have been loosened
Fig. 159 Anti-theft wheel
bolt
leon_ingles Seite 229 Donnerstag, 24. August 2006 1:56 13
Page 233 of 292

If and when231
Safety First
Operating instructions
Tips and Maintenance
Te c h n i c a l D a t a
Note
Seek professional assistance if the repair of a tyre puncture is not possible
with the sealing compound.Preparation work
What you must do before changing a wheel.– If you have a flat tyre or puncture, park the vehicle as far away
from the flow of traffic as possible.
–Apply the handbrake firmly.
–Engage the first gear, or put the selector lever to position P for
those vehicles with an automatic gearbox.
– All passengers must leave the vehicle. They should wait in a safe
area (for instance behind the roadside crash barrier).
– Check whether the puncture can be mended using the Tyre Mobility System “General observations and safety advice.”
– Unscrew cap from the valve of the affected wheel.
–Take the tyre repair kit from the luggage compartment.
WARNING
Put the hazard warning lights on and place the warning triangle in position.
This is for your own safety and also warns other road users.
Caution
Take the utmost caution when repairing a flat tyre on a gradient.
Note
Please observe legal requirements when doing so.Repairing the puncture
To repair the puncture, once the preliminary tasks are done,
follow these steps.Apply the sealant
– The instructions for using the sealant correctly are on the pack-
aging
Inflate the tyres.
– Remove the compressor and hose.
– Tighten the fastening nut onto the tyre valve.
– Connect the compressor power supply to the 12 Volt socket.
– Connect the compressor and chec k the tyre pressure with the
pressure gauge.
Finish the repair
– Remove the compressor hose from the valve.
– Check the cap on the tyre valve.
– Disconnect the compressor from the vehicle mains.
leon_ingles Seite 231 Donnerstag, 24. August 2006 1:56 13
Page 235 of 292

If and when233
Safety First
Operating instructions
Tips and Maintenance
Te c h n i c a l D a t a
– Take the plastic clip from inside the fuse cover (at left-hand end
of the dash panel), fit it onto the blown fuse and pull the fuse out.
– Replace the blown fuse (which will have a melted metal strip) with a new fuse of the same ampere rating.
– Carefully fit the fuse cover back on to ensure no water can enter the fuse box.The individual electrical circuits are pr otected by fuses. The fuses are located
behind a cover at the left-hand end of the dash panel and on the left-hand
side of the engine compartment.
The electric windows are protected by circuit breakers. These reset automat-
ically after a few seconds when the overload (caused for example by frozen
windows) has been corrected.
Colour coding of fuses
WARNING
Never “repair” damaged fuses and never replace them with fuses with a
higher rating. Failure to comply could re sult in fire. This could also cause
damage to other parts of the electrical system.
Note
•
If a newly replaced fuse blows again after a short time, the electrical
system must be checked by a qualified workshop as soon as possible.
•
If you replace a fuse with a stronger fuse, you could cause damage to
another location in the electrical system.
•
Always keep some spare fuses in the vehicle. These are available from
SEAT dealers.
Colour
Amperes
light brown 5
red 10
blue 15
yellow 20
natural (white) 25
green 30
orange 40
red 50
white 80
blue100
grey 150
violet 200
Colour
Amperes
leon_ingles Seite 233 Donnerstag, 24. August 2006 1:56 13
Page 237 of 292

If and when235
Safety First
Operating instructions
Tips and Maintenance
Te c h n i c a l D a t a
21
D2L Engine (2.0l 147 kW 4 speed TFSI)) 10
22 Fan switch 40
23 Electric windows (front) 30
24 Vacant
25 Rear window heater 25
26 Rear electric windows 30
27 Engine (fuel pump relay/ flowmeter) 15
28 Convenience controls 25
29 Vacant
30 Automatic gearbox 20
31 Vacuum pump 20
32 Vacant
33 Sunroof 30
34 Convenience controls 25
35 Vacant
36 Headlight washer system 20
37 Heated seats 30
38 D2L Engine (2.0 l 147 kW 4 speed TFSI)) 10
39 Vacant
40 Fan switch 40
41 Rear wiper motor/ Wiring control unit 15
42 12 V socket/ Lighter 15
43 Tow bar pre-installation 15
44 Tow bar pre-installation 20
Number
Electrical equipment Amperes
leon_ingles Seite 235 Donnerstag, 24. August 2006 1:56 13