gearbox Seat Leon 5D 2006 Maintenance programme
[x] Cancel search | Manufacturer: SEAT, Model Year: 2006, Model line: Leon 5D, Model: Seat Leon 5D 2006Pages: 292, PDF Size: 8.86 MB
Page 161 of 292

Driving159
Safety First
Operating instructions
Tips and Maintenance
Te c h n i c a l D a t a
– Press and hold the brake pedal, at the same time press the
button on the selector lever.The lock is only activated when the vehicle is stopped or at a speed of less
than 5 km/h. At higher speeds, the lock is automatically released in position
N .
For rapid changes of position (e.g. from R to D) the lever will not lock. If the
lever remains in the position N more than one second then it is locked. With
the automatic lock, the lever is prevented from passing from P and N to any
other gear without first pressing the brake pedal.
The selector lever must be put in the position P in order to remove the key.Driving with an automatic gearbox* / DSG automatic gearbox*
The drive and reverse gears are automatically engaged.
Driving
– Press and hold the foot brake.
– Press on the button on the selector lever knob (on the left,
⇒fig. 121.
– Select a gear for driving ( R, D or S).
– Release the button and wait a few seconds for the gear to engage, a light jerk will be felt.
– Release the brake and accelerate.
Short stop
– Hold the vehicle stationary with the brake pressed down (for example at traffic lights). The selector lever does not need to be
put into the positions P or N for this.
– Do not press the accelerator.
Parking the vehicle
– Press the foot brake and hold to bring the vehicle to a stop.
– Apply the handbrake firmly.
– Press in the button on the select or lever knob, move the lever to
the position P and release the button.
Driving slowly
– Move the selector lever to the position D and press to the right to
put the lever into Tiptronic mode.
– Press the gear lever towards (-) to select a lower gear.
Fig. 121 Driving
leon_ingles Seite 159 Donnerstag, 24. August 2006 1:56 13
Page 162 of 292

Driving
160
Hill stop
– Hold the vehicle, in all cases, using the foot brake to prevent rolling back.
– Do not try to slow the vehicle us ing another forward gear (engine
braking).
Descending gradients
– With the gear engaged, release the brake and accelerate.The steeper the gradient the lower the gear must be for effective engine
braking. For example, if 3rd gear is used on a very steep gradient, the engine
braking is insufficient and vehicle accelerates. So that the engine speed does
not become excessive, the gearbox changes to the next highest gear. Depress
the brake pedal and move the selector lever to the Tiptronic gate to return to
3rd gear.
WARNING
•
The driver should never leave the vehicle while the engine is running or
with any gear selected. If for any reason you must leave the vehicle with the
engine running, apply the handbrake and move the selector lever to posi-
tion P.
•
When the engine is running and the po sitions D, S or R are selected, it
is necessary to hold the vehicle with the foot brake because the vehicle will
creep at a low speed.
•
Never accelerate while changing the po sition of the selector lever (risk
of an accident).
•
The selector lever must never be moved into the positions R or P while
moving (risk of an accident).
•
Before descending a steep gradient, reduce speed and use the Tiptronic
programme to select a lower gear.
•
If you must stop on a hill, always hold the vehicle using the footbrake
to avoid rolling back.
•
The footbrake must not be held for a long period of time, not even
lightly; continuous braking will ca use overheating of the brakes and a
reduction or even a loss of braking power and a significant increase in
braking distances.
•
Never allow the vehicle to coast down a gradient with the selector lever
in positions N or D, even when the engine is not running. For descents, the
use of the Tiptronic programme is recommended to keep the speed
reduced.Caution
•
Never use the automatic gearbox to hold the vehicle stationary on a hill,
even for short periods, as this may overheat the gearbox and cause damage.
Apply the handbrake or depress the foot brake to hold the vehicle in position.
•
If the vehicle is allowed to roll with the engine stopped but the selector in
position N then the gearbox may be damaged because it will not be
lubricated.WARNING (continued)
leon_ingles Seite 160 Donnerstag, 24. August 2006 1:56 13
Page 163 of 292

Driving161
Safety First
Operating instructions
Tips and Maintenance
Te c h n i c a l D a t a
Using the Tiptronic gear system
The Tiptronic system allows th e driver to manually select
gears
General points about the Tiptronic gear system
Changing gear with the selector lever
– Put the lever in the position D and press towards the right to
enter the Tiptronic gate ⇒fig. 122.
– Press the gear lever forwards (+) to select a higher gear.
– Press the gear lever back (-) to select a lower gear.
Changing gear using the steering wheel levers
– Press the right lever (+) towards the steering wheel to change up ⇒fig. 123.
– Press the left lever (-) towards the steering wheel to change down ⇒fig. 123.The manual programme can be selected with the levers on the steering wheel
irrespective of the driving mode which has been preselected.
General points about the Tiptronic gear system
When accelerating, the automatic/DSG gearbox automatically shifts up to the
next gear shortly before the maximu m permitted engine speed is reached.
If a lower gear is selected, the automatic gearbox / direct shift gearbox does
not change down until the point is re ached where the engine could no longer
overrev.
If the “tiptronic” is selected whilst the vehicle is in motion and the automatic
gearbox / direct shift gearbox is in the 3rd gear in selector lever position D,
the “tiptronic” will then also be in the 3rd gear.
Fig. 122 Changing gear
with TiptronicFig. 123 Steering wheel
with levers for the auto-
matic gearbox
leon_ingles Seite 161 Donnerstag, 24. August 2006 1:56 13
Page 170 of 292

Driving
168Vehicles with a manual gearbox
The system is completely turned off by moving the control all the way to
the right hand side (OFF engaged), or when the vehicle is stationary, ignition
off.
Vehicles with automatic gearbox / DSG automatic gearbox
To completely turn off the cruise control system, engage the gear selection
lever into one of the following positions: P, N , R or 1 or stop the vehicle and
turn the ignition off.
AA
leon_ingles Seite 168 Donnerstag, 24. August 2006 1:56 13
Page 201 of 292

Checking and refilling levels199
Safety First
Operating instructions
Tips and Maintenance
Te c h n i c a l D a t a
WARNING
All work on the engine or in the engine compartment, e.g. checking and
refilling fluids, involves the danger of injury and scalding as well as the risk
of accident or fire.•
Never open the bonnet if you see steam, smoke or coolant escaping
from the engine compartment. Otherwis e, there is a risk of sustaining
burns. Wait until no more steam or coolant is emitted, then allow the
engine to cool before carefully opening the bonnet.
•
Switch off the engine and remove the key from the ignition.
•
Apply the handbrake and move the gear stick to neutral or selector
lever to position P.
•
Keep children away from the vehicle.
•
Never touch hot engine parts. There is a risk of burns.
•
Never spill liquids on a hot engine or on a hot exhaust gas system. This
is a fire hazard.
•
Avoid causing short-circuits in the electrical system, particularly at the
points where the jump leads are attached ⇒page 249. The battery could
explode.
•
Never touch the radiator fan. It is temperature controlled and could
start automatically, even when the engine has been switched off and the
key removed from the ignition!
•
Do not unscrew the cap on the expansion tank when the engine is hot.
If the coolant is hot, the cooling system will be pressurised!
•
Protect face, hands and arms by covering the cap with a large, thick
cloth to protect against escaping coolant and steam.
•
Always make sure you have not left any objects, such as cleaning cloths
and tools, in the engine compartment.
•
If you have to work underneath the vehicle, you must use suitable
stands additionally to support the vehicle, there is a risk of accident!. A
hydraulic jack is insufficient for securing the vehicle and there is a risk of
injury.
•
If any work has to be performed when the engine is started or with the
engine running, there is an additional, potentially fatal, safety risk from the
rotating parts, such as the drive belts, alternator, radiator fan, etc., and
from the high-voltage ignition system. You should also observe the
following points:
−Never touch the electrical wiring of the ignition system.
− Ensure that jewellery, loose cl othing and long hair do not get
trapped in rotating engine parts. Danger of death. Before starting any
work remove jewellery, tie back and cover hair, and wear tight-fitting
clothes.
− Always think carefully about pressing the accelerator if a gear is
engaged in either an automatic or manual gearbox. The vehicle could
move, even if the handbrake is applied. Danger of death.
•
If work has to be carried out on the fuel system or on electrical compo-
nents, you must observe the following sa fety notes in addition to the above
warnings:
−Always disconnect the battery. The vehicle must be unlocked when
this is done, otherwise the alarm will be triggered.
− Do not smoke.
− Never work near naked flames.
− Always have a fire extinguisher on hand.Caution
When changing or topping up service fluids, make absolutely certain that you
fill the fluids into the correct reservoirs. Failure to observe this point will result
in serious malfunctions and engine damage!
WARNING (continued)
leon_ingles Seite 199 Donnerstag, 24. August 2006 1:56 13
Page 226 of 292

If and when
224The tyre repair kit consists of a container with sealing compound to repair the
puncture and a compressor to generate the required tyre pressure. The kit will
reliably seal punctures up to a size of about 4 mm caused by the penetration
of a foreign body into the tyre.
Note
•
Seek professional assistance if the repair of a tyre puncture is not
possible with the sealing compound.
Wheel changePreparation work
What you must do before changing a wheel.– If you have a flat tyre or puncture, park the vehicle as far away from the flow of traffic as possible. Choose a location that is as
level as possible.
– All passengers should leave the ve hicle. They should wait in a
safe area (for instance behind the roadside crash barrier).
– Switch off the engine. Switch on the hazard warning lights.
–Apply the handbrake firmly.
– Engage the first gear, or put the selector lever to position P for
those vehicles with an automatic gearbox.
– If you are towing a trailer, unhitch it from your vehicle. –Take the
vehicle tools and the spare wheel out of the luggage
compartment.
WARNING
Put the hazard warning lights on and place the warning triangle in position.
This is for your own safety and also warns other road users.
Caution
If you have to change the wheel on a gradient, block the wheel opposite the
wheel being changed by placing a stone or similar object under it to prevent
the vehicle from rolling away.
Note
Please observe legal requirements when doing so.Changing a wheelChange the wheel as described below
–Pull off the hub cap. See ⇒ page 225, fig. 154.
– Slacken the wheel bolts
– Raise the car with the jack in the corresponding zone
– Ta k e o f f the wheel and then put on the spare wheel
– Lower the vehicle.
leon_ingles Seite 224 Donnerstag, 24. August 2006 1:56 13
Page 233 of 292

If and when231
Safety First
Operating instructions
Tips and Maintenance
Te c h n i c a l D a t a
Note
Seek professional assistance if the repair of a tyre puncture is not possible
with the sealing compound.Preparation work
What you must do before changing a wheel.– If you have a flat tyre or puncture, park the vehicle as far away
from the flow of traffic as possible.
–Apply the handbrake firmly.
–Engage the first gear, or put the selector lever to position P for
those vehicles with an automatic gearbox.
– All passengers must leave the vehicle. They should wait in a safe
area (for instance behind the roadside crash barrier).
– Check whether the puncture can be mended using the Tyre Mobility System “General observations and safety advice.”
– Unscrew cap from the valve of the affected wheel.
–Take the tyre repair kit from the luggage compartment.
WARNING
Put the hazard warning lights on and place the warning triangle in position.
This is for your own safety and also warns other road users.
Caution
Take the utmost caution when repairing a flat tyre on a gradient.
Note
Please observe legal requirements when doing so.Repairing the puncture
To repair the puncture, once the preliminary tasks are done,
follow these steps.Apply the sealant
– The instructions for using the sealant correctly are on the pack-
aging
Inflate the tyres.
– Remove the compressor and hose.
– Tighten the fastening nut onto the tyre valve.
– Connect the compressor power supply to the 12 Volt socket.
– Connect the compressor and chec k the tyre pressure with the
pressure gauge.
Finish the repair
– Remove the compressor hose from the valve.
– Check the cap on the tyre valve.
– Disconnect the compressor from the vehicle mains.
leon_ingles Seite 231 Donnerstag, 24. August 2006 1:56 13
Page 236 of 292

If and when
234Fuses on left side of dash panelFuses
Number Electrical equipment Amperes
1 Diagnosis/instrument lighting cont
rol unit/ Headlamp range control/ Flow gauge/ heated windscreen
control unit 10
2 Engine control unit/ ABS-ESP control unit/ Automatic Ge
arbox/ Instrument panel/ Trailer /Light switch /
Brake sensor / servosteering/ right and left headlamp control unit 5
3 Airbag 5
4 Heating/ Reverse switch/ ASR-ESP switch/ Telephone/ Fillers/ electrochrome mirror 5
5 Right xenon headlamp 5
6 Left xenon headlamp 5
7 Vacant
8 Trailer pre-installation kit (guided solution) 5
9 Vacant
10 Vacant
11 Vacant
12 Central locking 10
13 Diagnosis/ Light switch/ Rain sensor 10
14 Automatic gearbox/ Heating/ ESP co ntrol unit/ Automatic gearbox lever 5
15 Cable control unit 7,5
16 Vacant
17 Alarm 5
18 Vacant
19 Fog lamp Kit (guided solution)
20 Vacant
leon_ingles Seite 234 Donnerstag, 24. August 2006 1:56 13
Page 237 of 292

If and when235
Safety First
Operating instructions
Tips and Maintenance
Te c h n i c a l D a t a
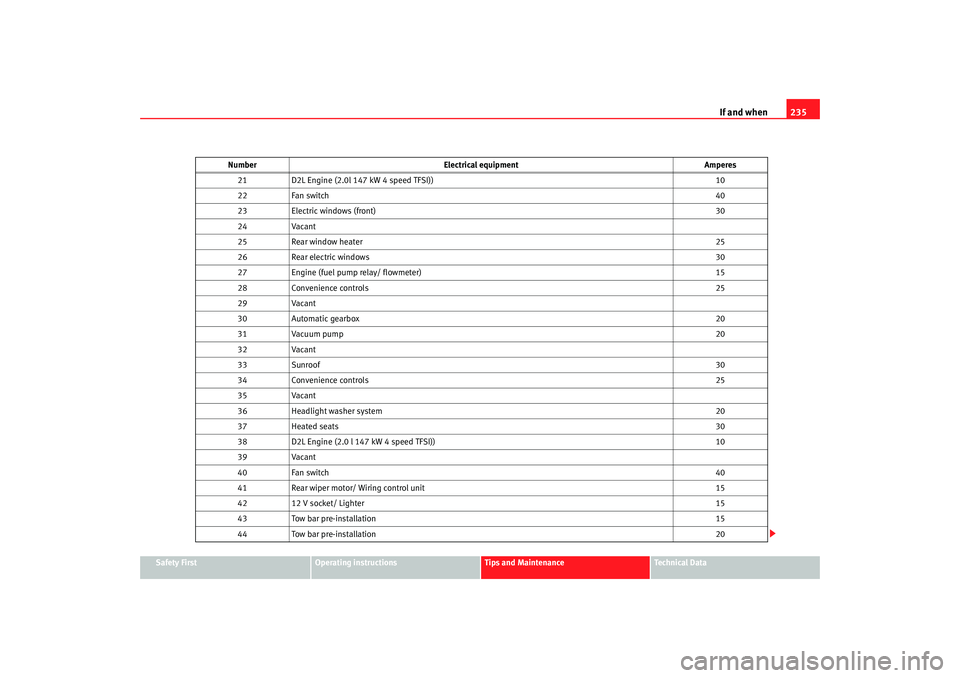
21
D2L Engine (2.0l 147 kW 4 speed TFSI)) 10
22 Fan switch 40
23 Electric windows (front) 30
24 Vacant
25 Rear window heater 25
26 Rear electric windows 30
27 Engine (fuel pump relay/ flowmeter) 15
28 Convenience controls 25
29 Vacant
30 Automatic gearbox 20
31 Vacuum pump 20
32 Vacant
33 Sunroof 30
34 Convenience controls 25
35 Vacant
36 Headlight washer system 20
37 Heated seats 30
38 D2L Engine (2.0 l 147 kW 4 speed TFSI)) 10
39 Vacant
40 Fan switch 40
41 Rear wiper motor/ Wiring control unit 15
42 12 V socket/ Lighter 15
43 Tow bar pre-installation 15
44 Tow bar pre-installation 20
Number
Electrical equipment Amperes
leon_ingles Seite 235 Donnerstag, 24. August 2006 1:56 13
Page 238 of 292

If and when
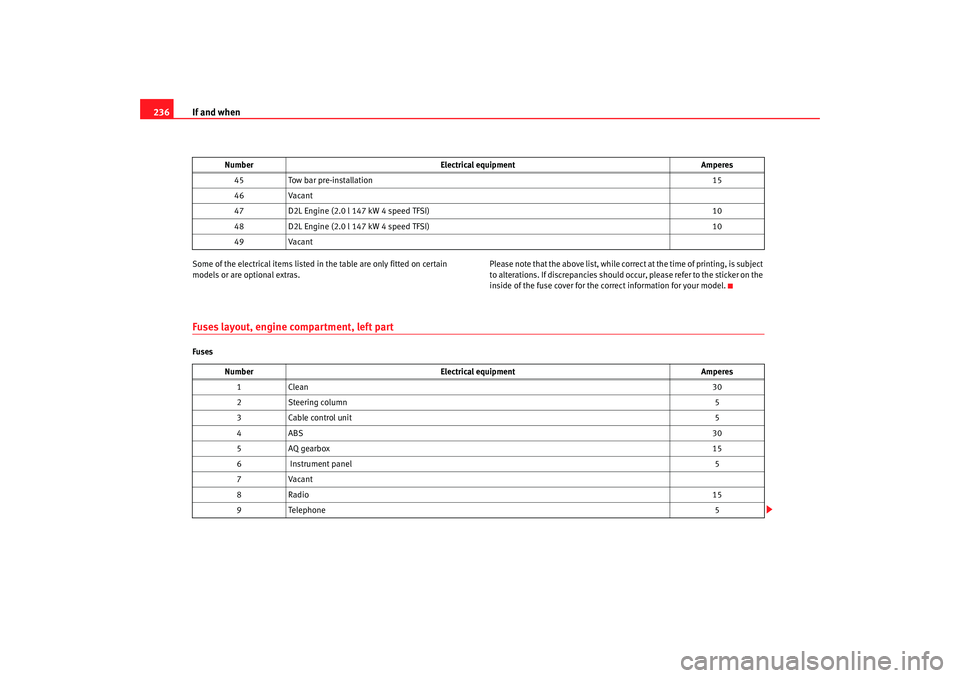
236Some of the electrical items listed in the table are only fitted on certain
models or are optional extras. Please note that the above list, while correct at the time of printing, is subject
to alterations. If discrepancies should
occur, please refer to the sticker on the
inside of the fuse cover for the correct information for your model.Fuses layout, engine compartment, left partFuses45
Tow bar pre-installation 15
46 Vacant
47 D2L Engine (2.0 l 147 kW 4 speed TFSI) 10
48 D2L Engine (2.0 l 147 kW 4 speed TFSI) 10
49 Vacant
Number
Electrical equipment Amperes
NumberElectrical equipment Amperes
1C le a n 30
2 Steering column 5
3 Cable control unit 5
4A BS 30
5 AQ gearbox 15
6 Instrument panel 5
7 Vacant
8R ad io 15
9 Telephone 5
leon_ingles Seite 236 Donnerstag, 24. August 2006 1:56 13