gearbox Seat Leon 5D 2006 Maintenance programme
[x] Cancel search | Manufacturer: SEAT, Model Year: 2006, Model line: Leon 5D, Model: Seat Leon 5D 2006Pages: 292, PDF Size: 8.86 MB
Page 5 of 292
Contents3
ContentsThe structure of this manual
. . . . .
Content
. . . . . . . . . . . . . . . . . . . . . . . . . . . . . . . .
Safety First
. . . . . . . . . . . . . . . . . . . . . . . . . . .
Safe driving
. . . . . . . . . . . . . . . . . . . . . . . . . . . . . .
Brief introduction . . . . . . . . . . . . . . . . . . . . . . . .
Proper sitting position for occupants . . . . . . . . .
Pedal area . . . . . . . . . . . . . . . . . . . . . . . . . . . . . .
Stowing luggage . . . . . . . . . . . . . . . . . . . . . . . . .
Seat belts
. . . . . . . . . . . . . . . . . . . . . . . . . . . . . . . .
Introduction . . . . . . . . . . . . . . . . . . . . . . . . . . . . .
Why wear seat belts? . . . . . . . . . . . . . . . . . . . . . .
Seat belts . . . . . . . . . . . . . . . . . . . . . . . . . . . . . . .
Belt tension devices . . . . . . . . . . . . . . . . . . . . . .
Airbag system
. . . . . . . . . . . . . . . . . . . . . . . . . . . .
Brief introduction . . . . . . . . . . . . . . . . . . . . . . . .
Front airbags . . . . . . . . . . . . . . . . . . . . . . . . . . . .
Side airbags* . . . . . . . . . . . . . . . . . . . . . . . . . . . .
Curtain airbags . . . . . . . . . . . . . . . . . . . . . . . . . .
Deactivating airbags* . . . . . . . . . . . . . . . . . . . . .
Child safety
. . . . . . . . . . . . . . . . . . . . . . . . . . . . . .
Brief introduction . . . . . . . . . . . . . . . . . . . . . . . .
Child seats . . . . . . . . . . . . . . . . . . . . . . . . . . . . . .
Securing child seats . . . . . . . . . . . . . . . . . . . . . .
Operating instructions
. . . . . . . . . . . .
Cockpit
. . . . . . . . . . . . . . . . . . . . . . . . . . . . . . . . . . .
Overview . . . . . . . . . . . . . . . . . . . . . . . . . . . . . . .
Instruments . . . . . . . . . . . . . . . . . . . . . . . . . . . . .
Digital display in the instrument panel . . . . . . .
Instrument panel menus . . . . . . . . . . . . . . . . . . .
Warning lamps . . . . . . . . . . . . . . . . . . . . . . . . . . .
Steering wheel controls
. . . . . . . . . . . . . . . . . . .
Using these instructions . . . . . . . . . . . . . . . . . . .
Audio system . . . . . . . . . . . . . . . . . . . . . . . . . . . .
Radio navigation system . . . . . . . . . . . . . . . . . . .
Steering wheel lighting controls . . . . . . . . . . . .
Unlocking and locking
. . . . . . . . . . . . . . . . . . . .
Central locking . . . . . . . . . . . . . . . . . . . . . . . . . . .
Keys . . . . . . . . . . . . . . . . . . . . . . . . . . . . . . . . . . .
Radio frequency remote control . . . . . . . . . . . . .
Anti-theft alarm system* . . . . . . . . . . . . . . . . . . .
Tailgate . . . . . . . . . . . . . . . . . . . . . . . . . . . . . . . . .
Windows . . . . . . . . . . . . . . . . . . . . . . . . . . . . . . .
Sliding/tilting roof* . . . . . . . . . . . . . . . . . . . . . . .
Lights and visibility
. . . . . . . . . . . . . . . . . . . . . . .
Lights . . . . . . . . . . . . . . . . . . . . . . . . . . . . . . . . . .
Interior lights . . . . . . . . . . . . . . . . . . . . . . . . . . . .
Visibility . . . . . . . . . . . . . . . . . . . . . . . . . . . . . . . .
Windscreen wipers . . . . . . . . . . . . . . . . . . . . . . .
Mirrors . . . . . . . . . . . . . . . . . . . . . . . . . . . . . . . . .
Seats and stowage
. . . . . . . . . . . . . . . . . . . . . . .
The importance of correct seat adjustment . . . .
Head restraints . . . . . . . . . . . . . . . . . . . . . . . . . .
Front seats . . . . . . . . . . . . . . . . . . . . . . . . . . . . . .
Rear seat bench . . . . . . . . . . . . . . . . . . . . . . . . . .
Stowage compartments . . . . . . . . . . . . . . . . . . . Ashtrays*, cigarette lighter* and electrical
sockets . . . . . . . . . . . . . . . . . . . . . . . . . . . . . . . . .
First-aid kit, warning triangle, fire extinguisher
Luggage compartment . . . . . . . . . . . . . . . . . . . .
Heating, Ventilation and Air conditioning
. .
Heating and ventilation . . . . . . . . . . . . . . . . . . .
Climatic* . . . . . . . . . . . . . . . . . . . . . . . . . . . . . . .
2C-Climatronic* . . . . . . . . . . . . . . . . . . . . . . . . . .
General notes . . . . . . . . . . . . . . . . . . . . . . . . . . .
Driving
. . . . . . . . . . . . . . . . . . . . . . . . . . . . . . . . . . .
Steering . . . . . . . . . . . . . . . . . . . . . . . . . . . . . . . .
Safety . . . . . . . . . . . . . . . . . . . . . . . . . . . . . . . . . .
Ignition lock . . . . . . . . . . . . . . . . . . . . . . . . . . . . .
Starting and stopping the engine . . . . . . . . . . .
Manual gearbox . . . . . . . . . . . . . . . . . . . . . . . . . .
Automatic gearbox* / DSG automatic gearbox*
Handbrake . . . . . . . . . . . . . . . . . . . . . . . . . . . . . .
Acoustic parking aid system* . . . . . . . . . . . . . . .
Cruise control system (CCS)* . . . . . . . . . . . . . . .
Tips and Maintenance
. . . . . . . . . . . . .
Intelligent technology
. . . . . . . . . . . . . . . . . . . . .
Brakes . . . . . . . . . . . . . . . . . . . . . . . . . . . . . . . . .
Anti-lock brake system and traction control M-ABS
(ABS and TCS) . . . . . . . . . . . . . . . . . . . . . . . . . . .
Electronic stabilisation program (ESP)* . . . . . . .
Driving and the environment
. . . . . . . . . . . . . .
Running-in . . . . . . . . . . . . . . . . . . . . . . . . . . . . . .
Exhaust gasses purification system . . . . . . . . . .
Driving abroad . . . . . . . . . . . . . . . . . . . . . . . . . . .
5
6
7
7
7
10
16
16
19
19
21
24
28
30
30
34
37
41
44
46
46
48
50 55
55
55
56
59
65
72
84
84
84
88
92
93
93
99
100
102
104
106
108
111
111
117
118
119
123
126
126
127
129
130
131 134
137
138
140
140
142
145
149
150
150
151
152
153
156
157
162
163
165
169
169
169
170
171
173
173
174
175
leon_ingles Seite 3 Donnerstag, 24. August 2006 1:56 13
Page 61 of 292
Cockpit59
Safety First
Operating instructions
Tips and Maintenance
Te c h n i c a l D a t a
Digital display in the instrument panelDisplay (without warning or information texts)
The display in the instrument panel shows, amongst other
things, the mileage and trip recorder as well as the selector
lever position.
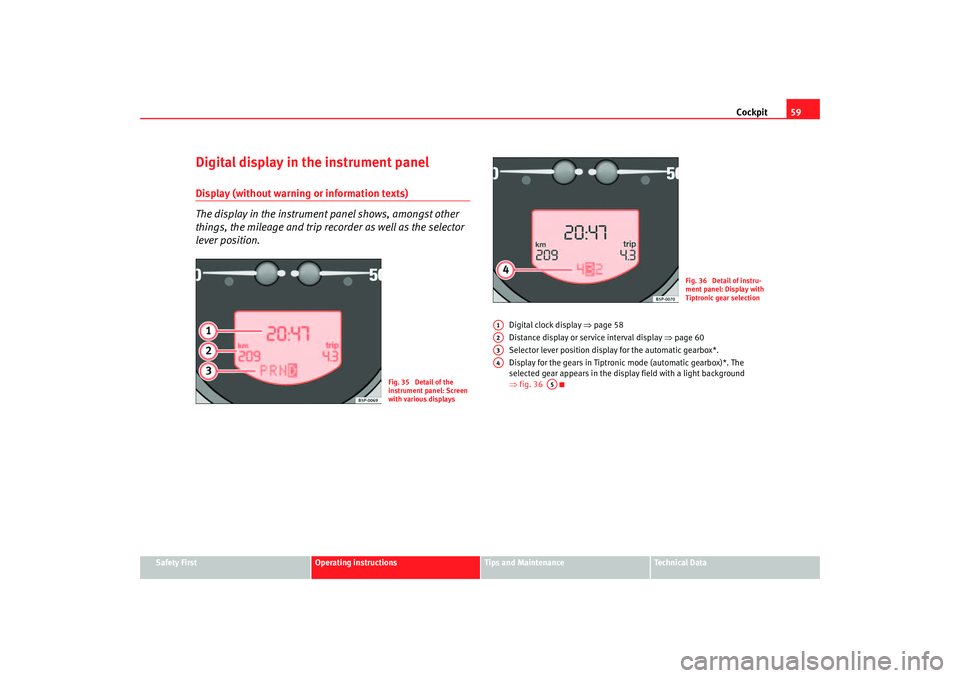
Digital clock display ⇒page 58
Distance display or service interval display ⇒page 60
Selector lever position display for the automatic gearbox*.
Display for the gears in Tiptronic mode (automatic gearbox)*. The
selected gear appears in the display field with a light background
⇒ fig. 36
Fig. 35 Detail of the
instrument panel: Screen
with various displays
Fig. 36 Detail of instru-
ment panel: Display with
Tiptronic gear selection
A1A2A3A4
A5
leon_ingles Seite 59 Donner stag, 24. August 2006 1:56 13
Page 62 of 292
Cockpit
60Displayed categories
The display in the instrument panel shows the mileage and
trip recorder as well as the selector lever position.
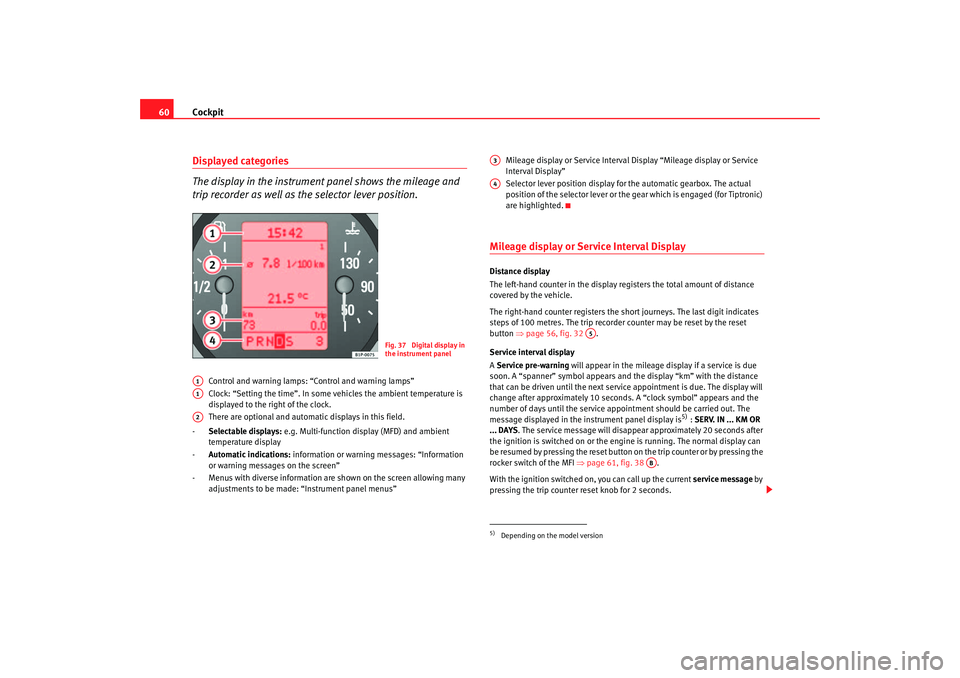
Control and warning lamps: “Control and warning lamps”
Clock: “Setting the time”. In some vehicles the ambient temperature is
displayed to the right of the clock.
There are optional and automatic displays in this field.
- Selectable displays: e.g. Multi-function display (MFD) and ambient
temperature display
- Automatic indications: information or warning messages: “Information
or warning messages on the screen”
- Menus with diverse information are shown on the screen allowing many adjustments to be made: “Instrument panel menus” Mileage display or Service Interval Display “Mileage display or Service
Interval Display”
Selector lever position display for the automatic gearbox. The actual
position of the selector lever or the gear which is engaged (for Tiptronic)
are highlighted.
Mileage display or Service Interval DisplayDistance display
The left-hand counter in the display registers the total amount of distance
covered by the vehicle.
The right-hand counter regi
sters the short journeys. The last digit indicates
steps of 100 metres. The trip recorder counter may be reset by the reset
button ⇒page 56, fig. 32 .
Service interval display
A Service pre-warning will appear in the mileage display if a service is due
soon. A “spanner” symbol appears and the display “km” with the distance
that can be driven until the next service appointment is due. The display will
change after approximately 10 seconds. A “clock symbol” appears and the
number of days until the service appointment should be carried out. The
message displayed in the instrument panel display is
5) : SERV. IN ... KM OR
... DAYS . The service message will disappear approximately 20 seconds after
the ignition is switched on or the en gine is running. The normal display can
be resumed by pressing the reset button on the trip counter or by pressing the
rocker switch of the MFI ⇒page 61, fig. 38 .
With the ignition switched on, you can call up the current service message by
pressing the trip counter reset knob for 2 seconds.
Fig. 37 Digital display in
the instrument panel
A1A1A2
5)Depending on the model versionA3A4
A5
AB
leon_ingles Seite 60 Donner stag, 24. August 2006 1:56 13
Page 76 of 292
Cockpit
74
WARNING
•
Failure to observe warning lamps and warning messages can result in
serious personal injury or damage to your vehicle.
•
The risk of an accident increases if your vehicle breaks down. Use a
warning triangle to draw the attention of other road users to your
stationary vehicle so that it does not represent a danger.
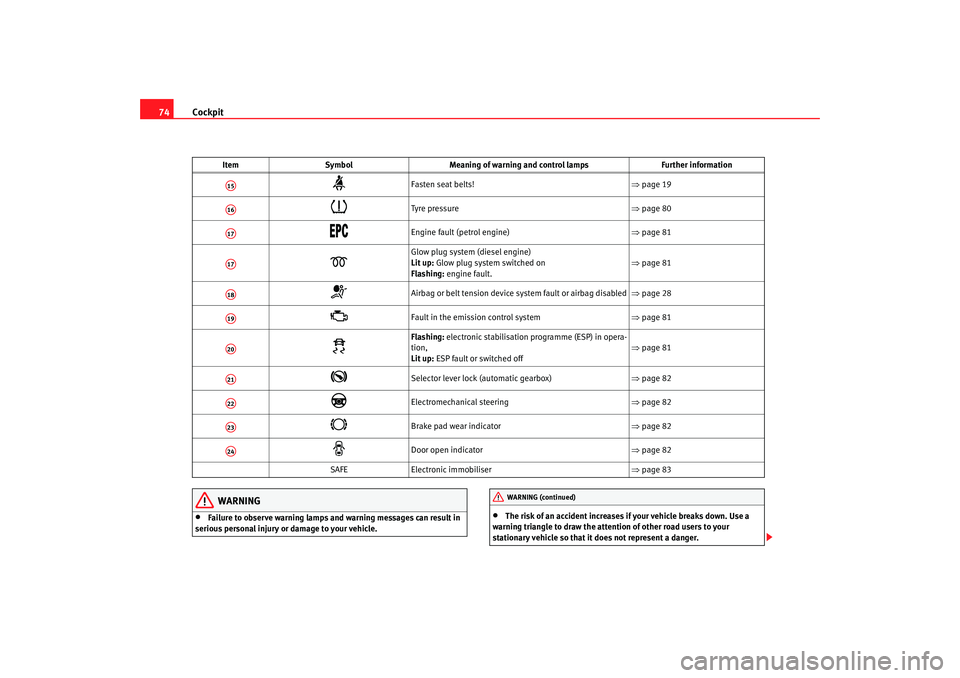
Fasten seat belts! ⇒page 19
Tyre pressure ⇒page 80
Engine fault (petrol engine) ⇒page 81
Glow plug system (diesel engine)
Lit up: Glow plug system switched on
Flashing: engine fault. ⇒
page 81
Airbag or belt tension device system fault or airbag disabled ⇒page 28
Fault in the emission control system ⇒page 81
Flashing: electronic stabilisation programme (ESP) in opera-
tion,
Lit up: ESP fault or switched off ⇒
page 81
Selector lever lock (automatic gearbox) ⇒page 82
Electromechanical steering ⇒page 82
Brake pad wear indicator ⇒page 82
Door open indicator ⇒page 82
SAFE Electronic immobiliser ⇒page 83
Item
Symbol Meaning of warning and control lamps Further information
A15A16A17A17A18A19A20A21A22A23A24
WARNING (continued)
leon_ingles Seite 74 Donnerstag, 24. August 2006 1:56 13
Page 84 of 292
Cockpit
82•
It will light up continuously if the ESP is switched off.
•
It will also come on if a fault should occur in the ABS because the ESP
operates in conjunction with the ABS.
If the ESP warning lamp
lights up and stays on after the engine is started,
this may mean that the control system has temporarily switched off the ESP.
In this case the ESP can be reactivated by switching the ignition off and then
on again. If the warning lamp goes out, this means the system is fully
functional.
Operating the foot brake
The footbrake must be depressed when this warning lamp lights up. This is
necessary when the automatic gearbox* selector lever is moved out of the
positions P or N.Power steering system*
For vehicles with power steering, the level of steering assistance depends on
the vehicle's speed and on the steering angle.
The warning lamp should light up for a few seconds when the ignition is
switched on. It should go out when the engine has started running.
If the battery is disconnected, the indicator remains lit, even with the engine
running. The warning light only goes off after a distance of approx. 50 m.
There is a fault in the electromechanica l steering system if the lamp does not
go out or light up, wh ils
t the vehicle is in motion. The indicator may appear in
two different colours to indicate faults. If it lights yellow, this indicates a
minor fault. If it lights red, seek wo rkshop assistance immediately, if no
assistance is available stop driving. Stop the vehicle and seek technical
assistance. The power steering does not work if the battery is flat or if the engine is off (for example, for towing). You should take into account that you
will need considerably more power than normal to steer the vehicle if the
steering assistance is reduced
or has failed completely.
Brake pad wear indicator*
As the brake pad wear indicator only monitors the front brake pads, it is advis-
able to have the rear brake pads inspected at the same time.
The information text displayed in the instrument panel display is
16): CHECK
BRAKE PADS .
WARNING
Have the brake pads inspected immediately by a qualified dealership if the
warning display
lights up.
Indicator for open doors or tailgate
This indicator lights if one of th e doors or the tailgate is open.The warning light
should go off when all the doors are closed correctly.
The system also works when the ignition is switched off. It should go off
about 15 seconds after the vehicle is locked.
16)Depending on the model version.
leon_ingles Seite 82 Donner stag, 24. August 2006 1:56 13
Page 86 of 292

Steering wheel controls
84Steering wheel controlsUsing these instructionsThe vehicle includes a multifunction modu le from where it is possible to
control the audio, telephone and radio / navigation functions and the auto-
matic gearbox* without needing to distract the driver.
There are three versions of the multifunction module:
•
Audio version, to control the available audio functions from the steering
wheel.
•
Audio + Telephone version, to control the available audio functions and
the telephone system from the steering wheel.
Both versions may be used to control the Audio system (Radio, CD Audio, CD
mp3, CD Changer) and the radio / navigation System, in which case they also
control the Navigation system.
•
Automatic gearbox version* ⇒page 161.
Audio systemSteering wheel audio version controls
Fig. 48 Controls on the
steering wheel
Fig. 49 Controls on the
steering wheel
leon_ingles Seite 84 Donner stag, 24. August 2006 1:56 13
Page 116 of 292

Lights and visibility
114Instrument and switch lighting
When the headlights are switched on, the brightness of the instruments and
switch lighting can be regulated to suit your requirements by turning the
thumb wheel ⇒page 113, fig. 74 .
Those vehicles fitted with xenon gas discharge headlights are fitted with an
automatic headlight range system.
Headlight range control
Using the electrical headlight range control, you can adjust the headlight
range to the load level that is being carried in the vehicle. In this way, it is
possible to avoid dazzling oncoming traffic more than necessary. At the same
time, the driver has the best possible lighting for the road ahead using the
correct headlight settings.
The headlights can only be adjusted when the dipped beam is switched on.
To lower the beam, turn the thumb wheel down from the basic setting 0.
Dynamic headlight range control
Vehicles with gas discharge lamps (“xenon lamps”) are equipped with
dynamic headlight range control. This means that the headlights will be
adjusted to suit the load level of the vehicle and “nodding movements” when
pulling off and braking are automatically compensated for.
Vehicles with gas discharge lamps are not fitted with headlight range
control.
Hazard warning lights
The hazard warning lights are used to draw the attention of
other road users to your vehicle in emergencies.
If your vehicle breaks down:
1. Park your vehicle at a safe distance from moving traffic.
2. Press the button to switch on the hazard warning lights ⇒ .
3. Switch the engine off.
4. Apply the handbrake.
5. On a manual gearbox engage 1st gear, and for an automatic move the selector lever to P.
6. Use the warning triangle to draw the attention of other road users
to your vehicle.
A1A1
A2
A2A2
Fig. 75 Detail of the dash
panel: Hazard warning
light switch
leon_ingles Seite 114 Donnerstag, 24. August 2006 1:56 13
Page 158 of 292

Driving
156
CautionIf the engine has been driven hard for a long period, the engine could over-
heat when it is switched off. Risk of engine damage. For this reason, you
should idle the engine for approx. 2 m inutes before you switch it off.Manual gearboxDriving a car with a manual gearbox
Selecting the reverse gear
– The vehicle should be stationary with the engine idling. Press the
clutch right down.
– Place the gear lever into neutral gate and push the lever all the way down.
– Slide the gearlever to the left, and then into the reverse position shown on the gear lever.The reverse gear can only be engaged when the vehicle is stationary. When
the engine is running, before engaging this gear wait about 6 seconds with
the clutch pressed in fully in order to protect the gearbox.
The reversing lights come on when the reverse gear is selected and the igni-
tion is on.
Fig. 116 Detail of the
centre console: Shift
diagram of a 5-speed
manual gearbox
Fig. 117 Detail of the
centre console: Shift
diagram of a 6-speed
manual gearbox
leon_ingles Seite 156 Donnerstag, 24. August 2006 1:56 13
Page 159 of 292

Driving157
Safety First
Operating instructions
Tips and Maintenance
Te c h n i c a l D a t a
WARNING
•
When the engine is running, the vehicle will start to move as soon as a
gear is engaged and the clutch released.
•
Never select the reverse gear when the vehicle is in motion. Risk of acci-
dent.Note
•
Do not rest your hand on the gear le ver when driving. The pressure of your
hand could cause premature wear on the selector forks in the gearbox.
•
When changing gear, you should always depress the clutch fully to avoid
unnecessary wear and damage.
•
Do not hold the car “on the clutch” on hills. This causes premature wear
and damage to the clutch.
Automatic gearbox* / DSG automatic
gearbox*Selector lever positionsSelector lever positions indicated on the cover
P Parking position (lever locked).
R Reverse position.
N Neutral position (lever loc ked). This position is similar to the neutral
position for manual gearboxes).
D Drive position (economic driving program).
S Sports driving position.
+/- Tiptronic driving position (this program is similar to the operation of a
manual gearbox).
Fig. 118 Section of
centre console: selector
lever on cars with an auto-
matic gearbox / direct
shift gearbox
leon_ingles Seite 157 Donnerstag, 24. August 2006 1:56 13
Page 160 of 292

Driving
158Driving programmes
The automatic gearbox / direct shift gearbox (DSG) has three
programmes.Selecting the economic programme
– This programme selects a higher gear earlier rather than remain
in a lower gear.
– Put the selector lever into position D to drive forwards
– Put the selector lever into position R to reverse. This position is
shared by all programmes for reversing.
Selecting the sport programme
– Move the lever to position S.If you select the sport programme, S, the programme is designed for a sports
mode, that is, a programme which changes up at higher engine speeds to use the full power of the engine. This pr
ogramme is not recommended for use on
the motorway or in the city.
Selecting manual programme (tiptronic)
This programme allows the vehicle to be driven as if with a manual gearbox.
This programme may be accessed using the selector lever or from the
steering wheel controls when t his option it is fitted ⇒page 161.
Selector lever locking
The selector lever lock prevents gears from being engaged
inadvertently, which would cause the vehicle to move.Releasing the selector lever lock
–Start the vehicle.
Fig. 119 programme
selection
Fig. 120 Deactivating the
lock
leon_ingles Seite 158 Donnerstag, 24. August 2006 1:56 13