ECO mode Seat Leon 5D 2006 Maintenance programme
[x] Cancel search | Manufacturer: SEAT, Model Year: 2006, Model line: Leon 5D, Model: Seat Leon 5D 2006Pages: 292, PDF Size: 8.86 MB
Page 2 of 292
SEAT S.A. se preocupa constantemente por mantener todos sus tipos y modelos en un desarrollo continuo. Por ello le rogamos que com-
prenda que, en cualquier momento, puedan producirse modificaciones del vehículo entregado en cuanto a la f orma, el equipamiento y la
técnica. Por esta razón, no se puede derivar derecho alguno basándose en los datos, las ilustrac iones y descripciones del presente
Manual.
Los textos, las ilustraciones y las normas de este manual se basan en el estado de la información en el momento de la realización de la
impresión. Salvo error u omisión, la información recogida en el presente manual es válida en la fecha de cierre de su edición.
No está permitida la reimpresión, la reproducción o la traducción, total o parcial, sin la autorización escrita de SEAT.
SEAT se reserva expresamente todos los der echos según la ley sobre el "Copyright". Reservados todos los derechos sobre modificación.
❀Este papel está fabricado con celulosa blanqueada sin cloro.
© SEAT S.A. - Reimpresión: 15.09.06
Interior Manual LEON 07.06 24/8/06 16:30 Página 1
Page 22 of 292
Seat belts
20The warning lamp in the combi-instrument lights up
1) if the driver seat belt
is not fastened when the ignition is switched on. In addition, an acoustic
signal is given for a few seconds and a text is displayed on the combi-instru-
ment asking you to
1) fasten your seat belt .
The warning lamp* does not go out until the driver seat belt is fastened
while the ignition is switched on.
1)Depending on the model version
leon_ingles Seite 20 Donner stag, 24. August 2006 1:56 13
Page 61 of 292
Cockpit59
Safety First
Operating instructions
Tips and Maintenance
Te c h n i c a l D a t a
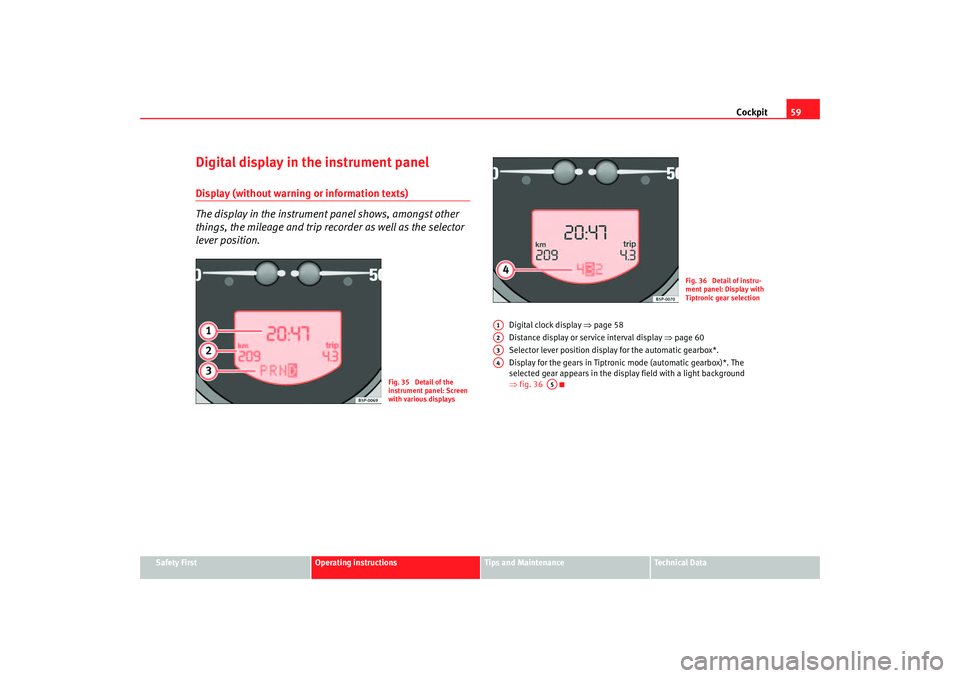
Digital display in the instrument panelDisplay (without warning or information texts)
The display in the instrument panel shows, amongst other
things, the mileage and trip recorder as well as the selector
lever position.
Digital clock display ⇒page 58
Distance display or service interval display ⇒page 60
Selector lever position display for the automatic gearbox*.
Display for the gears in Tiptronic mode (automatic gearbox)*. The
selected gear appears in the display field with a light background
⇒ fig. 36
Fig. 35 Detail of the
instrument panel: Screen
with various displays
Fig. 36 Detail of instru-
ment panel: Display with
Tiptronic gear selection
A1A2A3A4
A5
leon_ingles Seite 59 Donner stag, 24. August 2006 1:56 13
Page 62 of 292
Cockpit
60Displayed categories
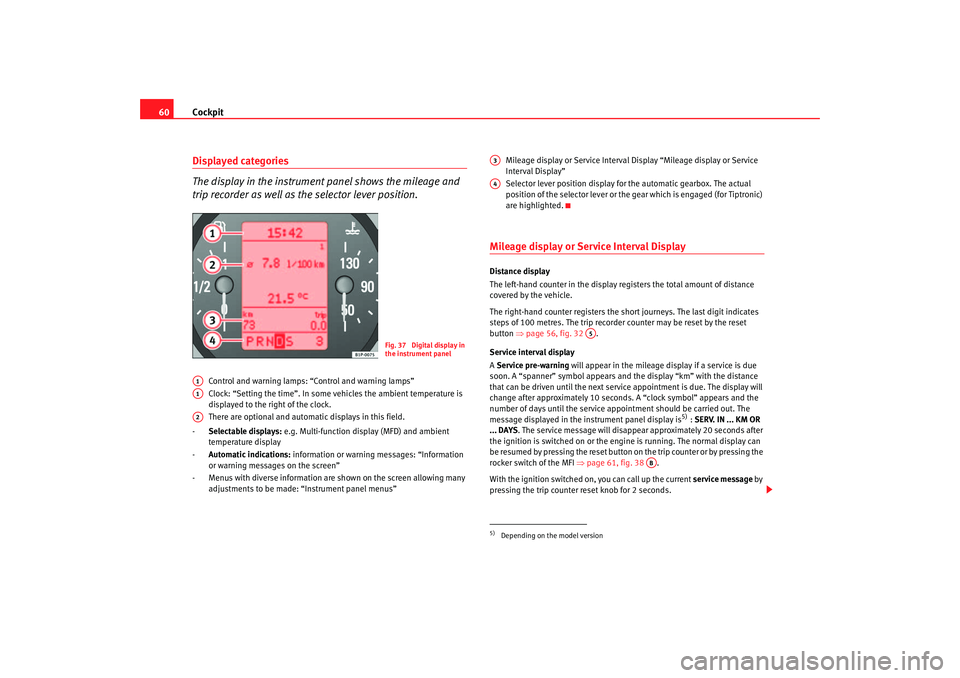
The display in the instrument panel shows the mileage and
trip recorder as well as the selector lever position.
Control and warning lamps: “Control and warning lamps”
Clock: “Setting the time”. In some vehicles the ambient temperature is
displayed to the right of the clock.
There are optional and automatic displays in this field.
- Selectable displays: e.g. Multi-function display (MFD) and ambient
temperature display
- Automatic indications: information or warning messages: “Information
or warning messages on the screen”
- Menus with diverse information are shown on the screen allowing many adjustments to be made: “Instrument panel menus” Mileage display or Service Interval Display “Mileage display or Service
Interval Display”
Selector lever position display for the automatic gearbox. The actual
position of the selector lever or the gear which is engaged (for Tiptronic)
are highlighted.
Mileage display or Service Interval DisplayDistance display
The left-hand counter in the display registers the total amount of distance
covered by the vehicle.
The right-hand counter regi
sters the short journeys. The last digit indicates
steps of 100 metres. The trip recorder counter may be reset by the reset
button ⇒page 56, fig. 32 .
Service interval display
A Service pre-warning will appear in the mileage display if a service is due
soon. A “spanner” symbol appears and the display “km” with the distance
that can be driven until the next service appointment is due. The display will
change after approximately 10 seconds. A “clock symbol” appears and the
number of days until the service appointment should be carried out. The
message displayed in the instrument panel display is
5) : SERV. IN ... KM OR
... DAYS . The service message will disappear approximately 20 seconds after
the ignition is switched on or the en gine is running. The normal display can
be resumed by pressing the reset button on the trip counter or by pressing the
rocker switch of the MFI ⇒page 61, fig. 38 .
With the ignition switched on, you can call up the current service message by
pressing the trip counter reset knob for 2 seconds.
Fig. 37 Digital display in
the instrument panel
A1A1A2
5)Depending on the model versionA3A4
A5
AB
leon_ingles Seite 60 Donner stag, 24. August 2006 1:56 13
Page 65 of 292
Cockpit63
Safety First
Operating instructions
Tips and Maintenance
Te c h n i c a l D a t a
Set speed indicator
When driving at the required speed, enter the speed indicator mode and
press the button (Reset), the display remembers the indicated speed. If
the indicated speed is exceeded, a warning text is displayed on the screen
6)
and a warning signal sounds.
This may be deactivated by pressing the button (Reset).
The speed may be altered using the rocker switch in steps of 5 km/h
within 5 seconds of the initial memory value.
Ø mph - Average speed
The average speed will be shown after a distance of approximately 100
metres has been travelled. Dashes will appear in the display until that time.
The display will be updated every 5 seconds whilst the vehicle is in motion.
Miles - Distance travelled
The display shows the distance travelled since the ignition was switched on.
The maximum display value in both memories is 9999 miles. The memory will
automatically be deleted once this value has been reached.
Miles - Fuel range
The fuel range is calculated using the fi gures for tank content and current fuel
consumption. It shows how far the vehicle can travel using the same condi-
tions as a reference.
Ø litre/100km - Average fuel consumption
The average fuel consumption will be shown ⇒page 62, fig. 41 after a
distance of approximately 100 metres has been travelled. Dashes will appear
in the display until that time. The display will be updated every 5 seconds
whilst the vehicle is in motion. The am ount of fuel used will not be shown. litres/100km or litres/hr - Current fuel consumption
The display will show the current fuel consumption in litre/km whilst the
vehicle is in motion or in litre/hour when
the vehicle is in a stationary position
with the engine running.
Using this display you can see how your driving style affects fuel consump-
tion ⇒page 180.
Ambient temperature display
The measurement margin extends from -45°C to +58°C. At temperatures
lower than +4°C, an “ice crystal symbol” is displayed and a “warning” sounds
if the vehicle is moving at more than 20 km/h (ice warning). This symbol will
flash for about 10 seconds and remains lit until the exterior temperature rises
above +4°C or 6°C if it was already lit.
WARNING
There could be black ice on the road surface even if the “snowflake symbol”
is not shown. You should, for this reason, not rely exclusively on this
display - Risk of accident!
Note
When the vehicle is stationary or travelling at very low speeds, the tempera-
ture displayed may be slightly higher than the actual ambient temperature as
a result of the heat radiated from the engine.Warning or information text in the display
Faults are shown in the display with warning lamps and
warning/information reports.The system runs a check on certain components and functions when the igni-
tion is switched on and while the vehicle is moving. Functional faults are indi-
6)Depending on the model version, the message on the screen may vary and may be
represented by flashing of the speed indication or by a speed message.
AA
AAAB
leon_ingles Seite 63 Donner stag, 24. August 2006 1:56 13
Page 66 of 292
Cockpit
64cated by symbols with warnings and information texts in the display. An
audible warning is given in certain cases.
Warning symbols
There are red warning symbols (priority 1) and yellow warning symbols
(priority 2)
Information text
In addition to warning me ssages given on a fault, you will receive information
in the display on procedures or will be asked to carry out certain tasks.
Note
In the case of screens without warning or information texts, faults are indi-
cated exclusively by the warning lamps.Warning reports, Priority 1 (red)If one of these faults occurs, the warning lamp will flash or light up and will
be accompanied by three audible warnings . This is a danger warning. Stop
the car and switch off the engine. Check the fault and correct it. Obtain profes-
sional assistance if necessary.
If several priority 1 faults are detected at the same time, the symbols will be
displayed one after the other for about 2 seconds at a time and will continue
until the fault is corrected.
No menus will be shown in the display fo r the duration of a priority 1 warning
report. Examples of priority 1 warning reports (red)
7)
•
Brake system symbol
with warning text
STOP BRAKE FLUID
INSTRUCTION MANUAL or STOP BRAKE FAULT INSTRUCTION MANUAL
•
Coolant symbol
with the warning text STOP CHECK COOLANT
INSTRUCTION MANUAL
•
Engine oil pressure symbol
with the warning text STOP ENGINE OIL
PRESSURE LOW! SERVICE MANUAL
Warning reports, Priority 2 (yellow)If one of these faults occurs, the warning lamp lights up, and is accompanied
by one audible warning . The function should be checked as soon as possible.
If several priority 2 warning reports are detected at the same time, the
symbols are displayed one after the other for about 2 seconds at a time. After
a set time, the information text will disappear and the symbol will be shown
as a reminder at the side of the display.
Priority 2 warning reports will not be shown until all Priority 1 warning
reports have been dealt with!
Examples of priority 2 warning reports (yellow):•
Fuel symbol with the information text PLEASE REFUEL
•
Windscreen washer fluid symbol
with the information text REFILL
WINDSCREEN WASHER FLUID . Refill the windscreen washer tank ⇒page 208
•
Electronic immobiliser symbol
with the information text SAFE. A valid
key was not used, for this reason the vehicle may not start
7)Depending on the model version
leon_ingles Seite 64 Donner stag, 24. August 2006 1:56 13
Page 73 of 292

Cockpit71
Safety First
Operating instructions
Tips and Maintenance
Te c h n i c a l D a t a
Note
For electronic and vehicle equipment on e or more of these menus will be
displayed.Lights and visibility menu
From this menu it is possible to alter the vehicle lighting settings.Open Lights and visibility Menu
– Choose the option Configuration from main menu: “Main menu”
and press the button on the windscreen wiper lever. – Select the option
Lights & visibility from the menu and press
button on the windscreen wiper lever.
Example of menu use: “Example of menu use”
Note
For electronic and vehicle equipment on e or more of these menus will be
displayed.
AA
AA
Lights & visibility Function
Coming Home/
Leaving Home The lighting dura
tion may be modified, in steps of 10 seconds, from a minimum of 10 seconds to a maxi-
mum of 90 seconds
The function may also be deactivated.
Indicator conf. With the convenience mode activated, the indicator will blink at least three times when turned on.
Manufacturer's settings The manufacturer's predefined values for the functions of this menu are restored.
Back This returns to the Configuration menu
leon_ingles Seite 71 Donner stag, 24. August 2006 1:56 13
Page 77 of 292
Cockpit75
Safety First
Operating instructions
Tips and Maintenance
Te c h n i c a l D a t a
•
The engine compartment of any motor vehicle is a dangerous area!
Before you open the bonnet to work on the engine or in the engine compart-
ment, you must switch off the engine and allow it to cool to reduce the risk
of scalding or other injuries. Read and observe the relevant warnings
⇒ page 198.Note
•
The appropriate warning lamp for a fault will light up in vehicles without
warning or information texts in the display.
•
In vehicles with warning or information texts in the display, the appro-
priate warning lamp for a fault will ligh t up and a warning or information text
will also appear in the display.
Fuel level / reserve
This symbol lights up to indicate that the fuel tank is down to
the reserve level.This lights when only 7 litres of fuel remain in the tank. Also, an audible
warning is given. This serves as a reminder to fill up with fuel at the earliest
opportunity ⇒page 195.
The message displayed in the instrument panel display is
8): PLEASE
REFUEL .
Coolant Level* / temperature
The warning lamp lights up if the coolant temperature is too
high or if the coolant level is too low.There is a fault if:•
The warning symbol does not go out again after a few seconds.
•
The warning lamp lights up or flashes while the vehicle is moving, while
three acoustic warning signals ⇒ are emitted.
This means that either the coolant level is too low or the coolant temperature
is too high.
Coolant temperature too high
The following text is displayed in the instrument panel display
9): CHECK
COOLANT! INSTRUCTIONS MANUAL .
First look at the coolant temperature gauge. The coolant temperature is too
high if the needle is over the warning area on the dial. Stop the vehicle,
switch off the engine and wait for it to cool down. Check the coolant level.
If the coolant level is correct, the over heating may be caused by a malfunction
of the radiator fan. Check the radiator fan fuse and have it replaced if neces-
sary ⇒page 232.
If the warning lamp lights up again after driving on for a short distance, stop
the vehicle and switch off the engine . Contact an Authorised Service Centre
or a qualified workshop.
Coolant level too low
The following text is displayed in the instrument panel display10): CHECK
COOLANT! INSTRUCTION MANUAL ⇒ page 205.
8)Depending on the model version.WARNING (continued)
9)Depending on the model version.10)Depending on the model version.
leon_ingles Seite 75 Donner stag, 24. August 2006 1:56 13
Page 80 of 292
Cockpit
78Engine oil pressure
This warning lamp indicates that the engine oil pressure is
too low.If this warning symbol starts to flash, and is accompanied by three audible
warnings, switch off the engine and check the oil level. If the oil level is too
low, add more engine oil ⇒page 201.
The following text is displayed in the instrument panel display
14): STOP
ENGINE OIL PRESSURE INSTRUCTIONS MANUAL .
If the symbol flashes although the oil level is correct, do not drive on. The
engine must not even run at idle speed. Obtain technical assistance.
Anti-lock brake system (ABS)
A warning lamp system monitors the ABS.
The warning lamp
should light up for a few seconds when the ignition is
switched on. It goes out again after the system has run through an automatic
test sequence.
There is a fault in the ABS if:
•
The warning lamp
does not light up when the ignition is switched on.
•
The warning lamp does not go out again after a few seconds.
•
The warning lamp lights up when the vehicle is moving.
The vehicle can still be braked in the normal way (except that the ABS control
function will not function). Please take the vehicle to a qualified workshop as
soon as possible. For further information on the ABS see the ⇒page 169.
If a fault occurs in the ABS, the ESP* warning lamp will also light up. Brake system fault
If the ABS warning lamp
lights up together with the brake warning lamp
, this indicates not only a fault in the ABS function, but also a possible fault
in the brake system ⇒.
WARNING
•
Before opening the bonnet, read and observe the warnings on
⇒ page 198.
•
If the brake warning lamp
should light up together with the ABS
warning lamp
, stop the vehicle immediately and check the brake fluid
level in the reservoir ⇒page 211, “Brake fluid”. If the fluid level has
dropped below the “MIN” mark you must not drive on. Risk of accident.
Obtain technical assistance.
•
If the brake fluid level is correct, the fault in the brake system may have
been caused by a failure of the ABS system. This could cause the rear
wheels to lock quickly when you brake. This could cause the rear to break
away. Risk of skidding. Drive carefully to the nearest qualified workshop
and have the fault corrected.
Differential lock fault (EDL)*
EDL operates along with the ABS in vehicles equipped with an
Electronic Stabilisation Program (ESP)*A malfunction in the EDL is indicated by the ABS warning lamp
. Please
take the vehicle to a qualified workshop as soon as possible. For further infor-
mation on the EDL ⇒page 172.
14)Depending on the model version.
leon_ingles Seite 78 Donner stag, 24. August 2006 1:56 13
Page 83 of 292
Cockpit81
Safety First
Operating instructions
Tips and Maintenance
Te c h n i c a l D a t a
Engine management
This warning lamp monitors th e engine management system
for petrol engines.
The warning lamp
(Electronic Power Control) lights up when the ignition
is switched on to show that the lamp is working properly. It should go out
when the engine has started running.
If a fault develops in the electronic engine management system while you are
driving, this warning lamp will light up. Take the vehicle to an Authorised
Service Centre as soon as possible and have the engine checked.
Glow plug system / Engine fault
The warning lamp lights up to show that the glow plugs are
preheating. It flashes if there is an engine fault.
Warning lamp
is lit
The warning lamp lights up while the glow plugs are preheating. When the
warning lamp goes off, the engine should be started straight away.
Warning lamp
flashes
If a fault develops in the engine management system while you are driving,
the glow plug lamp will flash
. Take the vehicle to an Authorised Service
Centre as soon as possible and have the engine checked.
Emission control system*
This warning lamp monitors the exhaust system.
Warning lamp
flashes:
when there is misfiring that can damage the catalytic converter. Reduce
speed and drive carefully to the nearest qualified workshop to have the
engine checked.
The following text is displayed in the instrument panel display
15) : EXHAUST
FUMES GO TO WORKSHOP!
Warning lamp
is lit:
if a fault has developed during driving which has reduced the quality of the
exhaust gas (e. g. lambda probe fault). Reduce speed and drive carefully to
the nearest qualified workshop to have the engine checked.
The following text is displayed in the instrument panel display: EXHAUST
FUMES GO TO WORKSHOP! .
Electronic stabilisation programme (ESP)*
This warning lamp monitors the electronic stabilisation
program.
This program includes the ABS, EDL and TCS.
The warning lamp
has the following functions:
•
It will light for about 2 seconds when the ignition is switched on while a
test of the function is carried out.
•
It flashes when the ESP is activated when driving.
•
It will light up continuously if there is a malfunction in the ESP.
15)Depending on the model version.
leon_ingles Seite 81 Donner stag, 24. August 2006 1:56 13