buttons Seat Leon 5D 2010 MEDIA SYSTEM 2.2
[x] Cancel search | Manufacturer: SEAT, Model Year: 2010, Model line: Leon 5D, Model: Seat Leon 5D 2010Pages: 99, PDF Size: 3.66 MB
Page 10 of 99
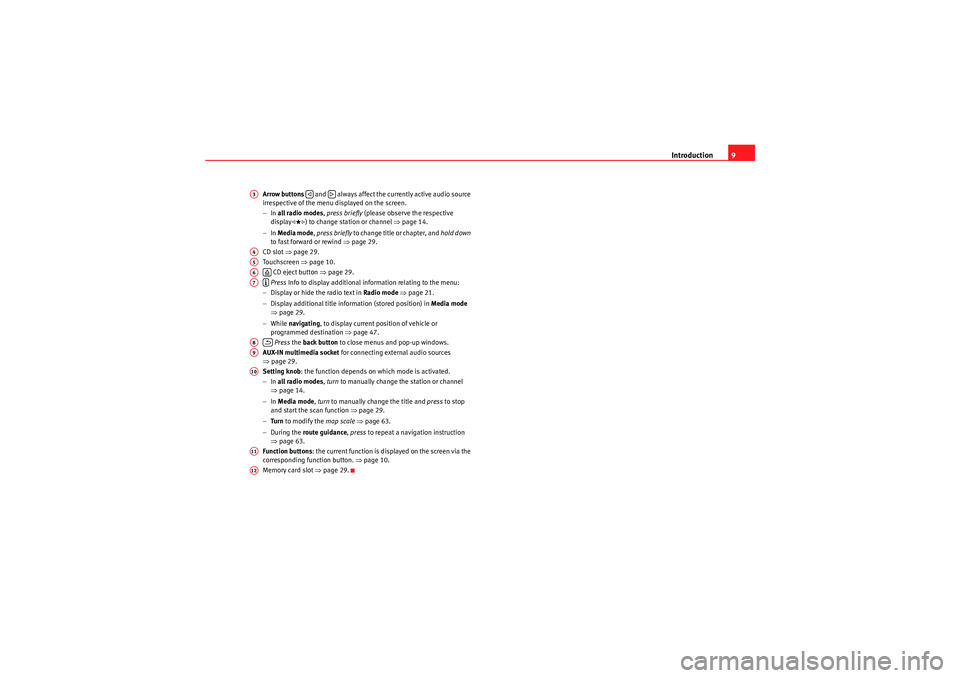
Introduction9
Arrow buttons and always affect the currently active audio source
irrespective of the menu displayed on the screen.
− In all radio modes , press briefly (please observe the respective
display
�
) to change station or channel ⇒page 14.
− In Media mode , press briefly to change title or chapter, and hold down
to fast forward or rewind ⇒page 29.
CD slot ⇒page 29.
Touch scre en ⇒page 10.
CD eject button ⇒page 29.
Press Info to display additional information relating to the menu:
− Display or hide the radio text in Radio mode ⇒ page 21.
− Display additional title information (stored position) in Media mode
⇒ page 29.
− While navigating , to display current position of vehicle or
programmed destination ⇒page 47.
Press the back button to close menus and pop-up windows.
AUX-IN multimedia socket for connecting external audio sources
⇒ page 29.
Setting knob : the function depends on which mode is activated.
− In all radio modes , turn to manually change the station or channel
⇒ page 14.
− In Media mode , turn to manually change the title and press to stop
and start the scan function ⇒page 29.
− Tu r n to modify the map scale ⇒ page 63.
− During the route guidance , press to repeat a navigation instruction
⇒ page 63.
Function buttons : the current function is displayed on the screen via the
corresponding function button. ⇒page 10.
Memory card slot ⇒page 29.
A3
�ƒ
�„
A4A5A6
�š
A7
�º
A8
�E
A9A10A11A12
MediaSystem2.1_EN.book Seite 9 Donnerstag, 29. April 2010 4:18 16
Page 11 of 99
Introduction
10General operating informationIntroductionDue to changes to its settings, some aspects of the unit's operation may
differ from the descriptions given in this manual. For this reason, SEAT recom-
mends that you reset the unit to its factory settings the first time you use it
⇒ page 87.
Additional Information:•Safety notes
�’ ⇒ page 6
•Unit overview ⇒page 8•Multifunction steering wheel, to change track or station ⇒Booklet
“Owner's Manual”, Section “Vehicle overview” Note
Lightly pressing the buttons or briefly pressing the touchscreen is sufficient
to operate the unit.
Note
Never press a button down for longer than 10 minutes. Otherwise the system
will interpret this as a malfunction ( button jammed).
Note
Due to country-specific legislation, certain functions cannot be selected on
the screen when the vehicle is travelling above a certain speed.
Note
Using a mobile telephone in the vehicle may cause noise from the vehicle
speakers.
Note
In some vehicles equipped with a parking distance warning system, the
volume of the current audio source is automatically lowered when reverse
gear is engaged.
Note
Restrictions on the use of devices using Bluetooth technology may be appli-
cable in some countries. Please ask your local authority for further
information.Switching on and offPress the rotary/push knob
�D ⇒ page 8, fig. 1 briefly to manually switch
the unit on or off.
When the system is switched on, the sound source which was playing when
the unit was switched off will come on.
When the engine is off, the unit will automatically switch off after 30 minutes
(timeout).
Anti-theft code
The anti-theft code is stored in the vehicle once it has been entered (conven-
ience radio code). The anti-theft coding lock then only needs to be released
manually if the unit is installed in another vehicle. In such a case, a keypad
field and a prompt to enter the code will appear when the unit is switched on.
In this case, you should contact a SEAT dealer.
If the vehicle battery has been disconnected, switch on the ignition before re-
connecting the unit.
A1
MediaSystem2.1_EN.book Seite 10 Donnerstag, 29. April 2010 4:18 16
Page 13 of 99
Introduction
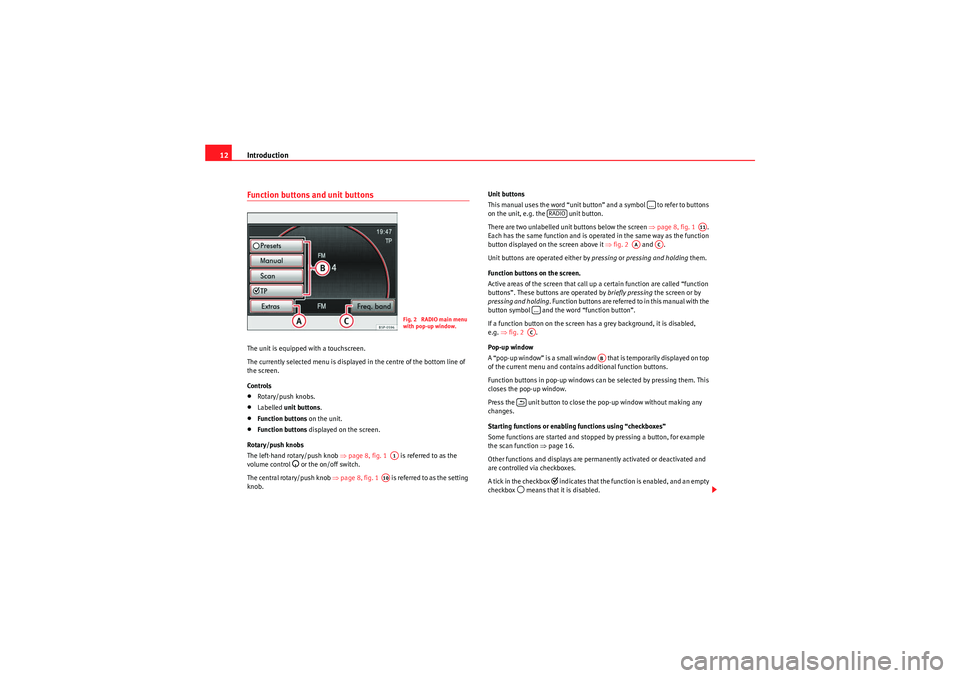
12Function buttons and unit buttonsThe unit is equipped with a touchscreen.
The currently selected menu is displayed in the centre of the bottom line of
the screen.
Controls•Rotary/push knobs.•Labelled unit buttons .•Function buttons on the unit.•Function buttons displayed on the screen.
Rotary/push knobs
The left-hand rotary/push knob ⇒page 8, fig. 1 is referred to as the
volume control
�D or the on/off switch.
The central rotary/push knob ⇒page 8, fig. 1 is referred to as the setting
knob. Unit buttons
This manual uses the word “unit button” and a symbol to refer to buttons
on the unit, e.g. the unit button.
There are two unlabelled unit buttons below the screen
⇒page 8, fig. 1 .
Each has the same function and is operated in the same way as the function
button displayed on the screen above it ⇒fig. 2 and .
Unit buttons are operated either by pressing or pressing and holding them.
Function buttons on the screen.
Active areas of the screen that call up a certain function are called “function
buttons”. These buttons are operated by briefly pressing the screen or by
pressing and holding . Function buttons are referred to in this manual with the
button symbol and the word “function button”.
If a function button on the screen has a grey background, it is disabled,
e.g. ⇒fig. 2 .
Pop-up window
A “pop-up window” is a small window that is temporarily displayed on top
of the current menu and contains additional function buttons.
Function buttons in pop-up windows can be selected by pressing them. This
closes the pop-up window.
Press the unit button to close the pop-up window without making any
changes.
Starting functions or enabling functions using “checkboxes”
Some functions are started and stopped by pressing a button, for example
the scan function ⇒ page 16.
Other functions and displays are permanently activated or deactivated and
are controlled via checkboxes.
A tick in the checkbox
�’ indicates that the function is enabled, and an empty
checkbox
�‰ means that it is disabled.
Fig. 2 RADIO main menu
with pop-up window.
A1
A10
...
RADIO
A11
AA
AC
...AC
AB
�E
MediaSystem2.1_EN.book Seite 12 Donnerstag, 29. April 2010 4:18 16
Page 14 of 99
Introduction13
Any functions enabled by checkbox can only be disabled by opening the pop-
up window again and pressing the respective checkbox.
Selecting function buttons with the setting knob
With the exception of the two function buttons ⇒page 12, fig. 2 and
at the bottom, function buttons displayed on the screen can also be marked
by turning the setting knob ⇒page 8, fig. 1 . Pressing the setting knob
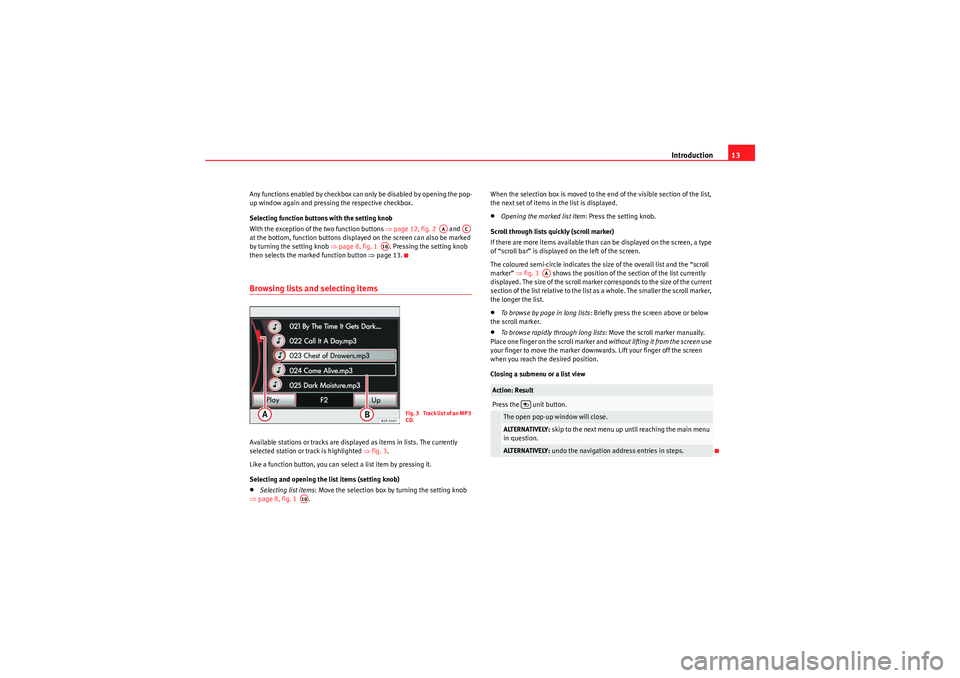
then selects the marked function button ⇒page 13.Browsing lists and selecting itemsAvailable stations or tracks are displayed as items in lists. The currently
selected station or track is highlighted ⇒fig. 3 .
Like a function button, you can select a list item by pressing it.
Selecting and opening the list items (setting knob)•Selecting list items : Move the selection box by turning the setting knob
⇒ page 8, fig. 1 . When the selection box is moved to the end of the visible section of the list,
the next set of items in the list is displayed.
•Opening the marked list item
: Press the setting knob.
Scroll through lists quickly (scroll marker)
If there are more items available than can be displayed on the screen, a type
of “scroll bar” is displayed on the left of the screen.
The coloured semi-circle indicates the size of the overall list and the “scroll
marker” ⇒fig. 3 shows the position of the section of the list currently
displayed. The size of the scroll marker corresponds to the size of the current
section of the list relative to the list as a whole. The smaller the scroll marker,
the longer the list.•To browse by page in long lists : Briefly press the screen above or below
the scroll marker.•To browse rapidly through long lists : Move the scroll marker manually.
Place one finger on the scroll marker and without lifting it from the screen use
your finger to move the marker downwards. Lift your finger off the screen
when you reach the desired position.
Closing a submenu or a list view
AA
AC
A10
Fig. 3 Track list of an MP3
CD.
A10
Action: ResultPress the unit button.The open pop-up window will close.ALTERNATIVELY: skip to the next menu up until reaching the main menu
in question.ALTERNATIVELY: undo the navigation address entries in steps.
AA
MediaSystem2.1_EN.book Seite 13 Donnerstag, 29. April 2010 4:18 16
Page 15 of 99
Audio mode
14Audio modeRadio modeIntroductionAdditional Information:•Safety notes
�’ ⇒ page 6
•Unit overview ⇒page 8Note
Car parks, tunnels, tall buildings or mountains may affect the radio signal.
Note
Foil or metal-coated stickers attached to the windows may affect reception on
vehicles with a window aerial.
Opening the RADIO main menu
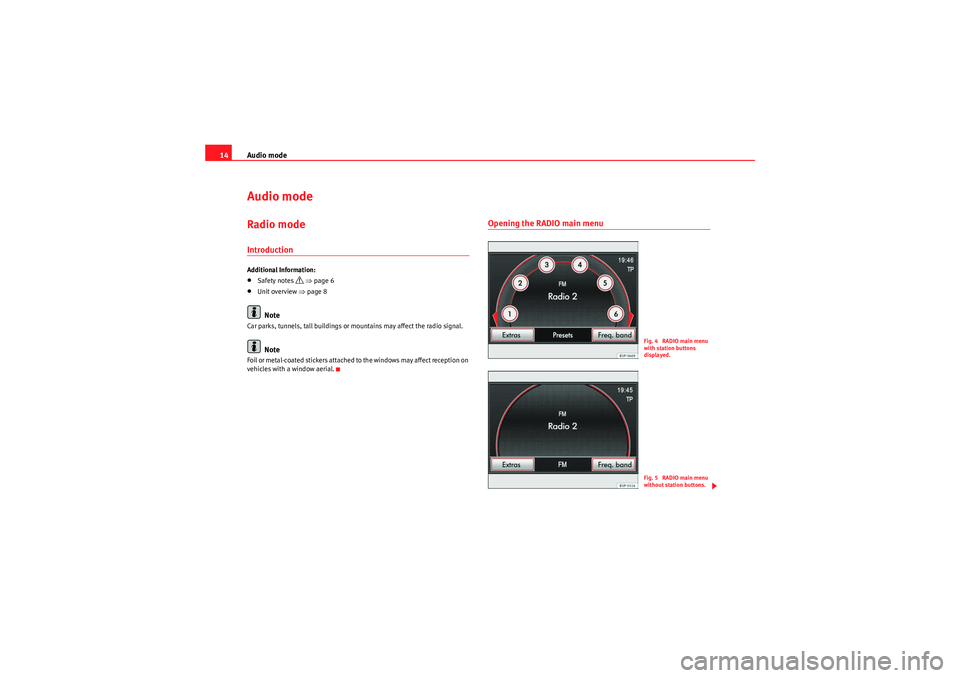
Fig. 4 RADIO main menu
with station buttons
displayed.Fig. 5 RADIO main menu
without station buttons.
MediaSystem2.1_EN.book Seite 14 Donnerstag, 29. April 2010 4:18 16
Page 16 of 99
Audio mode15
•Press the unit button.
The station you are currently listening to is shown in the middle of the screen.
The “station buttons” in the main RADIO menu ⇒page 14, fig. 4 can be
displayed or hidden ⇒page 18.
Displaying station name (RDS)
If RDS is available and reception is good enough, the station name is
displayed (in page 14, fig. 5 : Radio 2 ).
The RDS (Radio Data System) is not compatible with all units and is not avail-
able everywhere or on all radio stations.
In addition, the RDS permits automatic tracking of stations, radio texts or
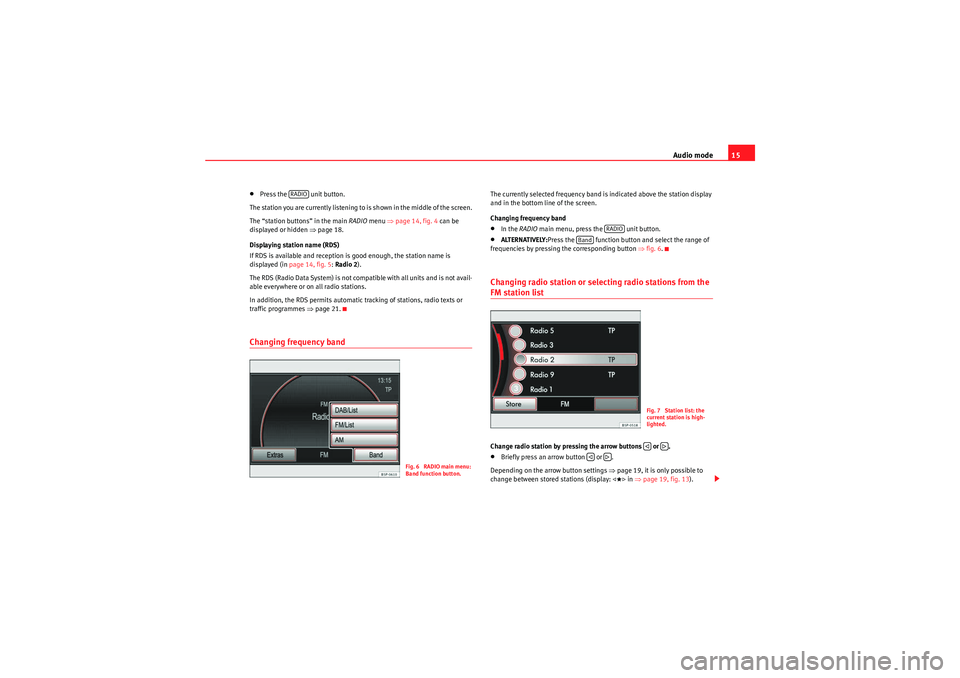
traffic programmes ⇒page 21.Changing frequency band
The currently selected frequency band is indicated above the station display
and in the bottom line of the screen.
Changing frequency band•In the RADIO main menu, press the unit button.•ALTERNATIVELY: Press the function button and select the range of
frequencies by pressing the corresponding button ⇒fig. 6.Changing radio station or selecting radio stations from the FM station listChange radio station by pressing the arrow buttons or .•Briefly press an arrow button or .
Depending on the arrow button settings ⇒page 19, it is only possible to
change between stored stations (display:
�
in ⇒page 19, fig. 13 ).
RADIO
Fig. 6 RADIO main menu:
Band function button.
RADIO
Band
Fig. 7 Station list: the
current station is high-
lighted.�ƒ
�„
�ƒ
�„
MediaSystem2.1_EN.book Seite 15 Donnerstag, 29. April 2010 4:18 16
Page 17 of 99
Audio mode
16If the TP function is on (display: TP), it is only possible to change to stations
that accept this function ⇒page 21.
Opening the FM station list
The FM station list shows all the FM stations with good reception. You can
select a specific station from the FM station list.•Switch to the FM frequency band ⇒page 15.•Press the function button and press the function button in
the pop-up window ⇒page 15, fig. 6 .•Alternatively:if the display station buttons off is ⇒ page 18, by turning
the setting knob ⇒page 8, fig. 1 it is possible to change directly to the
station list.
The FM station list view closes after one minute of inactivity. The FM station
list is updated automatically.
No station list is available for the AM frequency band.
Selecting stations from the FM station list and saving them•Open the FM station list.•Mark a station by turning the setting knob and press the setting knob to
select the marked station ⇒page 10.•Alternatively: Drag the scroll marker to browse the list and select the
desired station by pressing it on the screen ⇒page 10.•After selecting a station button, press the function button
⇒ page 15, fig. 7 to store the marked station ⇒ page 18.•To close the FM station list press the unit button.
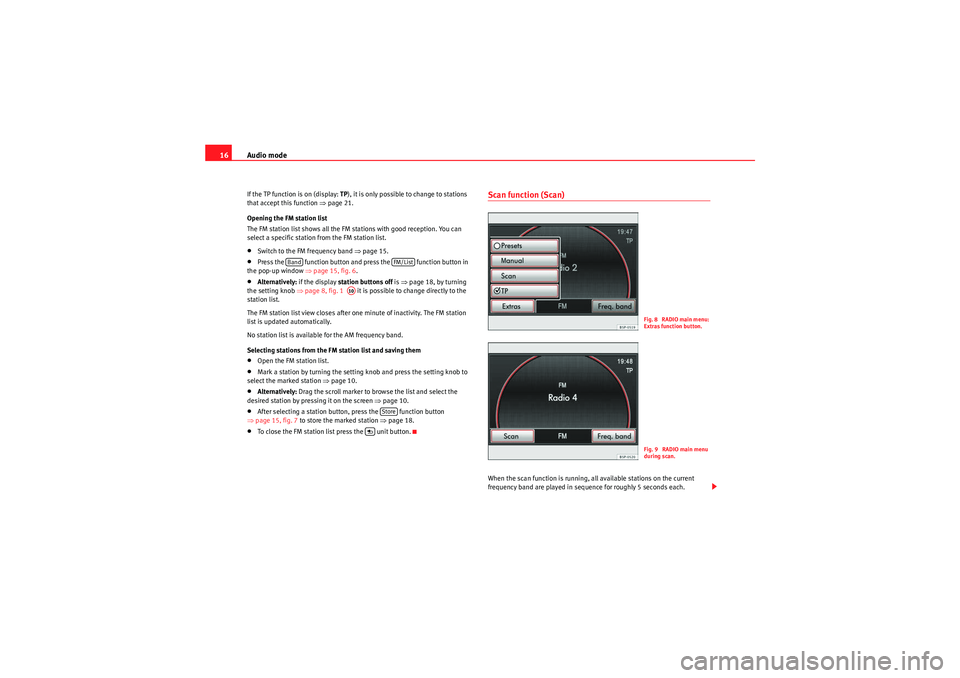
Scan function (Scan)When the scan function is running, all available stations on the current
frequency band are played in sequence for roughly 5 seconds each.
Band
FM/List
A10
Store
Fig. 8 RADIO main menu:
Extras function button.Fig. 9 RADIO main menu
during scan.
MediaSystem2.1_EN.book Seite 16 Donnerstag, 29. April 2010 4:18 16
Page 18 of 99
Audio mode17
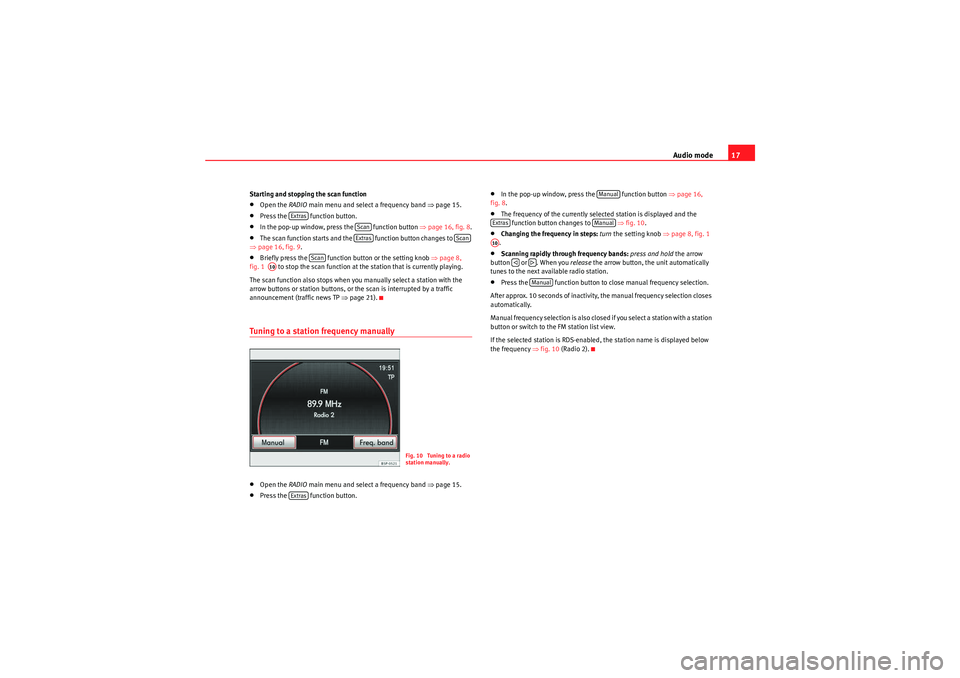
Starting and stopping the scan function•Open the RADIO main menu and select a frequency band ⇒ page 15.•Press the function button.•In the pop-up window, press the function button ⇒page 16, fig. 8 .•The scan function starts and the function button changes to
⇒ page 16, fig. 9.•Briefly press the function button or the setting knob ⇒page 8,
fig. 1 to stop the scan function at the station that is currently playing.
The scan function also stops when you manually select a station with the
arrow buttons or station buttons, or the scan is interrupted by a traffic
announcement (traffic news TP ⇒page 21).Tuning to a station frequency manually•Open the RADIO main menu and select a frequency band ⇒ page 15.•Press the function button.
•In the pop-up window, press the function button ⇒ page 16,
fig. 8 .•The frequency of the currently selected station is displayed and the
function button changes to ⇒fig. 10 .•Changing the frequency in steps: turn the setting knob ⇒page 8, fig. 1
.•Scanning rapidly through frequency bands: press and hold the arrow
button or . When you release the arrow button, the unit automatically
tunes to the next available radio station.•Press the function button to close manual frequency selection.
After approx. 10 seconds of inactivity, the manual frequency selection closes
automatically.
Manual frequency selection is also closed if you select a station with a station
button or switch to the FM station list view.
If the selected station is RDS-enabled, the station name is displayed below
the frequency ⇒ fig. 10(Radio 2).
Extras
ScanExtras
Scan
Scan
A10
Fig. 10 Tuning to a radio
station manually.
Extras
Manual
Extras
Manual
A10
�ƒ
�„Manual
MediaSystem2.1_EN.book Seite 17 Donnerstag, 29. April 2010 4:18 16
Page 19 of 99

Audio mode
18Hiding and displaying station buttons and storing stationsIn the main RADIO menu, the radio stations can be saved in numbered func-
tion buttons ⇒ fig. 12. These function buttons are called “station buttons”.
Station buttons can be hidden or displayed. Displaying and hiding the station buttons
•In the
RADIO main menu, press the function button ⇒fig. 11 .•To hide or display the station buttons, clear or tick the checkbox in the
function button by briefly pressing it.•When the checkbox is ticked
�’, six station buttons are displayed in the
RADIO main menu ⇒fig. 12 .
•Turn the setting knob ⇒page 8, fig. 1 to select a station button. If you
are selecting the first or last station button, when the setting knob is turned
either way, the next six station buttons are displayed.
If, even though the check box has been ticked, the station buttons are not
displayed, the “radio text” option may be activated ⇒page 21.
Saving stations in station button
If a station is saved to a station button, any station previously saved to the
button will be overwritten.•Display the station buttons and select a station.•Press and hold the desired station button until you hear a tone.•The currently selected station is saved to the station button ⇒page 19,
fig. 13.•ALTERNATIVELY: Select the station button by turning the setting knob and
press and hold the setting knob until you hear a tone.
The stations can also be saved with only the settings knob.•Press and hold the settings knob until the next free station button for the
currently selected station is automatically displayed.•Turn the setting knob to select another station button.•Briefly press the setting button to save the station.
The stations can also be selected by displaying the station list ⇒page 16.
If a station name has been sent by the RDS and saved incorrectly, it is
possible to change its name ⇒page 21.
Fig. 11 RADIO main
menu: Extras function
button.F i g . 1 2 R A D I O m a i n m e n u
with station buttons
displayed.
Extras
Presets
A10
MediaSystem2.1_EN.book Seite 18 Donnerstag, 29. April 2010 4:18 16
Page 20 of 99
Audio mode19
You can delete the stations stored to the station buttons individually or all
together ⇒page 19.
Note
If you do not usually use the station buttons to select stations, SEAT recom-
mends that you hide the station buttons. You can then go straight to the
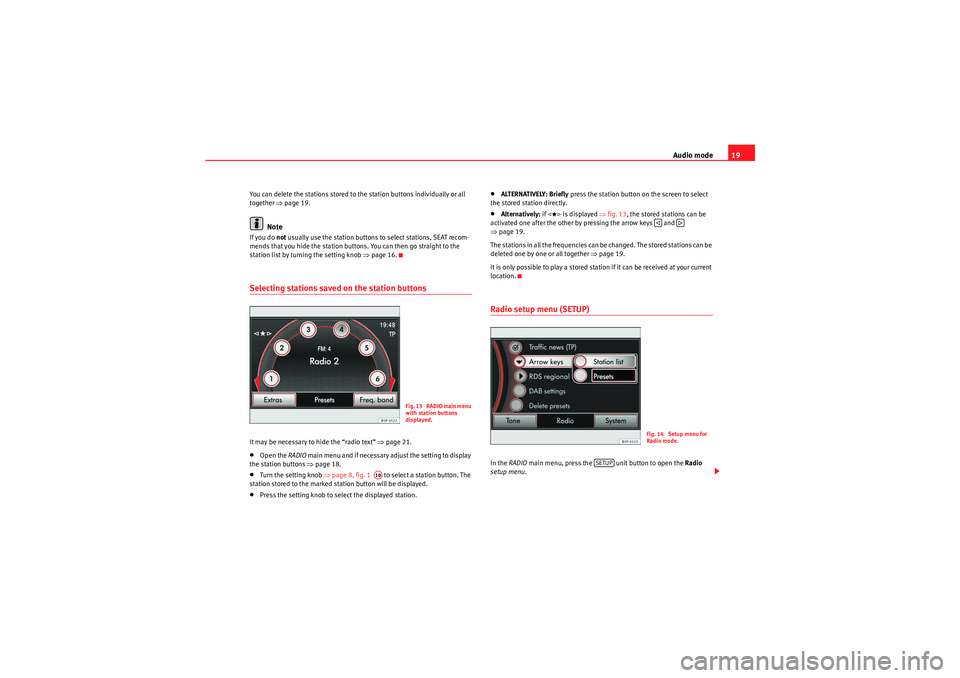
station list by turning the setting knob ⇒page 16.Selecting stations saved on the station buttonsIt may be necessary to hide the “radio text” ⇒ page 21.•Open the RADIO main menu and if necessary adjust the setting to display
the station buttons ⇒ page 18.•Turn the setting knob ⇒page 8, fig. 1 to select a station button. The
station stored to the marked station button will be displayed.•Press the setting knob to select the displayed station.
•ALTERNATIVELY: Briefly press the station button on the screen to select
the stored station directly.•Alternatively: if
�
is displayed ⇒fig. 13 , the stored stations can be
activated one after the other by pressing the arrow keys and
⇒ page 19.
The stations in all the frequencies can be changed. The stored stations can be
deleted one by one or all together ⇒page 19.
It is only possible to play a stored station if it can be received at your current
location.
Radio setup menu (SETUP)In the RADIO main menu, press the unit button to open the Radio
setup menu .
F i g . 1 3 R A D I O m a i n m e n u
with station buttons
displayed.
A10
�ƒ
�„
Fig. 14 Setup menu for
Radio mode.
SETUP
MediaSystem2.1_EN.book Seite 19 Donnerstag, 29. April 2010 4:18 16