display Seat Leon 5D 2011 Owner's Guide
[x] Cancel search | Manufacturer: SEAT, Model Year: 2011, Model line: Leon 5D, Model: Seat Leon 5D 2011Pages: 302, PDF Size: 4.17 MB
Page 76 of 302
74Cockpit
Vehicle status menu
This menu shows warning or information texts
Open Vehicle Condition menu
– Select the option Vehicle status from the main menu: “Main
menu” and press button OK
on the windscreen wiper lever
A⇒ fig. 45. or
– Press button
or on the multifunction steering wheel*
⇒ fig. 44 until the Vehicle Status menu is displayed.
Priority 2 warning messages and information texts: “Information and warn-
ing messages on the screen” will automatically disappear from the screen
after a time and will be stored in the Vehicle status menu.
The warning and information texts may be viewed in this menu. If there is
no warning or information message, the option Vehicle status is not dis-
played. If there are several messages, each one is shown for a few seconds.
Example of menu use ⇒ page 68
Note
If there are no warning messages, this menu is not available. Configuration menu
This menu is used to make the settings for the vehicle func-
tions.
Open Configuration menu
– Select the option Configuration from the main menu: “Main
menu” and press button OK
A ⇒ fig. 43 on the windscreen
wiper lever. or
– Press button
or on the multifunction steering wheel*
⇒ fig. 44 until the Configuration menu is displayed.
Example of menu use ⇒ page 68
Displayed on the screenFunctionMultifunction display
data.This menu is used to establish the data in the
multifunction display menu to be displayed on
the instrument panel ⇒ page 71
ConvenienceThis menu allows you to make the settings for
the convenience functions in the vehicle.
Lights and visibilityFrom this menu it is it possible to alter the vehi-
cle lighting settings.
TimeThe hours and minutes of the clock and the navi-
gation system can be changed. Choose between
12 and 24-hour format and change to summer
time.
Winter tyresThe menu allows the setting of a speed at which
an optical and acoustic warning will be given by
the system. You can use this function, for exam-
ple, if you have fitted winter tyres which are not
suited for the top speed of your vehicle. Please
see the section “Wheels and tyres”.
Page 77 of 302
75
Cockpit
Settings: LanguageThe display texts and the navigation system
texts can be seen in different languages.
UnitsThis option allows you to select the units for dis-
playing temperature, fuel consumption values
and distances.
sel. speedThe instrument panel also displays the speed in
another different unit of measurement (mph or
km/h) to that given on the speedometer.
Inter ServiceConsult service messages and reset service in-
terval display here.
Factory settingsThe manufacturer's predefined values for the
functions of this menu are restored.
Back a)This returns to the main menua)
Only if the windscreen wiper lever is used (MFI).
Note
● For electronic and vehicle equipment one or more of these menus will be
displayed.
● SEAT dealers are able to programme other functions or change the exist-
ing functions depending upon the vehicle equipment.
● The Configuration menu is only accessible when the vehicle is at a
standstill.
Convenience menu
From this menu it is it possible to alter the vehicle conven-
ience settings.
Open menu Convenience
– Choose the option Configuration from the main menu and press
the button OK
A ⇒ fig. 43 on the windscreen wiper lever. –
Press button
or on the multifunction steering wheel*
⇒ fig. 44 until the Configuration menu is displayed.
– Choose the option Convenience from the main menu and press
the button A
on the windscreen wiper lever.
Example of menu use ⇒ page 68
Displayed on the
screenFunction
Open doorOne door: Individual unlocking activated.
Auto. locking: the doors are automatically locked
when the vehicle is travelling at more than approx
15 km/h.
Auto unlock: the doors are unlocked when the key
is removed from the ignition.
Elec. window controlOpening and closing electric windows: this deter-
mines whether to open or close all the windows
when the vehicle is unlocked or locked. The open
function can also be activated for the driver door
only.
Exterior mirror adjust.If synchronised adjustment is selected, when the
driver side exterior mirror is adjusted, the passen-
ger exterior mirror is also moved.
Factory settingsThe manufacturer's predefined values for the func-
tions of this menu are restored.
BackThis returns to the Configuration menu
Note
For electronic and vehicle equipment one or more of these menus will be
displayed.
Safety FirstOperating InstructionsPractical TipsTechnical Specifications
Page 78 of 302
76Cockpit
Lights and visibility menu
From this menu it is it possible to alter the vehicle lighting
settings.
Open Lights and visibility Menu
– Select the option Configuration from the main menu: “Main
menu” and press button OK
A ⇒ page 68 on the windscreen
wiper lever. or
– Press button
or on the multifunction steering wheel*
⇒ fig. 44 until the Configuration menu is displayed.
– Select the option Lights & visibil. from the menu and press but-
ton A
on the windscreen wiper lever.
Example of menu use ⇒ page 68
Displayed on the
screenFunction
Coming Home/
Leaving HomeThis option permits the adjustment of the time
during which the headlights remain lit after the
vehicle is locked, and also permits the function to
be connected and disconnected
Indicator conf.The convenience turn signal function can be acti-
vated or deactivated here. With the convenience
mode activated, the turn signal will blink at least
three times when turned on.
Factory settingsThe manufacturer's predefined values for the func-
tions of this menu are restored.
BackThis returns to the Configuration menu
Note
For electronic and vehicle equipment one or more of these menus will be
displayed.
Page 81 of 302
79
Cockpit
WARNING
● Failure to observe warning lamps and warning messages can result in
serious personal injury or damage to your vehicle.
● The risk of an accident increases if your vehicle breaks down. Use a
warning triangle to draw the attention of other road users in order to pre-
vent danger to third parties.
● The engine compartment is a dangerous area! Before you open the
bonnet to work on the engine or in the engine compartment, you must
switch the engine off and allow it to cool to reduce the risk of scalding or
other injuries. Read and observe the relevant warnings ⇒ page 217.
Note
● The appropriate warning lamp for a fault will light up in vehicles without
warning or information messages in the display.
● In vehicles with warning or information texts on the screen, the appro-
priate warning lamp for a fault will light up and a warning or information
message will also appear on the screen. Overview of indicator and warning lamps (vehicles with
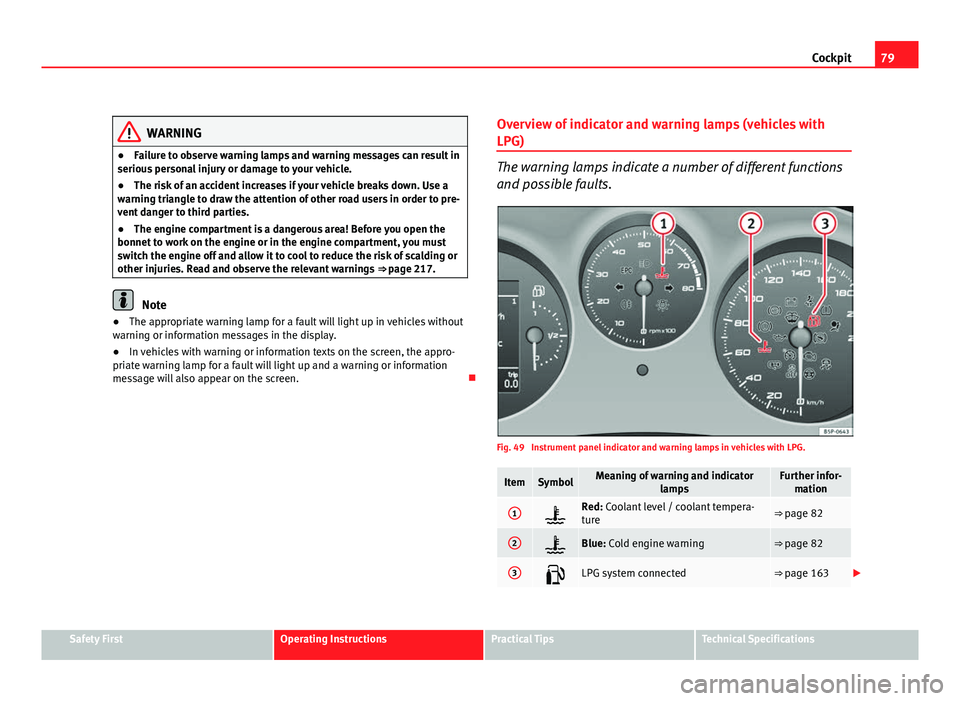
LPG)
The warning lamps indicate a number of different functions
and possible faults.
Fig. 49 Instrument panel indicator and warning lamps in vehicles with LPG.
ItemSymbolMeaning of warning and indicator
lampsFurther infor-mation
1Red: Coolant level / coolant tempera-
ture⇒ page 82
2Blue: Cold engine warning⇒ page 82
3LPG system connected⇒ page 163
Safety FirstOperating InstructionsPractical TipsTechnical Specifications
Page 82 of 302
80Cockpit
WARNING
● Failure to observe warning lamps and warning messages can result in
serious personal injury or damage to your vehicle.
● The risk of an accident increases if your vehicle breaks down. Use a
warning triangle to draw the attention of other road users in order to pre-
vent danger to third parties.
● The engine compartment is a dangerous area! Before you open the
bonnet to work on the engine or in the engine compartment, you must
switch the engine off and allow it to cool to reduce the risk of scalding or
other injuries. Read and observe the relevant warnings ⇒ page 217.
Note
● The appropriate warning lamp for a fault will light up in vehicles without
warning or information messages in the display.
● In vehicles with warning or information texts on the screen, the appro-
priate warning lamp for a fault will light up and a warning or information
message will also appear on the screen.
Warning symbols
There are red warning symbols (priority 1) and yellow warning sym-
bols (priority 2) Warning reports, Priority 1 (red)
If one of these faults occurs, the warning lamp will flash or light up and will
be accompanied by three audible warnings. This is a danger warning. Stop
the vehicle and switch off the engine. Check the fault and correct it. Obtain
professional assistance if necessary. If several priority 1 faults are detected at the same time, the symbols will be
displayed one after the other for about 2 seconds at a time and will contin-
ue until the fault is corrected.
No menus will be shown in the display for the duration of a priority 1 warn-
ing message.
Examples of priority 1 warning messages (red)
●
Brake system symbol with the warning message STOP BRAKE FLUID
SERVICE MANUAL or STOP BRAKE FAULT SERVICE MANUAL .
● Coolant symbol with the warning message STOP SEE COOLANT IN-
STRUCTION MANUAL.
● Engine oil pressure symbol with the warning message STOP ENGINE
OIL PRESSURE LOW! INSTRUCTION MANUAL .
Warning reports, Priority 2 (yellow)
If one of these faults occurs, the warning lamp lights up, and is accompa-
nied by one audible warning. Check the corresponding function as soon as
possible although the vehicle may be used without risk.
If several priority 2 warning messages are detected at the same time, the
symbols are displayed one after the other for about 2 seconds at a time. Af-
ter a set time, the information text will disappear and the symbol will be
shown as a reminder at the side of the display.
Priority 2 warning messages will not be shown until all Priority 1 warning
messages have been dealt with!
Examples of priority 2 warning messages (yellow): 1)
● Fuel warning light with the information text PLEASE REFUEL.
● Windscreen washer fluid symbol with the information text REFILL
WINDSCREEN WASHER FLUID . Top up the washer fluid level.
1)
Depending on the version of the model.
Page 83 of 302
81
Cockpit
Information messages displayed on the screen*
Message a)Description
SERVICEThe service interval has ended. Take the vehicle to an au-
thorised service.
IMMOBILIS-
ERImmobiliser system active. The vehicle will not start. Take
the vehicle to an authorised service.
ERRORInstrument panel faulty. Take the vehicle to an authorised
service.
CLEAN AIRFILTERWarning: The air filter must be cleaned
NO KEYWarning: Correct key cannot be found in the vehicle.KEY BATTERYWarning: Key battery low. Change the battery.
CLUTCHWarning: Press the clutch to start. In vehicles with manual
gearbox and Start/Stop system.
--> P/NWarning: Place the selector level in P/N to start. Only in ve-
hicles with automatic gearbox.
--> PWarning: Place the selector lever in position P to stop the
engine.
STARTINGWarning: The engine starts automatically. Start-Stop system
activated.
START MAN- UALLYWarning: The engine must be started manually. Start-Stop
system activated.
ERROR
START STOPWarning: Start-Stop system error.
START STOP
IMPOSSIBLEWarning: Although the Start-Stop system is switched on, the
engine cannot be stopped automatically. Not all the neces-
sary conditions are met
START STOP ACTIVEWarning: Start-Stop system activated. Vehicle in Stop mode.
SWITCH OFFWarning: Start-Stop system activated. Switch off the ignition
when you leave the vehicle.
STOP TRANS-MISSIONTOO HOTWarning: Stop the engine. Gearbox overheated.
BRAKEWarning: To start the engine, press the brake pedal. Only in
vehicles with automatic gearbox.
COASTING FUNCTIONWarning: Coasting mode active. Transmission engaged. On-
ly in vehicles with automatic gearbox.
CHECK SAFE- LOCKNotification of central locking function activated.
a)These messages may vary according the version of the vehicle model.
Fuel level / reserve
This symbol lights up to indicate that the fuel tank is under
the reserve level.
It lights up when only 7 litres of fuel remain in the tank. You will also hear a
warning signal. It reminds you to fuel up the fuel tank as soon as possible
⇒ page 210.
The instrument panel displays the following message 1)
: PLEASE REFUEL! .
1)
Depending on the version of the model.
Safety FirstOperating InstructionsPractical TipsTechnical Specifications
Page 84 of 302
82Cockpit
Coolant level* / temperature (red)
The warning lamp lights up if the coolant temperature is too
high or if the coolant level is too low.
There is a fault if:
● The warning symbol does not go out again after a few seconds.
● The warning lamp lights up or flashes while the vehicle is moving, and
three acoustic warning signals ⇒
are emitted.
This means that either the coolant level is too low or the coolant tempera-
ture is too high.
Coolant temperature too high
The instrument panel displays the following message 1)
: CHECK COOLANT IN-
STRUCTION MANUAL ⇒ page 224.
First look at the coolant temperature gauge. The coolant temperature is too
high if the needle is over the warning area on the dial. Stop the vehicle,
switch the engine off and wait for it to cool down. Check the coolant level.
If the coolant level is correct, the overheating may be caused by a malfunc-
tion of the radiator fan. Check the radiator fan fuse and have it replaced if
necessary ⇒ page 250.
If the warning lamp lights up again after driving on for a short distance,
stop the vehicle and switch the engine off . Contact an Authorised Service
Centre or a specialised workshop.
Coolant level too low
The instrument panel displays the following message 1)
: STOP CHECK COOL-
ANT INSTRUCTION MANUAL.
First look at the coolant temperature gauge. If the needle is in the normal
range, top up with coolant at the earliest opportunity ⇒
.
WARNING
● If your vehicle is immobilised for technical reasons, move it to a safe
distance from traffic. Turn the engine off, turn the hazard lights on and
place the warning triangle.
● Never open the bonnet if you can see or hear steam or coolant escap-
ing from the engine compartment. Risk of scalding. Wait until you can no
longer see or hear escaping steam or coolant.
● The engine compartment is a dangerous area! Before carrying out any
work in the engine compartment, switch off the engine and allow it to
cool down. Always note the corresponding warnings ⇒ page 217.
Coolant temperature (blue)
This lamp lights up when the coolant is below approximately 45°C. When it
exceeds this temperature the lamp turns off.
Rear fog light
This warning lamp lights up when the rear fog light is switched on . For
further information see ⇒ page 115.
1)
Depending on the version of the model.
Page 87 of 302
85
Cockpit
The following message is shown on the instrument panel display* 1)
: REFILL
WINDSCREEN WASHER FLUID .
Alternator
This warning lamp signals a fault in the alternator.
The warning lamp lights up when the ignition is switched on. It should
go out when the engine has started running.
If the warning lamp lights up while driving, the alternator is no longer
charging the battery. You should immediately drive to the nearest special-
ised workshop.
You should avoid using electrical equipment that is not absolutely necessa-
ry because this will drain the battery.
Worn brake pads
If the symbol lights up, have the front brake pads (and, for safety rea-
sons, the rear pads as well) inspected by a specialised workshop. Tyre pressure
The tyre pressure control system controls the tyre speed and
the frequency spectrum of each tyre.
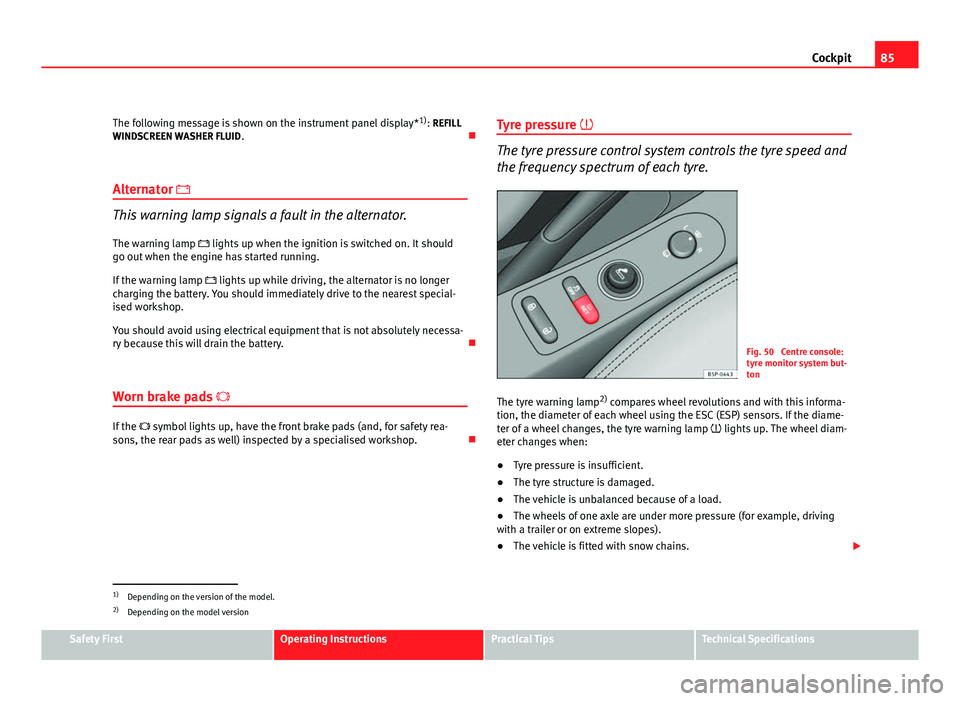
Fig. 50 Centre console:
tyre monitor system but-
ton
The tyre warning lamp 2)
compares wheel revolutions and with this informa-
tion, the diameter of each wheel using the ESC (ESP) sensors. If the diame-
ter of a wheel changes, the tyre warning lamp lights up. The wheel diam-
eter changes when:
● Tyre pressure is insufficient.
● The tyre structure is damaged.
● The vehicle is unbalanced because of a load.
● The wheels of one axle are under more pressure (for example, driving
with a trailer or on extreme slopes).
● The vehicle is fitted with snow chains.
1)
Depending on the version of the model.
2) Depending on the model version
Safety FirstOperating InstructionsPractical TipsTechnical Specifications
Page 88 of 302
86Cockpit
● The temporary spare wheel is fitted.
● The wheel on one axle is changed.
Tyre pressure adjustment
Following the modification to tyre pressure or after changing one or more
wheels, the button ⇒ fig. 50 must be kept pressed while the ignition is on
until an acoustic signal is heard and the warning lamp goes out.
If the wheels are under excessive load (for example, driving with a trailer or
heavy load), the tyre pressure must be increased to the recommended value
for a full load (see the sticker on the inside of the fuel flap). If the tyre moni-
tor system button is pressed down, the new tyre pressures are confirmed.
The tyre pressure warning lamp lights up
If the tyre pressure of one or more wheels is much lower than the value set
by the driver, the tyre control warning lamp lights up ⇒
.
The tyre pressure warning lamp flashes
If the tyre pressure warning lamp flashes, this indicates a fault. Go to the
nearest specialist workshop.
WARNING
● When the tyre pressure warning lamp lights up, reduce speed imme-
diately and avoid any sudden manoeuvre or braking. Stop when possible,
and check the tyre pressure and status.
● The driver is responsible for maintaining correct tyre pressures. For
this reason, tyre pressure must be regularly checked.
● Under certain circumstances (for example, when driving in a sports-
like manner, in winter conditions or on a dirt track) the tyre warning lamp
may light up or function incorrectly.
Note
If the battery is disconnected, the yellow warning lamp lights up after
turning the ignition on. This should turn off after a brief journey.
Brake system*
This warning lamp lights up if the brake fluid level is too low
or if there is a fault in the system.
This warning lamp lights up if
● the brake fluid level is too low ⇒ page 229.
The instrument panel displays the following message 1)
: STOP BRAKE FLUID
INSTRUCTION MANUAL.
● there is a fault in the brake system.
The instrument panel displays the following message 1)
: BRAKE SYSTEM
FAULT INSTRUCTION MANUAL.
This warning lamp can light up together with the ABS system warning lamp.
1)
Depending on the version of the model.
Page 89 of 302
87
Cockpit
WARNING
● Before opening the bonnet, read and observe the warnings on
⇒ page 217.
● If the brake warning lamp does not go out, or if it lights up when driv-
ing, the brake fluid level ⇒ page 229, Brake fluid in the reservoir is too
low. Risk of accident. Stop the vehicle and do not drive on. Obtain techni-
cal assistance.
● If the brake warning lamp lights up together with the ABS warning
lamp , the control function of the ABS could be out of action. This could
cause the rear wheels to lock quickly when you brake. This could cause
the rear to break away. Risk of skidding. Stop the vehicle and seek tech-
nical assistance.
Handbrake
This lamp lights up when the handbrake is applied. If you drive faster than 6 km/h with the handbrake on, the following mes-
sage will appear on the instrument panel display 1)
: HANDBRAKE ON. You will
also hear an acoustic warning signal ⇒ page 173.
Bulb defect
The warning lamp lights up when a bulb in the vehicle's ex-
terior lighting is defective.
The warning lamp lights up when a bulb in the vehicle's exterior lighting
(e.g. left-hand main beam) is defective. The instrument panel displays the following message
1)
: LEFT FULL BEAM
FAULTY.
Engine oil pressure
If this warning lamp is red it indicates that the engine oil
pressure is too low.
If this warning symbol starts to flash, and is accompanied by three audible
warnings, switch off the engine and check the oil level. If necessary, add
more oil ⇒ page 220.
The instrument panel displays the following message 1)
: STOP ENGINE OIL
PRESSURE INSTRUCTION MANUAL .
If the symbol flashes although the oil level is correct, do not drive on. The
engine must not even run at idle speed. Obtain technical assistance.
Checking the oil level
If the warning lamp is yellow the engine oil level should be checked as
soon as possible. Top up the oil ⇒ page 222 at the next opportunity.
Oil level sensor faulty*
If the yellow warning lamp flashes, take the vehicle to a specialised
workshop to have the oil level sensor checked. Until then it is advisable to
check the oil level every time you refuel.
1)
Depending on the version of the model.
Safety FirstOperating InstructionsPractical TipsTechnical Specifications