audio Seat Leon 5D 2011 SOUND SYSTEM 2.0
[x] Cancel search | Manufacturer: SEAT, Model Year: 2011, Model line: Leon 5D, Model: Seat Leon 5D 2011Pages: 44, PDF Size: 0.9 MB
Page 28 of 44
27
Audio mode
AUX-IN* connection
A JACK 1)
audio adaptor is required.
Connect the portable audio player (MP3, Walkman, CD, etc. ) to the AUX-IN
connector, ensuring that the jack fits perfectly. Folders, tracks... are man-
aged from the connected device.
To listen to the audio from the portable device, press the MEDIA button on
the radio.
The USB connection takes priority over AUX-IN inputs. A device connected to
the AUX-IN input can only be heard when there is no other device connected
to the USB port ⇒ page 29.
The audio source of the devices connected in the MEDIA-IN device
⇒ page 29 (USB as AUX-IN) takes priority over those connected in the RSE. Where both options are available, make sure that there is nothing connec-
ted in the MEDIA-IN* connections when you wish to listen to the audio
source of the RSE in the car. (See Rear Seat Entertainment manual).
Note
Keep in mind that if you change temporarily to a different source without
stopping the playback on the portable device, when you go back to the aux-
iliary source using the menu displayed with the MEDIA
button, it will not
continue to play at the point where you left it.
External audio source connected to the AUX-IN multimedia
socket
The AUX-IN multimedia socket can only be used with a 3.5 mm jack plug. An external audio source connected to the socket is indicated by
AUX in the
Media selection menu .
If AUX is not displayed, AUX must be activated in the SETUP menu
⇒ page 35.
Connecting an external audio source to the AUX-IN multimedia socket
● Connect the audio source to the AUX-IN multimedia socket.
● Start playback on the external audio source.
● Open the Media selection menu and select the AUX
function button
⇒ page 21.
The output volume of a connected external audio source should be adjusted
to the volume of the other audio sources ⇒ page 36.
Information on operating an external audio source connected to the AUX-IN
multimedia socket
MeaningResultSelection of another audio source
on the radio system.The external audio source continues
to run in the background.
Stopping playback on the external
audio source or disconnecting the
plug from the AUX-IN multimedia
socket.The radio system remains in the AUX
menu.
Vehicles with MEDIA-IN multimedia interface
See page 29.
Note
Interference noise may be heard if the external audio source is powered
from the vehicle's 12-volt socket.
1)
The cable is not supplied.
Page 29 of 44
28Audio mode
External audio sources connected via Bluetooth ®
In Bluetooth Audio mode, it is possible to listen to audio files being played
on an external audio source
1)
connected via Bluetooth ®
through the vehicle
speakers.
Bluetooth Audio mode is only available in vehicles factory-fitted with a UHV
mobile phone preparation compatible with this function. To use the function
for managing the external audio source connected via Bluetooth ®
, please
see the instructions given in the manual ⇒ booklet Communication System.
The external audio source connected by Bluetooth ®
cannot be operated us-
ing the radio system controls.
Bluetooth Audio mode is indicated by BT-AUDIO or BLUETOOTH-AUDIO on the
display.
Starting Bluetooth audio transfer
● The external audio source must be paired with or connected to the Blue-
tooth mobile phone interface following the instructions in the Owner's man-
ual.
● Start playback on the external audio source.
Playing through the vehicle loudspeakers
After starting, the procedure to transfer audio files depends on whether the
BLUETOOTH-AUDIO option is ON or OFF in the SETUP menu ⇒ page 35.
SETUP: BLUETOOTH-AUDIO OFF: ● After starting the Bluetooth audio transfer, a query is displayed to play
Bluetooth audio.
● Confirm the query.
● Bluetooth audio will start to play and the SETUP menu now displays
BLUETOOTH-AUDIO ON. SETUP: BLUETOOTH-AUDIO ON:
●
After starting the Bluetooth audio transfer, you must change manually to
BLUETOOTH-AUDIO ⇒ page 21.
When the external audio source has finished playing, the radio system re-
mains in the BLUETOOTH-AUDIO menu. To switch to another audio source, it
must be selected manually ⇒ page 21.
Note
The warning and service sounds of a connected Bluetooth audio source,
e.g. the keytones on a mobile phone, must be disconnected to avoid any
operating interference and abnormalities.
1)
The external audio source must be compatible with the Bluetooth A2DP profile.
Page 30 of 44
29
Audio mode
MEDIA-IN multimedia interface*
Introduction
The supported file formats listed below are collectively referred to in this
manual as audio files.
Audio files on an external data medium connected to the MEDIA-IN multime-
dia interface can be played and controlled via the radio system.
Where this manual refers to external data media, this means USB mass stor-
age devices containing supported audio files, such as MP3 players, iPods ®
and USB sticks. External data media are displayed as MDI (Media Device In-
terface) on the radio system.
The MEDIA-IN multimedia interface supplies the usual USB voltage of 5
volts.
Additional information:
● Safety notes ⇒ page 6
● Unit overview ⇒ page 8
● Media mode ⇒ page 18
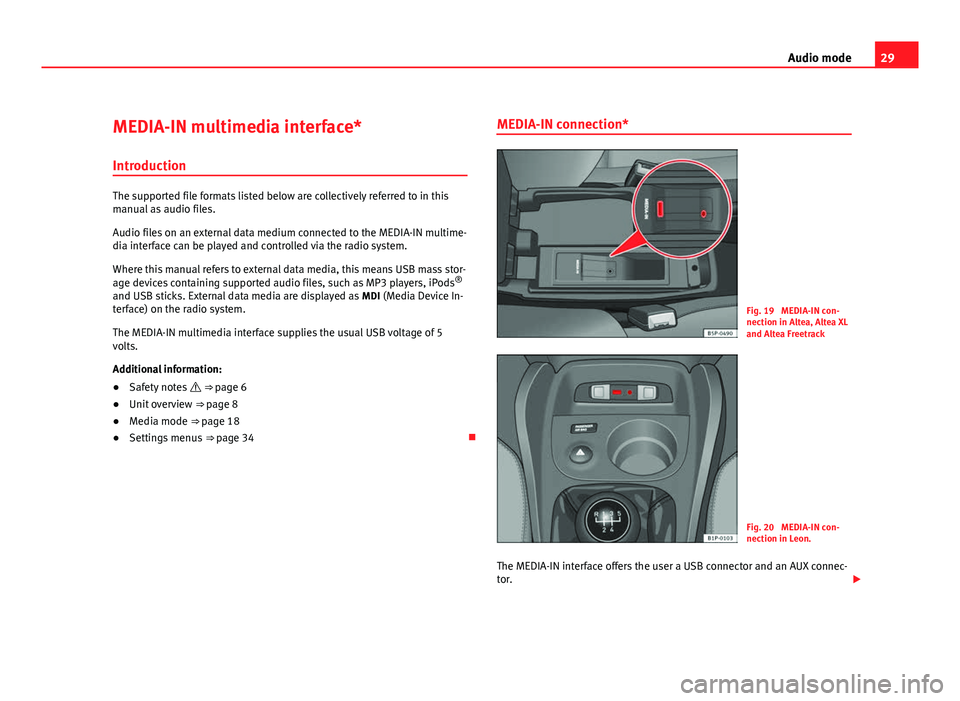
● Settings menus ⇒ page 34 MEDIA-IN connection*
Fig. 19 MEDIA-IN con-
nection in Altea, Altea XL
and Altea Freetrack
Fig. 20 MEDIA-IN con-
nection in Leon.
The MEDIA-IN interface offers the user a USB connector and an AUX connec-
tor.
Page 31 of 44
30Audio mode
This operation mode permits any of the following elements to be connec-
ted:
● USB mode: A storage device with USB connection. The connection is di-
rectly done into the USB port.
● iPod mode ®
: To connect an iPod device, an adapter cable or device is
required (SEAT brand), depending on the vehicle. This cable/device is con-
nected to the iPod at one end and has USB and audio JACK 1)
connections at
the other end.
● Auxiliary connection mode: A portable audio player device (MP3, Walk-
man, CD, etc...). Connection is through a JACK-JACK audio adapter 1)
⇒ page 26.
Insert a device in the MEDIA-IN* connections
Insert the necessary connectors in the USB/auxiliary/iPod ®
connections,
depending on the equipment to be connected (USB, iPod®, MP3, Walkman,
etc...), making sure that the pins are correctly connected.
A USB or iPod® device is controlled through the radio controls.
A portable device with audio output is directly controlled from the equip-
ment connected.
Selecting the source connected
See page 21.
Note
● iPod® is a registered trademark of Apple Computer, Inc.
● If you are not in USB/iPod ®
mode (e.g. in FM) when the MEDIA
button is
pressed, the last selected source will start to play (where available).
● Consult the list of compatible iPods with your Authorised Service Centre. Connecting and operating
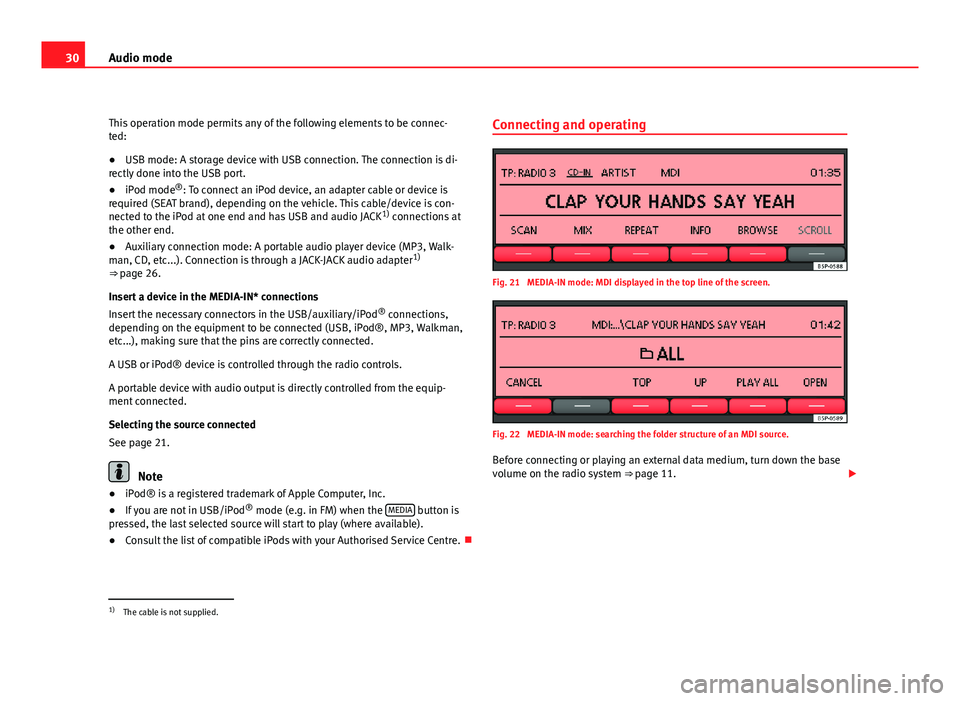
Fig. 21 MEDIA-IN mode: MDI displayed in the top line of the screen.
Fig. 22 MEDIA-IN mode: searching the folder structure of an MDI source.
Before connecting or playing an external data medium, turn down the base
volume on the radio system ⇒ page 11.
1)
The cable is not supplied.
Page 32 of 44
31
Audio mode
Connecting and disconnecting an external data medium
● Connect the appropriate adapter to the MEDIA-IN multimedia interface
⇒ page 29.
● Connect the external data medium to the MEDIA-IN multimedia interface
via the adapter.
● If necessary, switch on the external data medium or select the appropri-
ate data mode.
Even though the display may indicate otherwise, the external data medium
may be disconnected from the MEDIA-IN multimedia interface at any time
without data loss.
If the selected media source is disconnected from the MEDIA-IN multimedia
interface while being played, the radio system will remain in MDI mode. An-
other audio source must be selected manually.
Operation via the radio system
An external data medium that is correctly connected to the MEDIA-IN multi-
media interface can be operated from the radio system.
The radio system does not automatically switch to playback from an exter-
nal data medium when a data medium is connected to the MEDIA-IN multi-
media interface or when a connected data medium is switched on.
● Display the Media selection menu and select the MEDIA-IN
function but-
ton ⇒ page 21.
● Playback from the external data medium will start ⇒ fig. 21.
● When you press the BROWSE
function button, the function buttons for
searching the folder structure appear on the screen ⇒ fig. 22.
● You can browse folders or playlists with the function buttons TOP
(high-
est level), UP (one higher) and OPEN (open folder). The selected folder level
is displayed in the top line of the screen ⇒ fig. 22.
● You can switch between folders and playlists on the same level using
the
FOLDER
rocker switch ⇒ fig. 1 10. ●
To browse through the tracks within a folder or a playlist, turn the setting
knob and to play the displayed track press the PLAY
function button.
● To change track directly within a folder or playlist press the
SEEK / TRACK
rocker switch ⇒ fig. 1 12 to the left or right.
For a description of the different playback modes ( SCAN, MIX, REPEAT) and
instructions on selecting them, please refer to page 24.
iPod ®
and iPhone ®
The top level of a connected iPod ®
or iPhone ®
allows you to select menu
items specific to the device. This iPod selection menu always has the same
structure and is operated in the familiar way.
The music controls on the connected iPod ®
or iPhone ®
are disabled.
The output volume of a connected iPod ®
or iPhone ®
should be adjusted to
the volume of the other audio sources ⇒ page 36.
Possible error messages after connecting an external data medium
Error mes-
sageCauseHow to proceed
Device not
supportedThe external data medium
cannot be played or commu-
nication is not possible with
the adapter cable being
used.Check adapter cable.
Update the software of the
MEDIA-IN multimedia inter-
face at your Authorised Serv-
ice.
If possible, update the soft-
ware of the external data me-
dium.
Device defec-
tiveCommunication interrupted.Check the connection and
make sure the external data
medium is working correctly.
Due to the large number of different data media and various iPod ®
and
iPhone ®
generations available, it is not possible to guarantee fault-free
operation of all functions described here.
Page 33 of 44
32Audio mode
Additional instructions
Additional instructions for the mass storage device (MSD):
●Only external data devices or USB mass storage devices complying with
the USB 2.0 specification can be used.
● Partition of an external data device shall be in accordance with the file
system, FAT16 (2 GB) or FAT32 (> 2 GB) (FAT: File Allocation Table).
● MTP (Media Transfer Protocol) players, recognised by the commercial
name “PlaysForSure” or “ReadyForVista”, are highly sensitive to factors in-
cluding the battery charge and the volume of data in the MEDIA-IN multime-
dia interface requests. It may take several minutes before an MTP player is
ready to play.
● When playing large capacity hard discs with several files and a complex
data structure (several folders and subfolders, non-playable files, etc.) it
may take some time to read the audio files. The reaction time may also be
influenced by the connected device.
● The structure of the folders in the external data device shall not exceed a
depth of eight folder levels. A folder should not contain more than 1000 en-
tries.
● The use of USB cable extensions and USB hubs may cause operating er-
rors.
● If an external data device is divided into various partitions, only the first
partition with compatible audio files will be played.
● Memory card adapters cannot be used, their use may cause operating
errors.
● If an MP3 player is updated via the manufacturer (firmware update) this
may lead to operating errors.
● An external data device should be connected first or select the corre-
sponding data mode.
● Compatible formats include: MP3, WMA, OGG-Vorbis, AAC.
● Please refer to the respective manufacturer's manual for instructions on
the operation of the external data medium. Compatible file formats
The use of file formats which can be played on this equipment is the same
as for compressed audio files in MP3 format and will not be explained fur-
ther in this manual.
●
The radio and navigation equipment can be used to play and control au-
dio files in MP3, WMA, OGG Vorbis and AAC format from an external data
device.
● Playlists in PLS, B4S, ASX and WPL format are compatible.
● WMA (Windows Media Audio) audio files can only be played if they are
not protected by authors' rights with the DRM (Digital Rights Management)
system.
● Generally, files with anti-copy protection cannot be played (e.g. M4P).
● Files in 3GP format and “WMA lossless” file types cannot be played.
Check there are no MP3 files stored in the playlist. A playlist only defines a
certain order of play. If a playlist is not played, check whether the “route da-
ta” is correct, that is, whether the MP3 files are stored in the data device to
which the playlist refers.
WARNING
● The connected audio devices must be protected from possible me-
chanical damage and other kind of wear.
● We do not hold responsible for any possible damage on the connec-
ted devices.
● The connection of USB devices is sensitive to interference from mo-
bile telephones. Mobile telephones should not be left next to the USB
when this is connected, to prevent distortion.
● The connected audio devices must be protected from possible me-
chanical damage and other kind of wear.
● Objects which are not secured in the vehicle compartment may inter-
fere with driving and could result in serious injury.
Page 34 of 44
33
Audio mode
WARNING (Continued)
● The external data device should never be left on the dash panel. A
sharp manoeuvre can throw the device towards the compartment and in-
jure the vehicle passengers.
● The external data device should never be mounted in the vicinity of
the airbag. If an airbag is activated it can project the device towards the
compartment and injure the vehicle passengers.
● The external data device must not be held in hand or on the legs
while driving. A sharp manoeuvre can throw the device towards the com-
partment and injure the vehicle passengers.
● Place the external data device cables so that they are not in the way
while driving.
Note
Some vehicles with the MEDIA-IN multimedia interface mounted on the cen-
tre armrest are also equipped with an additional compartment. The rubber
insert of this compartment can be removed in order to extract small objects
which may have fallen inside.
Page 36 of 44
35
Settings menus
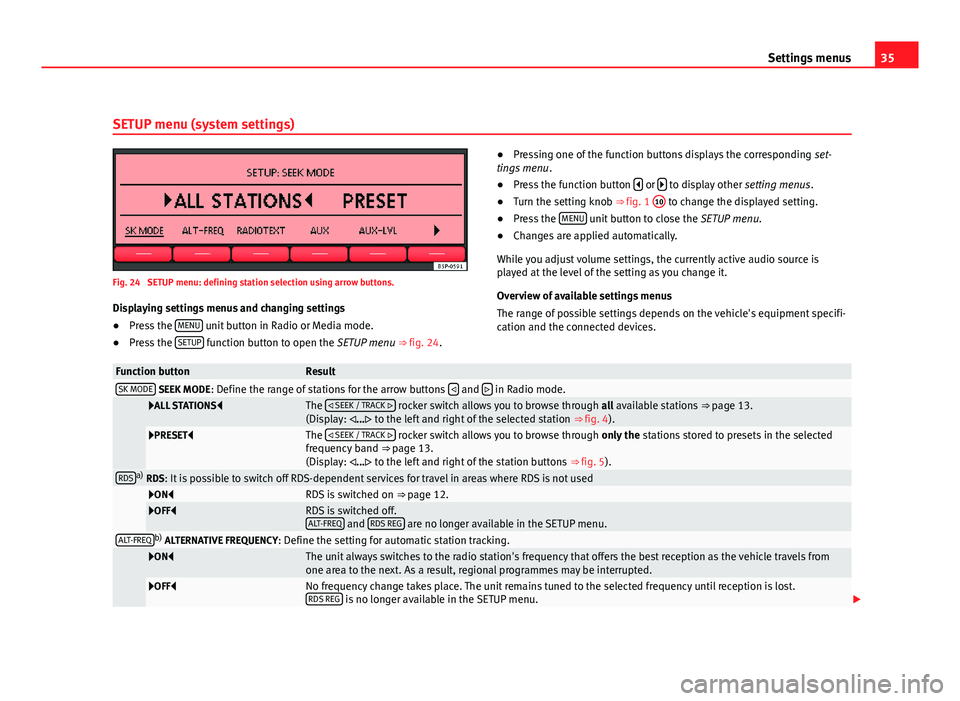
SETUP menu (system settings)
Fig. 24 SETUP menu: defining station selection using arrow buttons. Displaying settings menus and changing settings
● Press the MENU
unit button in Radio or Media mode.
● Press the SETUP function button to open the SETUP menu ⇒ fig. 24. ●
Pressing one of the function buttons displays the corresponding set-
tings menu .
● Press the function button
or to display other
setting menus.
● Turn the setting knob ⇒ fig. 1 10 to change the displayed setting.
● Press the MENU unit button to close the
SETUP menu.
● Changes are applied automatically.
While you adjust volume settings, the currently active audio source is
played at the level of the setting as you change it.
Overview of available settings menus
The range of possible settings depends on the vehicle's equipment specifi-
cation and the connected devices.
Function buttonResultSK MODE SEEK MODE : Define the range of stations for the arrow buttons and in Radio mode.
ALL STATIONS
The
SEEK / TRACK rocker switch allows you to browse through all available stations ⇒ page 13.
(Display: ... to the left and right of the selected station ⇒ fig. 4).
PRESETThe
SEEK / TRACK rocker switch allows you to browse through only the stations stored to presets in the selected
frequency band ⇒ page 13.
(Display: ... to the left and right of the station buttons ⇒ fig. 5).
RDSa)
RDS: It is possible to switch off RDS-dependent services for travel in areas where RDS is not used
ONRDS is switched on ⇒ page 12.OFFRDS is switched off.
ALT-FREQ and RDS REG are no longer available in the SETUP menu.ALT-FREQb)
ALTERNATIVE FREQUENCY : Define the setting for automatic station tracking.
ONThe unit always switches to the radio station's frequency that offers the best reception as the vehicle travels from
one area to the next. As a result, regional programmes may be interrupted.
OFFNo frequency change takes place. The unit remains tuned to the selected frequency until reception is lost.
RDS REG is no longer available in the SETUP menu.
Page 37 of 44
36Settings menus
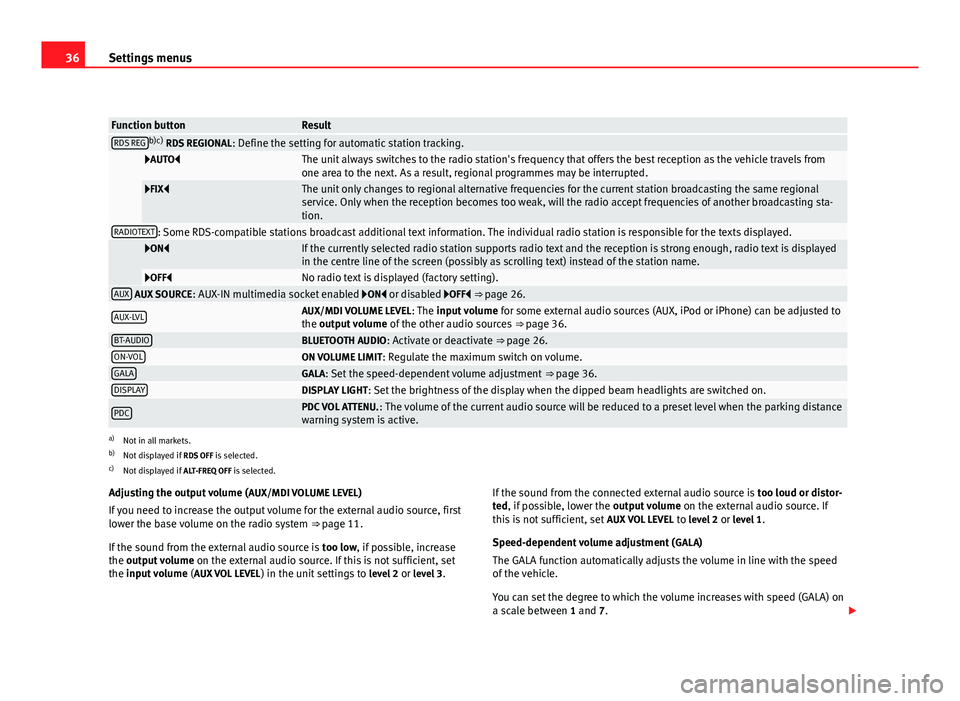
Function buttonResultRDS REGb)c)
RDS REGIONAL : Define the setting for automatic station tracking.
AUTOThe unit always switches to the radio station's frequency that offers the best reception as the vehicle travels from
one area to the next. As a result, regional programmes may be interrupted.
FIXThe unit only changes to regional alternative frequencies for the current station broadcasting the same regional
service. Only when the reception becomes too weak, will the radio accept frequencies of another broadcasting sta-
tion.
RADIOTEXT: Some RDS-compatible stations broadcast additional text information. The individual radio station is responsible for the texts displayed.
ONIf the currently selected radio station supports radio text and the reception is strong enough, radio text is displayed
in the centre line of the screen (possibly as scrolling text) instead of the station name.
OFFNo radio text is displayed (factory setting).AUX AUX SOURCE: AUX-IN multimedia socket enabled ON or disabled OFF ⇒ page 26.
AUX-LVLAUX/MDI VOLUME LEVEL : The input volume for some external audio sources (AUX, iPod or iPhone) can be adjusted to
the output volume of the other audio sources ⇒ page 36.
BT-AUDIOBLUETOOTH AUDIO: Activate or deactivate ⇒ page 26.ON-VOLON VOLUME LIMIT: Regulate the maximum switch on volume.GALAGALA: Set the speed-dependent volume adjustment ⇒ page 36.DISPLAYDISPLAY LIGHT: Set the brightness of the display when the dipped beam headlights are switched on.
PDCPDC VOL ATTENU. : The volume of the current audio source will be reduced to a preset level when the parking distance
warning system is active.
a) Not in all markets.
b) Not displayed if RDS OFF is selected.
c) Not displayed if ALT-FREQ OFF is selected.
Adjusting the output volume ( AUX/MDI VOLUME LEVEL)
If you need to increase the output volume for the external audio source, first
lower the base volume on the radio system ⇒ page 11.
If the sound from the external audio source is too low, if possible, increase
the output volume on the external audio source. If this is not sufficient, set
the input volume (AUX VOL LEVEL) in the unit settings to level 2 or level 3 . If the sound from the connected external audio source is
too loud or distor-
ted, if possible, lower the output volume on the external audio source. If
this is not sufficient, set AUX VOL LEVEL to level 2 or level 1 .
Speed-dependent volume adjustment ( GALA)
The GALA function automatically adjusts the volume in line with the speed
of the vehicle.
You can set the degree to which the volume increases with speed (GALA) on
a scale between 1 and 7.
Page 40 of 44
Index
A
Adjusting the output volume . . . . . . . . . . . . . . . 36
ALT-FREQALTERNATIVE FREQUENCY . . . . . . . . . . . . . . 35
AUX . . . . . . . . . . . . . . . . . . . . . . . . . . . . . . . . . . . 27 AUX-IN multimedia socket . . . . . . . . . . . . . . 27
External audio source . . . . . . . . . . . . . . . . . 27
ON or OFF . . . . . . . . . . . . . . . . . . . . . . . . . . . 35
Volume . . . . . . . . . . . . . . . . . . . . . . . . . . . . . 35
AUX-IN connection . . . . . . . . . . . . . . . . . . . . . . . 26
AUX-LVL (AUX VOL LEVEL) . . . . . . . . . . . . . . . . . 35
B
Balance . . . . . . . . . . . . . . . . . . . . . . . . . . . . . . . . 34
Base volume Changing . . . . . . . . . . . . . . . . . . . . . . . . . . . 11
Muting . . . . . . . . . . . . . . . . . . . . . . . . . . . . . . 11
Bass . . . . . . . . . . . . . . . . . . . . . . . . . . . . . . . . . . 34
Bluetooth Audio . . . . . . . . . . . . . . . . . . . . . . . . . 28
BT-Audio . . . . . . . . . . . . . . . . . . . . . . . . . . . . . . . 28
C
CD-IN . . . . . . . . . . . . . . . . . . . . . . . . . . . . . . . . . . 20
CD ERROR . . . . . . . . . . . . . . . . . . . . . . . . . . . . . . 21
CD mode See: MEDIA . . . . . . . . . . . . . . . . . . . . . . . . . . 20 CD ROM . . . . . . . . . . . . . . . . . . . . . . . . . . . . . . . . 21
CHECK CD . . . . . . . . . . . . . . . . . . . . . . . . . . . . . . 21
Controls . . . . . . . . . . . . . . . . . . . . . . . . . . . . . . . . . 8
D
DISPLAY LIGHT . . . . . . . . . . . . . . . . . . . . . . . . . . 35
E
Energy management . . . . . . . . . . . . . . . . . . . . . 10
External audio source AUX . . . . . . . . . . . . . . . . . . . . . . . . . . . . . . . . 27
External data medium (USB) . . . . . . . . . . . . 29
Input volume . . . . . . . . . . . . . . . . . . . . . . . . 36
MDI . . . . . . . . . . . . . . . . . . . . . . . . . . . . . . . . 29
MEDIA-IN multimedia interface . . . . . . . . . . 29
MP3 player . . . . . . . . . . . . . . . . . . . . . . . . . . 29
Output volume . . . . . . . . . . . . . . . . . . . . . . . 36
External audio sources Bluetooth Audio . . . . . . . . . . . . . . . . . . . . . . 28
External data medium See: MDI . . . . . . . . . . . . . . . . . . . . . . . . . . . . 29
F
Fader . . . . . . . . . . . . . . . . . . . . . . . . . . . . . . . . . . 34
Fast forward . . . . . . . . . . . . . . . . . . . . . . . . . . . . 23
Function buttons (soft keys) . . . . . . . . . . . . . . . 11 G
GALA . . . . . . . . . . . . . . . . . . . . . . . . . . . . . . . . . . 35
H Hard keys see: Unit buttons . . . . . . . . . . . . . . . . . . . . . 11
I
Ignition off Switch-off delay (timeout) . . . . . . . . . . . . . . 10
Interference mobile phone . . . . . . . . . . . . . . . . . . . . . . . . 10
Introduction . . . . . . . . . . . . . . . . . . . . . . . . . . . . . 6
iPhone See: iPod . . . . . . . . . . . . . . . . . . . . . . . . . . . . 31
iPod operating . . . . . . . . . . . . . . . . . . . . . . . . . . . 31
L
LOW BATTERY . . . . . . . . . . . . . . . . . . . . . . . . . . . 10
M
Main menu MEDIA . . . . . . . . . . . . . . . . . . . . . . . . . . . . . . 20
RADIO . . . . . . . . . . . . . . . . . . . . . . . . . . . . . . 12
39
Index