ESP Seat Leon 5D 2013 MEDIA SYSTEM PLUS - NAVI SYSTEM
[x] Cancel search | Manufacturer: SEAT, Model Year: 2013, Model line: Leon 5D, Model: Seat Leon 5D 2013Pages: 72, PDF Size: 3 MB
Page 31 of 72
30Audio modeNotes and restrictions
The infotainment system enables you to view, play and manage compatibleaudio files through the MEDIA-IN multimedia interface.
In the case of MTP players and depending on the battery charge and thequantity of data, it may take a few minutes for them to be ready for use.
External hard discs with a capacity greater than 32 GB must, in certain cir-cumstances, be reformatted to the FAT32 file system. On the Internet, for ex-ample, you will find programs and instructions for this.
If the data carrier has several partitions, only the first partition will be recog-nised (except with USB, in which the first 2 will be visible). Take into ac-count all other instructions and limitations regarding requirements for me-dia sources.
Connecting and disconnecting an external data medium
●
Connect a suitable adaptor to the MEDIA-IN multimedia interface.
●
Connect the external data medium to the MEDIA-IN multimedia interfacevia the adapter.
●
If necessary, switch on the external data medium or select the appropri-ate data mode.
Regardless of any indications to the contrary that there may be on the mat-ter, the external data medium can be disconnected from the MEDIA-IN multi-media interface at any time without losing the data.
When disconnecting an iPod® or iPhone® from the adaptor, take care topress the two unlocking tabs on the narrow sides of the iPod® connector si-multaneously.
Operating the infotainment system
An external data medium that is correctly connected to the MEDIA-IN multi-media interface can be operated using the infotainment system.
●
In the main MEDIA menu, press the button SOURCE ⇒ Fig. 20 and selectUSB or iPod.... ⇒ page 29.
Other operations with the external data medium (changing tracks, selectingtracks and activating playback modes) are carried out as described in thecorresponding chapters.
iPod® and iPhone®
If you connect an iPod® or iPhone®, the top selection level will display thespecific lists of the iPod ( playlists, artist, album, title, pod-casts etc.). The appearance of these lists is similar to that of the media cen-tre, and they are managed as described.
Music management is blocked so it can be managed with the iPod® oriPhone® that is connected.
The playback volume of some iPods® or iPhones® can adapt to the volumeof the other audio sources ⇒ page 29.
Files from iPods® or iPhones® cannot be imported.
Possible error messages after connecting an external data mediumError messageCauseProcedureDevice not suppor-tedThe external data me-dium cannot be played– Consult the list of suppor-ted devices on the web.– When possible, update thesoftware of the external datamedium.
Unit not operationalCommunication fault.Check the connection andmake sure the external datamedium is working correctly.
Due to the large number of different data media available, it is not possi-ble to guarantee fault-free operation of all functions described here.
Page 32 of 72
31Audio modeNote●The connecting adaptor used must not be crushed or bent sharply. Thiscould damage the adaptor and cause operational faults.●
To play music, do not simultaneously link the external media player tothe infotainment system using bluetooth and the MEDIA-IN multimedia in-terface, as this can cause limitations in the playback.
Connecting an external media player via Bluetooth®
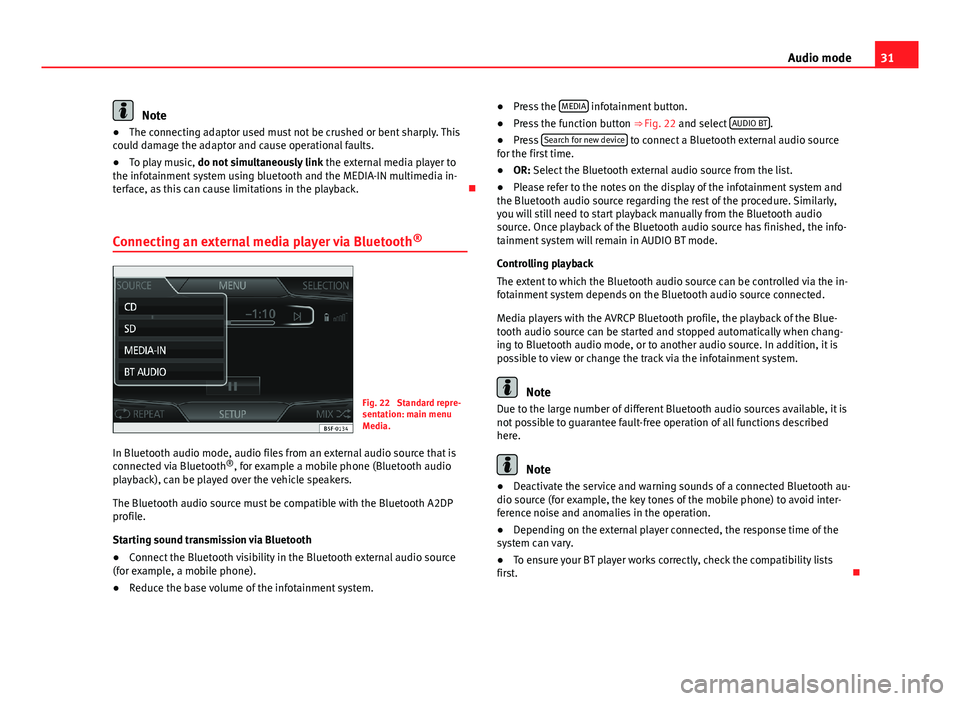
Fig. 22
Standard repre-sentation: main menuMedia.
In Bluetooth audio mode, audio files from an external audio source that isconnected via Bluetooth®, for example a mobile phone (Bluetooth audioplayback), can be played over the vehicle speakers.
The Bluetooth audio source must be compatible with the Bluetooth A2DPprofile.
Starting sound transmission via Bluetooth
●
Connect the Bluetooth visibility in the Bluetooth external audio source(for example, a mobile phone).
●
Reduce the base volume of the infotainment system.
●Press the MEDIA infotainment button.●
Press the function button ⇒ Fig. 22 and select AUDIO BT.
●
Press Search for new device to connect a Bluetooth external audio sourcefor the first time.
●
OR: Select the Bluetooth external audio source from the list.
●
Please refer to the notes on the display of the infotainment system andthe Bluetooth audio source regarding the rest of the procedure. Similarly,you will still need to start playback manually from the Bluetooth audiosource. Once playback of the Bluetooth audio source has finished, the info-tainment system will remain in AUDIO BT mode.
Controlling playback
The extent to which the Bluetooth audio source can be controlled via the in-fotainment system depends on the Bluetooth audio source connected.
Media players with the AVRCP Bluetooth profile, the playback of the Blue-tooth audio source can be started and stopped automatically when chang-ing to Bluetooth audio mode, or to another audio source. In addition, it ispossible to view or change the track via the infotainment system.
Note
Due to the large number of different Bluetooth audio sources available, it isnot possible to guarantee fault-free operation of all functions describedhere.
Note
●Deactivate the service and warning sounds of a connected Bluetooth au-dio source (for example, the key tones of the mobile phone) to avoid inter-ference noise and anomalies in the operation.
●
Depending on the external player connected, the response time of thesystem can vary.
●
To ensure your BT player works correctly, check the compatibility listsfirst.
Page 39 of 72
38NavigationAfter starting navigation to the destinationFig. 27
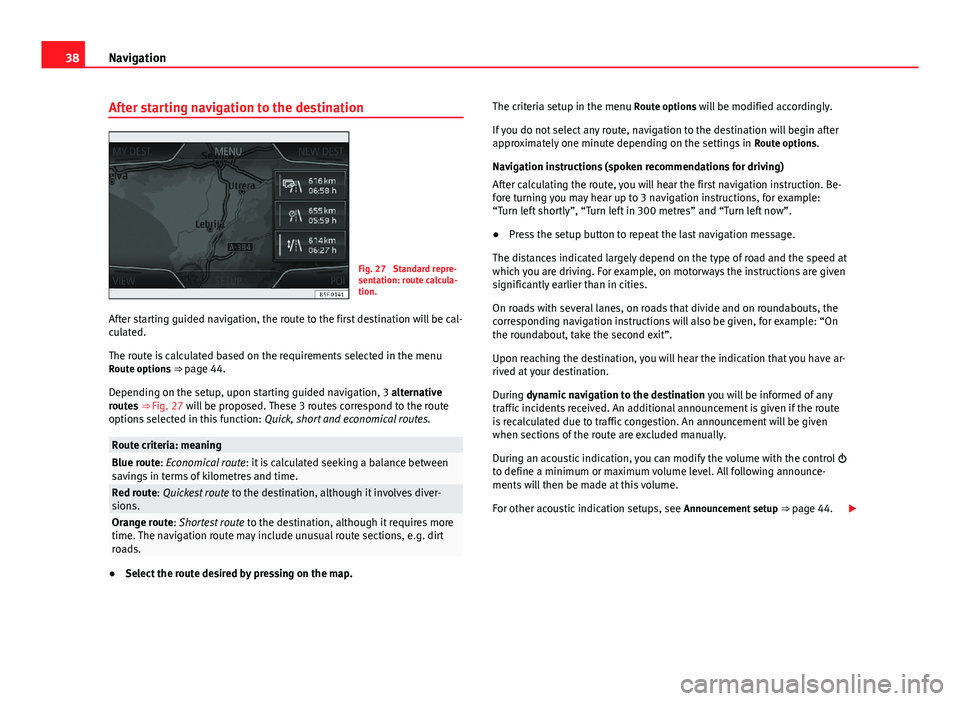
Standard repre-sentation: route calcula-tion.
After starting guided navigation, the route to the first destination will be cal-culated.
The route is calculated based on the requirements selected in the menuRoute options ⇒ page 44.
Depending on the setup, upon starting guided navigation, 3 alternativeroutes ⇒ Fig. 27 will be proposed. These 3 routes correspond to the routeoptions selected in this function: Quick, short and economical routes.
Route criteria: meaningBlue route: Economical route: it is calculated seeking a balance betweensavings in terms of kilometres and time.Red route: Quickest route to the destination, although it involves diver-sions.Orange route: Shortest route to the destination, although it requires moretime. The navigation route may include unusual route sections, e.g. dirtroads.
●
Select the route desired by pressing on the map.
The criteria setup in the menu Route options will be modified accordingly.
If you do not select any route, navigation to the destination will begin afterapproximately one minute depending on the settings in Route options.
Navigation instructions (spoken recommendations for driving)
After calculating the route, you will hear the first navigation instruction. Be-fore turning you may hear up to 3 navigation instructions, for example:“Turn left shortly”, “Turn left in 300 metres” and “Turn left now”.
●
Press the setup button to repeat the last navigation message.
The distances indicated largely depend on the type of road and the speed atwhich you are driving. For example, on motorways the instructions are givensignificantly earlier than in cities.
On roads with several lanes, on roads that divide and on roundabouts, thecorresponding navigation instructions will also be given, for example: “Onthe roundabout, take the second exit”.
Upon reaching the destination, you will hear the indication that you have ar-rived at your destination.
During dynamic navigation to the destination you will be informed of anytraffic incidents received. An additional announcement is given if the routeis recalculated due to traffic congestion. An announcement will be givenwhen sections of the route are excluded manually.
During an acoustic indication, you can modify the volume with the control to define a minimum or maximum volume level. All following announce-ments will then be made at this volume.
For other acoustic indication setups, see Announcement setup ⇒ page 44.
Page 40 of 72
39NavigationNote●If you miss a turning during route guidance and are currently unable toturn back, keep on driving until the navigation system offers a new route.●
The quality of the instructions given by the unit will depend on the navi-gation data available and the traffic reports received.
Route
Press the Route function button in the main navigation menu ⇒ Fig. 26.
The function button Route is only displayed when the guided navigation isactivated.
Function button: effectStop Route: stops the guided navigation underway.New destination: Enter a new destination ⇒ page 37 and accept it in the des-tination pop-up window as an intermediate or final destination.Route information: view information related to the route underway. Save: stores the destination currently selected in the destinationmemory.Route list: shows the roads you must drive along on the route, aswell as the respective section.
Congestion ahead: blocks the section ahead (from 0.2 to 10 km) of the routeunderway to, for example, avoid congestion. To unblock, press the func-tion button Route and then, Cancel congestion.
My destinations (destination memory)●
Press the My destinations button in the main navigation menu ⇒ Fig. 26.
●
Select the desired function button (Store position, Destinations and con-tacts or Home address).
1. Store current position
●
Press the function button Store position, to store the position indicated asa target flag in the Destination memory.
To save the stored position permanently, change the name of the position inthe destination memory. Otherwise the stored position will be overwrittenthe next time a flagged destination is stored.
In the following data entry mask you can modify the name. To save the des-tination, press the function button .
2. Destinations and contacts
Press the function button Options in the menu of Destinations and contacts..
Function button: effectRecent destinations: shows the destinations for which guided navigation hasalready been started.Dest. memory: Display of the destinations stored manually and importedvCards ⇒ page 45.Favourites: display of the destinations stored as favourites.Contacts: display of the entries in the telephone book with addresses stor-ed.
3. Home address
Only one address or position can be stored as the home address at any onetime. The stored home address can be edited or overwritten.
If there is a private address already stored, the guided navigation to this ad-dress will begin.
Page 44 of 72
43Navigationwith traffic. The quality of the dynamic route guidance depends on the infor-mation contained in the TMC traffic reports. The radio stations broadcastingthis information are responsible for the content.
The route to cover can also be blocked manually to force a new route to becalculated ⇒ page 39.
TMC traffic reports on the map
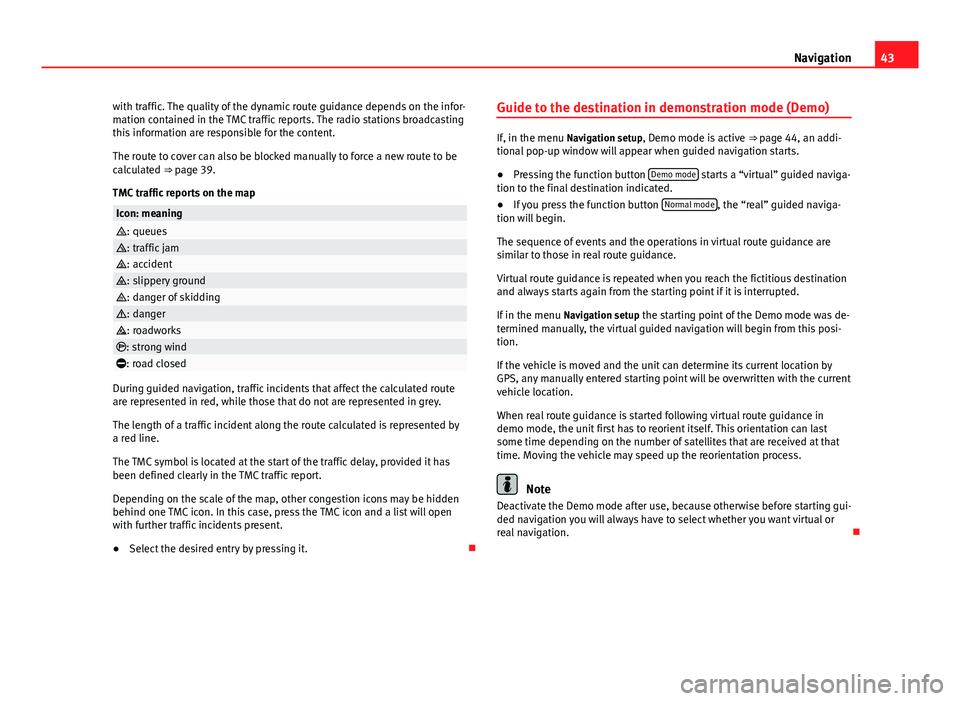
Icon: meaning: queues: traffic jam: accident: slippery ground: danger of skidding: danger: roadworks: strong wind: road closed
During guided navigation, traffic incidents that affect the calculated routeare represented in red, while those that do not are represented in grey.
The length of a traffic incident along the route calculated is represented bya red line.
The TMC symbol is located at the start of the traffic delay, provided it hasbeen defined clearly in the TMC traffic report.
Depending on the scale of the map, other congestion icons may be hiddenbehind one TMC icon. In this case, press the TMC icon and a list will openwith further traffic incidents present.
●
Select the desired entry by pressing it.
Guide to the destination in demonstration mode (Demo)
If, in the menu Navigation setup, Demo mode is active ⇒ page 44, an addi-tional pop-up window will appear when guided navigation starts.
●
Pressing the function button Demo mode starts a “virtual” guided naviga-tion to the final destination indicated.
●
If you press the function button Normal mode, the “real” guided naviga-tion will begin.
The sequence of events and the operations in virtual route guidance aresimilar to those in real route guidance.
Virtual route guidance is repeated when you reach the fictitious destinationand always starts again from the starting point if it is interrupted.
If in the menu Navigation setup the starting point of the Demo mode was de-termined manually, the virtual guided navigation will begin from this posi-tion.
If the vehicle is moved and the unit can determine its current location byGPS, any manually entered starting point will be overwritten with the currentvehicle location.
When real route guidance is started following virtual route guidance indemo mode, the unit first has to reorient itself. This orientation can lastsome time depending on the number of satellites that are received at thattime. Moving the vehicle may speed up the reorientation process.
Note
Deactivate the Demo mode after use, because otherwise before starting gui-ded navigation you will always have to select whether you want virtual orreal navigation.
Page 48 of 72
47CAR menuWhen one of these values is reached (depending on the version of the in-strument panel), the memory is automatically deleted and it starts countingfrom 0 again.
ECO
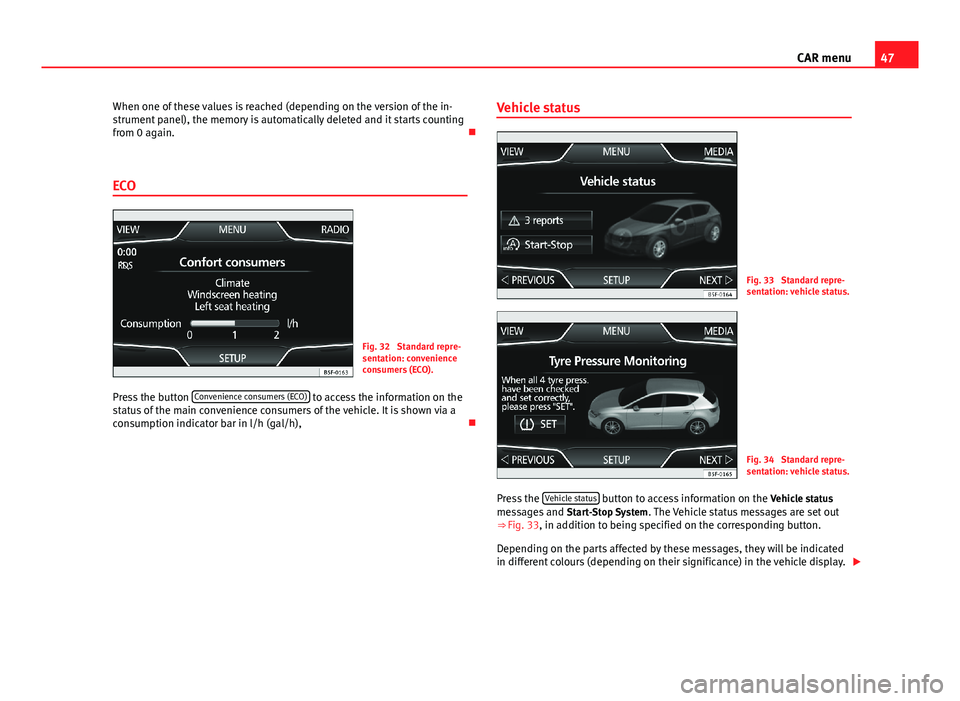
Fig. 32
Standard repre-sentation: convenienceconsumers (ECO).
Press the button Convenience consumers (ECO) to access the information on thestatus of the main convenience consumers of the vehicle. It is shown via aconsumption indicator bar in l/h (gal/h),
Vehicle statusFig. 33
Standard repre-sentation: vehicle status.
Fig. 34
Standard repre-sentation: vehicle status.
Press the Vehicle status button to access information on the Vehicle statusmessages and Start-Stop System. The Vehicle status messages are set out⇒ Fig. 33, in addition to being specified on the corresponding button.
Depending on the parts affected by these messages, they will be indicatedin different colours (depending on their significance) in the vehicle display.
Page 50 of 72
49Telephone management (PHONE)Telephone management (PHONE)Introduction to telephone management
Introduction
The telephone functions described below can be managed through the info-tainment system provided a mobile phone is linked and connected to theinfotainment system.
●
Linking and connecting a mobile phone to the infotainment system.
The requirement for establishing a connection between a mobile phone andthe infotainment system is that the mobile phone has Bluetooth®.
When there is no mobile phone linked to the infotainment system, tele-phone management is not available.
Please refer to the notes on how to use mobile telephones in vehicles with-out connection to the exterior antenna ⇒ Booklet Instruction Manual, chap-ter Accessories and technical modifications.
WARNINGMaking calls and managing the preinstallation for mobile phones whiledriving can distract you from the traffic and cause an accident.●
Always stay alert and drive responsibly.
●
Select volume settings that allow you to easily hear signals from out-side the vehicle at all times (e.g. emergency service sirens).
●
In areas with no or poor network coverage, under certain circumstan-ces in tunnels, garages and underpasses, telephone conversations maycut out or it may be impossible to make calls, even in an emergency.
WARNINGA loose or incorrectly secured mobile phone could be thrown inside thevehicle and cause injury in the event of sudden manoeuvres, braking oraccidents.
●
While driving, the mobile phone must always be correctly secured,outside of the working radius of the airbag.
WARNINGIf you carry a mobile phone that is switched on directly over a pacemaker,this may cause interference in its functioning.●
Between the antenna of the mobile phone and the pacemaker theremust be a minimum distance of 20 centimetres for the mobile phone notto affect the functioning of the pacemaker.
●
Do not carry your mobile phone in your breast pocket, directly overthe pacemaker, when it is switched on.
●
If you suspect your mobile phone is causing interference, switch it offimmediately.
Note
●Telephone conversations inside the vehicle can be affected by highspeed, poor atmospheric conditions and the road surface, as well as by thequality of the network.
●
The instructions that appear on the screen related to the telephonemenu depend on the mobile device used. There may be differences.
●
Take into account the instruction manuals of the mobile phone and thesupplier of the accessories, and any instructions for using the headset.
●
In areas with poor coverage there may be anomalies in the receptionand calls may be interrupted.
Page 51 of 72
50Telephone management (PHONE)●If you detect any strange behaviour between your mobile phone and theradio, restart your mobile by switching it off and on again.●
Consult the compatibility list to ensure your mobile phone will workproperly.
●
Most electronic devices are shielded against high-frequency radio sig-nals. On certain occasions, nevertheless, electronic equipment might notbe protected against the radio frequency signals of the telephone manage-ment (Phone). This may produce interference.
Places with special regulations
Switch off the mobile phone and the preinstallation for mobile telephonesin places with risk of explosion. These areas are common but are not alwaysclearly marked ⇒ in Introduction on page 49. They include, for example:
●
Areas with piping and reservoirs containing chemical products.
●
Below deck, on boats and ferries.
●
Near vehicles that run on liquefied gas (such as propane or butane).
●
In places where there are chemical substances or particles such as flour,dust or metal chips in the air.
●
In any other place where you must turn off the engine of your vehicle.
WARNINGSwitch off your mobile phone in places with risk of explosion! Your mo-bile phone will automatically connect to the mobile phone network assoon as the Bluetooth connection is cut from the mobile preinstallation.
NoteIn areas with special requirements and where the use of mobile phones isprohibited, you must keep the mobile phone and its preinstallation switch-ed off at all times. The radiation emitted by mobile phones when switchedon can cause interference in sensitive technical and medical equipment,which could damage this equipment or cause it to stop working properly.
Linking and connecting your mobile phone to the
infotainment system
To operate a mobile phone through the infotainment system, you need tolink both devices one time only.
For your safety, we recommend you make the link when the vehicle is sta-tionary. In some countries you cannot make the link with the vehicle run-ning.
You must guarantee the following setup in the mobile phone and the info-tainment system:
●
The Bluetooth® function must be active and visible on the mobile phoneand infotainment system, respectively.
●
The keypad lock of the mobile phone must be disconnected.
●
The notification and key tones of your mobile phone must be disconnec-ted.
In some countries, after switching the ignition on, the Bluetooth® functionof the infotainment system should be activated or remain visible for around3 minutes.
During the linking process you must enter data using your mobile phone'skeypad. To do so, you must have your mobile phone to hand.
Once the link has been made, the schedule and call lists stored in your mo-bile phone will be loaded. The duration of the loading process depends on
Page 53 of 72
52Telephone management (PHONE)Note●The behaviour may vary depending on the device connected.●
For some android mobile devices you must accept the request to accessthe PBAP phonebook after linking, to be able to access the phonebook. It isrecommended to activate the option “always” so as not to have to accept itevery time you connect.
General information
Please refer to the notes on using a mobile phone in the vehicle withoutconnection to exterior antenna ⇒ Booklet Instruction Manual, chapter Ac-cessories and technical modifications.
Only use devices that support Bluetooth. At your SEAT dealership, or on theInternet, you will find information about products that support Bluetooth.
Take into account the instruction manual of the mobile phone and of themanufacturer of the accessories. In areas with poor coverage there may beanomalies in the reception and calls may be interrupted.
Most electronic devices are shielded against radio frequency signals (high-frequency). On some occasions, nevertheless, electronic devices cannot beprotected against the radio frequency signals from the telephone manager.This may produce interference.
Note
●There may be restrictions on the use of Bluetooth devices in some coun-tries. Information is available from the local authorities.●
To connect the telephone manager to a device via Bluetooth technology,read the corresponding instruction manual for the particular safety instruc-tions. Only use products that support Bluetooth.
Bluetooth®
Bluetooth®
Bluetooth technology is used to connect a mobile phone to the vehicle's tel-ephone manager. To use the telephone manager with a mobile phone withBluetooth, the linking process must be carried out once.
If a connection has already been established, some mobile telephones withBluetooth are recognised and a connection is established with them auto-matically when the ignition is switched on. For this purpose, the mobilephone and its Bluetooth must be connected, and all the live Bluetooth con-nections with other devices must be closed.
The Bluetooth wireless connection is free.
BluetoothR is a registered trademark of Bluetooth® SIG, Inc.
Bluetooth® profiles
When you connect a mobile phone to the telephone manager, the data ex-change is through one of the 2 Bluetooth profiles.
●
Hands-free Bluetooth profile (HFP): If a mobile phone is connected tothe telephone manager through the HFP, calls can be made wirelesslythrough the hands-free device.
●
Advanced audio profile (A2DP): Bluetooth profile for transmitting audiosignals with stereo quality.
Voice control
Many radio, media, telephone and navigation functions may be activatedthrough voice commands.
The voice control of the infotainment system is only available for the lan-guage that has been selected in system setup ⇒ page 62.
Page 54 of 72
53Telephone management (PHONE)Setup of voice control ⇒ page 63.
When you activate voice control, you can choose which text and icons takeon the colour of the different functions:
●
Red (RADIO and MEDIA) ⇒ page 54 and ⇒ page 54
●
Green (PHONE) ⇒ page 54
●
Blue (NAV) ⇒ page 54
Start and stop the voice control
●
To activate the voice control, briefly press the button on the multi-func-tion steering wheel . It can also be activated with the VOICE button in theMIB.
●
When voice control is activated there will be an ascending acoustic sig-nal and a main command menu will be displayed within the function (themenu will be displayed if option ⇒ page 63 is activated in the voice con-trol setup). The spoken instructions will guide you through the following“dialogue”.
●
Pronounce the desired order and follow the instructions of the “dia-logue”. A function can often be activated with different spoken commands.In case of doubt, try to give a command. Due to the quantity of commandsthe system can admit, this manual only includes the most important ones.
●
When an action is carried out (e.g. calling a contact), the voice controlautomatically deactivates and must be reactivated when needed again.There are certain commands after which the voice control does not end andwaits with What do you wish to do now?.
●
To end voice control manually, keep the button pressed on the multi-function steering wheel until you hear the corresponding confirmation (de-scending sound), or press the button in the display. You can also brieflypress the VOICE button twice to deactivate voice control. (Voice control isdeactivated in the following ways: by briefly pressing the VOICE button orCommand on the steering wheel twice; or by pressing VOICE or Commandon the steering wheel for a few moments, and touching the screen or anybutton on the radio).
Help with voice control
The first time you use the voice control, listen to the Help.
●
Press the function button .
●
Give the “Help” command in the language established in the Systemsetup, and follow the dialogue instructions.
Operation during the dialogue
While the infotainment system transmits a spoken indication, the displaywill show the symbol .
●
Briefly press the button on the multi-function steering wheel to inter-rupt the spoken indication of the infotainment system and give the nextcommand.
IMPORTANT: The system will ONLY recognise a command when the sym-bol is displayed as “active” on the display or touch screen.
If you make a mistake when giving a command or give an incomplete com-mand, and it has no effect, you can repeat the command. The symbol remains active.
●
Briefly press the button of the multi-function steering wheel to repeatthe command.
Instructions for voice control
For optimum functioning of the voice control, follow these instructions:
●
Speak slowly and clearly, as far as possible. The system will not recog-nise words pronounced unclearly, or words and figures in which syllablesare omitted.
●
Telephone numbers must be indicated figure by figure or in blocks ofnumbers in units, tens or hundreds.
●
Speak at a normal volume, without exaggerated intonation or long pau-ses.
●
Avoid noise from the exterior and nearby (for example, conversations in-side the vehicle). Close all doors, windows and the sliding roof.