warning Seat Leon 5D 2013 MEDIA SYSTEM PLUS - NAVI SYSTEM
[x] Cancel search | Manufacturer: SEAT, Model Year: 2013, Model line: Leon 5D, Model: Seat Leon 5D 2013Pages: 72, PDF Size: 3 MB
Page 3 of 72
2General informationGeneral informationThis manual contains information, recommendations, advice and warningsrelated to your radio system. The other publications in the vehicle documen-tation contain further information of which you should be aware for yourown safety and for that of your passengers.
Ensure that the onboard documentation is kept in the vehicle at all times.This is especially important when lending or selling the vehicle to anotherperson.
This manual contains a description of the equipment supplied with the ve-hicle at the time of press. Some of the units described herein will not beavailable until a later date or is only available in certain markets.
The illustrations are intended as a general guide and may vary from theequipment fitted in your vehicle in some details.
The screen colour and the colour of the information displayed on it can varyaccording to vehicle model.
Directions and positions of components (e.g. right, left, front, rear) are al-ways relative to the direction of travel of the vehicle unless otherwise sta-ted.
The equipment marked with an asterisk is only supplied as standard incertain model versions, is optional in others or is only available in spe-cific countries.
Registered trademarks are marked ®. The absence of this symbol doesnot constitute a waiver of the rights concerning any proprietary name.
The section is continued on the following page.
Marks the end of a section.
®WARNINGTexts preceded by this symbol contain information on safety. They warnyou about possible dangers of accident or injury.
CAUTION
Texts with this symbol draw your attention to potential sources of damageto your vehicle.
For the sake of the environment
Texts preceded by this symbol contain relevant information concerning envi-ronmental protection.
Note
Texts preceded by this symbol contain additional information.
Page 4 of 72
3Important InformationImportant InformationImportant Information. Traffic safety
Travelling on today's roads requires the driver's full attention at all times.
Only operate the radio system and its various functions when the traffic sit-uation really permits this.
WARNING●Before starting the trip, you should familiarise yourself with the dif-ferent radio functions.●
High audio volume may represent a danger to you and to others.
●
Adjust the volume in a way that you can distinguish surroundingnoise, for example, horns and sirens, etc.
●
Radio settings should be made when the car is stopped or by a pas-senger.
ECE
SEAT hereby declares that the MIB Standard Radio is in compliance with theessential requirements and other relevant provisions of Directive 1999/5/EC.
Page 5 of 72
4IntroductionIntroductionBefore using the unit for the first timeBefore using the unit for the first time, carry out the following steps. Thiswill enable you to use the unit safely and make full use of the functions itprovides:Please refer to the basic safety instructions.⇒ page 4.Familiarise yourself with the unit overview.⇒ page 6.In System setup, restart the unit to factory set-tings.⇒ page 62Use suitable data media for multimedia playback(Media mode).⇒ page 23
Safety notes
WARNINGAccidents and injuries can occur if the driver is distracted. Operating theinfotainment system while driving can distract your attention from thetraffic.
●
Always drive carefully and responsibly.
●
Select volume settings that allow you to easily hear signals from out-side the vehicle at all times (e.g. emergency service sirens).
●
Setting the volume too high may damage your hearing. This also ap-plies if you are exposed to high volumes for short periods only.
WARNINGThe volume level may suddenly change when you switch audio source orconnect a new audio source.●
Reduce the base volume before switching audio source or connectinga new audio source ⇒ page 9.
WARNINGConnecting, inserting or removing a data medium while the vehicle is inmotion can distract you from the road and lead to accidents.WARNINGConnecting leads for external devices may obstruct the driver.●
Arrange the connecting leads so that they do not obstruct the driver.WARNINGExternal devices that are placed loose in the vehicle or not properly se-cured could be flung though the interior and cause injuries during a sud-den driving or braking manoeuvre, or in the event of an accident.
●
You should never position or attach an external device on a door, onthe windscreen or above or near to the areas marked “AIRBAG” on thesteering wheel, the dash panel and the seat backrests, or between theseareas and the vehicle occupants. External devices can cause serious in-jury in an accident, especially when the airbags inflate.
Page 6 of 72
5IntroductionWARNINGAn armrest may obstruct the driver's arm movements, which could causeaccidents and severe injuries.●
Always keep the armrest closed while the vehicle is in motion.
WARNINGOpening the housing of a CD player can cause injury due to invisible la-ser radiation.●
CD players should only be repaired by a qualified workshop.
WARNINGThe recommendations and traffic signs shown by the navigation systemmay differ from the true traffic conditions.●
Traffic signs and traffic regulations have priority over the recommen-dations and displays provided by the navigation system.
●
Adjust your speed and driving style to visibility, road, traffic andweather conditions.
Note
Not inserting the data medium correctly, or inserting unsuitable data media,may damage the unit.●
When inserting the memory card, make sure it is in the correct position⇒ page 28.
●
If you push too hard, you could damage the lock on the memory cardslot.
●Only use suitable memory cards.●
The CD slot is equipped with a lock function. Do not force CDs into theslot.
●
Only have the CD player repaired by a specialised workshop.
●
If you insert a CD while another is already inside or is being ejected, thiscould damage the CD player unit. Always wait until the data medium hasbeen fully ejected!
Note
The CD drive can be damaged by any foreign objects attached to a data me-dium and by irregularly shaped data media.●
Only use standard 12 cm CDs!
●
Do not stick stickers or other items to the data media. Stickers may peeloff and damage the drive.
●
Do not use printable data media. Covers and stickers may peel off anddamage the drive.
●
Do not insert CD or DVD “singles” (8 cm) or CDs that are not round(“shape-CDS”).
●
Do not insert DVD Plus discs, dual discs or flip discs, as these are thickerthan normal CDs.
Note
Playing media at a very high or distorted volume can damage the speakersof the vehicle.
Page 9 of 72
8IntroductionGeneral information on operating the unit
Introduction
Note
●Lightly pressing the buttons or briefly pressing the touchscreen is suffi-cient to operate the unit.●
It is possible that not all the functions and function buttons are availa-ble as the software of the unit responds to the specific characteristics ofeach market. If a function button is missing on the display this is not due toan error in the unit.
●
Due to country-specific legislation, certain functions cannot be selectedon the screen when the vehicle is travelling above a certain speed.
●
Using a mobile phone inside the vehicle can cause noise in the speak-ers.
●
There may be restrictions on the use of Bluetooth devices in some coun-tries. Information is available from the local authorities.
●
In some vehicles equipped with a parking distance warning system, thevolume of the audio source is automatically lowered when the gear is en-gaged.
Rotary push knobs and buttons
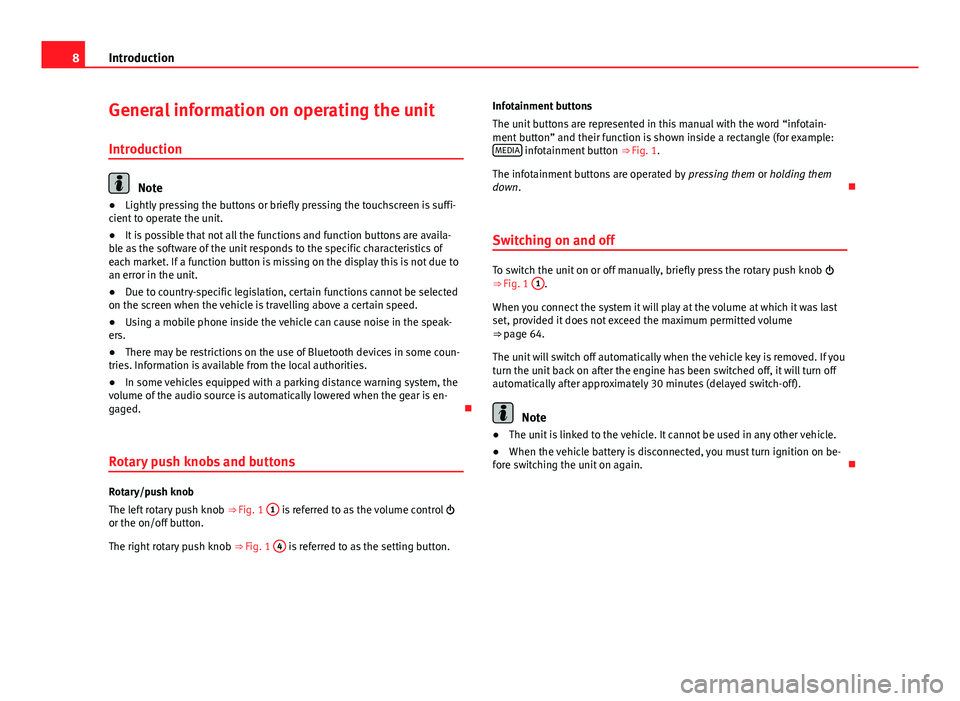
Rotary/push knob
The left rotary push knob ⇒ Fig. 1
1
is referred to as the volume control or the on/off button.
The right rotary push knob ⇒ Fig. 1
4
is referred to as the setting button.
Infotainment buttons
The unit buttons are represented in this manual with the word “infotain-ment button” and their function is shown inside a rectangle (for example:MEDIA infotainment button ⇒ Fig. 1.
The infotainment buttons are operated by pressing them or holding themdown.
Switching on and off
To switch the unit on or off manually, briefly press the rotary push knob ⇒ Fig. 1
1
.
When you connect the system it will play at the volume at which it was lastset, provided it does not exceed the maximum permitted volume⇒ page 64.
The unit will switch off automatically when the vehicle key is removed. If youturn the unit back on after the engine has been switched off, it will turn offautomatically after approximately 30 minutes (delayed switch-off).
Note
●The unit is linked to the vehicle. It cannot be used in any other vehicle.●
When the vehicle battery is disconnected, you must turn ignition on be-fore switching the unit on again.
Page 23 of 72
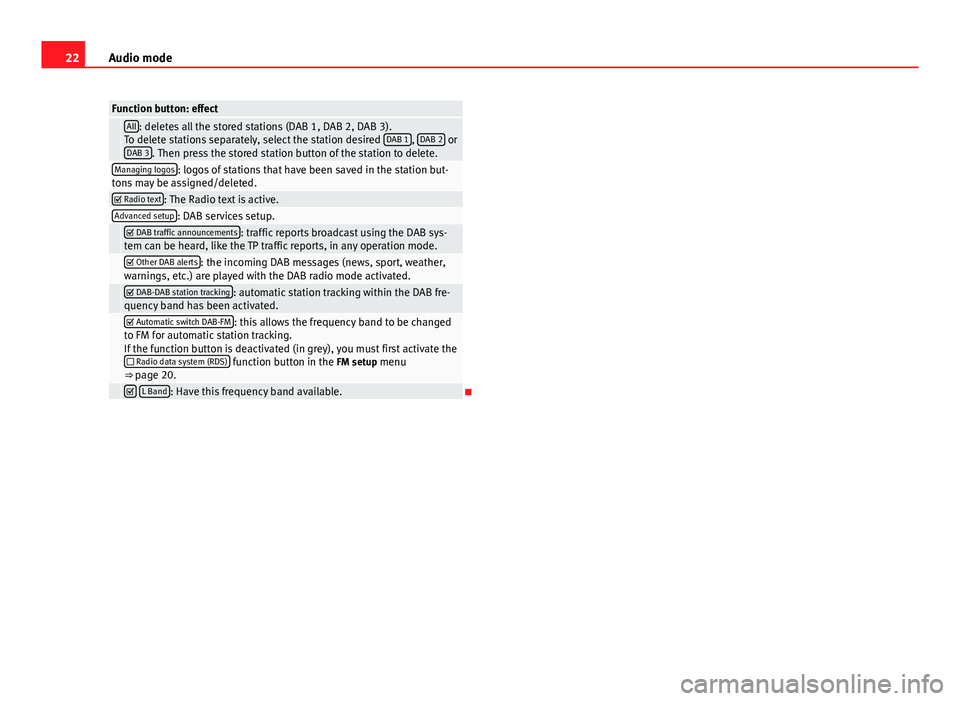
22Audio modeFunction button: effect All: deletes all the stored stations (DAB 1, DAB 2, DAB 3).To delete stations separately, select the station desired DAB 1, DAB 2 orDAB 3. Then press the stored station button of the station to delete.
Managing logos: logos of stations that have been saved in the station but-tons may be assigned/deleted. Radio text: The Radio text is active.Advanced setup: DAB services setup. DAB traffic announcements: traffic reports broadcast using the DAB sys-tem can be heard, like the TP traffic reports, in any operation mode. Other DAB alerts: the incoming DAB messages (news, sport, weather,warnings, etc.) are played with the DAB radio mode activated. DAB-DAB station tracking: automatic station tracking within the DAB fre-quency band has been activated. Automatic switch DAB-FM: this allows the frequency band to be changedto FM for automatic station tracking.If the function button is deactivated (in grey), you must first activate the Radio data system (RDS) function button in the FM setup menu⇒ page 20.
L Band: Have this frequency band available.
Page 32 of 72
31Audio modeNote●The connecting adaptor used must not be crushed or bent sharply. Thiscould damage the adaptor and cause operational faults.●
To play music, do not simultaneously link the external media player tothe infotainment system using bluetooth and the MEDIA-IN multimedia in-terface, as this can cause limitations in the playback.
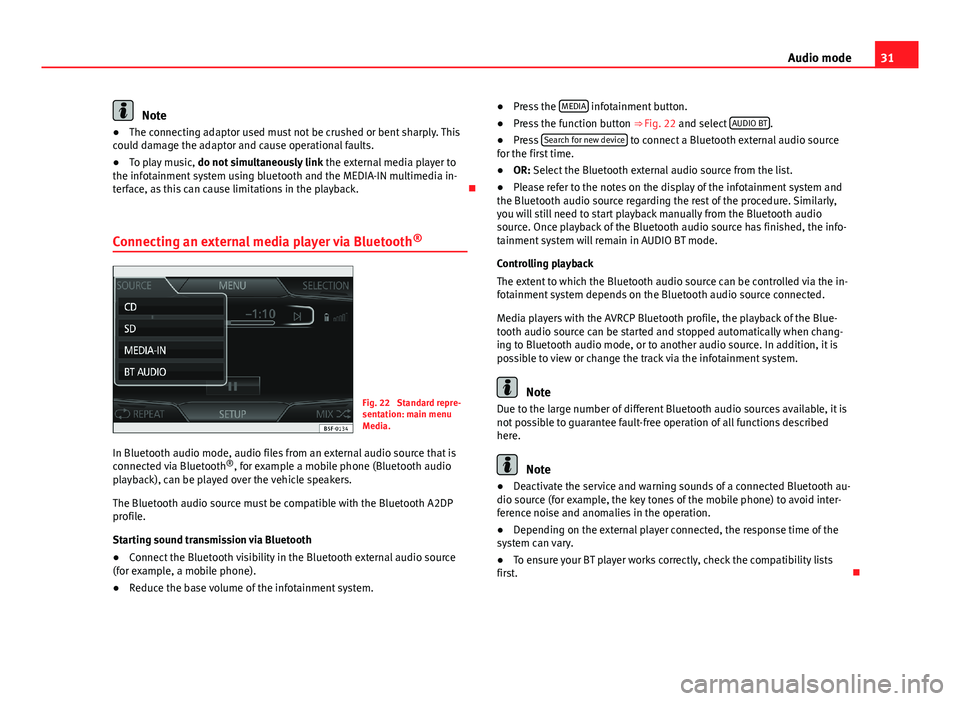
Connecting an external media player via Bluetooth®
Fig. 22
Standard repre-sentation: main menuMedia.
In Bluetooth audio mode, audio files from an external audio source that isconnected via Bluetooth®, for example a mobile phone (Bluetooth audioplayback), can be played over the vehicle speakers.
The Bluetooth audio source must be compatible with the Bluetooth A2DPprofile.
Starting sound transmission via Bluetooth
●
Connect the Bluetooth visibility in the Bluetooth external audio source(for example, a mobile phone).
●
Reduce the base volume of the infotainment system.
●Press the MEDIA infotainment button.●
Press the function button ⇒ Fig. 22 and select AUDIO BT.
●
Press Search for new device to connect a Bluetooth external audio sourcefor the first time.
●
OR: Select the Bluetooth external audio source from the list.
●
Please refer to the notes on the display of the infotainment system andthe Bluetooth audio source regarding the rest of the procedure. Similarly,you will still need to start playback manually from the Bluetooth audiosource. Once playback of the Bluetooth audio source has finished, the info-tainment system will remain in AUDIO BT mode.
Controlling playback
The extent to which the Bluetooth audio source can be controlled via the in-fotainment system depends on the Bluetooth audio source connected.
Media players with the AVRCP Bluetooth profile, the playback of the Blue-tooth audio source can be started and stopped automatically when chang-ing to Bluetooth audio mode, or to another audio source. In addition, it ispossible to view or change the track via the infotainment system.
Note
Due to the large number of different Bluetooth audio sources available, it isnot possible to guarantee fault-free operation of all functions describedhere.
Note
●Deactivate the service and warning sounds of a connected Bluetooth au-dio source (for example, the key tones of the mobile phone) to avoid inter-ference noise and anomalies in the operation.
●
Depending on the external player connected, the response time of thesystem can vary.
●
To ensure your BT player works correctly, check the compatibility listsfirst.
Page 43 of 72
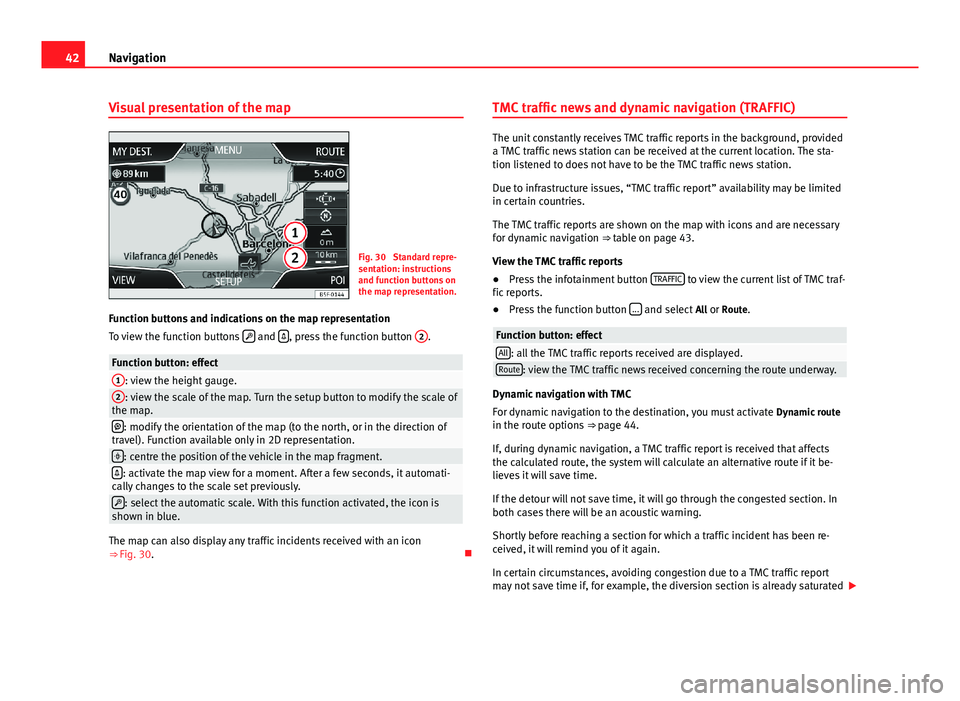
42NavigationVisual presentation of the mapFig. 30
Standard repre-sentation: instructionsand function buttons onthe map representation.
Function buttons and indications on the map representation
To view the function buttons and , press the function button
2
.
Function button: effect1: view the height gauge.2: view the scale of the map. Turn the setup button to modify the scale ofthe map.: modify the orientation of the map (to the north, or in the direction oftravel). Function available only in 2D representation.: centre the position of the vehicle in the map fragment.: activate the map view for a moment. After a few seconds, it automati-cally changes to the scale set previously.: select the automatic scale. With this function activated, the icon isshown in blue.
The map can also display any traffic incidents received with an icon⇒ Fig. 30.
TMC traffic news and dynamic navigation (TRAFFIC)
The unit constantly receives TMC traffic reports in the background, provideda TMC traffic news station can be received at the current location. The sta-tion listened to does not have to be the TMC traffic news station.
Due to infrastructure issues, “TMC traffic report” availability may be limitedin certain countries.
The TMC traffic reports are shown on the map with icons and are necessaryfor dynamic navigation ⇒ table on page 43.
View the TMC traffic reports
●
Press the infotainment button TRAFFIC to view the current list of TMC traf-fic reports.
●
Press the function button ... and select All or Route.
Function button: effectAll: all the TMC traffic reports received are displayed.Route: view the TMC traffic news received concerning the route underway.
Dynamic navigation with TMC
For dynamic navigation to the destination, you must activate Dynamic routein the route options ⇒ page 44.
If, during dynamic navigation, a TMC traffic report is received that affectsthe calculated route, the system will calculate an alternative route if it be-lieves it will save time.
If the detour will not save time, it will go through the congested section. Inboth cases there will be an acoustic warning.
Shortly before reaching a section for which a traffic incident has been re-ceived, it will remind you of it again.
In certain circumstances, avoiding congestion due to a TMC traffic reportmay not save time if, for example, the diversion section is already saturated
Page 45 of 72
44NavigationNavigation setup●
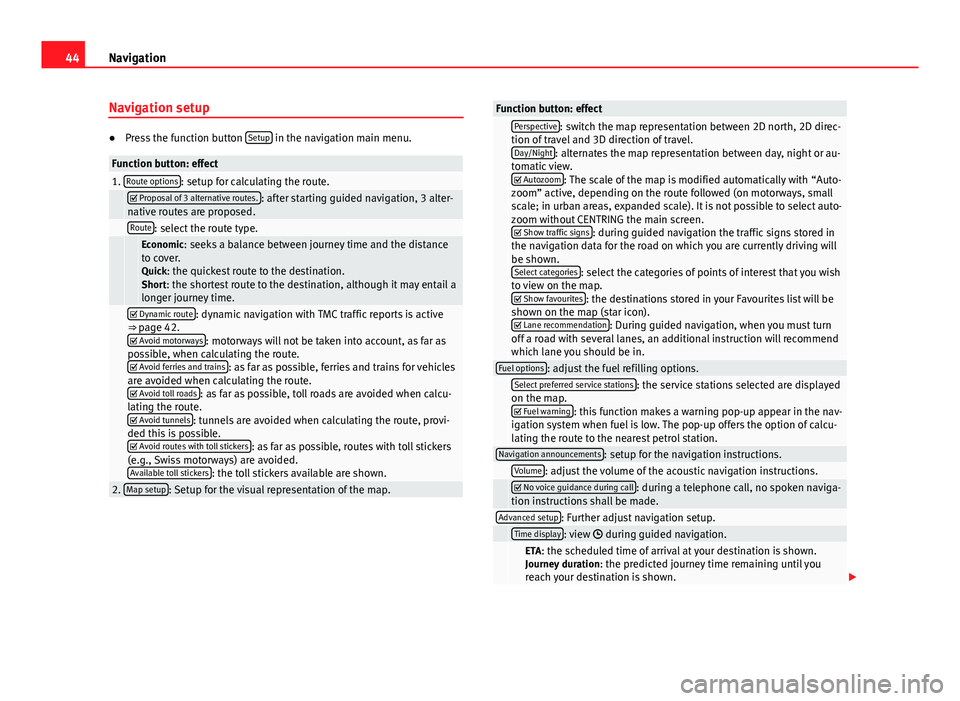
Press the function button Setup in the navigation main menu.
Function button: effect1. Route options: setup for calculating the route. Proposal of 3 alternative routes.: after starting guided navigation, 3 alter-native routes are proposed. Route: select the route type. Economic: seeks a balance between journey time and the distanceto cover.Quick: the quickest route to the destination.Short: the shortest route to the destination, although it may entail alonger journey time.
Dynamic route: dynamic navigation with TMC traffic reports is active⇒ page 42. Avoid motorways: motorways will not be taken into account, as far aspossible, when calculating the route. Avoid ferries and trains: as far as possible, ferries and trains for vehiclesare avoided when calculating the route. Avoid toll roads: as far as possible, toll roads are avoided when calcu-lating the route. Avoid tunnels: tunnels are avoided when calculating the route, provi-ded this is possible. Avoid routes with toll stickers: as far as possible, routes with toll stickers(e.g., Swiss motorways) are avoided.Available toll stickers: the toll stickers available are shown.
2. Map setup: Setup for the visual representation of the map.Function button: effect Perspective: switch the map representation between 2D north, 2D direc-tion of travel and 3D direction of travel.Day/Night: alternates the map representation between day, night or au-tomatic view. Autozoom: The scale of the map is modified automatically with “Auto-zoom” active, depending on the route followed (on motorways, smallscale; in urban areas, expanded scale). It is not possible to select auto-zoom without CENTRING the main screen. Show traffic signs: during guided navigation the traffic signs stored inthe navigation data for the road on which you are currently driving willbe shown.Select categories: select the categories of points of interest that you wishto view on the map. Show favourites: the destinations stored in your Favourites list will beshown on the map (star icon). Lane recommendation: During guided navigation, when you must turnoff a road with several lanes, an additional instruction will recommendwhich lane you should be in.
Fuel options: adjust the fuel refilling options. Select preferred service stations: the service stations selected are displayedon the map. Fuel warning: this function makes a warning pop-up appear in the nav-igation system when fuel is low. The pop-up offers the option of calcu-lating the route to the nearest petrol station.
Navigation announcements: setup for the navigation instructions. Volume: adjust the volume of the acoustic navigation instructions. No voice guidance during call: during a telephone call, no spoken naviga-tion instructions shall be made.Advanced setup: Further adjust navigation setup. Time display: view during guided navigation. ETA: the scheduled time of arrival at your destination is shown.Journey duration: the predicted journey time remaining until youreach your destination is shown.
Page 46 of 72
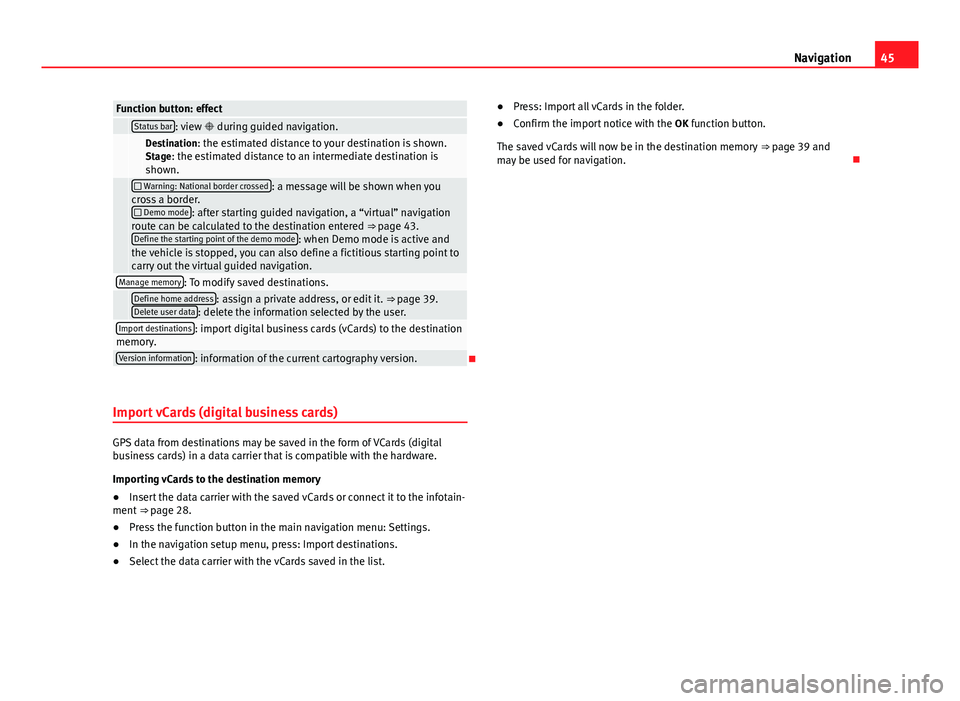
45NavigationFunction button: effect Status bar: view during guided navigation. Destination: the estimated distance to your destination is shown.Stage: the estimated distance to an intermediate destination isshown.
Warning: National border crossed: a message will be shown when youcross a border. Demo mode: after starting guided navigation, a “virtual” navigationroute can be calculated to the destination entered ⇒ page 43.Define the starting point of the demo mode: when Demo mode is active andthe vehicle is stopped, you can also define a fictitious starting point tocarry out the virtual guided navigation.
Manage memory: To modify saved destinations. Define home address: assign a private address, or edit it. ⇒ page 39.Delete user data: delete the information selected by the user.Import destinations: import digital business cards (vCards) to the destinationmemory.Version information: information of the current cartography version.
Import vCards (digital business cards)
GPS data from destinations may be saved in the form of VCards (digitalbusiness cards) in a data carrier that is compatible with the hardware.
Importing vCards to the destination memory
●
Insert the data carrier with the saved vCards or connect it to the infotain-ment ⇒ page 28.
●
Press the function button in the main navigation menu: Settings.
●
In the navigation setup menu, press: Import destinations.
●
Select the data carrier with the vCards saved in the list.
●Press: Import all vCards in the folder.●
Confirm the import notice with the OK function button.
The saved vCards will now be in the destination memory ⇒ page 39 andmay be used for navigation.