technical specifications Seat Leon 5D 2013 Owner's Guide
[x] Cancel search | Manufacturer: SEAT, Model Year: 2013, Model line: Leon 5D, Model: Seat Leon 5D 2013Pages: 339, PDF Size: 4.8 MB
Page 45 of 339
43
Airbag system
Curtain airbags
Description of curtain airbags
The airbag system is not a substitute for the seat belts.
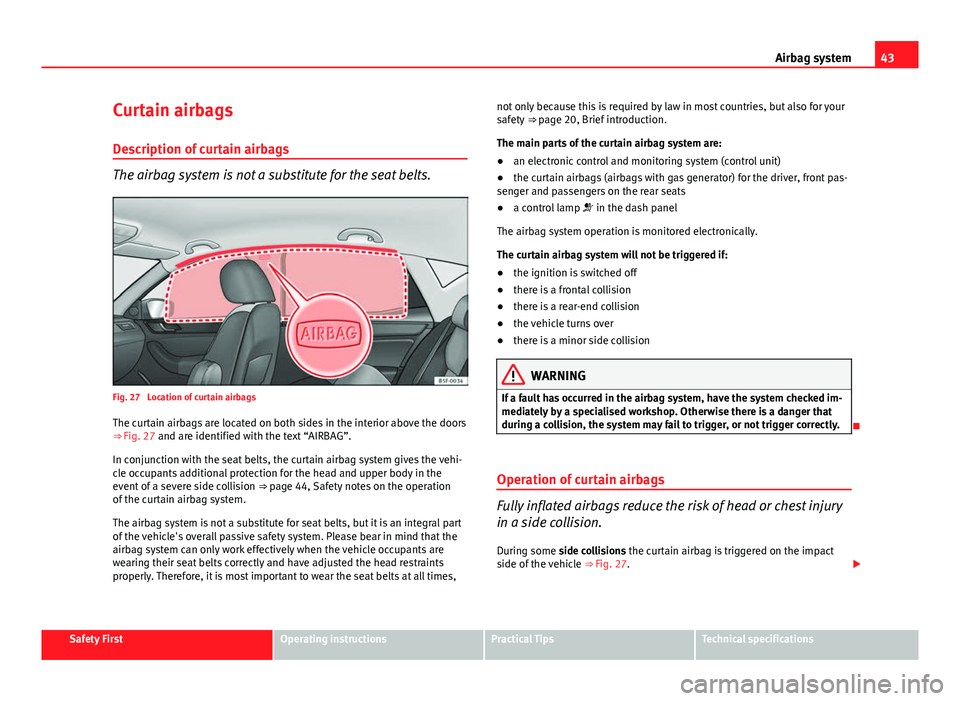
Fig. 27 Location of curtain airbags The curtain airbags are located on both sides in the interior above the doors
⇒ Fig. 27 and are identified with the text “AIRBAG”.
In conjunction with the seat belts, the curtain airbag system gives the vehi-
cle occupants additional protection for the head and upper body in the
event of a severe side collision ⇒ page 44, Safety notes on the operation
of the curtain airbag system.
The airbag system is not a substitute for seat belts, but it is an integral part
of the vehicle's overall passive safety system. Please bear in mind that the
airbag system can only work effectively when the vehicle occupants are
wearing their seat belts correctly and have adjusted the head restraints
properly. Therefore, it is most important to wear the seat belts at all times, not only because this is required by law in most countries, but also for your
safety
⇒ page 20, Brief introduction.
The main parts of the curtain airbag system are:
● an electronic control and monitoring system (control unit)
● the curtain airbags (airbags with gas generator) for the driver, front pas-
senger and passengers on the rear seats
● a control lamp in the dash panel
The airbag system operation is monitored electronically.
The curtain airbag system will not be triggered if:
● the ignition is switched off
● there is a frontal collision
● there is a rear-end collision
● the vehicle turns over
● there is a minor side collision
WARNING
If a fault has occurred in the airbag system, have the system checked im-
mediately by a specialised workshop. Otherwise there is a danger that
during a collision, the system may fail to trigger, or not trigger correctly.
Operation of curtain airbags
Fully inflated airbags reduce the risk of head or chest injury
in a side collision. During some side collisions the curtain airbag is triggered on the impact
side of the vehicle ⇒ Fig. 27.
Safety FirstOperating instructionsPractical TipsTechnical specifications
Page 47 of 339
45
Airbag system
Deactivating airbags
Deactivating airbags
The deactivation of airbags corresponds only to certain cases, i.e. if:
● a child seat is required in the front passenger seat with the child facing
in the opposite direction to the direction of travel (in some countries, due to
divergent legal requirements, facing in the direction of travel) ⇒ page 50;
● despite the driver seat being in the correct position, a minimum dis-
tance of 25 cm cannot be maintained between the centre of the steering
wheel and the driver's torso.
● installation of special devices is required in the steering wheel area due
to a physical disability.
● if you have special seats installed (e.g. an orthopaedic seat without side
airbag).
The front passenger front airbag can be disabled using the switch
⇒ page 46.
We recommend that you contact an authorised SEAT dealer for the disabling
of other airbags.
Airbag system control
The airbag system availability is controlled electronically, regardless of
whether an airbag is disabled.
If an airbag was disabled using a diagnostics system:
● the airbag system warning lamp lights up after switching on the igni-
tion for about 4 seconds, and then flashes for about 12 seconds If the airbag has been disabled with the airbag switch on the side of the
dash panel:
●
the airbag control lamp will light up for about 4 seconds after the ig-
nition is switched on.
● The airbag is disabled, signalled with the warning lamp which
lights up with the word placed in the centre part of the
dash panel ⇒ Fig. 28.
Note
● Respect the current legislation in your country regarding the deactiva-
tion of airbags
● At your authorised SEAT dealer you can find information on which vehi-
cle airbags can be deactivated.
Safety FirstOperating instructionsPractical TipsTechnical specifications
Page 49 of 339
47
Airbag system
Control lamp with the word (front passenger airbag
disabled)
If the front passenger front airbag is disabled, after switching on the igni-
tion, the control lamp will light up for several seconds, then it will switch off
for about 1 s and then switch on again.
If the control lamp is flashing, there is a fault in the disabling of the airbag
system ⇒
. Please go immediately to an Official Service.
WARNING
● The driver of the vehicle is responsible for disabling or switching on
the airbag.
● Always switch off the ignition before disabling the front passenger
airbag! Failure to do so could result in a fault in the airbag deactivation
system.
● Never leave the key in the airbag deactivation switch as it could get
damaged or activate or deactivate the airbag during driving.
● If the control lamp (airbag deactivated) flashes, the front pas-
senger front airbag will not trigger in the event of an accident! Have the
system immediately checked by an Official Service.
Safety FirstOperating instructionsPractical TipsTechnical specifications
Page 51 of 339
49
Child safety
WARNING
● Never install a child seat facing backwards on the front passenger
seat unless the front passenger front airbag has been disabled. Risk of
potentially fatal injuries to the child! However, if it is necessary, in excep-
tional cases, to transport a child in the front passenger seat, the front
passenger front airbag must always be disabled ⇒ page 45. If the pas-
senger seat has a height adjustment option, move it to the highest, most
upright position. If you have a fixed seat, do not install any child restraint
system in this location.
● For those vehicles that do not include a key lock switch to deactivate
the airbag, the vehicle must be taken to a Technical Service.
● All vehicle occupants, especially children, must assume the proper
sitting position and be properly belted in while travelling.
● Never hold children or babies on your lap, this can result in potential-
ly fatal injuries to the child!
● Never allow a child to be transported in a vehicle without being prop-
erly secured, or to stand up or kneel on a seat while travelling. In an acci-
dent, the child could be flung through the vehicle, causing possibly fatal
injuries to themselves and to the other vehicle occupants.
● If children assume an improper sitting position when the vehicle is
moving, they expose themselves to greater risk of injury in the event of a
sudden braking manoeuvre or in an accident. This is particularly impor-
tant if the child is travelling on the front passenger seat and the airbag
system is triggered in an accident; as this could cause serious injury or
even death.
● A suitable child seat can protect your child!
● Never leave an unsupervised child alone on a child seat or in the vehi-
cle.
● Depending on weather conditions, it may become extremely hot or
cold inside the vehicle. This can be fatal.WARNING (Continued)
● Children who are less than 1.5 metres tall must not wear a normal
seat belt without a child seat, as this could cause injuries to the abdomi-
nal and neck areas during a sudden braking manoeuvre or in an accident.
● Do not allow the seat belt to become twisted or jammed, or to rub on
any sharp edges.
● Incorrectly worn seat belts can cause injuries even in a minor colli-
sion or in sudden braking manoeuvres.
● The seat belt provides maximum protection only when the seat belt is
properly positioned ⇒ page 26, Seat belts.
● Only one child may occupy a child seat ⇒ page 50, Child seats.
Safety FirstOperating instructionsPractical TipsTechnical specifications
Page 53 of 339

51
Child safety
WARNING
Read and always observe information and warnings concerning the use
of child seats ⇒ page 48.
Group 1 child seats
A suitable child seat and a correctly adjusted seat belt can
help you to protect your child.
Fig. 31 A category 1 for-
ward-facing child seat fit-
ted on the rear seat
Babies and young children between 9 and 18 kg can travel in the direction
of travel or in the reverse, depending on the seat type. For safety reasons it
is recommended that the child is transported in the direction opposite to
travel for as long as possible. Consult the instruction manual of the child
seat manufacturer for possible installation options.
Follow the manufacturer's instructions and observe any statutory require-
ments when installing and using child seats. We recommend you to always include the manufacturer's Child Seat Instruc-
tion Manual together with the on-board documentation.
SEAT recommends the use of child seats from the
Original Accessories cata-
logue. These child seats have been designed and tested for use in SEAT ve-
hicles. You can find the right child seat for your model and age group at
SEAT dealers.
WARNING
Read and always observe information and warnings concerning the use
of child seats ⇒ page 48.
Group 2 and 3 child seats
A suitable child seat and a correctly adjusted seat belt can
help you to protect your child.
Fig. 32 Forward-facing
child seat installed on
rear seat
Safety FirstOperating instructionsPractical TipsTechnical specifications
Page 55 of 339

53
Child safety
Securing child seats
Ways to secure a child seat
A child seat can be secured differently on the rear seat and
on the front passenger seat.
Fig. 33 On the rear seats: figure A shows the basic child restraint system mounting
using lower retaining rings and the upper retaining strap figure B shows the child re-
straint system mounting using the vehicle seat belt
You can secure a child seat to the rear seat or front passenger seat in the
following ways:
● Child seats in groups 0 to 3 can be secured with a seat belt.
● Child seats in groups 0, 0+ and 1 with the ISOFIX and Top Tether* sys-
tems can be secured without using the seatbelt, thanks to the ISOFIX and
Top Tether* securing rings ⇒ page 55.
● During installation of some models of group I, II and III child seats in the
rear seat, difficulty may arise in mounting the seat given that it comes into
contact with the head restraint. In this case adjust the height of the head restraint or remove it from the seat following the instructions in the corre-
sponding chapter ⇒
page 131. Once you remove the child seat, replace the
head restraint in its original position.
Securing the child seat using the seat belt
The seat belt may be used to secure universal type child seats to the vehicle
seats marked with a U in the table below.
● If the front passenger seat lacks a height adjustment, child seats cannot
be mounted is this location.
Mass groupSeating positionFront passenger seatRear side seatRear centralseat
Group 0
to 10 kgU*UU
Group 0+ to 13 kgU*UU
Group I
9 to 18 kgU*UU
Group II
15 to 25 kgU*UU
Group III
22 to 36 kgU*UU
Suitable for universal restraint systems for use in this mass group.
Only compatible for models with adjustable seat height. Place seat in
the backmost highest position possible.
U:
*:
Safety FirstOperating instructionsPractical TipsTechnical specifications
Page 57 of 339

55
Child safety
Child seats fastened with the “ISOFIX” and Top Tether* system
Child seats with the “ISOFIX” and Toptether* system can be secured quickly, easily and safely on the rear outer seats. Two “ISOFIX” retaining rings are fitted on each rear seat. In some vehicles,
the rings are secured to the seat frame and, in others, they are secured to
the rear floor. The access to the ISOFIX rings is between the rear seat back-
rest and the seat cushioning. The Top Tether* anchors are located at the
rear of the backrests of the rear seats (behind the seat backrest or in the
luggage compartment). To understand the compatibility of the "ISOFIX" systems in the vehicle, con-
sult the table below.
●
The allowed body weight for the child seat or information regarding size
A to F is indicated on the label on the child seat with certification universal
or semi-universal.
Mass groupSize classElectrical equipmentMounting directionVehicle Isofix positionsRear side seats
Baby carrierFISO/L1Backward-facingXGISO/L2Backward-facingXGroup 0 to 10 kgEISO/R1Backward-facingIU
Group 0+ to 13 kgEISO/R1Backward-facingIUDISO/R2Backward-facingIUCISO/R3Backward-facingIU
Group I 9 to 18 kg
DISO/R2Backward-facingIUCISO/R3Backward-facingIUBISO/F2Forward-facingIUB1ISO/F2XForward-facingIUAISO/F3Forward-facingIUGroup II 15 to 25 kg------Forward-facing---Group III 22 to 36 kg------Forward-facing---
Suitable for ISOFIX universal child restraint systems approved for use in
this mass group
ISOFIX position not suitable for ISOFIX child restraint systems for this
mass group or size class
IU:
X:
Safety FirstOperating instructionsPractical TipsTechnical specifications
Page 59 of 339

57
Child safety
Child seats with the Top Tether system come with a strap for securing the
seat to the vehicle anchor point, located at the back of the rear seat back-
rest.
The objective of the retainer strap is to reduce forward movements of the
child seat in a crash, helping reduce the risk of injuries to the head from hit-
ting the inside of the vehicle.
Using the Top Tether in rear-facing mounted seats
Currently, there are very few rear-facing child safety seats that have Top
Tether. Please carefully read and follow the seat manufacturer instructions
to learn the proper way to install the Top Tether strap.
Fitting the Top Tether child restraint to the anchoring point
Fig. 36 Retainer strap:
correct adjustment and
fitting
Securing the Top Tether child restraint to the anchor point situated
on the rear of the backrest
– Pull out the fastening belt of the child restraint seat according
to the manufacturer's instructions. –
Guide the Top Tether fastening belt under the rear seat head re-
straint ⇒ Fig. 36 (lift the head restraint where necessary).
– Slide the belt so that the Top Tether belt of the child restraint
seat is correctly secured to the anchor on the back of the rear
seat.
– Firmly tighten the Top Tether belt following the child restraint
seat manufacturer's instructions.
Releasing the retaining strap
– Release the retainer strap in line with the instructions given by
the child safety seat manufacturer.
– Push the lock and release it from the anchoring support.
WARNING
An undue installation of the safety seat will increase the risk of injury in
the event of a crash.
● Never tie the retainer strap to a hook in the luggage compartment.
● Never secure or tie luggage or other items to the lower anchorages
(ISOFIX) or the upper ones (Top Tether).
Safety FirstOperating instructionsPractical TipsTechnical specifications
Page 61 of 339

59
Controls and displays
Operating instructions Controls and displays
Overview
Door handle
Central locking switch . . . . . . . . . . . . . . . . . . . . . . . . . . . . . . . . . . . . . 94
Electric control to adjust exterior mirrors . . . . . . . . . . . . . . . . . . . .125
Air outlets . . . . . . . . . . . . . . . . . . . . . . . . . . . . . . . . . . . . . . . . . . . . . . . . 160
Control lever for:
– Turn signals and main beam headlights . . . . . . . . . . . . . . . . .110
– Lane Assist . . . . . . . . . . . . . . . . . . . . . . . . . . . . . . . . . . . . . . . . . . . . . 207
– Main beam assist . . . . . . . . . . . . . . . . . . . . . . . . . . . . . . . . . . . . . . . 114
– Cruise control system (CCS) . . . . . . . . . . . . . . . . . . . . . . . . . . . . . 184
Depending on equipment fitted:
– Lever for cruise control . . . . . . . . . . . . . . . . . . . . . . . . . . . . . . . . . . 184
Steering wheel with horn and
– Driver airbag . . . . . . . . . . . . . . . . . . . . . . . . . . . . . . . . . . . . . . . . . . . 36
– On-board computer controls . . . . . . . . . . . . . . . . . . . . . . . . . . . . 73
– Controls for radio, telephone, navigation and speech dia-
logue system ⇒ Booklet Radio
– Paddle levers for tiptronic gearshift (automatic gearbox) . .178
Instrument panel . . . . . . . . . . . . . . . . . . . . . . . . . . . . . . . . . . . . . . . . . . 61
Control lever for:
– Windscreen wipers and washer . . . . . . . . . . . . . . . . . . . . . . . . . . 120
– Wipe and wash system . . . . . . . . . . . . . . . . . . . . . . . . . . . . . . . . . 120
– On-board computer . . . . . . . . . . . . . . . . . . . . . . . . . . . . . . . . . . . . . 73
12345
6
7
89
Depending on equipment fitted: Radio or display for Easy
Connect (navigation, radio, TV/video)
. . . . . . . . . . . . . . . . . . . . . .79
Depending on the equipment, buttons for:
– SEAT driving modes . . . . . . . . . . . . . . . . . . . . . . . . . . . . . . . . . . . . . 211
– Start-Stop system . . . . . . . . . . . . . . . . . . . . . . . . . . . . . . . . . . . . . . . 169
– Park assist system . . . . . . . . . . . . . . . . . . . . . . . . . . . . . . . . . . . . . . 217
– Hazard warning lights . . . . . . . . . . . . . . . . . . . . . . . . . . . . . . . . . . 113
– Airbag off display . . . . . . . . . . . . . . . . . . . . . . . . . . . . . . . . . . . . . . . 46
Glove box with (depending on equipment): . . . . . . . . . . . . . . . . .134
– CD player* and/or SD card* ⇒ Booklet Radio
– Multimedia interface* ⇒ Booklet Radio
Tyre pressure switch . . . . . . . . . . . . . . . . . . . . . . . . . . . . . . . . . . . . . . . 216
Front passenger airbag switch . . . . . . . . . . . . . . . . . . . . . . . . . . . . . 46
Front passenger airbag . . . . . . . . . . . . . . . . . . . . . . . . . . . . . . . . . . . . 36
Passenger seat heating control . . . . . . . . . . . . . . . . . . . . . . . . . . . . 130
Storage compartment
Depending on gearbox fitted, gear lever or selector lever for:
– manual gearbox . . . . . . . . . . . . . . . . . . . . . . . . . . . . . . . . . . . . . . . . 172
– automatic gearbox . . . . . . . . . . . . . . . . . . . . . . . . . . . . . . . . . . . . . . 173
Depending on the equipment, controls for:
– Heating and ventilation system or manual air conditioner .158, 157
– Automatic air conditioner . . . . . . . . . . . . . . . . . . . . . . . . . . . . . . . 154
Parking brake . . . . . . . . . . . . . . . . . . . . . . . . . . . . . . . . . . . . . . . . . . . . . 166
Driver seat heating control . . . . . . . . . . . . . . . . . . . . . . . . . . . . . . . . . 130
10
11
12
131415161718
19
2021
Safety FirstOperating instructionsPractical TipsTechnical specifications
Page 63 of 339
61
Instruments and warning/control lamps
Instruments and warning/control lamps
Instruments Introduction
Additional information and warnings:
● Control and warning lamps ⇒ page 69
● SEAT information system
● Easy Connect system
● Gear engaged display (automatic gearbox) ⇒ page 173.
● Instructions for inspection intervals ⇒ Booklet Maintenance Programme
WARNING
Any distraction may lead to an accident, with the risk of injury.
● Do not operate the instrument panel controls when driving.
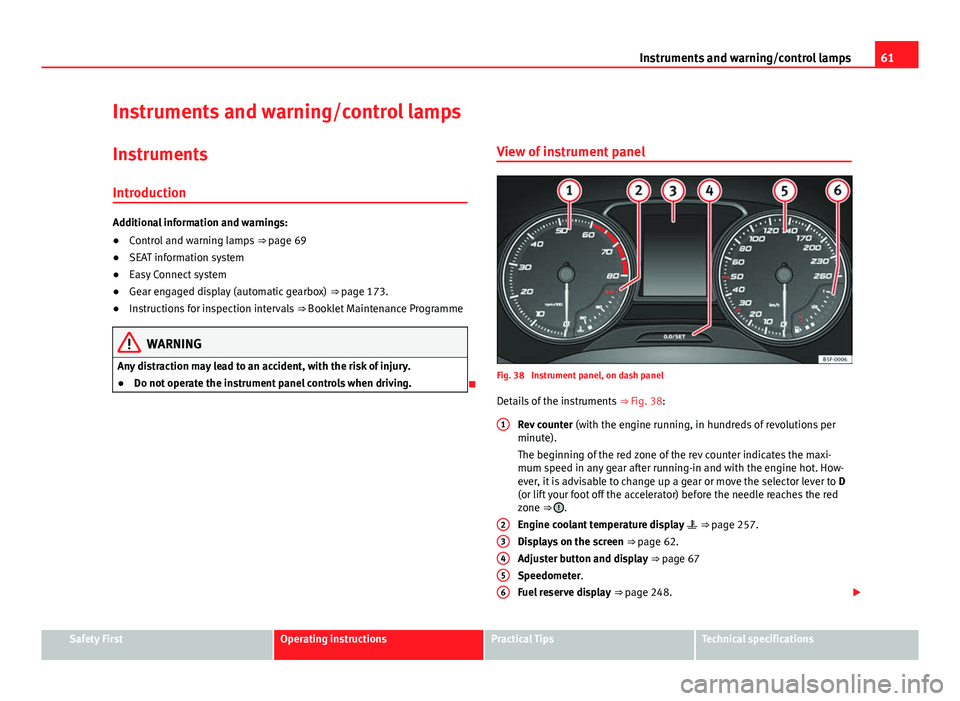
View of instrument panelFig. 38 Instrument panel, on dash panel
Details of the instruments
⇒ Fig. 38:
Rev counter (with the engine running, in hundreds of revolutions per
minute).
The beginning of the red zone of the rev counter indicates the maxi-
mum speed in any gear after running-in and with the engine hot. How-
ever, it is advisable to change up a gear or move the selector lever to D
(or lift your foot off the accelerator) before the needle reaches the red
zone ⇒
.
Engine coolant temperature display
⇒ page 257.
Displays on the screen
⇒ page 62.
Adjuster button and display ⇒ page 67
Speedometer.
Fuel reserve display
⇒ page 248.
123456
Safety FirstOperating instructionsPractical TipsTechnical specifications