technical specifications Seat Leon 5D 2013 Repair Manual
[x] Cancel search | Manufacturer: SEAT, Model Year: 2013, Model line: Leon 5D, Model: Seat Leon 5D 2013Pages: 339, PDF Size: 4.8 MB
Page 125 of 339
123
Lights and visibility
Lifting and returning windscreen wiper arms
● Place the wiper arms in the service position ⇒
.
● Only hold the wiper arms at the point where the blade is fixed.
CAUTION
● To prevent damage to the bonnet and the wiper arms, only leave them in
the service position.
● Before driving, always lower the wiper arms.
Rain sensor*
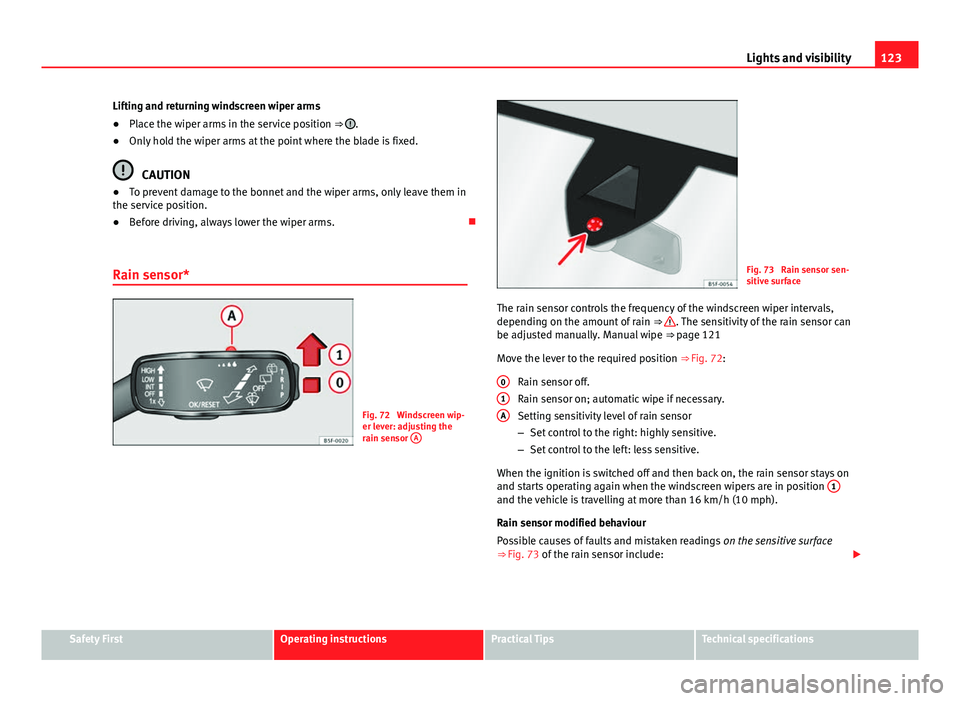
Fig. 72 Windscreen wip-
er lever: adjusting the
rain sensor A
Fig. 73 Rain sensor sen-
sitive surface
The rain sensor controls the frequency of the windscreen wiper intervals,
depending on the amount of rain ⇒
. The sensitivity of the rain sensor can
be adjusted manually. Manual wipe ⇒ page 121
Move the lever to the required position ⇒ Fig. 72:
Rain sensor off.
Rain sensor on; automatic wipe if necessary.
Setting sensitivity level of rain sensor
– Set control to the right: highly sensitive.
– Set control to the left: less sensitive.
When the ignition is switched off and then back on, the rain sensor stays on
and starts operating again when the windscreen wipers are in position 1
and the vehicle is travelling at more than 16 km/h (10 mph).
Rain sensor modified behaviour
Possible causes of faults and mistaken readings
on the sensitive surface
⇒ Fig. 73 of the rain sensor include:
0
1A
Safety FirstOperating instructionsPractical TipsTechnical specifications
Page 127 of 339
125
Lights and visibility
Recommended windscreen wipers
● For the hottest seasons we recommend summer G 052 184 A1 for clear
glass. Proportions of the mixture in the washer fluid tank: 1:100 (1 part con-
centrate per 100 parts water).
● All year round, G 052 164 A2 for clear glass. Approximate proportion of
the winter mixture, up to -18 °C (0 °F): 1:2 (1 part concentrate per 2 parts
water); otherwise, a 1:4 proportion of mixture in the washer fluid tank.
Reservoir capacity
The reservoir holds approximately 3 - 4 litres; in vehicles with headlight
washer, it is approximately 3 -6 litres.
WARNING
Never mix an unsuitable antifreeze or other similar additives with the
windscreen washer water. A greasy layer may be formed on the wind-
screen which will impair visibility.
● Use clean water with a window cleaner recommended by SEAT.
● If necessary, add a suitable antifreeze to the water in the reservoir.
CAUTION
● Do not mix cleaning products recommended by SEAT with other prod-
ucts. This could lead to flocculation and may block the windscreen washer
jets.
● When topping up service fluids, make absolutely certain that you fill the
fluids into the correct reservoirs. Using the wrong fluids could cause serious
malfunctions and engine damage! Rear vision mirror
Adjusting the exterior mirrors
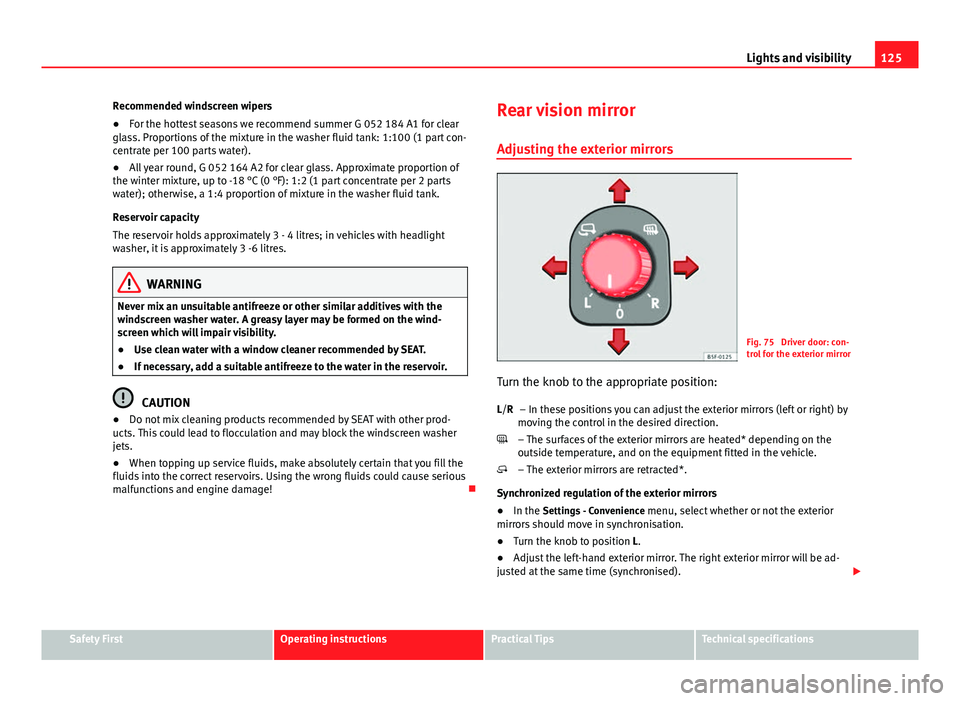
Fig. 75 Driver door: con-
trol for the exterior mirror
Turn the knob to the appropriate position: – In these positions you can adjust the exterior mirrors (left or right) by
moving the control in the desired direction.
– The surfaces of the exterior mirrors are heated* depending on the
outside temperature, and on the equipment fitted in the vehicle.
– The exterior mirrors are retracted*.
Synchronized regulation of the exterior mirrors
● In the Settings - Convenience menu, select whether or not the exterior
mirrors should move in synchronisation.
● Turn the knob to position L.
● Adjust the left-hand exterior mirror. The right exterior mirror will be ad-
justed at the same time (synchronised).
L/R
Safety FirstOperating instructionsPractical TipsTechnical specifications
Page 129 of 339
127
Lights and visibility
Interior rear vision mirror with manual setting for anti-dazzle
position
– Position the small lever of the lower edge of the mirror to face
towards the rear.
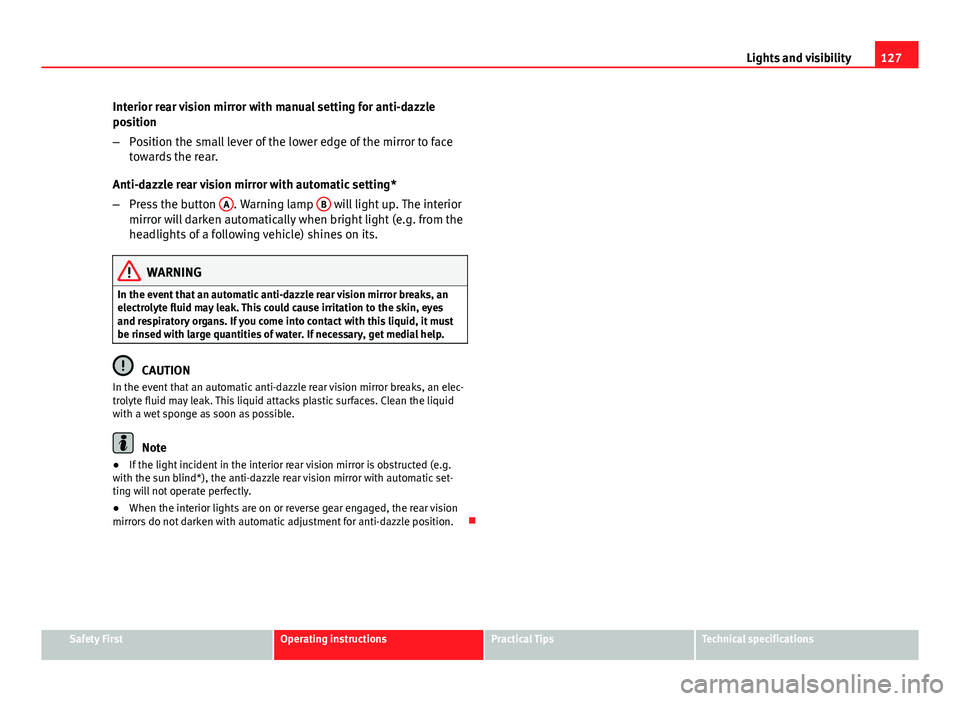
Anti-dazzle rear vision mirror with automatic setting*
– Press the button A
. Warning lamp B will light up. The interior
mirror will darken automatically when bright light (e.g. from the
headlights of a following vehicle) shines on its.
WARNING
In the event that an automatic anti-dazzle rear vision mirror breaks, an
electrolyte fluid may leak. This could cause irritation to the skin, eyes
and respiratory organs. If you come into contact with this liquid, it must
be rinsed with large quantities of water. If necessary, get medial help.
CAUTION
In the event that an automatic anti-dazzle rear vision mirror breaks, an elec-
trolyte fluid may leak. This liquid attacks plastic surfaces. Clean the liquid
with a wet sponge as soon as possible.
Note
● If the light incident in the interior rear vision mirror is obstructed (e.g.
with the sun blind*), the anti-dazzle rear vision mirror with automatic set-
ting will not operate perfectly.
● When the interior lights are on or reverse gear engaged, the rear vision
mirrors do not darken with automatic adjustment for anti-dazzle position.
Safety FirstOperating instructionsPractical TipsTechnical specifications
Page 131 of 339
129
Seats and storage
Front seats
Manual seat adjustment
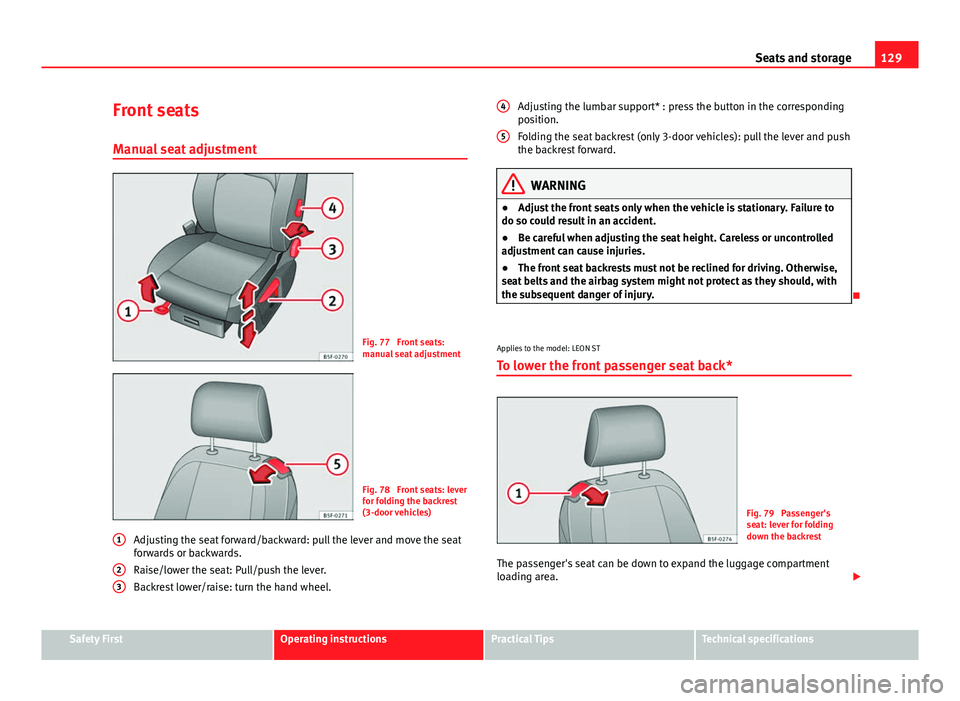
Fig. 77 Front seats:
manual seat adjustment
Fig. 78 Front seats: lever
for folding the backrest
(3-door vehicles)
Adjusting the seat forward/backward: pull the lever and move the seat
forwards or backwards.
Raise/lower the seat: Pull/push the lever.
Backrest lower/raise: turn the hand wheel.
1
23
Adjusting the lumbar support* : press the button in the corresponding
position.
Folding the seat backrest (only 3-door vehicles): pull the lever and push
the backrest forward.
WARNING
● Adjust the front seats only when the vehicle is stationary. Failure to
do so could result in an accident.
● Be careful when adjusting the seat height. Careless or uncontrolled
adjustment can cause injuries.
● The front seat backrests must not be reclined for driving. Otherwise,
seat belts and the airbag system might not protect as they should, with
the subsequent danger of injury.
Applies to the model: LEON ST
To lower the front passenger seat back*
Fig. 79 Passenger's
seat: lever for folding
down the backrest
The passenger's seat can be down to expand the luggage compartment
loading area.
4
5
Safety FirstOperating instructionsPractical TipsTechnical specifications
Page 133 of 339
131
Seats and storage
● The seat cushion is wet or damp.
● The indoor or outdoor temperature is greater than 25 °C (77 °F).
effectUsing seat heatingTo switch sys-
tem on:Press the button or . Seat heating is switched on fully.
Adjusting the
heating out-
put:Press the button or repeatedly until the desired inten-
sity level is reached.
To switch sys-
tem off:Press the button or until all warning lamps switch off.
WARNING
People who, because of medications, paralysis or chronic diseases (e.g.
diabetes) cannot perceive pain or temperature, or have a limited percep-
tion thereof, may suffer burns to the back, buttocks or legs when using
seat heating, an occurrence that may entail a very lengthy recovery peri-
od or from which it may not be possible to recover fully. Seek medical ad-
vice if you have doubts regarding your health.
● People with a limit pain and temperature threshold must never use
seat heating.
WARNING
If the fabric of the cushion is wet, this can adversely affect the operation
of the seat heating, increasing the risk of burns.
● Make sure the seat cushion is dry prior to using the seat heater.
● Do not sit on the seat with clothing that is wet or damp.
● Do not leave clothing that is wet or damp on the seat.
● Do not spill liquid on the seat.
CAUTION
● To avoid damaging the heating elements of the seat heating, please do
not kneel on the seat or apply sharp pressure at a single point to the seat
cushion and backrest.
● Liquids, sharps objects and insulating materials (e.g., covers or child
seats) can damage the seat heating.
● In the event of odours, switch off the seat heating immediately and have
the unit inspected by a specialised workshop.
For the sake of the environment
The seat heating should remain on only when needed. Otherwise, it is an
unnecessary fuel waste.
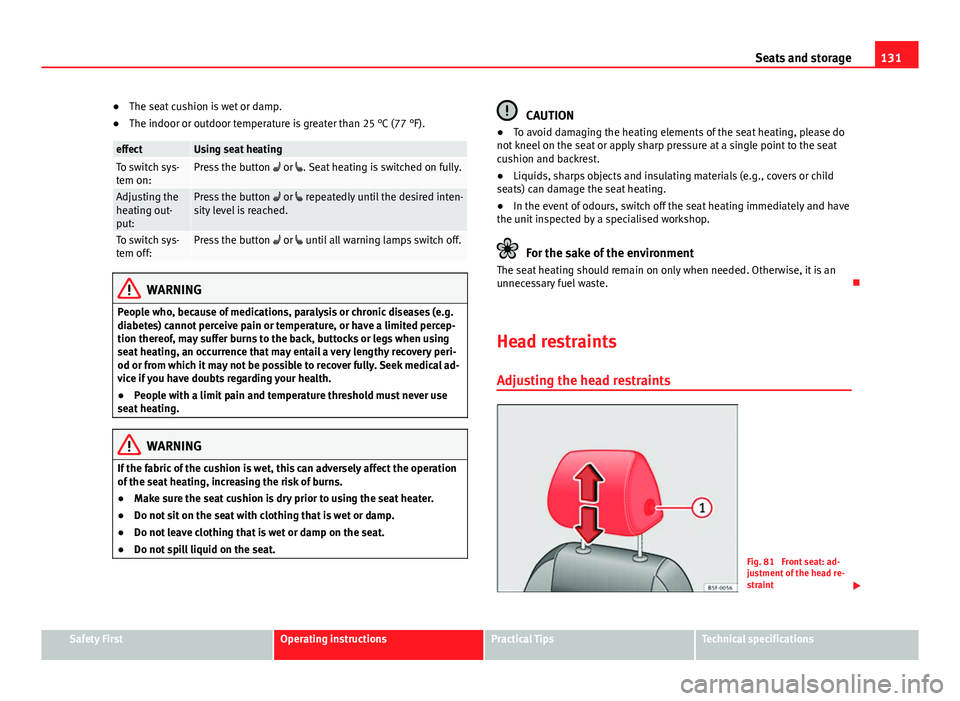
Head restraints Adjusting the head restraints
Fig. 81 Front seat: ad-
justment of the head re-
straint
Safety FirstOperating instructionsPractical TipsTechnical specifications
Page 135 of 339
133
Seats and storage
Storage compartments
Storage areas under the front seats*
There is a storage compartment with a cover under each
front seat.
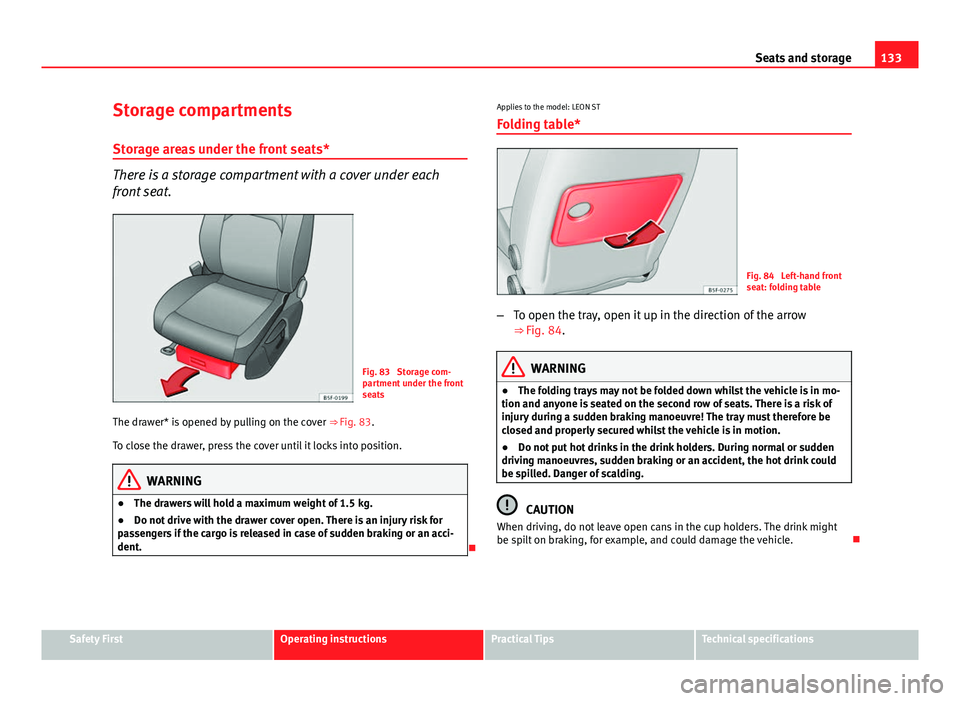
Fig. 83 Storage com-
partment under the front
seats
The drawer* is opened by pulling on the cover ⇒ Fig. 83.
To close the drawer, press the cover until it locks into position.
WARNING
● The drawers will hold a maximum weight of 1.5 kg.
● Do not drive with the drawer cover open. There is an injury risk for
passengers if the cargo is released in case of sudden braking or an acci-
dent.
Applies to the model: LEON ST
Folding table*
Fig. 84 Left-hand front
seat: folding table
– To open the tray, open it up in the direction of the arrow
⇒ Fig. 84.
WARNING
● The folding trays may not be folded down whilst the vehicle is in mo-
tion and anyone is seated on the second row of seats. There is a risk of
injury during a sudden braking manoeuvre! The tray must therefore be
closed and properly secured whilst the vehicle is in motion.
● Do not put hot drinks in the drink holders. During normal or sudden
driving manoeuvres, sudden braking or an accident, the hot drink could
be spilled. Danger of scalding.
CAUTION
When driving, do not leave open cans in the cup holders. The drink might
be spilt on braking, for example, and could damage the vehicle.
Safety FirstOperating instructionsPractical TipsTechnical specifications
Page 137 of 339

135
Seats and storage
Other storage compartments
You will find more object holders, compartments and supports in other
parts of the vehicle:
● In the top of the glove compartment in vehicles that do not have a CD
reader. The load must not exceed 1.2 kg.
● In the centre console under the centre armrest*.
● In the driver side panel there is a removable box for access to fuses and
relays. The load of the compartment should not exceed 0.2 kg.
● Coat hooks in the pillar B ⇒
.
● Other storage compartments are found in the rear seat, to the left and
the right of the seats.
WARNING
● Please make sure that any items of clothing hanging from the coat
hooks do not obstruct your view to the rear.
● The coat hooks should only be used for lightweight clothing. Do not
leave any heavy or sharp objects in the pockets.
● Do not use clothes hangers to hang up the clothing, as this could in-
terfere with the function of the head-protection airbags.
Power sockets
Electrical equipment can be connected to the 12 volt power
socket.
Fig. 87 Centre console:
front/rear 12-volt power
socket
Fig. 88 Detailed view of
the side trim in the lug-
gage compartment: 12-
volt power sockets (valid
only for the LEON ST
model)
Safety FirstOperating instructionsPractical TipsTechnical specifications
Page 139 of 339
137
Seats and storage
Applies to the model: LEON / LEON SC
Increase capacity of luggage compartment
The backrests can be folded forward individually or togeth-
er.
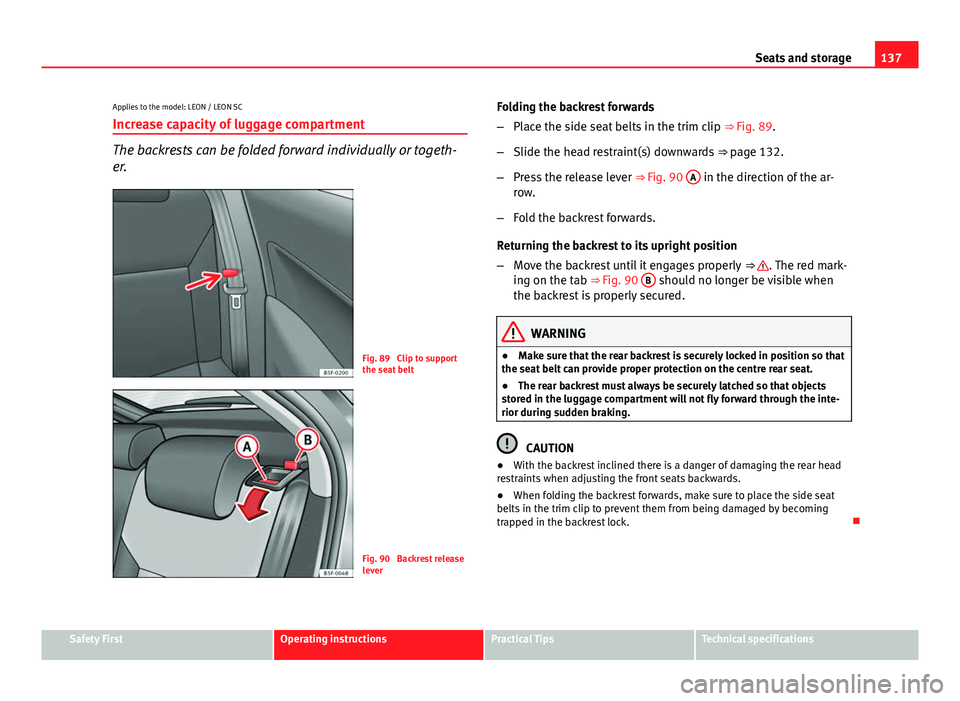
Fig. 89 Clip to support
the seat belt
Fig. 90 Backrest release
lever Folding the backrest forwards
–
Place the side seat belts in the trim clip ⇒ Fig. 89.
– Slide the head restraint(s) downwards ⇒ page 132.
– Press the release lever ⇒ Fig. 90 A
in the direction of the ar-
row.
– Fold the backrest forwards.
Returning the backrest to its upright position
– Move the backrest until it engages properly ⇒
. The red mark-
ing on the tab ⇒ Fig. 90 B should no longer be visible when
the backrest is properly secured.
WARNING
● Make sure that the rear backrest is securely locked in position so that
the seat belt can provide proper protection on the centre rear seat.
● The rear backrest must always be securely latched so that objects
stored in the luggage compartment will not fly forward through the inte-
rior during sudden braking.
CAUTION
● With the backrest inclined there is a danger of damaging the rear head
restraints when adjusting the front seats backwards.
● When folding the backrest forwards, make sure to place the side seat
belts in the trim clip to prevent them from being damaged by becoming
trapped in the backrest lock.
Safety FirstOperating instructionsPractical TipsTechnical specifications
Page 141 of 339
139
Seats and storage
WARNING (Continued)
● On lifting the rear seat backrest, avoid trapping or damaging the seat
belt.
● On folding down or lifting the rear seat backrest, always keep your
hands, fingers, feet and other body parts out of its path.
● For the safety belts to offer the necessary protection, all the parts of
the rear backrest should always be properly engaged. This is particularly
important in the case of the rear centre seat. Anyone sitting in a seat
whose backrest is not properly engaged could fly forward, together with
the backrest in the event of a sudden braking, a brusque manoeuvre or
an accident.
● A red mark on the button 2
warns that the backrest is not engaged.
Always check that the red marking is not visible when the backrest is in
the upright position.
● When the rear seat backrest is folded down or not properly engaged,
nobody is allowed to travel in the corresponding seats (not even a child).
CAUTION
If the rear seat backrest is folded down or lifted carelessly it may cause
damage to the vehicle or other objects.
● Before folding the rear seat backrest, adjust the front seats so that nei-
ther the head restraints nor the padding of the rear backrest hit them. Applies to the model: LEON / LEON SC
Luggage compartment cover
The luggage compartment cover blocks the view into the
luggage compartment.
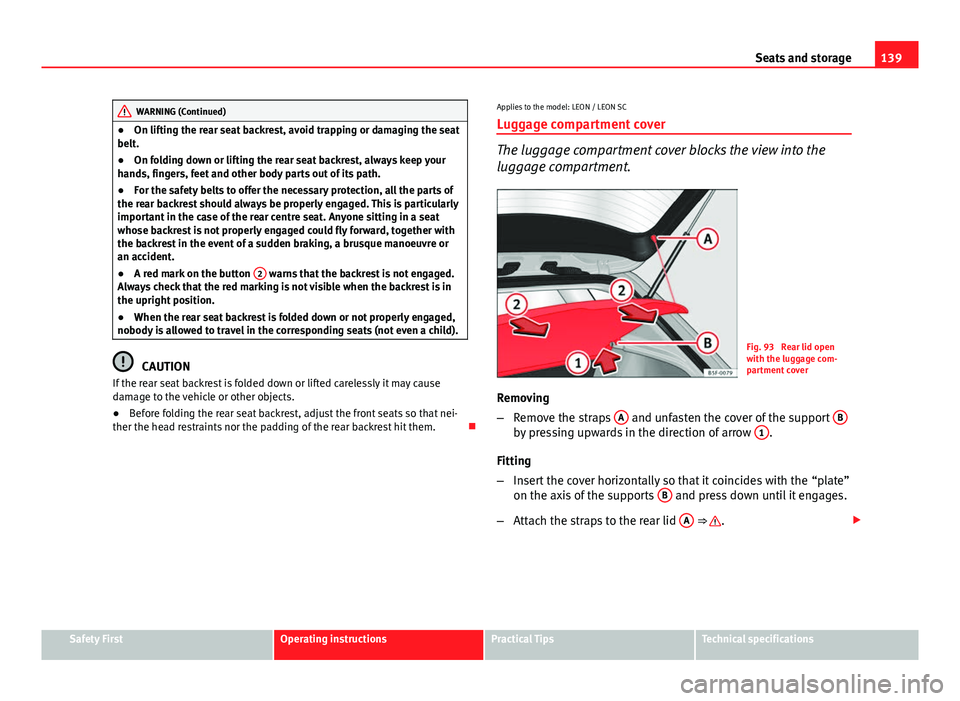
Fig. 93 Rear lid open
with the luggage com-
partment cover
Removing
– Remove the straps A
and unfasten the cover of the support Bby pressing upwards in the direction of arrow 1.
Fitting
– Insert the cover horizontally so that it coincides with the “plate”
on the axis of the supports B
and press down until it engages.
– Attach the straps to the rear lid A
⇒ .
Safety FirstOperating instructionsPractical TipsTechnical specifications
Page 143 of 339
141
Seats and storage
WARNING
If animals or other vehicles or stationary objects are carried incorrectly
on the rear shelf, they could cause serious injuries in case of sudden
braking or brusque manoeuvre or an accident.
● Do not leave hard, heavy or sharp objects loose on the rear shelf.
● Never transport animals on the rear shelf.
Applies to the model: LEON ST
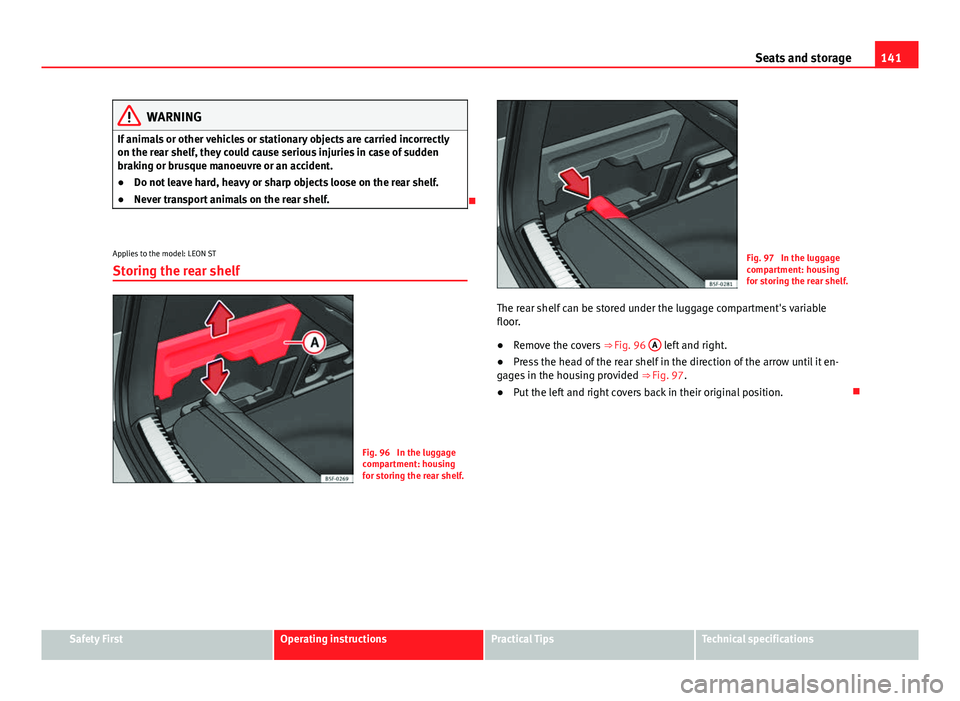
Storing the rear shelf
Fig. 96 In the luggage
compartment: housing
for storing the rear shelf.
Fig. 97 In the luggage
compartment: housing
for storing the rear shelf.
The rear shelf can be stored under the luggage compartment's variable
floor.
● Remove the covers
⇒ Fig. 96 A
left and right.
● Press the head of the rear shelf in the direction of the arrow until it en-
gages in the housing provided ⇒ Fig. 97.
● Put the left and right covers back in their original position.
Safety FirstOperating instructionsPractical TipsTechnical specifications