buttons Seat Leon 5D 2014 MEDIA SYSTEM PLUS - NAVI SYSTEM
[x] Cancel search | Manufacturer: SEAT, Model Year: 2014, Model line: Leon 5D, Model: Seat Leon 5D 2014Pages: 64, PDF Size: 1.71 MB
Page 7 of 64
Introduction
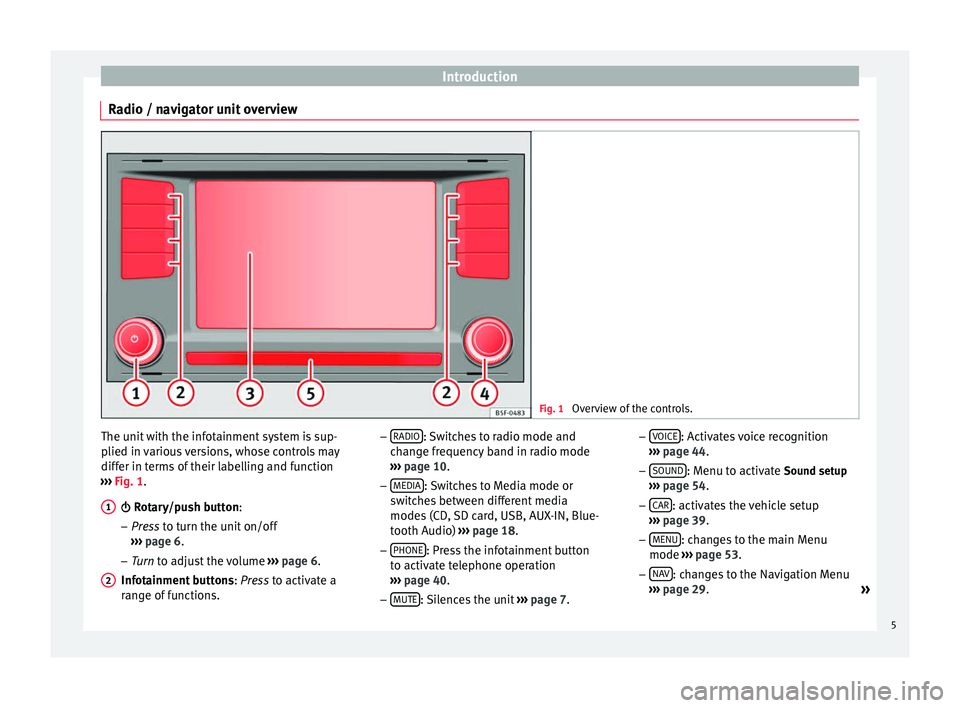
Radio / navigator unit overview Fig. 1
Overview of the controls. The unit with the infotainment system is sup-
plied in various versions, whose controls may
differ in terms of their labelling and function
››› Fig. 1
.
Rotary/push button:
– Pr
ess to turn the unit on/off
››
› page 6.
– Tur
n to adjust the volume ››
› page 6.
Infotainment buttons : Press to activate a
ran
ge of functions.
1
2 –
RADIO : Switches to radio mode and
change frequency band in radio mode
››› page 10
.
– MEDIA : Switches to Media mode or
switches between different media
modes (CD, SD card, USB, AUX-IN, Blue-
tooth Audio) ››› page 18.
– PHONE : Press the infotainment button
to activate telephone operation
››› page 40
.
– MUTE : Silences the unit
››› page 7. –
VOICE : Activates voice recognition
››› page 44
.
– SOUND : Menu to activate Sound setup
››› page 54
.
– CAR : activates the vehicle setup
››› page 39 .
– MENU : changes to the main Menu
mode ››› page 53 .
– NA
V : changes to the Navigation Menu
››› page 29
.
»
5
Page 8 of 64
Introduction
– TRAFFIC : displays traffic messages
››› page 35 .
T ouc
hscreen
.
Setting knob
: Its function depends on
the mode that is active at that time.
– In all radio modes , turn
to manually set
a station or channel and press to start
or stop the SCAN function ››› page 15.
– In media mode,
turn to change track
manually, and press to start or stop the
SCAN function.
– Turn to mark a menu option in the long
lis
ts, and press to activate the marked
option (for example, selecting a station
from a list).
– Turn to modify some settings (for exam-
pl
e, the scale of the map).
Proximity sensor: the proximity sensor
system is activated and deactivated in
the Screen settings ››› page 53 menu.
Diagram of the menus Using the touchscreen of the infotainment
system
›››
Fig. 1 3 , you can select various
main menus.
Press the infotainment button MENU to acti-
vate the main menu. 3 4
5
Function
buttons
a)Action and effect
RadioChanges to Radio mode.
MediaChanges to Media mode.
TelephoneActivates the telephone operation.
CARActivates the system and vehicle setup
››› Booklet Instruction manual, chap-
ter Introduction to the Easy Connect
system.
SoundActivates the sound settings.
SettingsActivates the system setup.
NavigationChanges to the Navigation Menu
a) Availability depends on the version.
General operating information
Introduction Note
● Lightly pressing the buttons or briefly
pressing the touchscreen is sufficient to op-
erate the unit.
● It is possible that not all the functions and
function buttons are available as the software
of the unit responds to the specific character-
istics of each market. If a function button is missing on the display this is not due to an
error in the unit.
● Due to country-specific legislation, certain
functions cannot be selected on the screen
when the vehicle is travelling above a certain
speed.
● Using a mobile phone inside the vehicle
can cause noise in the speakers.
● There may be restrictions on the use of
Bluetooth devices in some countries. Infor-
mation is available from the local authorities.
● In some vehicles equipped with a parking
distance warning system, the volume of the
audio source is automatically lowered when
the gear is engaged. Rotary knobs and buttons
Rotary/push button:
The left rotary push knob
››› Fig. 1 1 is refer-
red to as the volume control or the on/off
button.
The right rotary push knob ››› Fig. 1 4 is re-
ferred to as the setting button.
Infotainment buttons
The unit buttons are represented in this man-
ual with the word “infotainment button” and
their function is shown inside a rectangle (for
example: MEDIA infotainment button
››› Fig. 1 .
6
Page 9 of 64
Introduction
The infotainment buttons are operated by
pressing them or holding them down
.
Sw it
ching on and off To switch the unit on or off manually, briefly
press the rotary knob
››› Fig. 1 1 .
When you connect the system it will play at
the volume at which it was last set, provided
it does not exceed the maximum permitted
volume ››› page 54.
The u nit
will switch off automatically when
the vehicle key is removed. If you turn the
unit back on after the engine has been
switched off, it will turn off automatically af-
ter approximately 30 minutes (delayed
switch-off). Note
● The unit is linked to the vehicle. It cannot
be used in any other vehicle.
● When the vehicle battery is disconnected,
you must turn ignition on before switching
the unit on again. Adjusting the base volume
FunctionAction
Increase
the vol-
ume.Turn the volume control clockwise or
turn the right thumbwheel roller upwards
on the multifunction steering wheel
››› Booklet Instructions manual .
Lower the
volume.Turn the volume control anticlockwise
or turn the right thumbwheel downwards
on the multifunction steering wheel. The volume modification is shown on the
screen with a bar. During this time the unit
cannot be operated.
It is possible to preset certain volume set-
tings and adjustments
›››
page 54.
Silence the unit
● Turn the volume control anticlockwise
until you see .
● ALTERNATIVELY: Press the MUTE infotain-
ment button. Note
If the basic playback volume of an audio
source has been increased substantially, low-
er the volume before changing to another au-
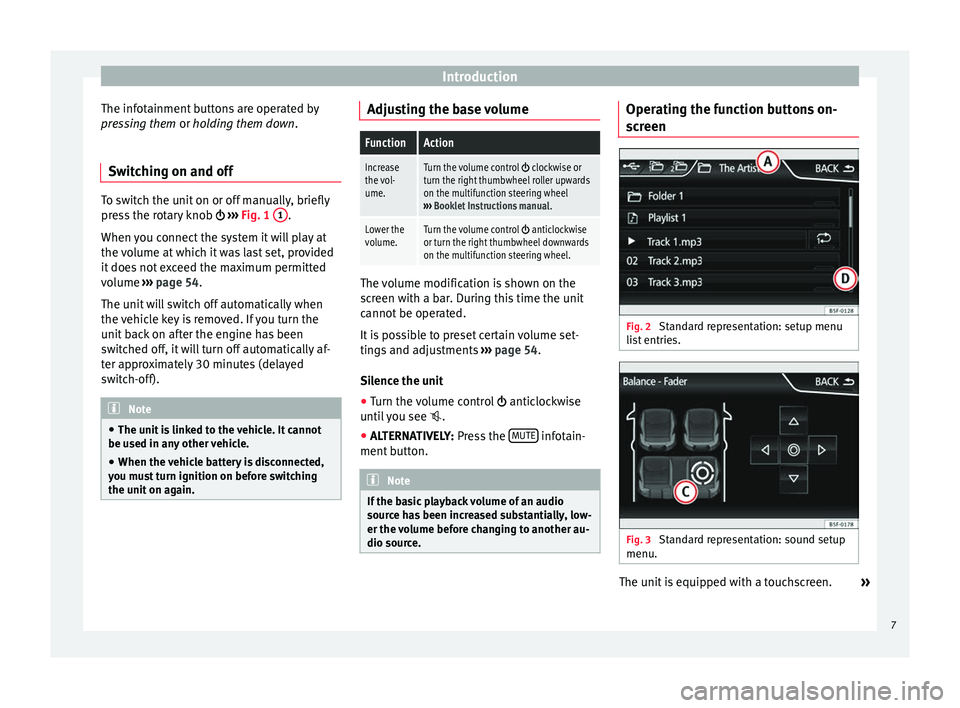
dio source. Operating the function buttons on-
screen
Fig. 2
Standard representation: setup menu
list entries. Fig. 3
Standard representation: sound setup
menu. The unit is equipped with a touchscreen.
»
7
Page 10 of 64
Introduction
The active areas of the screen that represent
a function are called “function buttons” and
are used by pressing them briefly on the dis-
p l
ay or holding them down . The function but-
tons are represented in the instructions with
the word “function buttons” and the button
symbol - - - .
The function buttons activate functions or
open submenus.
The function buttons that appear deactivated
(in grey) may not be selected at that time.
Summary of the indications and function
buttons
Action and effect
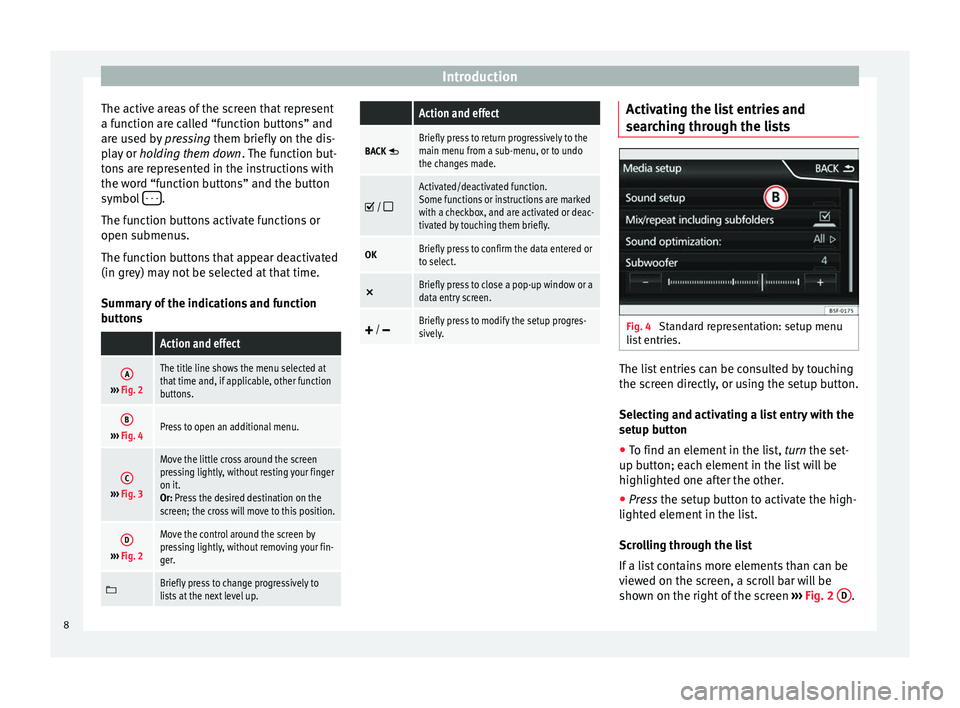
A››› Fig. 2
The title line shows the menu selected at
that time and, if applicable, other function
buttons.
B››› Fig. 4Press to open an additional menu.
C››› Fig. 3
Move the little cross around the screen
pressing lightly, without resting your finger
on it.
Or: Press the desired destination on the
screen; the cross will move to this position.
D››› Fig. 2
Move the control around the screen by
pressing lightly, without removing your fin-
ger.
Briefly press to change progressively to
lists at the next level up.
Action and effect
BACK Briefly press to return progressively to the
main menu from a sub-menu, or to undo
the changes made.
/
Activated/deactivated function.
Some functions or instructions are marked
with a checkbox, and are activated or deac-
tivated by touching them briefly.
OKBriefly press to confirm the data entered or
to select.
×
Briefly press to close a pop-up window or a
data entry screen.
/ Briefly press to modify the setup progres-
sively. Activating the list entries and
searching through the lists
Fig. 4
Standard representation: setup menu
list entries. The list entries can be consulted by touching
the screen directly, or using the setup button.
Selecting and activating a list entry with the
setup button
● To find an element in the list, turn the set-
up b utt
on; each element in the list will be
highlighted one after the other.
● Press
the setup button to activate the high-
lighted element in the list.
Scrolling through the list
If a list contains more elements than can be
viewed on the screen, a scroll bar will be
shown on the right of the screen ›››
Fig. 2 D .
8
Page 12 of 64
Audio mode
Audio mode
Radio mode Introduction Note
● Please bear in mind that in car parks, tun-
nels, areas with high buildings or mountains
the radio signal can be impaired.
● Foil or metal-coated stickers attached to
the windows may affect reception on vehicles
with a window aerial. RADIO main menu
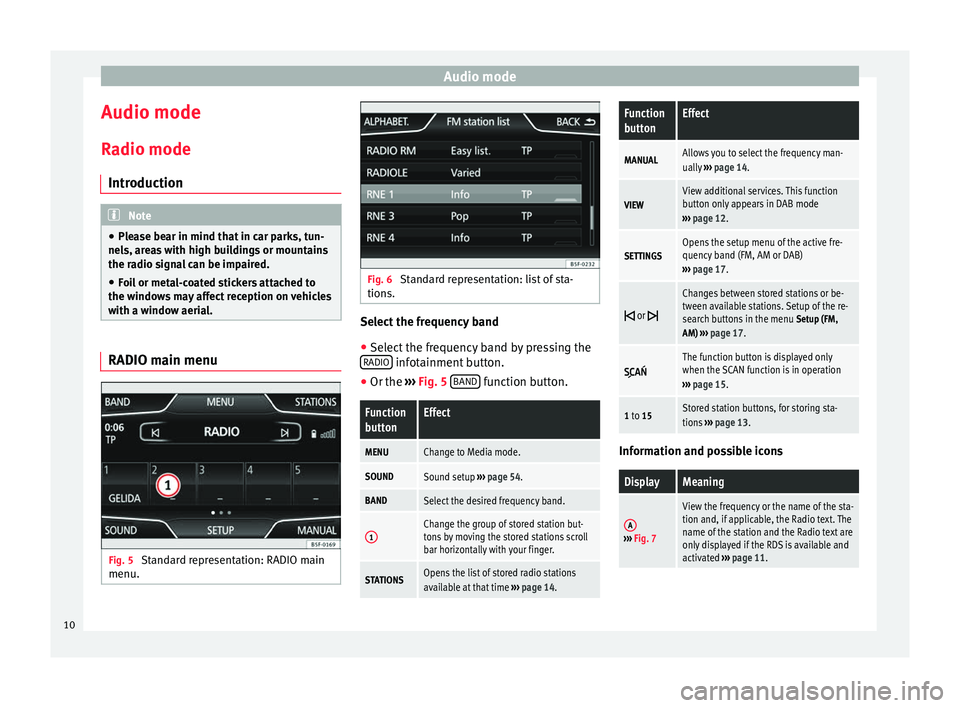
Fig. 5
Standard representation: RADIO main
menu. Fig. 6
Standard representation: list of sta-
tions. Select the frequency band
● Select the frequency band by pressing the
RADIO infotainment button.
● Or the ›››
Fig. 5 B
AND function button.Function
buttonEffect
MENUChange to Media mode.
SOUNDSound setup
››› page 54.
BANDSelect the desired frequency band.
1Change the group of stored station but-
tons by moving the stored stations scroll
bar horizontally with your finger.
STATIONSOpens the list of stored radio stations
available at that time ››› page 14.
Function
buttonEffect
MANUALAllows you to select the frequency man-
ually ››› page 14.
VIEWView additional services. This function
button only appears in DAB mode
››› page 12.
SETTINGSOpens the setup menu of the active fre-
quency band (FM, AM or DAB)
››› page 17.
or
Changes between stored stations or be-
tween available stations. Setup of the re-
search buttons in the menu
Setup (FM,
AM) ››› page 17.
The function button is displayed only
when the SCAN function is in operation
››› page 15.
1 to 15Stored station buttons, for storing sta-
tions ››› page 13. Information and possible icons
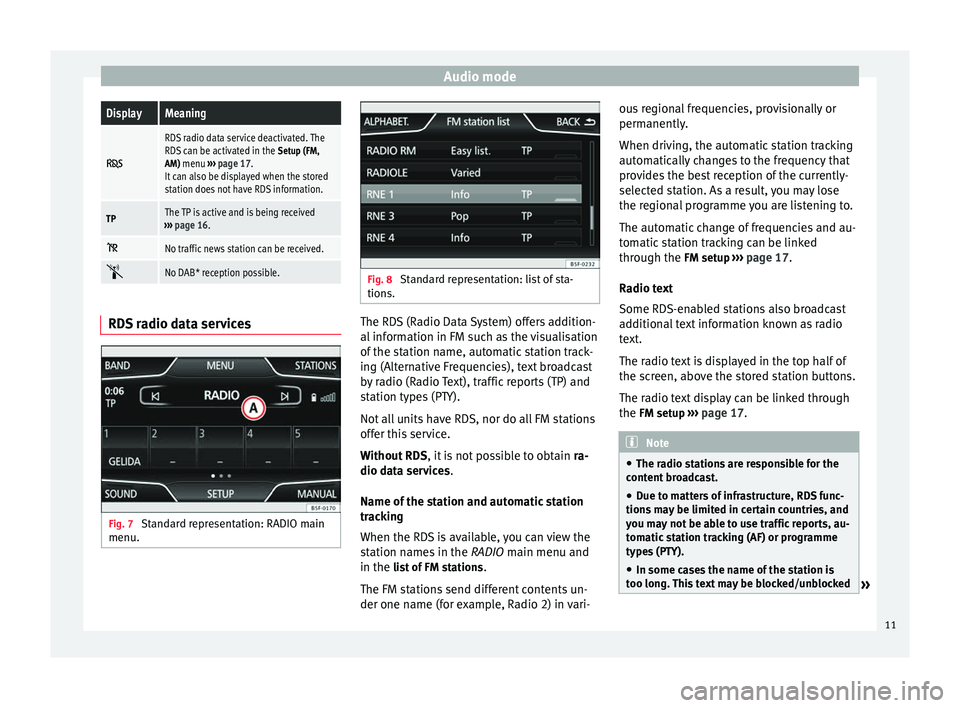
DisplayMeaning
A›››
Fig. 7
View the frequency or the name of the sta-
tion and, if applicable, the Radio text. The
name of the station and the Radio text are
only displayed if the RDS is available and
activated ››› page 11. 10
Page 13 of 64
Audio modeDisplayMeaning
RDS radio data service deactivated. The
RDS can be activated in the
Setup (FM,
AM) menu ››› page 17.
It can also be displayed when the stored
station does not have RDS information.
TPThe TP is active and is being received
››› page 16.
No traffic news station can be received.
No DAB* reception possible.
RDS radio data services
Fig. 7
Standard representation: RADIO main
menu. Fig. 8
Standard representation: list of sta-
tions. The RDS (Radio Data System) offers addition-
al information in FM such as the visualisation
of the station name, automatic station track-
ing (Alternative Frequencies), text broadcast
by radio (Radio Text), traffic reports (TP) and
station types (PTY).
Not all units have RDS, nor do all FM stations
offer this service.
Without RDS
, it is not possible to obtain ra-
dio data services.
Name of the station and automatic station
tracking
When the RDS is available, you can view the
station names in the RADIO main menu and
in the li
s
t of FM stations .
The FM stations send different contents un-
der one name (for example, Radio 2) in vari- ous regional frequencies, provisionally or
permanently.
When driving, the automatic station tracking
automatically changes to the frequency that
provides the best reception of the currently-
selected station. As a result, you may lose
the regional programme you are listening to.
The automatic change of frequencies and au-
tomatic station tracking can be linked
through the FM setup
››› p
age 17.
Radio text
Some RDS-enabled stations also broadcast
additional text information known as radio
text.
The radio text is displayed in the top half of
the screen, above the stored station buttons.
The radio text display can be linked through
the FM setup ››› page 17. Note
● The radio stations are responsible for the
content broadcast.
● Due to matters of infrastructure, RDS func-
tions may be limited in certain countries, and
you may not be able to use traffic reports, au-
tomatic station tracking (AF) or programme
types (PTY).
● In some cases the name of the station is
too long. This text may be blocked/unblocked » 11
Page 14 of 64
Audio mode
by pressing on the station name for 3 sec-
onds (a dot will appear to the left and right of
the station name).
Digital radio mode (DAB, DAB+ and
DMB audio)*
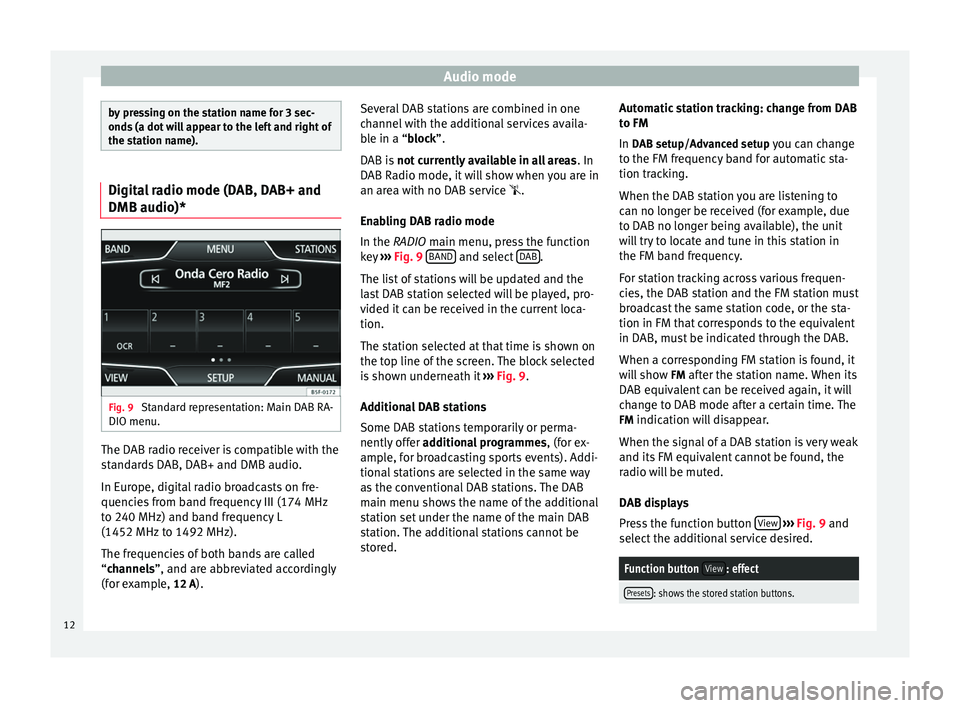
Fig. 9
Standard representation: Main DAB RA-
DIO menu. The DAB radio receiver is compatible with the
standards DAB, DAB+ and DMB audio.
In Europe, digital radio broadcasts on fre-
quencies from band frequency III (174 MHz
to 240 MHz) and band frequency L
(1452 MHz to 1492 MHz).
The frequencies of both bands are called
“
channels
”, and are abbreviated accordingly
(f
or example, 12 A). Several DAB stations are combined in one
channel with the additional services availa-
ble in a “block”.
D
AB is not currently available in all areas . In
DAB Radio mode, it will show when you are in
an area with no DAB service .
Enabling DAB radio mode
In the
RADIO main menu, press the function
key ››› Fig. 9 BAND and select
DAB .
The list of stations will be updated and the
last DAB station selected will be played, pro-
vided it can be received in the current loca-
tion.
The station selected at that time is shown on
the top line of the screen. The block selected
is shown underneath it ››› Fig. 9 .
Ad dition
al DAB stations
Some DAB stations temporarily or perma-
nently offer additional programmes , (for ex-
ample, for broadcasting sports events). Addi-
tional stations are selected in the same way
as the conventional DAB stations. The DAB
main menu shows the name of the additional
station set under the name of the main DAB
station. The additional stations cannot be
stored. Automatic station tracking: change from DAB
to FM
In DAB setup/Advanced setup you can change
to the FM fr
equency band for automatic sta-
tion tracking.
When the DAB station you are listening to
can no longer be received (for example, due
to DAB no longer being available), the unit
will try to locate and tune in this station in
the FM band frequency.
For station tracking across various frequen-
cies, the DAB station and the FM station must
broadcast the same station code, or the sta-
tion in FM that corresponds to the equivalent
in DAB, must be indicated through the DAB.
When a corresponding FM station is found, it
will show FM after the station name. When its
DAB equivalent can be received again, it will
change to DAB mode after a certain time. The
FM indication will disappear.
When the signal of a DAB station is very weak
and its FM equivalent cannot be found, the
radio will be muted.
DAB displays
Press the function button View
››› Fig. 9 and
sel ect
the additional service desired.
Function button View: effect
Presets: shows the stored station buttons.12
Page 15 of 64
Audio modeFunction button
View: effect
Station info: The radio text and slide show are displayed
instead of the stored station buttons in the lower half of
the screen.
Radio text: The Radio text is displayed instead of the stor-
ed station buttons in the lower half of the screen.
Presentation: The slide show is displayed instead of the
station buttons in the lower half of the screen. Function
called Slideshow; the icon ››› Fig. 13 will appear in the
list of DAB stations. Note
The radio stations are responsible for the
content broadcast. Stored station buttons
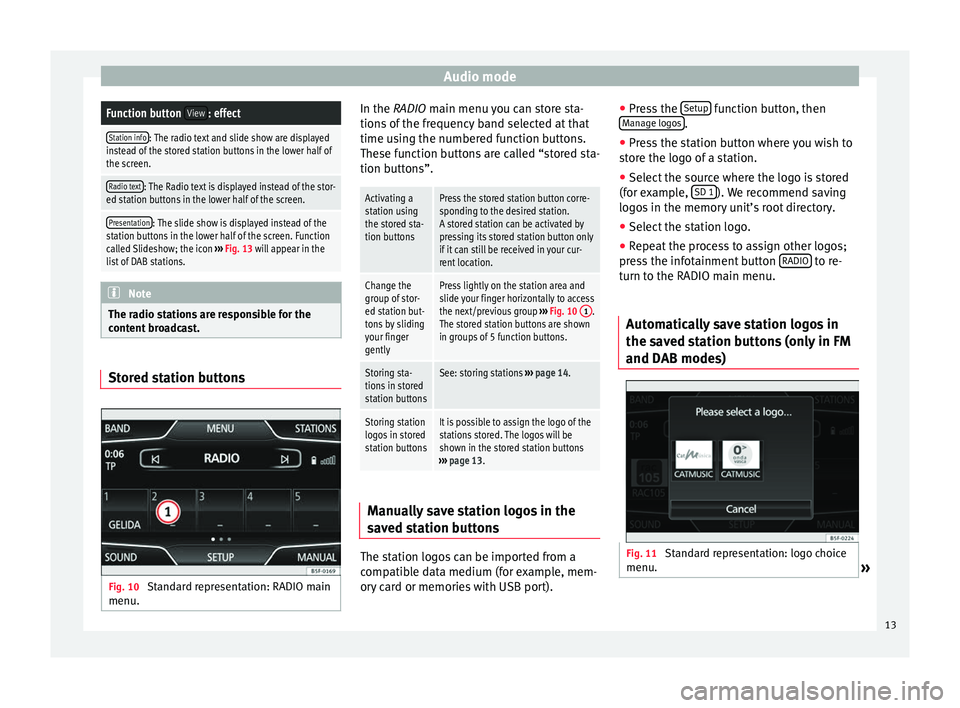
Fig. 10
Standard representation: RADIO main
menu. In the RADIO main menu you can store sta-
tions of the frequency band selected at that
time using the numbered function buttons.
These function buttons are called “stored sta-
tion buttons”.
Activating a
station using
the stored sta-
tion buttonsPress the stored station button corre-
sponding to the desired station.
A stored station can be activated by
pressing its stored station button only
if it can still be received in your cur-
rent location.
Change the
group of stor-
ed station but-
tons by sliding
your finger
gentlyPress lightly on the station area and
slide your finger horizontally to access
the next/previous group
››› Fig. 10 1
.
The stored station buttons are shown
in groups of 5 function buttons.
Storing sta-
tions in stored
station buttonsSee: storing stations ››› page 14.
Storing station
logos in stored
station buttonsIt is possible to assign the logo of the
stations stored. The logos will be
shown in the stored station buttons
››› page 13. Manually save station logos in the
saved station buttons
The station logos can be imported from a
compatible data medium (for example, mem-
ory card or memories with USB port).●
Press the Setup function button, then
Manage logos .
● Press the station button where you wish to
store the logo of a station.
● Select the source where the logo is stored
(for example, SD 1 ). We recommend saving
logos in the memory unit’s root directory.
● Select the station logo.
● Repeat the process to assign other logos;
press the infotainment button RADIO to re-
turn to the RADIO main menu.
Automatically save station logos in
the saved station buttons (only in FM
and DAB modes) Fig. 11
Standard representation: logo choice
menu. » 13
Page 16 of 64
Audio mode
A saved station is automatically assigned a
logo if it is available from the radio’s data-
base.
If 2 or more logos are available from the data-
base, there is the option to manually choose
the right one ››› Fig. 11. Note
Not all stations are stored in the database, so
logos cannot always be assigned automati-
cally. Selecting, adjusting and storing a
station
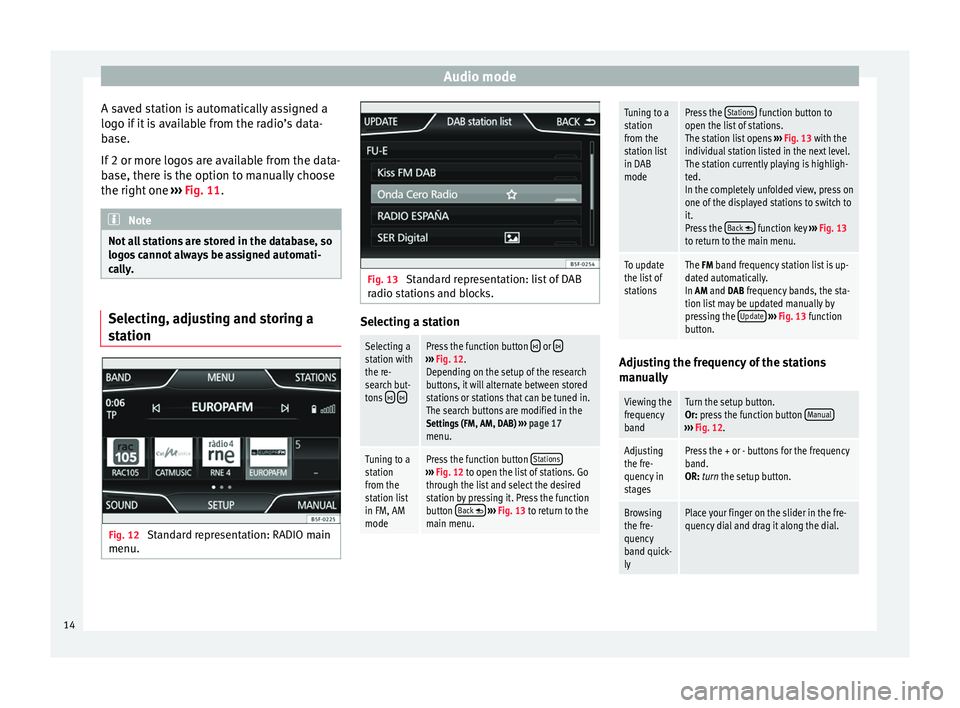
Fig. 12
Standard representation: RADIO main
menu. Fig. 13
Standard representation: list of DAB
radio stations and blocks. Selecting a stationSelecting a
station with
the re-
search but-
tons
Press the function button or ›››
Fig. 12.
Depending on the setup of the research
buttons, it will alternate between stored
stations or stations that can be tuned in.
The search buttons are modified in the
Settings (FM, AM, DAB) ››› page 17
menu.
Tuning to a
station
from the
station list
in FM, AM
modePress the function button Stations›››
Fig. 12 to open the list of stations. Go
through the list and select the desired
station by pressing it. Press the function
button Back
››› Fig. 13 to return to the
main menu.
Tuning to a
station
from the
station list
in DAB
modePress the Stations function button to
open the list of stations.
The station list opens ››› Fig. 13 with the
individual station listed in the next level.
The station currently playing is highligh-
ted.
In the completely unfolded view, press on
one of the displayed stations to switch to
it.
Press the Back
function key
››› Fig. 13
to return to the main menu.
To update
the list of
stationsThe FM band frequency station list is up-
dated automatically.
In AM and DAB frequency bands, the sta-
tion list may be updated manually by
pressing the Update
››› Fig. 13 function
button. Adjusting the frequency of the stations
manually
Viewing the
frequency
bandTurn the setup button.
Or: press the function button
Manual
›››
Fig. 12.
Adjusting
the fre-
quency in
stagesPress the + or - buttons for the frequency
band.
OR: turn the setup button.
Browsing
the fre-
quency
band quick-
lyPlace your finger on the slider in the fre-
quency dial and drag it along the dial. 14
Page 17 of 64
Audio modeHiding the
frequency
bandBriefly press
the function button Manual.
If you select a station with a stored sta-
tion button, the manual selection of the
frequency is also finalised. If you do not
do anything else, after a certain time the
frequency band will close automatically. Storing stations
Storing the
station that
you are lis-
tening to in
one of the
stored sta-
tion but-
tonsHold down the desired stored station
button
››› Fig. 12 until you hear the sig-
nal. The station that you are listening to
will be stored in this button.
Storing a
station
from the list
of stations
in one of
the stored
station but-
tonsPress the function button Stations›››
Fig. 12 to open the list of stations.
The stations already assigned to stored
station buttons are shown in the list of
stations marked with the symbol
››› Fig. 13.
Select the desired station holding it
down on the display until the screen for
storing stations appears.
Press the stored station button where
you wish to save the station. A signal will
sound and the station will then be saved
in this stored station button. The system
automatically returns to the list.
Deleting a
stored sta-
tionIn the menu Delete presets, available in the menu Radio setup you can delete the
stored stations one by one or all at once
››› page 17. Scan function (SCAN)
When the scan function is running, all availa-
ble stations on the current frequency band
are played in sequence for around 5 seconds
each.
Starting the
scan functionBriefly press the setup button.
OR: Press the function button
Setup
and then select SCAN.
Stopping the
scan functionPress the function button SCAN“crossed out” to stop the scan function
on the station you are listening to.
OR: Briefly press the setup button.
The scan function also ends when you
manually select a station using the
stored station buttons, or when a traffic
report comes in. Autostore (automatic station storing)
Hold the RADIO button down for approxi-
mately 10 seconds to carry out the autostore
function for the stations that can be tuned in
at the time of running the Autostore. The sta-
tions are saved in the stored station buttons.
Note
This function can take several minutes, dur-
ing which time the radio will remain muted. In
addition, any stored stations assigned previ-
ously will be deleted. Station list (only in FM mode)
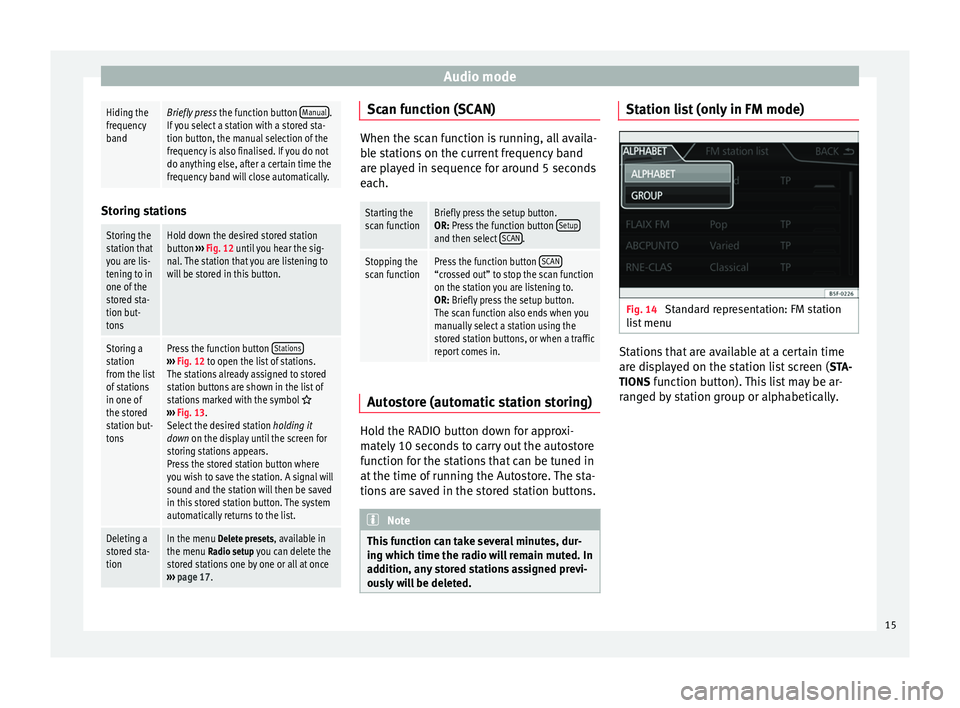
Fig. 14
Standard representation: FM station
list menu Stations that are available at a certain time
are displayed on the station list screen (
STA-
TIONS function button). This list may be ar-
ranged by station group or alphabetically.
15