service Seat Leon 5D 2014 MEDIA SYSTEM PLUS - NAVI SYSTEM
[x] Cancel search | Manufacturer: SEAT, Model Year: 2014, Model line: Leon 5D, Model: Seat Leon 5D 2014Pages: 64, PDF Size: 1.71 MB
Page 5 of 64
Introduction
Introduction Before using the unit for the first timeBefore using the unit for the first time, carry out
the following steps. This will enable you to use
the unit safely and make full use of the func-
tions it provides:
Please refer to the basic safety instructions
››› page 3.
Familiarise yourself with the unit overview
››› page 5.
In System setup, restart the unit to factory settings
››› page 53.
Use suitable data media for multimedia playback
(Media mode)
››› page 18. Safety notes
WARNING
Distracting the driver in any way can lead to
an accident and cause injuries. Operating the
infotainment system while driving can dis-
tract your attention from the traffic.
● Always drive carefully and responsibly.
● Select volume settings that allow you to
easily hear signals from outside the vehicle
at all times (e.g. emergency service sirens). ●
If you set the volume excessively high you
may suffer damage to your ears. This can also
happen if you are exposed to an excessively
high volume even for a short time. WARNING
The volume level may suddenly change when
you switch audio source or connect a new au-
dio source.
● Reduce the base volume before switching
audio source or connecting a new audio
source ››› page 7
. WARNING
Connecting, inserting or removing a data me-
dium while driving can distract your attention
from the traffic and cause an accident. WARNING
Connecting leads for external devices may
obstruct the driver.
● Arrange the connecting leads so that they
do not obstruct the driver. WARNING
External devices that are placed loose in the
vehicle or not properly secured could be flung
though the interior during a sudden driving
or braking manoeuvre, or in the event of an
accident. ●
Never, for any reason, fit the external units
on the doors, on the windscreen, on or near
the area marked “AIRBAG” on the steering
wheel, on the dash panel, on the seat backr-
ests or between these areas and the passen-
gers. These units may cause serious injury in
the event of an accident, especially if the air-
bag is activated. WARNING
The centre armrest may obstruct the driver's
arm movements, which could cause an acci-
dent and severe injuries.
● Always keep the armrest closed while the
vehicle is in motion. WARNING
Opening the housing of a CD player can cause
injury due to invisible laser radiation.
● Only have CD players repaired by a special-
ised workshop. WARNING
The recommendations and traffic signs
shown by the navigation system may differ
from the true traffic conditions.
● Traffic signs and traffic regulations have
priority over the recommendations and in-
structions given by the navigation system.
● Adjust your speed and driving style to visi-
bility, road, traffic and weather conditions. » 3
Page 12 of 64
Audio mode
Audio mode
Radio mode Introduction Note
● Please bear in mind that in car parks, tun-
nels, areas with high buildings or mountains
the radio signal can be impaired.
● Foil or metal-coated stickers attached to
the windows may affect reception on vehicles
with a window aerial. RADIO main menu
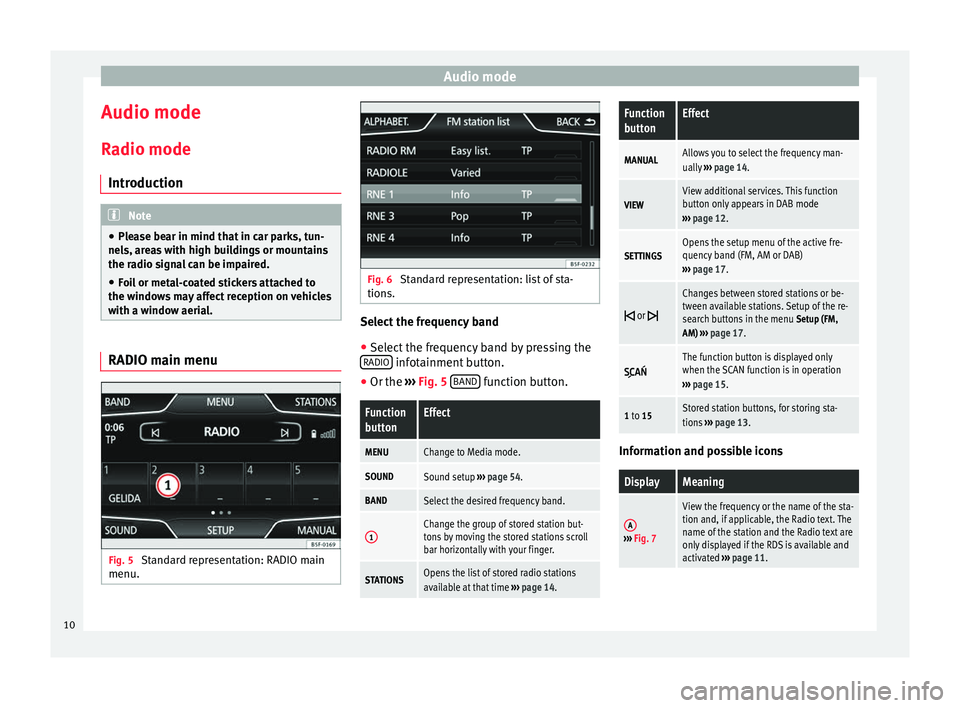
Fig. 5
Standard representation: RADIO main
menu. Fig. 6
Standard representation: list of sta-
tions. Select the frequency band
● Select the frequency band by pressing the
RADIO infotainment button.
● Or the ›››
Fig. 5 B
AND function button.Function
buttonEffect
MENUChange to Media mode.
SOUNDSound setup
››› page 54.
BANDSelect the desired frequency band.
1Change the group of stored station but-
tons by moving the stored stations scroll
bar horizontally with your finger.
STATIONSOpens the list of stored radio stations
available at that time ››› page 14.
Function
buttonEffect
MANUALAllows you to select the frequency man-
ually ››› page 14.
VIEWView additional services. This function
button only appears in DAB mode
››› page 12.
SETTINGSOpens the setup menu of the active fre-
quency band (FM, AM or DAB)
››› page 17.
or
Changes between stored stations or be-
tween available stations. Setup of the re-
search buttons in the menu
Setup (FM,
AM) ››› page 17.
The function button is displayed only
when the SCAN function is in operation
››› page 15.
1 to 15Stored station buttons, for storing sta-
tions ››› page 13. Information and possible icons
DisplayMeaning
A›››
Fig. 7
View the frequency or the name of the sta-
tion and, if applicable, the Radio text. The
name of the station and the Radio text are
only displayed if the RDS is available and
activated ››› page 11. 10
Page 13 of 64
Audio modeDisplayMeaning
RDS radio data service deactivated. The
RDS can be activated in the
Setup (FM,
AM) menu ››› page 17.
It can also be displayed when the stored
station does not have RDS information.
TPThe TP is active and is being received
››› page 16.
No traffic news station can be received.
No DAB* reception possible.
RDS radio data services
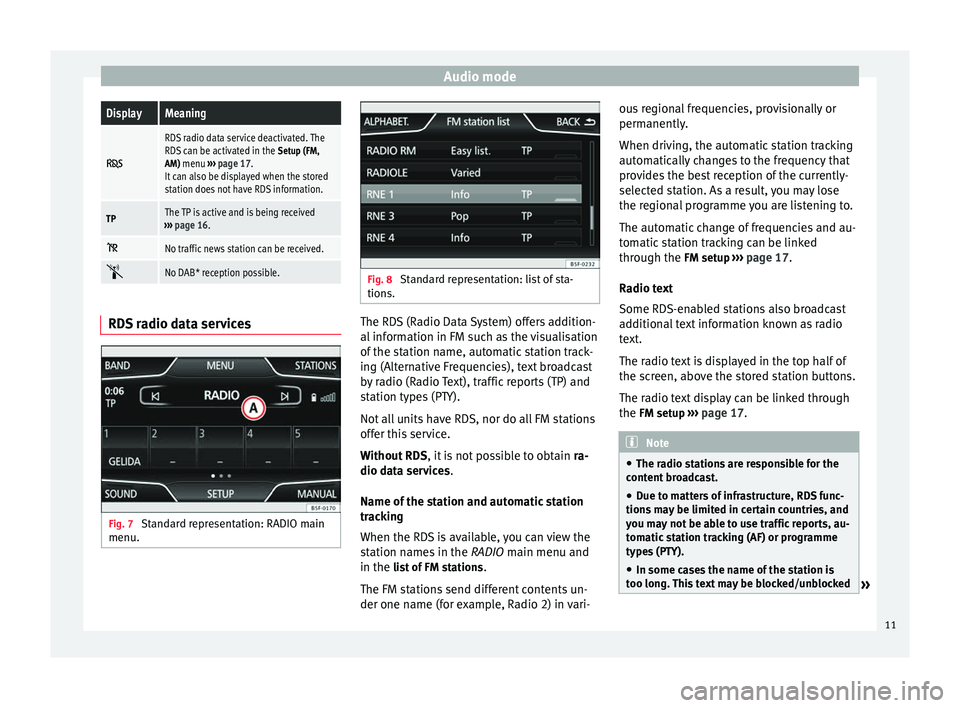
Fig. 7
Standard representation: RADIO main
menu. Fig. 8
Standard representation: list of sta-
tions. The RDS (Radio Data System) offers addition-
al information in FM such as the visualisation
of the station name, automatic station track-
ing (Alternative Frequencies), text broadcast
by radio (Radio Text), traffic reports (TP) and
station types (PTY).
Not all units have RDS, nor do all FM stations
offer this service.
Without RDS
, it is not possible to obtain ra-
dio data services.
Name of the station and automatic station
tracking
When the RDS is available, you can view the
station names in the RADIO main menu and
in the li
s
t of FM stations .
The FM stations send different contents un-
der one name (for example, Radio 2) in vari- ous regional frequencies, provisionally or
permanently.
When driving, the automatic station tracking
automatically changes to the frequency that
provides the best reception of the currently-
selected station. As a result, you may lose
the regional programme you are listening to.
The automatic change of frequencies and au-
tomatic station tracking can be linked
through the FM setup
››› p
age 17.
Radio text
Some RDS-enabled stations also broadcast
additional text information known as radio
text.
The radio text is displayed in the top half of
the screen, above the stored station buttons.
The radio text display can be linked through
the FM setup ››› page 17. Note
● The radio stations are responsible for the
content broadcast.
● Due to matters of infrastructure, RDS func-
tions may be limited in certain countries, and
you may not be able to use traffic reports, au-
tomatic station tracking (AF) or programme
types (PTY).
● In some cases the name of the station is
too long. This text may be blocked/unblocked » 11
Page 14 of 64
Audio mode
by pressing on the station name for 3 sec-
onds (a dot will appear to the left and right of
the station name).
Digital radio mode (DAB, DAB+ and
DMB audio)*
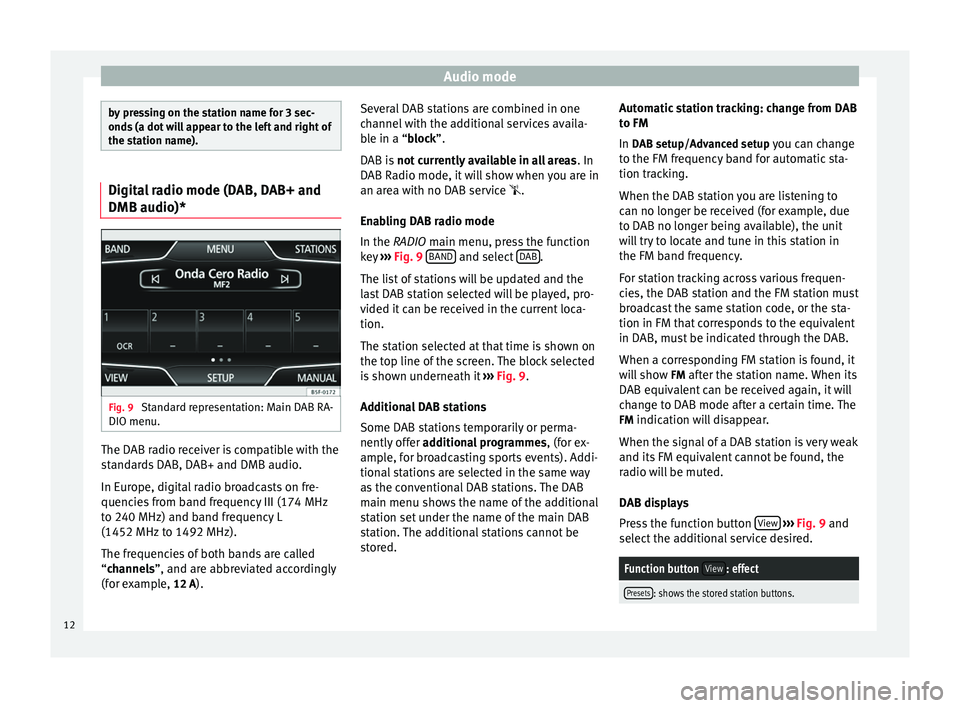
Fig. 9
Standard representation: Main DAB RA-
DIO menu. The DAB radio receiver is compatible with the
standards DAB, DAB+ and DMB audio.
In Europe, digital radio broadcasts on fre-
quencies from band frequency III (174 MHz
to 240 MHz) and band frequency L
(1452 MHz to 1492 MHz).
The frequencies of both bands are called
“
channels
”, and are abbreviated accordingly
(f
or example, 12 A). Several DAB stations are combined in one
channel with the additional services availa-
ble in a “block”.
D
AB is not currently available in all areas . In
DAB Radio mode, it will show when you are in
an area with no DAB service .
Enabling DAB radio mode
In the
RADIO main menu, press the function
key ››› Fig. 9 BAND and select
DAB .
The list of stations will be updated and the
last DAB station selected will be played, pro-
vided it can be received in the current loca-
tion.
The station selected at that time is shown on
the top line of the screen. The block selected
is shown underneath it ››› Fig. 9 .
Ad dition
al DAB stations
Some DAB stations temporarily or perma-
nently offer additional programmes , (for ex-
ample, for broadcasting sports events). Addi-
tional stations are selected in the same way
as the conventional DAB stations. The DAB
main menu shows the name of the additional
station set under the name of the main DAB
station. The additional stations cannot be
stored. Automatic station tracking: change from DAB
to FM
In DAB setup/Advanced setup you can change
to the FM fr
equency band for automatic sta-
tion tracking.
When the DAB station you are listening to
can no longer be received (for example, due
to DAB no longer being available), the unit
will try to locate and tune in this station in
the FM band frequency.
For station tracking across various frequen-
cies, the DAB station and the FM station must
broadcast the same station code, or the sta-
tion in FM that corresponds to the equivalent
in DAB, must be indicated through the DAB.
When a corresponding FM station is found, it
will show FM after the station name. When its
DAB equivalent can be received again, it will
change to DAB mode after a certain time. The
FM indication will disappear.
When the signal of a DAB station is very weak
and its FM equivalent cannot be found, the
radio will be muted.
DAB displays
Press the function button View
››› Fig. 9 and
sel ect
the additional service desired.
Function button View: effect
Presets: shows the stored station buttons.12
Page 19 of 64
Audio mode
● Press the function button Cancel to end the
current traffic report. The TP function remains
activated.
● ALTERNATIVELY: Press the function button
D e
activate to end the current traffic report and
deactivate the TP function. You can reactivate
it in the menu SETUP
››› page 17.
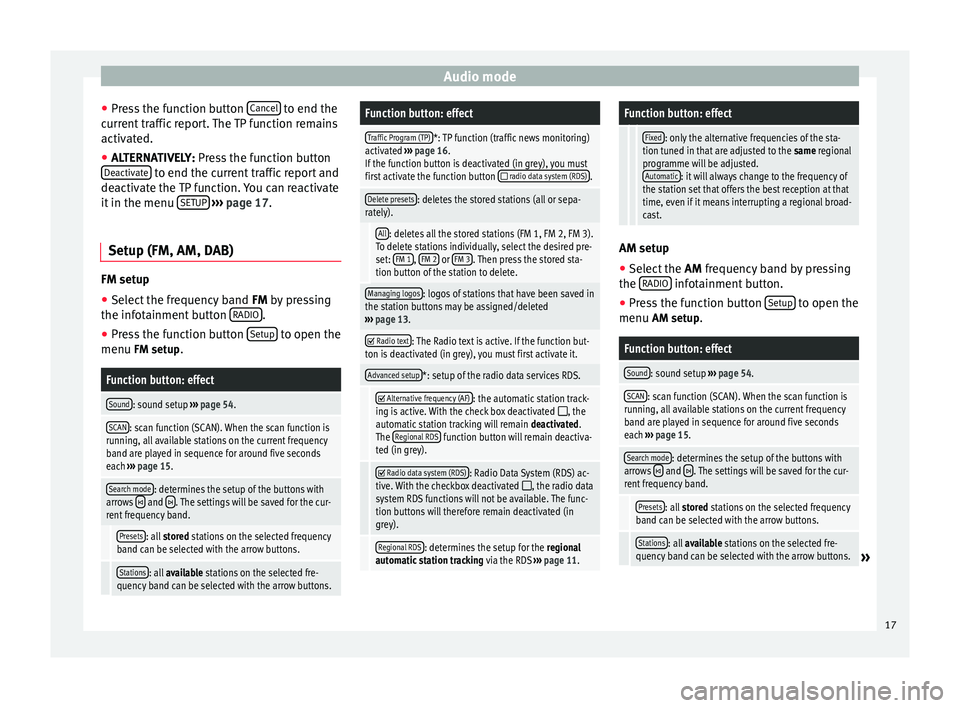
Setup (FM, AM, DAB) FM setup
● Select the frequency band FM
by pressing
the inf ot
ainment button RADIO .
● Press the function button Setup to open the
menu FM setup.
Function button: effect
Sound: sound setup ››› page 54.
SCAN: scan function (SCAN). When the scan function is
running, all available stations on the current frequency
band are played in sequence for around five seconds
each ››› page 15.
Search mode: determines the setup of the buttons with
arrows and . The settings will be saved for the cur-
rent frequency band.
Presets: all stored stations on the selected frequency
band can be selected with the arrow buttons.
Stations: all available stations on the selected fre-
quency band can be selected with the arrow buttons.
Function button: effect
Traffic Program (TP)*: TP function (traffic news monitoring)
activated ››› page 16.
If the function button is deactivated (in grey), you must
first activate the function button
radio data system (RDS).
Delete presets: deletes the stored stations (all or sepa-
rately).
All: deletes all the stored stations (FM 1, FM 2, FM 3).
To delete stations individually, select the desired pre-
set: FM 1
, FM 2 or FM 3. Then press the stored sta-
tion button of the station to delete.
Managing logos: logos of stations that have been saved in
the station buttons may be assigned/deleted
››› page 13.
Radio text: The Radio text is active. If the function but-
ton is deactivated (in grey), you must first activate it.
Advanced setup*: setup of the radio data services RDS.
Alternative frequency (AF): the automatic station track-
ing is active. With the check box deactivated , the
automatic station tracking will remain deactivated.
The Regional RDS
function button will remain deactiva-
ted (in grey).
Radio data system (RDS): Radio Data System (RDS) ac-
tive. With the checkbox deactivated , the radio data
system RDS functions will not be available. The func-
tion buttons will therefore remain deactivated (in
grey).
Regional RDS: determines the setup for the regional
automatic station tracking via the RDS ››› page 11.
Function button: effect
Fixed: only the alternative frequencies of the sta-
tion tuned in that are adjusted to the same regional
programme will be adjusted. Automatic
: it will always change to the frequency of
the station set that offers the best reception at that
time, even if it means interrupting a regional broad-
cast. AM setup
● Select the AM frequency band by pressing
the RADIO infotainment button.
● Press the function button Setup to open the
menu AM setup
.
Function button: effect
Sound: sound setup ››› page 54.
SCAN: scan function (SCAN). When the scan function is
running, all available stations on the current frequency
band are played in sequence for around five seconds
each ››› page 15.
Search mode: determines the setup of the buttons with
arrows and . The settings will be saved for the cur-
rent frequency band.
Presets: all stored stations on the selected frequency
band can be selected with the arrow buttons.
Stations: all available stations on the selected fre-
quency band can be selected with the arrow buttons.» 17
Page 20 of 64
Audio modeFunction button: effect
Traffic programme (TP): TP function (traffic news monitor-
ing) activated ››› page 16.
If the function button is deactivated (in grey), first you
must activate the function button
radio data system (RDS)in the menu FM setup.
Delete presets: deletes the stored stations (all or sepa-
rately).
All: deletes all the stored stations (AM 1, AM 2, AM
3). To delete the stations separately, select the desired
station AM 1
, AM 2 or AM 3. Then press the stored
station button of the station to delete.
Managing logos: a station logo can be assigned to the
stations saved in the stored station buttons. DAB setup
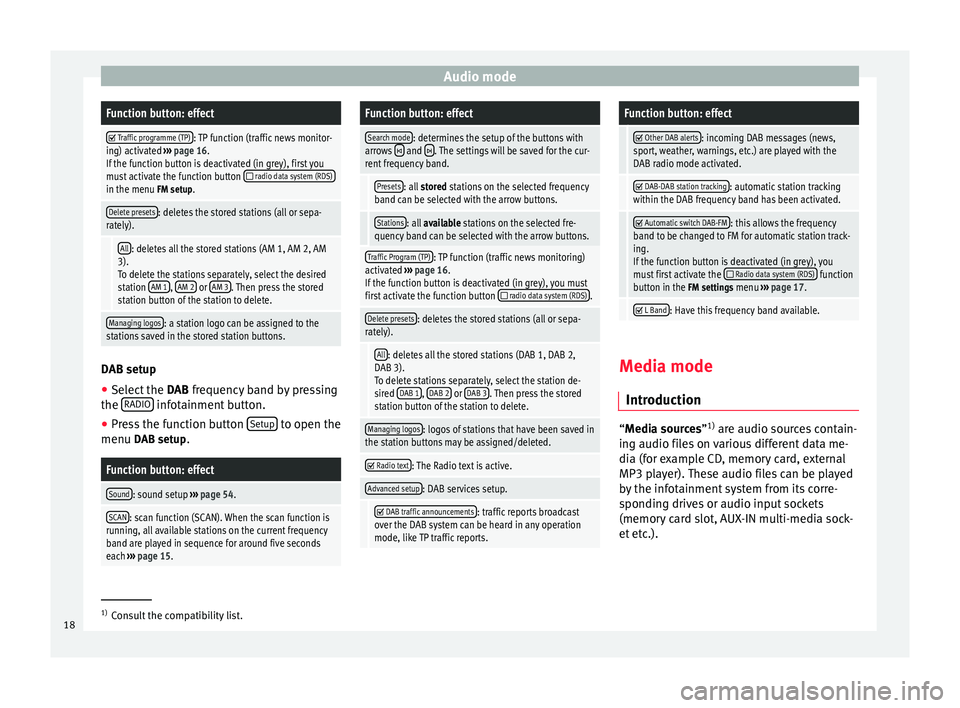
● Select the DAB frequency band by pressing
the RADIO infotainment button.
● Press the function button Setup to open the
menu DAB setup.
Function button: effect
Sound: sound setup ››› page 54.
SCAN: scan function (SCAN). When the scan function is
running, all available stations on the current frequency
band are played in sequence for around five seconds
each ››› page 15.
Function button: effect
Search mode: determines the setup of the buttons with
arrows and . The settings will be saved for the cur-
rent frequency band.
Presets: all stored stations on the selected frequency
band can be selected with the arrow buttons.
Stations: all available stations on the selected fre-
quency band can be selected with the arrow buttons.
Traffic Program (TP): TP function (traffic news monitoring)
activated ››› page 16.
If the function button is deactivated (in grey), you must
first activate the function button
radio data system (RDS).
Delete presets: deletes the stored stations (all or sepa-
rately).
All: deletes all the stored stations (DAB 1, DAB 2,
DAB 3).
To delete stations separately, select the station de-
sired DAB 1
, DAB 2 or DAB 3. Then press the stored
station button of the station to delete.
Managing logos: logos of stations that have been saved in
the station buttons may be assigned/deleted.
Radio text: The Radio text is active.
Advanced setup: DAB services setup.
DAB traffic announcements: traffic reports broadcast
over the DAB system can be heard in any operation
mode, like TP traffic reports.
Function button: effect
Other DAB alerts: incoming DAB messages (news,
sport, weather, warnings, etc.) are played with the
DAB radio mode activated.
DAB-DAB station tracking: automatic station tracking
within the DAB frequency band has been activated.
Automatic switch DAB-FM: this allows the frequency
band to be changed to FM for automatic station track-
ing.
If the function button is deactivated (in grey), you
must first activate the
Radio data system (RDS) function
button in the FM settings menu ››› page 17.
L Band: Have this frequency band available.
Media mode
Introduction “
Media sources
”1)
ar
e audio sources contain-
ing audio files on various different data me-
dia (for example CD, memory card, external
MP3 player). These audio files can be played
by the infotainment system from its corre-
sponding drives or audio input sockets
(memory card slot, AUX-IN multi-media sock-
et etc.). 1)
Consult the compatibility list.
18
Page 24 of 64
Audio modeIndication
››› Fig. 18Meaning
RDS radio data service deactivated. The
RDS can be activated in the menu Setup
(FM, AM) ››› page 17.
TPThe TP is active and receiving
››› page 16.
No traffic news station can be received.
No DAB reception possible.
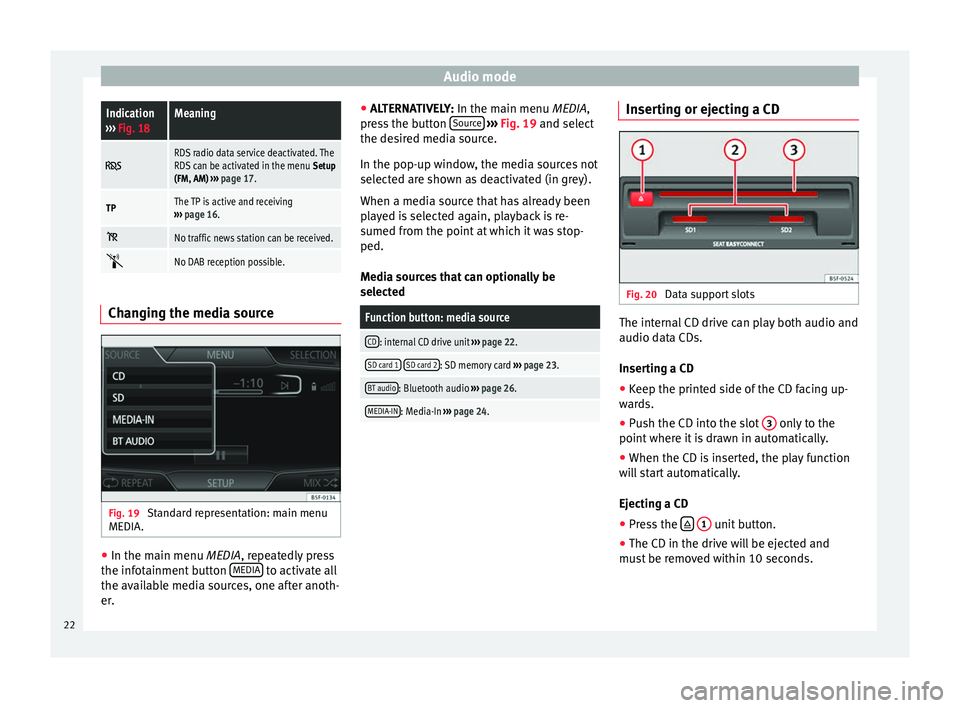
Changing the media source
Fig. 19
Standard representation: main menu
MEDIA. ●
In the main menu MEDIA, repeatedly press
the inf
otainment button MEDIA to activate all
the available media sources, one after anoth-
er. ●
ALTERNATIVELY: In the main menu MEDIA
,
press the button Source
››› Fig. 19 and select
the de s
ired media source.
In the pop-up window, the media sources not
selected are shown as deactivated (in grey).
When a media source that has already been
played is selected again, playback is re-
sumed from the point at which it was stop-
ped.
Media sources that can optionally be
selected
Function button: media source
CD: internal CD drive unit ››› page 22.
SD card 1 SD card 2: SD memory card
››› page 23.
BT audio: Bluetooth audio ››› page 26.
MEDIA-IN: Media-In ››› page 24. Inserting or ejecting a CD
Fig. 20
Data support slots The internal CD drive can play both audio and
audio data CDs.
Inserting a CD
● Keep the printed side of the CD facing up-
wards.
● Push the CD into the slot 3 only to the
point where it is drawn in automatically.
● When the CD is inserted, the play function
will start automatically.
Ejecting a CD
● Press the
1 unit button.
● The CD in the drive will be ejected and
must be removed within 10 seconds.
22
Page 29 of 64
Audio mode
Media players with the AVRCP Bluetooth pro-
file, the playback of the Bluetooth audio
source can be started and stopped automati-
cally when changing to Bluetooth audio
mode, or to another audio source. In addi-
tion, it is possible to view or change the track
via the infotainment system. Note
Due to the large number of different Blue-
tooth audio sources available, it is not possi-
ble to guarantee fault-free operation of all
functions described here. Note
● Deactivate the service and warning sounds
of a connected Bluetooth audio source (for
example, the key tones of the mobile phone)
to avoid interference noise and anomalies in
the operation.
● Depending on the external player connec-
ted, the response time of the system can
vary.
● To ensure your BT player works correctly,
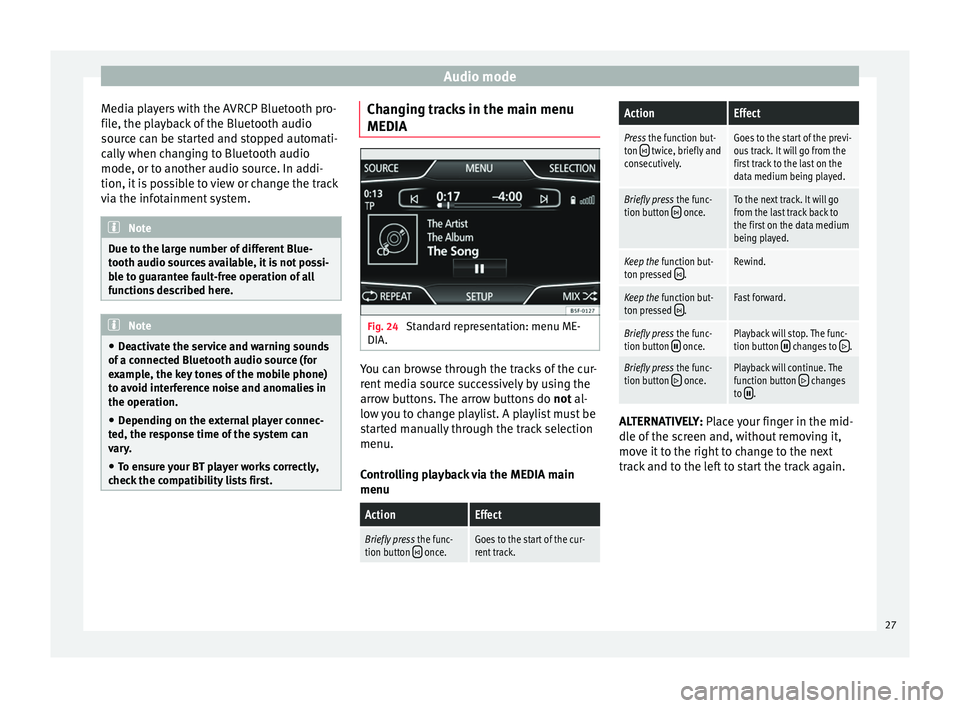
check the compatibility lists first. Changing tracks in the main menu
MEDIA
Fig. 24
Standard representation: menu ME-
DIA. You can browse through the tracks of the cur-
rent media source successively by using the
arrow buttons. The arrow buttons do
not al-
lo w
you to change playlist. A playlist must be
started manually through the track selection
menu.
Controlling playback via the MEDIA main
menu
ActionEffect
Briefly press the func-
tion button once.Goes to the start of the cur-
rent track.
ActionEffect
Press the function but-
ton twice, briefly and
consecutively.Goes to the start of the previ-
ous track. It will go from the
first track to the last on the
data medium being played.
Briefly press the func-
tion button once.To the next track. It will go
from the last track back to
the first on the data medium
being played.
Keep the function but-
ton pressed .Rewind.
Keep the function but-
ton pressed .Fast forward.
Briefly press the func-
tion button once.Playback will stop. The func-
tion button changes to .
Briefly press the func-
tion button once.Playback will continue. The
function button changes
to . ALTERNATIVELY:
Place your finger in the mid-
dl e of
the screen and, without removing it,
move it to the right to change to the next
track and to the left to start the track again.
27
Page 32 of 64
Navigation
Note
● Do not remove the memory card while the
navigation data is in use. This could damage
the memory card!
● The navigation memory card may not be
used as memory for other files. The infotain-
ment system will not recognise the files
saved.
● SEAT recommends only using original SEAT
memory cards to use navigation data. The
use of other memory cards could limit its op-
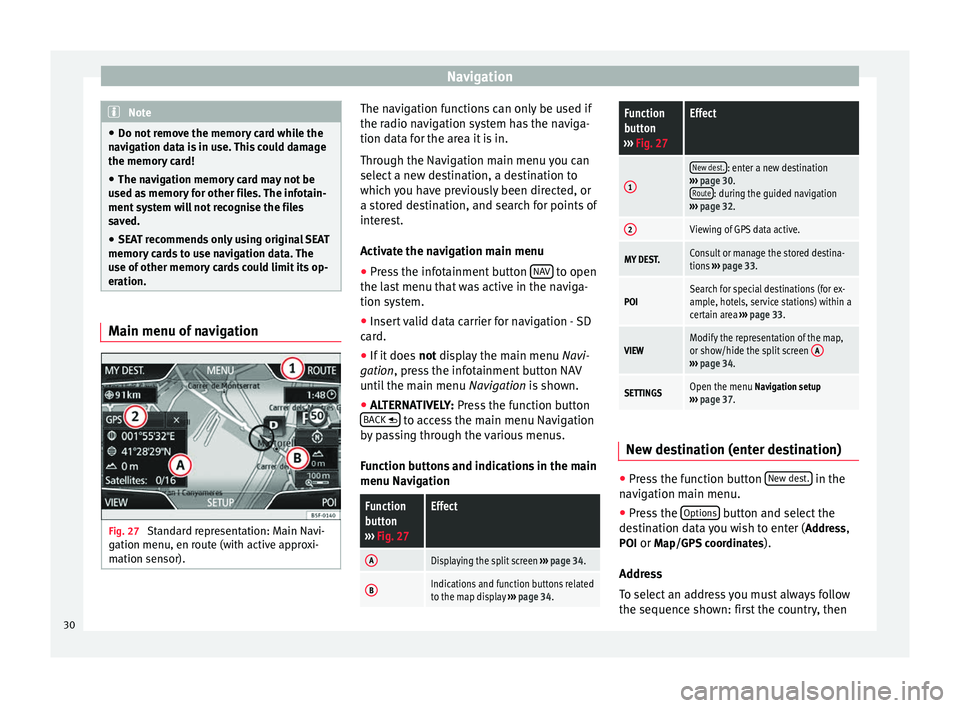
eration. Main menu of navigation
Fig. 27
Standard representation: Main Navi-
gation menu, en route (with active approxi-
mation sensor). The navigation functions can only be used if
the radio navigation system has the naviga-
tion data for the area it is in.
Through the Navigation main menu you can
select a new destination, a destination to
which you have previously been directed, or
a stored destination, and search for points of
interest.
Activate the navigation main menu
● Press the infotainment button NAV to open
the last menu that was active in the naviga-
tion system.
● Insert valid data carrier for navigation - SD
card.
● If it does not display the main menu
Na
vi-
gation, press the infotainment button NAV
until the main menu Navigation is shown.
● ALTERNATIVELY:
Press the function button
BACK to access the main menu Navigation
by passing through the various menus.
Function buttons and indications in the main
menu Navigation
Function
button
››› Fig. 27Effect
ADisplaying the split screen ››› page 34.
BIndications and function buttons related
to the map display ››› page 34.
Function
button
››› Fig. 27Effect
1
New dest.: enter a new destination
››› page 30.
Route
: during the guided navigation
››› page 32.
2Viewing of GPS data active.
MY DEST.Consult or manage the stored destina-
tions ››› page 33.
POISearch for special destinations (for ex-
ample, hotels, service stations) within a
certain area ››› page 33.
VIEWModify the representation of the map,
or show/hide the split screen A
›››
page 34.
SETTINGSOpen the menu Navigation setup
››› page 37. New destination (enter destination)
●
Press the function button New dest. in the
navigation main menu.
● Press the Options button and select the
destination data you wish to enter ( Address,
POI or Map/GPS coordinates ).
Address
To select an address you must always follow
the sequence shown: first the country, then
30
Page 39 of 64
Navigation
you will always have to select whether you
want virtual or real navigation.
Navigation setup
●
Press the function button Setup in the navi-
gation main menu.Function button: effect
1. Route options: setup for calculating the route.
Proposal of 3 alternative routes.: after starting guided
navigation, 3 alternative routes are proposed.
Route: select the route type.
Economic: seeks a balance between journey time
and the distance to cover. Quick: the quickest route to the destination.Short: the shortest route to the destination, al-
though it may entail a longer journey time.
Function button: effect
Dynamic route: dynamic navigation with TMC traffic
reports is active ››› page 35.
Avoid motorways: motorways will not be taken into
account, as far as possible, when calculating the
route.
Avoid ferries and trains: as far as possible, ferries and
trains for vehicles are avoided when calculating the
route.
Avoid toll roads: as far as possible, toll roads are
avoided when calculating the route.
Avoid tunnels: tunnels are avoided when calculating
the route, provided this is possible.
Avoid routes with toll stickers: as far as possible, routes
with toll stickers (e.g., Swiss motorways) are avoided. Available toll stickers
: the toll stickers available are
shown.
2. Map setup: Setup for the visual representation of the
map.
Function button: effect
Perspective: switch the map display between 2D
north, 2D direction of travel and 3D direction of trav-
el. Day/Night
: alternates the map representation be-
tween day, night or automatic view.
Autozoom: The scale of the map is modified auto-
matically with “Autozoom” active, depending on the
route followed (on motorways, small scale; in urban
areas, expanded scale). It is not possible to select au-
tozoom without CENTRING the main screen.
Show traffic signs: during guided navigation the traf-
fic signs stored in the navigation data for the road on
which you are currently driving will be shown. Select categories
: select the categories of points of in-
terest that you wish to view on the map.
Show favourites: the destinations stored in your Fa-
vourites list will be shown on the map (star icon).
Lane recommendation: During guided navigation,
when you must turn off a road with several lanes, an
additional instruction will recommend which lane you
should be in.
Fuel options: adjust the fuel refilling options.
Select preferred service stations: the service stations se-
lected are displayed on the map.
Fuel warning: this function makes a warning pop-up
appear in the navigation system when fuel is low. The
pop-up offers the option of calculating the route to
the nearest petrol station.
Navigation announcements: setup for the navigation instruc-
tions.
Volume: adjust the volume of the acoustic navigation
instructions.» 37