ignition Seat Leon 5D 2014 Owner's manual
[x] Cancel search | Manufacturer: SEAT, Model Year: 2014, Model line: Leon 5D, Model: Seat Leon 5D 2014Pages: 284, PDF Size: 5.85 MB
Page 5 of 284
Table of Contents
Table of Contents
The essentials . . . . . . . . . . . . . . . . . . . . . . . . 5
Exterior view . . . . . . . . . . . . . . . . . . . . . . . . . . . . 5
Interior view . . . . . . . . . . . . . . . . . . . . . . . . . . . . 7
How it works . . . . . . . . . . . . . . . . . . . . . . . . . . . . 9
Unlocking and locking . . . . . . . . . . . . . . . . . . . . 9
Before driving . . . . . . . . . . . . . . . . . . . . . . . . . . . 11
Starting the vehicle . . . . . . . . . . . . . . . . . . . . . . 14
Lights and visibility . . . . . . . . . . . . . . . . . . . . . . 15
Easy Connect . . . . . . . . . . . . . . . . . . . . . . . . . . . 17
Driver information system . . . . . . . . . . . . . . . . . 19
Cruise control . . . . . . . . . . . . . . . . . . . . . . . . . . . 21
Warning lamps . . . . . . . . . . . . . . . . . . . . . . . . . . 22
Gearbox lever . . . . . . . . . . . . . . . . . . . . . . . . . . . 24
Air conditioning . . . . . . . . . . . . . . . . . . . . . . . . . 26
Level control . . . . . . . . . . . . . . . . . . . . . . . . . . . . 31
Action in the event of a puncture . . . . . . . . . . . 33
Emergency towing of the vehicle . . . . . . . . . . . 35
Safety . . . . . . . . . . . . . . . . . . . . . . . . . . . . . . . . 37
Safe driving . . . . . . . . . . . . . . . . . . . . . . . . . . . . 37
Safety first! . . . . . . . . . . . . . . . . . . . . . . . . . . . . . 37
Advice about driving . . . . . . . . . . . . . . . . . . . . . 37
Sitting position for vehicle occupants . . . . . . . 38
Pedal area . . . . . . . . . . . . . . . . . . . . . . . . . . . . . . 42
Seat belts . . . . . . . . . . . . . . . . . . . . . . . . . . . . . . 43
The reasons why we should wear seat belts . . 43
How to properly adjust your seatbelt . . . . . . . . 46
Seat belt tensioners . . . . . . . . . . . . . . . . . . . . . . 47
Airbag system . . . . . . . . . . . . . . . . . . . . . . . . . . 48
Brief introduction . . . . . . . . . . . . . . . . . . . . . . . . 48
Airbag overview . . . . . . . . . . . . . . . . . . . . . . . . . 50
Deactivating airbags . . . . . . . . . . . . . . . . . . . . . 54
Transporting children safety . . . . . . . . . . . . . . . 56
Safety for children . . . . . . . . . . . . . . . . . . . . . . . 56
Child seats . . . . . . . . . . . . . . . . . . . . . . . . . . . . . 58 Operation
. . . . . . . . . . . . . . . . . . . . . . . . . . . . . 65
Controls and displays . . . . . . . . . . . . . . . . . . . . 65
Overview . . . . . . . . . . . . . . . . . . . . . . . . . . . . . . . 64
Instruments and warning/control lamps . . . . . 66
Instruments . . . . . . . . . . . . . . . . . . . . . . . . . . . . 66
Control lamps . . . . . . . . . . . . . . . . . . . . . . . . . . . 71
Driver information system . . . . . . . . . . . . . . . . . 72
Information system . . . . . . . . . . . . . . . . . . . . . . 72
Driving data . . . . . . . . . . . . . . . . . . . . . . . . . . . . 76
Speed warning function . . . . . . . . . . . . . . . . . . . 79
Service interval display . . . . . . . . . . . . . . . . . . . 80
Introduction to the Easy Connect system* . . . . 81
System Settings (CAR)* . . . . . . . . . . . . . . . . . . . 81
Opening and closing . . . . . . . . . . . . . . . . . . . . . 82
Central locking system . . . . . . . . . . . . . . . . . . . . 82
Anti-theft alarm system* . . . . . . . . . . . . . . . . . . 87
Rear lid (luggage compartment) . . . . . . . . . . . . 89
Electric windows . . . . . . . . . . . . . . . . . . . . . . . . . 90
Panoramic sliding sunroof* . . . . . . . . . . . . . . . . 92
Lights and visibility . . . . . . . . . . . . . . . . . . . . . . 94
Lights . . . . . . . . . . . . . . . . . . . . . . . . . . . . . . . . . 94
Visibility . . . . . . . . . . . . . . . . . . . . . . . . . . . . . . . 101
Windscreen wiper and window wiper systems . 102
Rear vision mirror . . . . . . . . . . . . . . . . . . . . . . . . 104
Seats and head restraints . . . . . . . . . . . . . . . . . 106
Adjusting the seats and headrests . . . . . . . . . . 106
Seat functions . . . . . . . . . . . . . . . . . . . . . . . . . . 107
Transport and practical equipment . . . . . . . . . 111
Storage compartments . . . . . . . . . . . . . . . . . . . 111
Storing objects . . . . . . . . . . . . . . . . . . . . . . . . . . 114
Roof carrier . . . . . . . . . . . . . . . . . . . . . . . . . . . . . 122
Air conditioning . . . . . . . . . . . . . . . . . . . . . . . . . 124
Heating, ventilation and cooling . . . . . . . . . . . . 124
Driving . . . . . . . . . . . . . . . . . . . . . . . . . . . . . . . . 129
Ignition lock . . . . . . . . . . . . . . . . . . . . . . . . . . . . 129
Braking and parking . . . . . . . . . . . . . . . . . . . . . 131
Manual gearbox . . . . . . . . . . . . . . . . . . . . . . . . . 132 Automatic gearbox/DSG automatic gearbox* . 132
Run-in and economical driving . . . . . . . . . . . . . 140
Driver assistance systems
. . . . . . . . . . . . . . . . . 143
Braking and stability systems . . . . . . . . . . . . . . 143
Start-Stop system* . . . . . . . . . . . . . . . . . . . . . . . 148
Cruise control system (CCS)* . . . . . . . . . . . . . . . 150
Adaptive Cruise Control ACC* . . . . . . . . . . . . . . 151
Monitoring system Front Assist* . . . . . . . . . . . . 161
Lane Assist system* . . . . . . . . . . . . . . . . . . . . . . 166
SEAT driving modes (SEAT Drive Profile)* . . . . . 169
Tiredness detection (break recommendation)* 172
Parking aid . . . . . . . . . . . . . . . . . . . . . . . . . . . . . 173
Towing bracket device . . . . . . . . . . . . . . . . . . . . 177
Trailer towing . . . . . . . . . . . . . . . . . . . . . . . . . . . 177
Advice . . . . . . . . . . . . . . . . . . . . . . . . . . . . . . . . 182
Care and maintenance . . . . . . . . . . . . . . . . . . . . 182
Accessories and modifications to the vehicle . 182
Care and cleaning . . . . . . . . . . . . . . . . . . . . . . . 183
Vehicle exterior care . . . . . . . . . . . . . . . . . . . . . . 183
Care of the vehicle interior . . . . . . . . . . . . . . . . . 187
Intelligent technology . . . . . . . . . . . . . . . . . . . . 190
Electro-mechanical steering . . . . . . . . . . . . . . . 190
Progressive steering . . . . . . . . . . . . . . . . . . . . . 190
Four-wheel drive . . . . . . . . . . . . . . . . . . . . . . . . . 191
Power Management . . . . . . . . . . . . . . . . . . . . . . 191
Checking and refilling levels . . . . . . . . . . . . . . . 193
Refuelling . . . . . . . . . . . . . . . . . . . . . . . . . . . . . . 193
Fuel . . . . . . . . . . . . . . . . . . . . . . . . . . . . . . . . . . . 195
Bonnet . . . . . . . . . . . . . . . . . . . . . . . . . . . . . . . . 198
Engine oil . . . . . . . . . . . . . . . . . . . . . . . . . . . . . . 200
Cooling system . . . . . . . . . . . . . . . . . . . . . . . . . . 203
Brake fluid . . . . . . . . . . . . . . . . . . . . . . . . . . . . . 204
Windscreen washer reservoir . . . . . . . . . . . . . . 204
Battery . . . . . . . . . . . . . . . . . . . . . . . . . . . . . . . . . 205
Wheels . . . . . . . . . . . . . . . . . . . . . . . . . . . . . . . . 208
Wheels and tyres . . . . . . . . . . . . . . . . . . . . . . . . 208
Tyre monitoring systems . . . . . . . . . . . . . . . . . . 212
3
Page 16 of 284
The essentials
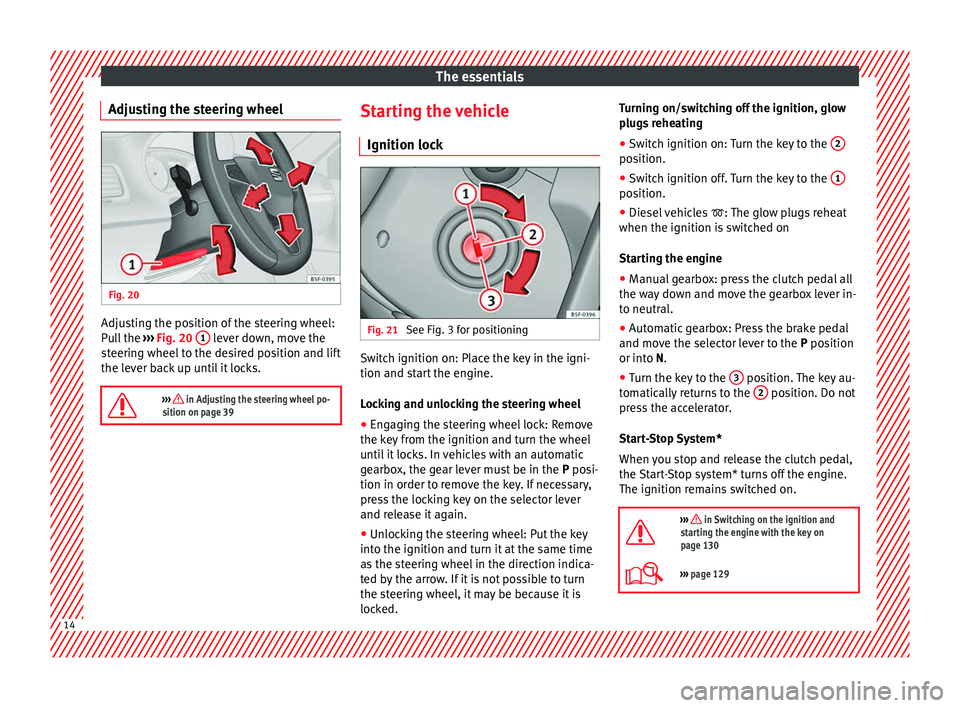
Adjusting the steering wheel Fig. 20
Adjusting the position of the steering wheel:
Pull the
››› Fig. 20 1 lever down, move the
steering wheel to the desired position and lift
the lever back up until it locks.
››› in Adjusting the steering wheel po-
sition on page 39 Starting the vehicle
Ignition lock Fig. 21
See Fig. 3 for positioning Switch ignition on: Place the key in the igni-
tion and start the engine.
Locking and unlocking the steering wheel
● Engaging the steering wheel lock: Remove
the key from the ignition and turn the wheel
until it locks. In vehicles with an automatic
gearbox, the gear lever must be in the P posi-
tion in or der t
o remove the key. If necessary,
press the locking key on the selector lever
and release it again.
● Unlocking the steering wheel: Put the key
into the ignition and turn it at the same time
as the steering wheel in the direction indica-
ted by the arrow. If it is not possible to turn
the steering wheel, it may be because it is
locked. Turning on/switching off the ignition, glow
plugs reheating
●
Switch ignition on: Turn the key to the 2 position.
●
Switch ignition off. Turn the key to the 1 position.
●
Diesel vehicles : The glow plugs reheat
when the ignition i s
switched on
Starting the engine
● Manual gearbox: press the clutch pedal all
the way down and move the gearbox lever in-
to neutral.
● Automatic gearbox: Press the brake pedal
and move the selector lever to the P position
or into
N.
● Turn the key to the 3 position. The key au-
tomatically returns to the 2 position. Do not
press the accelerator.
Start-Stop System*
When you stop and release the clutch pedal,
the Start-Stop system* turns off the engine.
The ignition remains switched on.
››› in Switching on the ignition and
starting the engine with the key on
page 130
››› page 129 14
Page 17 of 284
The essentials
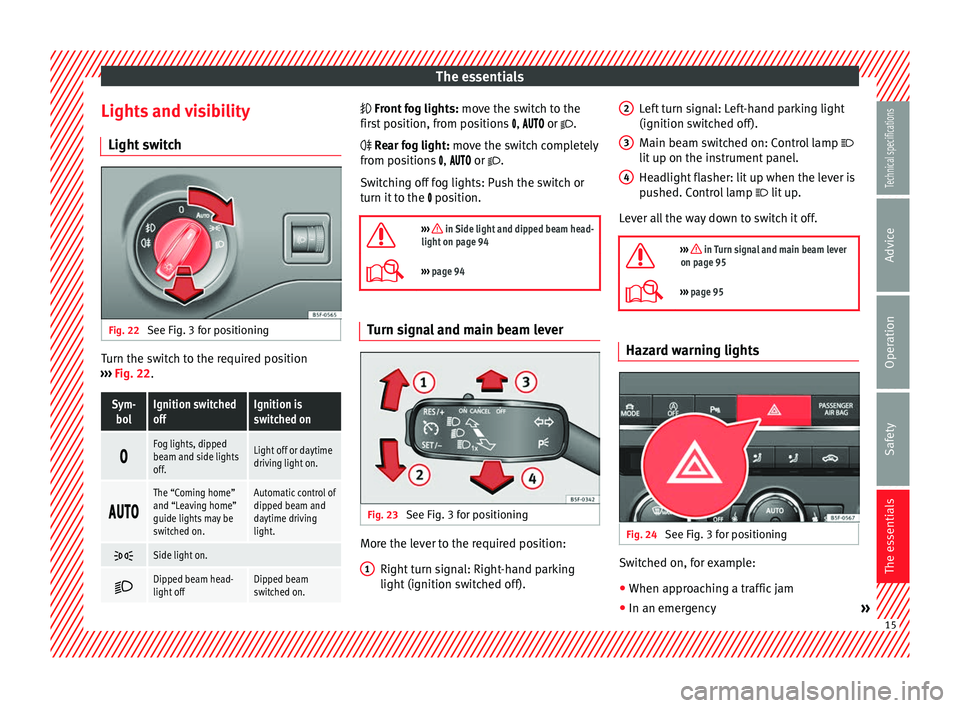
Lights and visibility Light switch Fig. 22
See Fig. 3 for positioning Turn the switch to the required position
››› Fig. 22 .Sym-
bolIgnition switched
offIgnition is
switched on
Fog lights, dipped
beam and side lights
off.Light off or daytime
driving light on.
The “Coming home”
and “Leaving home”
guide lights may be
switched on.Automatic control of
dipped beam and
daytime driving
light.
Side light on.
Dipped beam head-
light offDipped beam
switched on.
Front fog lights: move the switch to the
first position, from positions
,
or .
Rear fog light: move the switch completely
from positions , or .
Switching off fog lights: Push the switch or
turn it to the
position.
››› in Side light and dipped beam head-
light on page 94
››› page 94 Turn signal and main beam lever
Fig. 23
See Fig. 3 for positioning More the lever to the required position:
Right turn signal: Right-hand parking
light (ignition switched off).
1 Left turn signal: Left-hand parking light
(ignition switched off).
Main beam switched on: Control lamp
lit up on the instrument panel.
Headlight flasher: lit up when the lever is
pushed. Control lamp lit up.
L ev
er all the way down to switch it off.
››› in Turn signal and main beam lever
on page 95
››› page 95 Hazard warning lights
Fig. 24
See Fig. 3 for positioning Switched on, for example:
● When approaching a traffic jam
● In an emergency »
2 3
4
15
Technical specifications
Advice
Operation
Safety
The essentials
Page 18 of 284
The essentials
● The vehicle has broken down
● When towing or being towed
››› in Hazard warning lights on
page 99
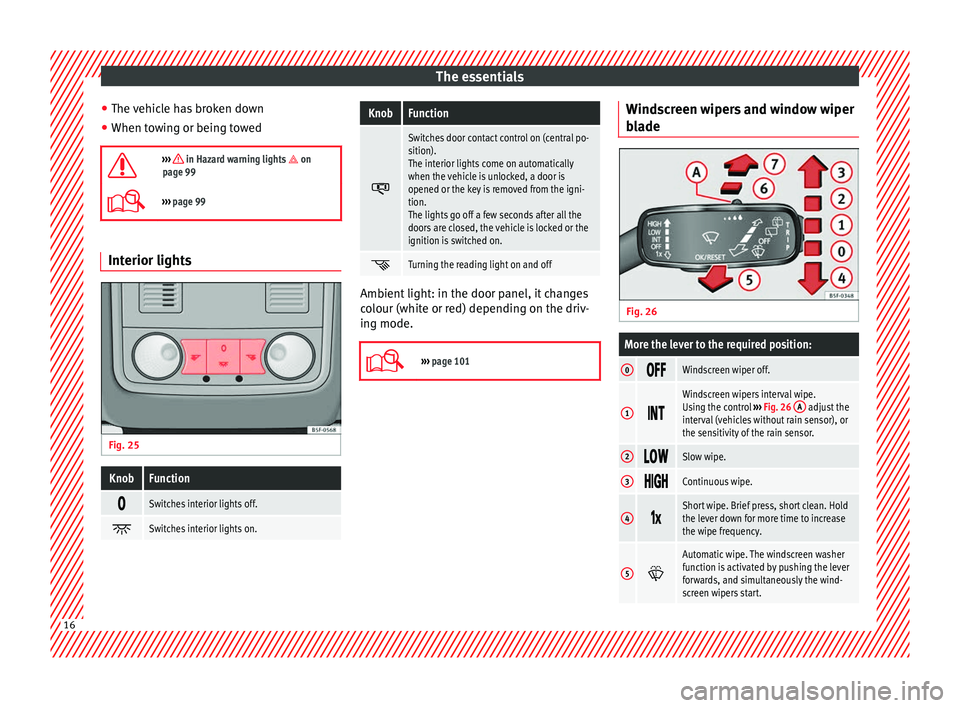
››› page 99 Interior lights
Fig. 25
KnobFunction
Switches interior lights off.
Switches interior lights on.
KnobFunction
Switches door contact control on (central po-
sition).
The interior lights come on automatically
when the vehicle is unlocked, a door is
opened or the key is removed from the igni-
tion.
The lights go off a few seconds after all the
doors are closed, the vehicle is locked or the
ignition is switched on.
Turning the reading light on and off
Ambient light: in the door panel, it changes
colour (white or red) depending on the driv-
ing mode.
››› page 101 Windscreen wipers and window wiper
blade
Fig. 26
More the lever to the required position:
0 Windscreen wiper off.
1
Windscreen wipers interval wipe.
Using the control
››› Fig. 26 A adjust the
interval (vehicles without rain sensor), or
the sensitivity of the rain sensor.
2 Slow wipe.
3
Continuous wipe.
4
Short wipe. Brief press, short clean. Hold
the lever down for more time to increase
the wipe frequency.
5
Automatic wipe. The windscreen washer
function is activated by pushing the lever
forwards, and simultaneously the wind-
screen wipers start.
16
Page 19 of 284

The essentialsMore the lever to the required position:
6
Interval wipe for rear window. The wiper
will wipe the window approximately every
six seconds.
More the lever to the required position:
7 The rear window wash function is activa-
ted by pressing the lever, and the rear
wiper starts simultaneously.
›››
page 102
››› page 230 Easy Connect
CAR menu Setup Fig. 27
See Fig. 3 for positioning Fig. 28
See Fig. 3 for positioning ●
Switch the ignition on.
● Switch on the Easy Connect system.
● Press the Easy Connect button ››› Fig. 27 . ●
Pr e
ss the function button
Setup to open the
menu Vehicle settings
›
›› Fig. 28
. ●
To select a function in the menu, keep the
desired button pressed down. » 17
Technical specifications
Advice
Operation
Safety
The essentials
Page 25 of 284
The essentials
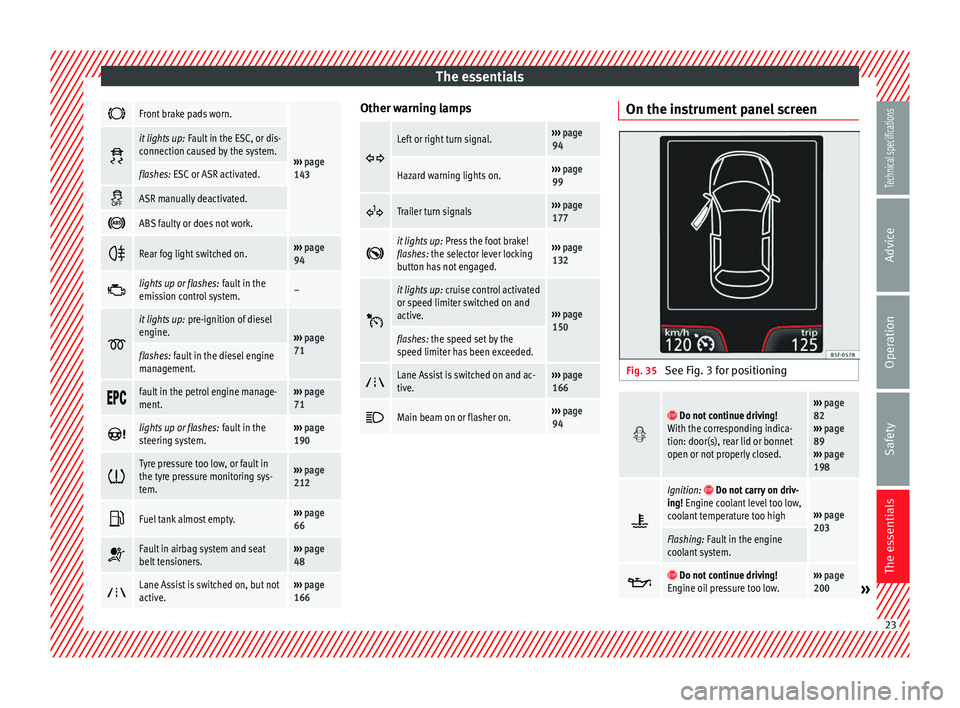
Front brake pads worn.
›››
page
143
it lights up:
Fault in the ESC, or dis-
connection caused by the system.
flashes: ESC or ASR activated.
ASR manually deactivated.
ABS faulty or does not work.
Rear fog light switched on.›››
page
94
lights up or flashes:
fault in the
emission control system.–
it lights up:
pre-ignition of diesel
engine.
››› page
71
flashes: fault in the diesel engine
management.
fault in the petrol engine manage-
ment.›››
page
71
lights up or flashes:
fault in the
steering system.››› page
190
Tyre pressure too low, or fault in
the tyre pressure monitoring sys-
tem.›››
page
212
Fuel tank almost empty.›››
page
66
Fault in airbag system and seat
belt tensioners.›››
page
48
Lane Assist is switched on, but not
active.›››
page
166 Other warning lamps
Left or right turn signal.›››
page
94
Hazard warning lights on.››› page
99
Trailer turn signals›››
page
177
it lights up:
Press the foot brake!
flashes: the selector lever locking
button has not engaged.››› page
132
it lights up:
cruise control activated
or speed limiter switched on and
active.
››› page
150
flashes: the speed set by the
speed limiter has been exceeded.
Lane Assist is switched on and ac-
tive.›››
page
166
Main beam on or flasher on.›››
page
94 On the instrument panel screen
Fig. 35
See Fig. 3 for positioning Do not continue driving!
With the corresponding indica-
tion: door(s), rear lid or bonnet
open or not properly closed.››› page
82
››› page
89
››› page
198
Ignition: Do not carry on driv-
ing! Engine coolant level too low,
coolant temperature too high
››› page
203
Flashing: Fault in the engine
coolant system.
Do not continue driving!
Engine oil pressure too low.››› page
200» 23
Technical specifications
Advice
Operation
Safety
The essentials
Page 26 of 284
The essentials
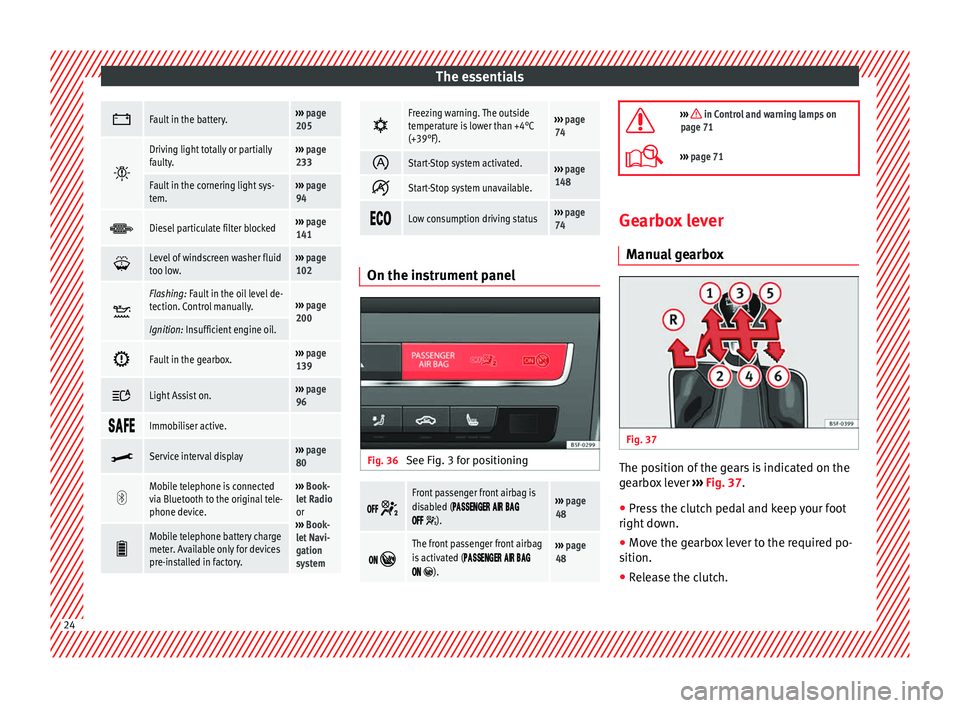
Fault in the battery.›››
page
205
Driving light totally or partially
faulty.›››
page
233
Fault in the cornering light sys-
tem.››› page
94
Diesel particulate filter blocked›››
page
141
Level of windscreen washer fluid
too low.›››
page
102
Flashing: Fault in the oil level de-
tection. Control manually.›››
page
200
Ignition: Insufficient engine oil.
Fault in the gearbox.›››
page
139
Light Assist on.›››
page
96
Immobiliser active.
Service interval display›››
page
80
Mobile telephone is connected
via Bluetooth to the original tele-
phone device.›››
Book-
let Radio
or
››› Book-
let Navi-
gation
system
Mobile telephone battery charge
meter. Available only for devices
pre-installed in factory.
Freezing warning. The outside
temperature is lower than +4°C
(+39°F).›››
page
74
Start-Stop system activated.›››
page
148
Start-Stop system unavailable.
Low consumption driving status›››
page
74 On the instrument panel
Fig. 36
See Fig. 3 for positioning
Front passenger front airbag is
disabled (
).
››› page
48
The front passenger front airbag
is activated (
).
››› page
48
››› in Control and warning lamps on
page 71
››› page 71 Gearbox lever
Manual gearbox Fig. 37
The position of the gears is indicated on the
gearbox lever
››› Fig. 37 .
● Pr e
ss the clutch pedal and keep your foot
right down.
● Move the gearbox lever to the required po-
sition.
● Release the clutch. 24
Page 37 of 284
The essentials
Wire hook for pulling off the wheel cov-
ers*/wheel bolt cap clip.
● Take out the spare wheel and the tools that
are located under the floor panel in the lug-
gage compartment.
● Take out the wheel cover or the bolt caps.
● Loosen the bolts with the box spanner (1
turn to the left).
● Mount the jack on the support points de-
signed for this purpose on the strut
››› Fig. 52 .
● Rai
se the vehicle, turning the jack until it is
slightly lifted off the ground.
● Unscrew the bolts completely and remove
the punctured wheel.
● Put the spare wheel in place. Screw on the
bolts and tighten them loosely with the box
spanner.
● Lower the vehicle with the jack. Finish tight-
ening the bolts with the box spanner.
››› in What to do first on page 217
››› page 217 6
Emergency towing of the
vehicle
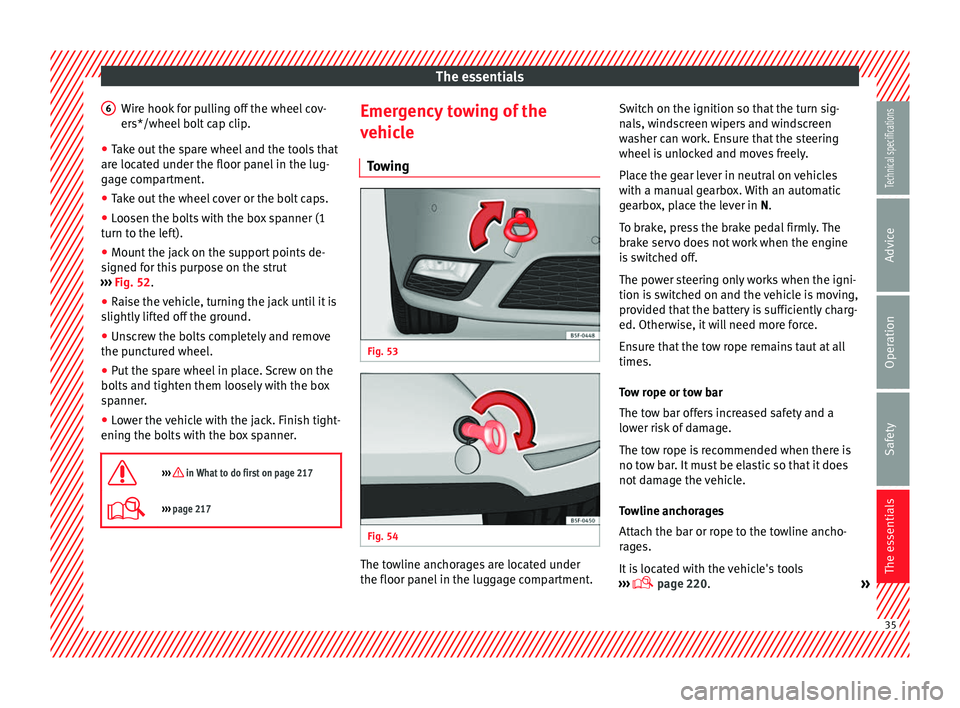
Towing Fig. 53
Fig. 54
The towline anchorages are located under
the floor panel in the luggage compartment.Switch on the ignition so that the turn sig-
nals, windscreen wipers and windscreen
washer can work. Ensure that the steering
wheel is unlocked and moves freely.
Place the gear lever in neutral on vehicles
with a manual gearbox. With an automatic
gearbox, place the lever in N.
To brake, press the brake pedal firmly. The
brake servo does not work when the engine
is switched off.
The power steering only works when the igni-
tion is switched on and the vehicle is moving,
provided that the battery is sufficiently charg-
ed. Otherwise, it will need more force.
Ensure that the tow rope remains taut at all
times.
Tow rope or tow bar
The tow bar offers increased safety and a
lower risk of damage.
The tow rope is recommended when there is
no tow bar. It must be elastic so that it does
not damage the vehicle.
Towline anchorages
Attach the bar or rope to the towline ancho-
rages.
It is located with the vehicle's tools
››› page 220
.
» 35
Technical specifications
Advice
Operation
Safety
The essentials
Page 45 of 284

Seat belts
Seat belts
The reasons why we should
wear seat belts Number of seats Your vehicle has
five seats, two in the front
and thr ee in the r
ear. Each seat is equipped
with a three-point seat belt.
In some versions, your vehicle is approved
only for four seats. Two front seats and two
r e
ar seats. WARNING
● Never transport more than the permitted
amount of people in your vehicle.
● Every vehicle occupant must properly fas-
ten and wear the seat belt belonging to his or
her seat. Children must be protected with an
appropriate child restraint system. Seat belt warning lamp*
Fig. 60
Instrument panel: right rear seat oc-
cupied and corresponding seat belt fastened
display. The control lamp illuminates to remind the
driver to fasten his seat belt.
Before starting the vehicle:
– Fasten your seat belt securely.
– Instruct your passengers to fasten their
seat belts properly before driving off.
– Protect children by using a child seat ac-
cording to the child's height and weight.
When the ignition is switched on, the control
lamp in the instrument panel lights up (de-
pending on the model version) if the driver or
passenger have not fastened their seat belts.
An audible warning signal will sound for a
few seconds if the seat belts are not fastened
as the vehicle drives off and reaches a speed of more than approximately 25 km/h
(15 mph) or if the seat belts are unfastened
while the vehicle is in motion. The warning
light will also flash
.
The
l
amp goes out when the driver and
p
assenger seat belts are fastened with the ig-
nition switched on.
Rear seat belts fastened display.*
Depending on the model version, when the
ignition is switched on, the seat belt status
display ››› Fig. 60 on the instrument panel in-
forms
the driver whether the passengers in
the rear seats have fastened their seat belts.
The symbol indicates that the passenger in
this seat has fastened “his or her” seat belt.
When a seat belt in the rear seats is fastened
or unfastened, the seat belt status is dis-
played for approximately 30 seconds. The in-
dication can be hidden by pressing the 0.0/SET button on the dash panel.
The seat belt status flashes for a maximum of
30 seconds when a seat belt in the rear seats
is unfastened while the vehicle is in motion.
An audible warning will also be heard if the
vehicle is travelling at over 25 km/h
(15 mph).
43
Technical specifications
Advice
Operation
Safety
The essentials
Page 51 of 284

Airbag system
travel on the rear seat. Never transport
children in the vehicle if they are not restrain-
ed or the restraint system is not appropriate
for their age, size or weight.
●
If you are not wearing a seat belt, or if you
lean forward or to the side while travelling or
assume an incorrect sitting position, there is
a substantially increased risk of injury. This
increased risk of injury will be further in-
creased if you are struck by an inflating air-
bag.
● To reduce the risk of injury from an inflating
airbag, always wear the seat belt properly
››› page 43.
● Alw
ays adjust the front seats properly. Description of airbag system
The airbag system is not a substitute for the
seat belts. The airbag system offers addition-
al protection for the driver and passenger in
combination with the seat belts.
The airbag system comprises the following
modules (as per vehicle equipment):
●
Electronic control unit
● Front airbags for driver and passenger
● Knee airbag for the driver
● Side airbags
● Head airbag ●
Airbag control lamp on the instrument
panel
● Key-operated switch for front passenger air-
bag
● Control lamp to disconnect/connect the
front airbag.
The airbag system operation is monitored
electronically. The airbag control lamp will il-
luminate for a few seconds every time the ig-
nition is switched on (self-diagnosis).
There is a fault in the system if the control
lamp :
● does not light up when the ignition is
switched on,
● turns off after 4 seconds after the ignition
is switched on
● turns off and then lights up again after the
ignition is switched on
● illuminates or flashes while the vehicle is
moving.
The airbag system is not triggered if:
● the ignition is switched off
● there is a minor frontal collision
● there is a minor side collision
● there is a rear-end collision
● the vehicle turns over. WARNING
● The seat belts and airbags can only provide
maximum protection if the occupants are
seated correctly ››› page 38, Sitting position
for vehicle occupants .
● If a fault has occurred in the airbag system,
have the system checked immediately by a
specialised workshop. Otherwise there is a
danger that during a collision, the system
may fail to trigger, or not trigger correctly. Airbag activation
The airbags deploy extremely rapidly, within
thousandths of a second, to provide addi-
tional protection in the event of an accident.
A fine dust may develop when the airbag de-
ploys. This is normal and it is not an indica-
tion of fire in the vehicle.
The airbag system is only ready to function
when the ignition is on.
In special accidents instances, several air-
bags may activate at the same time.
In the event of minor head-on and side colli-
sions, rear-end collisions, overturning or roll-
over of the vehicle, airbags
do not activate.
Activation factors
The conditions that lead to the airbag system
activating in each situation cannot be gener-
alised. Some factors play an important role, »
49
Technical specifications
Advice
Operation
Safety
The essentials