Seat Leon SC 2013 MEDIA SYSTEM PLUS - NAVI SYSTEM
Manufacturer: SEAT, Model Year: 2013, Model line: Leon SC, Model: Seat Leon SC 2013Pages: 72, PDF Size: 3 MB
Page 21 of 72
20Audio modeIn FM mode, the station tuned in must have the TP function. If, after activat-ing the TP function, you manually select or use the stored station buttons toselect a station that does not have the TP function, it will not check if thereare traffic reports (display: TP crossed out).
When the traffic report station tuned in stops being received, TP crossed outwill also be displayed, and you must search for a station manually⇒ page 17.
During operation in AM or Media mode, a traffic report station is always setautomatically in the background, provided there is one that can be tuned in.Depending on your location, this process can take some time.
Reception of a traffic report
An incoming traffic report will interrupt the active audio mode.
During the broadcast of the traffic report a pop-up window will appear and,if necessary, the radio will change to the station of the traffic report (EON)for the duration of the broadcast.
Media mode is interrupted and the volume is adjusted according to the pre-set volume ⇒ page 64.
The traffic report volume may be modified with the volume control⇒ Fig. 1. The modified volume will be stored for future traffic reports.
●
Press the function button Cancel to end the current traffic report. The TPfunction remains switched on.
●
OR: Press the function button Deactivate to end the current traffic reportand deactivate the TP function. You can reactivate it in the menu SETUP⇒ page 20.
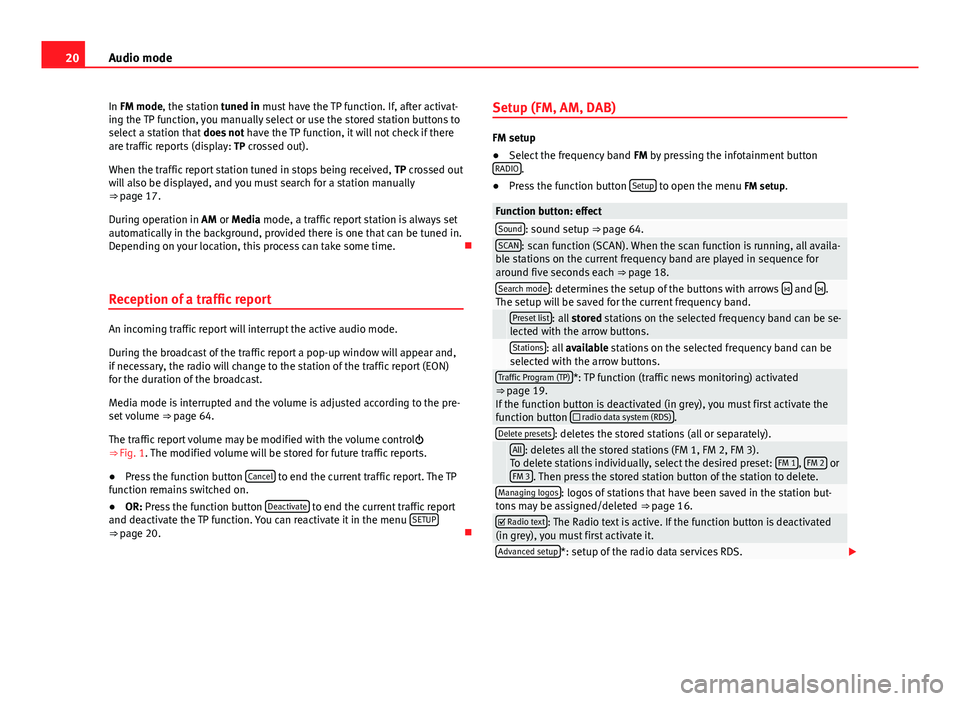
Setup (FM, AM, DAB)
FM setup
●
Select the frequency band FM by pressing the infotainment buttonRADIO.
●
Press the function button Setup to open the menu FM setup.
Function button: effectSound: sound setup ⇒ page 64.SCAN: scan function (SCAN). When the scan function is running, all availa-ble stations on the current frequency band are played in sequence foraround five seconds each ⇒ page 18.
Search mode: determines the setup of the buttons with arrows and .The setup will be saved for the current frequency band. Preset list: all stored stations on the selected frequency band can be se-lected with the arrow buttons. Stations: all available stations on the selected frequency band can beselected with the arrow buttons.Traffic Program (TP)*: TP function (traffic news monitoring) activated⇒ page 19.If the function button is deactivated (in grey), you must first activate thefunction button radio data system (RDS).
Delete presets: deletes the stored stations (all or separately). All: deletes all the stored stations (FM 1, FM 2, FM 3).To delete stations individually, select the desired preset: FM 1, FM 2 orFM 3. Then press the stored station button of the station to delete.
Managing logos: logos of stations that have been saved in the station but-tons may be assigned/deleted ⇒ page 16. Radio text: The Radio text is active. If the function button is deactivated(in grey), you must first activate it.Advanced setup*: setup of the radio data services RDS.
Page 22 of 72
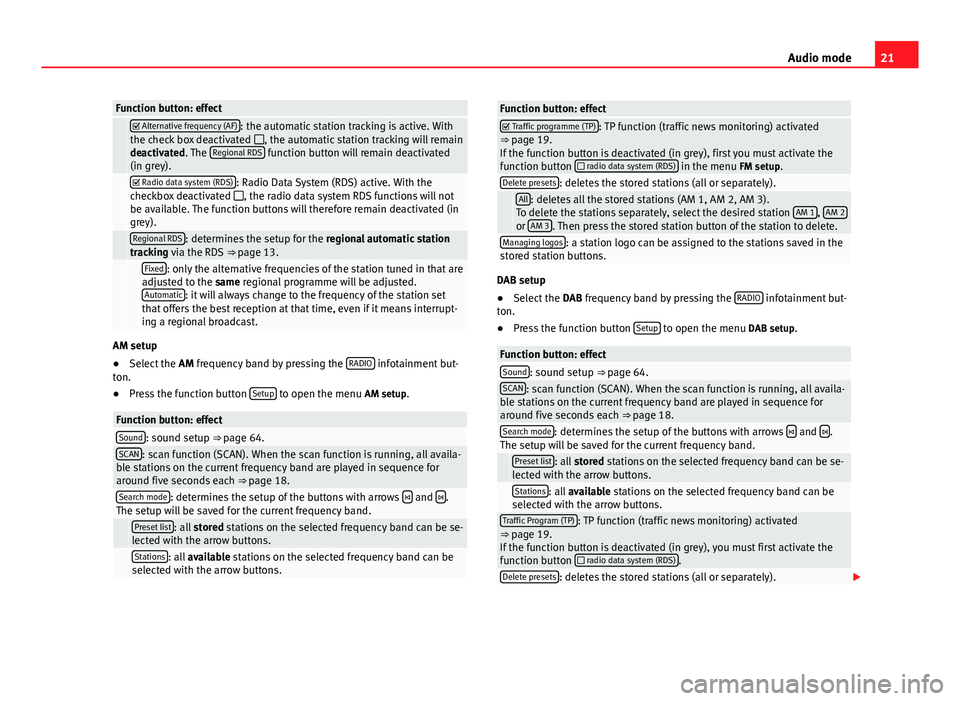
21Audio modeFunction button: effect Alternative frequency (AF): the automatic station tracking is active. Withthe check box deactivated , the automatic station tracking will remaindeactivated. The Regional RDS function button will remain deactivated(in grey).
Radio data system (RDS): Radio Data System (RDS) active. With thecheckbox deactivated , the radio data system RDS functions will notbe available. The function buttons will therefore remain deactivated (ingrey).
Regional RDS: determines the setup for the regional automatic stationtracking via the RDS ⇒ page 13. Fixed: only the alternative frequencies of the station tuned in that areadjusted to the same regional programme will be adjusted.Automatic: it will always change to the frequency of the station setthat offers the best reception at that time, even if it means interrupt-ing a regional broadcast.
AM setup
●
Select the AM frequency band by pressing the RADIO infotainment but-ton.
●
Press the function button Setup to open the menu AM setup.
Function button: effectSound: sound setup ⇒ page 64.SCAN: scan function (SCAN). When the scan function is running, all availa-ble stations on the current frequency band are played in sequence foraround five seconds each ⇒ page 18.
Search mode: determines the setup of the buttons with arrows and .The setup will be saved for the current frequency band. Preset list: all stored stations on the selected frequency band can be se-lected with the arrow buttons. Stations: all available stations on the selected frequency band can beselected with the arrow buttons.Function button: effect Traffic programme (TP): TP function (traffic news monitoring) activated⇒ page 19.If the function button is deactivated (in grey), first you must activate thefunction button radio data system (RDS) in the menu FM setup.
Delete presets: deletes the stored stations (all or separately). All: deletes all the stored stations (AM 1, AM 2, AM 3).To delete the stations separately, select the desired station AM 1, AM 2or AM 3. Then press the stored station button of the station to delete.
Managing logos: a station logo can be assigned to the stations saved in thestored station buttons.
DAB setup
●
Select the DAB frequency band by pressing the RADIO infotainment but-ton.
●
Press the function button Setup to open the menu DAB setup.
Function button: effectSound: sound setup ⇒ page 64.SCAN: scan function (SCAN). When the scan function is running, all availa-ble stations on the current frequency band are played in sequence foraround five seconds each ⇒ page 18.
Search mode: determines the setup of the buttons with arrows and .The setup will be saved for the current frequency band. Preset list: all stored stations on the selected frequency band can be se-lected with the arrow buttons. Stations: all available stations on the selected frequency band can beselected with the arrow buttons.Traffic Program (TP): TP function (traffic news monitoring) activated⇒ page 19.If the function button is deactivated (in grey), you must first activate thefunction button radio data system (RDS).
Delete presets: deletes the stored stations (all or separately).
Page 23 of 72
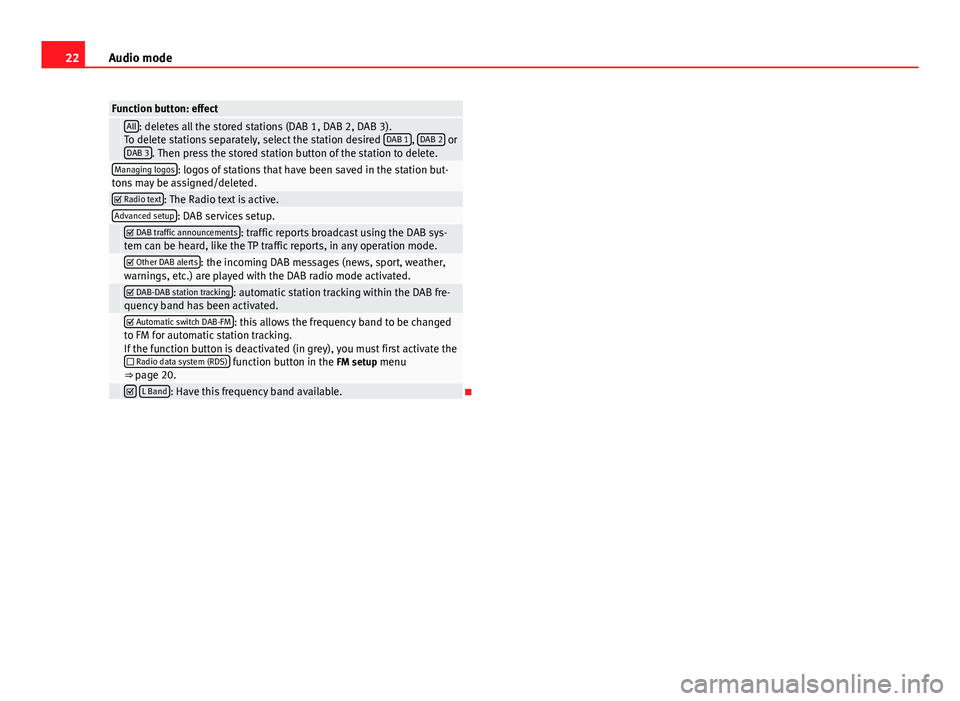
22Audio modeFunction button: effect All: deletes all the stored stations (DAB 1, DAB 2, DAB 3).To delete stations separately, select the station desired DAB 1, DAB 2 orDAB 3. Then press the stored station button of the station to delete.
Managing logos: logos of stations that have been saved in the station but-tons may be assigned/deleted. Radio text: The Radio text is active.Advanced setup: DAB services setup. DAB traffic announcements: traffic reports broadcast using the DAB sys-tem can be heard, like the TP traffic reports, in any operation mode. Other DAB alerts: the incoming DAB messages (news, sport, weather,warnings, etc.) are played with the DAB radio mode activated. DAB-DAB station tracking: automatic station tracking within the DAB fre-quency band has been activated. Automatic switch DAB-FM: this allows the frequency band to be changedto FM for automatic station tracking.If the function button is deactivated (in grey), you must first activate the Radio data system (RDS) function button in the FM setup menu⇒ page 20.
L Band: Have this frequency band available.
Page 24 of 72
23Audio modeMedia mode
Introduction
“Media sources”1) are audio sources containing audio files on various dif-ferent data media (for example CD, memory card, external MP3 player).These audio files can be played by the infotainment system from its corre-sponding drives or audio input sockets (memory card slot, AUX-IN multi-me-dia socket etc.).
The CD player and/or SD card reader, as well as the MEDIA-IN connection,are located inside the glove box.
Intellectual property rights
Audio and video files saved on data media are generally protected by intel-lectual property law depending on the national and international provisionsapplicable. Observe legal requirements!
Note
●The audio coding technology MPEG-4 HE-AAC and patents have aFraunhofer IIS licence.●
This product is protected by copyright and intellectual property rights ofMicrosoft Corporation. Using or distributing similar technology outside ofthis product without a licence from Microsoft or any of its authorised sub-sidiaries is prohibited.
●
The infotainment system allows you to view, play and manage compati-ble audio files only. Other files are ignored.
Data media and file requirements
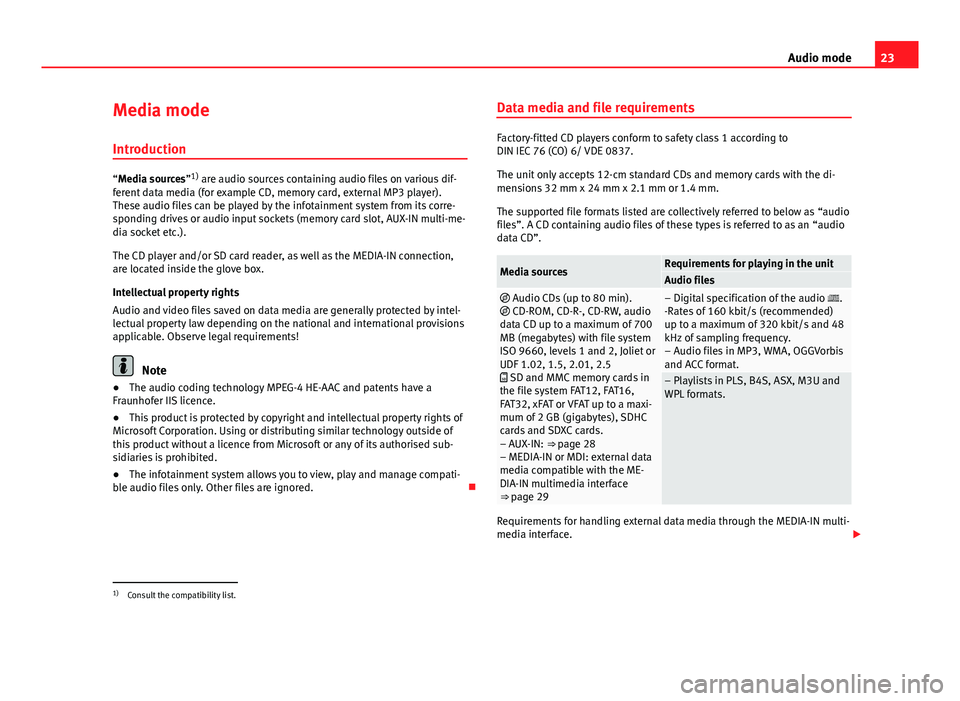
Factory-fitted CD players conform to safety class 1 according toDIN IEC 76 (CO) 6/ VDE 0837.
The unit only accepts 12-cm standard CDs and memory cards with the di-mensions 32 mm x 24 mm x 2.1 mm or 1.4 mm.
The supported file formats listed are collectively referred to below as “audiofiles”. A CD containing audio files of these types is referred to as an “audiodata CD”.
Media sourcesRequirements for playing in the unitAudio files Audio CDs (up to 80 min). CD-ROM, CD-R-, CD-RW, audiodata CD up to a maximum of 700MB (megabytes) with file systemISO 9660, levels 1 and 2, Joliet orUDF 1.02, 1.5, 2.01, 2.5 SD and MMC memory cards inthe file system FAT12, FAT16,FAT32, xFAT or VFAT up to a maxi-mum of 2 GB (gigabytes), SDHCcards and SDXC cards.– AUX-IN: ⇒ page 28– MEDIA-IN or MDI: external datamedia compatible with the ME-DIA-IN multimedia interface⇒ page 29
– Digital specification of the audio .-Rates of 160 kbit/s (recommended)up to a maximum of 320 kbit/s and 48kHz of sampling frequency.– Audio files in MP3, WMA, OGGVorbisand ACC format.
– Playlists in PLS, B4S, ASX, M3U andWPL formats.
Requirements for handling external data media through the MEDIA-IN multi-media interface.
1)
Consult the compatibility list.
Page 25 of 72
24Audio modeRestrictions and notes
Contamination, exposure to high temperatures and mechanical damage canrender a data medium unusable. Please observe the manufacturer's instruc-tions.
Variations in the quality of data media produced by different manufacturersmay lead to anomalies during playback.
Please observe copyright laws.
The unit may be unable to read individual tracks or the entire data mediumdue to the data medium configuration or the devices and programs used forrecording. Information can be found on the internet regarding the best waysto create audio files and data media (compression rate, ID3 tag etc.).
Depending on the size, its condition due to use (copy and delete process-es), the folder structure and file type, the read time of the data media usedcan vary considerably.
Playlists only determine a certain playing order. There are no files stored ina playlist. The unit will not play a playlist if the files are not on the data me-dium at the locations referred to by the playlist (relative file paths).
Note
●Do not use adaptors for memory cards.●
We will not accept any responsibility for files damaged or lost on the da-ta medium.
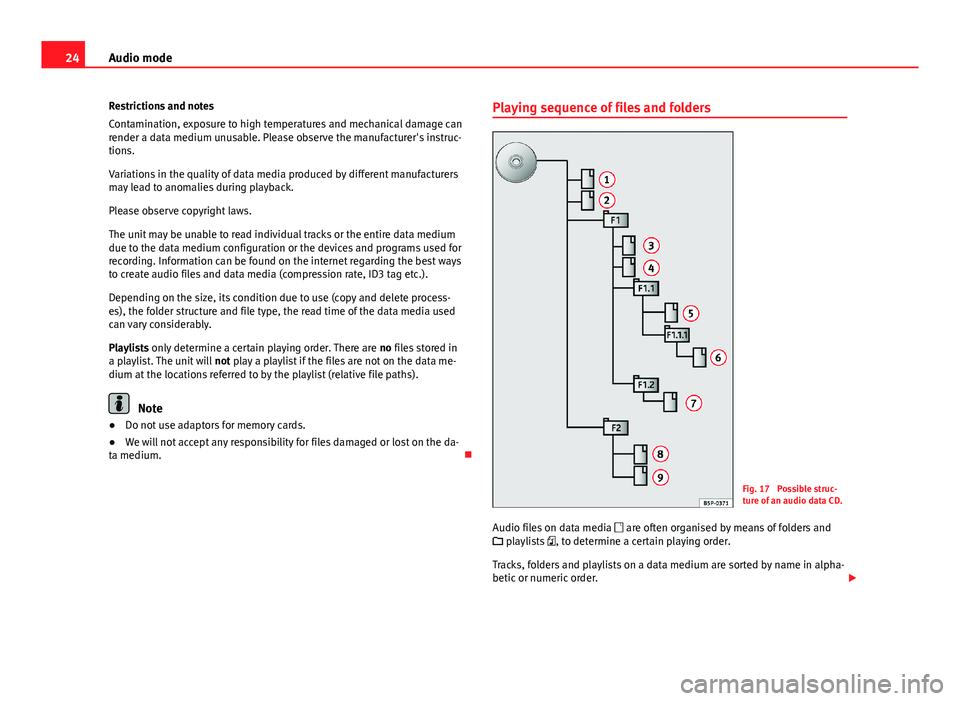
Playing sequence of files and foldersFig. 17
Possible struc-ture of an audio data CD.
Audio files on data media , to determine a certain playing order.
Tracks, folders and playlists on a data medium are sorted by name in alpha-betic or numeric order.
are often organised by means of folders and playlists
Page 26 of 72
25Audio modeThe diagram shows an example of a conventional audio data CD containingtracks , folders and subfolders ⇒ Fig. 17 that are played in the follow-ing way:1)
Tracks
1
and
2
in the CD's root directory
Tracks
3
and
4
in the first folder F1 in the CD's root directory
Track
5
in the first subfolder F1.1 of the folder F1
Track
6
in the first subfolder F1.1.1 of the subfolder F1.1
Track
7
in the second subfolder F1.2 of the folder F1
Tracks
8
and
9
in the second folder F2
Note
●The play order can be modified by selecting between the different play-back modes ⇒ page 27.●
The playlists are not automatically activated; they must be selectedthrough the menu ⇒ page 32.
1.2.3.4.5.6.MEDIA main menuFig. 18
Standard repre-sentation: main menuMEDIA.
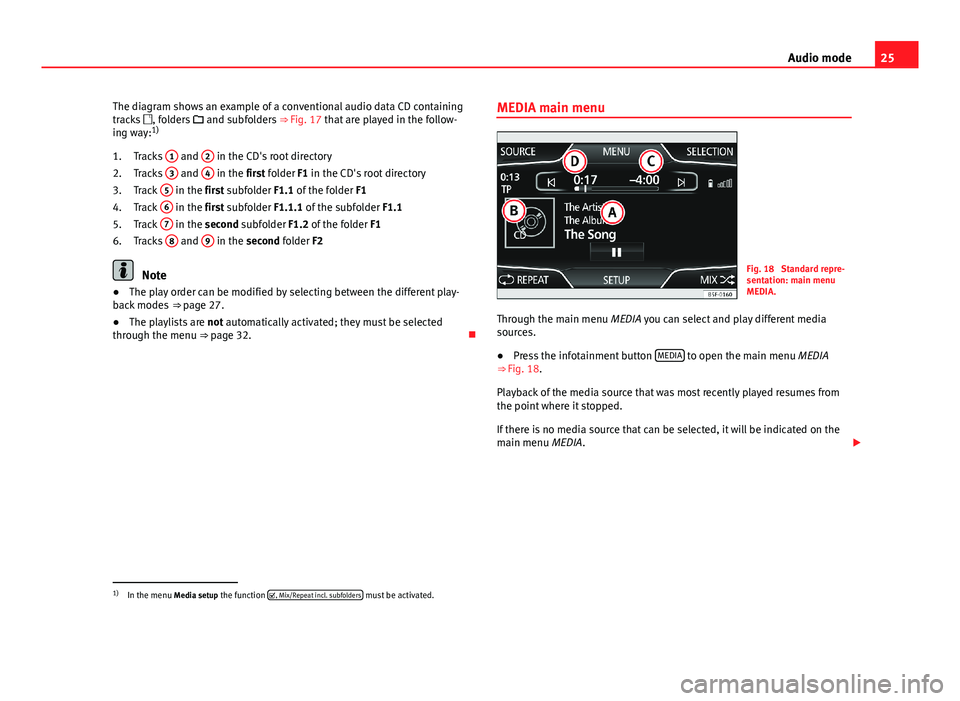
Through the main menu MEDIA you can select and play different mediasources.
●
Press the infotainment button MEDIA to open the main menu MEDIA⇒ Fig. 18.
Playback of the media source that was most recently played resumes fromthe point where it stopped.
If there is no media source that can be selected, it will be indicated on themain menu MEDIA.
1)
In the menu Media setup the function , Mix/Repeat incl. subfolders must be activated.
Page 27 of 72
26Audio modeFunction buttons of the main menu MediaFunctionbuttonEffectSOURCEOpens the list of available devices/media. Press to select an-other media source ⇒ page 27.CD, internal CD drive ⇒ page 27.SD card 1, SD card 2: SD memory card ⇒ page 28.BT Audio: Bluetooth audio ⇒ page 31.MEDIA-IN: Media-In ⇒ page 29.
SELECTIONOpens the list of tracks ⇒ page 33. or Changes track in Media mode ⇒ page 32.Playback will stop. The function button changes to ⇒ page 32.Playback will continue. The function button changes to ⇒ page 32.SETTINGSOpens the menu Media setup ⇒ page 33.Repeat all the tracks.Repeat the current track.Random play.SCANSCANWith the scan function running, all the tracks in the currentplaylist will be played for ten seconds each.The function button is displayed only when the scan functionis running. To start the scan function, press the setup buttonor open the track list Selection and press the function buttonSCAN or press the right knob.
Instructions and symbols in the main menu MediaNotice⇒ Fig. 18MeaningADisplay of the track information (CD text , ID3 tag in MP3)files.audio CDs: Display of the title and number, in accordance withthe play order on the data medium.Audio files: Display of the artist, album and title.
BDisplay of the album cover, if available on the data medium.CRemaining time in minutes and seconds. The remaining play-ing time cannot be displayed for files with variable bit rate(VBR).
DTime passed RDS radio data service deactivated. The RDS can be activatedin the menu Setup (FM, AM) ⇒ page 20.TPThe TP is active and receiving ⇒ page 19. No traffic news station can be received.No DAB reception possible.
Page 28 of 72
27Audio modeChanging the media sourceFig. 19
Standard repre-sentation: main menuMEDIA.
●
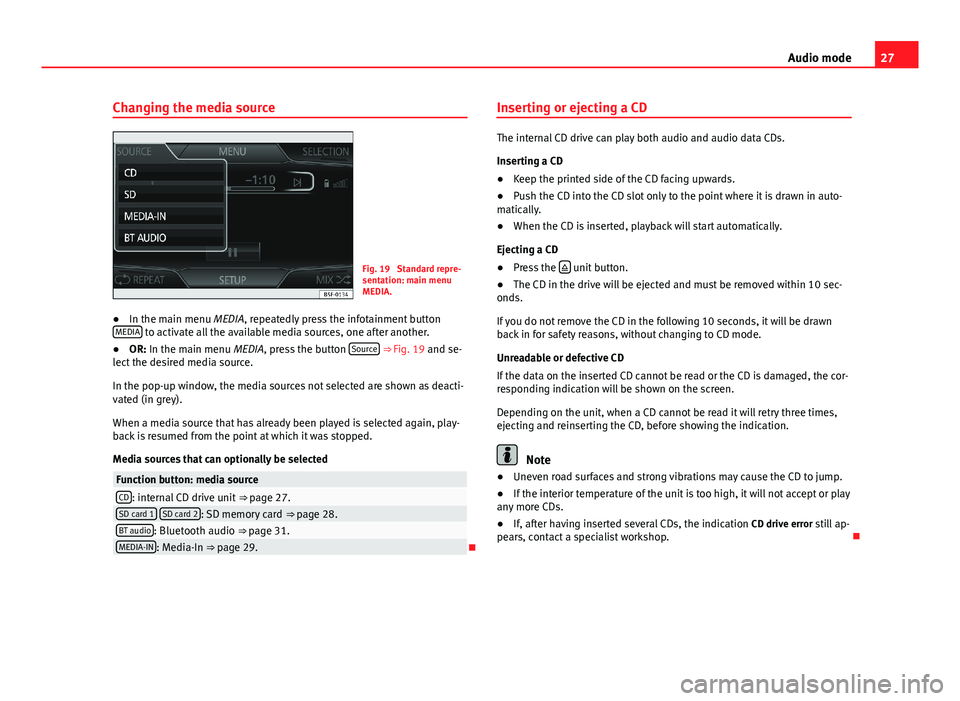
In the main menu MEDIA, repeatedly press the infotainment buttonMEDIA to activate all the available media sources, one after another.
●
OR: In the main menu MEDIA, press the button Source ⇒ Fig. 19 and se-lect the desired media source.
In the pop-up window, the media sources not selected are shown as deacti-vated (in grey).
When a media source that has already been played is selected again, play-back is resumed from the point at which it was stopped.
Media sources that can optionally be selected
Function button: media sourceCD: internal CD drive unit ⇒ page 27.SD card 1 SD card 2: SD memory card ⇒ page 28.BT audio: Bluetooth audio ⇒ page 31.MEDIA-IN: Media-In ⇒ page 29.
Inserting or ejecting a CD
The internal CD drive can play both audio and audio data CDs.
Inserting a CD
●
Keep the printed side of the CD facing upwards.
●
Push the CD into the CD slot only to the point where it is drawn in auto-matically.
●
When the CD is inserted, playback will start automatically.
Ejecting a CD
●
Press the unit button.
●
The CD in the drive will be ejected and must be removed within 10 sec-onds.
If you do not remove the CD in the following 10 seconds, it will be drawnback in for safety reasons, without changing to CD mode.
Unreadable or defective CD
If the data on the inserted CD cannot be read or the CD is damaged, the cor-responding indication will be shown on the screen.
Depending on the unit, when a CD cannot be read it will retry three times,ejecting and reinserting the CD, before showing the indication.
Note
●Uneven road surfaces and strong vibrations may cause the CD to jump.●
If the interior temperature of the unit is too high, it will not accept or playany more CDs.
●
If, after having inserted several CDs, the indication CD drive error still ap-pears, contact a specialist workshop.
Page 29 of 72
28Audio modeInserting and removing memory cards
Inserting a memory card
If a memory card cannot be inserted, ensure that it is positioned correctlyand is compatible with the unit.
Playback starts automatically if supported audio files are stored on thememory card.
Insert a compatible memory card, push it into the memory card slot with thecut-off corner first and facing upwards until it locks.
Removing a memory card
The memory card inserted must be prepared before it is ejected.
●
Press the infotainment button MENU; then, press Setup to open themenu System settings.
●
Press the function button Remove SD card 1 safely or Remove SD card 2 safely.After ejecting the memory card, the function button will be shown in grey.
●
Press the memory card inserted. The memory card jumps to the eject po-sition.
●
Remove the memory card.
Unreadable memory card
If you insert a memory card containing data that cannot be read, the unitwill not change to memory card mode after loading.
It will show the indication: There are no playable files available.
External audio source connected to the AUX-IN multimedia
socket
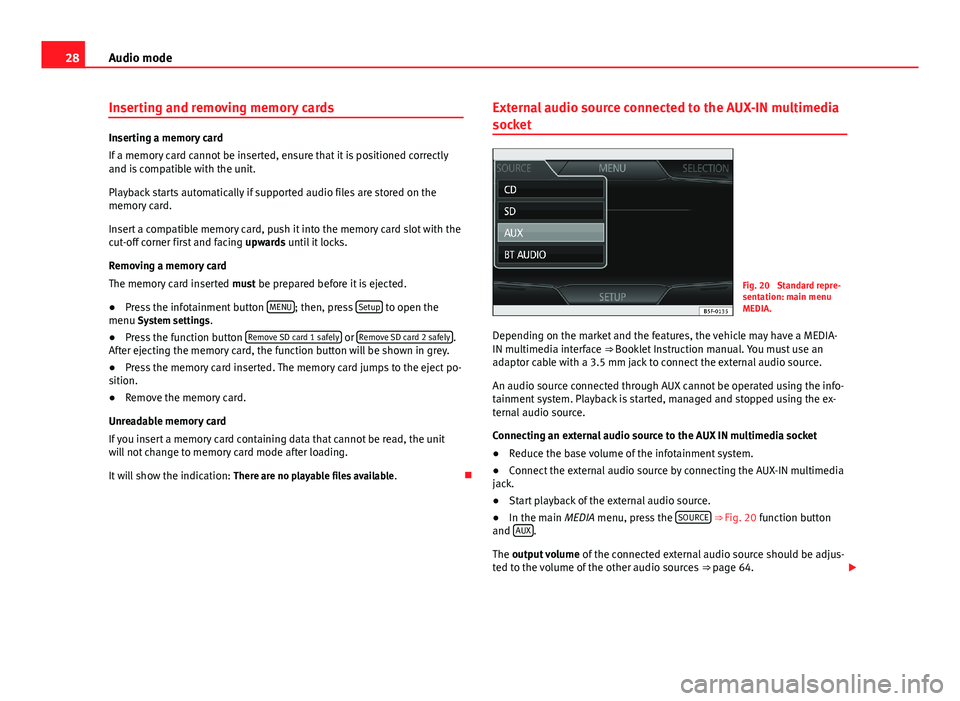
Fig. 20
Standard repre-sentation: main menuMEDIA.
Depending on the market and the features, the vehicle may have a MEDIA-IN multimedia interface ⇒ Booklet Instruction manual. You must use anadaptor cable with a 3.5 mm jack to connect the external audio source.
An audio source connected through AUX cannot be operated using the info-tainment system. Playback is started, managed and stopped using the ex-ternal audio source.
Connecting an external audio source to the AUX IN multimedia socket
●
Reduce the base volume of the infotainment system.
●
Connect the external audio source by connecting the AUX-IN multimediajack.
●
Start playback of the external audio source.
●
In the main MEDIA menu, press the SOURCE ⇒ Fig. 20 function buttonand AUX.
The output volume of the connected external audio source should be adjus-ted to the volume of the other audio sources ⇒ page 64.
Page 30 of 72
29Audio modeThings to note when operating an external audio source using the AUX-INmultimediauseEffectSelection of another audio sourceon the radio-navigation system.The external audio source continuesto run in the background.Stopping playback on the externalaudio source.The infotainment system remains inthe AUX menu.Disconnecting the plug from theAUX-IN multimedia socket.The infotainment system changes,and plays the last media source thatwas active.
Note
●Please read and observe the external audio source manufacturer operat-ing manual.●
Interference may be heard if the external audio source is powered fromthe vehicle’s 12-volt socket.
MEDIA-IN multimedia interface
Fig. 21
Standard repre-sentation: MEDIA-IN mul-timedia interface.
Depending on the market and the features, the vehicle may have a MEDIA-IN multimedia interface ⇒ Booklet Instruction manual.
The infotainment system enables you to play and manage audio files andsome video files from an external data medium connected to the MEDIA-INmultimedia interface.
Where this manual refers to external data media, this means USB mass stor-age devices containing supported audio files, such as MP3 players, iPods®
and USB sticks.
The MEDIA-IN multimedia interface supplies the usual USB voltage of 5volts.
Adapter for connecting a data medium
The external data media are connected to the MEDIA-IN multimedia inter-face using an adaptor.
Depending on the market and features, the adaptor is included in the sup-ply. Other adaptors can be purchased from your SEAT Dealership.
Do not use memory card adaptors, USB extension cords or USB hubs!
Requirements
Connectable data mediaCompatible formats and filesData media compliant with the USB 2.0specification.Data media with the FAT16 (< 2 GB)or FAT32 (> 2 GB) file system.iPods® and iPhones® of various genera-tions.a)
MTP players with the “PlaysForSure” or“ReadyForVista” logo.
– Audio files in MP3, WMA,OGG Vorbis and AAC format.– Playlists in PLS, B4S, ASXand WPL format.
Read and bear in mind the manufacturer's instruction manual for the exter-nal data medium.
a)
iPod® and iPhone® are protected registered trademarks of Apple Inc.