service Seat Leon Sportstourer 2013 User Guide
[x] Cancel search | Manufacturer: SEAT, Model Year: 2013, Model line: Leon Sportstourer, Model: Seat Leon Sportstourer 2013Pages: 339, PDF Size: 4.8 MB
Page 73 of 339
71
Instruments and warning/control lamps
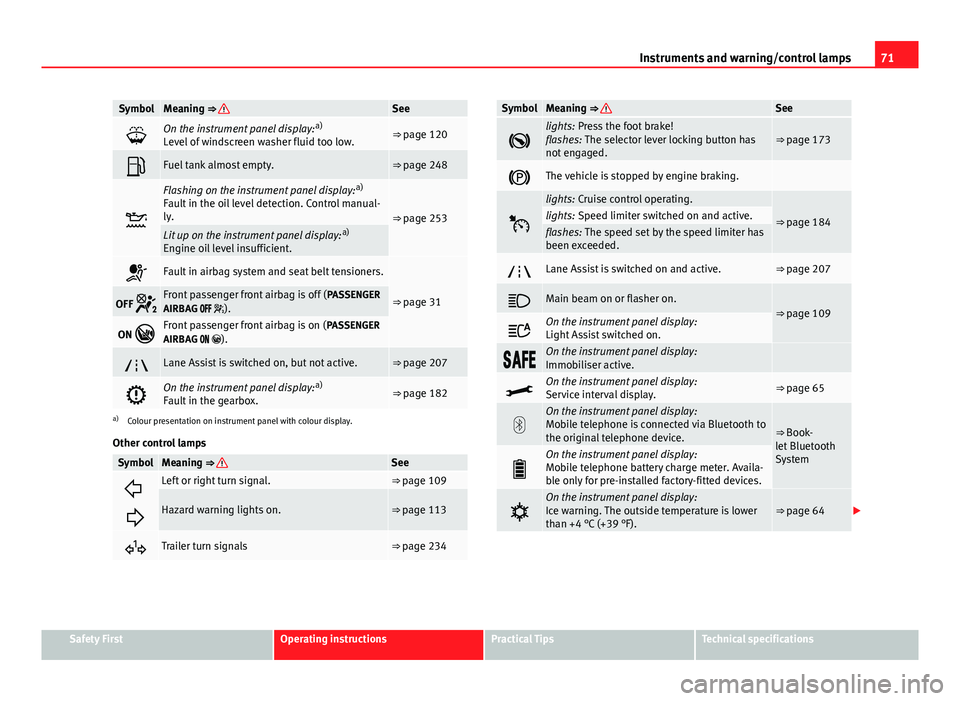
SymbolMeaning ⇒ See
On the instrument panel display: a)
Level of windscreen washer fluid too low.⇒ page 120
Fuel tank almost empty.⇒ page 248
Flashing on the instrument panel display: a)
Fault in the oil level detection. Control manual-
ly.
⇒ page 253Lit up on the instrument panel display: a)
Engine oil level insufficient.
Fault in airbag system and seat belt tensioners.
⇒ page 31OFF Front passenger front airbag is off ( PASSENGER
AIRBAG ).
ON Front passenger front airbag is on ( PASSENGER
AIRBAG ).
Lane Assist is switched on, but not active.⇒ page 207
On the instrument panel display: a)
Fault in the gearbox.⇒ page 182
a) Colour presentation on instrument panel with colour display.
Other control lamps
SymbolMeaning ⇒ See
Left or right turn signal.⇒ page 109
Hazard warning lights on.⇒ page 113
Trailer turn signals⇒ page 234
SymbolMeaning ⇒ See
lights: Press the foot brake!
flashes: The selector lever locking button has
not engaged.⇒ page 173
The vehicle is stopped by engine braking.
lights: Cruise control operating.
⇒ page 184lights: Speed limiter switched on and active.flashes: The speed set by the speed limiter has
been exceeded.
Lane Assist is switched on and active.⇒ page 207
Main beam on or flasher on.⇒ page 109
On the instrument panel display:
Light Assist switched on.
On the instrument panel display:
Immobiliser active.
On the instrument panel display:
Service interval display.⇒ page 65
On the instrument panel display:
Mobile telephone is connected via Bluetooth to
the original telephone device.
⇒ Book-
let Bluetooth
System
On the instrument panel display:
Mobile telephone battery charge meter. Availa-
ble only for pre-installed factory-fitted devices.
On the instrument panel display:
Ice warning. The outside temperature is lower
than +4 °C (+39 °F).⇒ page 64
Safety FirstOperating instructionsPractical TipsTechnical specifications
Page 75 of 339
73
Driver information system
Driver information system Information system
Introduction
With the ignition switched on, it is possible to read the different functions of
the display by scrolling through the menus.
In vehicles with multifunction steering wheel, the multifunction display can
only be operated with the multifunction steering wheel buttons.
The number of menus displayed on the instrument panel will vary according
to the vehicle electronics and equipment.
A specialised workshop will be able to programme or modify additional
functions, according to the vehicle equipment. SEAT recommends visiting a
SEAT Official Service.
Some menu options can only be read when the vehicle is at a standstill.
As long as a priority 1 warning is displayed, it will not be possible to read
the menus. Some warning messages can be confirmed and made to disap-
pear with the windscreen wiper lever button or the multifunction steering
wheel button.
Additional information and warnings:
● Easy Connect system ⇒ page 79
● Driver assistance systems ⇒ page 184
● Radio or navigation system ⇒ Booklet Radio or ⇒ Booklet Navigation
system
WARNING
Any distraction may lead to an accident, with the risk of injury.
● Do not read the instrument panel display menus when driving.
Overview of the menu structure
Driving data ⇒ page 75
■ Vehicle status
■ MFD from departure
■ MFD from refuelling
■ MFD total calculation
Assist systems ⇒ table on page 75
■ Activate/deactivate Lane Assist
■ Reverse (optional)
Navigation ⇒ Booklet Navigation system Audio ⇒ Booklet Radio or ⇒ Booklet Navigation systemTelephone ⇒ Booklet Bluetooth systemVehicle ⇒ table on page 75
Safety FirstOperating instructionsPractical TipsTechnical specifications
Page 81 of 339
79
Introduction to the Easy Connect system*
Introduction to the Easy Connect system* System settings (CAR)*Introduction
To select the settings menus, press the Easy Connect button and the
Setup function button.
The actual number of menus available and the name of the various options
in these menus will depend on the vehicle’s electronics and equipment.
Additional information and warnings:
● Driver assistance systems ⇒ page 184
WARNING
Any distraction may lead to an accident, with the risk of injury. Operating
the Easy Connect system while driving could distract you from traffic.
CAR menu (Setup) settings
– Switch the ignition on.
– Switch on the Easy Connect system.
– Press the Easy Connect button
.
– Press the Setup
function button to open the main Vehicle set-
tings menu . Pressing the menu button will always take you to the last menu
used.
Function buttons in the
vehicle’s settings menuPageESC system⇒ page 79Tyres⇒ page 80Driver assistance⇒ page 80Parking and manoeuvring⇒ page 81Vehicle lights⇒ page 82Rear vision mirrors and windscreen wipers⇒ page 82Opening and closing⇒ page 83Multifunction display⇒ page 83Date and time⇒ page 84Units⇒ page 84Service⇒ page 85Factory settings⇒ page 85
Any changes made using the settings menus are automatically saved on
closing those menus.
WARNING
Any distraction may lead to an accident, with the risk of injury. Operating
the Easy Connect system while driving could distract you from traffic.
ESC System menu
–Switch the ignition on.
Safety FirstOperating instructionsPractical TipsTechnical specifications
Page 87 of 339
85
Introduction to the Easy Connect system*
When the menu appears, choose the desired option.
Pressing the menu button
will always take you to the last menu used.
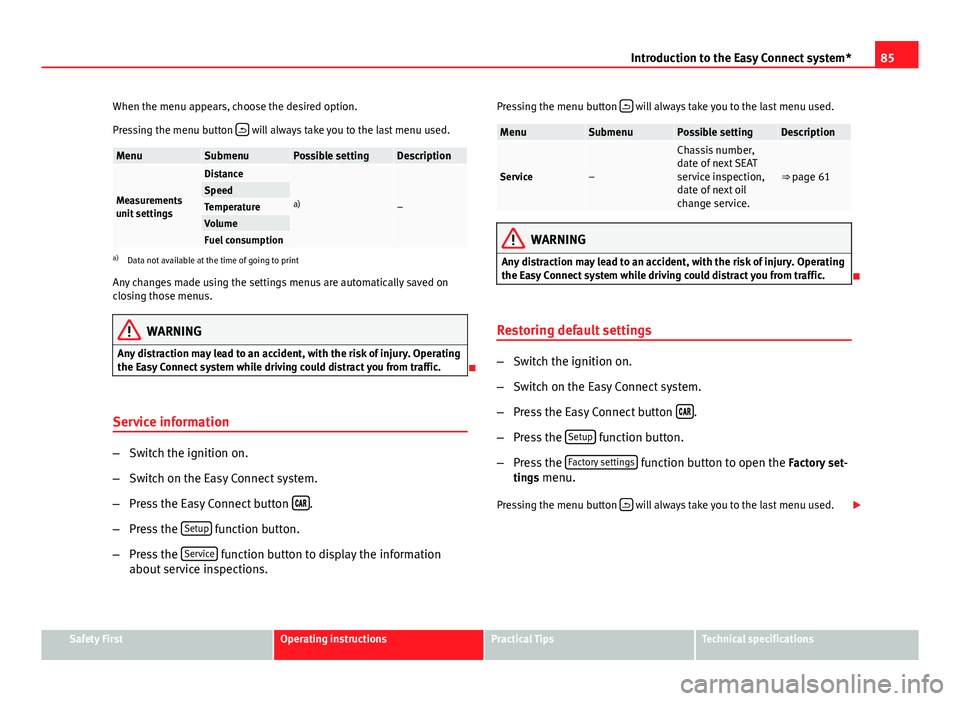
MenuSubmenuPossible settingDescription
Measurements
unit settings
Distance
a)–SpeedTemperatureVolumeFuel consumptiona)
Data not available at the time of going to print
Any changes made using the settings menus are automatically saved on
closing those menus.
WARNING
Any distraction may lead to an accident, with the risk of injury. Operating
the Easy Connect system while driving could distract you from traffic.
Service information
– Switch the ignition on.
– Switch on the Easy Connect system.
– Press the Easy Connect button
.
– Press the Setup
function button.
– Press the Service
function button to display the information
about service inspections. Pressing the menu button
will always take you to the last menu used.
MenuSubmenuPossible settingDescription
Service–
Chassis number,
date of next SEAT
service inspection,
date of next oil
change service.
⇒ page 61
WARNING
Any distraction may lead to an accident, with the risk of injury. Operating
the Easy Connect system while driving could distract you from traffic.
Restoring default settings
– Switch the ignition on.
– Switch on the Easy Connect system.
– Press the Easy Connect button
.
– Press the Setup
function button.
– Press the Factory settings
function button to open the Factory set-
tings menu.
Pressing the menu button
will always take you to the last menu used.
Safety FirstOperating instructionsPractical TipsTechnical specifications
Page 91 of 339
89
Opening and closing
Vehicle key
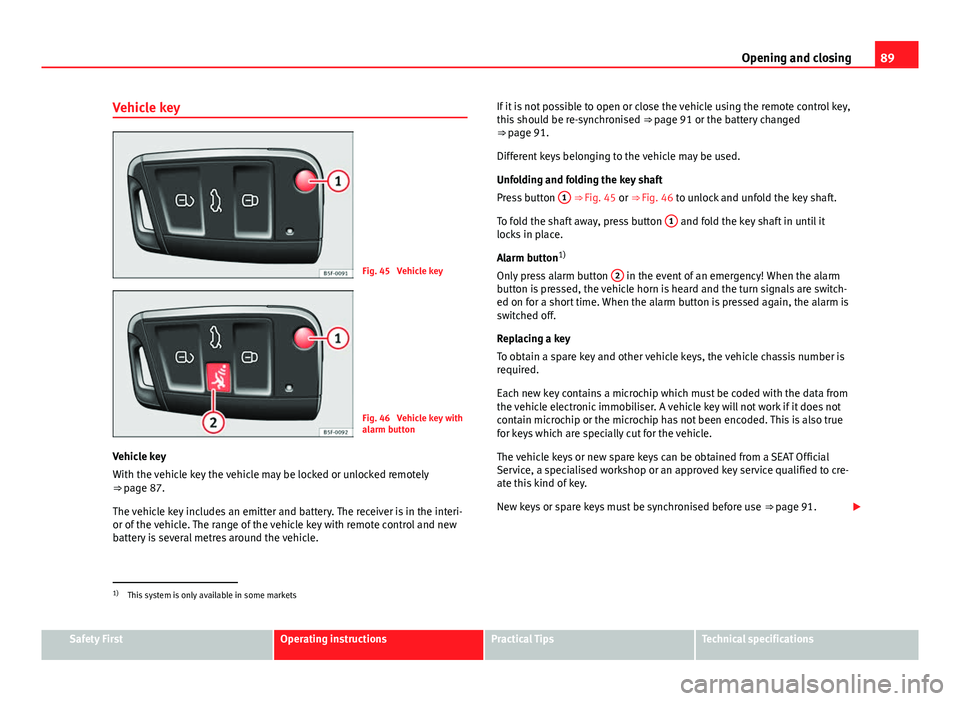
Fig. 45 Vehicle key
Fig. 46 Vehicle key with
alarm button
Vehicle key
With the vehicle key the vehicle may be locked or unlocked remotely
⇒ page 87.
The vehicle key includes an emitter and battery. The receiver is in the interi-
or of the vehicle. The range of the vehicle key with remote control and new
battery is several metres around the vehicle. If it is not possible to open or close the vehicle using the remote control key,
this should be re-synchronised
⇒ page 91 or the battery changed
⇒ page 91.
Different keys belonging to the vehicle may be used.
Unfolding and folding the key shaft
Press button 1
⇒ Fig. 45 or ⇒
Fig. 46 to unlock and unfold the key shaft.
To fold the shaft away, press button 1
and fold the key shaft in until it
locks in place.
Alarm button 1)
Only press alarm button 2
in the event of an emergency! When the alarm
button is pressed, the vehicle horn is heard and the turn signals are switch-
ed on for a short time. When the alarm button is pressed again, the alarm is
switched off.
Replacing a key
To obtain a spare key and other vehicle keys, the vehicle chassis number is
required.
Each new key contains a microchip which must be coded with the data from
the vehicle electronic immobiliser. A vehicle key will not work if it does not
contain microchip or the microchip has not been encoded. This is also true
for keys which are specially cut for the vehicle.
The vehicle keys or new spare keys can be obtained from a SEAT Official
Service, a specialised workshop or an approved key service qualified to cre-
ate this kind of key.
New keys or spare keys must be synchronised before use ⇒ page 91.
1)
This system is only available in some markets
Safety FirstOperating instructionsPractical TipsTechnical specifications
Page 103 of 339
101
Opening and closing
The automatic rear lid locking time extension function can be activated.
Where this function is activated and once the rear lid has been unlocked by
pressing the
button on the remote control key
⇒ page 92, the rear lid
can be re-opened for a certain length of time.
Where required, the automatic rear lid locking time extension function can
be activated or deactivated at a SEAT Authorised Service, which will provide
all of the necessary information.
Before the vehicle locks automatically, there is a risk of intruders getting in-
to the vehicle. Therefore, we recommend you always lock the vehicle by
pressing the
button on the remote control or by using the central locking
button.
Applies to the model: LEON / LEON SC Manual release of the rear lid in an emergency
The rear lid can be unlocked manually from inside in the
event of an emergency.
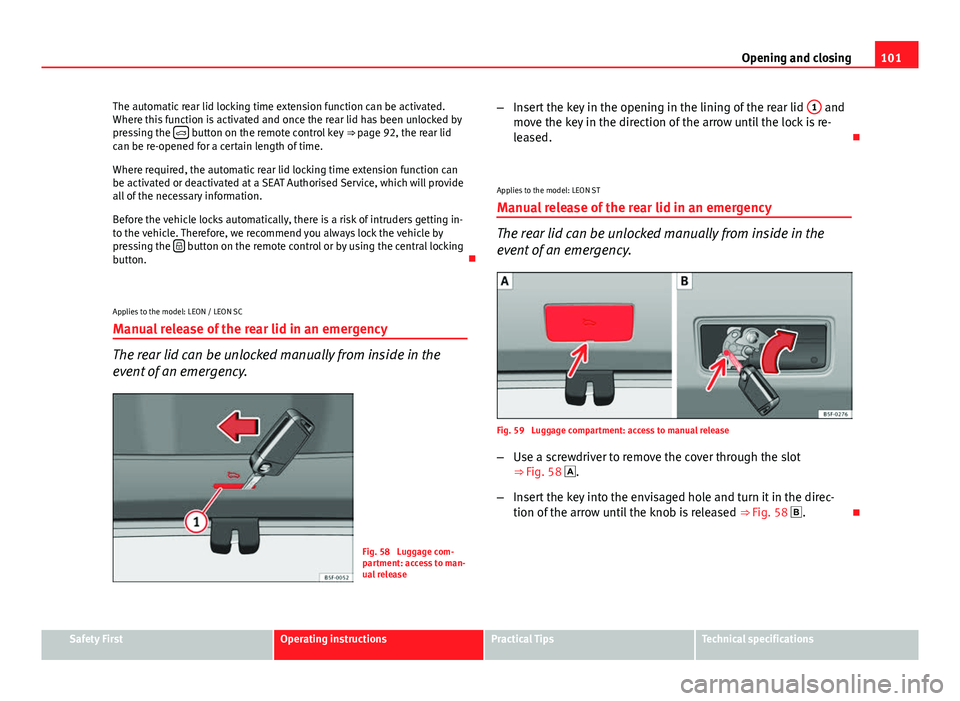
Fig. 58 Luggage com-
partment: access to man-
ual release –
Insert the key in the opening in the lining of the rear lid 1
and
move the key in the direction of the arrow until the lock is re-
leased.
Applies to the model: LEON ST
Manual release of the rear lid in an emergency
The rear lid can be unlocked manually from inside in the
event of an emergency.
Fig. 59 Luggage compartment: access to manual release
– Use a screwdriver to remove the cover through the slot
⇒ Fig. 58 .
– Insert the key into the envisaged hole and turn it in the direc-
tion of the arrow until the knob is released ⇒ Fig. 58 .
Safety FirstOperating instructionsPractical TipsTechnical specifications
Page 118 of 339
116Lights and visibility
When a car that is manufactured in a country that drives on the right travels
to a country that drives on the left (or vice versa), it is normally necessary to
cover part of the headlight bulbs with stickers or to change the adjustment
of the headlights to avoid dazzling other drivers.
In such cases, the regulations specify certain light values that must be com-
plied with for designated points of the light distribution. This is known as
“Tourist light”.
The light distribution that the halogen and full-LED headlights of the SEAT
Leon range have, allows the specific “tourist light” values to be met without
the need for stickers or changes in the settings.
Note
“Tourist light” is only allowed temporarily. If you are planning a long stay in
a country that drives on the other side, you should take the vehicle to an
Authorised Technical Service to change the headlights.
Coming home “function”
This function may be connected/disconnected through the radio menu. The
“Coming Home” and/or “Leaving Home” delay functions may also be set
(default: 30 sec.).
Vehicle with halo-
gen headlightsIn the “Coming Home” function, the daytime running
lights (DRL), the rear side lights and the licence plate
lights are turned on.
Vehicle with full-
LED headlightsIn the “Coming Home” function, the dipped beams
and the daytime running lights (DRL), the rear side
lights and the licence plate lights are switched on.
Automatic “Coming Home” activation*
For vehicles with a light and rain sensor (rotary light switch in position ). ●
Switch off the engine and remove the key from the ignition with the rota-
ry light switch in position ⇒ Fig. 65.
● The automatic “Coming Home” function is only active when the light
sensor detects darkness.
● When the car door is opened, the “Coming Home” lighting comes on.
Activation “Coming Home” manual
For vehicles with a light and rain sensor (rotary light switch without position
).
● Switch off the engine and remove the key from the ignition.
● Activate the headlight flashers for approximately 1 second.
● Activated for any position of the rotary light switch.
● When the car door is opened, the “Coming Home” lighting comes on.
The headlights are turned off 60 seconds after the vehicle door is opened.
Deactivation
● If no door has been closed, they go out automatically after 60 seconds.
● After the last door has been closed, the headlights will be switched off
after the “Coming Home” delay (as established in the radio menu).
● On turning the light switch to position ⇒ Fig. 65 .
● When the ignition is switched on (when starting the engine).
Leaving Home “function”
The “Leaving Home” function is only available for vehicles with a light and
rain sensor (rotary light switch in position ).
This function may be connected/disconnected through the radio menu. The
“Leaving Home” delay may also be set (default: 30 sec.).
Page 122 of 339
120Lights and visibility
Windscreen wiper and rear wiper systems
Introduction
Additional information and warnings:
● Changing wheels round
● Heating, ventilation, cooling
● Caring for and cleaning the vehicle exterior
WARNING
If the water from the windscreen washer does not contain enough anti-
freeze, it may freeze on the windscreen and rear window, reducing for-
ward and rear visibility.
● In winter, ensure the windscreen washer contains enough anti-freeze.
● In cold conditions, you should not use the wash/wipe system unless
you have warmed the windscreen with the ventilation system. The anti-
freeze could freeze on the windscreen and reduce visibility.
WARNING
Worn or dirty wiper blades reduce visibility and increase the risk of acci-
dent and serious injury.
● Always replace damaged or worn blades or blades which do not clean
the windscreen correctly.
CAUTION
In icy conditions, always check that the wiper blades are not frozen to the
glass before using the wipers. In cold weather, it may help to leave the vehi-
cle parked with the wipers in service position ⇒ page 122. Control lamp
lights upPossible causeSolution
Windscreen wiper fluid level
too lowTop up the windscreen wiper
reservoir as soon as possible
⇒ page 124.
Several warning and control lamps should light up for a few seconds when
the ignition is switched on, signalling that the function is being verified.
They will switch off after a few seconds.
CAUTION
Failure to heed the control lamps and text messages when they appear may
result in faults in the vehicle.
Page 124 of 339
122Lights and visibility
Windscreen wiper functions
Windscreen wiper performance in different situations:If the vehicle is at a stand-
still:The activated position provisionally changes
to the previous position.
During the automatic wipe:
The air conditioner comes on for approxi-
mately 30 seconds in air recirculation mode
to prevent the smell of the windscreen wash-
er fluid entering the inside the vehicle.
For the interval wipe:The intervals between wipes vary according
to the speed of the vehicle. The higher the
vehicle speed the shorter the intervals.
Heated windscreen washer jets
The heating only thaws the frozen jets, it does not thaw the water in the
washer hoses. The heated windscreen washer jets automatically adjust the
heat depending on the ambient temperature, when the ignition is switched
on.
Headlight wash/wipe system
The headlight washers/wipers clean the headlight lenses.
After the ignition is switched on, the first and every fifth time the wind-
screen washer is switched on, the headlights are also washed. Therefore,
the windscreen wiper lever should be pulled towards the steering wheel
when the dipped beam or main beam are on. Any incrusted dirt (such as in-
sects) should be cleaned regularly (e.g. when refuelling).
To ensure the headlight washers work correctly in winter, any snow which
has got into the bumper jet supports should be cleaned away. If necessary,
remove snow with an anti-icing spray.
Note
The wiper will try to wipe away any obstacles that are on the windscreen.
The wiper will stop moving if the obstacle blocks its path. Remove the ob-
stacle and switch the wiper back on again.
Windscreen wipers service position
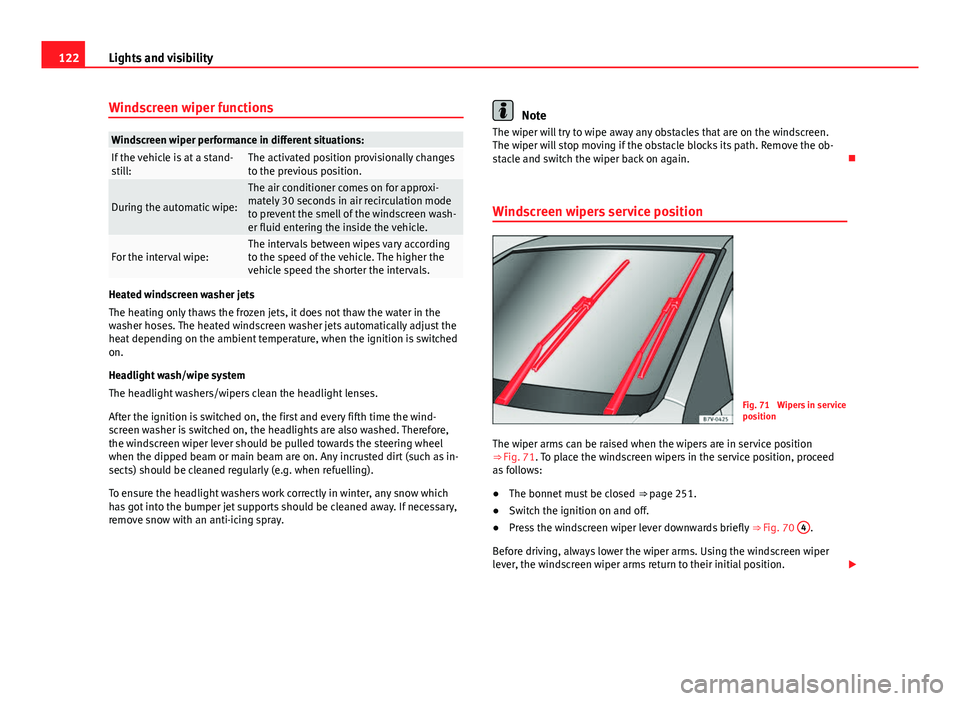
Fig. 71 Wipers in service
position
The wiper arms can be raised when the wipers are in service position
⇒ Fig. 71. To place the windscreen wipers in the service position, proceed
as follows:
● The bonnet must be closed ⇒ page 251.
● Switch the ignition on and off.
● Press the windscreen wiper lever downwards briefly ⇒ Fig. 70 4
.
Before driving, always lower the wiper arms. Using the windscreen wiper
lever, the windscreen wiper arms return to their initial position.
Page 125 of 339
123
Lights and visibility
Lifting and returning windscreen wiper arms
● Place the wiper arms in the service position ⇒
.
● Only hold the wiper arms at the point where the blade is fixed.
CAUTION
● To prevent damage to the bonnet and the wiper arms, only leave them in
the service position.
● Before driving, always lower the wiper arms.
Rain sensor*
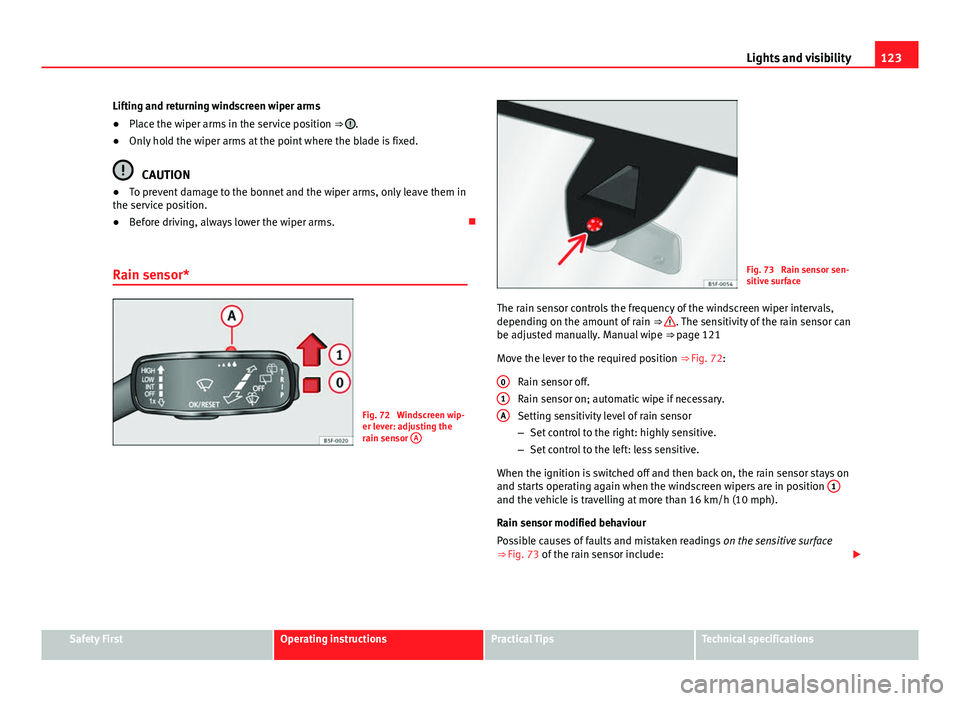
Fig. 72 Windscreen wip-
er lever: adjusting the
rain sensor A
Fig. 73 Rain sensor sen-
sitive surface
The rain sensor controls the frequency of the windscreen wiper intervals,
depending on the amount of rain ⇒
. The sensitivity of the rain sensor can
be adjusted manually. Manual wipe ⇒ page 121
Move the lever to the required position ⇒ Fig. 72:
Rain sensor off.
Rain sensor on; automatic wipe if necessary.
Setting sensitivity level of rain sensor
– Set control to the right: highly sensitive.
– Set control to the left: less sensitive.
When the ignition is switched off and then back on, the rain sensor stays on
and starts operating again when the windscreen wipers are in position 1
and the vehicle is travelling at more than 16 km/h (10 mph).
Rain sensor modified behaviour
Possible causes of faults and mistaken readings
on the sensitive surface
⇒ Fig. 73 of the rain sensor include:
0
1A
Safety FirstOperating instructionsPractical TipsTechnical specifications