seat Seat Leon Sportstourer 2015 Owner's Guide
[x] Cancel search | Manufacturer: SEAT, Model Year: 2015, Model line: Leon Sportstourer, Model: Seat Leon Sportstourer 2015Pages: 308, PDF Size: 5.93 MB
Page 48 of 308

The essentials
To switch a specific function on, press the ap-
pr opri
at
e button. Press the button again to
switch off the function. The LED on each control lights up to indicate
that the r
espective function of a control has
been switched on.
1TemperatureThe left and right sides can be adjusted separately: Turn the control to adjust the temperature
2FanThe power of the fan is automatically adjusted. The fan is also adjusted manually by turning the control.
3Air distributionThe airflow adjusts automatically for comfort. You can also switch it on manually using the buttons 3.
4Indications on the temperature display screen selected for the right and left sides.
Defrost functionThe air drawn in from outside the vehicle is directed at the windscreen and air recirculation is automatically switched off. To defrost the wind-
screen more quickly, the air is dehumidified at temperatures over approximately +3°C (+38°F) and the fan runs at maximum output.
The air is directed at the chest of driver and passengers by the dash panel air vents.
Air distribution towards the footwell.
Upward air distribution.
Heated rear window: this only works when the engine is running and switches off automatically after a maximum of 10 minutes.
Air recirculation
Seat heating buttons
Press the button to switch on or off the cooling system.
Press the button to make maximum cooling capacity available. The recirculation of air and the cooling system turn on automatically and air distri-
bution adjusts automatically to the position .
When the warning light for button lights up, the settings on the driver side also apply to the passenger side. Press the button or the temper-
ature control on the passenger side 46
Page 50 of 308

The essentials1TemperatureTurn the control to adjust the temperature
2FanSetting 0: blower and manual air conditioning switched off
Level 6: maximum fan level.
3Air distributionRotate the continuous control to direct the airflow to the desired area.
Defrost functionThe airflow is directed at the windscreen. Air recirculation is automatically switched off or is not switched on. Increase the fan power to clear the
windscreen of condensation as soon as possible. To dehumidify the air, the cooling system will automatically switch on.
The air is directed at the chest of driver and passengers by the dash panel air vents.
Distribution of air towards the chest and the footwell area.
Air distribution towards the footwell.
Air distribution towards the windscreen and the footwell.
Heated rear window: this only works when the engine is running and switches off automatically after a maximum of 10 minutes.
Air recirculation
Seat heating buttons
Maximum cooling power. The recirculation of air and the cooling system turn on automatically and air distribution adjusts automatically to the
position
››› in Introduction on page 160
›››
page 159 48
Page 52 of 308

The essentials
Air distribution towards the footwell.
Air distribution towards the windscreen and the footwell.
Heated rear window: this only works when the engine is running and switches off automatically after a maximum of 10 minutes
Air recirculation
››› page 163
Seat heating buttons
››› in Introduction on page 160
›››
page 159 50
Page 55 of 308

The essentials
even in warm climates where anti-freeze pro-
t ection i
s
not required.
If for weather reasons further protection is
necessary, the proportion of additive may be
increased, but only up to 60 %; otherwise an-
tifreeze protection will diminish and this will
worsen cooling.
When the coolant is topped up, use a mixture
of distilled water and at least 40 % of the
G13 or G12 plus-plus (TL-VW 774 G) additive
(both are purple) to obtain an optimum anti-
corrosion protection ››› in Topping up cool-
ant on p ag
e 251
. The mixture of G13 with
G12 plus (TL-VW 774 F), G12 (red) or G11
(green-blue) engine coolants will significant-
ly reduce anti-corrosion protection and
should therefore be avoided ››› in Topping
up c oo
l
ant on page 251.
››› in Topping up coolant on page 251
››› page 250 Brake fluid
Fig. 63
Engine compartment: brake fluid res-
er v
oir c
ap The brake fluid reservoir is located in the en-
gine c
omp
ar
tment ›››
page 246.
The level should be between the and
marks. If it is below , please visit a Techni-
cal Service.
››› in Topping up brake fluid on
page 252
››› page 251 Windscreen washer
Fig. 64
In the engine compartment: wind-
s c
r
een washer reservoir top. The windscreen washer reservoir is located in
the en
gine c
omp
artment ›››
page 246.
To top up, mix water with a product recom-
mended by SEAT.
In cold temperatures, add anti-freeze.
››› in Checking and topping up the
windscreen washer reservoir on
page 252
››› page 252 Battery
The battery is located in the engine compart-
ment
›
›
› page 246. It does not require » 53
Page 61 of 308

The essentials
Anti-theft wheel bolts Fig. 72
Anti-theft wheel bolt with cap and
a d
apt
er. ●
Remove the wheel cover* or the cap*.
● Insert the special adapter (vehicle tools)
ont o the anti-thef
t
wheel bolt and push it on
as far as it will go.
● Insert the wheel brace (vehicle tools) onto
the adapt
er as far as it will go.
● Remove the wheel bolt ›››
page 59 . Note
Make a note of the code number of the anti-
theft wheel
bolt and keep it in a safe place,
but not in your vehicle. If you need a new
adapter, you can obtain it from the SEAT Offi-
cial Service, indicating the code number. Loosening the wheel bolts
Fig. 73
Wheel: loosen the wheel bolts. ●
Insert the box spanner (vehicle tools) onto
the wheel bo
lt
as far as it will go. An adapter
is required to unscrew or tighten the anti-
theft wheel bolts ››› page 59.
● Turn the wheel bolt approximately one turn
to the lef
t ››› Fig. 73 (arrow). To apply the re-
quired torque, hold the wheel brace at the
end. If it is not possible to loosen a wheel
bolt, carefully apply pressure with one foot
on the end of the box spanner. Hold on to the
vehicle for support and take care not to slip. WARNING
Slightly loosen the wheel bolts (one turn) be-
for e r
aising the vehicle with the jack*. If not,
an accident may occur. Lifting the vehicle
Fig. 74
Crossbar: marks. Fig. 75
Strut: mounting the jack on the vehi-
c l
e. ●
Place the jack* (vehicle tools) on firm
gr ou
nd. If
necessary use a large, strong
board or similar support. If the surface is slip-
pery (for example tiles) place the jack on a
rubber mat or similar to prevent it from slip-
ping ››› .
» 59
Page 63 of 308

The essentials
● Ret
urn al
l tools to their proper storing loca-
tion.
● If the replaced wheel does not fit in the
spar
e wheel housing, store it safely in the
luggage compartment ›››
page 148.
● Check the tyre pressure of the newly moun-
ted tyr
e as soon as possible.
● In vehicles fitted with a tyre pressure indi-
cator
, adjust the pressure and store the read-
ing in the radio/Easy Connect system*
››› page 259.
● Have the tightening torque of the wheel
bolts c
hecked as soon as possible with a tor-
que wrench (it should be 120 Nm). Mean-
while, drive carefully.
● Have the flat tyre replaced as quickly as
poss
ible.
Snow chains Use Snow chains should only be used on the
fr
on
t
wheels.
Check that they are correctly seated after
driving for a few yards; correct the position if
necessary, in accordance with the manufac-
turer's fitting instructions. Keep your speed
below 50 km/h. If there is a danger of being trapped despite
havin
g mounted the chains, it is best to disa-
ble the driving wheels (ASR) in the ESC
››› page 180, Switching on/off the ESC
and ASR.
Snow chains will improve braking ability as
well as traction in winter conditions.
For technical reasons snow chains may only
be used with the following wheel rim/tyre
combination.
195/65 R15Chains with links of maximum 15 mm
205/55 R16Chains with links of maximum 15 mm
225/45 R17Chains with links of maximum 9 mm
225/40 R18Chains with links of maximum 9 mm Remove wheel covers and any integral trim
rin
g bef
or
e fitting snow chains.
Remove the chains when roads are free of
snow. Driving characteristics worsen, and the
wheels become damaged quickly and may
even be rendered unusable. Emergency towing of the vehi-
cle
T
owing Fig. 76
Right side of the front bumper: tow-
line anc hor
ag
e screwed in. Fig. 77
Right side of the rear bumper: towline
anc hor
ag
e screwed in. » 61
Page 68 of 308
Safety
Safety
Saf e driv
in
g
Safety first! WARNING
● This m
anual contains important informa-
tion about the operation of the vehicle, both
for the driver and the passengers. The other
sections of the on-board documentation also
contain further information that you should
be aware of for your own safety and for the
safety of your passengers.
● Ensure that the on-board documentation is
kept in the
vehicle at all times. This is espe-
cially important when lending or selling the
vehicle to another person. Advice about driving
B ef
or
e starting every trip For your own safety and the safety of your
p
a
s
sengers, always note the following points
before every trip:
– Make sure that the vehicle's lights and turn
signal
s are working properly.
– Check tyre pressure. –
Ensur
e that all windows provide a clear and
good view of the surroundings.
– Make sure all luggage is secured
›››
page 148.
– Make sure that no objects can interfere
with the pedal
s.
– Adjust front seat, head restraint and rear vi-
sion mirror
s properly according to your
size.
– Ensure that the passengers in the rear
seats alw
ays have the head restraints in
the in-use position ››› page 70.
– Instruct passengers to adjust the head re-
straints
according to their height.
– Protect children with appropriate child
seats and pr
operly applied seat belts
››› page 83.
– Assume the correct sitting position. Instruct
your pa
ssengers also to assume a proper
sitting position. ››› page 67.
– Fasten your seat belt securely. Instruct your
pas
sengers also to fasten their seat belts
properly. ››› page 72.
What affects driving safety? As a driver, you are responsible for yourself
and
your p
assengers. When your concentra-
tion or driving safety is affected by any cir- cumstance, you endanger yourself as well as
others on the r
oad ››› , for this reason:
– Always pay attention to traffic and do not
g et
di
stracted by passengers or telephone
calls.
– Never drive when your driving ability is im-
paired (e.
g. by medication, alcohol, drugs).
– Observe traffic laws and speed limits.
– Always reduce your speed as appropriate
for ro
ad, traffic and weather conditions.
– When travelling long distances, take
break
s regularly - at least every two hours.
– If possible, avoid driving when you are tired
or stre
ssed. WARNING
When driving safety is impaired during a trip,
the risk of
injury and accidents increases. Safety equipment
Never put your safety or the safety of your
p
a
s
sengers in danger. In the event of an acci-
dent, the safety equipment may reduce the
risk of injury. The following list includes most
of the safety equipment in your SEAT:
● Three-point seat belts
● belt tension limiters for the front and rear
side seats,
66
Page 69 of 308
Safe driving
● Belt
t
ensioners for the front seats
● Front airbags
● knee airbags,
● Side airbags in the front seat backrests
● Side airbags in the rear seat backrests*
● Head-protection airbags
● “ISOFIX” anchor points for child seats in
the rear s
ide seats with the “ISOFIX” system,
● Height-adjustable front head restraints
● Rear head restraints with in-use position
and non-use pos
ition
● Adjustable steering column
The safety
equipment mentioned above
works together to provide you and your pas-
sengers with the best possible protection in
the event of an accident. However, these
safety systems can only be effective if you
and your passengers are sitting in a correct
position and use this equipment properly.
Safety is everyone's business! Correct position for passengers
Correct
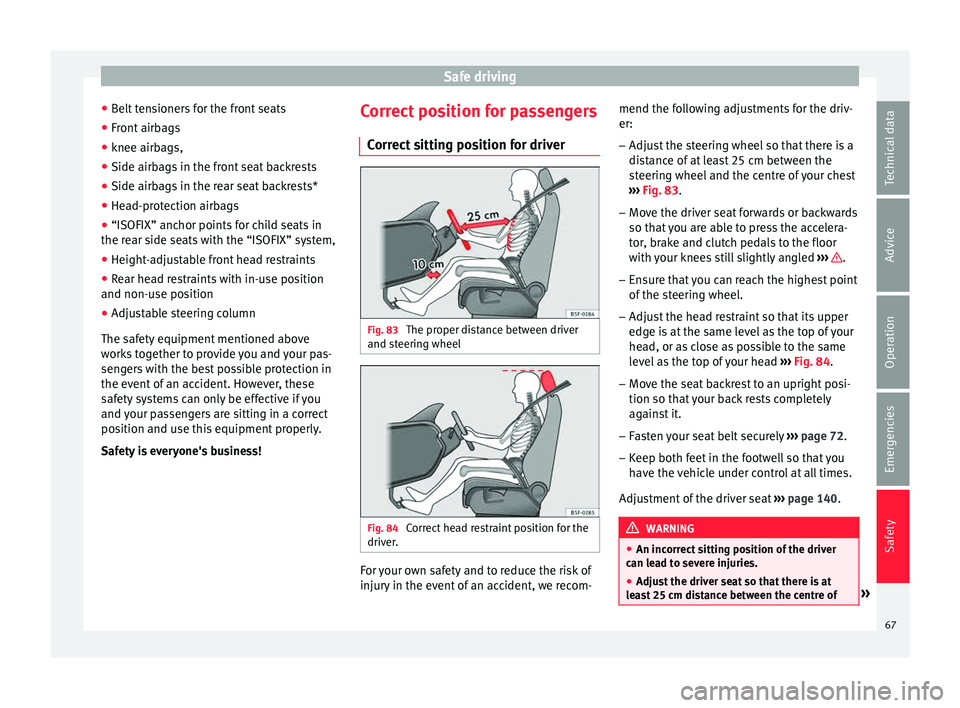
sitting position for driver Fig. 83
The proper distance between driver
and s t
eerin
g wheel Fig. 84
Correct head restraint position for the
driv er
. For your own safety and to reduce the risk of
injur
y
in the ev
ent of an accident, we recom- mend the following adjustments for the driv-
er:
– Adjust the steering wheel so that there is a
dist
ance of at least 25 cm between the
steering wheel and the centre of your chest
››› Fig. 83.
– Move the driver seat forwards or backwards
so that
you are able to press the accelera-
tor, brake and clutch pedals to the floor
with your knees still slightly angled ››› .
– Ensure that you can reach the highest point
of the s
t
eering wheel.
– Adjust the head restraint so that its upper
edge is
at the same level as the top of your
head, or as close as possible to the same
level as the top of your head ››› Fig. 84.
– Move the seat backrest to an upright posi-
tion so that
your back rests completely
against it.
– Fasten your seat belt securely ›››
page 72.
– Keep both feet in the footwell so that you
have the
vehicle under control at all times.
Adjustment of the driver seat ››› page 140. WARNING
● An incorr ect
sitting position of the driver
can lead to severe injuries.
● Adjust the driver seat so that there is at
lea
st 25 cm distance between the centre of » 67
Technical data
Advice
Operation
Emergencies
Safety
Page 70 of 308

Safety
the chest and the centre of the steering
wheel
››
› Fig. 83. If you are sitting closer than
25 cm, the airbag system cannot protect you
properly.
● If your physical constitution prevents you
from maint
aining the minimum distance of 25
cm, contact a specialised workshop. The
workshop will help you decide if special spe-
cific modifications are necessary.
● When driving, always hold the steering
wheel with both h
ands on the outside of the
ring at the 9 o'clock and 3 o'clock positions.
This reduces the risk of injury when the driver
airbag is triggered.
● Never hold the steering wheel at the 12
o'clock
position, or in any other manner (e.g.
in the centre of the steering wheel). In such
cases, if the airbag is triggered, you may sus-
tain injuries to the arms, hands and head.
● To reduce the risk of injury to the driver
during sud
den braking manoeuvres or an ac-
cident, never drive with the backrest tilted far
back! The airbag system and seat belts can
only provide optimal protection when the
backrest is in an upright position and the
driver is wearing his or her seat belt correct-
ly.
● Adjust the head restraint properly to ach-
ieve optima
l protection. Adjusting the steering wheel position
Read the additional information carefully
›› ›
page 17. WARNING
● Never a dju
st the position of the steering
wheel when the vehicle is moving, as this
could cause an accident.
● Move the lever up firmly so the steering
wheel pos
ition does not accidentally change
during driving. risk of accident!
● Make sure you are capable of reaching and
firmly ho
lding the upper part of the steering
wheel: risk of accident!
● If you adjust the steering wheel so that it
points t
owards your face, the driver airbag
will not protect you properly in the event of
an accident. Make sure that the steering
wheel points towards your chest. Correct sitting position for front pas-
sen
g
er For your own safety and to reduce the risk of
injur
y
in the ev
ent of an accident, we recom-
mend the following adjustments for the front
passenger:
– Move the front passenger seat back as far
as po
ssible ››› .–
Mo v
e the se
at backrest to an upright posi-
tion so that your back rests completely
against it.
– Adjust the head restraint so that its upper
edge is
at the same level as the top of your
head, or as close as possible to the same
level as the top of your head ››› page 70.
– Always keep both feet in the footwell in
front of
the front passenger seat.
– Fasten your seat belt securely ›››
page 72.
It is possible to deactivate the front passen-
ger airbag in exceptional circumstances
››› page 81.
Adjusting the front passenger seat
››› page 140. WARNING
● An incorr ect
sitting position of the front
passenger can lead to severe injuries.
● Adjust the front passenger seat so that
there is
at least 25 cm between your chest
and the dash panel. If you are sitting closer
than 25 cm, the airbag system cannot protect
you properly.
● If your physical constitution prevents you
from maint
aining the minimum distance of 25
cm, contact a specialised workshop. The
workshop will help you decide if special spe-
cific modifications are necessary.
● Always keep your feet in the footwell when
the vehic
le is moving; never rest them on the68
Page 71 of 308

Safe driving
dash panel, out the window or on the seat. An
incorr
ect
sitting position exposes you to an
increased risk of injury in case of a sudden
braking or an accident. If the airbag is trig-
gered, you could sustain severe injuries due
to an incorrect sitting position.
● To reduce the risk of injury to the front pas-
senger in ev
ents such as sudden braking ma-
noeuvres or an accident, never travel with the
backrest tilted far back! The airbag system
and seat belts can only provide optimal pro-
tection when the backrest is in an upright po-
sition and the front passenger is wearing his
or her seat belt properly. The further the seat
backrests are tilted to the rear, the greater
the risk of injury due to incorrect positioning
of the belt web or to the incorrect sitting po-
sition!
● Adjust the head restraint correctly in order
to achiev
e maximum protection. Correct sitting position for rear seat
p
as
sengers To reduce the risk of injury in the event of a
s
ud
den br
aking manoeuvre or an accident,
passengers on the rear seat bench must con-
sider the following:
– Sit up straight.
– Adjust the head restraint to the correct po-
sition ››
› page 70. –
Alwa
ys keep both feet in the footwell in
front of the rear seat.
– Fasten your seat belt securely ›››
page 72.
– Use an appropriate child restraint system
when you t
ake children in the vehicle
››› page 83. WARNING
● If the p a
ssengers in the rear seats are not
sitting properly, they could sustain severe in-
juries.
● Adjust the head restraint correctly in order
to achiev
e maximum protection.
● Seat belts can only provide optimal protec-
tion when seat b
ackrests are in an upright
position and the vehicle occupants are wear-
ing their seat belts correctly. If passengers In
the rear seats are not sitting in an upright po-
sition, the risk of injury due to incorrect posi-
tioning of the seat belt increases. Examples of incorrect sitting posi-
tion
s Seat belts can provide optimal protection on-
ly
when the belt
w
ebs are properly posi-
tioned. Incorrect sitting positions substan-
tially reduce the protective function of seat
belts and increase the risk of injury due to in-
correct seat belt position. As the driver, you
are responsible for all passengers, especially
children. –
Never allo
w anyone to assume an incorrect
sitting position in the vehicle while travel-
ling ››› .
The f o
l
lowing list contains examples of sit-
ting positions that could be dangerous for all
vehicle occupants. The list is not complete,
but we would like to make you aware of this
issue.
Therefore, whenever the vehicle is in motion:
● Never stand in the vehicle.
● Never stand on the seats.
● Never kneel on the seats.
● Never tilt your seat backrest far to the rear.
● Never lean against the dash panel.
● Never lie on the rear bench.
● Never sit on the front edge of a seat.
● Never sit sideways.
● Never lean out of a window.
● Never put your feet out of a window.
● Never put your feet on the dash panel.
● Never put your feet on the surface of a seat.
● Do not allow anyone to travel in the foot-
well
.
● Never travel without wearing the seat belt.
● Do not allow anyone to travel in the lug-
gage c
ompartment. »
69
Technical data
Advice
Operation
Emergencies
Safety