seat Seat Leon Sportstourer 2015 Service Manual
[x] Cancel search | Manufacturer: SEAT, Model Year: 2015, Model line: Leon Sportstourer, Model: Seat Leon Sportstourer 2015Pages: 308, PDF Size: 5.93 MB
Page 83 of 308
Airbag system
●
The side and he a
d airbags are managed
through sensors located in the interior of the
front doors. To ensure the correct operation of
the side and curtain airbags neither the
doors nor the door panels should be modified
in any way (e.g. fitting loudspeakers). If the
front door is damaged, the airbag system
may not work correctly. All work carried out
on the front door must be done in a special-
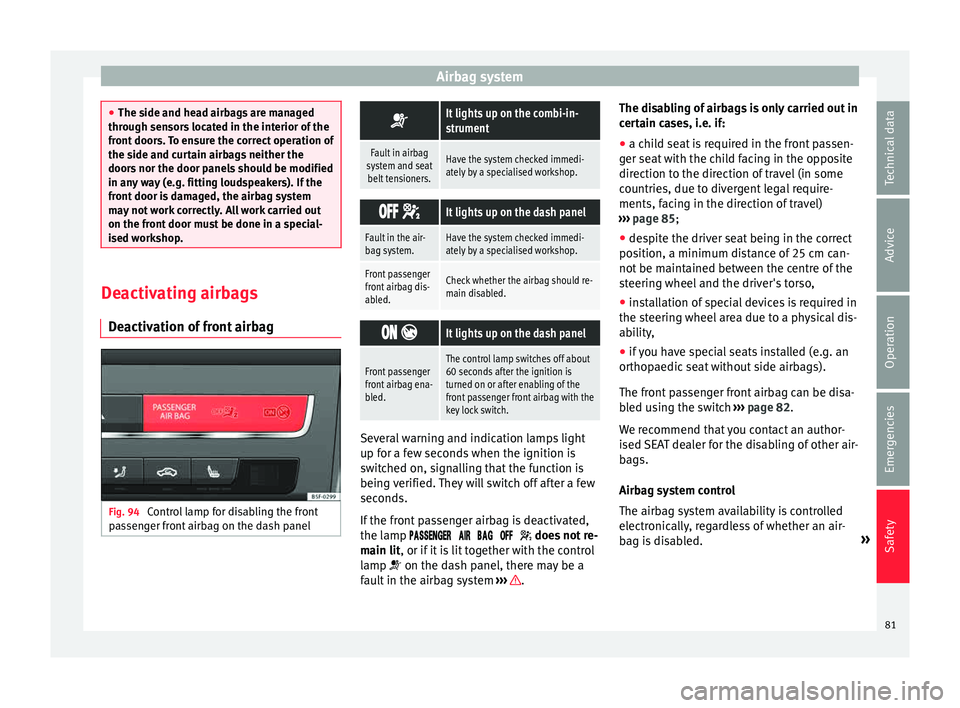
ised workshop. Deactivating airbags
D e
activ
ation of front airbag Fig. 94
Control lamp for disabling the front
p a
s
senger front airbag on the dash panel
It lights up on the combi-in-
strument
Fault in airbag
system and seat belt tensioners.Have the system checked immedi-
ately by a specialised workshop.
It lights up on the dash panel
Fault in the air-
bag system.Have the system checked immedi-
ately by a specialised workshop.
Front passenger
front airbag dis-
abled.Check whether the airbag should re-
main disabled.
It lights up on the dash panel
Front passenger
front airbag ena-
bled.The control lamp switches off about
60 seconds after the ignition is
turned on or after enabling of the
front passenger front airbag with the
key lock switch. Several warning and indication lamps light
up f
or a f
ew sec
onds when the ignition is
switched on, signalling that the function is
being verified. They will switch off after a few
seconds.
If the front passenger airbag is deactivated,
the lamp does not re-
main lit, or if it is lit together with the control
lamp on the dash panel, there may be a
fault in the airbag system ››› .The disabling of airbags is only carried out in
c
er
t
ain cases, i.e. if:
● a child seat is required in the front passen-
ger seat
with the child facing in the opposite
direction to the direction of travel (in some
countries, due to divergent legal require-
ments, facing in the direction of travel)
››› page 85;
● despite the driver seat being in the correct
position, a minimum di
stance of 25 cm can-
not be maintained between the centre of the
steering wheel and the driver's torso,
● installation of special devices is required in
the steerin
g wheel area due to a physical dis-
ability,
● if you have special seats installed (e.g. an
orthopaedic
seat without side airbags).
The front passenger front airbag can be disa-
bled using the switch ››› page 82.
We recommend that you contact an author-
ised SEAT dealer for the disabling of other air-
bags.
Airbag system control
The airbag system availability is controlled
electronically, regardless of whether an air-
bag is disabled. »
81
Technical data
Advice
Operation
Emergencies
Safety
Page 84 of 308
Safety
If an airbag was disabled using a diagnostics
sy s
t
em:
● the airbag system warning lamp illumi-
n
ates after switching on the ignition for
about 4 seconds, and then flashes for about
12 seconds.
If the airbag has been disabled with the air-
bag switch on the side of the dash panel:
● the airbag control lamp wil
l illuminate
for about 4 seconds after the ignition is
switched on,
● The airbag is disabled, signalled with the
warning l
amp which lights up with the
word placed in the cen-
tre part of the dash panel ››› Fig. 95. WARNING
In the event of a fault in the airbag system,
the airbag m a
y not trigger correctly, may fail
to trigger or may even trigger unexpectedly,
leading to severe or fatal injuries.
● Have the airbag system checked immedi-
ately b
y a specialised workshop.
● Never mount a child seat in the front pas-
senger se
at or remove the mounted child
seat! The front passenger front airbag may
deploy during an accident in spite of the
fault. CAUTION
Always pay attention to any lit control lamps
and to the c orr
esponding descriptions and in-
structions to avoid damage to the vehicle. Note
● Fo l
low the current legislation in your coun-
try regarding the disabling of airbags.
● At your authorised SEAT dealer you can find
information on whic
h vehicle airbags can be
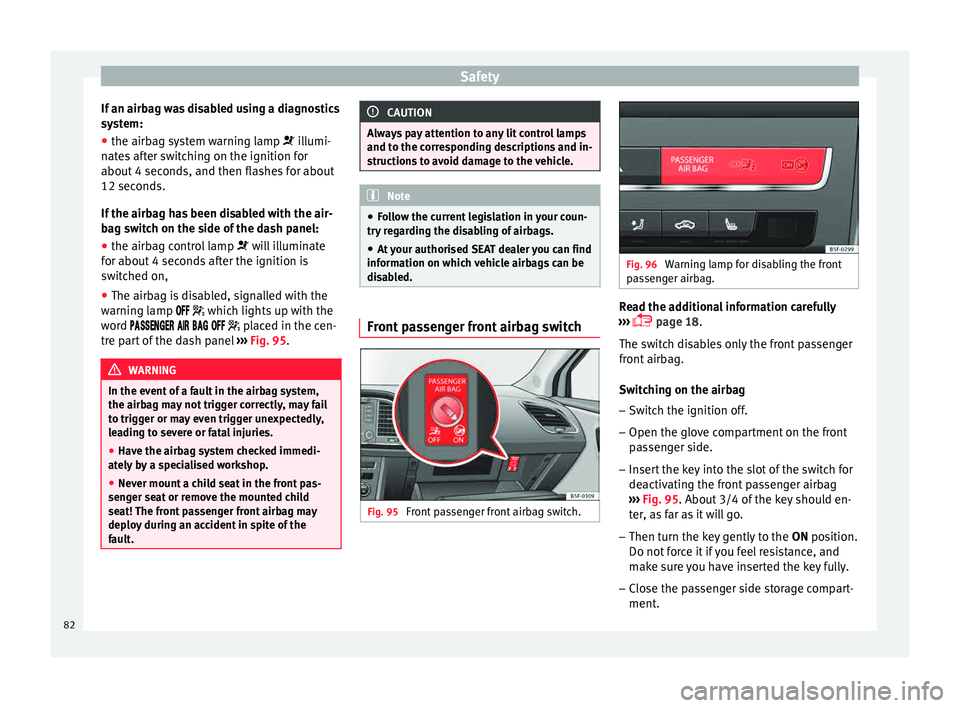
disabled. Front passenger front airbag switch
Fig. 95
Front passenger front airbag switch. Fig. 96
Warning lamp for disabling the front
pa s
senger airbag. Read the additional information carefully
› ›
›
page 18.
The switch disables only the front passenger
front airbag.
Switching on the airbag
– Switch the ignition off.
– Open the glove compartment on the front
pas
senger side.
– Insert the key into the slot of the switch for
deactivatin
g the front passenger airbag
››› Fig. 95. About 3/4 of the key should en-
ter, as far as it will go.
– Then turn the key gently to the ON position.
Do not
force it if you feel resistance, and
make sure you have inserted the key fully.
– Close the passenger side storage compart-
ment.
82
Page 85 of 308

Transporting children safely
– Check, with the ignition switched on, that
the control lamp
››› Fig. 96 does not
light up, with the word
in the centre part of the dash panel.
– The warning lamp
is illuminated for
60 seconds in the centre part of the dash
panel.
Control lamp with the word (front passenger
If the fr
ont passenger front airbag is disa-
bled, after switching on the ignition, the con-
tro
l lamp will light up for several seconds,
then it will switch off for about 1 s and then
switch on again.
If the control lamp is flashing, there is a fault
in the disabling of the airbag system ››› .
Please go immediately to an Official Service. WARNING
● The driver of the vehicle is responsible for
disabling or switching on the airbag.
● Always switch off the ignition before disa-
bling the front passenger airbag! Failure to do
so could result in a fault in the airbag deacti-
vation system.
● Never leave the key in the airbag disabling
switch as it could get damaged or enable or
disable the airbag during driving.
● If the (airbag disabled) control lamp
fl a
shes, the front passenger front airbag will not trigger in the event of an accident! Have
the system immediately checked by an Offi-
cial Service.
Transporting children safely
Safety for children Introduction For safety reasons, as we have learned from
accident statistics, we recommend that chil-
dren under 12 years of age travel in the rear
seats. Depending on their age, height and
weight, children travelling in rear seats must
use a child seat or a seat belt. For safety rea-
sons, the child seat should be installed in the
rear seat, behind the front passenger seat or
in the centre back seat.
The physical laws involved and the forces
acting in a collision apply also to children
››› page 74 . But unlike adults, children do not
h av
e fully developed muscle and bone struc-
tures. This means that children are subject to
a greater risk of injury.
To reduce the risk of injuries, children must
always use special child restraint systems
when travelling in the vehicle.
We recommend the use of child safety prod-
ucts from the SEAT Original Accessories Pro-
gramme, which includes systems for all ages
made by “Peke” (not for all countries).
These systems have been especially de-
signed and approved, complying with the
ECE-R44. regulation. »
83
Technical data
Advice
Operation
Emergencies
Safety airbag disabled)
Page 86 of 308

Safety
Follow the manufacturer's instructions and
o b
ser
ve any statutory requirements when in-
stalling and using child seats. Always read
and note ››› page 84.
We recommend you always carry the manu-
facturer's Child Seat Instruction Manual to-
gether with the on-board documentation.
Important information regarding the
front p
assenger's airbag Read the additional information carefully
› ›
›
page 20.
Read and always observe the safety informa-
tion included in the following chapters:
● Safety distance with respect to the passen-
ger airbag ›
›› page 77.
● Objects between the passenger and the
pas
senger side airbag ››› in Front airbags
on p ag
e 79
.
The passenger side front airbag, when ena-
bled, is a serious risk for a child that is facing
backward since the airbag can strike the seat
with such force that it can cause serious or
fatal injuries. Children up to 12 years old
should always travel on the rear seat.
Therefore we strongly recommend you to
transport children on the rear seats. This is
the safest location in the vehicle. Alternative-
ly, the front passenger airbag can be disa- bled with a key-operated switch
›››
page 82.
When transporting children, use a child seat
suitable for the age and size of each child
››› page 85. WARNING
● If a c hi
ld seat is secured to the front pas-
senger seat, the risk to the child of sustain-
ing critical or fatal injuries in the event of an
accident increases.
● An inflating front passenger airbag can
strike the r
ear-facing child seat and project it
with great force against the door, the roof or
the backrest.
● Never install a child seat facing backwards
on the front p
assenger seat unless the front
passenger front airbag has been disabled.
Risk of potentially fatal injuries to the child!
However, if it is necessary, in exceptional ca-
ses, to transport a child in the front passen-
ger seat, the front passenger front airbag
must always be disabled ››› page 81. If the
passenger seat has a height adjustment op-
tion, move it to the highest, most upright po-
sition. If you have a fixed seat, do not install
any child restraint system in this location.
● For those vehicles that do not include a key
lock sw
itch to deactivate the airbag, the vehi-
cle must be taken to a technical service.
● All vehicle occupants, especially children,
must
assume the proper sitting position and
be properly belted in while travelling. ●
Never ho l
d children or babies on your lap,
this can result in potentially fatal injuries to
the child!
● Never allow a child to be transported in a
vehicl
e without being properly secured, or to
stand up or kneel on a seat while travelling.
In an accident, the child could be flung
through the vehicle, causing possibly fatal in-
juries to themselves and to the other vehicle
occupants.
● If children assume an improper sitting posi-
tion when the vehic
le is moving, they expose
themselves to greater risk of injury in the
event of a sudden braking manoeuvre or in an
accident. This is particularly important if the
child is travelling on the front passenger seat
and the airbag system is triggered in an acci-
dent; as this could cause serious injury or
even death.
● A suitable child seat can protect your child!
● Never leave a child alone in the child seat
or inside the
vehicle because depending on
the season, very high temperatures may be
reached inside a parked vehicle, which could
be fatal.
● Children who are less than 1.5 metres tall
must
not wear a normal seat belt without a
child seat, as this could cause injuries to the
abdominal and neck areas during a sudden
braking manoeuvre or in an accident.
● Do not allow the seat belt to become twis-
ted and the seat
belt should be properly in
place ››› page 72.
● Only one child may occupy a child seat
›››
page 85, Child seats. 84
Page 87 of 308

Transporting children safely
●
When a chi l
d seat is mounted in the rear
seats, the door child-proof lock should be ac-
tivated ››› page 121. Child seats
Safety in
structionsRead the additional information carefully
›› ›
page 20. WARNING
When travelling, children must be secured in
the v ehic
le with a restraint system suitable
for age, weight and size.
● Read and always observe information and
warning
s concerning the use of child seats
››› page 84. WARNING
The retaining rings are designed only for use
with “ISOFIX” and T op
Tether* system child
seats.
● Never secure other child seats that do not
have the “ISOFIX” or T
op Tether* system, or
retaining belts or objects to the fastening
rings - this can result in potentially fatal inju-
ries to the child.
● Ensure that the child seat is secured cor-
rectly u
sing the “ISOFIX” and Top Tether* se-
curing rings. WARNING
An undue installation of the safety seat will
incr e
ase the risk of injury in the event of a
crash.
● Never tie the retainer strap to a hook in the
luggag
e compartment.
● Never secure or tie luggage or other items
to the low
er anchorages (ISOFIX) or the upper
ones (Top Tether). Categorisation of child seats into
gr
oup
s Use only child seats that are officially ap-
pr
o
v
ed and suitable for the child.
Child seats are subject to the regulation ECE-
R 44. ECE-R stands for: Economic Commis-
sion for Europe Regulations.
The child seats are grouped into 5 catego-
ries:
Group 0: Up to 10 kg (up to around 9
months)
Group 0+: Up to 13 kg (up to around 18
months)
Group 1: from 9 to 18 kg (up to approx. 4
years old)
Group 2: from 15 to 25 kg (up to approx. 7
years old) Group 3: From 22 to 36 kg (over around 7
ye
ars old)
Child seats that have been tested and ap-
proved under the ECE R44 standard bear the
test mark on the seat (the letter E in a circle
with the test number below it).
Follow the manufacturer's instructions and
observe any statutory requirements when in-
stalling and using child seats.
We recommend you to always include the
manufacturer's Child Seat Instruction Manual
together with the on-board documentation.
SEAT recommends you use child seats from
the Original Accessories Catalogue . These
child seats have been designed and tested
for use in SEAT vehicles. You can find the
right child seat for your model and age group
at SEAT dealers.
85
Technical data
Advice
Operation
Emergencies
Safety
Page 95 of 308
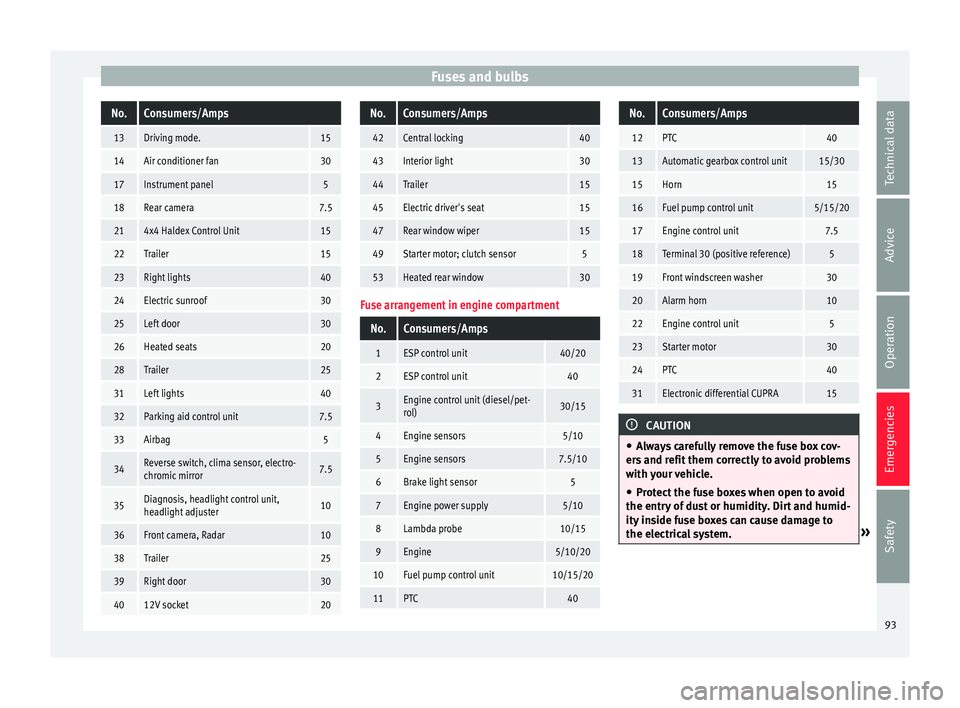
Fuses and bulbsNo.Consumers/Amps
13Driving mode.15
14Air conditioner fan30
17Instrument panel5
18Rear camera7.5
214x4 Haldex Control Unit15
22Trailer15
23Right lights40
24Electric sunroof30
25Left door30
26Heated seats20
28Trailer25
31Left lights40
32Parking aid control unit7.5
33Airbag5
34Reverse switch, clima sensor, electro-
chromic mirror7.5
35Diagnosis, headlight control unit,
headlight adjuster10
36Front camera, Radar10
38Trailer25
39Right door30
4012V socket20
No.Consumers/Amps
42Central locking40
43Interior light30
44Trailer15
45Electric driver's seat15
47Rear window wiper15
49Starter motor; clutch sensor5
53Heated rear window30
Fuse arrangement in engine compartment
No.Consumers/Amps
1ESP control unit40/20
2ESP control unit40
3Engine control unit (diesel/pet-
rol)30/15
4Engine sensors5/10
5Engine sensors7.5/10
6Brake light sensor5
7Engine power supply5/10
8Lambda probe10/15
9Engine5/10/20
10Fuel pump control unit10/15/20
11PTC40
No.Consumers/Amps
12PTC40
13Automatic gearbox control unit15/30
15Horn15
16Fuel pump control unit5/15/20
17Engine control unit7.5
18Terminal 30 (positive reference)5
19Front windscreen washer30
20Alarm horn10
22Engine control unit5
23Starter motor30
24PTC40
31Electronic differential CUPRA15
CAUTION
● Alw a
ys carefully remove the fuse box cov-
ers and refit them correctly to avoid problems
with your vehicle.
● Protect the fuse boxes when open to avoid
the entry of
dust or humidity. Dirt and humid-
ity inside fuse boxes can cause damage to
the electrical system. » 93
Technical data
Advice
Operation
Emergencies
Safety
Page 105 of 308
Controls and displays
Operation
C ontr
o
ls and displays
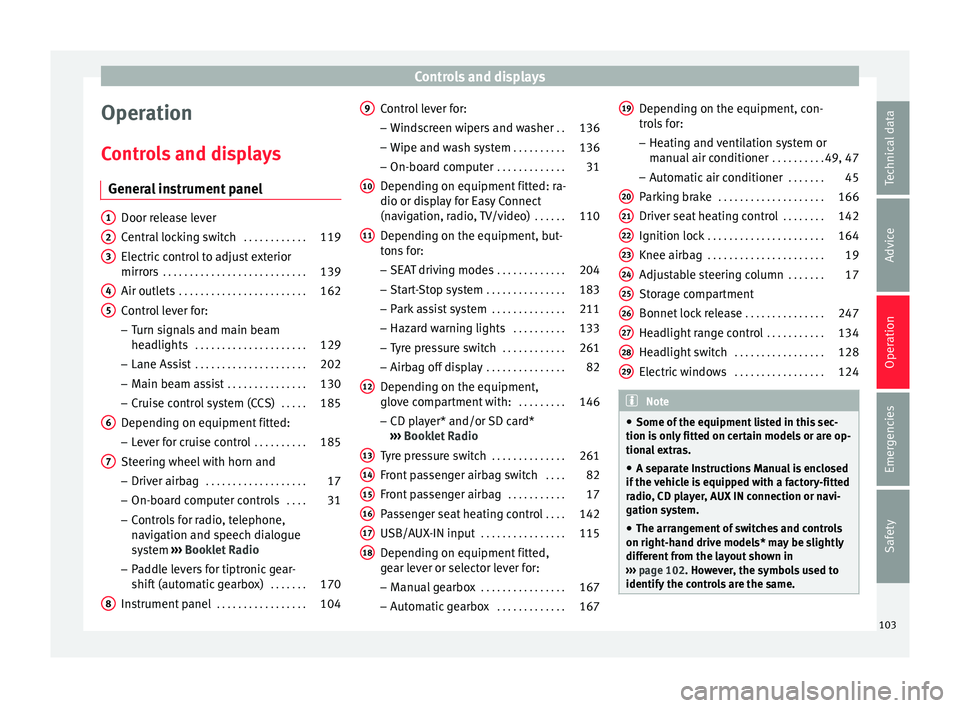
General instrument panel Door release lever
Centr
al
locking switch . . . . . . . . . . . .119
Electric control to adjust exterior
mirrors . . . . . . . . . . . . . . . . . . . . . . . . . . . 139
Air outl
ets . . . . . . . . . . . . . . . . . . . . . . . . 162
Control lever for:
– Turn s ign
als and main beam
headlights . . . . . . . . . . . . . . . . . . . . . 129
– Lane Ass i
st . . . . . . . . . . . . . . . . . . . . . 202
– Main beam a
ssist . . . . . . . . . . . . . . . 130
– Cruise c
ontrol system (CCS) . . . . .185
Depending on equipment fitted:
– Lev er f
or cruise control . . . . . . . . . .185
Steering wheel with horn and – Driver airbag . . . . . . . . . . . . . . . . . . . 17
– On-boar d c
omputer controls . . . .31
– Contro
ls for radio, telephone,
navigation and speech dialogue
system ›››
Booklet Radio
– Paddle levers for tiptronic gear-
shift (automatic gearbox) . . . . . . .170
Instrument panel . . . . . . . . . . . . . . . . . 104
1 2
3
4
5
6
7
8 Control lever for:
– Wind
s
creen wipers and washer . .136
– Wipe and wa
sh system . . . . . . . . . . 136
– On-board c
omputer . . . . . . . . . . . . . 31
Depending on equipment fitted: ra-
dio or disp
lay for Easy Connect
(navigation, radio, TV/video) . . . . . .110
Depending on the equipment, but-
tons
for:
– SEAT driving modes . . . . . . . . . . . . .204
– Star t
-Stop system . . . . . . . . . . . . . . . 183
– Park a
ssist system . . . . . . . . . . . . . . 211
– Hazard w
arning lights . . . . . . . . . .133
– Tyr
e pressure switch . . . . . . . . . . . .261
– Airbag off di
splay . . . . . . . . . . . . . . . 82
Depending on the equipment,
glov e c
ompartment with: . . . . . . . . .146
– CD pl a
yer* and/or SD card*
››› Booklet Radio
Tyre pressure switch . . . . . . . . . . . . . .261
Front passenger airbag switch . . . .82
Front passenger airbag . . . . . . . . . . .17
Passenger seat heating control . . . .142
USB/AUX-IN input . . . . . . . . . . . . . . . . 115
Depending on equipment fitted,
ge ar l
ever or selector lever for:
– Manual gearbox . . . . . . . . . . . . . . . . 167
– Autom atic
gearbox . . . . . . . . . . . . . 167
9
10
11
12
13
14
15
16
17
18 Depending on the equipment, con-
tr
o
l
s for:
– Heating and ventilation system or
manual air conditioner . . . . . . . . . .49, 47
– Automatic
air conditioner . . . . . . .45
Parking brake . . . . . . . . . . . . . . . . . . . . 166
Driver seat heating control . . . . . . . .142
Ignition lock . . . . . . . . . . . . . . . . . . . . . . 164
Knee airbag . . . . . . . . . . . . . . . . . . . . . . 19
Adjustable steering column . . . . . . .17
Storage compartment
Bonnet lock
release . . . . . . . . . . . . . . . 247
Headlight range control . . . . . . . . . . .134
Headlight switch . . . . . . . . . . . . . . . . . 128
Electric windows . . . . . . . . . . . . . . . . . 124 Note
● Some of the equipment li
sted in this sec-
tion is only fitted on certain models or are op-
tional extras.
● A separate Instructions Manual is enclosed
if the v
ehicle is equipped with a factory-fitted
radio, CD player, AUX IN connection or navi-
gation system.
● The arrangement of switches and controls
on right-hand driv
e models* may be slightly
different from the layout shown in
››› page 102. However, the symbols used to
identify the controls are the same. 19
20
21
22
23
24
25
26
27
28
29
103
Technical data
Advice
Operation
Emergencies
Safety
Page 119 of 308

Opening and closing
Note
● Never l e
ave any valuable items in the vehi-
cle unattended. Even a locked vehicle is not a
safe.
● If the diode on the driver door sill lights up
for about 30 sec
onds when the vehicle is
locked, the central locking system or anti-
theft alarm* is not working properly. You
should have the fault repaired at a SEAT Offi-
cial Service or specialised workshop.
● The vehicle interior monitoring of the anti-
theft a
larm* system will only function as in-
tended if the windows and the sunroof* are
closed. Car key
Fig. 131
Vehicle key Fig. 132
Vehicle key with alarm button Vehicle key
W
ith the
v
ehicle key the vehicle may be
locked or unlocked remotely ››› page 116.
The vehicle key includes an emitter and bat-
tery. The receiver is in the interior of the vehi-
cle. The range of the vehicle key with remote
control and new battery is several metres around the vehicle.
If it is not possible to open or close the vehi-
cle using the remote control key, this should
be re-synchronised ››› page 121 or the bat-
tery changed ››› page 120.
Different keys belonging to the vehicle may
be used.
Control lamp on the vehicle key
When a button on the vehicle key is pressed,
the control lamp flashes ››› Fig. 131 (arrow)
once briefly, but if the button is held down for a longer period the control lamp flashes sev-
eral time
s, such as in convenience opening.
If the vehicle key control lamp does not light
up when the button is pressed, replace the
key's battery ››› page 120.
Unfolding and folding the key shaft
Press button 1
› ››
Fig. 131
or ›
›› Fig. 132 to
unlock and unfold the key shaft.
To fold the shaft away, press button 1 and
f o
l
d the key shaft in until it locks in place.
Alarm button*
Only press alarm button 2 in the event of an
emer g
ency!
When the alarm button is press-
ed, the vehicle horn is heard and the turn sig-
nals are switched on for a short time. When
the alarm button is pressed again, the alarm
is switched off.
Spare key
To obtain a spare key and other vehicle keys,
the vehicle chassis number is required.
Each new key contains a microchip which
must be coded with the data from the vehicle
electronic immobiliser. A vehicle key will not
work if it does not contain a microchip or the
microchip has not been encoded. This is also
true for keys which are specially cut for the
vehicle. »
117
Technical data
Advice
Operation
Emergencies
Safety
Page 120 of 308

Operation
The vehicle keys or new spare keys can be
o bt
ained fr
om a SEAT Official Service, a spe-
cialised workshop or an approved key service
qualified to create this kind of key.
New keys or spare keys must be synchron-
ised before use ››› page 121. CAUTION
All of the vehicle keys contain electronic com-
ponents. Pr ot
ect them from damage, impacts
and humidity. Note
● Only u
se the key button when you require
the corresponding function. Pushing the but-
ton unnecessarily could accidentally unlock
the vehicle or trigger the alarm. It is also pos-
sible even when you are outside the radius of
action.
● Key operation can be greatly influenced by
overl
apping radio signals close to the vehicle
working in the same range of frequencies, for
example, radio transmitters or mobile tele-
phones.
● Obstacles between the remote control and
the vehic
le, bad weather conditions and dis-
charged batteries can considerably reduce
the range of the remote control.
● If the buttons of the vehicle key are press-
ed ›››
Fig. 131 or ››› Fig. 132 or one of the cen-
tral locking buttons ››› page 119 is pressed
repeatedly in short succession, the central
locking briefly disconnects as protection against overloading. The vehicle is then un-
lock
ed. L
ock it if necessary. Unlocking/Locking by remote control
Read the additional information carefully
›› ›
page 11
The vehicle will be locked again automatical-
ly if you do not open one of the doors or the
rear lid within 30 seconds after unlocking the
car. This function prevents the vehicle from
remaining unlocked if the unlocking button is
pressed by mistake. This does not apply if
you press the button for at least one sec-
ond.
In v
ehic
les with a security central locking
feature (selective unlocking of side doors)
››› page 118, when the button is pressed
onc e, on
ly
the driver door and the fuel tank
flap are unlocked. When the button is press-
ed a second time, all the vehicle doors are
unlocked. WARNING
Observe the safety warnings ›››
in Descrip-
tion on pag e 116
. Note
● Do not u se the r
emote control key until the
vehicle is visible. ●
Other fu nction
s of the remote control key
››› page 125, Convenience opening/closing. Selective unlocking system
The selective unlocking system allows you to
only
u
nlock the driver door and the fuel tank
flap. All other doors and the rear lid remain
locked.
Unlocking the driver door and tank flap
– Press button on the remote control key
onc e
, or t
urn the key once to open.
Unlocking all the doors, the rear lid and the
tank flap simultaneously.
– Within 5 seconds, press button on the
r emot
e c
ontrol key twice, or turn the key to
open twice within 5 seconds.
The anti-theft security system* and the anti-
theft alarm* are immediately disabled if you
unlock only the driver door, without unlock-
ing the other doors.
In vehicles with Easy Connect*, you can pro-
gramme the security central locking system
directly ››› page 119.
118
Page 122 of 308

Operation
Please see Instruction Manual . The
v ehic
le cannot be opened from inside. This
makes it more difficult for unauthorised per-
sons to break into the vehicle ››› in De-
s c
ription on p
age 116.
The anti-theft security system can be switch-
ed off each time the vehicle is locked:
● Turn the key a second time to the lock posi-
tion, in the door lock, f
or the next two sec-
onds. If necessary, remove the protective cov-
er on the driver door handle ›››
page 11
or else
● Press on the remote control key for a
sec ond time
f
or the following 2 seconds.
The flashing frequency of the diode in the
door sill immediately confirms the process.
Initially, the diode flashes in a fast sequence
for a brief period, then it stops for approxi-
mately 30 seconds and, lastly continues
flashing slowly. Replacing the battery Fig. 133
Vehicle key: opening the battery
c omp
ar
tment Fig. 134
Vehicle key: removing the battery SEAT recommends you ask a specialised
w
ork
shop t
o replace the battery.
The battery is located to the rear of the vehi-
cle key, under a cover. Changing the battery
● Unfold the vehicle key shaft ›››
page 117.
● Remove the cover from the back of the ve-
hicle k
ey ››› Fig. 133 in the direction of the ar-
row ››› .
● Extract the battery from the compartment
u s
in
g a suitable thin object ››› Fig. 134.
● Place the new battery in the compartment
as sho
wn ››› Fig. 134, pressing in the oppo-
site direction to that shown by the arrow
››› .
● Fit the cover as shown ››
›
Fig. 133 , pressing
it onto the vehicle key casing in the opposite
direction to that shown by the arrow until it
clicks into place. CAUTION
● If the b att
ery is not changed correctly, the
vehicle key may be damaged.
● Use of unsuitable batteries may damage
the vehic
le key. For this reason, always re-
place the dead battery with another of the
same voltage, size and specifications.
● When fitting the battery, check that the po-
larity i
s correct. For the sake of the environment
Please dispose of your used batteries correct-
ly and w ith r
espect for the environment.120