Seat Mii 2013 Owner's manual
Manufacturer: SEAT, Model Year: 2013, Model line: Mii, Model: Seat Mii 2013Pages: 306, PDF Size: 4.3 MB
Page 101 of 306
99
Transporting
Note
The ventilating slits between the heated rear window and the rear shelf
must not be covered so that used air can escape from the vehicle. ο
Folding and lifting up the rear seat bench backrest
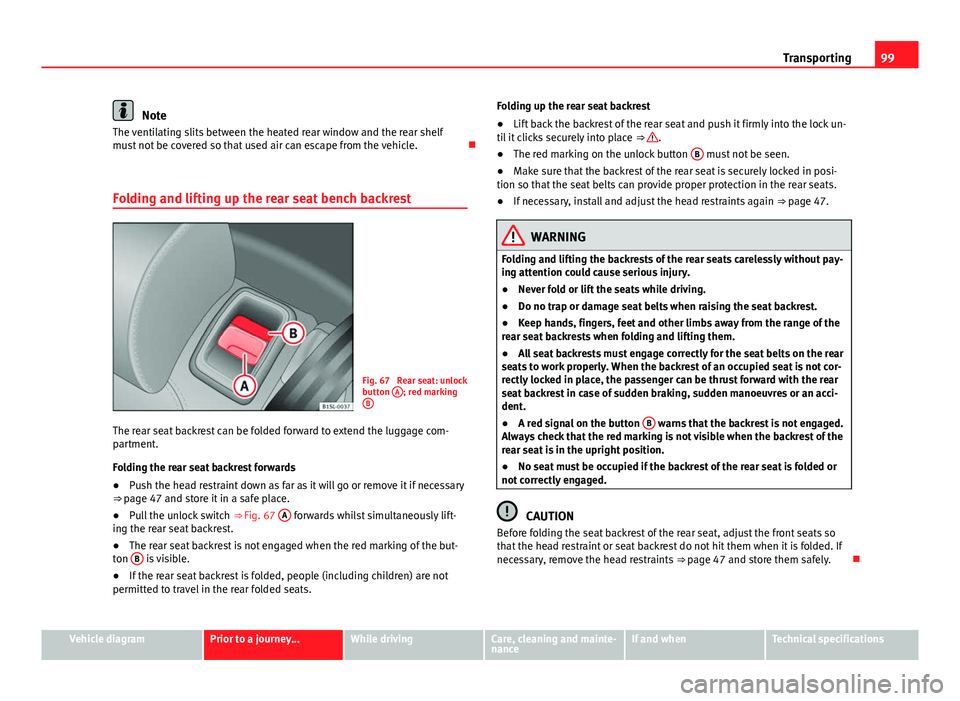
Fig. 67 Rear seat: unlock
button A; red marking
B
The rear seat backrest can be folded forward to extend the luggage com-
partment.
Folding the rear seat backrest forwards
β Push the head restraint down as far as it will go or remove it if necessary
ββ page 47 and store it in a safe place.
β Pull the unlock switch
ββFig. 67 A
forwards whilst simultaneously lift-
ing the rear seat backrest.
β The rear seat backrest is not engaged when the red marking of the but-
ton B
is visible.
β If the rear seat backrest is folded, people (including children) are not
permitted to travel in the rear folded seats. Folding up the rear seat backrest
β
Lift back the backrest of the rear seat and push it firmly into the lock un-
til it clicks securely into place ββ
.
β The red marking on the unlock button B must not be seen.
β Make sure that the backrest of the rear seat is securely locked in posi-
tion so that the seat belts can provide proper protection in the rear seats.
β If necessary, install and adjust the head restraints again ββpage 47.
WARNING
Folding and lifting the backrests of the rear seats carelessly without pay-
ing attention could cause serious injury.
β Never fold or lift the seats while driving.
β Do no trap or damage seat belts when raising the seat backrest.
β Keep hands, fingers, feet and other limbs away from the range of the
rear seat backrests when folding and lifting them.
β All seat backrests must engage correctly for the seat belts on the rear
seats to work properly. When the backrest of an occupied seat is not cor-
rectly locked in place, the passenger can be thrust forward with the rear
seat backrest in case of sudden braking, sudden manoeuvres or an acci-
dent.
β A red signal on the button B
warns that the backrest is not engaged.
Always check that the red marking is not visible when the backrest of the
rear seat is in the upright position.
β No seat must be occupied if the backrest of the rear seat is folded or
not correctly engaged.
CAUTION
Before folding the seat backrest of the rear seat, adjust the front seats so
that the head restraint or seat backrest do not hit them when it is folded. If
necessary, remove the head restraints ββpage 47 and store them safely. ο
Vehicle diagramPrior to a journey...While drivingCare, cleaning and mainte-
nanceIf and whenTechnical specifications
Page 102 of 306
100Transporting
Rear shelf*
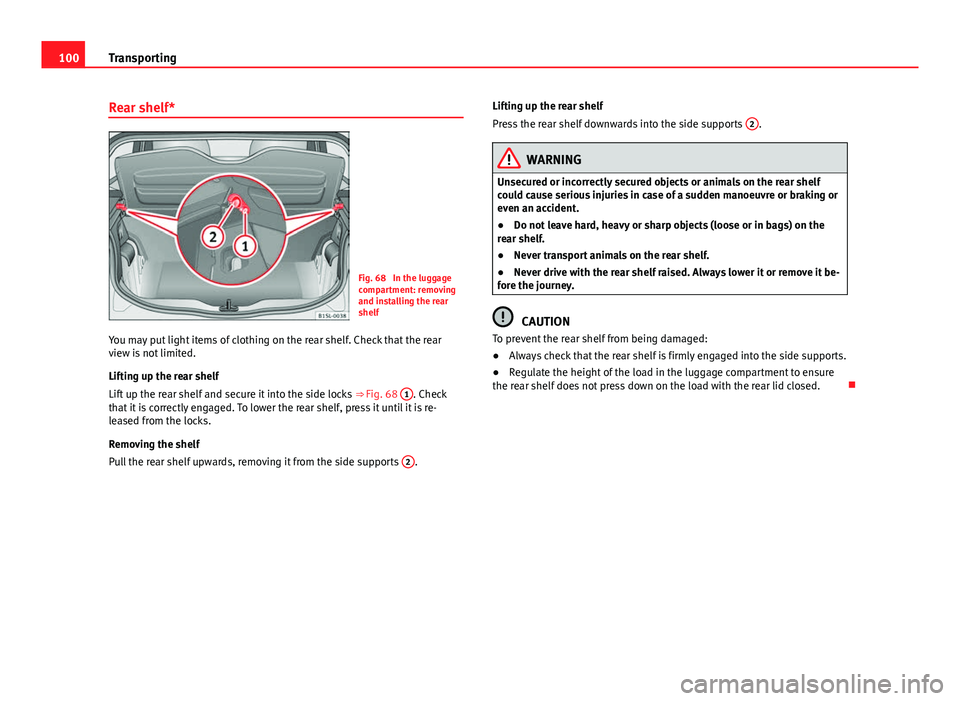
Fig. 68 In the luggage
compartment: removing
and installing the rear
shelf
You may put light items of clothing on the rear shelf. Check that the rear
view is not limited.
Lifting up the rear shelf
Lift up the rear shelf and secure it into the side locks ββFig. 68 1
. Check
that it is correctly engaged. To lower the rear shelf, press it until it is re-
leased from the locks.
Removing the shelf
Pull the rear shelf upwards, removing it from the side supports 2
.Lifting up the rear shelf
Press the rear shelf downwards into the side supports
2
.
WARNING
Unsecured or incorrectly secured objects or animals on the rear shelf
could cause serious injuries in case of a sudden manoeuvre or braking or
even an accident.
β Do not leave hard, heavy or sharp objects (loose or in bags) on the
rear shelf.
β Never transport animals on the rear shelf.
β Never drive with the rear shelf raised. Always lower it or remove it be-
fore the journey.
CAUTION
To prevent the rear shelf from being damaged:
β Always check that the rear shelf is firmly engaged into the side supports.
β Regulate the height of the load in the luggage compartment to ensure
the rear shelf does not press down on the load with the rear lid closed. ο
Page 103 of 306
101
Transporting
Luggage compartment variable floor
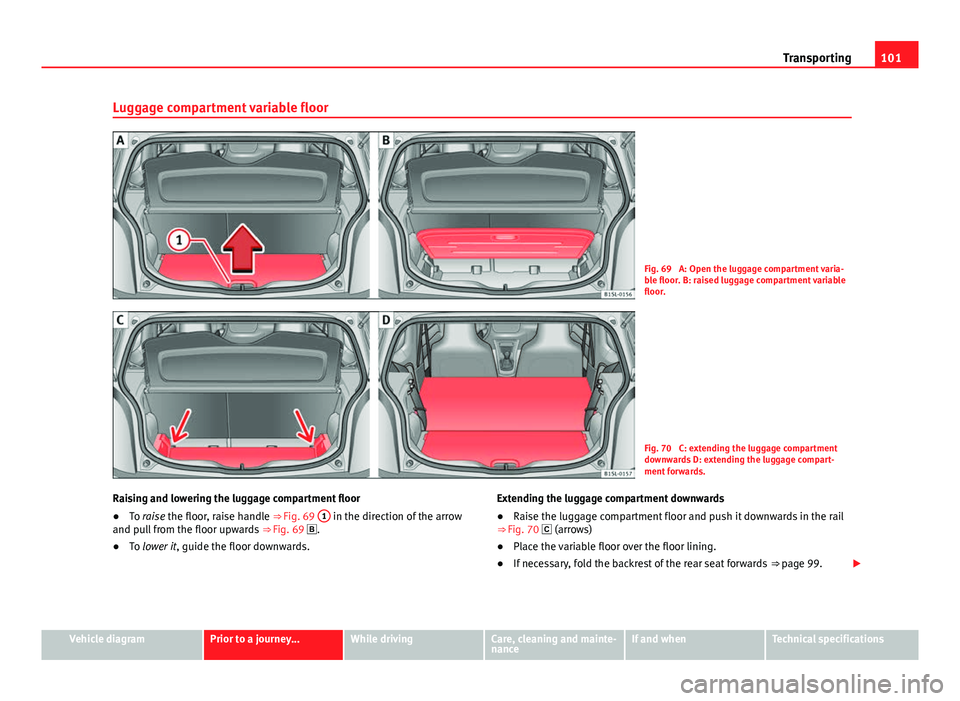
Fig. 69 A: Open the luggage compartment varia-
ble floor. B: raised luggage compartment variable
floor.
Fig. 70 C: extending the luggage compartment
downwards D: extending the luggage compart-
ment forwards.
Raising and lowering the luggage compartment floor
β To raise the floor, raise handle ββFig. 69 1
in the direction of the arrow
and pull from the floor upwards ββFig. 69 ο.
β To lower it , guide the floor downwards. Extending the luggage compartment downwards
β
Raise the luggage compartment floor and push it downwards in the rail
ββFig. 70 ο (arrows)
β Place the variable floor over the floor lining.
β If necessary, fold the backrest of the rear seat forwards ββpage 99.ο£
Vehicle diagramPrior to a journey...While drivingCare, cleaning and mainte-
nanceIf and whenTechnical specifications
Page 104 of 306
102Transporting
Extending the luggage compartment forwards
β Disassemble the luggage compartment tray ββpage 100.
β Disassemble the rear headrests ββpage 47.
β Fold the backrest of the rear seat forwards ββpage 99.
β If necessary, expand the luggage compartment downwards.
CAUTION
Do not let the luggage compartment floor fall when closing it. Always care-
fully guide it downwards in a controlled manner. Otherwise, the lining and
the floor of the luggage compartment could be damaged. ο
Fastening rings*
In the front part of the luggage compartment, there may be fastening rings
to secure the luggage.
In order to use the fastening rings, they must be lifted beforehand.
WARNING
If unsuitable or damaged belts or retaining straps are used, they could
break in the event of braking or an accident. Objects could then be
launched across the passenger compartment and cause serious or fatal
injuries.
β It is important to always use belts or retaining straps that are suita-
ble and in a good condition.
β Belts and retaining straps should be securely fastened to the fasten-
ing rings.
β Objects in the luggage compartment that are unsecured could move
suddenly and modify the handling of the vehicle.
WARNING (Continued)
β Small and light objects must also be secured.
β The maximum tensile load of the fastening ring for securing objects
should never be exceeded.
β A child seat should never be secured with the fastening rings.
Note
β The maximum tensile load that the fastening rings can support is 3.5
kN.
β Belts and securing systems for the appropriate load can be obtained
from specialised dealerships. SEAT recommends visiting a SEAT dealership
for this. ο
Retaining hooks
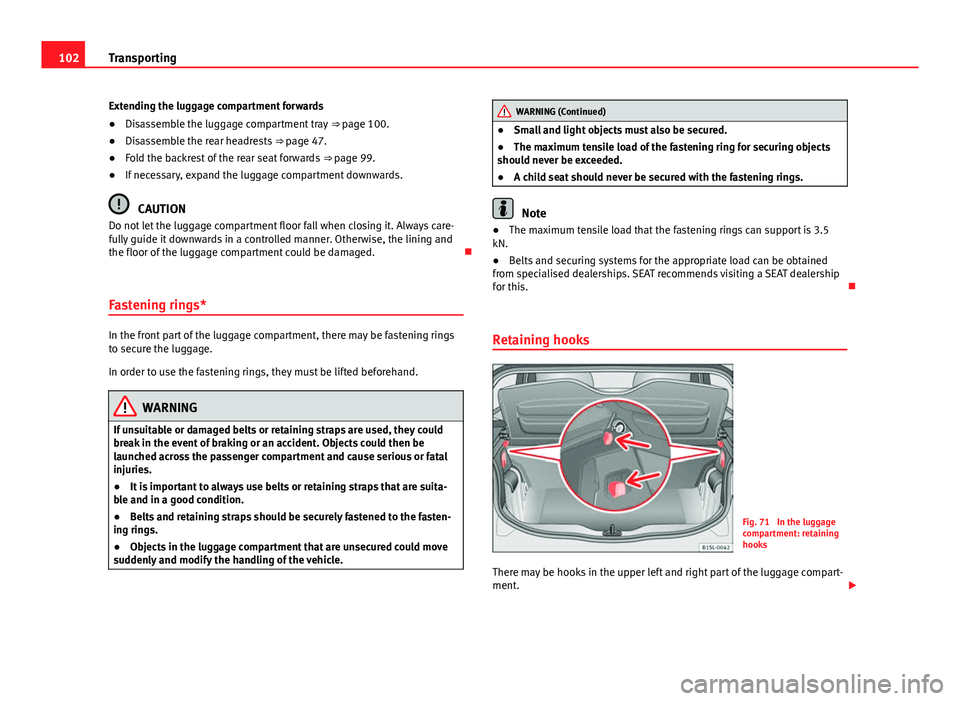
Fig. 71 In the luggage
compartment: retaining
hooks
There may be hooks in the upper left and right part of the luggage compart-
ment. ο£
Page 105 of 306
103
Transporting
WARNING
Never use these hooks to secure objects. In case of sudden braking or an
accident, the hooks could rupture.
CAUTION
The hooks can support a maximum of 2.5 kg individually. ο
Vehicle diagramPrior to a journey...While drivingCare, cleaning and mainte-
nanceIf and whenTechnical specifications
Page 106 of 306
104Transporting
Roof carrier system
Introduction
The vehicle roof has been designed to optimise aerodynamics. For this rea-
son, conventional roof carrier systems cannot be secured to the water
drains.
Given that the water drains have been incorporated into the roof for aerody-
namic reasons, only the SEAT approved basic supports and roof carrier sys-
tems can be used.
When the roof carrier system should be removed:
β When it is not being used.
β When the vehicle is being washed in a car wash.
β When the vehicle height exceeds the maximum height, for example, in a
garage.
Additional information and warnings:
β Light ββpage 82
β Transporting ββ page 95
β Ecological driving ββpage 144
β Wheels and tyres ββpage 210
β Accessories, parts replacement, repairs and modifications ββpage 222
WARNING
The risk of an accident is increased by transporting heavy or bulky loads
on the roof, which affects the car's handling by shifting the centre of
gravity and increasing susceptibility to cross winds.
β Always secure loads correctly with suitable and undamaged attach-
ment rope or straps.
β Large, heavy, wide and flat loads negatively affect the vehicle aerody-
namics, centre of gravity and handling.
β Avoid brusque manoeuvres and sudden braking.
β Adjust your speed and driving style to visibility, road, traffic and
weather conditions.
CAUTION
β Always remove the roof carrier system from the roof before entering a car
wash.
β The height of your vehicle is changed by the installation of the roof carri-
er and the load secured on it. Compare the vehicle height with the passage
height, for example in underground car parks or entering garage doors.
β The roof antenna and the range of the rear lid should not be affected by
the roof carrier system and the load being transported.
β Take extra care not to let the rear lid strike the roof load when opening.
For the sake of the environment
The vehicle uses more fuel when the roof carrier system is fitted. ο
Page 107 of 306
105
Transporting
Securing the base supports and roof carrier system
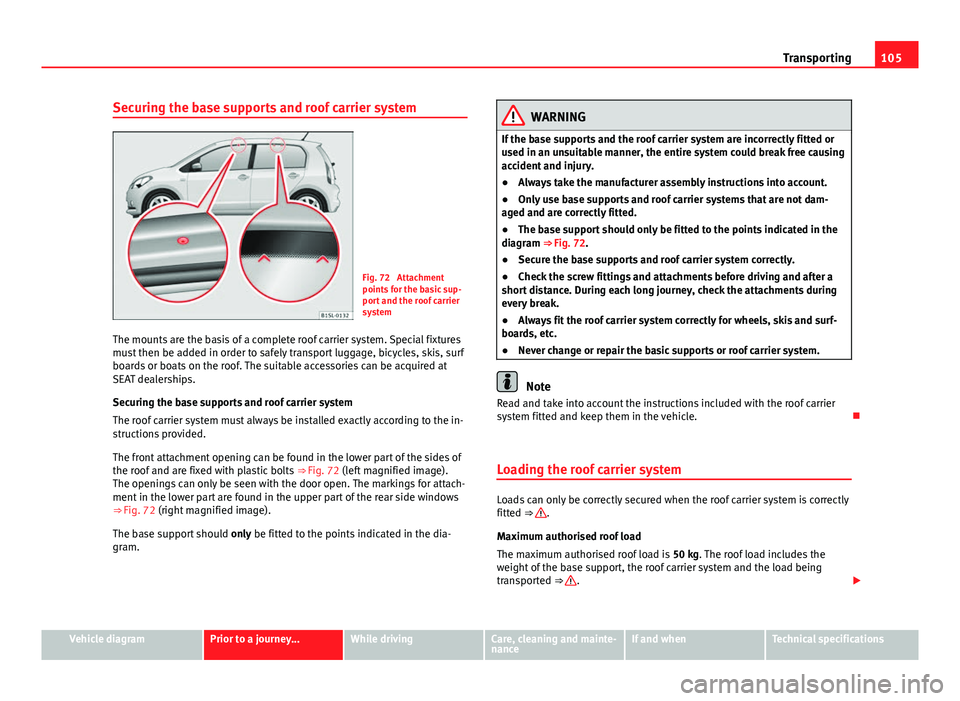
Fig. 72 Attachment
points for the basic sup-
port and the roof carrier
system
The mounts are the basis of a complete roof carrier system. Special fixtures
must then be added in order to safely transport luggage, bicycles, skis, surf
boards or boats on the roof. The suitable accessories can be acquired at
SEAT dealerships.
Securing the base supports and roof carrier system
The roof carrier system must always be installed exactly according to the in-
structions provided.
The front attachment opening can be found in the lower part of the sides of
the roof and are fixed with plastic bolts ββFig. 72 (left magnified image).
The openings can only be seen with the door open. The markings for attach-
ment in the lower part are found in the upper part of the rear side windows
ββFig. 72 (right magnified image).
The base support should only be fitted to the points indicated in the dia-
gram.
WARNING
If the base supports and the roof carrier system are incorrectly fitted or
used in an unsuitable manner, the entire system could break free causing
accident and injury.
β Always take the manufacturer assembly instructions into account.
β Only use base supports and roof carrier systems that are not dam-
aged and are correctly fitted.
β The base support should only be fitted to the points indicated in the
diagram ββFig. 72.
β Secure the base supports and roof carrier system correctly.
β Check the screw fittings and attachments before driving and after a
short distance. During each long journey, check the attachments during
every break.
β Always fit the roof carrier system correctly for wheels, skis and surf-
boards, etc.
β Never change or repair the basic supports or roof carrier system.
Note
Read and take into account the instructions included with the roof carrier
system fitted and keep them in the vehicle. ο
Loading the roof carrier system
Loads can only be correctly secured when the roof carrier system is correctly
fitted ββ.
Maximum authorised roof load
The maximum authorised roof load is 50 kg. The roof load includes the
weight of the base support, the roof carrier system and the load being
transported ββ
. ο£
Vehicle diagramPrior to a journey...While drivingCare, cleaning and mainte-
nanceIf and whenTechnical specifications
Page 108 of 306
106Transporting
Always check the weight of the base support, the roof carrier system and
the weight of the load to be transported and, if necessary, weigh them. Nev-
er exceed the maximum authorised roof load.
If you are using a roof carrier with a lower weight rating, you cannot trans-
port the maximum roof load. Do not exceed the maximum weight limit for
the roof carrier given in the fitting instructions.
Distributing a load
Uniformly distribute loads and secure them correctly ββ
.
Check attachments
After fitting the base supports and the roof carrier system, always check the
attachments after a short trip or at regular intervals.
WARNING
Exceeding the maximum authorised roof load can result in accidents
and/or vehicle damage.
β Always respect the maximum authorised weight for the roof, the max-
imum authorised weight on the axles and the total maximum authorised
weight of the vehicle.
β Never exceed the capacity of the roof carrier system even if this is
less than the maximum authorised roof load.
β Secure heavy objects towards the front and distribute the load even-
ly.
WARNING
Loose and incorrectly secured loads can fall from the roof carrier system
causing accidents and injury.
β Always use suitable ropes and straps in good condition.
β Always secure loads correctly.
ο
Page 109 of 306
107
Transporting
Trailer coupling Information about trailer coupling
The vehicle is not certified for trailer coupling. The vehicle is not equipped
in the manufacture with a towing bracket, nor is it possible to retrofit a tow-
ing bracket.
WARNING
Installing a towing bracket on the vehicle may cause accidents and seri-
ous injuries while operating the vehicle.
β Never install a towing bracket on the vehicle.
β The trailer may be released from the vehicle when the vehicle is mov-
ing.
CAUTION
Any type of towing bracket installed on the vehicle can cause serious and
costly damage that are not covered under the SEAT guarantee. ο
Vehicle diagramPrior to a journey...While drivingCare, cleaning and mainte-
nanceIf and whenTechnical specifications
Page 110 of 306
108Practical equipment
Practical equipment
Storage compartments
Introduction
Storage compartments must only be used to store light or small objects.
Additional information and warnings:
β Care and cleaning of the vehicle interior ββpage 205
β ββBooklet Radio
WARNING
In the event of sudden braking movements or turns, loose objects may be
thrown around the vehicle interior. This could cause serious injuries to
passengers and cause the driver to lose control of the vehicle.
β Do not transport animals or place hard, heavy or sharp objects inside
the vehicle in: open storage compartments, dash panel, rear shelf, items
of clothing or bags.
β While driving, always keep object compartments closed.
WARNING
Objects falling into the driver's footwell could prevent use of the pedals.
This could lead the driver to lose control of the vehicle, increasing the
risk of a serious accident.
β Make sure the pedals can be used at all times, with no objects rolling
underneath them.
β The floor mat should always be secured to the floor.
WARNING (Continued)
β Never place other mats or rugs on top of the original mat supplied by
the factory.
β Make sure that no objects can fall into the driver's footwell while the
vehicle is in motion.
CAUTION
β Objects on the shelf could chafe against the wires of the heating ele-
ment in the heated rear window and cause damage.
β Do not keep temperature-sensitive objects, food or medicines inside the
vehicle. Heat and cold could damage them or render them useless.
β Light-transparent objects placed inside the vehicle, such as lenses,
magnifying glasses or transparent suction caps on the windows, could con-
centrate the sun's rays and cause damage to the vehicle.
Note
The ventilating slits between the heated rear window and the rear shelf
must not be covered so that used air can escape from the vehicle. ο