Seat Mii 2013 Owner's manual
Manufacturer: SEAT, Model Year: 2013, Model line: Mii, Model: Seat Mii 2013Pages: 306, PDF Size: 4.3 MB
Page 261 of 306
259
Practical information
WARNING (Continued)
● Avoid heavy acceleration, hard braking and fast cornering.
● Drive only during 10 minutes at a maximum speed of 80 km/h
(50 mph) and subsequently check the tyre.
For the sake of the environment
Dispose of used or expired sealant observing any legal requirements.
Note
A new bottle of sealant can be purchased at SEAT dealerships.
Note
Take into account the separate instruction manual of the tire mobility set
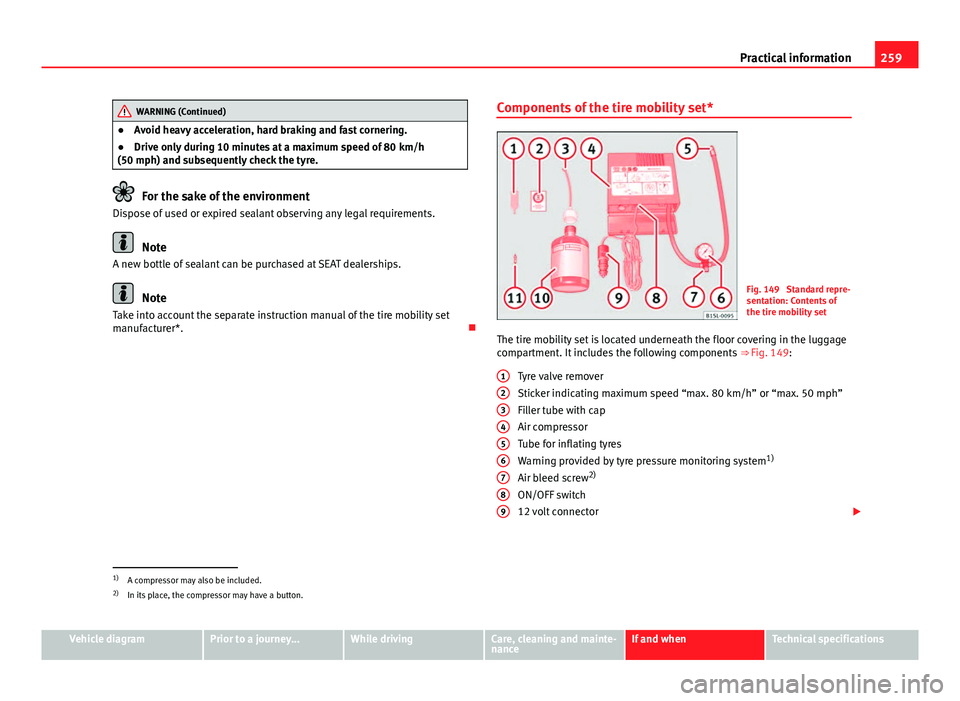
manufacturer*. Components of the tire mobility set*Fig. 149 Standard repre-
sentation: Contents of
the tire mobility set
The tire mobility set is located underneath the floor covering in the luggage
compartment. It includes the following components ⇒ Fig. 149:
Tyre valve remover
Sticker indicating maximum speed “max. 80 km/h” or “max. 50 mph”
Filler tube with cap
Air compressor
Tube for inflating tyres
Warning provided by tyre pressure monitoring system 1)
Air bleed screw 2)
ON/OFF switch
12 volt connector
1
23456789
1)
A compressor may also be included.
2) In its place, the compressor may have a button.
Vehicle diagramPrior to a journey...While drivingCare, cleaning and mainte-
nanceIf and whenTechnical specifications
Page 262 of 306

260Practical information
Bottle of sealant 1)
Spare tyre valve
The valve insert remover 1
has a gap at the lower end for a valve insert.
The valve insert can only be screwed or unscrewed in this way. This also ap-
plies to its replacement part 11
.
Preparation
Checklist
Before filling a tyre, complete the following operations in the order given
⇒
:
1. In the event of a puncture, park the vehicle as far as possible from traffic and on flat, suitable ground.
2. Apply the handbrake firmly ⇒ page 134.
3. Stop the engine and remove the key from the ignition ⇒ page 119.
4. Manual gearbox: Select a gear ⇒ page 124.
5. Have all vehicle occupants get out of the vehicle and wait in a safe place (for example, behind the safety barrier).
6. Switch on the hazard warning lights and set the warning triangle in position ⇒ page 241. Observe legal requirements.
7. Check whether a repair is possible using the Tyre Mobility Set ⇒ page 258
8. If the luggage compartment is full: take the baggage out of the vehi- cle.
9. Remove the tire mobility set from the luggage compartment.
10. Apply the sticker ⇒ Fig. 149 2
from the tire mobility set to the dash
panel where it can be seen clearly.
11. Do not remove foreign objects, e.g. screws or nails, from the tyre.
1011WARNING
Failure to follow the checklist prepared for your own safety could lead to
accidents and severe injuries.
● Always complete the operations given in the checklist and observe
the general rules of safety.
Sealing and inflating a tyre
Sealing a tyre
● Unscrew the tyre valve cap.
● Use the corresponding enclosed extractor ⇒ Fig. 149 1
to unscrew the
tyre valve insert. Place the valve insert on a clean surface.
● Vigorously shake the sealant bottle ⇒ Fig. 149 10
for several seconds.
● Screw the inflator tube ⇒ Fig. 149 3 securely into the sealant bottle in
a clockwise direction. The seal on the mouth of the bottle moves automati-
cally.
● Remove the lid from the filling tube ⇒ Fig. 149 3
and screw the open
end of the tube into the tyre valve.
● Hold the tyre sealant can upside down and fill the complete contents of
the can into the tyre.
● Remove the tyre sealant bottle from the valve.
● Screw the valve insert again with the corresponding enclosed extractor
⇒ Fig. 149 1
into the tyre valve.
Inflating the tyre
● Securely screw the tyre inflator tube ⇒ Fig. 149 5
of the compressor in-
to the tyre valve.
● Check whether the air bleed screw ⇒ Fig. 149 7
is closed.
1)
A compressor may also be included.
Page 263 of 306

261
Practical information
● Start the vehicle engine and leave it running.
● Attach the connector ⇒ Fig. 149 9
to a 12 volt socket of the vehicle
⇒ page 117.
● Connect the air compressor with the ON/OFF switch ⇒ Fig. 149 8
.
● Keep the air compressor running until it reaches 2.0 to 2.5 bar
(29-36 psi / 200-250 kPa) ⇒
. Maximum operation time 8 minutes ⇒ .
● Disconnect the air compressor.
● If it is not possible to achieve an air pressure of 2.0 to 2.5 bar
(29-36 psi / 200-250 kPa), unscrew the tyre inflator tube from the tyre valve.
● Move the vehicle some 10 metres forwards or backwards so that the
sealant is evenly distributed in the tyre interior.
● Securely screw the compressor tyre inflator tube into the tyre valve and
repeat the inflation process.
● If the indicated pressure can still not be reached, the tyre is too badly
damaged. The tyre cannot be sealed with the anti-puncture kit. Do not con-
tinue driving. You should obtain professional assistance ⇒
.
● Disconnect the air compressor and unscrew the flexible inflator tube
from the tyre valve.
● When the tyre pressure is between 2.5 and 2.0 bars, immediately con-
tinue driving without exceeding 80 km/h (50 mph).
● After 10 minutes, Check the pressure again ⇒ page 261.
WARNING
When inflating the wheel, the air compressor and the inflator tube may
become hot.
● Protect hands and skin from hot parts.
● Do not place the hot flexible inflator tube or hot air compressor on
flammable material.
WARNING (Continued)
● Allow them to cool before storing the device.
● If it is not possible to inflate the tyre to at least 2.0 bars (29 psi /
200 kPa), the tyre is too badly damaged. The sealant is not in a good con-
dition to seal the tyre. Do not continue driving. Seek specialist assis-
tance.
CAUTION
Switch off the air compressor after a maximum of 8 operational minutes to
avoid overheating! Before switching on the air compressor again, let it cool
for several minutes.
Check after 10 minutes of driving
Screw the inflator tube ⇒ Fig. 149 5 again and check the pressure on the
gauge 6.
1.3 bar (19 psi / 130 kPa) and lower:
● Stop the vehicle! The tyre cannot be sealed sufficiently with the tyre mo-
bility set.
● You should obtain professional assistance ⇒
.
1.4 bar (20 psi / 140 kPa) and higher:
● Set the tyre pressure to the correct value again ⇒ page 210.
● Carefully resume your journey until you reach the nearest specialised
workshop without exceeding 80 km/h (50 mph).
● Have the damaged tyre replaced.
Vehicle diagramPrior to a journey...While drivingCare, cleaning and mainte-
nanceIf and whenTechnical specifications
Page 264 of 306
262Practical information
WARNING
Driving with an unsealed tyre is dangerous and can cause accidents and
serious injury.
● Do not continue driving if the tyre pressure is 1.3 bar (19 psi /
130 kPa) and lower.
● Seek specialist assistance.
Page 265 of 306
263
Practical information
Fuses
Introduction
Due to the constant update of vehicles, fuse assignments depending on
equipment and the use of the same fuse for various electrical components,
at the time of printing this manual it is not possible to provide an up-to-date
summary of the electrical components fuse positions. For detailed informa-
tion about the fuse positions, please consult a Technical Service.
In general, a fuse can be assigned to various electrical components. Like-
wise, an electrical component can be protected by several fuses.
Only replace fuses when the cause of the problem has been solved. If a
newly inserted fuse blows after a short time, you must have the electrical
system checked by a specialised workshop as soon as possible.
Additional information and warnings:
● Working in the engine compartment ⇒ page 180
WARNING
The high voltages in the electrical system can give serious electrical
shocks, causing burns and even death!
● Never touch the electrical wiring of the ignition system.
● Take care not to cause short circuits in the electrical system.
WARNING
Using unsuitable fuses, repairing fuses or bridging a current circuit with-
out fuses can cause a fire and serious injury.
● Never use a fuse with a higher value. Only replace fuses with a fuse of
the same amperage (same colour and markings) and size.
● Never repair a fuse.
● Never replace a fuse by a metal strip, staple or similar.
CAUTION
● To avoid damage to the vehicles electric system, before replacing a fuse
turn off the ignition, the lights and all electrical elements and remove the
keys from the ignition.
● If you replace a fuse with higher-rating fuse, you could cause damage to
another part of the electrical system.
● Protect the fuse boxes when open to avoid the entry of dust or humidity.
Dirt and humidity inside fuse boxes can cause damage to the electrical sys-
tem.
Note
One single consumer could have more than one fuse.
Note
Several consumers could run over one single fuse.
Vehicle diagramPrior to a journey...While drivingCare, cleaning and mainte-
nanceIf and whenTechnical specifications
Page 266 of 306
264Practical information
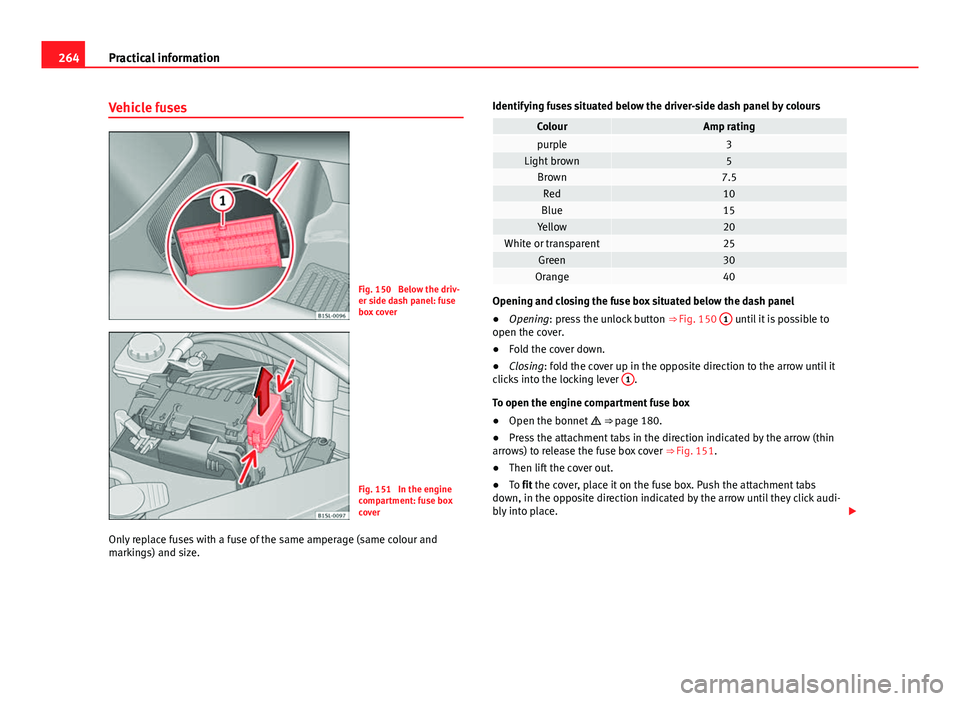
Vehicle fuses
Fig. 150 Below the driv-
er side dash panel: fuse
box cover
Fig. 151 In the engine
compartment: fuse box
cover
Only replace fuses with a fuse of the same amperage (same colour and
markings) and size. Identifying fuses situated below the driver-side dash panel by colours
ColourAmp ratingpurple3Light brown5Brown7.5Red10Blue15Yellow20White or transparent25Green30Orange40
Opening and closing the fuse box situated below the dash panel
●
Opening: press the unlock button ⇒ Fig. 150 1 until it is possible to
open the cover.
● Fold the cover down.
● Closing: fold the cover up in the opposite direction to the arrow until it
clicks into the locking lever 1
.
To open the engine compartment fuse box
● Open the bonnet ⇒ page 180.
● Press the attachment tabs in the direction indicated by the arrow (thin
arrows) to release the fuse box cover ⇒ Fig. 151.
● Then lift the cover out.
● To fit the cover, place it on the fuse box. Push the attachment tabs
down, in the opposite direction indicated by the arrow until they click audi-
bly into place.
Page 267 of 306
265
Practical information
CAUTION
● Always carefully remove the fuse box covers and refit them correctly to
avoid problems with your vehicle.
● Protect the fuse boxes when open to avoid the entry of dust or humidity.
Dirt and humidity inside fuse boxes can cause damage to the electrical sys-
tem.
Note
In the vehicle, there are more fuses than those indicated in this chapter.
These should only be changed by a specialised workshop.
Replacing a blown fuse
Fig. 152 Image of a
blown fuse
Preparation
● Switch off the ignition, lights and all electrical equipment.
● Open the corresponding fuse box ⇒ page 264. Identifying a blown fuse
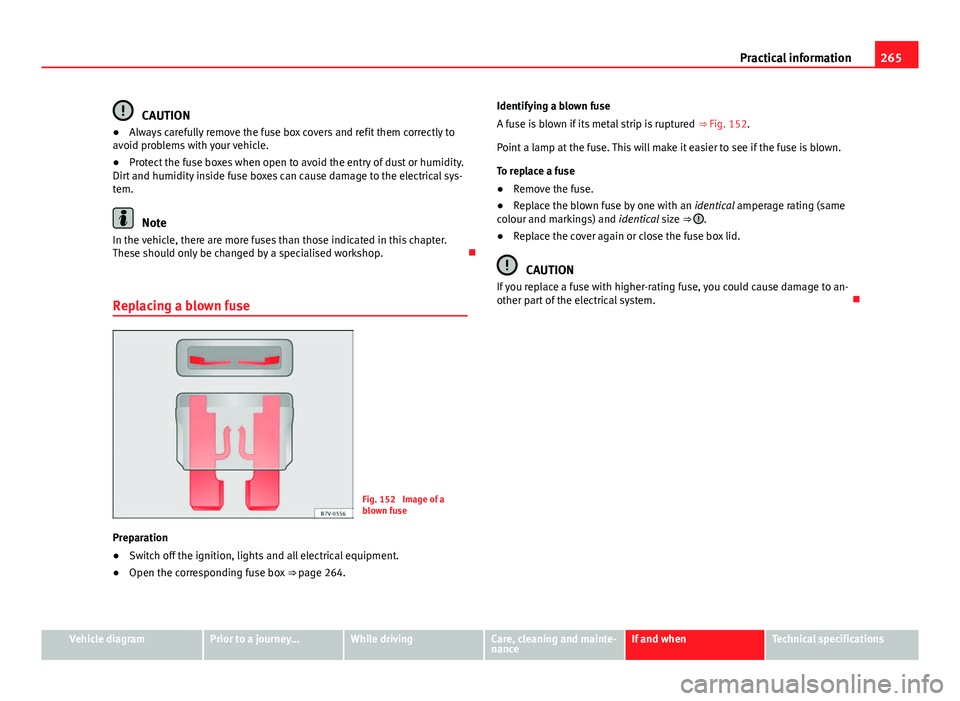
A fuse is blown if its metal strip is ruptured
⇒ Fig. 152.
Point a lamp at the fuse. This will make it easier to see if the fuse is blown.
To replace a fuse
● Remove the fuse.
● Replace the blown fuse by one with an identical amperage rating (same
colour and markings) and identical size ⇒
.
● Replace the cover again or close the fuse box lid.
CAUTION
If you replace a fuse with higher-rating fuse, you could cause damage to an-
other part of the electrical system.
Vehicle diagramPrior to a journey...While drivingCare, cleaning and mainte-
nanceIf and whenTechnical specifications
Page 268 of 306
266Practical information
Changing bulbs
Introduction
Changing bulbs requires a certain amount of manual skill. If you are unsure,
SEAT recommends that you consult a Technical Service or request assis-
tance from a specialist. In general a specialist is needed if, in addition to
the bulbs, other vehicle components require removal.
You should store spare light bulbs in the vehicle for safety-relevant lights.
Spare bulbs may be obtained from the Technical Services. In some coun-
tries, it is a legal requirement to carry spare bulbs in the vehicle.
Driving with faults and blown bulbs on the vehicle exterior lighting is
against the law.
Additional bulb specifications
The specifications of some headlamp bulbs and bulbs for the tail lamps fit-
ted at the factory may be different to those of conventional bulbs. Bulb in-
formation is displayed on the bulb socket or on the bulb itself.
Additional information and warnings:
● Exterior detail ⇒ page 6
● Lights and visibility ⇒ page 82
● Working in the engine compartment ⇒ page 180
● Vehicle tools ⇒ page 247
● Fuses ⇒ page 263
WARNING
If the road is not well-lit and the vehicle is not clearly visible to other
drivers, there is a risk of accident.
WARNING
Failure to replace bulbs correctly may cause serious accidents.
● Before carrying out any work in the engine compartment please read
and observe the warnings ⇒ page 180. In any vehicle, the engine com-
partment is a hazardous area and could cause severe injury.
● The bulbs H4, HB4 and H7 are pressurised and might explode on
changing them.
● Only replace the bulbs concerned when they have cooled.
● Never replace bulbs alone if you are not familiar with the operations
necessary. If you are not sure about procedures then visit a specialised
workshop to carry out the necessary work.
● Never touch the bulb glass directly. Fingerprints will be evaporated by
the heat of the operating bulb thus “fogging” up the reflector.
● The headlamp frameworks in the engine compartment and the tail
lamps contain sharp elements. Always protect your hands when chang-
ing bulbs.
CAUTION
After changing a bulb, if the rubber covers are not replaced correctly on the
headlamp framework, the electrical installation may be damaged, especial-
ly if water is allowed to enter.
Page 269 of 306
267
Practical information
Information for replacing bulbs
Checklist
To replace a bulb, carry out the following operations always in the order giv-
en ⇒
:
1. Park the vehicle a safe distance from traffic and on suitable ground.
2. Apply the handbrake firmly ⇒ page 134.
3. Turn the light switch to position 0 ⇒ page 82.
4. Move the gear lever into the neutral position ⇒ page 82.
5. Stop the engine and remove the key from the ignition ⇒ page 119.
6. Automatic gearbox: move the selector lever to position P
⇒ page 124.
7. Manual gearbox: Select a gear ⇒ page 124.
8. Allow the corresponding bulb to cool.
9. Visually inspect fuses to see if any are blown ⇒ page 263.
10. Replace the bulb according to the instructions ⇒
. Bulbs should
only be replaced by new identical models. Bulb information is dis-
played on the bulb socket or on the bulb itself.
11. In general, never touch the bulb glass directly. The heat of the bulb would cause the fingerprint to evaporate and condense on the reflec-
tor. This will impair the brightness of the headlight.
12. Check if the new bulb is working. If the bulb is not working, it maynot have been correctly fitted, it could be damaged or the connector
may not be correctly connected.
13. Every time a bulb for the headlights is replaced, visit a specialised workshop to check the headlights.
WARNING
Failure to follow the checklist prepared for your own safety could lead to
accidents and severe injuries.
● Always complete the operations given in the checklist and observe
the general rules of safety.
CAUTION
Always remove and fit headlights carefully to avoid damage to the paint-
work and other vehicle parts.
Vehicle diagramPrior to a journey...While drivingCare, cleaning and mainte-
nanceIf and whenTechnical specifications
Page 270 of 306
268Practical information
Replacing the bulbs in the headlights
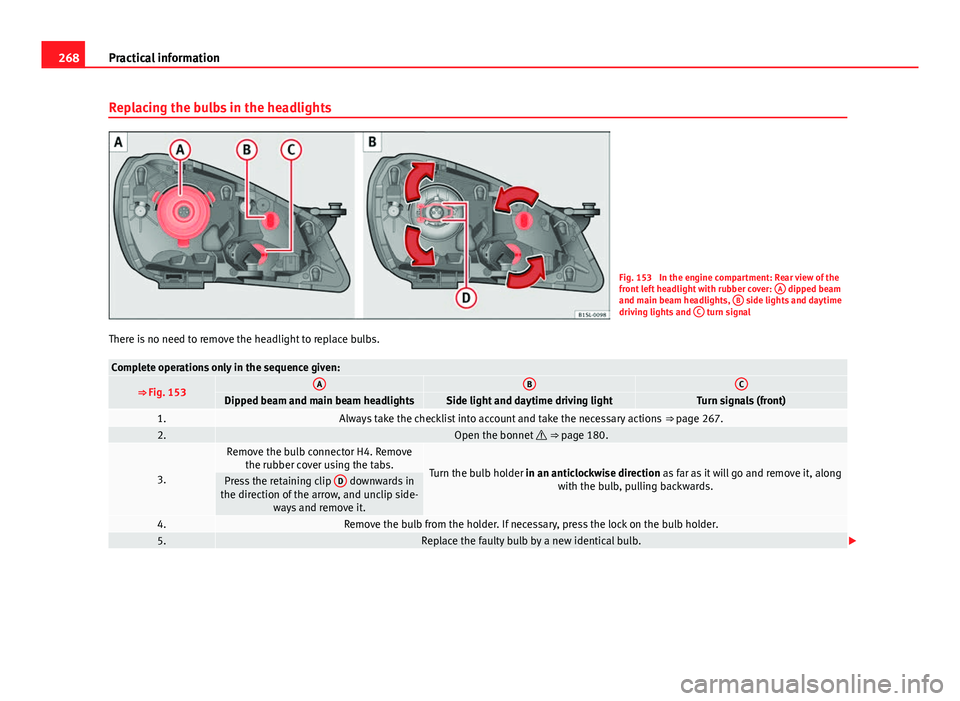
Fig. 153 In the engine compartment: Rear view of the
front left headlight with rubber cover: A dipped beam
and main beam headlights, B side lights and daytime
driving lights and C turn signal
There is no need to remove the headlight to replace bulbs.
Complete operations only in the sequence given:
⇒ Fig. 153ABCDipped beam and main beam headlightsSide light and daytime driving lightTurn signals (front)1.Always take the checklist into account and take the necessary actions ⇒ page 267.2.Open the bonnet ⇒ page 180.
3.
Remove the bulb connector H4. Remove
the rubber cover using the tabs.
Turn the bulb holder in an anticlockwise direction as far as it will go and remove it, along with the bulb, pulling backwards.Press the retaining clip D downwards in
the direction of the arrow, and unclip side- ways and remove it.
4.Remove the bulb from the holder. If necessary, press the lock on the bulb holder.5.Replace the faulty bulb by a new identical bulb.