technical specifications Seat Mii 2013 Owner's manual
[x] Cancel search | Manufacturer: SEAT, Model Year: 2013, Model line: Mii, Model: Seat Mii 2013Pages: 306, PDF Size: 4.3 MB
Page 6 of 306
Wheel trims . . . . . . . . . . . . . . . . . . . . . . . . . . . . . . 250
Changing a wheel . . . . . . . . . . . . . . . . . . . . . . . . . 252
Anti-puncture kit* . . . . . . . . . . . . . . . . . . . . . . . . . 258
Fuses . . . . . . . . . . . . . . . . . . . . . . . . . . . . . . . . . . . 263
Changing bulbs . . . . . . . . . . . . . . . . . . . . . . . . . . . 266
Starting assistance . . . . . . . . . . . . . . . . . . . . . . . . 275
Towing and tow starting . . . . . . . . . . . . . . . . . . . . 278
Technical specifications . . . . . . . . . . . . 282
Description of specifications . . . . . . . . . . . . . . . 282
Technical specifications . . . . . . . . . . . . . . . . . . . . 282
Engine specifications . . . . . . . . . . . . . . . . . . . . . . 285
Dimensions . . . . . . . . . . . . . . . . . . . . . . . . . . . . . . 288
Capacities . . . . . . . . . . . . . . . . . . . . . . . . . . . . . . . 288
Index . . . . . . . . . . . . . . . . . . . . . . . . . . . . . . . . . . . 289
4Table of Contents
Page 9 of 306
7
Exterior views
Front view
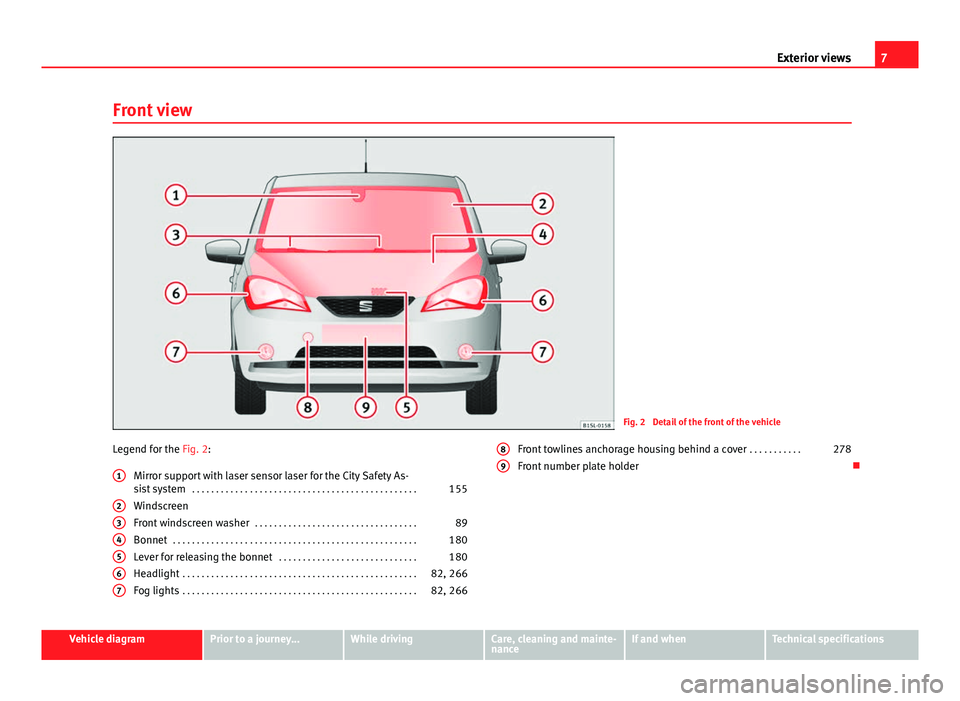
Fig. 2 Detail of the front of the vehicle
Legend for the Fig. 2: Mirror support with laser sensor laser for the City Safety As-
sist system . . . . . . . . . . . . . . . . . . . . . . . . . . . . . . . . . . . . . . . . . . . . . . . 155
Windscreen
Front windscreen washer . . . . . . . . . . . . . . . . . . . . . . . . . . . . . . . . . . 89
Bonnet . . . . . . . . . . . . . . . . . . . . . . . . . . . . . . . . . . . . . . . . . . . . . . . . . . . 180
Lever for releasing the bonnet . . . . . . . . . . . . . . . . . . . . . . . . . . . . . 180
Headlight . . . . . . . . . . . . . . . . . . . . . . . . . . . . . . . . . . . . . . . . . . . . . . . . . 82, 266
Fog lights . . . . . . . . . . . . . . . . . . . . . . . . . . . . . . . . . . . . . . . . . . . . . . . . . 82, 266
1
234567
Front towlines anchorage housing behind a cover
. . . . . . . . . . .278
Front number plate holder 89
Vehicle diagramPrior to a journey...While drivingCare, cleaning and mainte-
nanceIf and whenTechnical specifications
Page 11 of 306
9
Vehicle interior
Vehicle interior Driver door overview
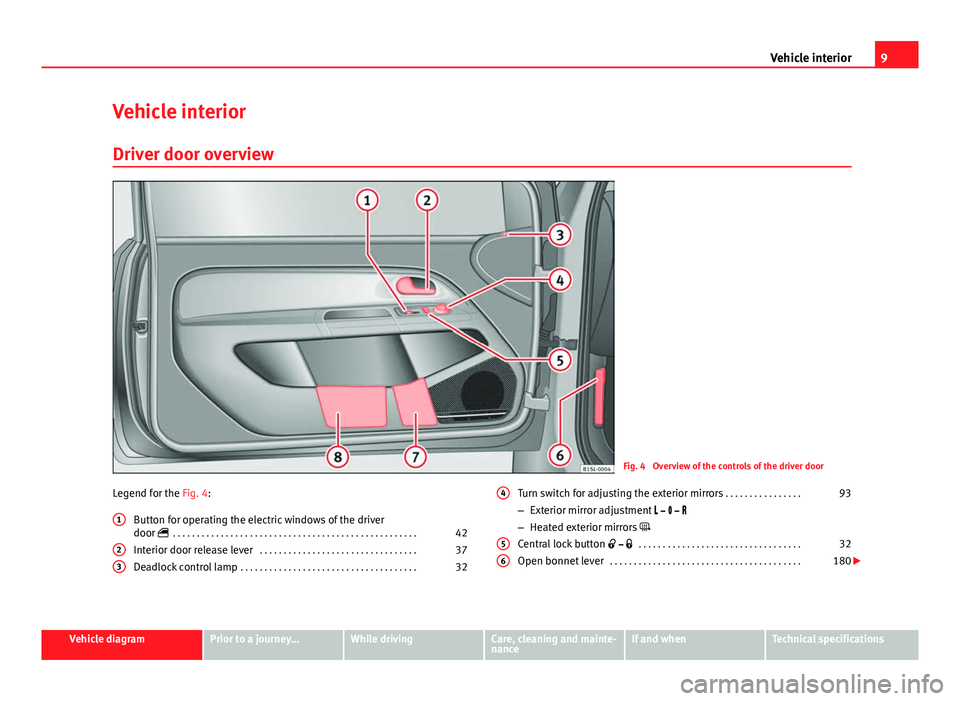
Fig. 4 Overview of the controls of the driver door
Legend for the Fig. 4: Button for operating the electric windows of the driver
door . . . . . . . . . . . . . . . . . . . . . . . . . . . . . . . . . . . . . . . . . . . . . . . . . . . 42
Interior door release lever . . . . . . . . . . . . . . . . . . . . . . . . . . . . . . . . . 37
Deadlock control lamp . . . . . . . . . . . . . . . . . . . . . . . . . . . . . . . . . . . . . 32
1
23
Turn switch for adjusting the exterior mirrors
. . . . . . . . . . . . . . . .93
– Exterior mirror adjustment
– Heated exterior mirrors
Central lock button . . . . . . . . . . . . . . . . . . . . . . . . . . . . . . . . . . 32
Open bonnet lever . . . . . . . . . . . . . . . . . . . . . . . . . . . . . . . . . . . . . . . . 180
4
56
Vehicle diagramPrior to a journey...While drivingCare, cleaning and mainte-
nanceIf and whenTechnical specifications
Page 13 of 306
11
Vehicle interior
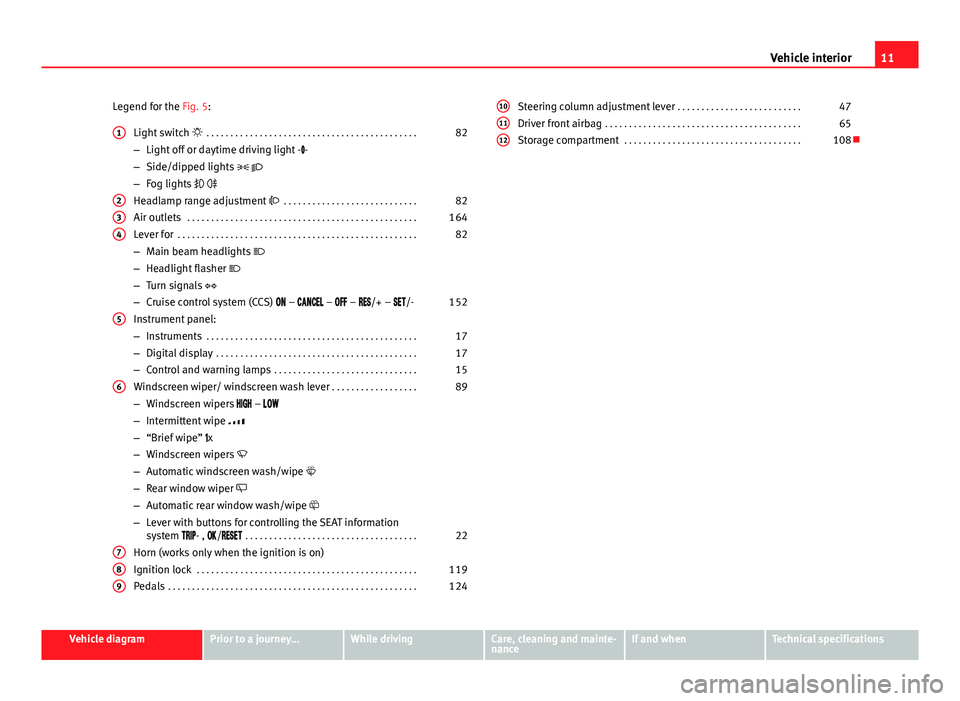
Legend for the Fig. 5: Light switch . . . . . . . . . . . . . . . . . . . . . . . . . . . . . . . . . . . . . . . . . . . . 82
– Light off or daytime driving light - -
– Side/dipped lights
– Fog lights
Headlamp range adjustment . . . . . . . . . . . . . . . . . . . . . . . . . . . . 82
Air outlets . . . . . . . . . . . . . . . . . . . . . . . . . . . . . . . . . . . . . . . . . . . . . . . . 164
Lever for . . . . . . . . . . . . . . . . . . . . . . . . . . . . . . . . . . . . . . . . . . . . . . . . . . 82
– Main beam headlights
– Headlight flasher
– Turn signals
– Cruise control system (CCS) – – – /+ – /- 152
Instrument panel:
– Instruments . . . . . . . . . . . . . . . . . . . . . . . . . . . . . . . . . . . . . . . . . . . . 17
– Digital display . . . . . . . . . . . . . . . . . . . . . . . . . . . . . . . . . . . . . . . . . . 17
– Control and warning lamps . . . . . . . . . . . . . . . . . . . . . . . . . . . . . . 15
Windscreen wiper/ windscreen wash lever . . . . . . . . . . . . . . . . . .89
– Windscreen wipers –
– Intermittent wipe
– “Brief wipe” x
– Windscreen wipers
– Automatic windscreen wash/wipe
– Rear window wiper
– Automatic rear window wash/wipe
– Lever with buttons for controlling the SEAT information
system - , / . . . . . . . . . . . . . . . . . . . . . . . . . . . . . . . . . . . . 22
Horn (works only when the ignition is on)
Ignition lock . . . . . . . . . . . . . . . . . . . . . . . . . . . . . . . . . . . . . . . . . . . . . . 119
Pedals . . . . . . . . . . . . . . . . . . . . . . . . . . . . . . . . . . . . . . . . . . . . . . . . . . . . 124
1
234
5
6
789
Steering column adjustment lever
. . . . . . . . . . . . . . . . . . . . . . . . . . 47
Driver front airbag . . . . . . . . . . . . . . . . . . . . . . . . . . . . . . . . . . . . . . . . . 65
Storage compartment . . . . . . . . . . . . . . . . . . . . . . . . . . . . . . . . . . . . . 108101112
Vehicle diagramPrior to a journey...While drivingCare, cleaning and mainte-
nanceIf and whenTechnical specifications
Page 15 of 306
13
Vehicle interior
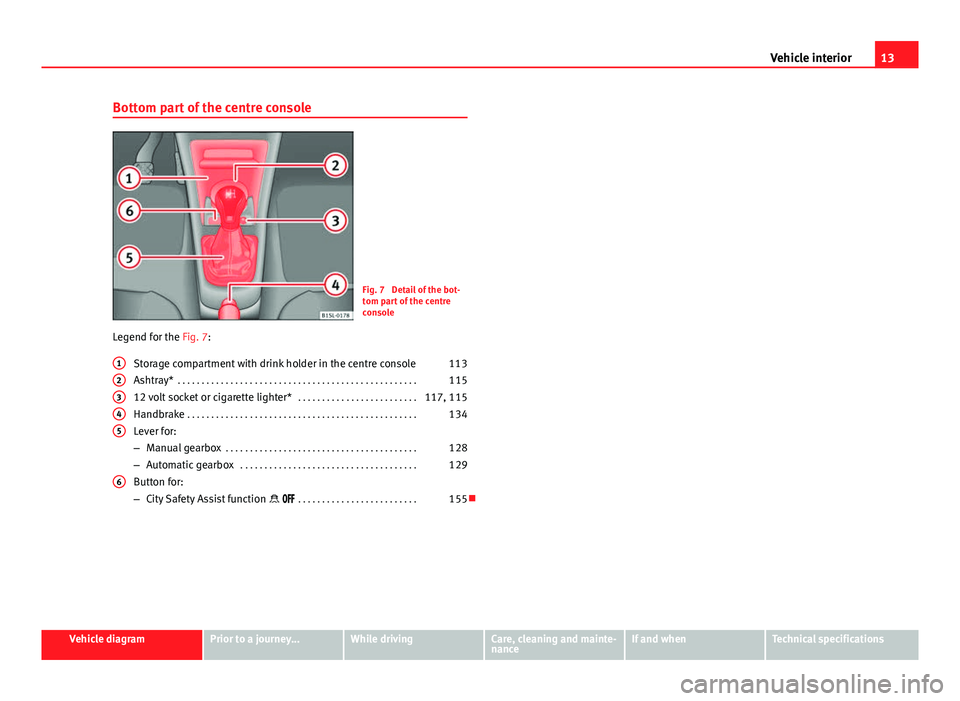
Bottom part of the centre console
Fig. 7 Detail of the bot-
tom part of the centre
console
Legend for the Fig. 7:
Storage compartment with drink holder in the centre console 113
Ashtray* . . . . . . . . . . . . . . . . . . . . . . . . . . . . . . . . . . . . . . . . . . . . . . . . . . 115
12 volt socket or cigarette lighter* . . . . . . . . . . . . . . . . . . . . . . . . .117, 115
Handbrake . . . . . . . . . . . . . . . . . . . . . . . . . . . . . . . . . . . . . . . . . . . . . . . . 134
Lever for:
– Manual gearbox . . . . . . . . . . . . . . . . . . . . . . . . . . . . . . . . . . . . . . . . 128
– Automatic gearbox . . . . . . . . . . . . . . . . . . . . . . . . . . . . . . . . . . . . . 129
Button for:
– City Safety Assist function . . . . . . . . . . . . . . . . . . . . . . . . . 155
12345
6
Vehicle diagramPrior to a journey...While drivingCare, cleaning and mainte-
nanceIf and whenTechnical specifications
Page 17 of 306
15
Instrument panel
Instrument panel Control and warning lamps
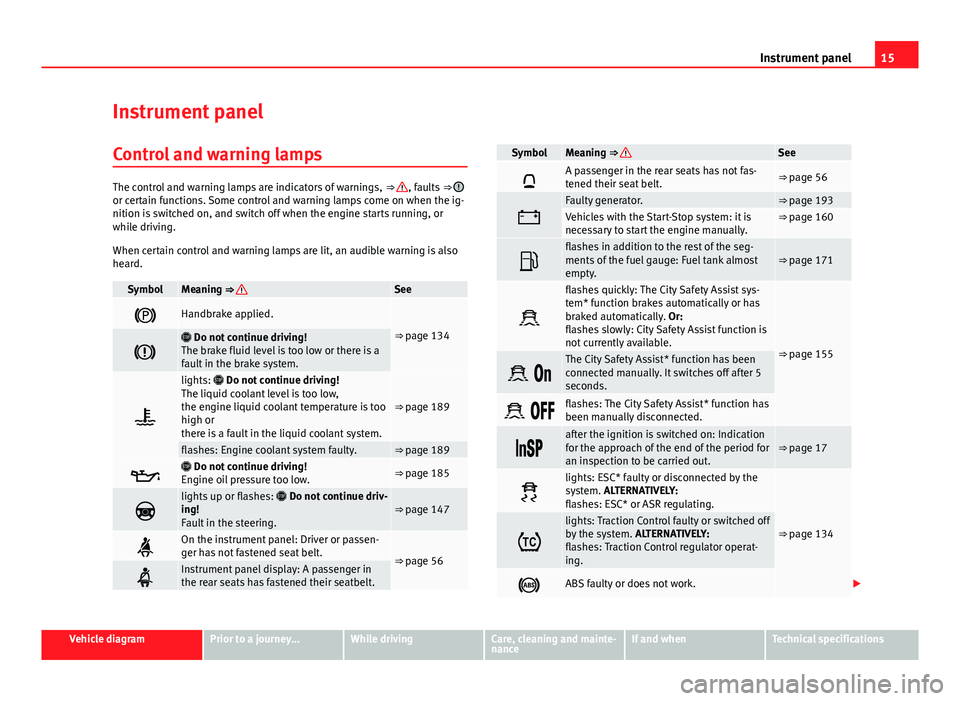
The control and warning lamps are indicators of warnings, ⇒ , faults ⇒ or certain functions. Some control and warning lamps come on when the ig-
nition is switched on, and switch off when the engine starts running, or
while driving.
When certain control and warning lamps are lit, an audible warning is also
heard.
SymbolMeaning ⇒ See
Handbrake applied.
⇒ page 134
Do not continue driving!
The brake fluid level is too low or there is a
fault in the brake system.
lights: Do not continue driving!
The liquid coolant level is too low,
the engine liquid coolant temperature is too
high or
there is a fault in the liquid coolant system.
⇒ page 189
flashes: Engine coolant system faulty.⇒ page 189
Do not continue driving!
Engine oil pressure too low.⇒ page 185
lights up or flashes: Do not continue driv-
ing!
Fault in the steering.⇒ page 147
On the instrument panel: Driver or passen-
ger has not fastened seat belt.
⇒ page 56
Instrument panel display: A passenger in
the rear seats has fastened their seatbelt.
SymbolMeaning ⇒ See
A passenger in the rear seats has not fas-
tened their seat belt.⇒ page 56
Faulty generator.⇒ page 193Vehicles with the Start-Stop system: it is
necessary to start the engine manually.⇒ page 160
flashes in addition to the rest of the seg-
ments of the fuel gauge: Fuel tank almost
empty.⇒ page 171
flashes quickly: The City Safety Assist sys-
tem* function brakes automatically or has
braked automatically. Or:
flashes slowly: City Safety Assist function is
not currently available.
⇒ page 155
The City Safety Assist* function has been
connected manually. It switches off after 5
seconds.
flashes: The City Safety Assist* function has
been manually disconnected.
after the ignition is switched on: Indication
for the approach of the end of the period for
an inspection to be carried out.⇒ page 17
lights: ESC* faulty or disconnected by the
system. ALTERNATIVELY:
flashes: ESC* or ASR regulating.
⇒ page 134
lights: Traction Control faulty or switched off
by the system. ALTERNATIVELY:
flashes: Traction Control regulator operat-
ing.
ABS faulty or does not work.
Vehicle diagramPrior to a journey...While drivingCare, cleaning and mainte-
nanceIf and whenTechnical specifications
Page 19 of 306
17
Instrument panel
Instruments Introduction
Additional information and warnings:
● Control and warning lamps ⇒ page 15
● Gear engaged display (automatic gearbox) ⇒ page 124.
● Instructions for inspection intervals ⇒ Booklet Maintenance Programme
WARNING
Any distraction may lead to an accident, with the risk of injury.
● Do not operate the instrument panel controls when driving.
Vehicle diagramPrior to a journey...While drivingCare, cleaning and mainte-
nanceIf and whenTechnical specifications
Page 21 of 306
19
Instrument panel
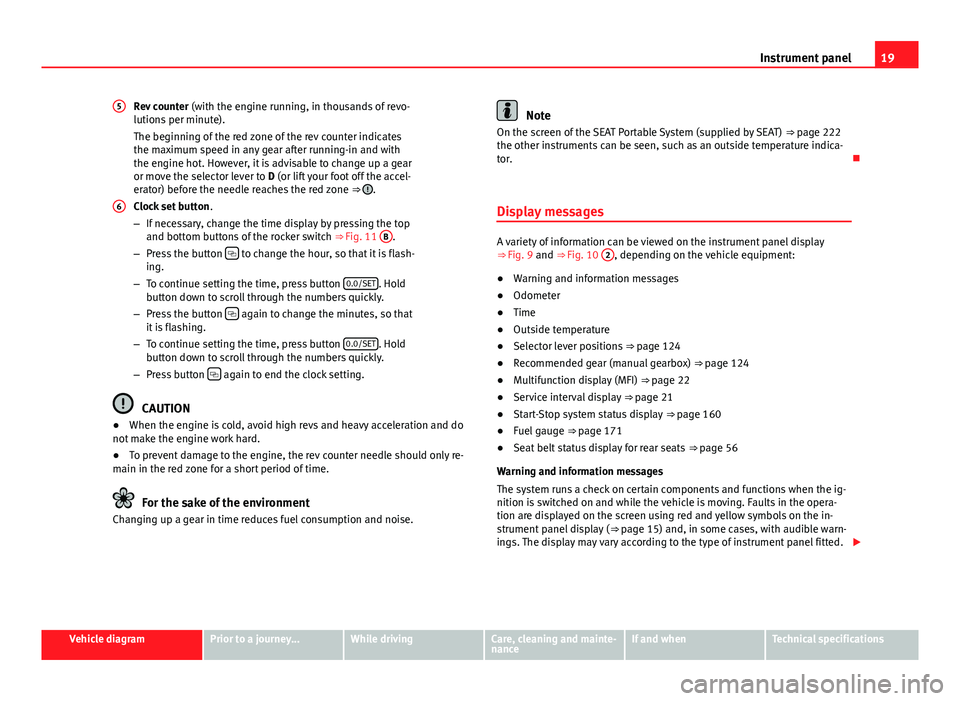
Rev counter (with the engine running, in thousands of revo-
lutions per minute).
The beginning of the red zone of the rev counter indicates
the maximum speed in any gear after running-in and with
the engine hot. However, it is advisable to change up a gear
or move the selector lever to D (or lift your foot off the accel-
erator) before the needle reaches the red zone ⇒
.
Clock set button .
– If necessary, change the time display by pressing the top
and bottom buttons of the rocker switch ⇒ Fig. 11 B
.
– Press the button to change the hour, so that it is flash-
ing.
– To continue setting the time, press button 0.0/SET
. Hold
button down to scroll through the numbers quickly.
– Press the button
again to change the minutes, so that
it is flashing.
– To continue setting the time, press button 0.0/SET
. Hold
button down to scroll through the numbers quickly.
– Press button
again to end the clock setting.
CAUTION
● When the engine is cold, avoid high revs and heavy acceleration and do
not make the engine work hard.
● To prevent damage to the engine, the rev counter needle should only re-
main in the red zone for a short period of time.
For the sake of the environment
Changing up a gear in time reduces fuel consumption and noise. 5
6
Note
On the screen of the SEAT Portable System (supplied by SEAT) ⇒ page 222
the other instruments can be seen, such as an outside temperature indica-
tor.
Display messages
A variety of information can be viewed on the instrument panel display
⇒ Fig. 9 and ⇒ Fig. 10 2, depending on the vehicle equipment:
● Warning and information messages
● Odometer
● Time
● Outside temperature
● Selector lever positions ⇒ page 124
● Recommended gear (manual gearbox) ⇒ page 124
● Multifunction display (MFI) ⇒ page 22
● Service interval display ⇒ page 21
● Start-Stop system status display ⇒ page 160
● Fuel gauge ⇒ page 171
● Seat belt status display for rear seats ⇒ page 56
Warning and information messages
The system runs a check on certain components and functions when the ig-
nition is switched on and while the vehicle is moving. Faults in the opera-
tion are displayed on the screen using red and yellow symbols on the in-
strument panel display ( ⇒ page 15) and, in some cases, with audible warn-
ings. The display may vary according to the type of instrument panel fitted.
Vehicle diagramPrior to a journey...While drivingCare, cleaning and mainte-
nanceIf and whenTechnical specifications
Page 23 of 306
21
Instrument panel
WARNING
Although the outside temperature is above freezing, some roads and
bridges may be frozen.
● At an outside temperature of above +4 °C (+39 °F), even when the
“ice crystal” is not visible, there may still be ice on the road.
● Never rely on the outside temperature indicator!
CAUTION
Failure to heed the warning lamps when they appear may result in faults in
the vehicle.
Note
Different versions of the instrument panel are available and therefore the
versions and instructions on the display may vary.
Note
When several warnings are active at the same time, the symbols are shown
successively for a few seconds. The symbols will stay on until the fault is
rectified.
Service interval display
The inspection display appears on the instrument panel display ⇒ Fig. 9
or ⇒ Fig. 10 2.
SEAT makes a difference between services with engine oil change (Interval
Service) and services without engine oil change (Inspection Service). The
service interval display only gives information for service dates which in-
volve an engine oil change. The dates of the remaining services (for exam-
ple, the next Inspection Service or change of brake fluid) are listed on the
label attached to the door strut, or even in the Maintenance Programme. The set service intervals have been specified with
the service dependent on
time/distance travelled.
Inspection reminder
If the inspection period is due to expire shortly, Inspection reminder ap-
pears when starting the ignition abbreviated to and a warning in km. The
number of kilometres shown is the maximum number that may be driven
until the next service.
Service due
After the service date, an audible warning is given when the ignition is
switched on and the abbreviation displayed on the screen flashes for a
few seconds.
Note
The service message disappears after a few seconds, when the engine is
started or when OK
is pressed on the windscreen wiper lever.
Note
In vehicles in which the battery has been disconnected for a long period of
time, it is not possible to calculate the date of the next service. Therefore
the service interval display may not be correct. In this case, please check
the maximum permitted service intervals ⇒ Booklet Maintenance Pro-
gramme.
Vehicle diagramPrior to a journey...While drivingCare, cleaning and mainte-
nanceIf and whenTechnical specifications
Page 25 of 306
23
Instrument panel
With the ignition switched on, and memory 1 or 2 displayed, briefly press
OK to change from one memory to another.
1
Trip memo-
ry (for a
single jour-
ney).
The memory stores the values for the journey and the con-
sumption from the moment the ignition is switched on un-
til it is switched off again.
If the journey is broken for more than 2 hours, the memory
is automatically erased. If the journey is continued in less
than 2 hours after the ignition is switched off, the new da-
ta is added to the data already stored in the memory.
2Total mem-
ory (for all
journeys).
The memory stores the values of any number of journeys,
until it counts a total of 19 hours and 59 minutes of driv-
ing, or 1999.9 km or miles of driving, depending on the
type of instrument panel fitted. On reaching either of these
limits, the memory is automatically erased and starts to
count from 0 again.
Possible displays
MenueffectTimeCurrent time in hours (h) and minutes (min).Journey durationThis indicates the hours (h) and minutes (min)
since the ignition was switched on.
Current fuel consump-
tionThe current fuel consumption display operates
throughout the journey, in litres/100 km; and with
the engine running and the vehicle stopped, in li-
tres/hour.
Average fuel consump-
tionAfter turning on the ignition, average fuel con-
sumption in litres/100 km will be shown after trav-
elling approximately 100 metres. Otherwise hori-
zontal lines are displayed. The value shown is up-
dated approximately every 5 seconds.
Operating rangeApproximate distance in km that can still be travel-
led with the fuel remaining in the tank, assuming
the same style of driving is maintained. This is cal-
culated using the current fuel consumption.
MenueffectDistance coveredDistance travelled, after ignition is switched on, in
km.
Average speedAfter starting the ignition, the average speed will
be shown after a distance of approximately 100
metres has been travelled. Otherwise horizontal
lines are displayed. The value shown is updated
approximately every 5 seconds.
Digital display of
speedCurrent speed displayed digitally.
Liquid coolant temper-
ature digital displayDigital display of the current temperature of the en-
gine liquid coolant.
Warning at --- km/hIf the stored speed is exceeded (between 30 -
250 km/h, or 18 - 155 mph), an audible warning is
given together with a visual warning.
Changing between display modes
● Press the rocker switch in the windscreen wiper lever.
Storing a speed for the speed warning
● Select the display Speed warning at --- km/h.
● Press OK
on the windscreen wiper lever to store the current speed and
switch off the warning.
● In addition, set the required speed by pressing the rocker switch on the
windscreen wiper lever or buttons
or on the multifunction steering
wheel for 5 seconds. Next, press OK again or wait a few seconds. The
speed is stored and the warning activated.
● To switch off , press OK
. The stored speed is deleted.
Manually erasing memory 1 or 2
● Select the memory to be erased.
● Press and hold the eject button OK
for approximately 2 seconds.
Vehicle diagramPrior to a journey...While drivingCare, cleaning and mainte-
nanceIf and whenTechnical specifications