display Seat Toledo 2005 RADIO-NAVIGATION 300 MP3
[x] Cancel search | Manufacturer: SEAT, Model Year: 2005, Model line: Toledo, Model: Seat Toledo 2005Pages: 49, PDF Size: 2.74 MB
Page 19 of 49
Radio/CD and CD charger / MP3 CD
18
To access a subdirectory or the main directory
– To access an upper directory, rotate the menu button or press the
button .
– To access a superior directory or the main directory pre ss the
button as many times as necessary or select the entry Back
from the subdirectory displayed on the screen.
To play all the CD titles from an MP3 CD
– Select the option Play all from the main menu using the menu
button.
– Press the menu button. In the box to the right of the entry a poin t
appears. The tracks on the CD will be played.
To play all the titles from one directory
– Select the desired directory.
– Play a title from this directory by pressing on the menu button.
– Select the option Play this directory pressing the menu button.
– Press the menu button. In the box close to the entry a point appears. Only the titles in this directory are played as well as
those of any .
To begin random track selection ( function)
– Press The CD player will then play the MP3 tracks in random
order. Press the button again to switch off the function .
To begin the track search ( function)
– Press All of the MP3 files on the CD will be pla yed for 10
seconds. To select the title being played, press once mor e.To eject the MP3 CD
– Press button
⇒page 2, fig. 1 . The ejected CD will be
pulled back into the unit if it is not fully withdrawn within 10
seconds.
MP3 system settings
–Press in CD mode
– Activate or deactivate the function
MP3: display ID3 pressing
the menu button.
Note
If the equipment cannot play the inserted MP3 CD, the me ssage Error appears
on the screen.
MIX
MIX
MIX
SCAN
SCAN
SCAN
A10
SETUP
Radionaveg300_angles Seite 18 D onnerstag, 13. Oktober 2005 11:48 11
Page 20 of 49
Important information on operating the CD player19
Important information on operating the CD playerSafety precautions for equipment fitted with lasers Laser devices are classified by DIN IEC 76 (CO) 6/ VDE 0837 into safety
classes 1 to 4.
SEAT CD players correspond to safety class 1.
The lasers used in class 1 units are low energy lasers, or are shielded in such
a manner that they present no danger when used corr ectly.
WARNING
The CD player is a class 1 laser product. If it is opened, or i s faulty or
damaged, there is a risk of invisible laser beams e scaping from the unit.
The CD player contains no parts that have to be servic ed. For safety
reasons, any repair work that needs to be done must, therefore, be carried
out by an Authorised Seat Service Centre.
Caution
•
If the CD player develops a mechanical fault, Error is displayed on the
status line with Player fault. See supplier. in the centre of the screen. Please
ask your SEAT dealership for further information ⇒ .
•
Only use standard 12 cm CDs, given that 8 cm and non- standard shaped
CDs (“Shape CD”) may damage the player mechanism.
•
Slide the CD with the printed side up into the CD slot up t o the point where
it is drawn in automatically. Handle CDs by the edges and av oid leaving finger
marks. Clean the CDs as indicated in ⇒page 19, “Tips on cleaning CDs”
•
Do not stick labels to the CDs; these may be detached a nd damage the
player mechanism.Note
•
You might not be able to play CDs with copy protectio n or CD-Rs and CD-
RWs.
•
Note the laws in vigour in your country concerning co pyright.
Tips on CD modeIn order to guarantee an optimum sound quality from CDS and from MP3 files,
ensure that disks are not damaged, scratched or so iled.
Note that a soiled or damaged navigation CD may effect the f unctions of the
navigation system.
Please do not stick any labels onto the CDs.
Keep the CDs in a disk carrier or in its box.
Never expose CDs to direct sunlight!Tips on cleaning CDsUse a soft, lint–free cloth to clean CDs. Wipe the disc i n a straight line from
the centre outwards. Stubborn soiling can be removed with a commercial CD
cleaner or isopropyl alcohol.
Radionaveg300_angles Seite 19 D onnerstag, 13. Oktober 2005 11:48 11
Page 24 of 49
Navigation23
The last audio instruction can be r epeated by pushing the button. The
volume of a navigation recommendation can be changed whilst it is being
made.
If the display Off Road appears on the screen, it means you are on a rout e not
recorded on the CD, e.g. on a dirt road. The GPS satellites will not be able to
reach your antenna when you are in a tunnel or undergrou nd garage,
meaning that the unit orientates itself via the wheel sensors. If you try to carry
out a route calculation in this situation you may hear an ann ouncement indi-
cating that you are located on a street fo r which no digital record exists. Drive
on until the display Off Road disappears.
INFO
Radionaveg300_angles Seite 23 D onnerstag, 13. Oktober 2005 11:48 11
Page 26 of 49
Navigation25
If the menu Route planning menu is displayed instead of the
previous menu, then the option Route with intermediate
destination must be deactivated in the menu ⇒page 29.
Pressing a menu with information on the actual loca tion
of the vehicle can be accessed ⇒ page 25, “Navigation menu func-
tion buttons”.
To access the navigation menu and enter a destination
– Press the button. The main NAVIGATION menu appears
⇒ page 24, fig. 12.
– Select how you would like to enter the destination an d press the
menu button ( ⇒page 25, “Methods of entering a destination”).
– To enter a new address, select the country in the list afte r
pushing the Countr y . The previously used address is erased and
a town and post code are entered To w n / P C.
– Press the menus button to access the selection screen ⇒page 24, fig. 13. To enter characters, proceed as follows :
To enter characters
– After selecting an entry (in the example To w n / P C) select charac-
ters by rotating the menu button. Pressing the button, the
selected characters will form part of the name ⇒page 24,
fig. 13 . Invalid characters will be displayed, so that only plac e
names found in the destination country or in the indicated town
included in the navigation CD can be entered.
– Select to enter a number (for example, the post c ode).
– Select to enter special characters. – The entry on the upper line following
To w n / P C alters with each
character entered. If the entry corresponds to a searched name or
is similar, press or the function key to acces s the
list where the entry may be entered by rotating the menu button
and confirm by pushing.
If the destination address has already been entered, th en the information
only needs to be altered to the new destination. For examp le, only the entry
To w n / P C needs to be altered if the new destination corresponds to another
country.
Methods of entering a destination
Using the options Countr y, To w n / P C , Street and Junction the destination
address may be indicated. Following country select ion, the previous entries,
for example special destinations, are limited to the corre sponding countries.
Special destination - To enter real locations such as petrol stations or ho spi-
tals as a destination ⇒page 31, “Special destination”.
Begin Guide – Starts destination guide to the entered destination
⇒ page 37, “Destination guide”.
Position – To enter the longitude and latitude of the destination.
This menu is also used to display poin ts of interest close to the destination;
these may be directly selected. Nearby destinations are t hose that have been
memorized by activating the option Show as nearb y destination ⇒ page 32,
“To record or select a final destination, intermediate des tinations, destina-
tions with a flag or current position”.
To record a trip destination
⇒ page 32, “To record or select a final destination, intermedi ate destina-
tions, destinations with a flag or current position”
Navigation menu function buttons
– Displays the destination memory ⇒page 32, “Destination
memory”.
ROUTE
SYMBOLS
NAV
0-9*?!
OK
LIST / OK
MEMORY
Radionaveg300_angles Seite 25 D onnerstag, 13. Oktober 2005 11:48 11
Page 27 of 49

Navigation
26
– To enter stages, route lists, route options and bloc ked sections
⇒ page 29, “Route options”
– Displays the vehicle position. The actual vehi cle position is
displayed as an address (if the location is on the na vigation CD) and coordi-
nates. The direction of travel is indicated using a compass on the left hand
side of the screen. The SETUP menu may be used to manually enter the
vehicle position ⇒ page 35. While the destination guide is working, vis ual
indications will be given using symbols ⇒page 40.
– Starts destination guide to the indicated destin ation. The
guide may be stopped using the funct ion ⇒page 37, “Destina-
tion guide”.
Function buttons used to enter numbers and figures
– To erase the character to the right hand side of the sc reen (only acti-
vated after entering characters).
– Shows a list from which the destination may be se lected.
button on the NAVIGATION menu
More options are available in the Navigation setup menu ⇒page 35.Note
•
If the destination is changed while the guide is being u sed, you will be
asked if you wish to substitute the actual destinati on or to indicate a stage. If
a stage is added, route planning is automatically selected ⇒ page 27.
•
A mark may be displayed under certain letters. If these let ters are marked
then, after a few seconds, special related symbols wil l appear (see also
⇒ page 32, fig. 18 ).
•
The entries between square brackets [ ... ] can neither be selected or
edited; insufficient data may have been entered. In th e case of address, for
example, the country must first be entered followed by the town then finally
the address.ROUTESYMBOLSSTART GUIDE
END GUIDE
ERASELIST / OKSETUP
Radionaveg300_angles Seite 26 D onnerstag, 13. Oktober 2005 11:48 11
Page 28 of 49
Navigation27
Route planning
Several destinations may be grouped together for one route.To access the route planning menu
– Press the button to enter the main navigation menu.
– If route planning is not displayed, press the function
button, select Route with intermediate destinations ⇒ page 29.
– Select the entry Enter new destination by pressing the menu
button. If a destination is displayed, this may be inserted into the
route. Otherwise, it should be erased ( ⇒page 28, “To modify
the trip or to choose an intermediate destination”).
– Select the enter me thod in the menu Enter new destination as
described in ⇒ page 24, “To enter the trip destination”.
–The Confirm option is used to enter an address into the route
planning (for example, as a departure or destination point). –Pressing
Confirm entr y , the destination entered will become part
of the journey.
– Rotate and press the menu button to determine the position of
the recently entered destination in the journey. The positi on indi-
cates the order of journey destinations and if a new destinatio n
forms part of this journey as a stage ( Stage on the screen) or a
principal destination of the journey ( Destination on the screen.
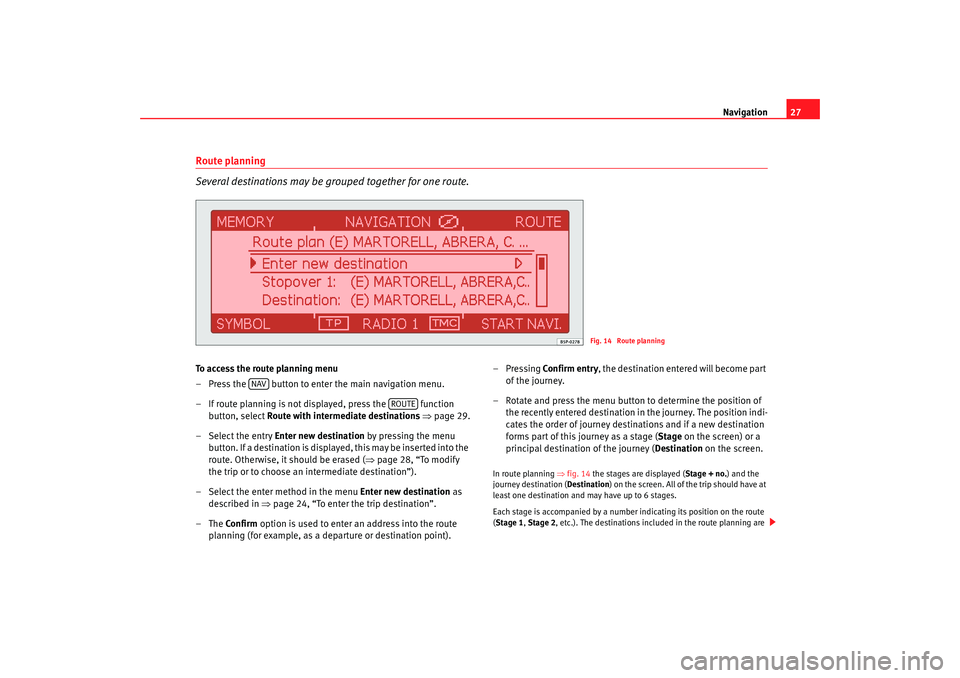
In route planning ⇒fig. 14 the stages are displayed ( Stage + no.) and the
journey destination ( Destination) on the screen. All of the trip should have at
least one destination and may have up to 6 stag es.
Each stage is accompanied by a number indicating it s position on the route
( Stage 1, Stage 2, etc.). The destinations included in the route p lanning are
Fig. 14 Route planning
NAV
ROUTE
Radionaveg300_angles Seite 27 Donnerstag, 13. Oktober 2005 11:48 11
Page 29 of 49
Navigation
28displayed from up to down, for example, first the stag es Stage 1, Stage 2
down to the final destination ( Destination).
A menu bar on the right hand side (see also ⇒page 5, “Handling the
menus”) indicates that not all of the journey stages or th e menu options are
visible. Turn the menu bu tton to verify stages.
While the destination guide is active, it is possible to add st ages to a journey
(up to six stages)
Menu options Route planning
Pressing Enter new destination new destinations may be added to the trip.
Destination and Stage refer to the final destination and the stages respec-
tively. These entries may be modified.
Pushing Begin destination guide the trip is begun.
To modify the trip or to choo se an intermediate destination
Following the selection of a destinatio n from the route planning by rotating
and pressing the menu button, th e following options are available:
Change – To change, for example, the name of the st reet.
Move – To change the order of the destinations. If an inte rmediate destina-
tion is moved to the end of a trip, it is automatically conv erted to the final
destination and the previous final destination beco mes an intermediate
destination.
Erase – To erase the destination from the trip.
Begin guide – To begin the guide to this destination. The interm ediate desti-
nations are not taken into account. If the required destination is an interme-
diate destination, the trip is resumed when the desti nation is reached
⇒ page 37, “Destination guide”.
To record a trip
⇒ page 32, “To record or select a final destination, int ermediate destina-
tions, destinations with a flag or current position”
Radionaveg300_angles Seite 28 D onnerstag, 13. Oktober 2005 11:48 11
Page 32 of 49
Navigation31
Special destination
Special destinations are, for exampl e, petrol stations or hospitalsTo enter a special destination
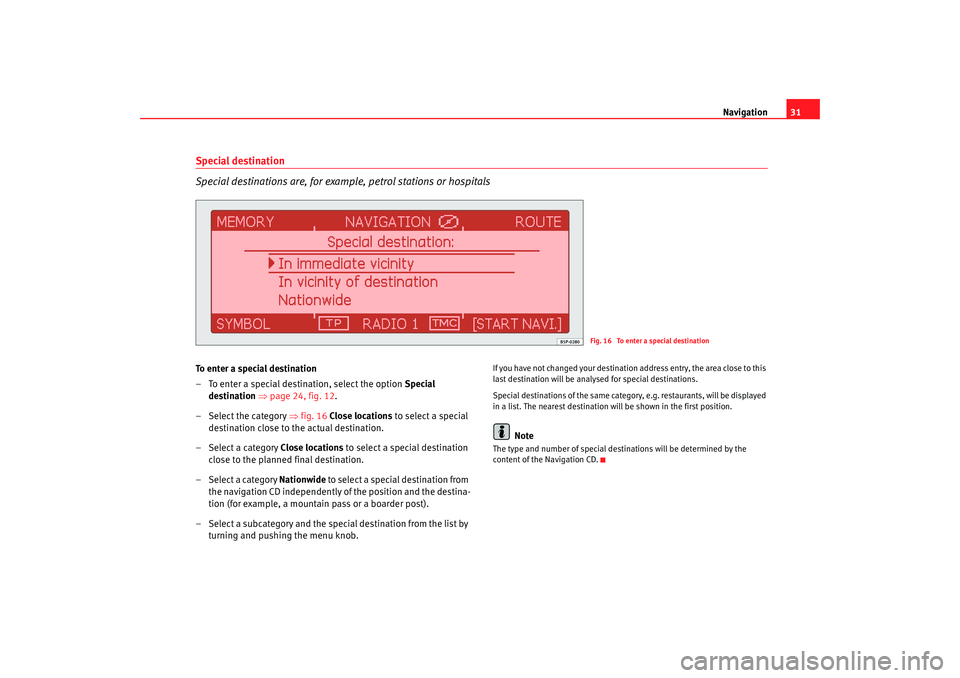
– To enter a special destination, select the option Special
destination ⇒ page 24, fig. 12 .
– Select the category ⇒fig. 16 Close locations to select a special
destination close to the actual destination.
– Select a category Close locations to select a special destination
close to the planned final destination.
– Select a category Nationwide to select a special destination from
the navigation CD independently of the position and the destin a-
tion (for example, a mountain pass or a boarder post).
– Select a subcategory and the special destination from the list by
turning and pushing the menu knob.
If you have not changed your destination address entr y, the area close to this
last destination will be analysed for special destin ations.
Special destinations of the same category, e.g. restaurant s, will be displayed
in a list. The nearest destination will be shown in the first position.
Note
The type and number of special destinations will be det ermined by the
content of the Navigation CD.
Fig. 16 To enter a special destination
Radionaveg300_angles Seite 31 D onnerstag, 13. Oktober 2005 11:48 11
Page 34 of 49
Navigation33
– Press the button and then the function button to
a
c cess t
he destination m
em
o ry ⇒ page 32, fig. 17.
– Select the options from the list by turning and pushing the menu
knob.
Recent destinations
A list of the 25 most recent destinations will be dis played. When the list is full,
the oldest entries will automatically overwritten b y the newest destinations
entered. The option may be used to erase all of the lat est destinations
altogether or one by one ⇒page 35, “Navigation settings (SETUP)”.
Special destinations nearby
This may be used to select a special destination close to th e current position
or the destination.
The following options are available for the surroundin gs of the current posi-
tion:
– Closest car park
– Closest service station
– Closest SEAT dealer
– Closest restaurant
The following are the options for the destination s urroundings:
– Hotel close to the destination
– Restaurant close to the destination
– Parking area close to the destination
Load from the destination memory
Shows a list of destinations from the memory Select a de stination from the
list using the menu button. Save to the destination memory
The entered destination is saved to memory. The equipment autom
atically
proposes a name for the destination. This may be confirmed or changed.
The memory has a capacity for 100 destinations. If this is full, a destination
must be erased before saving another.
To assign a name to a destination, consult the ⇒page 34, “Character input
mask”.
If a “route with intermediate destinations” has been t aken ⇒page 29, the
complete itinerary is displayed. Select the destinati on from the itinerary to be
memorized using the menu button. To memo rize the complete itinerary, go to
the previous option using the button and select Save itinerary (see
below).
To edit the destination memory
The screen Edit the destination memory may be used to erase all of the desti-
nations using the option Erase the destination memory or modify one of the
displayed destinations. For this, select the destination to be modified by
rotating and pressing the menu button.
The following possibilities are available:
Pressing Name: ... access is given to a screen ⇒page 32, fig. 18 that may be
used to change an existing name ⇒page 34, “Character input mask”. The
changes are confirmed using and are then accepted u sing Save entry.
Pressing Show as a nearby destination the destination is displ ayed in the
main navigation menu so that it may be selected more rapidly. Enter, for
example, your address, save with the name “home” and act ivate the function
Show as nearby destination (a point appears in the right hand side box). To
take the route for home, the button is presse d and the option “home”
is selected from the menu.
Save entry – Save changes.
Erase entry – Erase the memory entry.
NAV
MEMORY
SETUP
OK
NAV
Radionaveg300_angles Seite 33 D onnerstag, 13. Oktober 2005 11:48 11
Page 35 of 49
Navigation
34In the lower part of the list, details of the selected de stination are displayed.
Load itineraries
A list of recorded itineraries is displayed. Select an itinera ry from the list
using the menu button.
Save an itinerary
An itinerary entered in the destination memory is saved. The equipment auto-
matically proposes a name for the itinerary. This may be c hanged using the
menu button ⇒ page 34, “Character input mask”.
Up to six itineraries may be saved, each one with a final destination and a
maximum of six stages. If there are already six itinerarie s saved, one must be
erased before saving another.
Erase itineraries
It is possible to erase the itineraries one by one or all a t the same time.
Save position
This saves the actual position in memory as a dest ination. The proposed
name may be modified on the display ⇒page 34, “Character input mask”.
Flagged destination
Press to save the current position in the destination memory. The flagged
destination is saved with the time ( FLAG DEST HH:MM); it may be renamed or
saved using the option Edit the destination memor y. When the button is
pressed again, the flagged destination will be ov erwritten if it has not been
stored in the destination memory ⇒page 33, “To edit the destination
memory”.
Character input mask
The letters and digits ⇒page 32, fig. 18 are selected by rotating the menu
button and are added to the corresponding line press ing.
A mark may be displayed under certain letters. If these l etters are selected
and some seconds go by, the special characters will appear. The corre-sponding character is selected by rotati
ng and pressing the menu button (in
the example, the characters derived from “Y”: ⇒page 32, fig. 18 ).
– Arrows to the left and to the right. These move th e cursor in the corre-
sponding direction.
– This erases the characters on e by one, beginning from the right.
– To leave the character input mask. Changes must still be saved.
Note
•
If “Route with intermediate destinations” is selected, the last destination
or last itinerary is added. The selec ted destination may be moved to the
required position in the itinerary using the menu bu tton, if only one destina-
tion is required, first deactivate the Route with stages option in the “route
options” (access using the menu ⇒page 29, fig. 15 ).
•
The options between square brackets [ ... ] can not be selected because
they do not conform to the conditions. The options Load itinerary and Save
an itinerary, for example, can only be selected if the corresponding
menu option is available ⇒page 29, fig. 15 .
•
A destination will not be stored in Last dest. until destination guide has
started.
•
The memory has a capacity for 100 destinations. If you ar e not able to
store any more destinations, the destination memor y is full. A destination
must be erased from the memory before saving another.
ERASEOK
ROUTE
ROUTE
Radionaveg300_angles Seite 34 D onnerstag, 13. Oktober 2005 11:48 11