change time Seat Toledo 2005 RADIO-NAVIGATION MFD2
[x] Cancel search | Manufacturer: SEAT, Model Year: 2005, Model line: Toledo, Model: Seat Toledo 2005Pages: 50, PDF Size: 2.89 MB
Page 3 of 50
General information
2General informationThis manual contains important information, tips, sugg estions and warnings
on using the MFD2 radio navigation system. The o ther publications in the
vehicle wallet contain further information which you should be aware of for
your own safety and for the safety of your passenge rs.
Ensure that the complete vehicle wallet is always in the ve hicle. This is espe-
cially important when you lend or sell the vehicle to othe rs.
This manual describes the scope of vehicle equipment at the time of publica-
tion. Some of the equipment described he re will not be available until a later
date, or is available only in certain markets.
Illustrations are intended as a general guide, and may vary from t he equip-
ment fitted in your vehicle in some details.
Directions and positions are always relative to the direction of travel of t he
vehicle unless otherwise stated.
Some sections of this booklet do not apply to all vehicles . If this is the case,
a text at the start of the section indicates to which vehicles it applies, e. g.
“Applies to vehicles with: CD changer”.
The equipment marked with an asterisk * comes in series only in determined
model versions, are supplied as optionals only for some ve rsions, or are only
offered in different countries.
® Registered trademarks are marked ®. However, the absence of this
symbol does not constitute a waiver of the rights concerning any propri-
etary name.
The section is continued on the following page.
Indicates the end of a section .WARNING
Texts with this symbol contain safety information. They warn you of serious
dangers, possibly involving accident or injury.
Caution
Texts with this symbol draw your attention to a possib le risk of damage to
your vehicle.
For the sake of the environment
Texts with this symbol refer to points re levant to the protection of the environ-
ment.
Note
Texts with this symbol contain addition al information of a more general
nature.
radionaving Seite 2 Mittwo ch, 30. März 2005 12:26 12
Page 8 of 50
Quick Reference Guide7
Switching on/off
– Press the left button ⇒page 4, fig. 1 .
– Press the left button again, to switch the unit off.
Entering the safety code
– The safety code can be found on the unit card.
– Enter the characters by turning and pressing the menu knob ⇒page 6, fig. 3 .
– Press if you wish to change incorrect digits.
– Once the safety code as entere d corresponds to the code given
on the unit card, press .
The last menu used and also the last audio source used before switching off
will be selected automatically when the unit is swi tched on again. The MFD2
radio navigation system will be switched off if the igni tion is turned off. The
unit can be switched on again using the left button w hen the ignition is
switched off. It will be switched off automatically aft er an hour to stop the
vehicle battery from running down.
If no CD has been introduced into the unit, upon entering th e safety code and
pressing the following message may appear: No CD inserted. Insert a CD-
ROM for SEAT Dynamic Navigation MFD2.
If you do not wish to use the navigation system immedi ately, you can still
select a different audio source by pressing the ap propriate button.
Unit card
The code number is printed on a unit card together with the serial number.
This card can be found at the front of the vehicle wallet.
The unit card must be kept in a safe place - under no ci rcumstances in the
vehicle! Only then will the unit be useless to thieves .
Note
If a wrong code is entered twice repeatedly, the system i s locked for an hour.
After this time has passed you may enter the safety code.
A1
OK
OK
radionaving Seite 7 Mittwo ch, 30. März 2005 12:26 12
Page 13 of 50
Radio / CD / Sound
12
Listening to a CD
– Press the ⇒
page 4, fig. 1 button. If a CD is already in the
player, the last played track will be selected, otherwis e the
following will appear briefly on the screen: “No Audio CD”.
– Insert a standard 12 cm audio CD. The play function will s tart
automatically.
Playing the previous or next track
– Press button or briefly .
Fast forward/reverse
– Press and hold button or .
Ejecting a CD
– Press ⇒
page 4, fig. 1 .The number of the track and its length are shown on the screen.
TMC
lights
up in red when traffic bulletins are desired and TMC
indicates whether TMC
stations are being received ⇒page 11, fig. 9
Function keys during the play function: ... – Selects the corresponding disc of the CD changer
2).
– Plays the disc inserted in the reader.
– All tracks on the CD will be played for 8 seconds at a time.
– The tracks on the CD will be played in a random order .
⇒ page 42
WARNING
The CD player is a class 1 laser product. If it is opened, or i s faulty or
damaged, there is a risk of invisible laser beams escapin g from the unit.
The CD player contains no parts that have to be servic ed. Any repair work
that needs to be done should, therefor e, be carried out by an Official SEAT
Service exclusively.
Caution
•
Only 12 cm standard CDs should be used, avoid 8 cm "single" CDs. Only
round CDs should be inserted in the CD slot. “Spe cial shape CDs”), can not
be played and they will damage the CD player.
•
Slide the CD with the printed side up into the CD slot up t o the point where
it is drawn in automatically. Hold the CD at the sides. A void leaving finger-
prints on the CD. Clean CDs with a dry, lint-free cloth. When doing this, wipe
the CD from the centre outwards. Do not clean the CDs u sing alcohol or
solvents. Do not place the CDs near heat sources or in the direct sunlight. Do
not write on the CDs and do not attach stickers to them.Note
•
The upper 6 function keys are only active if a CD chan ger has been
connected.
•
CD-R and CD-RW formats can also be played, dependi ng on the quality of
the blanks.
•
If the text CD ?
is displayed in the small marking above the /
button, the CD inserted in the CD drive can not be read and may be
damaged.
2)Optional equipment
CD
A8
CD1
CD6
CD int.ScanMixSystem settings
CD6
NAVI
radionaving Seite 12 Mittwoch, 30. März 2005 12 :26 12
Page 34 of 50
Navigation33
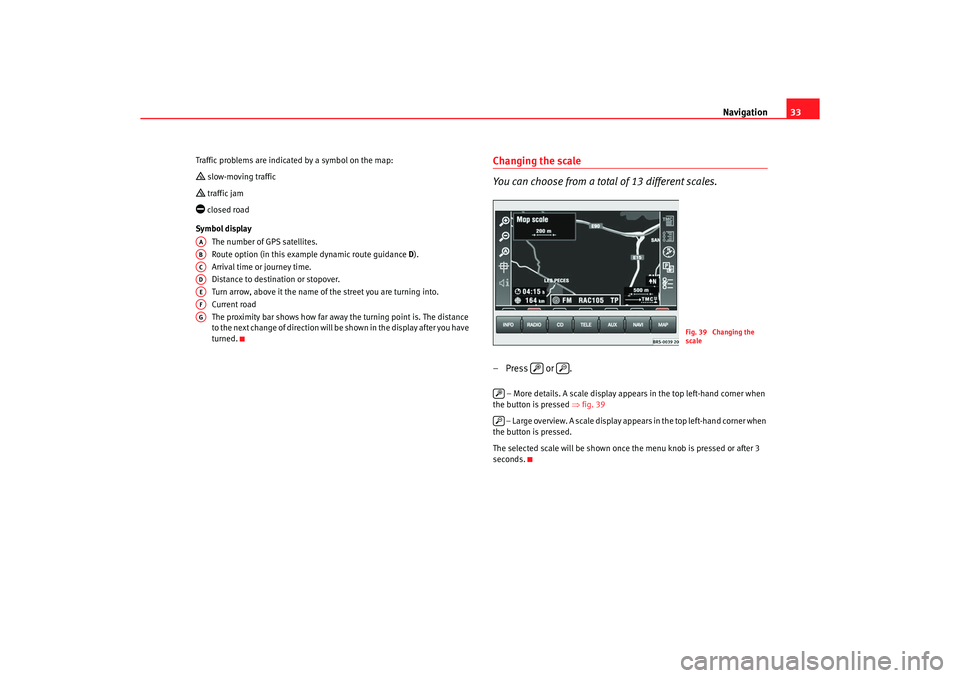
Traffic problems are indicated by a symbol on the ma p: slow-moving traffic traffic jam closed road
Symbol display The number of GPS satellites.
Route option (in this example dynamic route guid ance
D).
Arrival time or journey time.
Distance to destination or stopover.
Turn arrow, above it the name of the street you are turning into.
Current road
The proximity bar shows how far away the turning po int is. The distance
to the next change of direction will be shown in the display after you have
turned.
Changing the scale
You can choose from a total of 13 different scales.– Press or .
– More details. A scale display appears in the top left -hand corner when
the button is pressed ⇒fig. 39
– Large overview. A scale display appears in the top le ft-hand corner when
the button is pressed.
The selected scale will be shown once the menu knob is pressed or after 3
seconds.
AAABACADAEAFAG
Fig. 39 Changing the
scale
radionaving Seite 33 Mittwoch, 30. März 2005 12 :26 12
Page 35 of 50
Navigation
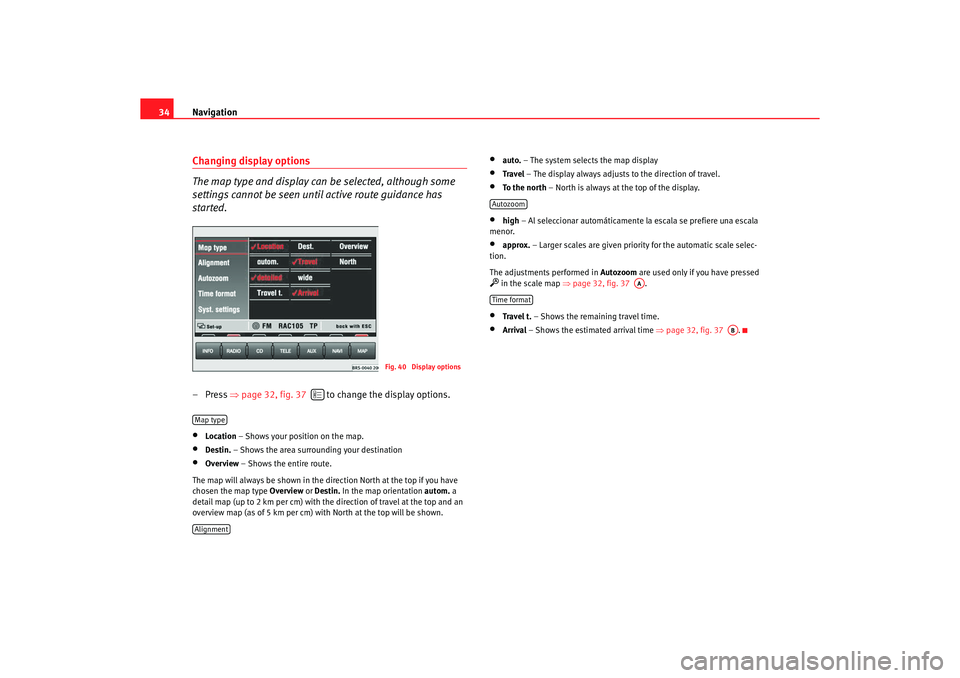
34Changing display options
The map type and display can be selected, although some
settings cannot be seen until active route guidance has
started.– Press ⇒
page 32, fig. 37 to change the display options.•
Location – Shows your position on the map.
•
Destin. – Shows the area surrounding your destination
•
Overview – Shows the entire route.
The map will always be shown in the direction Nor th at the top if you have
chosen the map type Overview or
Destin. In the map orientation autom. a
detail map (up to 2 km per cm) with the direction of t ravel at the top and an
overview map (as of 5 km per cm) with North at th e top will be shown.
•
auto.
– The system selects the map display
•
Travel – The display always adjusts to the direction of travel.
•
To the north – North is always at the top of the display.
•
high
– Al seleccionar automáticamente la escala se pr efiere una escala
menor.
•
approx. – Larger scales are given priority for the automatic scale selec-
tion.
The adjustments performed in Autozoom
are used only if you have pressed
in the scale map ⇒
page 32, fig. 37 .•
Travel t. – Shows the remaining travel time.
•
Arrival – Shows the estimated arrival time ⇒
page 32, fig. 37 .
Fig. 40 Display options
Map typeAlignment
Autozoom
AA
Time format
AB
radionaving Seite 34 Mittwoch, 30. März 2005 12 :26 12
Page 44 of 50
Information and system settings43
– You can set the screen brightness to be adjusted to suit the light
conditions when the headlights are switched on.
•
auto : When turning on the head lights,the display wi ll automatically
change from day to night.
•
manual : With ⇒
page 4, fig. 1 you may switch between the day
and night displays.
and – Sets the screen settings for the day and
night display.
– If the system does not have the correct time, you may a djust the clock
by turning and pressing the menu button s. The data for the arrival time is
oriented towards this time if the route guidance function i s active.Note
The language can only be changed if the navigation CD has been inserted.Day/Night
A13
Contrast day
Contrast night
Hour
radionaving Seite 43 Mittwoch, 30. März 2005 12:26 12
Page 49 of 50
SEAT S.A. is permanently concerned about continuous development of its types and models. For this reason we ask you to understand,
that at any given time, changes regarding shape, equipment and technique may take place on the car delivered. For this reason no
right at all may derive based on the data, drawings and descriptionsin this current handbook.
All texts, illustrations and standards in this handbook are based on the status of information at the time of printing. Except for error
or omission, the information included in the current handbook is valid as of the date of closing print.
Re-printing, copying or translating, whether total or partial is not allowed unless SEAT allows it in written form.
SEAT reserves all rights in accordance with the "Copyright" Act.
All rights on changes are reserved.
❀This paper has been manufactured using bleached non-chlorine cellulose.
© SEAT S.A. - Reprint: 15.04.05
SEAT S.A. preocupa-se por manter um constante desenvolvimento dos seus tipos e modelos. Pedimos que compreenda que devemos
reservar-nos o direito de efectuar modificações, em qualquer momento, na forma, equipamento e a técnica. Por esta razão, não se
pode exigir direito algum, baseando-se nos dados, ilustrações e descrições do presente Manual.
Os textos, as ilustrações e as normas deste manual estão actualizadasaté ao momento da impressão. Salvo erro ou omissão, a infor-
mação do presente manual é válida até à data de fecho da sua edição.
Não está permitida a reimpressão, copia ou tradução, total ou parcial, sem a autorização escrita de SEAT.
SEAT se reserva todos os direitos de acordo com a lei do "Copyright".
Reservados todos os direitos de modificação.
❀Este papel está fabricado com pasta celulosica branqueada sem cloro.
© SEAT S.A. - Reimpresão: 15.04.05