spare wheel Seat Toledo 2006 Owner's manual
[x] Cancel search | Manufacturer: SEAT, Model Year: 2006, Model line: Toledo, Model: Seat Toledo 2006Pages: 298, PDF Size: 9.04 MB
Page 6 of 298
Contents
4Trailer towing . . . . . . . . . . . . . . . . . . . . . . . . . . . .
Driving economically and with respect for the
environment . . . . . . . . . . . . . . . . . . . . . . . . . . . . Cleaning and caring for your vehicle
. . . . . . .
General notes . . . . . . . . . . . . . . . . . . . . . . . . . . .
Care of the vehicle exterior . . . . . . . . . . . . . . . . .
Care of the vehicle interior . . . . . . . . . . . . . . . . .
Accessories, parts replacement and
modifications
. . . . . . . . . . . . . . . . . . . . . . . . . . . .
Accessories and parts . . . . . . . . . . . . . . . . . . . . .
Modifications . . . . . . . . . . . . . . . . . . . . . . . . . . . .
Roof aerial* . . . . . . . . . . . . . . . . . . . . . . . . . . . . .
Mobile telephones and two-way radios . . . . . . .
Fitting a towing bracket* . . . . . . . . . . . . . . . . . . .
Checking and refilling levels
. . . . . . . . . . . . . .
Refuelling . . . . . . . . . . . . . . . . . . . . . . . . . . . . . . .
Petrol . . . . . . . . . . . . . . . . . . . . . . . . . . . . . . . . . .
Diesel . . . . . . . . . . . . . . . . . . . . . . . . . . . . . . . . . .
Working in the engine compartment . . . . . . . . .
Engine oil . . . . . . . . . . . . . . . . . . . . . . . . . . . . . . .
Coolant . . . . . . . . . . . . . . . . . . . . . . . . . . . . . . . . .
Washer fluid and windscreen wiper blades . . . .
Brake fluid . . . . . . . . . . . . . . . . . . . . . . . . . . . . . .
Battery . . . . . . . . . . . . . . . . . . . . . . . . . . . . . . . . .
Wheels . . . . . . . . . . . . . . . . . . . . . . . . . . . . . . . . .
If and when
. . . . . . . . . . . . . . . . . . . . . . . . . . . . . .
Tools, tyre repair kit and spare wheel . . . . . . . .
Wheel change . . . . . . . . . . . . . . . . . . . . . . . . . . .
Tyre repair kit* (Tyre Mobility System)* . . . . . . .
Fuses . . . . . . . . . . . . . . . . . . . . . . . . . . . . . . . . . .
Bulb change . . . . . . . . . . . . . . . . . . . . . . . . . . . . .
Jump-starting . . . . . . . . . . . . . . . . . . . . . . . . . . . .
Towing and tow-starting . . . . . . . . . . . . . . . . . . .
Te c h n i c a l D a t a
. . . . . . . . . . . . . . . . . . . . . . .
General notes on the technical data
. . . . . . .
What you should be aware of . . . . . . . . . . . . . . .
How are the figures measured? . . . . . . . . . . . . .
Towing a trailer . . . . . . . . . . . . . . . . . . . . . . . . . .
Wheels . . . . . . . . . . . . . . . . . . . . . . . . . . . . . . . . .
Techn ical Data
. . . . . . . . . . . . . . . . . . . . . . . . . . . .
Checking fluid levels . . . . . . . . . . . . . . . . . . . . . .
Petrol engine 1.4 litre 63 kW (86 bhp) . . . . . . .
Petrol engine 1.6 litre 75 kW (102 bhp) . . . . . .
Petrol engine 2.0 litre 110 kW (150 bhp) . . . . .
Petrol engine 2.0 litre 110 kW (150 hp).
Automatic . . . . . . . . . . . . . . . . . . . . . . . . . . . . . .
Petrol engine 2.0 litre 147 kW (200 hp). Manual
Petrol engine 2.0 litre 147 kW (200 hp).
Automatic . . . . . . . . . . . . . . . . . . . . . . . . . . . . . .
Diesel engine 1.9l TDI 77 kW (105 bhp) . . . . . .
Diesel engine 2.0l 103 kW (140 bhp). Manual .
Diesel engine 2.0 litre 103 kW (140 bhp).
Automatic . . . . . . . . . . . . . . . . . . . . . . . . . . . . . .
Diesel engine 2.0l 100 kW (136 bhp). Manual .
Diesel engine 2.0 litre 100 kW (136 bhp).
Automatic . . . . . . . . . . . . . . . . . . . . . . . . . . . . . .
Diesel engine 2.0l 125 kW (170 bhp) . . . . . . . .
Dimensions and capacities . . . . . . . . . . . . . . . .
Index
. . . . . . . . . . . . . . . . . . . . . . . . . . . . . . . . . .
188
190
192
192
193
198
201
201
201
202
202
203
205
205
206
207
208
211
215
218
221
223
225
232
232
234
240
242
249
259
262 265
265
265
267
268
268
270
270
271
272
273
274
276
277
278
279
281
282
283
284
286
287
toledo_angles_0706 Seite 4 Dienst
ag, 5. September 2006 10:32 10
Page 138 of 298
Seats and stowage
136Stowage in the luggage compartment*
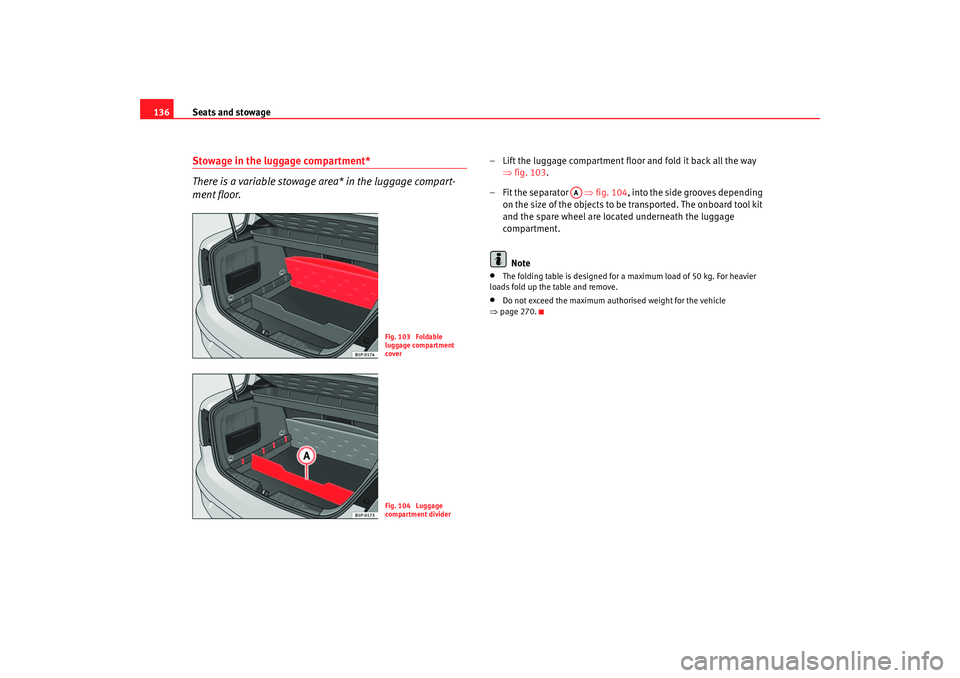
There is a variable stowage area* in the luggage compart-
ment floor.
– Lift the luggage compartment floor and fold it back all the way
⇒fig. 103.
– Fit the separator ⇒fig. 104, into the side grooves depending
on the size of the objects to be transported. The onboard tool kit
and the spare wheel are located underneath the luggage
compartment.
Note•
The folding table is designed for a maximum load of 50 kg. For heavier
loads fold up the table and remove.
•
Do not exceed the maximum authorised weight for the vehicle
⇒ page 270.
Fig. 103 Foldable
luggage compartment
coverFig. 104 Luggage
compartment divider
AA
toledo_angles_0706 Seite 136 Dienstag, 5. September 2006 10:32 10
Page 139 of 298
Seats and stowage137
Safety First
Operating instructions
Tips and Maintenance
Te c h n i c a l D a t a
Luggage compartment retaining net
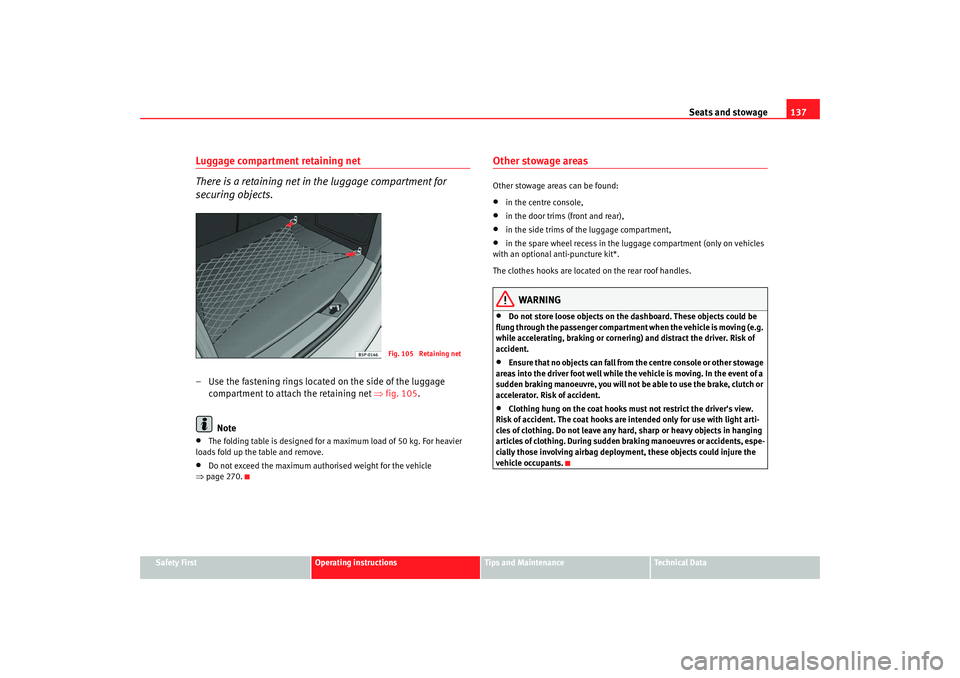
There is a retaining net in the luggage compartment for
securing objects.– Use the fastening rings located on the side of the luggage
compartment to attach the retaining net ⇒fig. 105.
Note•
The folding table is designed for a maximum load of 50 kg. For heavier
loads fold up the table and remove.
•
Do not exceed the maximum authorised weight for the vehicle
⇒ page 270.
Other stowage areasOther stowage areas can be found:•
in the centre console,
•
in the door trims (front and rear),
•
in the side trims of the luggage compartment,
•
in the spare wheel recess in the luggage compartment (only on vehicles
with an optional anti-puncture kit*.
The clothes hooks are located on the rear roof handles.
WARNING
•
Do not store loose objects on the dashboard. These objects could be
flung through the passenger compartment when the vehicle is moving (e.g.
while accelerating, braking or cornering) and distract the driver. Risk of
accident.
•
Ensure that no objects can fall from the centre console or other stowage
areas into the driver foot well while the vehicle is moving. In the event of a
sudden braking manoeuvre, you will not be able to use the brake, clutch or
accelerator. Risk of accident.
•
Clothing hung on the coat hooks must not restrict the driver's view.
Risk of accident. The coat hooks are intended only for use with light arti-
cles of clothing. Do not leave any hard, sharp or heavy objects in hanging
articles of clothing. During sudden br aking manoeuvres or accidents, espe-
cially those involving airbag deployment, these objects could injure the
vehicle occupants.
Fig. 105 Retaining net
toledo_angles_0706 Seite 137 Dienstag, 5. September 2006 10:32 10
Page 182 of 298
Intelligent technology
180Anti-lock brake system and traction control
M-ABS (ABS and TCS)Anti-lock brake system (ABS)
The anti-lock brake system prevents the wheels locking
during braking.The anti-lock brake system (ABS) is an important part of the vehicle's active
safety system.
How the ABS works
If one of the wheels turns too slowly in relation to the road speed, and is close
to locking, the system will reduce the braking pressure for this wheel. The
driver is made aware of this control process by a pulsating of the brake pedal
and audible noise. This is a deliberate warning to the driver that one or more
of the wheels is tending to lock and the ABS control function has intervened.
In this situation it is important to keep the brake pedal fully depressed so the
ABS can regulate the brake application. Do not “pump”.
If you brake hard on a slippery road surface, the best possible control is
retained as the wheels do not lock.
However, ABS will not necessarily guarantee shorter braking distances in all
conditions. The braking distance could even be longer if you brake on gravel
or on fresh snow covering a slippery surface.
WARNING
•
The anti-lock brake system cannot defy the laws of physics. Slippery
and wet roads are dangerous even with ABS! If you notice that the ABS is
working (to counteract locked wheels under braking), you should reduce
speed immediately to suit the road and traffic conditions. Do not let the
extra safety features tempt you into taking any risks when driving.
•
The effectiveness of ABS is also determined by the tyres fitted
⇒ page 225.
•
If the running gear or brakes are mo dified, the effectiveness of the ABS
could be severely limited.
Traction control system (TCS)
The traction control system prevents the drive wheels from
spinning when the car is accelerating.Description and operation of the traction control system during acceleration
(TCS)
TCS reduces engine power to help prevent the drive wheels of front-wheel
drive vehicles losing traction during acceleration. The system works in the
entire speed range in conjunction with ABS. If a malfunction should occur in
the ABS, the TCS will also be out of action.
TCS helps the vehicle to start moving, accelerate and climb a gradient in slip-
pery conditions where this may otherwise be difficult or even impossible.
The TCS is switched on automatically when the engine is started. If necessary,
it may be turned on or off pushing the button on the centre console.
When the TCS is off, the warning lamp is lit. The TCS should normally be left
switched on at all times. Only in exceptional circumstances, when slipping of
the wheels is required, should it be disconnected for example•
With compact temporary spare wheel.
•
When using the snow chains.
•
When driving in deep snow or on loose surfaces
•
When the vehicle is bogged-down, to free it by “rocking.”WARNING (continued)
toledo_angles_0706 Seite 180 Dienstag, 5. September 2006 10:32 10
Page 231 of 298
Checking and refilling levels229
Safety First
Operating instructions
Tips and Maintenance
Te c h n i c a l D a t a
easier to choose the correct tyres. Radial tyres have the tyre designations
marked on the sidewall, for example:
195/65 R15 91T
This contains the following information:
195 Tyre width in mm
65 Height/width ratio in %
R Tyre construction: Radial
15 Rim diameter in inches
91 Load rating code
T Speed rating
The tyres could also have the following information:
•
A direction of rotation symbol
•
“Reinforced” denotes heavy-duty tyres.
The manufacturing date is also indicated on the tyre sidewall (possibly only
on the inner side of the wheel).
“DOT ... 1103 ...” means, for example, th at the tyre was produced in the 11th
week of 2003.
We recommend that work on tyres and wheels is carried out by an Authorised
Service Centre. They are familiar with the procedure and have the necessary
special tools and spare parts as well as the proper facilities for disposing of
the old tyres.
Any Authorised Service Centre has full information on the technical require-
ments when installing or changing tyres, wheels or wheel trims.
WARNING
•
We recommend that you use only wheels and tyres that have been
approved by SEAT for your model. Fa ilure to do so could impair vehicle
handling. Risk of accident.
•
Avoid running the vehicle on tyres th at are more than six years old. If
you have no alternative, you should dr ive slowly and with extra care at all
times.
•
Never use old tyres or those with an unknown “history of use”.
•
If wheel trims are retrofitted, you must ensure that the flow of air to the
brakes is not restricted. This could cause them to overheat.
•
All four wheels must be fitted with radial tyres of the same type, size
(rolling circumference) and the same tread pattern.For the sake of the environment
Old tyres must be disposed of accordi ng to the laws in the country concerned.
Note
•
For technical reasons, it is not generally possible to use the wheels from
other vehicles. This can also apply to wheels of the same model. The use of
wheels or tyres which have not been approved by SEAT for use with your
model may invalidate the vehicle's type approval for use on public roads.
•
If the spare tyre is not the same as the tyres that are mounted on the
vehicle - for example with winter tyres - you should only use the spare tyre for
a short period of time and drive with extra care. Refit the normal road wheel
as soon as possible.
Wheel bolts
Wheel bolts must be tightened to the correct torque.The design of wheel bolts is matched to the rims. If different wheel rims are
fitted, the correct wheel bolts with the right length and correctly shaped bolt
WARNING (continued)
toledo_angles_0706 Seite 229 Dienstag, 5. September 2006 10:32 10
Page 232 of 298
Checking and refilling levels
230heads must be used. This ensures that wheels are fitted securely and that the
brake system functions correctly.
In certain circumstances, you may not use wheel bolts from a different car -
even if it is the same model ⇒page 201.
WARNING
If the wheel bolts are not tightened correctly, the wheel could become
loose while driving. Risk of accident.•
The wheel bolts must be clean and turn easily. Never apply grease or oil
to them.
•
Use only wheel bolts which belong to the wheel.
•
If the prescribed torque of the wheel bolts is too low, they could loosen
whilst the vehicle is in motion. Risk of accident! If the tightening torque is
too high, the wheel bolts and threads could be damaged.Caution
The prescribed torque for wheel bolts for steel and alloy wheels is 120 Nm.Winter tyres
Winter tyres will improve the vehicles handling on snow and
ice.In winter conditions winter tyres will considerably improve the vehicles
handling. The design of summer tyres (width, rubber compound, tread
pattern) gives less grip on ice and snow.
Winter tyres must be inflated to a pressure 0.2 bar higher than the pressures
specified for summer tyres (see sticker on tank flap).
Winter tyres must be fitted on all four wheels. Information on permitted
winter tyre sizes can be found in the vehicle's regis-
tration documents. Use only radial winter tyres. All tyre sizes listed in the
vehicle documentation also apply to winter tyres.
Winter tyres lose their effectiveness when the tread is worn down to a depth
of 4 mm.
The speed rating code ⇒page 228, “New tyres and wheels” determines the
following speed limits ⇒ :
Q max. 160 km/h
S max. 180 km/h
T max. 190 km/h
H max. 210 km/h
In some countries, vehicles which can exceed the speed rating of the fitted
tyre must have an appropriate sticker in the driver's field of view. These
stickers are available from your Authorised Service Centre. The legal require-
ments of each country must be followed.
Do not have winter tyres fitted for unnecessarily long periods. Vehicles with
summer tyres handle better when the roads are free of snow and ice.
If you have a flat tyre, please refer to the notes on the spare wheel
⇒ page 228, “New tyres and wheels”.
WARNING
The maximum speed for the winter tyres must not be exceeded. Otherwise,
this could lead to tyre damage and thus, an accident risk.
For the sake of the environment
Fit your summer tyres in good time. They are quieter, do not wear so quickly
and reduce fuel consumption.
toledo_angles_0706 Seite 230 Dienstag, 5. September 2006 10:32 10
Page 234 of 298
If and when
232If and whenTools, tyre repair kit and spare wheelVehicle To ols
The vehicle onboard tools are located under the floor panel in
the luggage compartment.– Lift the cover of the luggage compartment, by pulling it up with a
finger in the fitting.
– Take the onboard tools out of the vehicle.The tool kit includes:•
Jack*
•
Hook for removing wheel covers* or hub caps*
•
Box spanner for wheel bolts*
•
Reversible screwdriver with handle (including hexagonal interior) for the
wheel bolts. The screwdriver is a combination tool.
•
To wi ng e ye
•
Adapter for the anti-theft wheel bolts*
Some of the items listed are only prov ided on certain models / model years,
or are optional extras.
WARNING
•
Do not use the hexagonal socket in the screwdriver handle to tighten
the wheel bolts. It is impossible to tighten the bolts with the torque
required, risk of accident.
•
The jack* supplied by the factory is only designed for changing wheels
on this model. On no account attempt to use it for lifting heavier vehicles
or other loads, risk of injury.
•
Use the jack* only on firm, level ground.
•
Never start the engine when the vehicle is on the jack, risk of accident.
•
I f wo r k is t o b e ca r r i e d o u t un d e r n ea th the vehicle, this must be secured
by suitable stands. Otherwise, there is a risk of injury.WARNING (continued)
toledo_angles_0706 Seite 232 Dienstag, 5. September 2006 10:32 10
Page 235 of 298
If and when233
Safety First
Operating instructions
Tips and Maintenance
Te c h n i c a l D a t a
Compact temporary spare wheel*
The compact temporary spare wheel (spare wheel for vehicles
with no puncture repair kit) should only be used when really
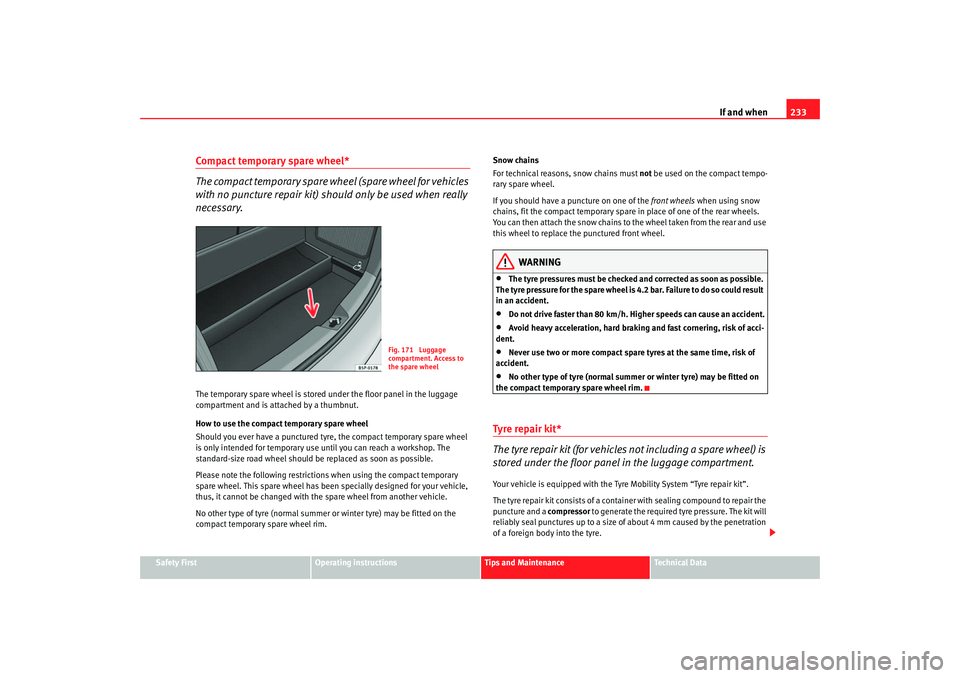
necessary.The temporary spare wheel is stored under the floor panel in the luggage
compartment and is attached by a thumbnut.
How to use the compact temporary spare wheel
Should you ever have a punctured tyre, the compact temporary spare wheel
is only intended for temporary use until you can reach a workshop. The
standard-size road wheel should be replaced as soon as possible.
Please note the following restrictions when using the compact temporary
spare wheel. This spare wheel has been specially designed for your vehicle,
thus, it cannot be changed with th e spare wheel from another vehicle.
No other type of tyre (normal summer or winter tyre) may be fitted on the
compact temporary spare wheel rim. Snow chains
For technical reasons, snow chains must not
be used on the compact tempo-
rary spare wheel.
If you should have a puncture on one of the front wheels when using snow
chains, fit the compact temporary spare in place of one of the rear wheels.
You can then attach the snow chains to the wheel taken from the rear and use
this wheel to replace the punctured front wheel.
WARNING
•
The tyre pressures must be checked and corrected as soon as possible.
The tyre pressure for the spare wheel is 4.2 bar. Failure to do so could result
in an accident.
•
Do not drive faster than 80 km/h. High er speeds can cause an accident.
•
Avoid heavy acceleration, hard braking and fast cornering, risk of acci-
dent.
•
Never use two or more compact spare tyres at the same time, risk of
accident.
•
No other type of tyre (normal summer or winter tyre) may be fitted on
the compact temporary spare wheel rim.
Tyre repair kit*
The tyre repair kit (for vehicles not including a spare wheel) is
stored under the floor panel in the luggage compartment.Your vehicle is equipped with the Tyre Mobility System “Tyre repair kit”.
The tyre repair kit consists of a contai ner with sealing compound to repair the
puncture and a compressor to generate the required tyre pressure. The kit will
reliably seal punctures up to a size of about 4 mm caused by the penetration
of a foreign body into the tyre.
Fig. 171 Luggage
compartment. Access to
the spare wheel
toledo_angles_0706 Seite 233 Dienstag, 5. September 2006 10:32 10
Page 236 of 298

If and when
234
Note•
Seek professional assistance if the repair of a tyre puncture is not
possible with the sealing compound.
Wheel changePreparation work
What you must do before changing a wheel.– If you have a flat tyre or puncture, park the vehicle as far away from the flow of traffic as possible. Choose a location that is as
level as possible.
– All passengers should leave the ve hicle. They should wait in a
safe area (for instance behind the roadside crash barrier).
– Switch off the engine. Switch on the hazard warning lights.
–Apply the handbrake firmly.
– Engage the first gear, or put the selector lever to position P for
those vehicles with an automatic gearbox.
– If you are towing a trailer, unhitch it from your vehicle.
– Take the vehicle tools and the spare wheel out of the luggage
compartment.
WARNING
Put the hazard warning lights on and place the warning triangle in position.
This is for your own safety and also warns other road users.
Caution
If you have to change the tyre on a gradient, block the wheel opposite the
wheel being changed by placing a stone or similar object under it to prevent
the vehicle from rolling away.
Note
Please observe legal requirements when doing so.Changing a wheelChange the wheel as described below
–Pull off the hub cap. Also refer to ⇒page 235.
– Slacken the wheel bolts .
– Raise the car with the jack in the corresponding zone.
– Ta k e o f f the wheel and then put on the spare wheel.
– Lower the vehicle.
– Tighten the wheel bolts firmly in diagonal sequence with the box
spanner.
–Replace the hub cap.
toledo_angles_0706 Seite 234 Dienstag, 5. September 2006 10:32 10
Page 241 of 298
If and when239
Safety First
Operating instructions
Tips and Maintenance
Te c h n i c a l D a t a
Removing and fitting the wheel
For removal and fitting the wheel, the following tasks must be
completed.Change the wheel as described below after loosening the wheel
bolts and raising the vehicle with the jack.
Removing a wheel
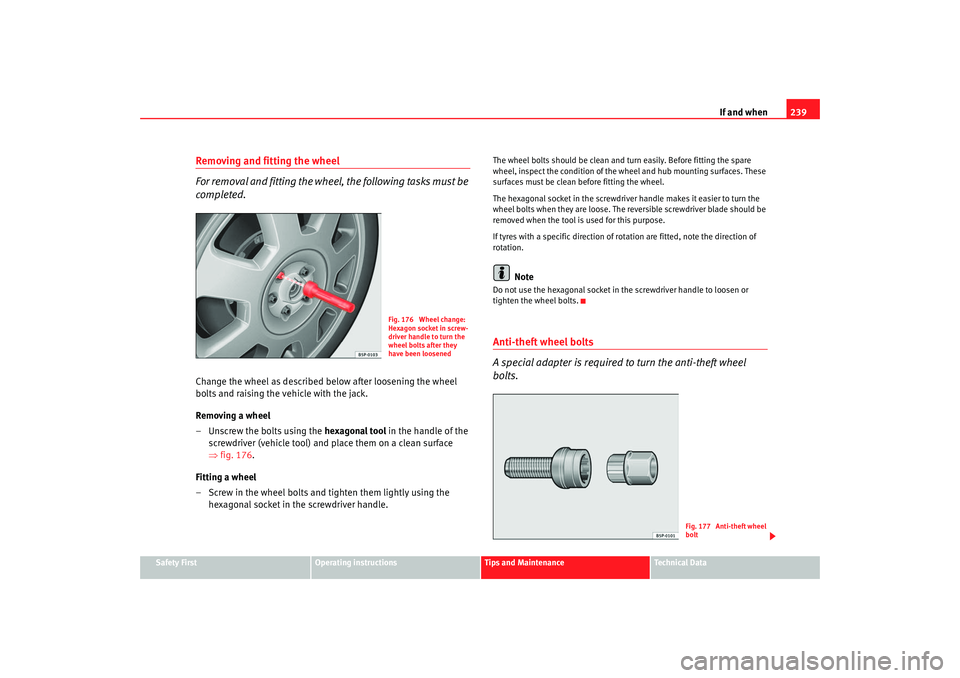
– Unscrew the bolts using the hexagonal tool in the handle of the
screwdriver (vehicle tool) and place them on a clean surface
⇒ fig. 176 .
Fitting a wheel
– Screw in the wheel bolts and tighten them lightly using the hexagonal socket in the screwdriver handle.
The wheel bolts should be clean and turn easily. Before fitting the spare
wheel, inspect the condition of the wheel and hub mounting surfaces. These
surfaces must be clean before fitting the wheel.
The hexagonal socket in the screwdriver handle makes it easier to turn the
wheel bolts when they are loose. The reversible screwdriver blade should be
removed when the tool is used for this purpose.
If tyres with a specific direction of ro tation are fitted, note the direction of
rotation.
Note
Do not use the hexagonal socket in the screwdriver handle to loosen or
tighten the wheel bolts.Anti-theft wheel bolts
A special adapter is required to turn the anti-theft wheel
bolts.
Fig. 176 Wheel change:
Hexagon socket in screw-
driver handle to turn the
wheel bolts after they
have been loosened
Fig. 177 Anti-theft wheel
bolt
toledo_angles_0706 Seite 239 Dienstag, 5. September 2006 10:32 10