stop start Seat Toledo 2013 Owner's manual
[x] Cancel search | Manufacturer: SEAT, Model Year: 2013, Model line: Toledo, Model: Seat Toledo 2013Pages: 258, PDF Size: 3.94 MB
Page 5 of 258
Table of Contents
About this manual . . . . . . . . . . . . . . . . . . . 5
Content . . . . . . . . . . . . . . . . . . . . . . . . . . . . . . . . 6
Safety First . . . . . . . . . . . . . . . . . . . . . . . . . . . . 7
Safe driving . . . . . . . . . . . . . . . . . . . . . . . . . . . . . . . 7
Brief introduction . . . . . . . . . . . . . . . . . . . . . . . . . 7
Sitting position for vehicle occupants . . . . . . . . . 10
Pedal area . . . . . . . . . . . . . . . . . . . . . . . . . . . . . . . 17
Storing objects . . . . . . . . . . . . . . . . . . . . . . . . . . . 17
Seat belts . . . . . . . . . . . . . . . . . . . . . . . . . . . . . . . . . 20
Brief introduction . . . . . . . . . . . . . . . . . . . . . . . . . 20
Why wear seat belts? . . . . . . . . . . . . . . . . . . . . . . 22
Seat belts . . . . . . . . . . . . . . . . . . . . . . . . . . . . . . . 26
Seat belt tensioners . . . . . . . . . . . . . . . . . . . . . . . 30
Airbag system . . . . . . . . . . . . . . . . . . . . . . . . . . . . . 31
Brief introduction . . . . . . . . . . . . . . . . . . . . . . . . . 31
Front airbags . . . . . . . . . . . . . . . . . . . . . . . . . . . . . 35
Side airbags* . . . . . . . . . . . . . . . . . . . . . . . . . . . . 38
Curtain airbags* . . . . . . . . . . . . . . . . . . . . . . . . . . 41
Deactivating airbags . . . . . . . . . . . . . . . . . . . . . . . 43
Child safety . . . . . . . . . . . . . . . . . . . . . . . . . . . . . . . 46
Brief introduction . . . . . . . . . . . . . . . . . . . . . . . . . 46
Child seats . . . . . . . . . . . . . . . . . . . . . . . . . . . . . . . 48
Securing child seats . . . . . . . . . . . . . . . . . . . . . . . 51 Operating instructions
. . . . . . . . . . . . . 55
Controls and displays . . . . . . . . . . . . . . . . . . . . . . 55
Overview . . . . . . . . . . . . . . . . . . . . . . . . . . . . . . . . 54
Instruments and warning lamps . . . . . . . . . . . . . 57
Multi-function display* (on board computer) . . . 61
MAXI DOT* (Informative display) . . . . . . . . . . . . . 66
Control lamps . . . . . . . . . . . . . . . . . . . . . . . . . . . . 69
Communication . . . . . . . . . . . . . . . . . . . . . . . . . . . 78
Steering wheel controls* . . . . . . . . . . . . . . . . . . . 78
Multimedia . . . . . . . . . . . . . . . . . . . . . . . . . . . . . . 81
Voice control . . . . . . . . . . . . . . . . . . . . . . . . . . . . . 82
Opening and closing . . . . . . . . . . . . . . . . . . . . . . 84
Keys . . . . . . . . . . . . . . . . . . . . . . . . . . . . . . . . . . . . 84
Central locking system . . . . . . . . . . . . . . . . . . . . . 86
Remote control . . . . . . . . . . . . . . . . . . . . . . . . . . . 89
Anti-theft alarm system* . . . . . . . . . . . . . . . . . . . 91
Vehicle interior monitoring and tow-away
protection system . . . . . . . . . . . . . . . . . . . . . . . . . 92
Rear lid . . . . . . . . . . . . . . . . . . . . . . . . . . . . . . . . . . 92
Opening and closing electric windows . . . . . . . . 95
Lights and visibility . . . . . . . . . . . . . . . . . . . . . . . . 97
Lights . . . . . . . . . . . . . . . . . . . . . . . . . . . . . . . . . . . 97
Interior lights . . . . . . . . . . . . . . . . . . . . . . . . . . . . . 102
Visibility . . . . . . . . . . . . . . . . . . . . . . . . . . . . . . . . . 104
Windscreen wipers and windscreen washers . . . 106
Rear vision mirrors . . . . . . . . . . . . . . . . . . . . . . . . 109
Seats and storage . . . . . . . . . . . . . . . . . . . . . . . . . 110
Front seats . . . . . . . . . . . . . . . . . . . . . . . . . . . . . . . 110
Head restraints . . . . . . . . . . . . . . . . . . . . . . . . . . . 112
Rear seats . . . . . . . . . . . . . . . . . . . . . . . . . . . . . . . 113
Luggage compartment . . . . . . . . . . . . . . . . . . . . . 115
Roof carrier* . . . . . . . . . . . . . . . . . . . . . . . . . . . . . 119
Drink holder . . . . . . . . . . . . . . . . . . . . . . . . . . . . . . 120 Cigarette lighter, 12V power socket . . . . . . . . . . . 121
Storage compartment . . . . . . . . . . . . . . . . . . . . . . 123
Coat hooks* . . . . . . . . . . . . . . . . . . . . . . . . . . . . . . 127
Heating and air conditioning . . . . . . . . . . . . . . . 128
Heating and air conditioning . . . . . . . . . . . . . . . . 128
Air vents . . . . . . . . . . . . . . . . . . . . . . . . . . . . . . . . . 129
Heating . . . . . . . . . . . . . . . . . . . . . . . . . . . . . . . . . 130
Air conditioning (manual)* . . . . . . . . . . . . . . . . . . 132
Climatronic* (automatic air conditioning) . . . . . . 135
Driving . . . . . . . . . . . . . . . . . . . . . . . . . . . . . . . . . . . . 139
Starting and stopping the engine . . . . . . . . . . . . 139
Brakes and brake servo systems . . . . . . . . . . . . . 142
Manual gearbox . . . . . . . . . . . . . . . . . . . . . . . . . . 145
Automatic gearbox . . . . . . . . . . . . . . . . . . . . . . . . 146
Foot pedals . . . . . . . . . . . . . . . . . . . . . . . . . . . . . . 151
Parking aid* . . . . . . . . . . . . . . . . . . . . . . . . . . . . . . 151
Cruise control (Cruise control system)* . . . . . . . . 152
START-STOP* . . . . . . . . . . . . . . . . . . . . . . . . . . . . . 154
Practical Tips . . . . . . . . . . . . . . . . . . . . . . . . . 156
Driving and the environment . . . . . . . . . . . . . . . 156
The first 1500 km (900 miles) . . . . . . . . . . . . . . . 156
Catalytic converter . . . . . . . . . . . . . . . . . . . . . . . . 157
Economical and ecological driving . . . . . . . . . . . 157
Environmental friendliness . . . . . . . . . . . . . . . . . 161
Driving abroad . . . . . . . . . . . . . . . . . . . . . . . . . . . . 161
Preventing damage to the vehicle . . . . . . . . . . . . 162
Driving through water . . . . . . . . . . . . . . . . . . . . . . 162
Driving the vehicle with a trailer . . . . . . . . . . . . 164
Driving the vehicle with a trailer . . . . . . . . . . . . . 164
Towing bracket device . . . . . . . . . . . . . . . . . . . . . 167
3
Table of Contents
Page 86 of 258
84Opening and closing
Opening and closing
Keys
General notes
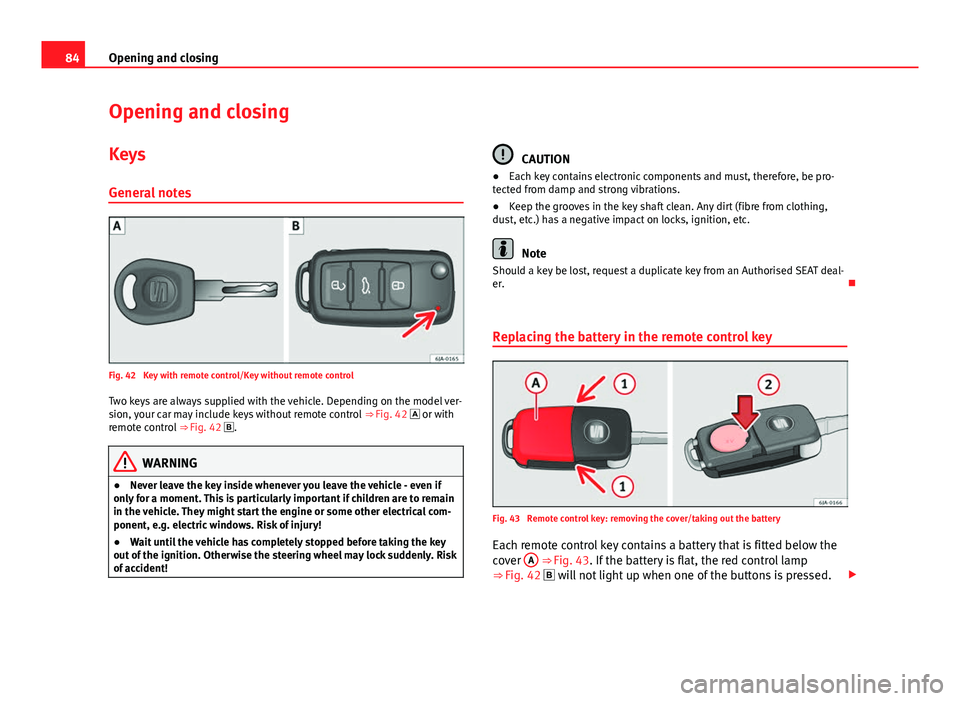
Fig. 42 Key with remote control/Key without remote control Two keys are always supplied with the vehicle. Depending on the model ver-
sion, your car may include keys without remote control ⇒ Fig. 42 or with
remote control ⇒ Fig. 42 .
WARNING
● Never leave the key inside whenever you leave the vehicle - even if
only for a moment. This is particularly important if children are to remain
in the vehicle. They might start the engine or some other electrical com-
ponent, e.g. electric windows. Risk of injury!
● Wait until the vehicle has completely stopped before taking the key
out of the ignition. Otherwise the steering wheel may lock suddenly. Risk
of accident!
CAUTION
● Each key contains electronic components and must, therefore, be pro-
tected from damp and strong vibrations.
● Keep the grooves in the key shaft clean. Any dirt (fibre from clothing,
dust, etc.) has a negative impact on locks, ignition, etc.
Note
Should a key be lost, request a duplicate key from an Authorised SEAT deal-
er.
Replacing the battery in the remote control key
Fig. 43 Remote control key: removing the cover/taking out the battery
Each remote control key contains a battery that is fitted below the
cover A
⇒ Fig. 43. If the battery is flat, the red control lamp
⇒ Fig. 42 will not light up when one of the buttons is pressed.
Page 89 of 258
87
Opening and closing
If the Safe lock is out of service, the control lamp on the driver door will
flash quickly for 2 seconds before switching off for 30 seconds and then
flashing at a slower rate.
The Safe lock is re-activated on unlocking and locking the vehicle again.
If the vehicle is locked and the Safe lock is deactivated, the vehicle can be
opened from inside by pulling on the door handle.
WARNING
Do not leave people or animals in locked vehicles with the Safe lock acti-
vated: the doors and windows cannot then be opened from the inside.
Doors locked in this manner could delay assistance in an emergency.
Risk of death!
Note
● The anti-theft alarm switches on automatically when the vehicle is
locked, even if the Safe lock is deactivated. The Vehicle interior monitoring,
however, is not activated.
● Given that the Safe function will be activated on locking the vehicle,
CHECK DEADLOCK will be shown on the general instrument panel display. On
vehicles equipped with an informative display, Caution SAFE! On-board docu-
mentation! will be indicated. Unlocking the vehicle with the key
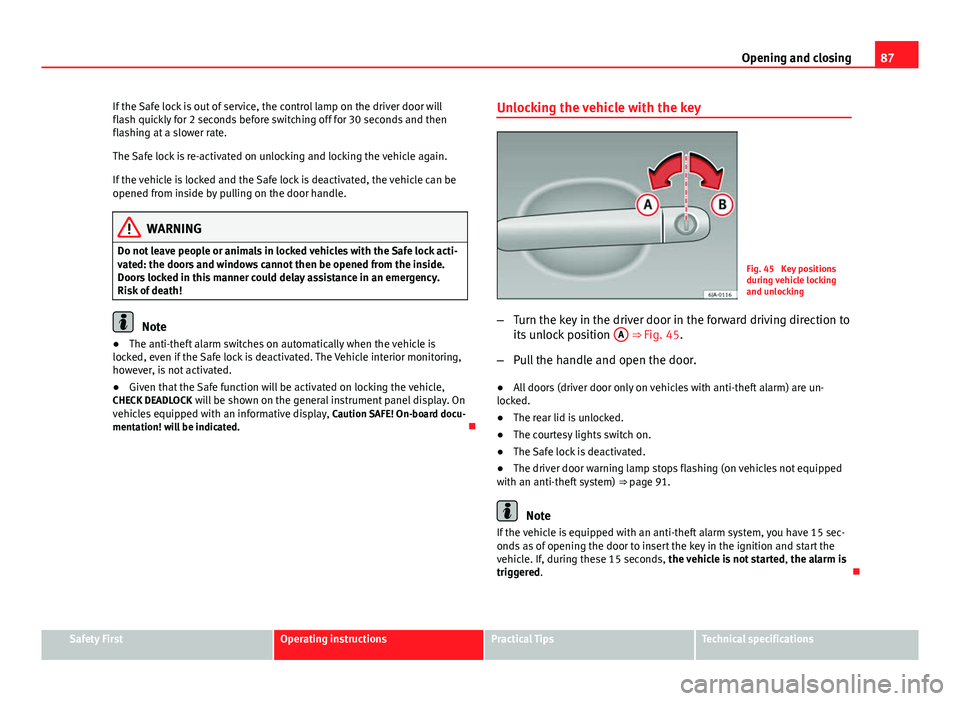
Fig. 45 Key positions
during vehicle locking
and unlocking
– Turn the key in the driver door in the forward driving direction to
its unlock position A
⇒ Fig. 45.
– Pull the handle and open the door.
● All doors (driver door only on vehicles with anti-theft alarm) are un-
locked.
● The rear lid is unlocked.
● The courtesy lights switch on.
● The Safe lock is deactivated.
● The driver door warning lamp stops flashing (on vehicles not equipped
with an anti-theft system) ⇒ page 91.
Note
If the vehicle is equipped with an anti-theft alarm system, you have 15 sec-
onds as of opening the door to insert the key in the ignition and start the
vehicle. If, during these 15 seconds, the vehicle is not started , the alarm is
triggered.
Safety FirstOperating instructionsPractical TipsTechnical specifications
Page 90 of 258
88Opening and closing
Locking the vehicle with the key
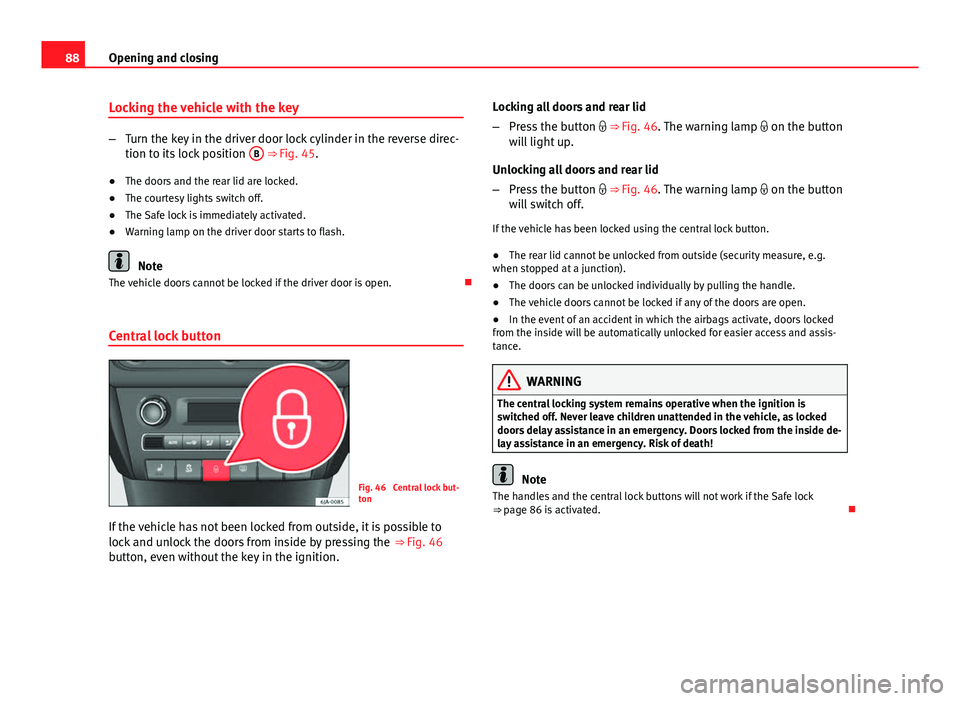
–Turn the key in the driver door lock cylinder in the reverse direc-
tion to its lock position B ⇒ Fig. 45.
● The doors and the rear lid are locked.
● The courtesy lights switch off.
● The Safe lock is immediately activated.
● Warning lamp on the driver door starts to flash.
Note
The vehicle doors cannot be locked if the driver door is open.
Central lock button
Fig. 46 Central lock but-
ton
If the vehicle has not been locked from outside, it is possible to
lock and unlock the doors from inside by pressing the ⇒ Fig. 46
button, even without the key in the ignition. Locking all doors and rear lid
–
Press the button ⇒ Fig. 46. The warning lamp on the button
will light up.
Unlocking all doors and rear lid
– Press the button ⇒ Fig. 46. The warning lamp on the button
will switch off.
If the vehicle has been locked using the central lock button.
● The rear lid cannot be unlocked from outside (security measure, e.g.
when stopped at a junction).
● The doors can be unlocked individually by pulling the handle.
● The vehicle doors cannot be locked if any of the doors are open.
● In the event of an accident in which the airbags activate, doors locked
from the inside will be automatically unlocked for easier access and assis-
tance.
WARNING
The central locking system remains operative when the ignition is
switched off. Never leave children unattended in the vehicle, as locked
doors delay assistance in an emergency. Doors locked from the inside de-
lay assistance in an emergency. Risk of death!
Note
The handles and the central lock buttons will not work if the Safe lock
⇒ page 86 is activated.
Page 91 of 258
89
Opening and closing
Manual locking
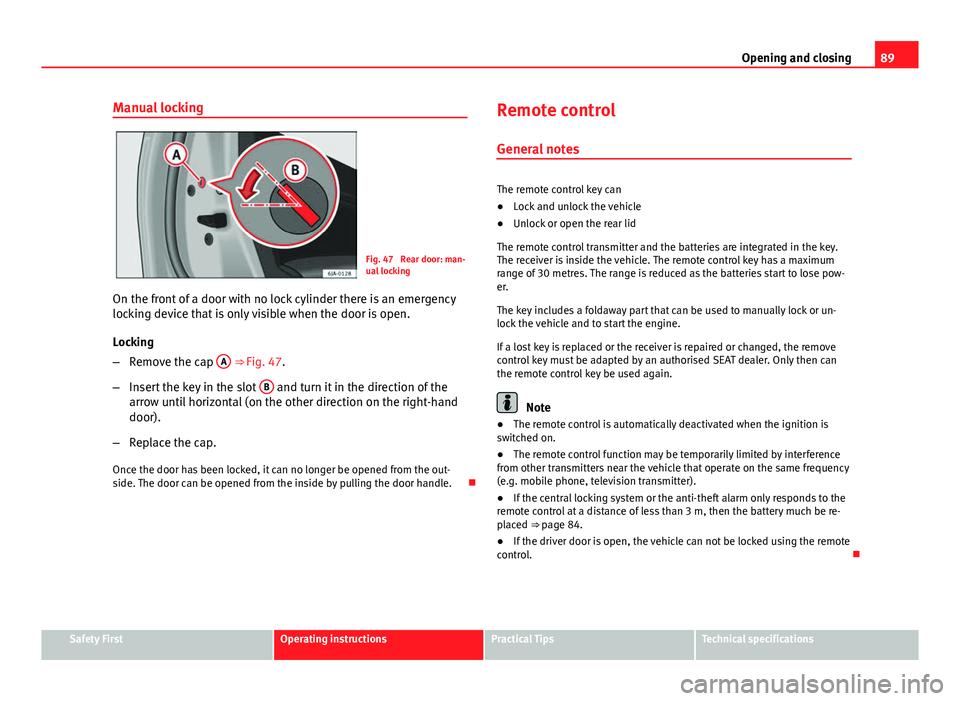
Fig. 47 Rear door: man-
ual locking
On the front of a door with no lock cylinder there is an emergency
locking device that is only visible when the door is open.
Locking
– Remove the cap A
⇒ Fig. 47.
– Insert the key in the slot B
and turn it in the direction of the
arrow until horizontal (on the other direction on the right-hand
door).
– Replace the cap.
Once the door has been locked, it can no longer be opened from the out-
side. The door can be opened from the inside by pulling the door handle. Remote control
General notes
The remote control key can
● Lock and unlock the vehicle
● Unlock or open the rear lid
The remote control transmitter and the batteries are integrated in the key.
The receiver is inside the vehicle. The remote control key has a maximum
range of 30 metres. The range is reduced as the batteries start to lose pow-
er.
The key includes a foldaway part that can be used to manually lock or un-
lock the vehicle and to start the engine.
If a lost key is replaced or the receiver is repaired or changed, the remove
control key must be adapted by an authorised SEAT dealer. Only then can
the remote control key be used again.
Note
● The remote control is automatically deactivated when the ignition is
switched on.
● The remote control function may be temporarily limited by interference
from other transmitters near the vehicle that operate on the same frequency
(e.g. mobile phone, television transmitter).
● If the central locking system or the anti-theft alarm only responds to the
remote control at a distance of less than 3 m, then the battery much be re-
placed ⇒ page 84.
● If the driver door is open, the vehicle can not be locked using the remote
control.
Safety FirstOperating instructionsPractical TipsTechnical specifications
Page 93 of 258
91
Opening and closing
Remote control synchronisation
If the vehicle cannot be locked or unlocked using the remote control, the
code of the key might not match that of the control unit. This can occur
when the remote control buttons are frequently pressed outside the range
of the system or if the remote control battery has been replaced.
In this case, it must be synchronised as follows:
● Press any key on the remote control key.
● Open the door using the key within the next minute.
Anti-theft alarm system* General notes
The anti-theft alarm system increases vehicle protection from intruders. If
the anti-theft alarm system senses interference with the vehicle it triggers
an audible and visible alarm.
Activating the alarm system
The anti-theft alarm switches on automatically when the vehicle is locked
using the remote control key or inserting the key in the driver door. The
alarm is activated around 30 seconds after the vehicle is locked.
Deactivating the alarm system
The anti-theft alarm system is deactivated when the remote control unlock
button is pressed. If the vehicle is not opened within 30 seconds after emit-
ting the radiofrequency signal, the system will be reactivated.
If the vehicle is unlocked using by inserting the key in the driver door, the
ignition must be switched on within 15 seconds. This deactivates the alarm system. If, during these 15 seconds, the vehicle is not started
, the alarm is
triggered.
When does the system trigger an alarm?
The following areas of the vehicle are monitored:
● Bonnet
● Rear lid
● Doors
● Ignition
● Tilt angle ⇒ page 92, Vehicle interior monitoring and tow-away protec-
tion system
● The interior ⇒ page 92, Vehicle interior monitoring and tow-away pro-
tection system
● Drop in voltage in the car systems
● The factory-fitted towing bracket
The alarm is triggered immediately if one of the battery cables is disconnec-
ted while the alarm system is active.
How to turn off the alarm
To deactivate the alarm, press the unlock button on the remote control key
or switch on the ignition.
Note
● The alarm horn power supply has a 5-year useful life. Contact an Official
Service for more detailed information.
● To make sure that the anti-theft alarm is fully operative when leaving the
vehicle, check that all the doors and windows are closed.
● Remote control and receiver unit coding means that the remote control
cannot be used on other vehicles.
Safety FirstOperating instructionsPractical TipsTechnical specifications
Page 100 of 258
98Lights and visibility
DAY LIGHT Function*
Switching on daytime driving lights
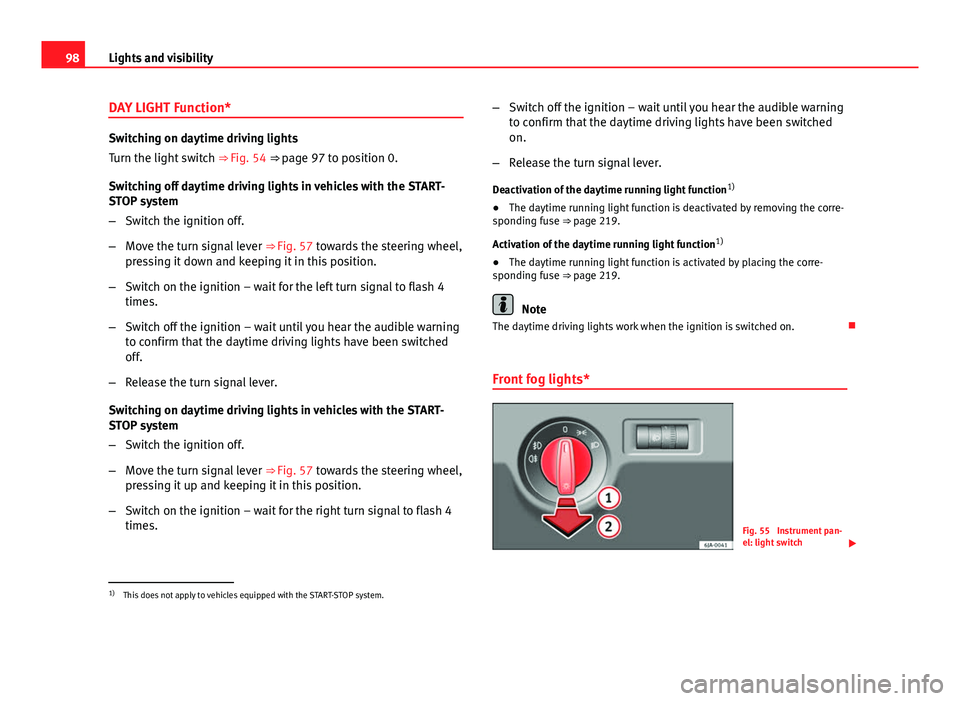
Turn the light switch ⇒ Fig. 54 ⇒ page 97 to position 0.
Switching off daytime driving lights in vehicles with the START-
STOP system
– Switch the ignition off.
– Move the turn signal lever ⇒ Fig. 57 towards the steering wheel,
pressing it down and keeping it in this position.
– Switch on the ignition – wait for the left turn signal to flash 4
times.
– Switch off the ignition – wait until you hear the audible warning
to confirm that the daytime driving lights have been switched
off.
– Release the turn signal lever.
Switching on daytime driving lights in vehicles with the START-
STOP system
– Switch the ignition off.
– Move the turn signal lever ⇒ Fig. 57 towards the steering wheel,
pressing it up and keeping it in this position.
– Switch on the ignition – wait for the right turn signal to flash 4
times. –
Switch off the ignition – wait until you hear the audible warning
to confirm that the daytime driving lights have been switched
on.
– Release the turn signal lever.
Deactivation of the daytime running light function 1)
● The daytime running light function is deactivated by removing the corre-
sponding fuse ⇒ page 219.
Activation of the daytime running light function 1)
● The daytime running light function is activated by placing the corre-
sponding fuse ⇒ page 219.
Note
The daytime driving lights work when the ignition is switched on.
Front fog lights*
Fig. 55 Instrument pan-
el: light switch
1)
This does not apply to vehicles equipped with the START-STOP system.
Page 139 of 258
137
Heating and air conditioning
Temperature selection
– When you switch on the ignition, control 1 ⇒ Fig. 99
⇒ page 136 can be used to set the required interior tempera-
ture.
The interior temperature can be adjusted between +18 °C (+64 °F) and
+29 °C (+84 °F). The temperature is regulated automatically within this
range. If a temperature below +18 °C (+64 °F) is selected, “LO” is displayed
on the screen. If a temperature above +29 °C (+84 °F) is selected, “HI” is
displayed on the screen. At both extremes, Climatronic works at maximum
cooling or heating power, respectively. The temperature is not regulated.
In the event of prolonged, irregular distribution of the air flow from the out-
lets (particularly the footwells) and significant differences in temperature,
e.g. on leaving the vehicle, sensitive people may catch a cold.
Air recirculation
Air recirculation prevents unpleasant smells, e.g. when passing
through a tunnel or in queuing traffic, from entering the interior.
Switching on air recirculation mode
– Press button
17 ⇒ Fig. 99 ⇒ page 136 and the
symbol
is displayed on the screen.
Switching off air recirculation mode
– Press button
17 ⇒ Fig. 99 ⇒ page 136 and the
symbol
disappears from the screen.
WARNING
Never use the air recirculation system for too long, as it prevents fresh air
from entering the vehicle and “used” air can cause tiredness, reduce your
attention span and cause the windows to mist over. This increases the
risk of an accident. Switch off the air recirculation system as soon as the
windows begin to mist over.
Note
If air recirculation mode remains on for 15 minutes, the symbol will
start to flash on the screen to indicate prolonged air recirculation. If air recir-
culation is not switched off, the symbol will continue to flash for 5 minutes.
Blower selection
Climatronic automatically regulates the blower speed according to
the interior temperature. It is possible, however, to set the blower
speed to suit requirements.
– Turn rotary control 10
⇒ Fig. 99 ⇒
page 136 anti-clockwise (de-
crease speed) or clockwise (increase speed).
Climatronic will switch off when the blower switches off.
WARNING
● “Used air” can cause tiredness, reduce attention spans and cause the
windows to mist over. This increases the risk of an accident.
● Do not switch off Climatronic for longer than necessary.
● Switch Climatronic back on as soon as the windows begin to mist
over.
Safety FirstOperating instructionsPractical TipsTechnical specifications
Page 141 of 258
139
Driving
Driving Starting and stopping the engine
Introduction
WARNING
● Never adjust the steering wheel while the vehicle is moving!
● Maintain at least 25 cm distance between the steering wheel and the
upper part of your body 1
⇒ Fig. 100
⇒ page 140. The airbag system
will not be able to give the required protection if the minimum distance is
not observed. This can cause a risk of fatal injury!
● For safety reasons, the steering wheel adjustment lever must always
be pushed securely against the steering column to prevent the steering
wheel from accidentally changing position while driving. Risk of acci-
dent!
● If the steering wheel is adjusted closer to your face, the protective ef-
fect of the driver airbag will be decreased in the event of an accident.
Check that the steering wheel is pointing towards the upper part of your
body.
● When driving, always hold the steering wheel with both hands on the
outside part at the 9 o'clock and 3 o'clock positions. Never hold the
steering wheel at the 12 o'clock position, or in any other manner (e.g. in
the centre of the steering wheel). In such cases, if the airbag is triggered,
you may sustain injuries to the arms, hands and head.
● When moving with the engine switched off, the ignition key must al-
ways remain in position 2
⇒ Fig. 101 ⇒
page 141 (ignition on). The
control lamps will light up in this position. Otherwise, the steering lock
could engage suddenly. Risk of accident!
WARNING (Continued)
● Do not remove the key from the ignition until the vehicle has come to
a standstill and is secure (e.g. the handbrake is engaged). Otherwise, the
steering lock could suddenly engage. Risk of accident!
● Always take the ignition key with you when you leave the vehicle.
This is particularly important if you leave children in the vehicle. Children
could start the engine, for example, with the subsequent risk of accident.
● Never leave the engine running in unventilated or closed rooms. The
exhaust gases contain carbon monoxide, an odourless and colourless
poisonous gas. Risk of fatal accidents! Carbon monoxide can cause peo-
ple to lose consciousness and can cause death.
● Never leave the vehicle unattended if the engine is running.
● Never switch the engine off until the vehicle is stationary. Risk of ac-
cident!
CAUTION
● Turning the steering wheel fully in either direction when the vehicle is
stationary and the engine in gear puts the power steering under great
stress. This could lead to noise. Never leave the steering wheel turned fully
in either direction for more than 15 seconds. Risk of damage to the power
steering system!
● The starter motor may only be used (key position 3
⇒ Fig. 101
⇒ page 141 in the ignition) if the engine is off. Using the starter motor
when the engine is running could cause damage.
● Immediately release the ignition key when the engine starts, otherwise
damage could be caused to the starter motor.
● When the engine is cold, you should avoid high engine speeds, driving
at full throttle and over-loading the engine before it reaches operating tem-
perature. Risk of engine damage!
Safety FirstOperating instructionsPractical TipsTechnical specifications
Page 142 of 258
140Driving
● Do not tow-start the engine. Risk of engine damage! In vehicles with a
catalytic converter, unburnt fuel could reach the catalytic converter and
catch fire in it. This would lead to a fault in the catalytic converter. Use the
battery from another vehicle for help in starting the engine ⇒ page 214,
Jump-starting.
● After the engine has been working hard for a long time, leave the engine
idling for about one minute before switching it off at the end of a journey.
This will stop the engine from overheating.
For the sake of the environment
Do not warm up the engine when the vehicle is stationary. If possible, move
off immediately after starting the engine. This will help the engine reach op-
erating temperature more quickly, reducing the quantity of emissions.
Note
● The engine can only be started with the original SEAT key.
● Loud running noises may be heard briefly after cold-starting the engine.
This is normal and is no cause for concern.
● After the engine has been stopped and the ignition switched off, the ra-
diator fan may continue running for around 10 minutes.
● If the engine still does not start after a second attempt, the fuel pump
fuse might have blown. Check the fuse and replace if necessary
⇒ page 219 or contact your Specialised Service.
● You should always engage the steering lock when you leave the vehicle.
This will hinder any attempts at theft. Adjusting the steering wheel position
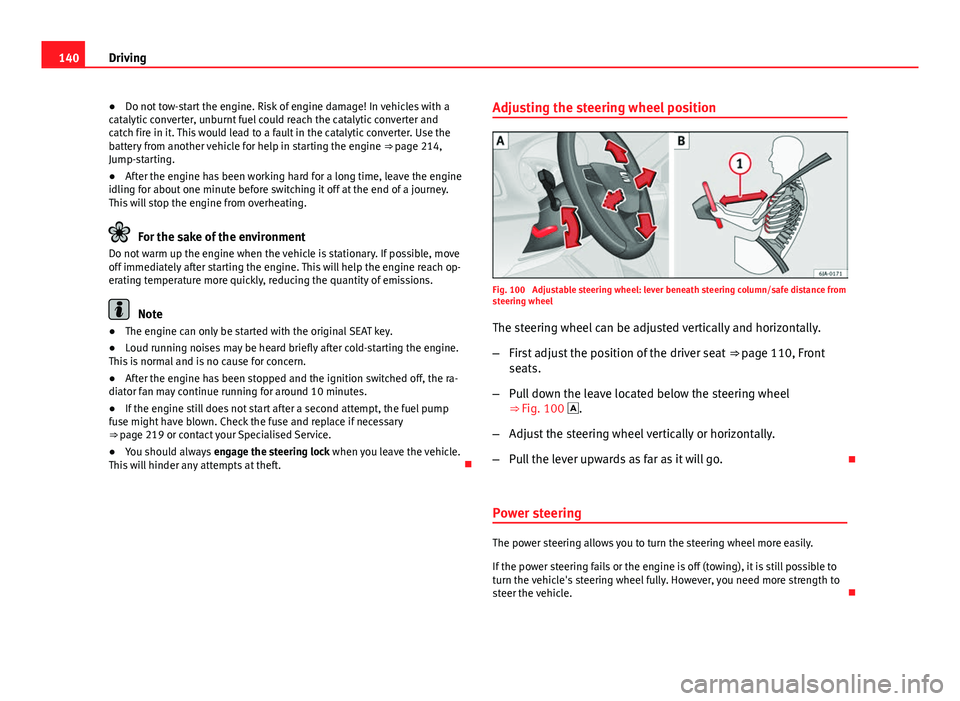
Fig. 100 Adjustable steering wheel: lever beneath steering column/safe distance from
steering wheel
The steering wheel can be adjusted vertically and horizontally.
– First adjust the position of the driver seat ⇒ page 110, Front
seats.
– Pull down the leave located below the steering wheel
⇒ Fig. 100 .
– Adjust the steering wheel vertically or horizontally.
– Pull the lever upwards as far as it will go.
Power steering
The power steering allows you to turn the steering wheel more easily.
If the power steering fails or the engine is off (towing), it is still possible to
turn the vehicle's steering wheel fully. However, you need more strength to
steer the vehicle.