technical data Seat Toledo 2016 Owner's Guide
[x] Cancel search | Manufacturer: SEAT, Model Year: 2016, Model line: Toledo, Model: Seat Toledo 2016Pages: 248, PDF Size: 5.82 MB
Page 93 of 248
Fuses and bulbs
Changing the bulb on the num-
ber p l
at
e
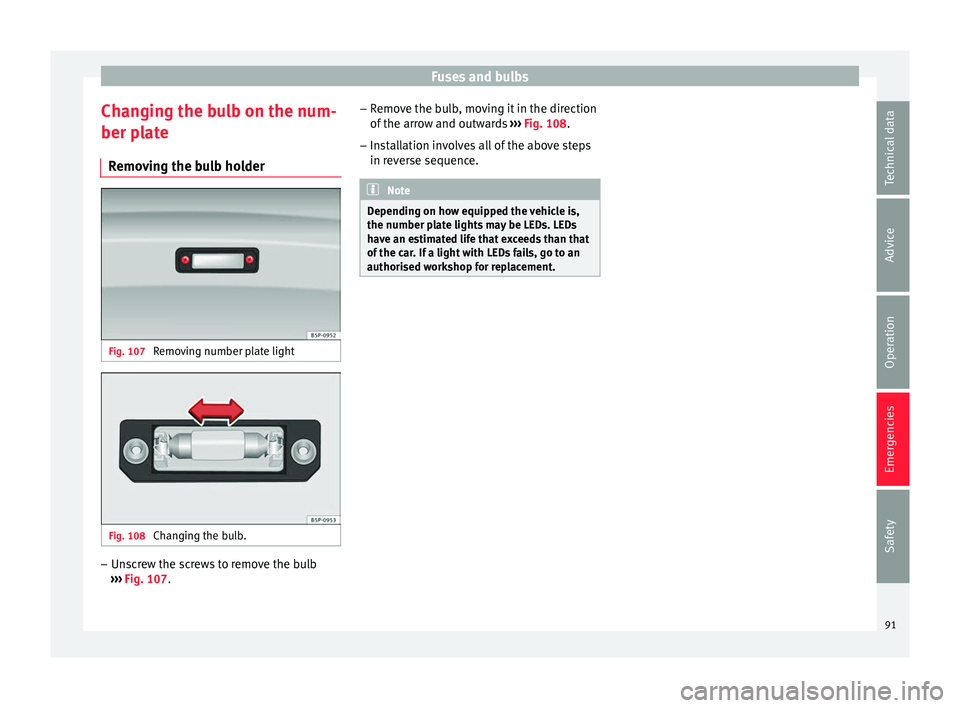
Removing the bulb holder Fig. 107
Removing number plate light Fig. 108
Changing the bulb. –
Unscrew the screws to remove the bulb
› ›
›
Fig. 107. –
Remov
e the bulb, moving it in the direction
of the arrow and outwards ››› Fig. 108.
– Installation involves all of the above steps
in rever
se sequence. Note
Depending on how equipped the vehicle is,
the number pl at
e lights may be LEDs. LEDs
have an estimated life that exceeds than that
of the car. If a light with LEDs fails, go to an
authorised workshop for replacement. 91
Technical data
Advice
Operation
Emergencies
Safety
Page 95 of 248
Controls and displays
Operation
C ontr
o
ls and displays
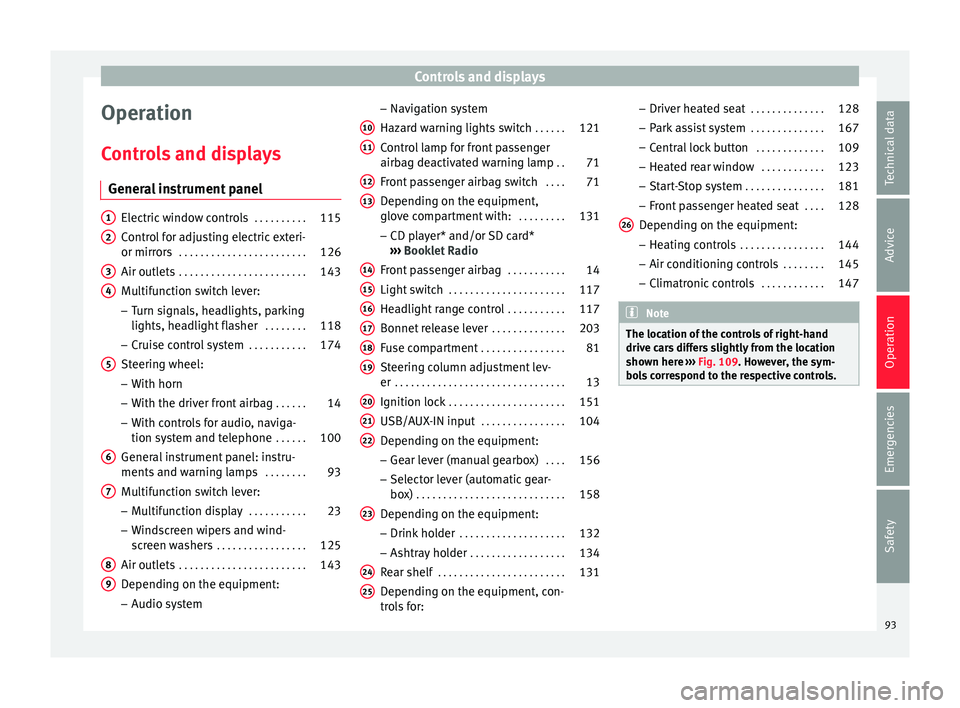
General instrument panel Electric window controls
. . . . . . . . . .115
Control for adjusting electric exteri-
or mirror s . . . . . . . . . . . . . . . . . . . . . . . . 126
Air outl
ets . . . . . . . . . . . . . . . . . . . . . . . . 143
Multifunction switch lever:
– Turn s ign
als, headlights, parking
lights, headlight flasher . . . . . . . .118
– Crui se c
ontrol system . . . . . . . . . . .174
Steering wheel:
– With horn
– With the driv
er front airbag . . . . . .14
– With c ontr
ols for audio, naviga-
tion system and telephone . . . . . .100
General instrument panel: instru-
ments and w arnin
g lamps . . . . . . . . 93
Multifunction switch lever:
– Multif
unction display . . . . . . . . . . .23
– Wind s
creen wipers and wind-
screen washers . . . . . . . . . . . . . . . . . 125
Air outlets . . . . . . . . . . . . . . . . . . . . . . . . 143
Depending on the equipment:
– Audio sy st
em
1 2
3
4
5
6
7
8
9 –
Nav ig
ation sy
stem
Hazard warning lights switch . . . . . .121
Control lamp for front passenger
airbag deactiv
ated warning lamp . .71
Front passenger airbag switch . . . .71
Depending on the equipment,
glove c
ompartment with: . . . . . . . . .131
– CD pla
yer* and/or SD card*
››› Booklet Radio
Front passenger airbag . . . . . . . . . . .14
Light switch . . . . . . . . . . . . . . . . . . . . . . 117
Headlight range control . . . . . . . . . . .117
Bonnet release lever . . . . . . . . . . . . . .203
Fuse compartment . . . . . . . . . . . . . . . . 81
Steering column adjustment lev-
er . . . . . . . . . . . . . . . . . . . . . . . . . . . . . . . . 13
Ignition lock . . . . . . . . . . . . . . . . . . . . . . 151
USB/AUX-IN input . . . . . . . . . . . . . . . . 104
Depending on the equipment: – Gear lev
er (manual gearbox) . . . .156
– Select or l
ever (automatic gear-
box) . . . . . . . . . . . . . . . . . . . . . . . . . . . . 158
Depending on the equipment:
– Drink ho l
der . . . . . . . . . . . . . . . . . . . . 132
– Ashtra y
holder . . . . . . . . . . . . . . . . . . 134
Rear shelf . . . . . . . . . . . . . . . . . . . . . . . . 131
Depending on the equipment, con-
tro l
s for:
10 11
12
13
14
15
16
17
18
19
20
21
22
23
24
25 –
Driv er he
at
ed seat . . . . . . . . . . . . . . 128
– Park a
ssist system . . . . . . . . . . . . . . 167
– Central
lock button . . . . . . . . . . . . . 109
– Heated r
ear window . . . . . . . . . . . . 123
– Start
-Stop system . . . . . . . . . . . . . . . 181
– Front p
assenger heated seat . . . .128
Depending on the equipment: – Heating c
ontrols . . . . . . . . . . . . . . . . 144
– Air conditioning c
ontrols . . . . . . . . 145
– Climatr
onic controls . . . . . . . . . . . . 147 Note
The location of the controls of right-hand
drive c ar
s differs slightly from the location
shown here ››› Fig. 109. However, the sym-
bols correspond to the respective controls. 26
93
Technical data
Advice
Operation
Emergencies
Safety
Page 97 of 248

Instruments and warning lamps
CAUTION
● To pr ev
ent damage to the engine, the rev
counter needle should only remain in the red
zone for a short period of time.
● When the engine is cold, avoid high revs
and heavy ac
celeration and do not make the
engine work hard. For the sake of the environment
Changing up a gear in time reduces fuel con-
sumption and noi se.Rev counter
The rev counter indicates the number of en-
gine r
ev
o
lutions per minute ›››
Fig. 110 1 .
T og
ether w
ith the gear-change indicator, the
rev counter offers you the possibility of using
the engine of your vehicle at a suitable
speed.
The start of the red zone on the dial indicates
the maximum engine speed which may be
used briefly when the engine is warm and af-
ter it has been run in properly. Before reach-
ing this range, you should change to a higher
gear for vehicles with a manual gearbox or for
automatic gearboxes put the selector lever in
“D” or take your foot off the accelerator ped-
al. We recommend that you avoid high revs and
that
you follow the recommendations on the
gear-change indicator. Consult the additional
information in ›››
page 25. CAUTION
Never allow the rev counter needle 1 ›››
Fig. 110 to g o int
o the red zone on the
scale for more than a very brief period, other-
wise there is a risk of engine damage. For the sake of the environment
Changing up a gear early will help you to save
fuel and minimi
se emissions and engine
noise. Indications on the display
A variety of information can be viewed on the
in
s
trument
panel display ›››
Fig. 110 3 de-
pendin g on the
v
ehicle equipment:
● Bonnet, rear lid and doors open
›››
page 25.
● Information and warning texts.
● Mileage.
● Time.
● Navigation instructions.
● Outside temperature.
● Compass. ●
Shift l
ever position ››› page 158.
● Recommended gear (manual gearbox)
›››
page 25.
● Multifunction display (MFD) and menus
with differ
ent setting options ›››
page 23.
● Service interval display ›››
page 30.
● Second speed display ›››
page 26.
● Speed warning function ›››
page 29.
● Start-Stop system status display
›››
page 181.
● Low consumption driving status (ECO)
›››
page 96
● Identifying letters on engine (MKB).
Dist
ance travelled
The odometer registers the total distance
travelled by the car.
The odometer (trip ) shows the distance
travelled since the last odometer reset. The
last digit of the trip recorder indicates distan-
ces of 100 metres or one tenths of a mile.
● Briefly press the button ›››
Fig. 110 4 to re-
set the trip r
ec
order to 0.
● Keep the button 4 pressed for about 3
sec ond
s
and the previous value will be dis-
played. »
95
Technical data
Advice
Operation
Emergencies
Safety
Page 99 of 248
Instruments and warning lamps
●
Dependin g on the equipment, some set
-
tings and instructions can also be carried out
in the Easy Connect system.
● When several warnings are active at the
same time, the symbol
s are shown succes-
sively for a few seconds and will stay on until
the fault is rectified. Odometer
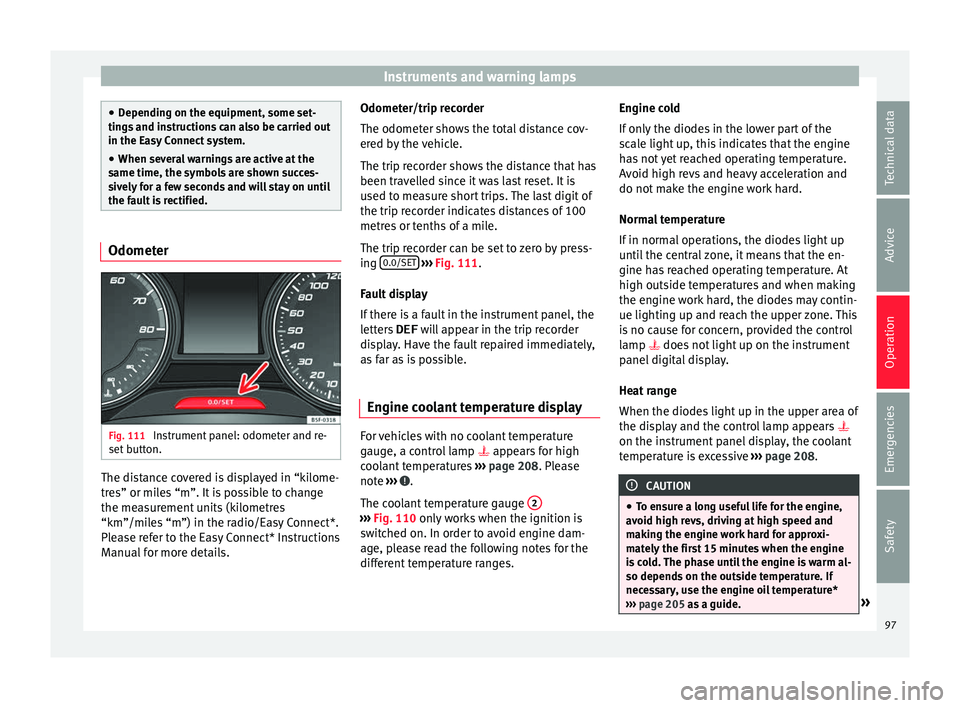
Fig. 111
Instrument panel: odometer and re-
set b
utt
on. The distance covered is displayed in “kilome-
tr
e
s” or mi
les “m”. It is possible to change
the measurement units (kilometres
“km”/miles “m”) in the radio/Easy Connect*.
Please refer to the Easy Connect* Instructions
Manual for more details. Odometer/trip recorder
The odometer show
s the total distance cov-
ered by the vehicle.
The trip recorder shows the distance that has
been travelled since it was last reset. It is
used to measure short trips. The last digit of
the trip recorder indicates distances of 100
metres or tenths of a mile.
The trip recorder can be set to zero by press-
ing 0.0/SET
› ››
Fig. 111
.
F
ault display
If there is a fault in the instrument panel, the
letters DEF will appear in the trip recorder
display. Have the fault repaired immediately,
as far as is possible.
Engine coolant temperature display For vehicles with no coolant temperature
g
aug
e, a c
ontrol lamp appears for high
coolant temperatures ›››
page 208. Please
note ››› .
The c oo
l
ant temperature gauge 2 ›››
Fig. 110 only w
orks when the ignition is
switched on. In order to avoid engine dam-
age, please read the following notes for the
different temperature ranges. Engine cold
If on
ly
the diodes in the lower part of the
scale light up, this indicates that the engine
has not yet reached operating temperature.
Avoid high revs and heavy acceleration and
do not make the engine work hard.
Normal temperature
If in normal operations, the diodes light up
until the central zone, it means that the en-
gine has reached operating temperature. At
high outside temperatures and when making
the engine work hard, the diodes may contin-
ue lighting up and reach the upper zone. This
is no cause for concern, provided the control
lamp does not light up on the instrument
panel digital display.
Heat range
When the diodes light up in the upper area of
the display and the control lamp appears
on the instrument panel display, the coolant
temperature is excessive ››› page 208. CAUTION
● To en s
ure a long useful life for the engine,
avoid high revs, driving at high speed and
making the engine work hard for approxi-
mately the first 15 minutes when the engine
is cold. The phase until the engine is warm al-
so depends on the outside temperature. If
necessary, use the engine oil temperature*
››› page 205 as a guide. » 97
Technical data
Advice
Operation
Emergencies
Safety
Page 101 of 248

Introduction to the Easy Connect system*
●
Bef or
e opening the bonnet, switch off the
engine and allow it to cool.
● In any vehicle, the engine compartment is a
hazar
dous area and could cause severe inju-
ries ››› page 202. CAUTION
Failure to heed the control lamps and text
me ss
ages when they appear may result in
faults in the vehicle. Introduction to the Easy
C
onnect
sy
stem*
System settings (CAR)* CAR menu (Setup) Read the additional information carefully
›› ›
page 21
To select the settings menus, press the Easy
Connect button and the
Set
up function
b utt
on.
The act
ual number of menus available and
the name of the various options in these me-
nus will depend on the vehicle’s electronics
and equipment.
Pressing the menu button will always take
you to the last menu used.
When the function button check box is activa-
ted , the function is active.
Pressing the menu button will always take
y ou t
o the l
ast menu used.
Any changes made using the settings menus
are automatically saved on closing those me-
nus.
Function buttons in the vehicle settings
menuPage
ESC system››› page 154
Tyres››› page 219
Driver assistance››› table on page 21
Parking and manoeuvring››› page 167
Vehicle lights››› table on page 21
Mirrors and windscreen wipers››› table on page 21
Opening and closing››› table on page 21
Multifunction display››› table on page 21
Date and time››› table on page 21
Units››› table on page 21
Service››› page 30
Factory settings››› table on page 21 WARNING
Any distraction may lead to an accident, with
the risk of
injury. Operating the Easy Connect
system while driving could distract you from
traffic. 99
Technical data
Advice
Operation
Emergencies
Safety
Page 103 of 248
Communications and multimedia
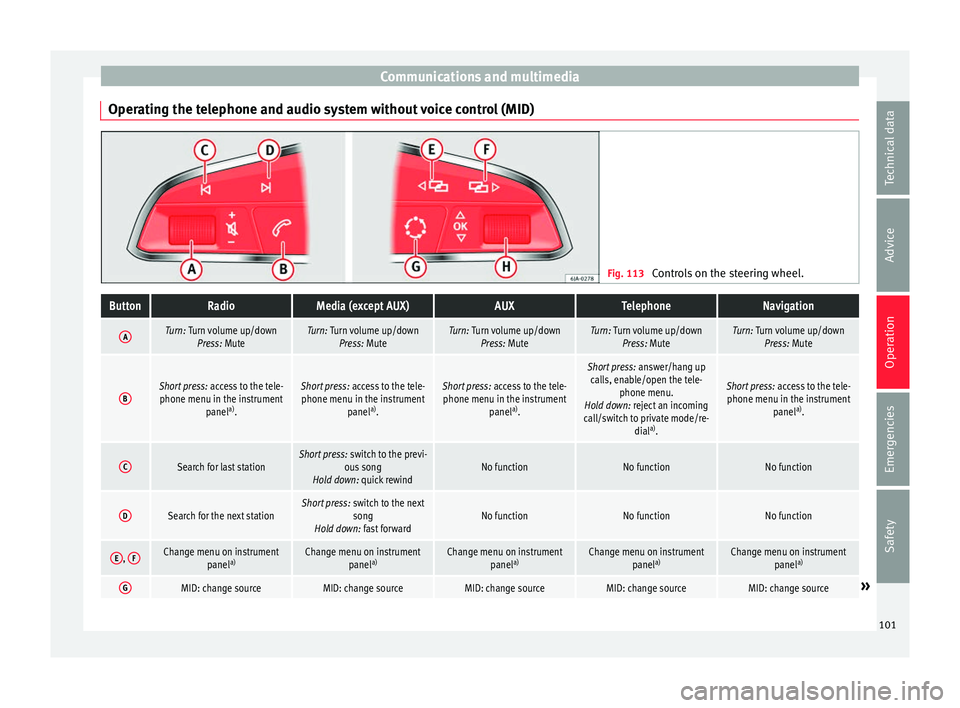
Operating the telephone and audio system without voice control (MID) Fig. 113
Controls on the steering wheel.ButtonRadioMedia (except AUX)AUXTelephoneNavigation
ATurn: Turn volume up/down
Press: MuteTurn: Turn volume up/downPress: MuteTurn: Turn volume up/downPress: MuteTurn: Turn volume up/downPress: MuteTurn: Turn volume up/downPress: Mute
BShort press: access to the tele-
phone menu in the instrument panela)
.Short press: access to the tele-
phone menu in the instrument panela)
.Short press: access to the tele-
phone menu in the instrument panela)
.
Short press: answer/hang up
calls, enable/open the tele- phone menu.
Hold down: reject an incoming
call/switch to private mode/re- diala)
.
Short press: access to the tele-
phone menu in the instrument panela)
.
CSearch for last stationShort press: switch to the previ-
ous song
Hold down: quick rewindNo functionNo functionNo function
DSearch for the next stationShort press: switch to the next
song
Hold down: fast forwardNo functionNo functionNo function
E, FChange menu on instrument
panela)Change menu on instrument
panela)Change menu on instrument
panela)Change menu on instrument
panela)Change menu on instrument
panela)
GMID: change sourceMID: change sourceMID: change sourceMID: change sourceMID: change source» 101
Technical data
Advice
Operation
Emergencies
Safety
Page 105 of 248
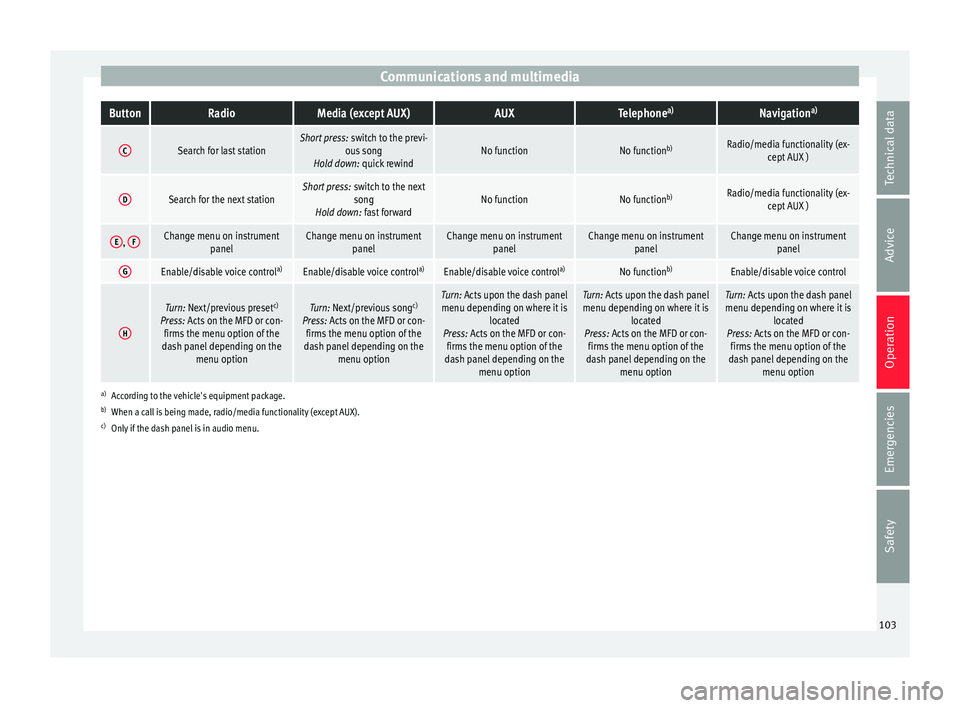
Communications and multimediaButtonRadioMedia (except AUX)AUXTelephone
a)Navigation a)
CSearch for last stationShort press:
switch to the previ-
ous song
Hold down: quick rewindNo functionNo function b)Radio/media functionality (ex-
cept AUX )
DSearch for the next stationShort press: switch to the next
song
Hold down: fast forwardNo functionNo function b)Radio/media functionality (ex-
cept AUX )
E, FChange menu on instrument
panelChange menu on instrumentpanelChange menu on instrumentpanelChange menu on instrumentpanelChange menu on instrumentpanel
GEnable/disable voice control a)Enable/disable voice controla)Enable/disable voice controla)No functionb)Enable/disable voice control
H
Turn: Next/previous preset c)
Press: Acts on the MFD or con- firms the menu option of the
dash panel depending on the menu optionTurn: Next/previous song c)
Press: Acts on the MFD or con- firms the menu option of the
dash panel depending on the menu optionTurn: Acts upon the dash panelmenu depending on where it is located
Press: Acts on the MFD or con- firms the menu option of the
dash panel depending on the menu optionTurn: Acts upon the dash panelmenu depending on where it is located
Press: Acts on the MFD or con- firms the menu option of the
dash panel depending on the menu optionTurn: Acts upon the dash panelmenu depending on where it is located
Press: Acts on the MFD or con- firms the menu option of the
dash panel depending on the menu option
a)According to the vehicle's equipment package.
b) When a call is being made, radio/media functionality (except AUX).
c) Only if the dash panel is in audio menu.
103
Technical data
Advice
Operation
Emergencies
Safety
Page 107 of 248
Opening and closing
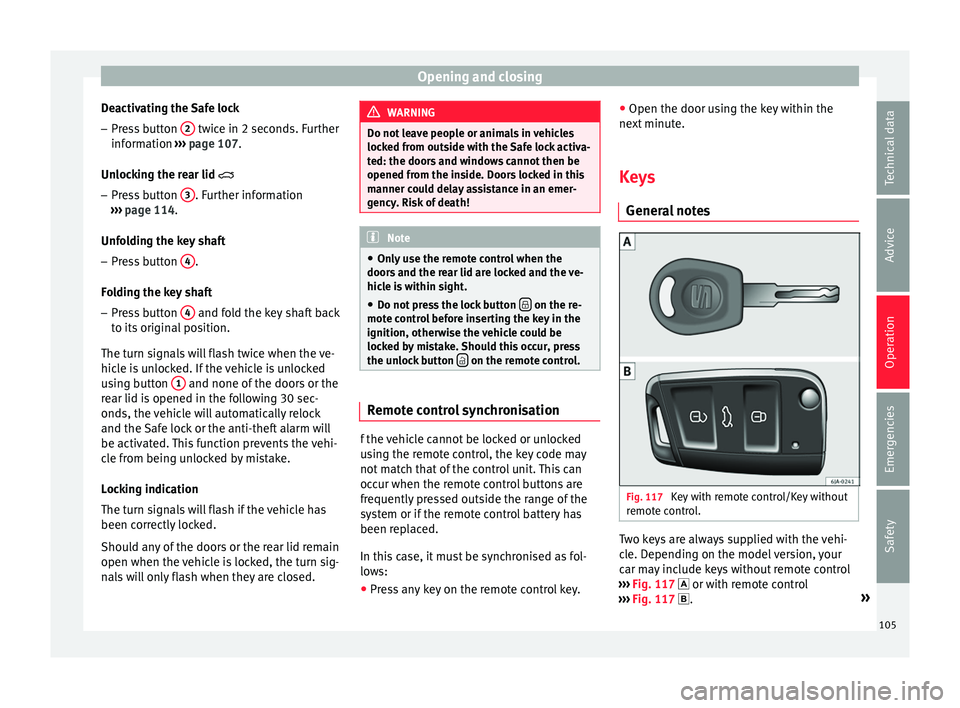
Deactivating the Safe lock – Press button 2 twice in 2 seconds. Further
inf orm
ation ›
›› page 107.
Unlocking the rear lid
– Press button 3 . Further information
› ›
›
page 114.
Unfolding the key shaft
– Press button 4 .
F o
l
ding the key shaft
– Press button 4 and fold the key shaft back
t o its
origin
al position.
The turn signals will flash twice when the ve-
hicle is unlocked. If the vehicle is unlocked
using button 1 and none of the doors or the
r e
ar lid i
s opened in the following 30 sec-
onds, the vehicle will automatically relock
and the Safe lock or the anti-theft alarm will
be activated. This function prevents the vehi-
cle from being unlocked by mistake.
Locking indication
The turn signals will flash if the vehicle has
been correctly locked.
Should any of the doors or the rear lid remain
open when the vehicle is locked, the turn sig-
nals will only flash when they are closed. WARNING
Do not leave people or animals in vehicles
lock ed fr
om outside with the Safe lock activa-
ted: the doors and windows cannot then be
opened from the inside. Doors locked in this
manner could delay assistance in an emer-
gency. Risk of death! Note
● Only u
se the remote control when the
doors and the rear lid are locked and the ve-
hicle is within sight.
● Do not press the lock button on the re-
mote c ontr
ol before inserting the key in the
ignition, otherwise the vehicle could be
locked by mistake. Should this occur, press
the unlock button on the remote control.
Remote control synchronisation
f the vehicle cannot be locked or unlocked
u
s
in
g the remote control, the key code may
not match that of the control unit. This can
occur when the remote control buttons are
frequently pressed outside the range of the
system or if the remote control battery has
been replaced.
In this case, it must be synchronised as fol-
lows:
● Press any key on the remote control key. ●
Open the door usin
g the key within the
next minute.
Keys General
notes Fig. 117
Key with remote control/Key without
r emot
e c
ontrol. Two keys are always supplied with the vehi-
c
l
e. D
epending on the model version, your
car may include keys without remote control
››› Fig. 117 or with remote control
››› Fig. 117 . »
105
Technical data
Advice
Operation
Emergencies
Safety
Page 109 of 248
Opening and closing
Note
If it is not possible to unlock or lock the vehi-
cl e w
ith the remote control key once the bat-
tery has been replaced, it will need to be re-
synchronised ››› page 105. Central locking system
Genera l
notesAll of
the doors, the boot lid and the fuel cap
fl ap w
ill1)
unlock at the same time when the
central locking system is used.
Warning lamp on the driver door
Once the doors are locked, the warning lamp
will flash quickly for 2 seconds and then at a
slower rate.
If the vehicle is locked with Safe lock engag-
ed ›››
page 108, the warning lamp on the
driver door will flash quickly for 2 seconds
before switching off for 30 seconds and then
flashing at a slower rate.
If the warning lamp flashes quickly for 2 sec-
onds and then remains switched on before
flashing at a slower rate after 30 seconds,
there is a fault in the interior monitor and tow-away protection system
›››
page 113. Go
to a technical service.
Individualised settings Unlocking single doors
This
option
al function unlocks the driver door
only. The other doors remain locked and are
only unlocked when the next command is giv-
en (unlock).
Automatic unlock and lock
The doors and the rear lid are locked auto-
matically when the vehicle reaches a speed
of about 15 km/h (9 mph).
The doors unlock automatically when the key
is removed from the ignition. Additionally,
the driver or front passenger can unlock the
doors by pressing the ›››
page 109 central
lock button or by pulling the front door han-
dle. WARNING
Locking the doors prevents intruders from
gettin g int
o the car, e.g. while waiting at in-
tersections. However, it can also delay assis-
tance in the event of an accident. Risk of
death! Note
● Activ ation of
the single door setting can be
requested at your SEAT dealer.
● In the event of an accident in which the air-
bags
deploy, the doors will be automatically
unlocked for easier access and assistance.
● If the central locking system should fail to
work at
any time, only the driver door can be
locked or unlocked using the key
››› page 108. All other doors and the boot
hatch can be operated manually.
– Manual release ›››
page 10.
– Manual release of the rear lid
››› page 10. 1)
Valid for vehicles with a keyless fuel tank cap.
107
Technical data
Advice
Operation
Emergencies
Safety
Page 111 of 248
Opening and closing
Note
● The anti-theft a
larm switches on automati-
cally when the vehicle is locked, even if the
Safe lock is deactivated. The Vehicle interior
monitoring, however, is not activated.
● Given that the Safe function will be activa-
ted on lock
ing the vehicle, CHECK DEADLOCK
will be shown on the general instrument pan-
el display. On vehicles equipped with an in-
formative display, Caution SAFE! On- board documentation! Central locking button
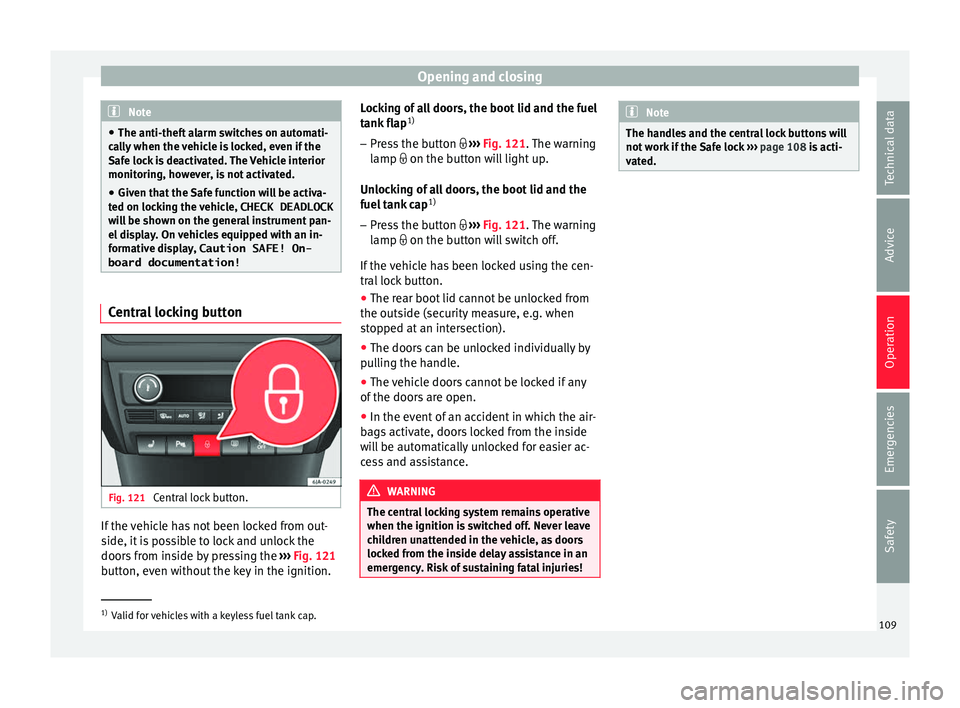
Fig. 121
Central lock button. If the vehicle has not been locked from out-
s
ide, it
i
s possible to lock and unlock the
doors from inside by pressing the ›››
Fig. 121
button, even without the key in the ignition. Locking of all doors, the boot lid and the fuel
tank fl
ap1)
– Press the button ›››
Fig. 121. The warning
lamp on the button will light up.
Unlocking of all doors, the boot lid and the
fuel tank cap 1)
– Press the button ›››
Fig. 121. The warning
lamp on the button will switch off.
If the vehicle has been locked using the cen-
tral lock button.
● The rear boot lid cannot be unlocked from
the outside (security
measure, e.g. when
stopped at an intersection).
● The doors can be unlocked individually by
pul
ling the handle.
● The vehicle doors cannot be locked if any
of the doors
are open.
● In the event of an accident in which the air-
bags
activate, doors locked from the inside
will be automatically unlocked for easier ac-
cess and assistance. WARNING
The central locking system remains operative
when the ignition is sw
itched off. Never leave
children unattended in the vehicle, as doors
locked from the inside delay assistance in an
emergency. Risk of sustaining fatal injuries! Note
The handles and the central lock buttons will
not w ork
if the Safe lock ››› page 108 is acti-
vated. 1)
Valid for vehicles with a keyless fuel tank cap.
109
Technical data
Advice
Operation
Emergencies
Safety