technical data Seat Toledo 2016 Workshop Manual
[x] Cancel search | Manufacturer: SEAT, Model Year: 2016, Model line: Toledo, Model: Seat Toledo 2016Pages: 248, PDF Size: 5.82 MB
Page 153 of 248
Driving
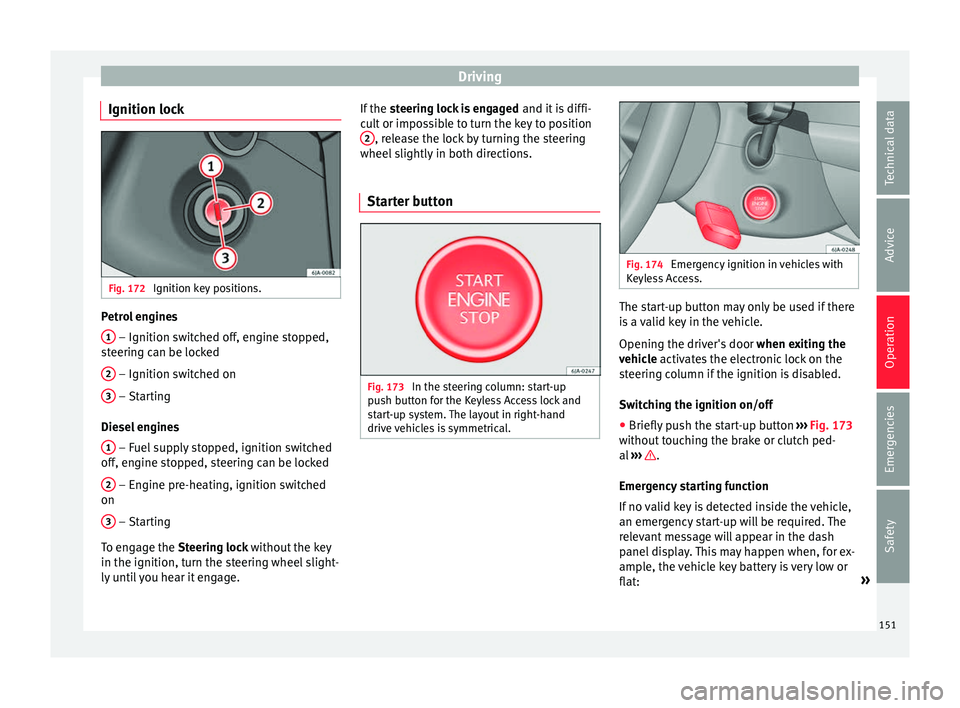
Ignition lock Fig. 172
Ignition key positions. Petrol engines
1 – Ignition switched off, engine stopped,
s t
eerin
g can be locked
2 – Ignition switched on
3 – Starting
Die sel
en
gines
1 – Fuel supply stopped, ignition switched
off , en
gine s
topped, steering can be locked
2 – Engine pre-heating, ignition switched
on
3 – Starting
T o en
g
age the Steering lock without the key
in the ignition, turn the steering wheel slight-
ly until you hear it engage. If the
steering lock is engaged and it i
s diffi-
cult or impossible to turn the key to position 2 , release the lock by turning the steering
wheel s
lightly
in both directions.
Starter button Fig. 173
In the steering column: start-up
p u
sh b
utton for the Keyless Access lock and
start-up system. The layout in right-hand
drive vehicles is symmetrical. Fig. 174
Emergency ignition in vehicles with
Keyl e
ss Access. The start-up button may only be used if there
i
s
a
valid key in the vehicle.
Opening the driver's door when exiting the
vehicle activates the electronic lock on the
steering column if the ignition is disabled.
Switching the ignition on/off
● Briefly push the start-up button ›››
Fig. 173
without touching the brake or clutch ped-
al ››› .
Emer g
ency
starting function
If no valid key is detected inside the vehicle,
an emergency start-up will be required. The
relevant message will appear in the dash
panel display. This may happen when, for ex-
ample, the vehicle key battery is very low or
flat: »
151
Technical data
Advice
Operation
Emergencies
Safety
Page 155 of 248

Driving
petrol engine vehicle at low speed. Other-
wi
se, the br
ake servo might not work proper-
ly. Risk of accident!
● In the event of damage to the standard
front s
poiler or where a different front spoil-
er, wheel trims, etc. are subsequently fitted,
make sure the air vent to the brakes on the
front wheels is not blocked. Otherwise, brak-
ing operations may be impaired. Risk of acci-
dent!
● Always fully release the handbrake. If it is
only p
artially released, this will cause over-
heating of the rear brakes, which can impair
the function of the brake system. Risk of acci-
dent!
● Never leave children unsupervised in the
vehicl
e. They could release the handbrake or
move the gear lever. The vehicle could start
moving. Risk of accident!
● Insufficient fuel can cause the engine to run
irregu
larly or to switch off. Brake assist sys-
tems could be impaired. Risk of accident!
● Always adjust your driving style to suit visi-
bility
, the weather and road and traffic condi-
tions. The best vehicle safety offered by
brake assist systems must never encourage
you to run greater risks. Risk of accident! CAUTION
● Ob ser
ve the information concerning new
brake pads ››› page 161.
● Where braking is not necessary, do not
wear do
wn the brake pads by pressing down gently on the brake pedal. This causes the
brak
e
s to overheat, increasing their wear and
increasing braking distances.
● To ensure the brake assist systems work
properly, a
ll wheels must be fitted with tyres
approved by the manufacturer. Note
● If y
ou brake suddenly and the brake system
control unit regards the situation as hazard-
ous for the drivers behind you, the brake
lights will begin to flash automatically. After
reducing speed to approximately 10 km/h (6
mph) or stopping the vehicle, the brake lights
will stop flashing and the hazard warning
lights will switch on. The hazard warning
lights are automatically switched off when
you accelerate or restart the vehicle.
● On long, steep gradients, reduce your
speed and ch
ange to a lower gear (manual
gearbox) or move the selector lever to a lower
gear position (automatic gearbox). This uses
the force of the engine and the brakes do not
suffer as much. If you still have to brake, do
so intermittently, pressing down repeatedly
on the brake pedal.
● Vehicle modifications (e.g. to the engine,
brake
s, frame or a combination of wheels and
tyres) could impair the brake assist systems
››› page 192, Accessories and modifications
to the vehicle .
● In the event of a fault in the ABS system,
the ESC, T
CS and EDL are switched off auto- matically. A fault in the ABS is indicated by
the
›››
page 155 warning lamp. Control lamp
The warning lamp il
lumin
ates if the brake
fluid level is too low or if there is a fault in the
ABS system.
The informative display indicates:
Brake fluid Instruction Manual!
Stop the vehicle, switch off the engine and
check the level of the brake fluid
››› page 209 WARNING
● The fo l
lowing indications must be taken in-
to account when opening the engine com-
partment to check the brake fluid
››› page 202, Engine compartment.
● If the warning lamp illumin
ates together
with the warning lamp ››› page 155, ,
stop the vehicle! Go to a technical service.
● A fault in the brake system or in the Anti-
lock br
ake system (ABS) can lead to longer
braking distances – Risk of accident! 153
Technical data
Advice
Operation
Emergencies
Safety
Page 157 of 248
Driving
example, if the vehicle begins to skid, the
E SC
br
akes the appropriate wheel automati-
cally.
The warning lamp on the general instru-
ment panel starts flashing when the system
is working.
The stability (ESC) system includes the fol-
lowing systems:
● Anti-lock brake system (ABS),
● Traction control system (TCS),
● Electronic differential lock (EDL),
● Hydraulic brake assist system (HBA),
● Hill hold control (HHC).
The ASR should be sw
itched on at all times.
Only under certain circumstances should the
system be switched off, e.g.
● driving with chains,
● driving in deep snow or on very soft surfa-
ces,
● D
uring the “swinging movement” required
to remo
ve a stuck vehicle
Switch the ASR back on as soon as possible.
Brake assist system (HBA)*
The HBA system is activated when you press
down on the brake pedal suddenly. It increa-
ses braking power, helping to reduce braking
distances. To reduce braking distance as
much as possible, keep the brake pedal pressed down firmly until the vehicle comes
to a st
andstill.
With the help of this system, the ABS is acti-
vated more quickly and more efficiently.
The brake assist function is deactivated auto-
matically when the brake pedal is released.
Hill hold control (HHC)*
The HHC system makes it easier to start the
vehicle on hills. The system maintains the
brake pressure created by pressing down on
the brake pedal for 2 seconds after it has
been released. Your foot can be removed
from the brake pedal and you can use the ac-
celerator pedal and move away on a hill with-
out having to use the handbrake. The brake
pressure drops as the accelerator pedal is
pressed. If the vehicle cannot be started, it
will start to move backwards after 2 seconds.
The HHC is activated on gradients of over
5%, if the driver door is closed. It only works
for starting on hills, moving both forward and
in reverse. It is not activated during start-up
down hill.
Control lamp
If the control lamp flashes, the ESC is
working.
If the warning lamp illuminates on igni-
tion, the ESC system may have switched off
due to technical reasons. Turn off the ignition and turn it on again. Upon switching on the
ignition again, if the w
arning lamp has
switched off, this means the ESC is function-
ing correctly again.
If the warning lamp is illuminated there is
a fault in the ESC.
The informative display indicates:
Report No.: electronic stability
control (ESC)
or Report No.: Traction control
system (ASR)
Go to a technical service. Note
If the battery is disconnected and connected
again, the y
ellow warning lamp lights up
when the ignition is switched on. This warn-
ing lamp must switch off after covering a
short distance. Anti-lock brake system (ABS)
The ABS system prevents the wheels locking
durin
g br
ak
ing. This helps the driver keep
control of the vehicle.
The driver is made aware of ABS assistance
by the pulsating of the brake pedal and a
characteristic noise. »
155
Technical data
Advice
Operation
Emergencies
Safety
Page 159 of 248
Driving
WARNING
Never engage reverse gear when moving for-
war d. Ri
sk of accident! Note
Do not rest your hand on the gear lever while
drivin g.
The pressure of your hand could lead
to premature wear of the gear system. Automatic gearbox
Ba s
ic information The gearbox changes up and down automati-
c
al
ly
. The gearbox can be set to Tiptronic
mode. The gears can be changed manually in
this mode ›››
page 159.
The engine can only be started in positions P
or N. If, on engaging the steering lock,
switching the ignition on/off or starting the
engine, the selector lever is not in these posi-
tions, the informative display will show Move
the selector lever to position
P/N! , or
P/N is shown on the general
dash panel display.
At temperatures below -10°C (14°F), the en-
gine can only be started in position P.
Move the selector lever to position P when
parking the vehicle on a flat surface. On a
slope, the handbrake should be firmly ap- plied before moving the selector lever to the
park po
sition. This reduces the load on the
lock mechanism while making it easier to
move the selector lever from position P.
If, while the vehicle is moving, the selector
lever is accidentally moved to position N, re-
lease the accelerator and wait for the engine
to idle before moving it back into position. WARNING
● Never pr e
ss the accelerator when selecting
the automatic gearbox operating mode when
the vehicle is stationary. Risk of accident!
● Never move the selector lever to positions
R or P when driving. Ri
sk of accident!
● If the vehicle is to be stopped with a gear
selected and the en
gine idling (e.g. waiting
or moving slowly at traffic lights), press down
on the brake pedal because the transmission
is not entirely interrupted when the engine is
idling and the vehicle will tend to start mov-
ing.
● Apply the handbrake firmly and put the se-
lector l
ever in position P before opening the
bonnet and working on the vehicle with the
engine running. Risk of accident! Strictly fol-
low the safety instructions ››› page 202, En-
gine compartment.
● When stopping on a slope (hill), try not to
stop the
vehicle from moving by pressing the
“accelerator” with a gear selected. This could
overheat the clutch. If the clutch risks being
burnt due to this force, it would switch off and the vehicle could move backwards. Risk
of ac
c
ident!
● If you have to stop on a hill, press down on
the brake ped
al to stop the vehicle from mov-
ing.
● The drive wheels could lose traction on a
slipper
y road surface when the kick-down
function is activated. Risk of sliding! CAUTION
● In D SG aut om
atic gearboxes, the double
clutch is protected from overloads. If the hill
hold control is used, the clutches are subjec-
ted to greater force if the vehicle is at a
standstill on a slope or suddenly accelerating
on a slope.
● Should the clutches overheat, the sym-
bol i
s shown on the informative display with
a warning message Gear overheated.
Stop! Instruction Manual! An audible
warning is also heard. Stop the vehicle in this
case, stop the engine and wait until the sym-
bol has switched off. Danger of damage to
the gearbox! You can continue driving once
the symbol is switched off. Starting and driving
Starting
– Press and hold the brake pedal.
– Press and hold the interlock button on the
sel ect
or l
ever knob and move the selector »
157
Technical data
Advice
Operation
Emergencies
Safety
Page 161 of 248
Driving
more than 2 seconds) to position D or R at
s peed
s
of less than 5 km/h (3 mph) and
when the vehicle is stationary, press down on
the brake pedal.
D – Drive (forwards)
In thi s
po
sition, the gearbox automatically
changes to a lower or higher gear, depending
on engine requirements, the driving speed
and the gear shift programme.
To move the selector lever to position D from
position N at speeds of less than 5 km/h (3
mph) and when the vehicle is stationary,
press down on the brake pedal.
In some situations (e.g. on mountain roads or
when towing a trailer or caravan), it can be
advantageous to switch temporarily to the
manual shift programme ››› page 159 so that
the gear ratios can be selected manually to
suit driving conditions.
S – Sports driving position
Shif tin
g up l
ater than usual makes full use of
the engine power. This shifts down earlier in
relation to position D.
To move the selector lever to position S from
position D, press the interlock button on the
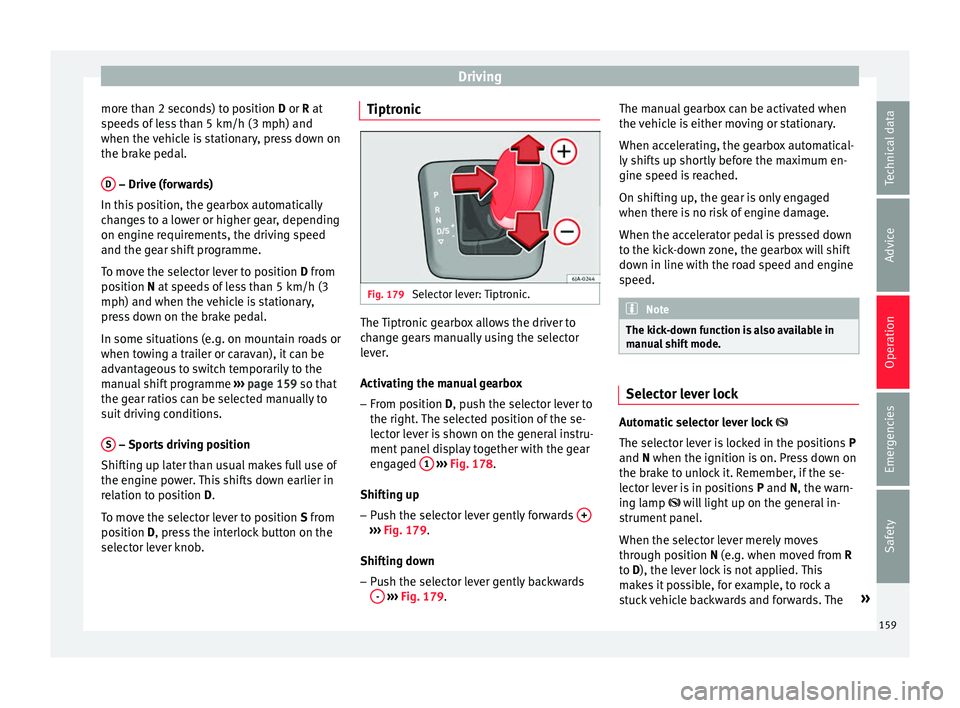
selector lever knob. Tiptronic
Fig. 179
Selector lever: Tiptronic. The Tiptronic gearbox allows the driver to
c
h
an
ge gears manually using the selector
lever.
Activating the manual gearbox
– From position D, push the sel
ector lever to
the right. The selected position of the se-
lector lever is shown on the general instru-
ment panel display together with the gear
engaged 1
› ›
› Fig. 178
.
Shifting up – Push the selector lever gently forwards + ›››
Fig. 179.
Shiftin g do
wn
– Push the selector lever gently backwards
-
› ›
› Fig. 179
. The manual gearbox can be activated when
the vehic
le is either moving or stationary.
When accelerating, the gearbox automatical-
ly shifts up shortly before the maximum en-
gine speed is reached.
On shifting up, the gear is only engaged
when there is no risk of engine damage.
When the accelerator pedal is pressed down
to the kick-down zone, the gearbox will shift
down in line with the road speed and engine
speed. Note
The kick-down function is also available in
manua l
shift mode. Selector lever lock
Automatic selector lever lock
The sel ect
or l
ever is locked in the positions P
and N when the ignition is on. Press down on
the brake to unlock it. Remember, if the se-
lector lever is in positions P and N, the warn-
ing lamp will light up on the general in-
strument panel.
When the selector lever merely moves
through position N (e.g. when moved from R
to D), the lever lock is not applied. This
makes it possible, for example, to rock a
stuck vehicle backwards and forwards. The »
159
Technical data
Advice
Operation
Emergencies
Safety
Page 163 of 248
Driving
Gearbox: System fault! You
may continue driving.
Hav e the f
au
lt corrected by a specialised
workshop without delay.
Gearbox: System fault! You
can continue driving with re-
strictions. Reverse gear disa‐
bled
Take the vehicle to a specialised workshop
and have the fault repaired without delay. Gearbox: System fault! You
can continue driving in D until
switching off the engine
Stop the vehicle in a safe place well away
from moving traffic. Seek specialist assis-
tance. Gearbox: too hot. Adapt your
driving accordingly
Continue driving at moderate speeds. When
the warning lamp switches off, you can con-
tinue driving in a normal manner. Gearbox: press the brake and
engage a gear again.
If the fault was caused by a gearbox with a
high temperature, this driver message will be
displayed when the gearbox has cooled
again. Run-in and economical driving
The first 1,500 km Over the first 1,500 kilometres the engine
mus
t
be run in.
Up to 1000 kilometres
– Do not drive at more than 3/4 of the maxi-
mum speed corr
esponding to the engaged
gear, i.e. up to 3/4 of the maximum permit-
ted engine speed.
– Do not drive at full speed.
– Avoid high engine speeds.
– Do not tow a trailer.
From 1000 t o 1500 k
ilometres (600 to 900
miles)
– Slowly increase the engine speed until
re
aching the maximum permitted speed of
the engaged gear, i.e. the maximum per-
mitted engine speed.
During its first few hours of running, the in-
ternal friction in the engine is greater than
later on, when all the moving parts have bed-
ded in. How the vehicle is driven over approx-
imately the first 1,500 kilometres (900
miles), determines the success of the proc-
ess of running in the engine. Even after running in, the vehicle should not
be unnece
ssarily driven at high engine
speeds. The maximum permitted engine
speed is marked at the start of the red zone
on the rev counter dial. The gear must be
changed up when the red area is reached in
vehicles with a manual gearbox. Extremely
high engine speeds when accelerating are
automatically limited, however the engine is
not protected against high engine speeds
produced by incorrectly changing to a lower
gear, which could cause the engine to run at
revs above the maximum permitted amount,
and consequently result in damage to the en-
gine.
Additionally, vehicles with a manual gearbox
must also bear the following in mind: do not
drive with the engine speed too low. Change
down to a lower gear when the engine no
longer runs smoothly. Observe the recom-
mendations for changing gear
››› page 25.
New tyres
New tyres must be submitted to “running in”,
given that initially their grip is not yet at the
maximum level. During the first 500 km (120
miles) drive very carefully.
New brake pads
New brake pads do not yet provide maximum
friction capacity. First they must be “run in”. »
161
Technical data
Advice
Operation
Emergencies
Safety
Page 165 of 248

Driving
engine at high rpm in the lower gears uses
an u nnec
e
ssary amount of fuel.
Manual gearbox: shift up from first to second
gear as soon as possible. We recommend
that, whenever possible, you change to a
higher gear upon reaching 2000 rpm. Follow
the “recommended gear” indication that ap-
pears on the instrument panel
››› page 25.
Avoid driving at high speed
We advise you not to drive at the top speed
permitted by the vehicle. Fuel consumption,
exhaust emissions and noise levels all in-
crease very rapidly at higher speeds. Driving
at moderate speeds will help to save fuel.
Avoid idling
It is worthwhile switching off the engine
when waiting in a traffic jam, at level cross-
ings or at traffic lights with a long red phase.
The fuel saved after only 30 - 40 seconds is
greater than the amount of fuel needed to re-
start the engine.
The engine takes a long time to warm up
when it is idling. Mechanical wear and pollu-
tant emissions are also especially high dur-
ing this initial warm-up phase. It is therefore
best to drive off immediately after starting
the engine. Avoid running the engine at high
speed. Periodic maintenance
Periodic m
aintenance work guarantees that,
before beginning a journey, you will not con-
sume more than the required amount of fuel.
A well-serviced engine gives you the benefit
of improved fuel efficiency as well as maxi-
mum reliability and an enhanced resale val-
ue.
A badly serviced engine can consume up to
10% more fuel than necessary.
Avoid short journeys
To reduce the consumption and emission of
polluting exhaust gases, the engine and the
exhaust gas filtration systems should reach
the optimum operating temperature.
With the engine cold, fuel consumption is
proportionally higher. The engine does not
warm up and fuel consumption does not nor-
malise until having driven approximately four
kilometres (2.5 miles). This is why we recom-
mend avoiding short trips whenever possi-
ble.
Maintain the correct tyre pressures
Bear in mind that keeping the tyres at an ad-
equate pressure saves fuel. If the tyre pres-
sure is just one bar (14.5 psi/100 kPa) too
low, fuel consumption can increase by as
much as 5%. Due to the greater rolling resist-
ance, under-inflation also increases tyre wear
wear and impairs handling. The tyre pressures should always be checked
when the tyre
s are cold.
Do not use winter tyres all year round as they
increase fuel consumption by up to 10%.
Avoid unnecessary weight
Given that every kilo of extra weight will in-
crease the fuel consumption, it is advisable
to always check the luggage compartment to
make sure that no unnecessary loads are be-
ing transported.
A roof rack is often left in place for the sake
of convenience, even when it is no longer
needed. At a speed of 100 km/h (62 mph)
and 120 km/h (75 mph) your vehicle will use
about 12% more fuel as a result of the extra
wind resistance caused by the roof rack even
when it is not in use.
Save electricity
The engine activates the alternator, which
produces electricity. With the need for elec-
tricity, fuel consumption also increases. Be-
cause of this, always turn off electrical devi-
ces when you do not need them. Examples of
devices that use a lot of electricity are: the
fan at high speeds, the rear window heating
and the seat heaters*. Note
● If y
ou vehicle has Start-Stop, it is not rec-
ommended to switch this function off. » 163
Technical data
Advice
Operation
Emergencies
Safety
Page 167 of 248

Driving
rise in temperature causes the soot on the fil-
t er t
o b
urn. On completion of the cleaning
the warning lamp will switch off.
If the lamp does not turn off, or the three
lamps turn on (particulate filter , fault in
the emission control system and glow
plugs ), drive the vehicle to a specialised
workshop and have the fault repaired at the
earliest opportunity. WARNING
● Alw a
ys drive according to the road weather
conditions, the terrain and traffic.
● The particulate filter attains very high tem-
peratur
es. Therefore, do not park the vehicle
in places where the exhaust pipe could come
into contact with dry grass or with highly-
flammable materials. Risk of fire! CAUTION
While the warning lamp is lit
up, the fuel
consumption is high, and in certain condi-
tions, the engine power is reduced. Note
● In order f or the p
articulate filter to burn off
soot in a correct manner, avoid carrying out
frequent short journeys.
● Using diesel fuel with a high sulphur count
can con
siderably reduce the useful life of the
particulate filter. The specialised service pro- vides information about the countries where
fuel
w
ith a high sulphur content is used. Engine management*
This warning lamp monitors the engine man-
agement
sy
stem for petrol engines.
The warning lamp (Electronic Power Con-
trol) lights up when the ignition is switched
on while system operation is being verified. It
should go out once the engine is started.
If there is a fault in the electronic engine
management system while you are driving,
this warning lamp will light up. Take the vehi-
cle to a specialised workshop as soon as
possible and have the engine checked.
Emission control system* Control lamp
fla
she
s:
When there is misfiring that can damage the
catalytic converter. Reduce speed and drive
carefully to the nearest specialised workshop
to have the engine checked.
The control lamp lights up:
If a fault has developed during driving which
has reduced the quality of the exhaust gas
(e.g. lambda probe fault). Reduce speed and drive carefully to the nearest specialised
workshop t
o have the engine checked.
Engine pre-heating/fault system* The warning lamp lights up to show that the
glow p
lug
s are preheating the diesel engine.
The control lamp lights up
If the control lamp lights up when the en-
gine is started it means that the glow plugs
are preheating. The engine can be started
straight away when the lamp switches off.
Control lamp flashes
If a fault develops in the engine management
system while you are driving, the glow plug
system lamp will flash . Take the vehicle to
a specialised workshop as soon as possible
and have the engine checked.
165
Technical data
Advice
Operation
Emergencies
Safety
Page 169 of 248

Driver assistance systems
Driver assistance systems
P ark
in
g aid
General information Various systems are available to help you
when park
in
g or manoeuvring in tight
spaces, depending on the equipment fitted
on your vehicle.
The rear parking aid is an audible assistant
that warns about obstacles located behind
the vehicle ›››
page 168.
During parking, Parking System Plus assists
the driver by visually and audibly warning
them about obstacles detected in front and
behind the vehicle ›››
page 168. WARNING
● Alw a
ys pay attention, also when looking
straight ahead, to traffic and the vehicle sur-
roundings. The assistance systems are not a
replacement for driver awareness. When in-
serting or removing the vehicle from a park-
ing space, or when performing similar ma-
noeuvres the driver always assumes the re-
sponsibility.
● Adapt your speed and driving style at all
times t
o suit visibility, weather, road and traf-
fic conditions.
● The ultrasound sensors have blind spots in
which ob
stacles and people are not regis- tered. Pay special attention to children and
anima
l
s.
● Always keep visual control of the vehicle
surrou
ndings: use the mirrors for additional
help. CAUTION
Parking Aid functions may be negatively af-
f ect ed b
y different factors that may lead to
damage to the vehicle or its immediate sur-
rounds:
● Under certain circumstances, the system
does not
detect or display certain objects:
– Objects such as chains, trailer draw bars,
fences, posts and thin trees.
– Objects that are located above the sen-
sors, such as protrusions in a wall.
– Objects with certain surfaces or struc-
tures, such as wire mesh fences or pow-
der snow.
● Certain surfaces of objects and garments
do not refl
ect the ultrasound sensors' sig-
nals. The system cannot detect, at least cor-
rectly, these objects or people wearing such
clothes.
● Ultrasound sensor signals may be affected
by e
xternal sound sources. In certain circum-
stances this may prevent them from detect-
ing people or objects.
● Please note that low obstacles detected by
the syst
em may no longer be registered by
the sensors as the car moves closer, so the system will not give any further warning. In
cer
t
ain circumstances, objects such as high
kerbs that could damage the bottom of the
vehicle are not detected either.
● If the first warning from the Parking Aid is
ignored, the v
ehicle could suffer considerable
damage.
● The knocks or damage on the radiator
grill
e, bumper, wheel arch and vehicle under-
body can adjust the orientation of the sen-
sors. This can affect the parking aid function.
Have the function checked by a specialised
workshop. Note
● In cer t
ain situations, the system can give a
warning even though there is no obstacle in
the detected area, e.g:
–with rough or cobbled floors or ground
with long grass;
– with external ultrasound sources, such as
cleaning vehicles or other vehicles;
– In downpours, intense snow or dense ex-
haust gases;
– if the registration plate (front or rear) is
not properly affixed to the bumper sur-
face;
– or in locations such as the brow of a hill.
● In order to guarantee good system opera-
tion, keep the ultr
asound sensors clean, free
of snow or ice, and do not cover them with
adhesives or other objects. » 167
Technical data
Advice
Operation
Emergencies
Safety
Page 171 of 248
Driver assistance systems
The approximate measurement range of the
sen sor
s
is:
1.20 m
0.90 m
1.60 m
0.90 m
As you approach the obstacle, the time inter-
val between the audible warnings will be re-
duced. When you reach around 0.30 m the
warning will be constant: do not continue to
move forward (or backward)!
If you maintain separation from the obstacle,
the volume of the warning begins to reduce
after four seconds (does not affect the tone
of the constant warning).
Parking Aid Operation Fig. 182
Centre console: parking aid button. A
B
C
D Manual connection of Parking Aid
●
Press the butt
on
once.
Manual disconnection of Parking Aid
● Press the button
again.
Manual disconnection of Parking Aid display
(the audible sounds remain active)
● Press a button on the main menu of the fac-
tory
-assembled infotainment system.
● OR: press the BACK fu
nction button.
Automatic connection of Parking Aid ● Engage reverse gear or turn the selector
lever t
o position R.
● OR: If the vehicle approaches an obstacle
that
is in its forwards path at a speed below
10 km/h (6 mph) ››› page 169, Automatic ac-
tivation. The obstacle is detected as of a dis-
tance of approx. 95 cm if the automatic con-
nection is activated in the infotainment sys-
tem. A reduced display is shown.
Automatic disconnection of Parking Aid
● Move the selector lever to position P.
● OR: accelerate to more than approx.
10 km/h (6 mph) for
ward.
Temporary suppression of sound in Parking
Aid
● Press the function b
utton. Change from reduced view to full view
●
Engage reverse gear or turn the selector
lever t
o position R.
● OR: press the car icon in reduced view.
If nec
essary, switch to the rear-assist image
(Rear View Camera “RVC”)
● Engage reverse gear or turn the selector
lever t
o position R.
● OR: Press the RVC fu
nction button.
A short confirmation signal will be heard and
the button symbol will light up yellow when
the system is switched on.
Automatic activation Fig. 183
Miniature indication of automatic ac-
tiv ation When the Parking System Plus is switched on
aut
om
atic
ally, a miniature of the vehicle will »
169
Technical data
Advice
Operation
Emergencies
Safety