check engine Seat Toledo 2017 Owner's manual
[x] Cancel search | Manufacturer: SEAT, Model Year: 2017, Model line: Toledo, Model: Seat Toledo 2017Pages: 248, PDF Size: 5.86 MB
Page 4 of 248
Frequently Asked Ques-
tion
sBefore driving
How do you adjust the seat?
››› page 11
How do you adjust the steering wheel? ››› page 13
How do you adjust the exterior mirrors? ››› page 13
How do you turn on the exterior lights? ››› page 18
How does the automatic gearbox selector lever work?
››› page 36
How do you refuel? ››› page 40
How do you activate the windscreen wipers and wind-
screen washer system? ››› page 20
Emergency situations
A warning lamp lights up or flashes. What does this
mean? ››› page 33
Where are the first-aid kit and the warning triangle in
the vehicle? ››› page 76
How do you open the bonnet? ››› page 11
How do you perform a jump start? ››› page 52
Where is the vehicle tool kit located? ››› page 47
How do you repair a tyre with the anti-puncture kit?
››› page 46
How do you change a wheel? ››› page 47
How do you change a fuse? ››› page 44
How do you change a light? ››› page 45
How do you tow a vehicle? ››› page 51
Useful tips
How do you set the time? ››› page 97
When should the vehicle inspection should be per-
formed? ››› page 31
What functions do the buttons/thumbwheels on the
steering wheel perform? ››› page 103
How do you drive in an economical and environmental-
ly-friendly way? ››› page 166
How do you check and top up the engine oil?
››› page 41
How do you check and top up the engine coolant?
››› page 42
How do you top up the windscreen washer fluid?
››› page 43
How do you check and top up the brake fluid?
››› page 43
How do you check and adjust tyre pressure values?
››› page 218
Vehicle washing tips ››› page 196
Functions of interest
Easy Connect, CAR menu ››› page 21
How does the START-STOP system work? ››› page 183
What parking assistants are available? ››› page 170
How does the rear assist work? ››› page 175
How does tyre pressure monitoring work? ››› page 221
How do you open the vehicle without a key (Keyless Ac-
cess)? ››› page 114
Interior lighting and ambient light ››› page 126
Page 6 of 248
Table of Contents
Engine management and emission control sys-
t em
. . . . . . . . . . . . . . . . . . . . . . . . . . . . . . . . . . . 167
Driv
ing tips . . . . . . . . . . . . . . . . . . . . . . . . . . . . . 169
Driver assistance systems . . . . . . . . . . . . . . . . . 170
Parking aid . . . . . . . . . . . . . . . . . . . . . . . . . . . . . 170
Rear Assist “Rear View Camera”* . . . . . . . . . . . 175
Cruise speed (Cruise Control)* . . . . . . . . . . . . . 178
Emergency brake assist system (Front As-
sis
t)* . . . . . . . . . . . . . . . . . . . . . . . . . . . . . . . . . . 179
Start-Stop System* . . . . . . . . . . . . . . . . . . . . . . . 183
Fatigue detection (break recommendation)* . . 185
Towing bracket device . . . . . . . . . . . . . . . . . . . . 186
Driving with a trailer . . . . . . . . . . . . . . . . . . . . . . 186
Towing bracket device . . . . . . . . . . . . . . . . . . . . 188
Advice . . . . . . . . . . . . . . . . . . . . . . . . . . . . . . . . 194
Care and maintenance . . . . . . . . . . . . . . . . . . . . 194
Accessories and modifications to the vehi-
cle
. . . . . . . . . . . . . . . . . . . . . . . . . . . . . . . . . . . . 194
Care and cleaning . . . . . . . . . . . . . . . . . . . . . . . 195
Checking and refilling levels . . . . . . . . . . . . . . . 201
Fuel . . . . . . . . . . . . . . . . . . . . . . . . . . . . . . . . . . . 201
Engine compartment . . . . . . . . . . . . . . . . . . . . . 204
Engine oil . . . . . . . . . . . . . . . . . . . . . . . . . . . . . . 207
Coolant . . . . . . . . . . . . . . . . . . . . . . . . . . . . . . . . 210
Brake fluid . . . . . . . . . . . . . . . . . . . . . . . . . . . . . 211
Window washer system . . . . . . . . . . . . . . . . . . . 212
Battery . . . . . . . . . . . . . . . . . . . . . . . . . . . . . . . . . 213
Wheels and tyres . . . . . . . . . . . . . . . . . . . . . . . . 217
Tyres . . . . . . . . . . . . . . . . . . . . . . . . . . . . . . . . . . 217
Spare wheel . . . . . . . . . . . . . . . . . . . . . . . . . . . . 220
Tyre monitoring systems . . . . . . . . . . . . . . . . . . 221
Winter service . . . . . . . . . . . . . . . . . . . . . . . . . . . 222
Technical data . . . . . . . . . . . . . . . . . . . . . . . . 223
Technical specifications . . . . . . . . . . . . . . . . . . 223
Important information . . . . . . . . . . . . . . . . . . . . 223
Information on fuel consumption . . . . . . . . . . . 224 Driving with a trailer . . . . . . . . . . . . . . . . . . . . . . 225
Wheels . . . . . . . . . . . . . . . . . . . . . . . . . . . . . . . . 226
Engine data . . . . . . . . . . . . . . . . . . . . . . . . . . . . . 227
Dimensions . . . . . . . . . . . . . . . . . . . . . . . . . . . . . 233
Index . . . . . . . . . . . . . . . . . . . . . . . . . . . . . . . . . 235
4
Page 43 of 248

The essentials
Oil Fig. 50
Engine oil dipstick. Fig. 51
In the engine compartment: Engine
oil fi
ller cap. The level is measured using the dipstick loca-
t
ed in the en
gine c
ompartment
››› page 207.
The oil should leave a mark between zones A and
C . It should never exceed zone
A .
● Zone A : Do not add oil.
● Zone B : You can add oil but keep the level
in th at
zone. ●
Zone C : Add oil up to zone
B .
T op
pin
g up engine oil
● Unscrew cap from engine oil filler opening
›››
Fig. 51.
● Add oil slowly.
● At the same time, check the level to ensure
you do not a
dd too much. ●
When the oil l
evel reaches at least zone B ,
u n
s
crew the engine oil filler cap carefully.
Engine oil additives
No type of additive should be mixed with the
engine oil. The deterioration caused by these
additives is not covered by the warranty. » 41
Page 45 of 248
The essentials
››› in Topping up the coolant level on
page 211
››› page 210 Brake fluid
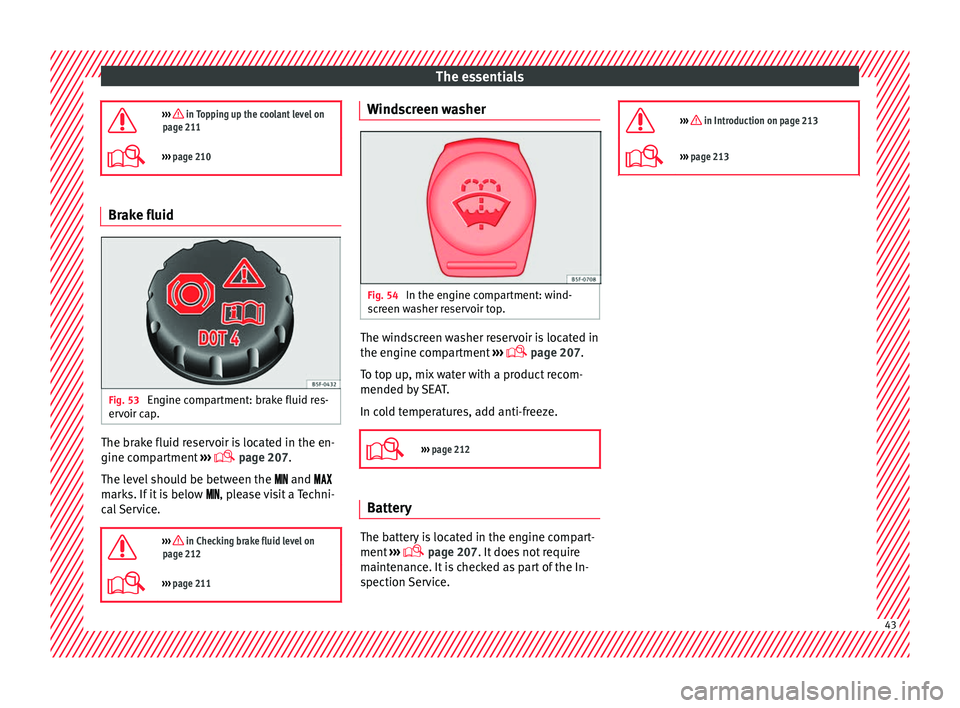
Fig. 53
Engine compartment: brake fluid res-
er v
oir c
ap. The brake fluid reservoir is located in the en-
gine c
omp
ar
tment ›››
page 207
.
The level should be between the and
marks. If it is below , please visit a Techni-
cal Service.
››› in Checking brake fluid level on
page 212
››› page 211 Windscreen washer
Fig. 54
In the engine compartment: wind-
s c
r
een washer reservoir top. The windscreen washer reservoir is located in
the en
gine c
omp
artment ›››
page 207.
To top up, mix water with a product recom-
mended by SEAT.
In cold temperatures, add anti-freeze.
››› page 212 Battery
The battery is located in the engine compart-
ment
›
›
› page 207. It does not require
maintenance. It is checked as part of the In-
spection Service.
››› in Introduction on page 213
›››
page 213 43
Page 48 of 248
The essentials
Repairing a tyre with the anti-punc-
t ur
e k
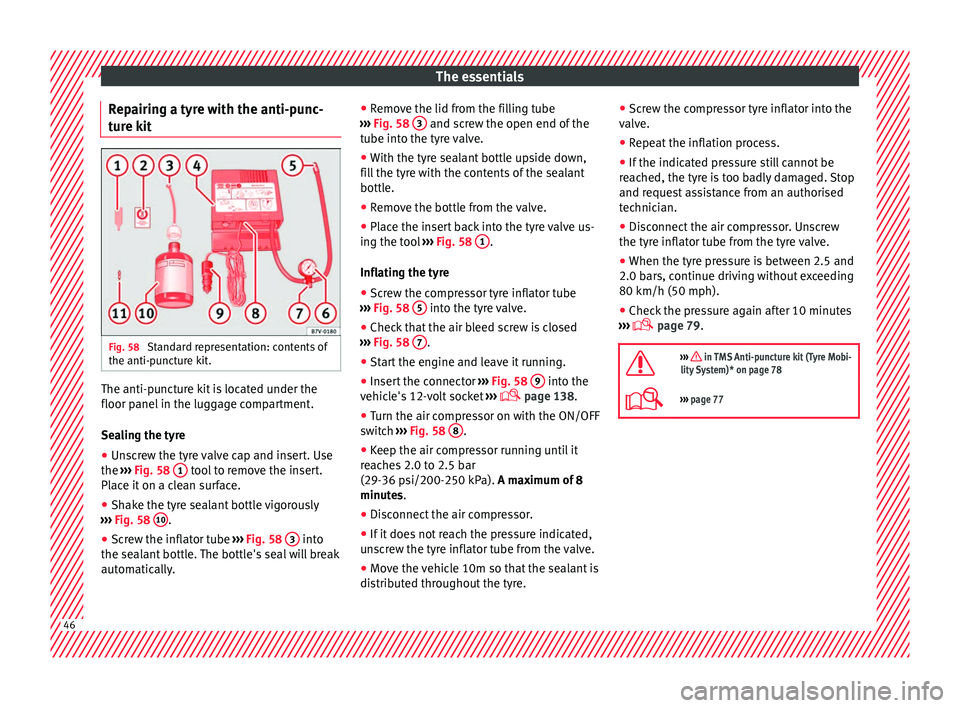
it Fig. 58
Standard representation: contents of
the anti-p u
nct
ure kit. The anti-puncture kit is located under the
floor p
anel
in the lug
gage compartment.
Sealing the tyre
● Unscrew the tyre valve cap and insert. Use
the ›››
Fig. 58 1 tool to remove the insert.
Pl ac
e it
on a clean surface.
● Shake the tyre sealant bottle vigorously
›››
Fig. 58 10 .
● Screw the inflator tube ››
›
Fig. 58 3 into
the se al
ant
bottle. The bottle's seal will break
automatically. ●
Remov
e the lid from the filling tube
››› Fig. 58 3 and screw the open end of the
t ube int
o the ty
re valve.
● With the tyre sealant bottle upside down,
fill
the tyre with the contents of the sealant
bottle.
● Remove the bottle from the valve.
● Place the insert back into the tyre valve us-
ing the too
l ››› Fig. 58 1 .
Infl atin
g the ty
re
● Screw the compressor tyre inflator tube
›››
Fig. 58 5 into the tyre valve.
● Check that the air bleed screw is closed
› ›
›
Fig. 58 7 .
● Start the engine and leave it running.
● Insert the connector ››
›
Fig. 58 9 into the
v ehic
l
e's 12-volt socket ›››
page 138.
● Turn the air compressor on with the ON/OFF
switc
h ››› Fig. 58 8 .
● Keep the air compressor running until it
r e
ac
hes 2.0 to 2.5 bar
(29-36 psi/200-250 kPa). A maximum of 8
minutes.
● Disconnect the air compressor.
● If it does not reach the pressure indicated,
uns
crew the tyre inflator tube from the valve.
● Move the vehicle 10m so that the sealant is
dis trib
uted throughout the tyre. ●
Scr ew the c
ompressor tyre inflator into the
valve.
● Repeat the inflation process.
● If the indicated pressure still cannot be
reac
hed, the tyre is too badly damaged. Stop
and request assistance from an authorised
technician.
● Disconnect the air compressor. Unscrew
the tyre infl
ator tube from the tyre valve.
● When the tyre pressure is between 2.5 and
2.0 bars, c
ontinue driving without exceeding
80 km/h (50 mph).
● Check the pressure again after 10 minutes
›››
page 79.
››› in TMS Anti-puncture kit (Tyre Mobi-
lity System)* on page 78
››› page 77 46
Page 55 of 248
The essentials
●
Ple a
se note the safety warnings referring to
working in the engine compartment
››› page 204.
● The non-insulated parts of the battery
clamp
s must not be allowed to touch. Addi-
tionally, the jump lead attached to the posi-
tive battery terminal must not touch metal
parts of the vehicle. Risk of short circuit!
● Do not connect the negative lead to the
negativ
e terminal of the discharged battery.
In the event of sparks when starting the en-
gine, the explosive gas given off by the bat-
tery could catch fire.
● Position the jump leads in such a way that
they cannot
come into contact with any mov-
ing parts in the engine compartment.
● Do not bend over the battery. Risk of acid
burns!
● The s
crew plugs on the battery cells must
be scr
ewed in firmly.
● Keep sources of fire (flames, lit cigarettes,
etc.) a
way from the battery. - Risk of explo-
sion!
● Never use the jump leads on batteries in
which the electr
olyte level is too low. Risk of
explosion and acid burns. Note
● The v ehic
les must not touch each other, as
electricity could flow as soon as the positive
terminals are connected. ●
The dis c
harged battery must be properly
connected to the vehicle electrical system.
● The jump leads should be checked in a spe-
cia
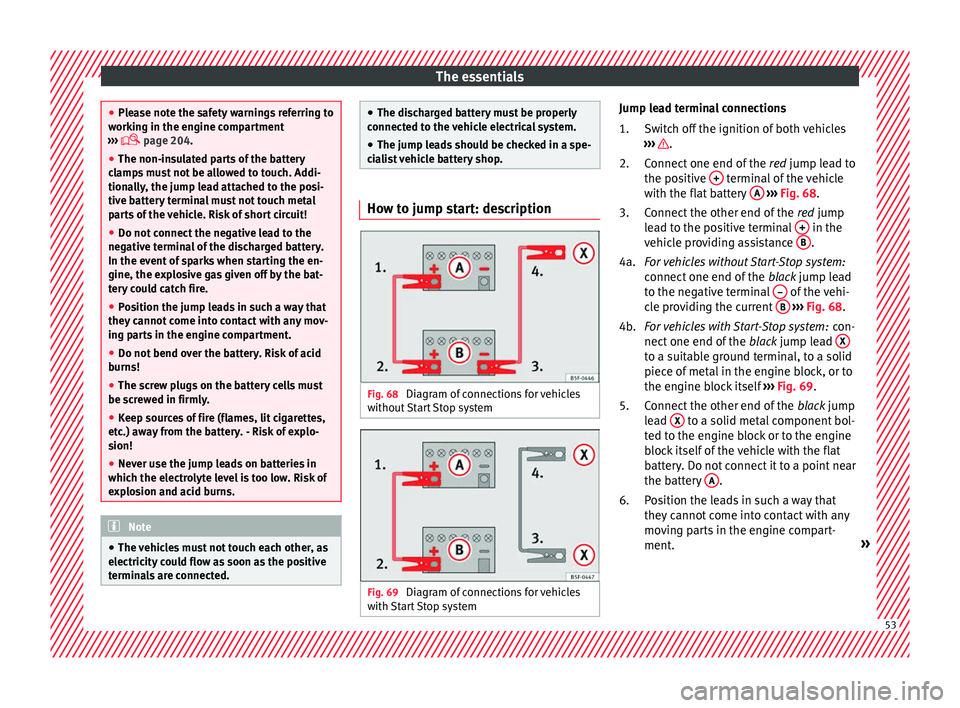
list vehicle battery shop. How to jump start: description
Fig. 68
Diagram of connections for vehicles
w ithout
Start Stop system Fig. 69
Diagram of connections for vehicles
w ith
St
art Stop system Jump lead terminal connections
Switc
h off the ignition of both vehicles
››› .
C onnect
one end of
the red jump lead to
the positive + terminal of the vehicle
w ith the fl
at
battery A
› ››
Fig. 68
.
C
onnect the other end of the red jump
lead to the positive terminal + in the
v ehic
l
e providing assistance B .
F or
vehicles without Start-Stop system:
connect one end of the black jump lead
to the negative terminal – of the vehi-
c l
e pr
oviding the current B
› ›
› Fig. 68 .
For vehicles with Start-Stop system: con-
nect one end of the black jump lead X to a suitable ground terminal, to a solid
piec
e of
met
al in the engine block, or to
the engine block itself ››› Fig. 69.
Connect the other end of the black jump
lead X to a solid metal component bol-
t ed t
o the en
gine block or to the engine
block itself of the vehicle with the flat
battery. Do not connect it to a point near
the battery A .
P o
s
ition the leads in such a way that
they cannot come into contact with any
moving parts in the engine compart-
ment. »
1.
2.
3.
4a.
4b.
5.
6.
53
Page 71 of 248

Airbag system
frontal collision the system might not trigger
corr
ectly
or may fail to trigger at all. Airbag activation
The airbags deploy extremely rapidly, within
thous
andths
of a second, to provide addi-
tional protection in the event of an accident.
A fine dust may develop when the airbag de-
ploys. This is normal and it is not an indica-
tion of fire in the vehicle.
The airbag system is only ready to function
when the ignition is on.
In special accidents instances, several air-
bags may activate at the same time.
In the event of minor head-on and side colli-
sions, rear-end collisions, overturning or roll-
over of the vehicle, airbags do not activate.
Activation factors
The conditions that lead to the airbag system
activating in each situation cannot be gener-
alised. Some factors play an important role,
such as the properties of the object the vehi-
cle hits (hard/soft), angle of impact, vehicle
speed, etc.
Deceleration trajectory is key for airbag acti-
vation. The control unit analyses the collision trajec-
tor
y
and activates the respective restraint
system.
If the deceleration rate is below the prede-
fined reference value in the control unit the
airbags will not be triggered, even though
the accident may cause extensive damage to
the car.
The following airbags are triggered in seri-
ous head-on collisions:
● Driver airbag.
● Front passenger front airbag
The fol
lowing airbags are triggered in seri-
ous side-on collisions:
● Front side airbag on the side of the acci-
dent.
● Re
ar side airbag on the side of the acci-
dent.
● Cur
tain (head) airbag on the side of the ac-
cident.
In an ac
cident with airbag activation:
● the interior lights switch on (if the interior
light swit
ch is in the courtesy light position);
● the hazard warning lights switch on;
● all doors are unlocked;
● the fuel supply to the engine is cut. Airbag and seat belt tensioner control
lamp The control lamp monitors all airbags and
seat
belt
tensioners in the vehicle, including
control units and wiring connections.
Monitoring of airbag and belt tensioner sys-
tem
Both the airbag and belt tensioner systems
operation is constantly monitored electroni-
cally. Each time the ignition is switched on,
the control lamp illuminates for several
seconds (self-diagnosis) and the instrument
panel display* shows AIRBAG/TENSIONER.
The system must be checked when the con-
trol lamp :
● does not light up when the ignition is
swit c
hed on,
● turns off after 4 seconds after the ignition
is sw
itched on,
● turns off and then lights up again after the
ignition is sw
itched on,
● illuminates or flashes while the vehicle is
movin
g.
In the event of a malfunction, the warning
lamp stays on continuously. In addition, de-
pending on the malfunction, a fault message
appears on the instrument panel display for
approximately 10 seconds and a short audi-
ble warning is given. In this event, you »
69
Technical data
Advice
Operation
Emergencies
Safety
Page 79 of 248

Self-help
distance. Observe applicable local legal regu-
lation
s.
This is for your own safety and that of
other drivers.
● If you have a flat tyre, stop the vehicle as
far aw
ay as possible from moving traffic. Stop
on flat, solid ground.
● If you have to change the tyre on a gradi-
ent, block
the wheel opposite the wheel be-
ing changed by placing a stone or similar ob-
ject under it to prevent the vehicle from roll-
ing away unexpectedly.
● If the vehicle has been fitted with tyres or
allo
ys that are different to those fitted in
manufacture, the instructions ››› page 219,
New tyres or wheels must be followed.
● Always raise the vehicle with the doors
closed.
● Nev
er place parts of your body, e.g. arms
and leg
s, underneath the vehicle when it is
supported only by the jack.
● Secure the base of the jack with suitable
suppor
ts so that it cannot slip. The jack could
slide if the ground below it is soft and slip-
pery and the vehicle could slip off it. There-
fore, place the jack on a firm surface or use a
large, stable base. On a slippery surface, e.g.
tile, use a non-slip base such as a rubber
mat.
● Never start the engine when the vehicle is
jack
ed. Risk of injury.
● The jack should only be used in the correct
jack
ing points. CAUTION
● The pre s
cribed tightening torque for wheel
bolts on steel and alloy wheels is 120 Nm.
● If the anti-theft wheel bolt is overly tight-
ened, this c
ould damage the bolt and the
adapter. Note
● The set of anti-thef
t wheel bolts or the
adapter are available from authorised SEAT
dealers.
● Please observe the relevant local legal reg-
ulation
s when changing the wheel. Wheel bolts
The wheel
bolts
ar
e m
atched to the rims.
When installing different wheels, e.g. to fit
light alloy wheels or wheels with winter tyres,
it is important to use the correct wheel bolts
with the right length and correctly shaped
bolt heads. This is essential for a secure fit of
the wheels and for proper operation of the
brake system. Note
● Never gr e
ase or oil the wheel bolts!
● If the wheel bolt is very tight, it may be
poss
ible to loosen it by pushing down the
end of the box spanner carefully with your foot. Hold on to the vehicle for support and
tak
e c
are not to slip.
● If you notice that the wheel bolts are rusty
and difficult
to turn when changing a wheel,
they must be replaced before having the
tightening torque checked. Tyre repairs
TMS Anti-p
uncture kit (Tyre Mobility
System)* Read the additional information carefully
› ›
›
page 46
The Tyre Mobility System is stored in a box
under the carpet in the boot.
Using the Tyre Mobility System you can relia-
bly seal tyres damaged by foreign bodies,
provided that cuts or punctures are no larger
than approx. 4 mm in diameter. Do not re-
move the foreign bodies, e.g. bolts or nails,
from the tyre!
The tyre must be repaired immediately.
The repair made using the Tyre Mobility Sys-
tem under no circumstances replaces perma-
nent tyre repair and should only be used to
drive to the nearest official service. »
77
Technical data
Advice
Operation
Emergencies
Safety
Page 80 of 248
Emergencies
The Tyre Mobility System kit shall not be
u sed:
● If the wheel
rim has been damaged,
● when the outside temperature is below
-20°C (-4°F),
● on sl
ashes or punctures larger than 4 mm,
● if the sidewall of the wheel has been dam-
aged,
● If
you have been driving with very low tyre
pres
sure or a completely flat tyre
● If the best-before date on the air can has
expired WARNING
Using the tyre mobility system can be dan-
ger ou
s, especially when filling the tyre at the
roadside. Please observe the following rules
to minimise the risk of injury:
● Stop the vehicle safely as soon as possible.
Park it
at a safe distance from surrounding
traffic to fill the tyre.
● Ensure the ground on which you park is flat
and solid.
● Al
l passengers and particularly children
must
keep a safe distance from the work area.
● Turn on the hazard warning lights to warn
other roa
d users.
● Use the tyre mobility system only if you are
famili
ar with the necessary procedures. Oth-
erwise, you should seek professional assis-
tance. ●
The tyr e mo
bility set is intended for tempo-
rary emergency use only until you can reach
the nearest specialised workshop.
● Replace the repaired tyre with the tyre mo-
bility
set as soon as possible.
● The sealant is a health hazard and must be
cle
aned immediately if it comes into contact
with the skin.
● Always keep the tyre mobility set out of the
reac
h of small children.
● Never use an equivalent jack, even if it has
been appro
ved for your vehicle.
● Always stop the engine, apply the hand-
brake l
ever firmly and engage gear if using a
manual gearbox, in order to reduce the risk of
vehicle involuntary movement. WARNING
A tyre filled with sealant does not have the
same per f
ormance properties as a conven-
tional tyre.
● Never drive faster than 80 km/h (50 mph).
● Avoid heavy acceleration, hard braking and
fas
t cornering.
● Drive for only 10 minutes at a maximum
speed of 80
km/h (50 mph) and then check
the tyre. For the sake of the environment
Dispose of used or expired sealant observing
any l
egal requirements. Note
● A new bottle of se
alant can be purchased at
SEAT dealerships.
● Take into account the separate instruction
manual
of the tyre mobility set* manufactur-
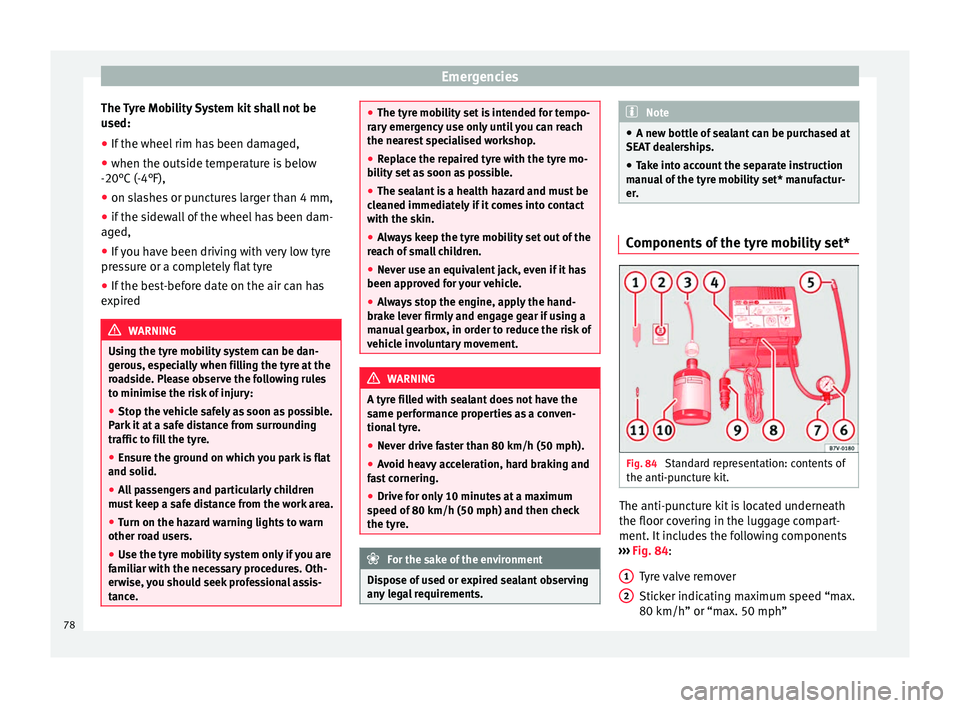
er. Components of the tyre mobility set*
Fig. 84
Standard representation: contents of
the anti-p u
nct
ure kit. The anti-puncture kit is located underneath
the floor c
o
v
ering in the luggage compart-
ment. It includes the following components
››› Fig. 84:
Tyre valve remover
Sticker indicating maximum speed “max.
80 km/h” or “max. 50 mph”
1 2
78
Page 83 of 248
Fuses and bulbs
down on its right-hand side. The cover
mu s
t
be securely engaged.
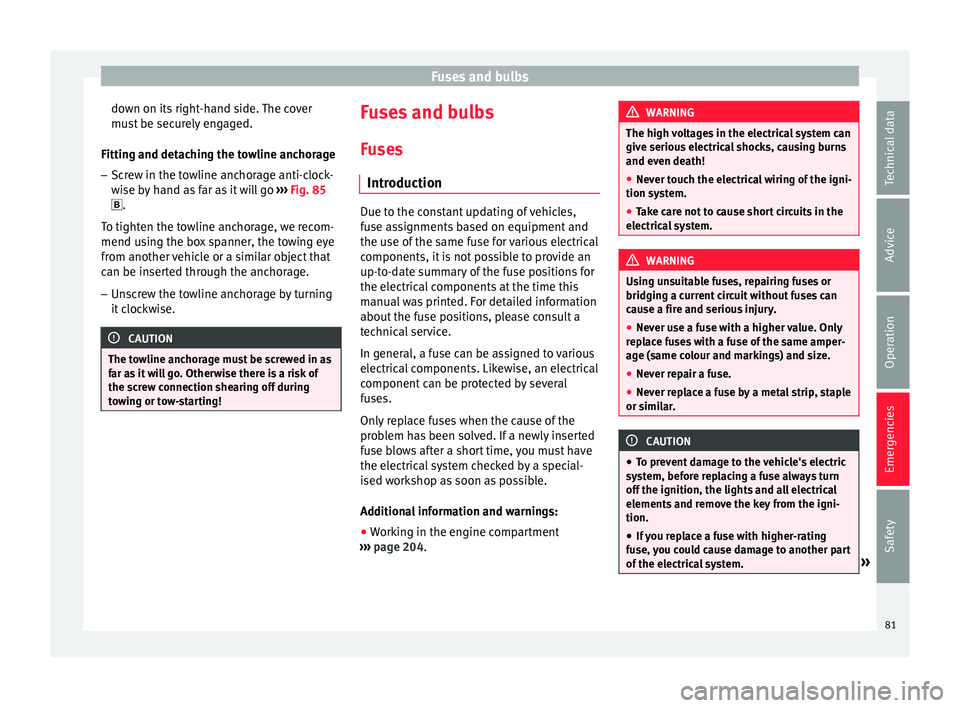
Fitting and detaching the towline anchorage
– Screw in the towline anchorage anti-clock-
wise b
y hand as far as it will go ››› Fig. 85
.
To tighten the towline anchorage, we recom-
mend using the box spanner, the towing eye
from another vehicle or a similar object that
can be inserted through the anchorage.
– Unscrew the towline anchorage by turning
it cloc
kwise. CAUTION
The towline anchorage must be screwed in as
far a s
it will go. Otherwise there is a risk of
the screw connection shearing off during
towing or tow-starting! Fuses and bulbs
F u
se
s
Introduction Due to the constant updating of vehicles,
fu
se a
ssignments based on equipment and
the use of the same fuse for various electrical
components, it is not possible to provide an
up-to-date summary of the fuse positions for
the electrical components at the time this
manual was printed. For detailed information
about the fuse positions, please consult a
technical service.
In general, a fuse can be assigned to various
electrical components. Likewise, an electrical
component can be protected by several
fuses.
Only replace fuses when the cause of the
problem has been solved. If a newly inserted
fuse blows after a short time, you must have
the electrical system checked by a special-
ised workshop as soon as possible.
Additional information and warnings:
● Working in the engine compartment
›› ›
page 204. WARNING
The high voltages in the electrical system can
give seriou s
electrical shocks, causing burns
and even death!
● Never touch the electrical wiring of the igni-
tion syst
em.
● Take care not to cause short circuits in the
electrica
l system. WARNING
Using unsuitable fuses, repairing fuses or
bridging a c urr
ent circuit without fuses can
cause a fire and serious injury.
● Never use a fuse with a higher value. Only
repl
ace fuses with a fuse of the same amper-
age (same colour and markings) and size.
● Never repair a fuse.
● Never replace a fuse by a metal strip, staple
or simil
ar. CAUTION
● To pr ev
ent damage to the vehicle's electric
system, before replacing a fuse always turn
off the ignition, the lights and all electrical
elements and remove the key from the igni-
tion.
● If you replace a fuse with higher-rating
fuse,
you could cause damage to another part
of the electrical system. » 81
Technical data
Advice
Operation
Emergencies
Safety