ECO mode Seat Toledo 2017 User Guide
[x] Cancel search | Manufacturer: SEAT, Model Year: 2017, Model line: Toledo, Model: Seat Toledo 2017Pages: 248, PDF Size: 5.86 MB
Page 153 of 248
Air conditioning
The system also allows for the effect of sun-
light, so ther e i
s
no need for manual adjust-
ment. It also has a humidity sensor that
helps to automatically demist the wind-
screen.
Automatic operations ››› page 151 guaran-
tee maximum comfort any time of year.
Climatronic description
Cooling only works if the following conditions
are met:
● The engine is running
● the outside temperature is above +2°C
(+36°F);
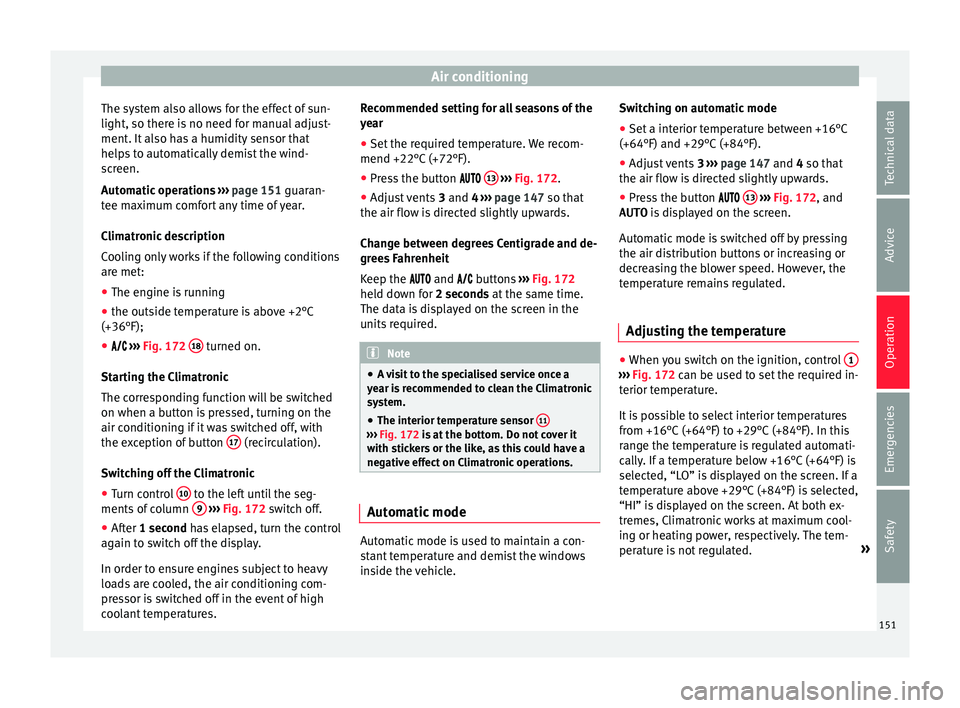
● ››› Fig. 172 18 turned on.
St ar
tin
g the Climatronic
The corresponding function will be switched
on when a button is pressed, turning on the
air conditioning if it was switched off, with
the exception of button 17 (recirculation).
Sw it
c
hing off the Climatronic
● Turn control 10 to the left until the seg-
ments of
c
olumn 9
› ›
› Fig. 172 switch off.
● After 1 second has elapsed, turn the control
again t
o switch off the display.
In order to ensure engines subject to heavy
loads are cooled, the air conditioning com-
pressor is switched off in the event of high
coolant temperatures. Recommended setting for all seasons of the
year
● Set
the required temperature. We recom-
mend +22°C (+72°F).
● Pre
ss the button 13
› ››
Fig. 172
.
● Adju
st vents 3 and 4 ›››
page 147 so that
the air flow is directed slightly upwards.
Change between degrees Centigrade and de-
grees Fahrenheit
Keep the and buttons ››› Fig. 172
held down for 2 seconds at the same time.
The data is displayed on the screen in the
units required. Note
● A v i
sit to the specialised service once a
year is recommended to clean the Climatronic
system.
● The interior temperature sensor 11 ›››
Fig. 172 is at
the bottom. Do not cover it
with stickers or the like, as this could have a
negative effect on Climatronic operations. Automatic mode
Automatic mode is used to maintain a con-
s
t
ant
temperature and demist the windows
inside the vehicle. Switching on automatic mode
● Set a interior temperature between +16°C
(+64°F) and +29°C (+84°F).
● Adjus
t vents 3 ›››
page 147 and 4 so that
the air flow is directed slightly upwards.
● Press the button 13
› ››
Fig. 172
, and
AUTO i
s displayed on the screen.
Automatic mode is switched off by pressing
the air distribution buttons or increasing or
decreasing the blower speed. However, the
temperature remains regulated.
Adjusting the temperature ●
When you switch on the ignition, control 1 ›››
Fig. 172 can be u sed t
o set the required in-
terior temperature.
It is possible to select interior temperatures
from +16°C (+64°F) to +29°C (+84°F). In this
range the temperature is regulated automati-
cally. If a temperature below +16°C (+64°F) is
selected, “LO” is displayed on the screen. If a
temperature above +29°C (+84°F) is selected,
“HI” is displayed on the screen. At both ex-
tremes, Climatronic works at maximum cool-
ing or heating power, respectively. The tem-
perature is not regulated. »
151
Technical data
Advice
Operation
Emergencies
Safety
Page 165 of 248
Driving
Tiptronic gearbox Fig. 180
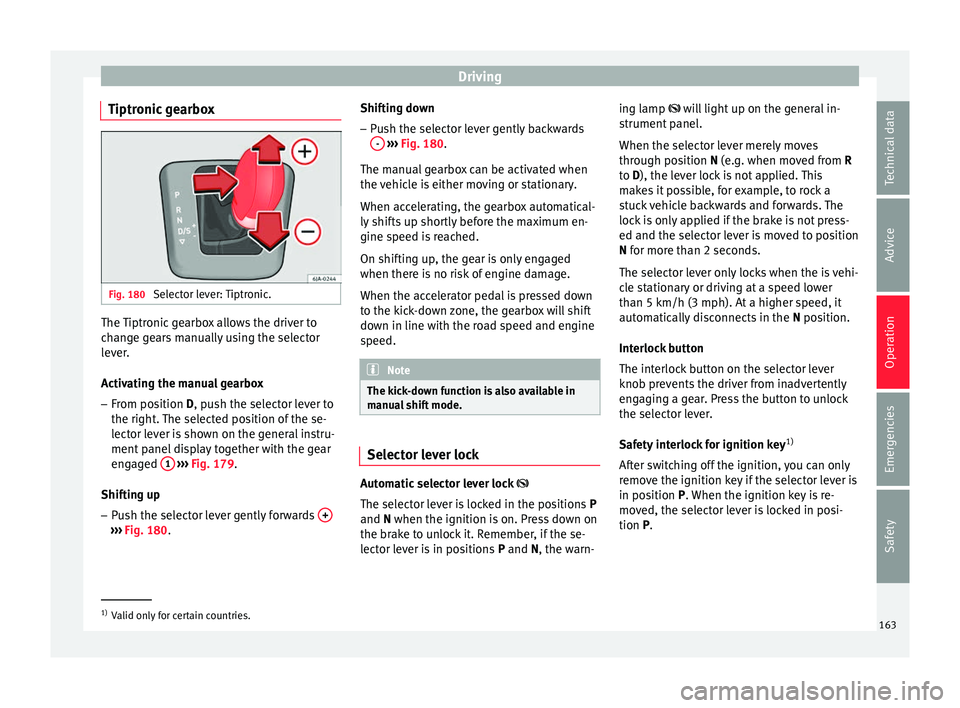
Selector lever: Tiptronic. The Tiptronic gearbox allows the driver to
c
h
an
ge gears manually using the selector
lever.
Activating the manual gearbox
– From position D, push the sel
ector lever to
the right. The selected position of the se-
lector lever is shown on the general instru-
ment panel display together with the gear
engaged 1
› ›
› Fig. 179
.
Shifting up – Push the selector lever gently forwards +›››
Fig. 180. Shifting down
– Push the selector lever gently backwards
-
› ››
Fig. 180
.
The m
anual gearbox can be activated when
the vehicle is either moving or stationary.
When accelerating, the gearbox automatical-
ly shifts up shortly before the maximum en-
gine speed is reached.
On shifting up, the gear is only engaged
when there is no risk of engine damage.
When the accelerator pedal is pressed down
to the kick-down zone, the gearbox will shift
down in line with the road speed and engine
speed. Note
The kick-down function is also available in
manua l
shift mode. Selector lever lock
Automatic selector lever lock
The sel ect
or l
ever is locked in the positions P
and N when the ignition is on. Press down on
the brake to unlock it. Remember, if the se-
lector lever is in positions P and N, the warn-ing lamp wil
l light up on the general in-
strument panel.
When the selector lever merely moves
through position N (e.g. when moved from R
to D), the lever lock is not applied. This
makes it possible, for example, to rock a
stuck vehicle backwards and forwards. The
lock is only applied if the brake is not press-
ed and the selector lever is moved to position
N for more than 2 seconds.
The selector lever only locks when the is vehi-
cle stationary or driving at a speed lower
than 5 km/h (3 mph). At a higher speed, it
automatically disconnects in the N position.
Interlock button
The interlock button on the selector lever
knob prevents the driver from inadvertently
engaging a gear. Press the button to unlock
the selector lever.
Safety interlock for ignition key 1)
After switching off the ignition, you can only
remove the ignition key if the selector lever is
in position P. When the ignition key is re-
moved, the selector lever is locked in posi-
tion P. 1)
Valid only for certain countries.
163
Technical data
Advice
Operation
Emergencies
Safety
Page 166 of 248

Operation
Driving programmes Your vehicle is equipped with an electronical-
ly-c
ontr
olled automatic gearbox. Shifting up
or down depends on the programme selec-
ted.
For a calm driving style, the gearbox uses the
most economic programme. The gearbox
shifts up as quickly as possible and shifts
down as late as possible, thus increasing
driving economy.
With a sporty driving style , characterised by
sudden acceleration, heavy acceleration,
speeds that often increase and decrease and
maximum speed, the gearbox adapts to this
driving style when the accelerator is pressed
down fully (kick-down) by shifting down as
quickly as possible and can even shift down
by several gears at once.
Selecting the best driving programmes is an
endless job. Regardless of this, the driver can
also make the gearbox switch to a more dy-
namic gear shift programme by pressing the
accelerator quickly. This makes the automatic
gearbox shift down into a lower gear than the
one that would normally apply to the current
speed, allowing for more rapid acceleration
(e.g. to overtake another vehicle) without
having to press the accelerator until the kick-
down position. On shifting up in a corre-
sponding driving style, the gearbox returns to
the original programme. When driving along mountain roads, the
ge
arbo
x adapts to the gradients. This avoids
having to frequently change gears when driv-
ing uphill. In Tiptronic mode, it is possible to
shift down manually when driving downhill to
use the braking effect of the engine.
Emergency program A back-up programme exists in case of faults.
In the event
of
a fault in the gearbox electron-
ics, it will continue to work in one of the cor-
responding back-up programmes. All seg-
ments of the screen are lit up or switched off.
The fault can be seen as follows:
● The gearbox only engages certain gears
● Reverse gear R cannot be en
gaged
● The manual gearbox switches off in the
back
-up programme Note
If the gearbox switches to the back-up pro-
gramme, v
isit an Authorised Service as soon
as possible to solve the problem. Gearbox malfunctions
Gearbox: Fault! Stop the ve-
hicle and place the lever in the
position P. There is a fault in the gearbox. Stop the vehi-
c
l
e in a s
afe place and do not continue driv-
ing. Seek specialist assistance.
Gearbox: System fault! You
may continue driving.
Have the fault corrected by a specialised
workshop without delay. Gearbox: System fault! You
can continue driving with re-
strictions. Reverse gear disa‐
bled
Take the vehicle to a specialised workshop
and have the fault repaired without delay. Gearbox: System fault! You
can continue driving in D until
switching off the engine
Stop the vehicle in a safe place well away
from moving traffic. Seek specialist assis-
tance. Gearbox: too hot. Adapt your
driving accordingly
Continue driving at moderate speeds. When
the warning lamp switches off, you can con-
tinue driving in a normal manner. Gearbox: press the brake and
engage a gear again.
If the fault was caused by a gearbox with a
high temperature, this driver message will be
164
Page 168 of 248

Operation
● Inc r
e
ased use of single-grade materials.
● Plastic parts and elastomers are marked in
accor
dance with ISO 1043, ISO 11469 and
ISO 1629.
Choice of materials
● Use of recycled materials.
● Use of compatible plastics in the same part
if its c
omponents are not easily separated.
● Use of recycled materials and/or materials
originating fr
om renewable sources.
● Reduction of volatile components, includ-
ing odour, in p
lastic materials.
● Use of CFC-free coolants.
Ban on heavy
metals, with the exceptions
dictated by law (Annex II of ELV Directive
2000/53/EC): cadmium, lead, mercury, hexa-
valent chromium.
Manufacturing methods
● Reduction of the quantity of thinner in the
protectiv
e wax for cavities.
● Use of plastic film as protection during ve-
hicle tr
ansport.
● Use of solvent-free adhesives.
● Use of CFC-free coolants in cooling sys-
tems.
● Recy
cling and energy recovery from resi-
dues (RDF).
● Impr
ovement in the quality of waste water. ●
Use of sy
stems for the recovery of residual
heat (thermal recovery, enthalpy wheels,
etc.).
● The use of water-soluble paints.
Economical and environmentally-
friendly drivin
g Fuel consumption, environmental pollution
and we
ar t
o the engine, brakes and tyres de-
pends in large part on your driving style. By
adopting an economical driving style and an-
ticipating the traffic situation ahead, you can
easily reduce fuel consumption by 10-15%.
Some tips on how to help you reduce pollu-
tion while saving money are listed below.
Drive anticipating the traffic situation
A vehicle uses most fuel when accelerating.
When you anticipate situations, you have to
brake less often and, thus, accelerate less. If
it is possible, let the vehicle roll with a gear
engaged, for example, if you see a red light
ahead. The braking effect achieved in this
way helps to reduce the wear of brakes and
tyres; emissions and fuel consumption are
reduced to zero (disconnection due to iner-
tia).
Change gear early to save energy
An effective way of saving fuel is to change
up quickly through the gears. Running the engine at high rpm in the lower gears uses
an unnec
e
ssary amount of fuel.
Manual gearbox: shift up from first to second
gear as soon as possible. We recommend
that, whenever possible, you change to a
higher gear upon reaching 2000 rpm. Follow
the “recommended gear” indication that ap-
pears on the instrument panel
››› page 29.
Avoid driving at high speed
We advise you not to drive at the top speed
permitted by the vehicle. Fuel consumption,
exhaust emissions and noise levels all in-
crease very rapidly at higher speeds. Driving
at moderate speeds will help to save fuel.
Avoid idling
It is worthwhile switching off the engine
when waiting in a traffic jam, at level cross-
ings or at traffic lights with a long red phase.
The fuel saved after only 30 - 40 seconds is
greater than the amount of fuel needed to re-
start the engine.
The engine takes a long time to warm up
when it is idling. Mechanical wear and pollu-
tant emissions are also especially high dur-
ing this initial warm-up phase. It is therefore
best to drive off immediately after starting
the engine. Avoid running the engine at high
speed.
166
Page 179 of 248
Driver assistance systems
too much traffic or in a car park when there
ar e g
ood w
eather and visibility conditions.
Cleaning the camera lens
Keep the camera lens clean and clear of snow
and ice:
● Moisten the lens using a normal alcohol-
based gl
ass cleaning product and clean the
lens with a dry cloth.
● Remove snow using a small brush.
● Use de-icing spray to remove any ice. CAUTION
● Never u se abr
asive cleaning products to
clean the camera lens.
● Do not use hot or warm water to remove ice
or snow fr
om the camera lens. Doing so could
damage the camera. Parking and manoeuvring with the
r
e
ar a
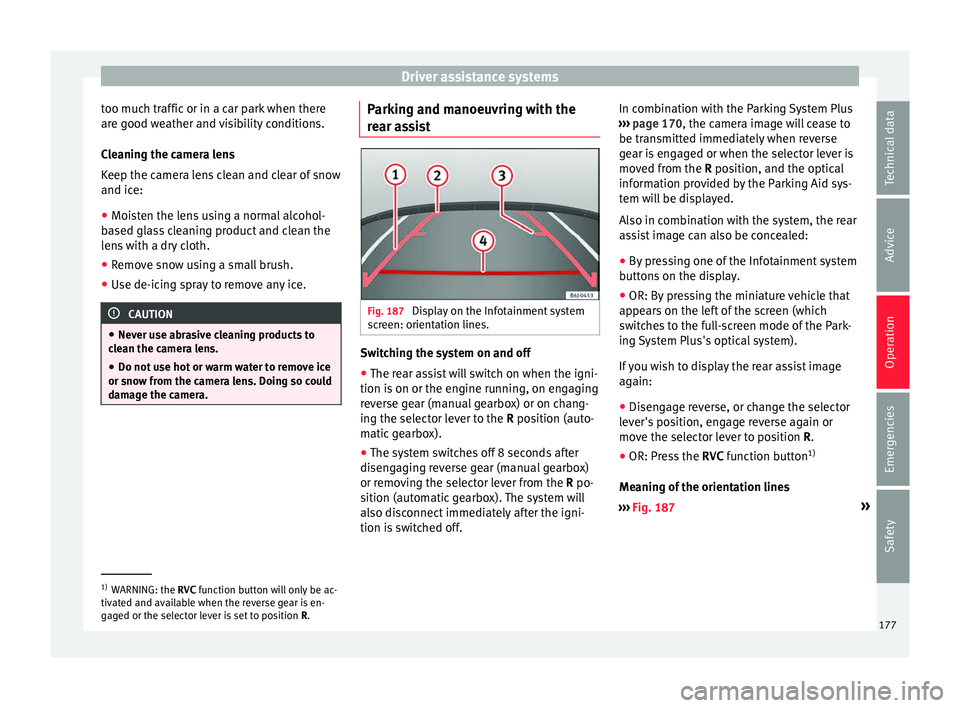
ssist Fig. 187
Display on the Infotainment system
s c
r
een: orientation lines. Switching the system on and off
●
The rear assist will switch on when the igni-
tion i s
on or the en
gine running, on engaging
reverse gear (manual gearbox) or on chang-
ing the selector lever to the R position (auto-
matic gearbox).
● The system switches off 8 seconds after
diseng
aging reverse gear (manual gearbox)
or removing the selector lever from the R po-
sition (automatic gearbox). The system will
also disconnect immediately after the igni-
tion is switched off. In combination with the Parking System Plus
›››
page 170, the camera image will cease to
be transmitted immediately when reverse
gear is engaged or when the selector lever is
moved from the R position, and the optical
information provided by the Parking Aid sys-
tem will be displayed.
Also in combination with the system, the rear
assist image can also be concealed:
● By pressing one of the Infotainment system
button
s on the display.
● OR: By pressing the miniature vehicle that
appear
s on the left of the screen (which
switches to the full-screen mode of the Park-
ing System Plus's optical system).
If you wish to display the rear assist image
again:
● Disengage reverse, or change the selector
lever's
position, engage reverse again or
move the selector lever to position R.
● OR: Press the RVC function b
utton1)
Meaning of the orientation lines
››› Fig. 187 »1)
WARNING: the RVC function b
utton will only be ac-
tivated and available when the reverse gear is en-
gaged or the selector lever is set to position R.
177
Technical data
Advice
Operation
Emergencies
Safety
Page 184 of 248
Operation
Operating the Emergency braking as-
s i
s
tance system (Front Assist) Fig. 191
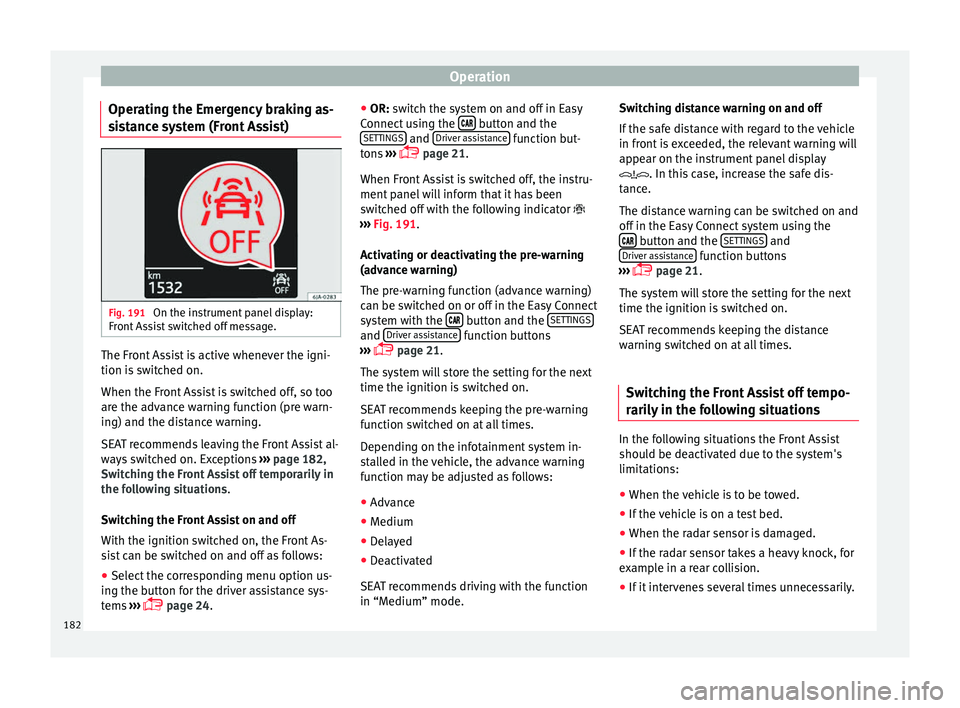
On the instrument panel display:
Fr ont
As
sist switched off message. The Front Assist is active whenever the igni-
tion i
s
sw
itched on.
When the Front Assist is switched off, so too
are the advance warning function (pre warn-
ing) and the distance warning.
SEAT recommends leaving the Front Assist al-
ways switched on. Exceptions ›››
page 182,
Switching the Front Assist off temporarily in
the following situations.
Switching the Front Assist on and off
With the ignition switched on, the Front As-
sist can be switched on and off as follows:
● Select the corresponding menu option us-
ing the butt
on for the driver assistance sys-
tems ›››
page 24. ●
OR: switc
h the system on and off in Easy
Connect using the button and the
S ET
TINGS and
Driv
er a
s
sistance function but-
t on
s
›››
page 21.
When Front Assist is switched off, the instru-
ment panel will inform that it has been
switched off with the following indicator
››› Fig. 191.
Activating or deactivating the pre-warning
(advance warning)
The pre-warning function (advance warning)
can be switched on or off in the Easy Connect
system with the button and the
S
ET
TINGS and
Driv
er a
s
sistance function buttons
› ›
›
page 21.
The system will store the setting for the next
time the ignition is switched on.
SEAT recommends keeping the pre-warning
function switched on at all times.
Depending on the infotainment system in-
stalled in the vehicle, the advance warning
function may be adjusted as follows:
● Advance
● Medium
● Delayed
● Deactivated
SEAT r
ecommends driving with the function
in “Medium” mode. Switching distance warning on and off
If the saf
e distance with regard to the vehicle
in front is exceeded, the relevant warning will
appear on the instrument panel display
. In this case, increase the safe dis-
tance.
The distance warning can be switched on and
off in the Easy Connect system using the button and the
S
ET
TINGS and
Driv er a
s
sistance function buttons
› ›
›
page 21.
The system will store the setting for the next
time the ignition is switched on.
SEAT recommends keeping the distance
warning switched on at all times.
Switching the Front Assist off tempo-
rarily
in the following situations In the following situations the Front Assist
shou
l
d be de
activated due to the system's
limitations:
● When the vehicle is to be towed.
● If the vehicle is on a test bed.
● When the radar sensor is damaged.
● If the radar sensor takes a heavy knock, for
examp
le in a rear collision.
● If it intervenes several times unnecessarily.
182
Page 204 of 248
Advice
– Chec k
th
at the fuel flap is correctly closed.
Vehicles with a keyless fuel cap (the side
flap will unlock using the central locking sys-
tem)
– Once the vehicle has been unlocked using
the central
locking button, press the fuel
flap in the direction of the arrow 1›››
Fig. 202.
– Open the cover in the direction indicated
by
the arr
ow 2 .
– Unscrew the tank cap anti-clockwise and
pl
ac
e it on top of the tank flap ››› Fig. 202
.
– Insert the pump nozzle into the fuel feed
tube as
far as it will go.
The fuel tank is full as soon as the automatic
filler nozzle cuts out ››› .
– Remove the pump nozzle from the fuel feed
tube and p
l
ace it back on the pump.
– Screw the tank cap clockwise until it clicks
into pl
ace.
– Close the tank flap. Make sure you hear it
click
into place.
– Check that the fuel flap is properly closed. WARNING
Observe all relevant statutory regulations on
tran s
porting spare fuel canisters. For safety reasons, we do not recommend carrying a
sp
ar
e canister in the vehicle. The canister
could be damaged in an accident and fuel
may leak. Risk of fire! CAUTION
● Sw itc
h off the auxiliary heater (heater and
independent heater) before filling the tank.
● The fuel tank is full as soon as the automat-
ic fil
ler nozzle cuts out. Do not continue fill-
ing, as this will fill the expansion chamber.
● Never completely empty the tank! An irreg-
ular f
uel supply can cause ignition faults,
which can result in damage to a substantial
amount of engine parts and the exhaust sys-
tem.
● If any fuel is spilt onto the paintwork of the
vehicl
e, it should be removed immediately.
Risk of damage to paintwork! Note
There is no emergency mechanism for the
manua l
release of the fuel tank flap. If neces-
sary, request assistance from specialised per-
sonnel. Note
The fuel tank capacity is around 55 litres, of
which 7 litr e
s are the reserve. Types of petrol
The correct grade of petrol is listed inside the
fuel
t
ank flap.
The vehicle is equipped with a catalytic con-
verter and must only be run on unleaded pet-
rol. The petrol must comply with European
Standard EN 228 or German standard DIN
51626-1 and must be unleaded. You can re-
fuel with a maximum ethanol proportion of
10 % (E10). The types of petrol are differenti-
ated by their octane rating (RON).
The following titles appear on the corre-
sponding adhesive on the fuel tank flap:
Super unleaded 95 octane or normal 91 oc-
tane unleaded petrol
We recommend you use super 95 octane pet-
rol. If this is not available: normal 91 octane
petrol, with a slight decrease in power.
Super unleaded petrol with a minimum of 95
octanes
You should use super petrol with a minimum
of 95 octanes.
If super is not available, in an emergency you
may refuel with normal 91 octane petrol. In
this case only use moderate engine speeds
and a light throttle. Refuel with super as soon
as possible.
202
Page 205 of 248
Checking and refilling levels
Super unleaded 98 octane or super 95 oc-
t ane u
n
leaded petrol
We recommend you use super plus 98 octane
petrol. If this is not available: super 95 oc-
tane petrol, with a slight decrease in power.
If super is not available, in an emergency you
may refuel with normal 91 octane petrol. In
this case only use moderate engine speeds
and a light throttle. Refuel with super as soon
as possible.
Petrol additives
The quality of the fuel influences the behav-
iour, power and service life of the engine.
This is why the petrol you use should carry
suitable additives already included by the
petrol industry, free of metals. These addi-
tives will help to prevent corrosion, keep the
fuel system clean and prevent deposits from
building up in the engine.
If good-quality petrol with metal-free addi-
tives is not available or engine problems
arise, the necessary additives must be added
when refuelling ››› .
Not al
l
petrol additives have been shown to
be effective. The use of unsuitable petrol ad-
ditives may cause significant damage to the
engine and the catalytic converter. Metal ad-
ditives should never be used. Metal additives
may also be contained in petrol additives for
improving anti-detonation ratings or octane
ratings ››› . SEAT recommends “genuine Volkswagen
Gr
oup F
uel
Additives for petrol engines”.
These additives can be bought at SEAT deal-
ers, where information on how to use them
can also be obtained. CAUTION
● Do not r ef
uel if the filler indicates that the
fuel contains metal. LRP ( lead replacement
petrol) fuels contain high concentrations of
metal additives. Using them may damage the
engine!
● Never refuel with fuels containing a large
proportion of
ethanol (for example, E50, E85).
This could damage the fuel system.
● Just filling one full tank of leaded fuel or
fuel c
ontaining other metal additives would
seriously impair the efficiency of the catalytic
converter.
● Only use fuel additives that have been ap-
prov
ed by SEAT. Octane boosting or anti-
knock additives may contain metal additives
that could seriously damage the engine or
the catalytic converter. These additives must
not be used.
● High engine speed and full throttle can
damag
e the engine when using petrol with an
octane rating lower than the correct grade for
the engine. Note
● You m a
y use petrol with a high octane num-
ber than the one recommended for your en-
gine.
● In those countries where unleaded petrol is
not avai
lable, you may refuel with a fuel with
a low lead content. Diesel fuel
Please note the information on the inside of
the f
uel
t
ank flap.
We recommend the use of diesel fuel which
complies to European standard EN 590. If
diesel fuel which meets European standard
EN 590 is not available, the Cetane number
(CZ) must, at minimum, be 51. If the engine
is equipped with a particulate filter, the sul-
phur content of the fuel must be below 50
parts per million.
Winter-grade diesel
Summer fuel becomes thicker in winter and it
is more difficult to start the engine. For this
reason, petrol stations in some countries al-
so offer winter diesel with improved fluidity
when cold (winter-grade diesel). »
203
Technical data
Advice
Operation
Emergencies
Safety
Page 219 of 248
Wheels and tyres
Wheels and tyres
T y
r
es
Introduction WARNING
● Durin g the fir
st 500 km, new tyres do not
give maximum grip, therefore you should
drive carefully. Risk of accident!
● Never drive with damaged tyres. Risk of ac-
cident!
● Only
use wheels and tyres that been au-
thorised by
SEAT or your vehicle model. Fail-
ure to do so could impair road safety. Risk of
accident!
● Never exceed the maximum speed permit-
ted for
your tyres. Risk of accident due to tyre
damage and loss of vehicle control!
● Under-inflated tyres are submitted to great-
er rol
ling resistance. This means that they
can overheat at high speeds. This can cause
tread separation and even tyre blow-out.
● For driving safety, tyres should be replaced
at le
ast in pairs according to the axle and not
individually. The tyres with the deepest tread
should always be used on the front wheels.
● Never fit used tyres of an unknown age or
prior use.
● Ty
res must be immediately changed at the
very
latest when they have worn down to the
tread wear indicators. ●
Worn ty r
es reduce the necessary grip at
high speeds on damp surfaces. This could
lead to “aquaplaning” (uncontrolled vehicle
movement –“skidding” on damp surfaces).
● Damaged wheels and tyres must be re-
plac
ed immediately.
● Do not use summer or winter tyres that are
more than 6 or 4
years old respectively.
● Wheel bolts should be clean and screw
eas
ily. However, they must never be treated
with grease or oil.
● If the tightening torque of the wheel bolts
is t
oo low, they could loosen while the vehi-
cle is moving. Risk of accident! If the tighten-
ing torque of the wheel bolts is too high, the
bolts and threads could be damaged, leading
to the permanent deforming of the rim sup-
port surfaces.
● Incorrectly handled wheel bolts could lead
to a wheel c
oming loose while the vehicle is
moving. Risk of accident!
● Observe the national legal requirements re-
gardin
g the use of snow tyres and chains. CAUTION
● Where a s p
are wheel that is not compatible
with the wheels fitted is used, follow the in-
structions ››› page 220.
● The prescribed tightening torque for wheel
bolts
on steel and alloy wheels is 120 Nm.
● Protect your tyres from coming into contact
with oil, gr
ease and fuel.
● Replace any lost valve caps immediately. For the sake of the environment
Under-inflated tyres increases fuel consump-
tion. Note
● We r ec
ommend having all work on tyres
and wheels carried out by an authorised SEAT
dealer.
● We recommend using wheels, tyres, hub
caps
and snow chains from the SEAT Original
Accessories programme. 217
Technical data
Advice
Operation
Emergencies
Safety
Page 223 of 248
Wheels and tyres
CAUTION
Follow the instructions given on the tempora-
ry s
pare wheel label. Note
The tyre pressure of the spare wheel must al-
wa y
s correspond to the highest pressure pre-
scribed for the model of vehicle in question. Tyre monitoring systems
Ty r
e pressure* The tyre pressure monitoring system uses
ABS
sen
sor
s to compare the revolutions and
the circumference of each wheel. Should the
circumference of any wheel change, the
warning lamp on the general instrument
panel will light up and an audible warning
will be heard.
Tyre circumference may change if:
● Tyre pressure is too low
● Tyre structure is damaged
● Vehicle load not evenly distributed
● wheels on one axle are subjected to greater
load, (e.
g. driving with trailer, uphill, down-
hill);
● Snow chains are fitted
● The temporary spare wheel is fitted ●
One wheel on the axl
e has been changed
Basic system settings
Should the tyre pressure change or if one or
more wheels are changed or the position of
the wheel on the vehicle is changed, e.g.
changing round the front and rear wheels, or
where a warning lamp lights up when driv-
ing, the system must be adjusted as follows: ● Inflate all tyres to the prescribed pressures
›››
page 218.
● Switch the ignition on.
● Store the new tyre pressure in the Easy
Connect sy
stem with the button and the
S ET
TINGS function button
››
›
page 21.
● In vehicles without radio : pres
s and hold
down the button with the ignition on,
until an acoustic signal is heard.
The warning lamp lights up
If the pressure on at least one tyre is signifi-
cantly lower than the pressure set by the driv-
er, the warning lamp will light up ››› .
The w arnin
g l
amp flashes
If the warning lamp flashes, there is a fault in
the system. Contact a specialised service to
have it fixed. WARNING
● If the w arnin
g lamp lights up, slow down
immediately and avoid any severe braking or
steering manoeuvres. Stop and check the
tyres and their pressure as soon as possible.
● Under certain conditions (e.g. sporty driv-
ing styl
e, driving on loose surfaces or in win-
ter) the warning lamp may take a while to
light up or may remain switched off.
● Despite the tyre pressure monitoring sys-
tem, the driver r
emains responsible for main-
taining the correct tyre pressure. You must
therefore check the tyre pressure often. Note
● The tyr e pr
essure monitoring system is not
a replacement for regularly checking the tyre
pressure, as it is unable to recognise an even
drop in pressure.
● The tyre pressure monitoring system is un-
able t
o warn of a sudden drop in tyre pres-
sure, e.g. a puncture. In this case, try to stop
the vehicle carefully with no severe braking
or steering manoeuvres.
● To ensure the tyre pressure monitoring sys-
tem work
s correctly, the basic setting must
be performed every 10 000 km (6000 miles)
or once a year.
● If the battery is disconnected the warning
lamp lights
up when the ignition is switch-
ed on. This warning lamp must switch off af-
ter covering a short distance. 221
Technical data
Advice
Operation
Emergencies
Safety