air condition Seat Toledo 2017 User Guide
[x] Cancel search | Manufacturer: SEAT, Model Year: 2017, Model line: Toledo, Model: Seat Toledo 2017Pages: 248, PDF Size: 5.86 MB
Page 85 of 248
Fuses and bulbsNo.Consumer
24Air conditioning fan, heating, control unit for air
conditioning, heating
26Front seat heating switch.
27Rear window wiper
29Airbag
30
Electric windows, reversing light switch, air con-
ditioning control unit, Park Assist control unit,
exterior mirror, power supply for middle button
bar, power supply for the side button bar, interi-
or mirror
31Fuel pump, radiator fan control unit, cruise con-
trol, relay coil for the windscreen and rear win-
dow washer system, switch for the lights
32Diagnostics socket, headlight range regulator,
control lever under the steering wheel, ambient
lighting regulator
33Ignition relay coil, clutch pedal switch
34Heatable washer jets of windscreen washer
36USB charging socket
37Radar
39Additional electric heating
41Rear window heater
42Electric windows - passenger
43Towing bracket - Connector contact
No.Consumer
4412 V connection in the interior, 12 V connection
in the boot
45Rear right window
46Windshield and front window washing system,
control lever under the steering wheel
47Towing bracket - Connector contact
48Towing bracket - Right hand light
49Fuel pump control unit
50Radio
51Heat for exterior mirrors
52Keyless Access
53Steering lock (Keyless Access)
54ABS/ESC control unit
56Diagnosis
59Full LED
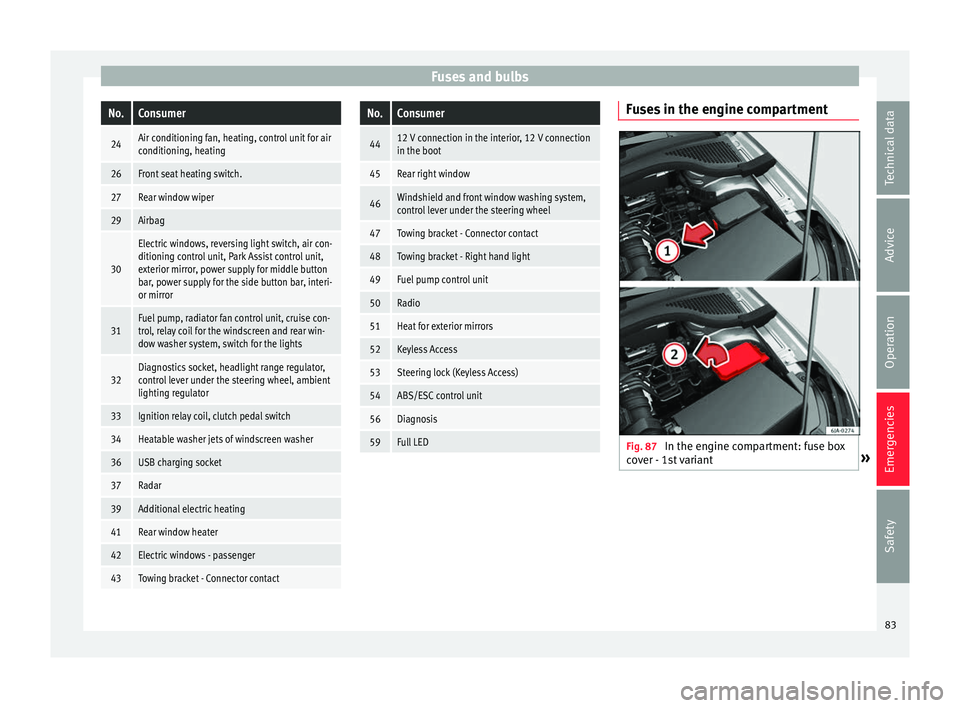
Fuses in the engine compartment
Fig. 87
In the engine compartment: fuse box
c o
v
er - 1st variant » 83
Technical data
Advice
Operation
Emergencies
Safety
Page 97 of 248
Controls and displays
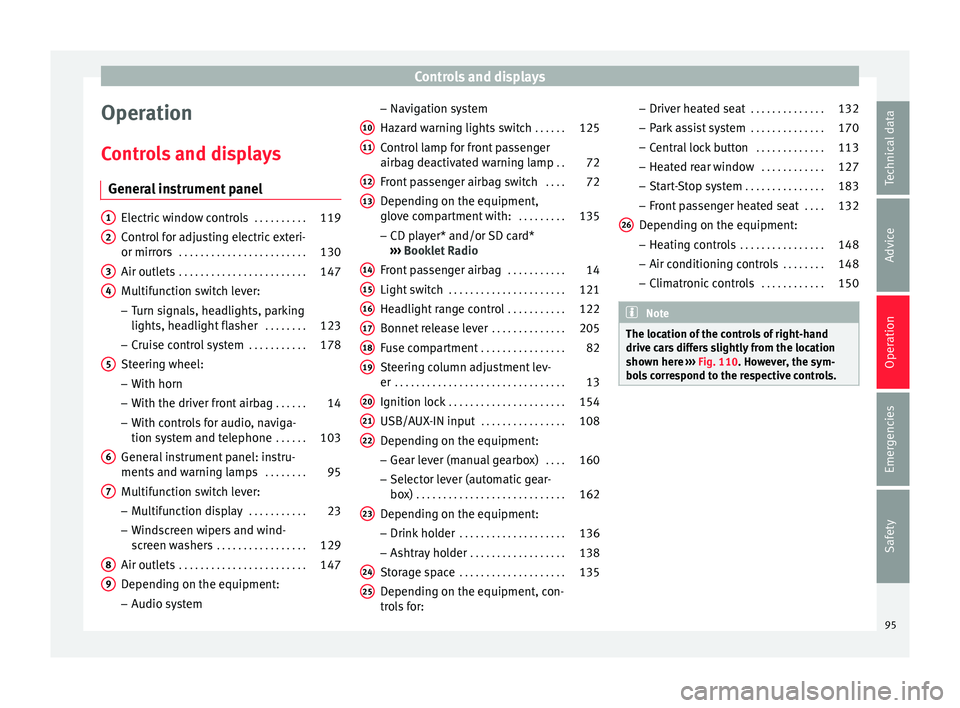
Operation
C ontr
o
ls and displays
General instrument panel Electric window controls
. . . . . . . . . .119
Control for adjusting electric exteri-
or mirror s . . . . . . . . . . . . . . . . . . . . . . . . 130
Air outl
ets . . . . . . . . . . . . . . . . . . . . . . . . 147
Multifunction switch lever:
– Turn s ign
als, headlights, parking
lights, headlight flasher . . . . . . . .123
– Crui se c
ontrol system . . . . . . . . . . .178
Steering wheel:
– With horn
– With the driv
er front airbag . . . . . .14
– With c ontr
ols for audio, naviga-
tion system and telephone . . . . . .103
General instrument panel: instru-
ments and w arnin
g lamps . . . . . . . . 95
Multifunction switch lever:
– Multif
unction display . . . . . . . . . . .23
– Wind s
creen wipers and wind-
screen washers . . . . . . . . . . . . . . . . . 129
Air outlets . . . . . . . . . . . . . . . . . . . . . . . . 147
Depending on the equipment:
– Audio sy st
em
1 2
3
4
5
6
7
8
9 –
Nav ig
ation sy
stem
Hazard warning lights switch . . . . . .125
Control lamp for front passenger
airbag deactiv
ated warning lamp . .72
Front passenger airbag switch . . . .72
Depending on the equipment,
glove c
ompartment with: . . . . . . . . .135
– CD pla
yer* and/or SD card*
››› Booklet Radio
Front passenger airbag . . . . . . . . . . .14
Light switch . . . . . . . . . . . . . . . . . . . . . . 121
Headlight range control . . . . . . . . . . .122
Bonnet release lever . . . . . . . . . . . . . .205
Fuse compartment . . . . . . . . . . . . . . . . 82
Steering column adjustment lev-
er . . . . . . . . . . . . . . . . . . . . . . . . . . . . . . . . 13
Ignition lock . . . . . . . . . . . . . . . . . . . . . . 154
USB/AUX-IN input . . . . . . . . . . . . . . . . 108
Depending on the equipment: – Gear lev
er (manual gearbox) . . . .160
– Select or l
ever (automatic gear-
box) . . . . . . . . . . . . . . . . . . . . . . . . . . . . 162
Depending on the equipment:
– Drink ho l
der . . . . . . . . . . . . . . . . . . . . 136
– Ashtra y
holder . . . . . . . . . . . . . . . . . . 138
Storage space . . . . . . . . . . . . . . . . . . . . 135
Depending on the equipment, con-
tro l
s for:
10 11
12
13
14
15
16
17
18
19
20
21
22
23
24
25 –
Driv er he
at
ed seat . . . . . . . . . . . . . . 132
– Park a
ssist system . . . . . . . . . . . . . . 170
– Central
lock button . . . . . . . . . . . . . 113
– Heated r
ear window . . . . . . . . . . . . 127
– Start
-Stop system . . . . . . . . . . . . . . . 183
– Front p
assenger heated seat . . . .132
Depending on the equipment: – Heating c
ontrols . . . . . . . . . . . . . . . . 148
– Air conditioning c
ontrols . . . . . . . . 148
– Climatr
onic controls . . . . . . . . . . . . 150 Note
The location of the controls of right-hand
drive c ar
s differs slightly from the location
shown here ››› Fig. 110. However, the sym-
bols correspond to the respective controls. 26
95
Technical data
Advice
Operation
Emergencies
Safety
Page 127 of 248

Lights and visibility
Rear fog light Switching on the rear fog light
– First turn the light switch ››› Fig. 134
››› page 124 to position , or .
– Pull on the light switch to position 2 .
If the v
ehicle is not equipped with front fog
lights ››› page 124, the rear fog light is
switched on by turning the switch to position
or and pulling it to position 2 . This
type of sw it
ch only has one position.
The ››› page 100 warning lamp lights up on
the general instrument panel if the rear fog
lights are switched on.
If you are towing a trailer or caravan equip-
ped with a rear fog light on a vehicle with a
factory-fitted towing bracket or one installed
using parts from the original SEAT parts
catalogue, only the rear fog light on the trail-
er or caravan will light up.
Function “Coming Home”/“Leaving
Home”* This function makes it possible, under poor
v
i
s
ibility conditions, to automatically turn on
the lights for a brief period of time after the
vehicle has been parked or when approach-
ing the vehicle. The function is automatically turned on if the
fol
lowing conditions are met:
● The light switch is in position
››
› page 123.
● The visibility around the vehicle is reduced.
● The ignition is switched off.
To turn on thi
s function, switch on the head-
light flasher prior to exiting the vehicle.
The light is adjusted according to the data re-
corded by the light sensor that is installed
between the windscreen and the inside rear
view mirror.
The function automatically turns on the side
lights and headlights, the lighting for the en-
try area on the exterior mirrors and the num-
ber plate light.
“Coming Home” function
The light is automatically switched on when
the driver door is opened (for 60 seconds af-
ter the ignition is switched off).
The light is switched off when all the doors
and the rear lid are closed.
If a door or the rear lid remains open, the
light will switch off after 60 seconds.
“Leaving Home” function
The light is automatically switched on when
the vehicle is unlocked using the remote con-
trol. The light is switched off after 10 seconds or
when the vehic
le is locked.
Hazard warning lights switch Fig. 135
Instrument panel: switch for hazard
w arnin
g lights. –
Press the button ››
›
Fig. 135 to switch
the hazard warning lights on or off.
The warning lamps on the instrument panel
and the warning lamp on the switch will flash
at the same time as the turn signals when
the hazard warning lights are switched on.
The hazard warning lights also work when
the ignition is switched off.
The hazard warning lights come on automati-
cally in the event of an accident in which an
airbag is triggered. »
125
Technical data
Advice
Operation
Emergencies
Safety
Page 130 of 248
Operation
After approximately 7 minutes, the heating
dev ic
e of
the rear window switches off auto-
matically. For the sake of the environment
The heated rear window should be switched
off a s
soon as the glass is demisted. By sav-
ing electrical power you can also save fuel
››› page 166. Note
In the event of a drop in voltage in the on-
boar d sy
stems, the heated rear window
switches off automatically to ensure enough
power to control the engine ››› page 216, Au-
tomatic disconnection of electrical equip-
ment. Sun visors
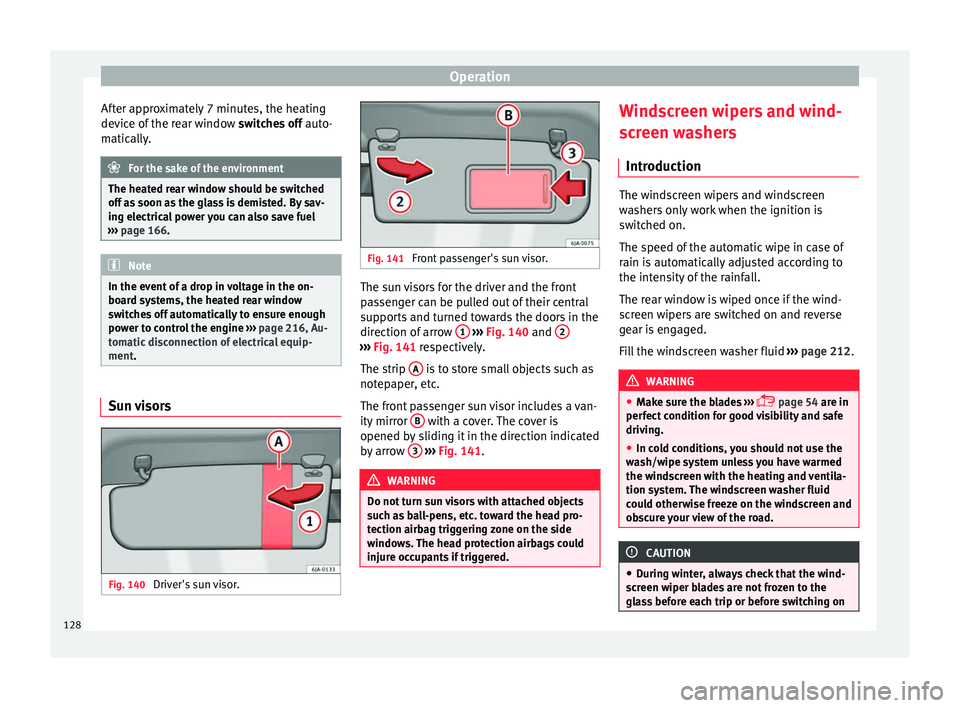
Fig. 140
Driver's sun visor. Fig. 141
Front passenger's sun visor. The sun visors for the driver and the front
p
a
s
senger can be pulled out of their central
supports and turned towards the doors in the
direction of arrow 1
› ›
› Fig. 140
and 2 ›››
Fig. 141 re s pectively.
The strip A is to store small objects such as
not ep
aper
, etc.
The front passenger sun visor includes a van-
ity mirror B with a cover. The cover is
opened b y
s
liding it in the direction indicated
by arrow 3
› ›
› Fig. 141
. WARNING
Do not turn sun visors with attached objects
suc h a
s ball-pens, etc. toward the head pro-
tection airbag triggering zone on the side
windows. The head protection airbags could
injure occupants if triggered. Windscreen wipers and wind-
s
c
r
een washers
Introduction The windscreen wipers and windscreen
wa
sher
s only work when the ignition is
switched on.
The speed of the automatic wipe in case of
rain is automatically adjusted according to
the intensity of the rainfall.
The rear window is wiped once if the wind-
screen wipers are switched on and reverse
gear is engaged.
Fill the windscreen washer fluid ›››
page 212. WARNING
● Mak e s
ure the blades ›››
page 54 are in
perfect condition for good visibility and safe
driving.
● In cold conditions, you should not use the
wash/w
ipe system unless you have warmed
the windscreen with the heating and ventila-
tion system. The windscreen washer fluid
could otherwise freeze on the windscreen and
obscure your view of the road. CAUTION
● Durin g w
inter, always check that the wind-
screen wiper blades are not frozen to the
glass before each trip or before switching on 128
Page 137 of 248
Transport and practical equipment
CAUTION
Take care when handling the rear backrests
so as not
to damage the seat belts. The seat
belt must never be left behind the lifted back-
rest. Transport and practical
equipment
Pr actic
a
l equipment
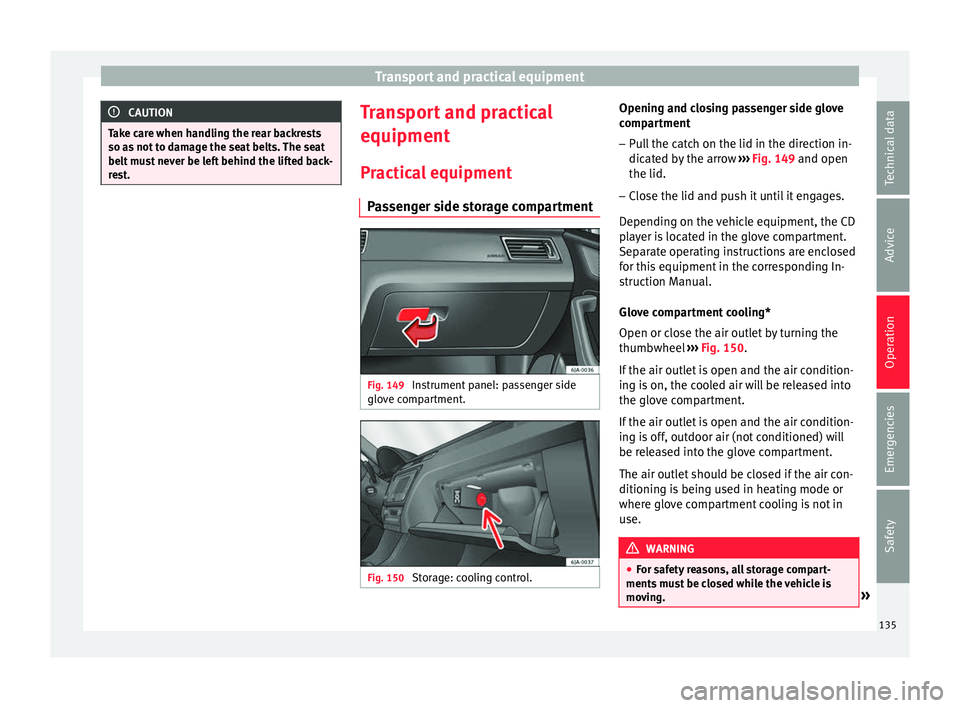
Passenger side storage compartment Fig. 149
Instrument panel: passenger side
glo v
e c
ompartment. Fig. 150
Storage: cooling control. Opening and closing passenger side glove
c
omp ar
tment
– Pull the catch on the lid in the direction in-
dicated b
y the arrow ››› Fig. 149 and open
the lid.
– Close the lid and push it until it engages.
Depending on the
vehicle equipment, the CD
player is located in the glove compartment.
Separate operating instructions are enclosed
for this equipment in the corresponding In-
struction Manual.
Glove compartment cooling*
Open or close the air outlet by turning the
thumbwheel ››› Fig. 150.
If the air outlet is open and the air condition-
ing is on, the cooled air will be released into
the glove compartment.
If the air outlet is open and the air condition-
ing is off, outdoor air (not conditioned) will
be released into the glove compartment.
The air outlet should be closed if the air con-
ditioning is being used in heating mode or
where glove compartment cooling is not in
use. WARNING
● For s af
ety reasons, all storage compart-
ments must be closed while the vehicle is
moving. » 135
Technical data
Advice
Operation
Emergencies
Safety
Page 148 of 248
Operation
Air conditioning
He atin
g and air c
onditioning
General notes The power of the heating depends on the
temper
at
ure of the coolant. Therefore, maxi-
mum power is only obtained when the en-
gine has reached operating temperature.
The temperature and humidity of the air in-
side the vehicle decrease when the cooling
system is turned on. This therefore increases
the comfort of all vehicle occupants when
outside temperatures and humidity are high.
It also helps prevent the windows from mist-
ing over during cold periods of the year.
The air recirculation system can be switched
on temporarily to increase the cooling effect.
Keep the air intake slots in front of the wind-
screen clear of ice, snow or leaves to ensure
unimpaired heating and cooling.
When the air conditioning is on, condensa-
tion can drip from the evaporator in the air
cooling system and form a pool underneath
the vehicle. This is normal and does not indi-
cate a leak! WARNING
● All
windows must be clear of ice, snow and
condensation for driving safety. Therefore, make sure you familiarise yourself with the
corr
ect
use of heating and ventilation, win-
dow demisting and defrosting and cooling.
● Never use the air recirculation system for
too long, a
s it prevents fresh air from enter-
ing the vehicle and used air can cause tired-
ness, reduce your attention span and cause
the windows to mist over. This increases the
risk of an accident. Switch off the air recircu-
lation system as soon as the windows begin
to mist over. WARNING
Do not switch off Climatronic for longer than
nece s
sary.
● Switch Climatronic back on as soon as the
window
s begin to mist over. Note
● Used air e s
capes through ventilation slots
in the rear of the luggage compartment.
● Smoking is not recommended while the air
recir
culation system is in use, as the smoke
drawn from the interior of the vehicle settles
in the evaporator of the air conditioning sys-
tem. This causes a persistent, unpleasant
smell while the system is running that is
time-consuming and expensive (evaporator
replacement) to eliminate.
● To guarantee proper operation, never cover
the air outlets
in the luggage compartment. Economic use of the air-conditioning
sy
s
t
em When the air conditioning is switched on, the
compr
e
ssor consumes engine power and has
influence on fuel consumption.
If the vehicle interior has overheated due to
excessive solar radiation, it is best to open
the windows or doors to allow the hot air to
escape.
While in motion, the air conditioning should
not be switched on if the windows are open.
If the interior temperature can be reached
without switching on the air conditioning, the
fresh air mode should be used. For the sake of the environment
Saving fuel reduces emissions. Faults
If the air conditioning does not work at out-
s
ide t
emper
atures above +5°C (+41°F) then
the system is faulty. This may be due to one
of the following reasons:
● One of the fuses has blown. Check the fuse
and repl
ace if necessary ›››
page 81.
146
Page 149 of 248
Air conditioning
● The air c onditionin
g c
ompressor has
switched off temporarily because of in-
creased engine coolant temperature
››› page 99. If you cannot repair the fault yourself or
where coo
ling power continues to drop,
switch off the system. Contact a specialised
service.
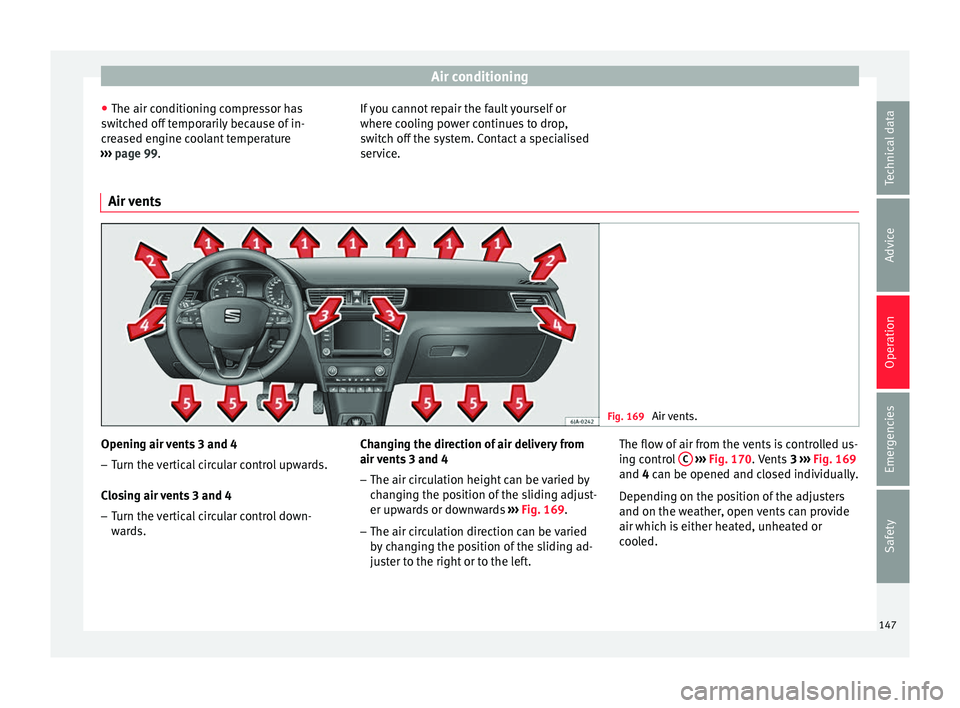
Air vents Fig. 169
Air vents. Opening air vents 3 and 4
– Turn the vertical circular control upwards.
C lo
s
ing air vents 3 and 4
– Turn the vertical circular control down-
ward
s. Changing the direction of air delivery from
air vent
s 3 and 4
– The air circulation height can be varied by
chan
ging the position of the sliding adjust-
er upwards or downwards ››› Fig. 169.
– The air circulation direction can be varied
by c
hanging the position of the sliding ad-
juster to the right or to the left. The flow of air from the vents is controlled us-
ing contr
ol C
› ››
Fig. 170
. Vents 3 ››› Fig. 169
and 4 can be opened and closed individually.
Depending on the position of the adjusters
and on the weather, open vents can provide
air which is either heated, unheated or
cooled.
147
Technical data
Advice
Operation
Emergencies
Safety
Page 150 of 248
Operation
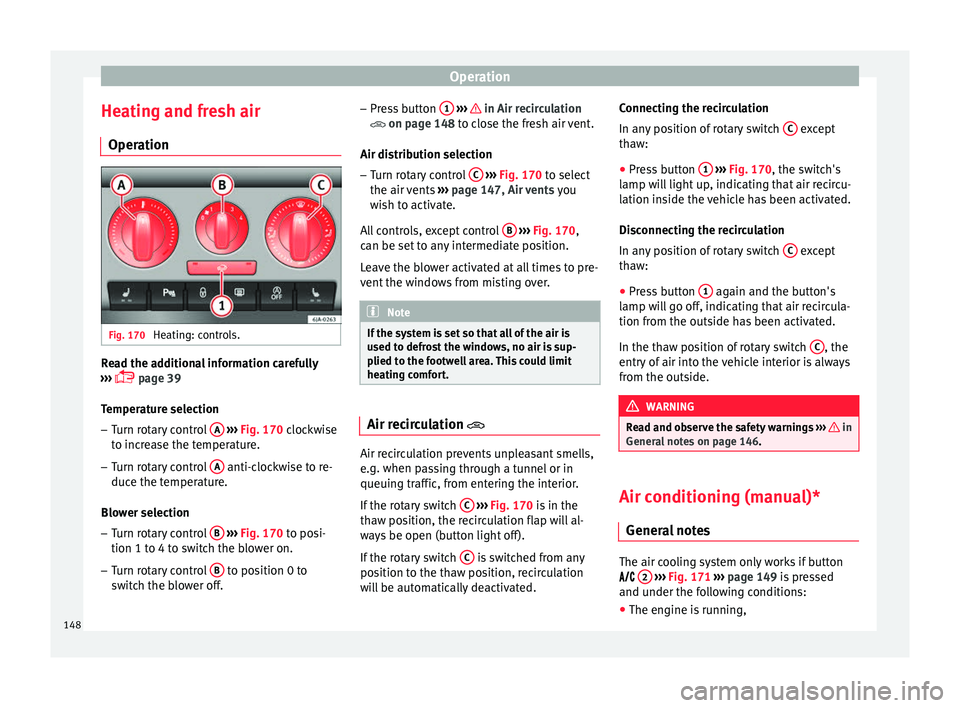
Heating and fresh air Oper ation Fig. 170
Heating: controls. Read the additional information carefully
› ›
›
page 39
Temperature selection
– Turn rotary control A
› ›
› Fig. 170
clockwise
to increase the temperature.
– Turn rotary control A anti-clockwise to re-
duc e the t
emper
ature.
Blower selection
– Turn rotary control B
› ›
› Fig. 170
to posi-
tion 1 to 4 to switch the blower on.
– Turn rotary control B to position 0 to
sw it
c
h the blower off. –
Pres
s button 1
› ›› in Air recirculation
on p ag
e 148
to close the fresh air vent.
Air distribution selection – Turn rotary control C
› ››
Fig. 170
t
o select
the air vents ››› page 147, Air vents you
wish to activate.
All controls, except control B
› ››
Fig. 170
,
c
an be set to any intermediate position.
Leave the blower activated at all times to pre-
vent the windows from misting over. Note
If the system is set so that all of the air is
used t o defr
ost the windows, no air is sup-
plied to the footwell area. This could limit
heating comfort. Air recirculation
Air recirculation prevents unpleasant smells,
e.
g. when p
a
ssing through a tunnel or in
queuing traffic, from entering the interior.
If the rotary switch C
› ›
›
Fig. 170 is in the
thaw position, the recirculation flap will al-
ways be open (button light off).
If the rotary switch C is switched from any
po sition t
o the thaw position, recirculation
will be automatically deactivated. Connecting the recirculation
In any po
sition of rotary switch C except
th a
w:
● Pr
ess button 1
› ››
Fig. 170
, the sw
itch's
lamp will light up, indicating that air recircu-
lation inside the vehicle has been activated.
Disconnecting the recirculation
In any position of rotary switch C except
th a
w:
● Pr
ess button 1 again and the button's
l amp w
i
ll go off, indicating that air recircula-
tion from the outside has been activated.
In the thaw position of rotary switch C , the
entr y
of
air into the vehicle interior is always
from the outside. WARNING
Read and observe the safety warnings ›››
in
Genera l
notes on page 146. Air conditioning (manual)*
Gener a
l
notes The air cooling system only works if button
2
› ›
›
Fig. 171 ›››
page 149 is pressed
and under the following conditions:
● The engine is running,
148
Page 151 of 248
Air conditioning
● The outs ide t
emper
ature is above +2°C
(+36°F),
● The blower control is in position 1–4.
When the coolin
g system is on and under cer-
tain conditions, air can be blown from the
vents at a temperature of approximately +5°C
(+41°F). In the event of prolonged, irregular
distribution of the air flow from the outlets
and significant differences in temperature,
e.g. on leaving the vehicle, sensitive people
may catch cold. Note
A visit to the specialised service once a year
is r
ecommended to clean the air conditioning
system. Manual operation
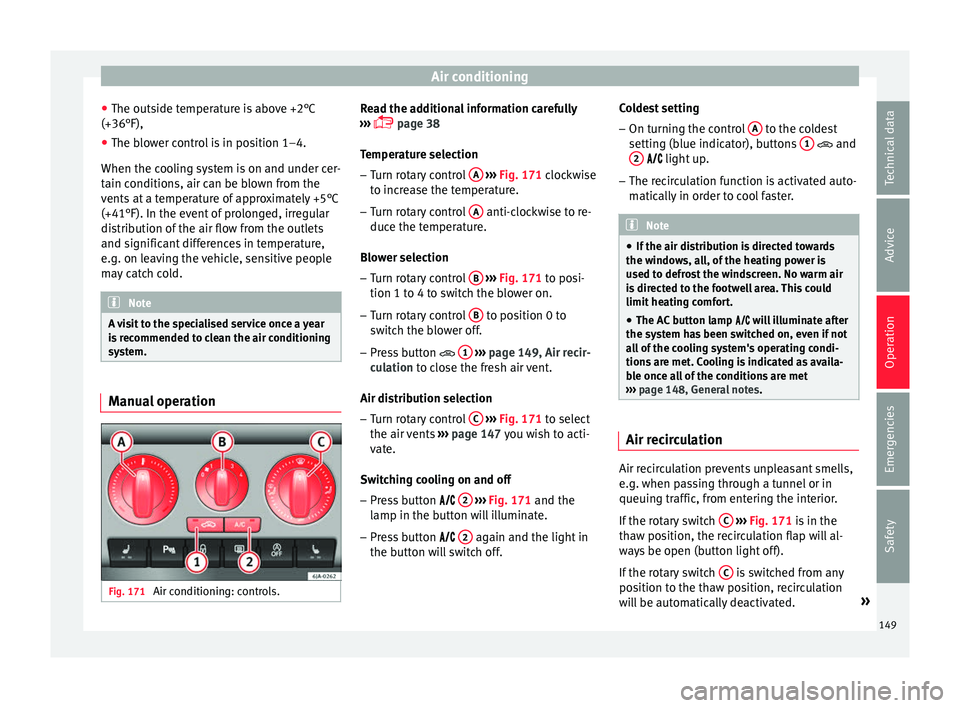
Fig. 171
Air conditioning: controls. Read the additional information carefully
› ›
›
page 38
Temperature selection – Turn rotary control A
› ››
Fig. 171
c
lockwise
to increase the temperature.
– Turn rotary control A anti-clockwise to re-
duc e the t
emper
ature.
Blower selection
– Turn rotary control B
› ››
Fig. 171
t
o posi-
tion 1 to 4 to switch the blower on.
– Turn rotary control B to position 0 to
sw it
c
h the blower off.
– Press button 1
› ›
› p
age 149, Air recir-
culation to close the fresh air vent.
Air distribution selection – Turn rotary control C
› ›
› Fig. 171
to select
the air vents ››› page 147 you wish to acti-
vate.
Switching cooling on and off
– Press button 2
› ›
› Fig. 171
and the
lamp in the button will illuminate.
– Press button 2 again and the light in
the b utt
on w
ill switch off. Coldest setting
– On turning the control A to the coldest
settin g (b
lue indic
ator), buttons 1 and
2
light up.
– The r ec
irculation function is activated auto-
matical
ly in order to cool faster. Note
● If the air di s
tribution is directed towards
the windows, all, of the heating power is
used to defrost the windscreen. No warm air
is directed to the footwell area. This could
limit heating comfort.
● The AC button lamp w
ill illuminate after
the system has been switched on, even if not
all of the cooling system's operating condi-
tions are met. Cooling is indicated as availa-
ble once all of the conditions are met
››› page 148, General notes . Air recirculation
Air recirculation prevents unpleasant smells,
e.
g. when p
a
ssing through a tunnel or in
queuing traffic, from entering the interior.
If the rotary switch C
› ›
›
Fig. 171 is in the
thaw position, the recirculation flap will al-
ways be open (button light off).
If the rotary switch C is switched from any
po sition t
o the thaw position, recirculation
will be automatically deactivated. »
149
Technical data
Advice
Operation
Emergencies
Safety
Page 152 of 248

Operation
Connecting the recirculation
In an y
po
sition of rotary switch C except
th a
w:
● Pr
ess button 1
› ››
Fig. 171
, the sw
itch's
lamp will light up, indicating that air recircu-
lation inside the vehicle has been activated.
Disconnecting the recirculation
In any position of rotary switch C except
th a
w: ●
Pr
es
s button 1 again and the button's
l amp w
i
ll go off, indicating that air recircula-
tion from the outside has been activated.
In the thaw position of rotary switch C , the
entr y
of
air into the vehicle interior is always
from the outside. WARNING
Read and observe the safety warnings ›››
in
Genera l
notes on page 146. Climatronic* (automatic air conditioning)
Gener a
l
notes Fig. 172
Climatronic: controls. Read the additional information carefully
› ››
page 37 Climatronic automatically maintains a com-
fort
able temperature. To do so, it automati- cally regulates the supplied air temperature
and the blow
er and air distribution levels.
150