seats Seat Toledo 2017 Owner's manual
[x] Cancel search | Manufacturer: SEAT, Model Year: 2017, Model line: Toledo, Model: Seat Toledo 2017Pages: 248, PDF Size: 5.86 MB
Page 5 of 248
Table of Contents
Table of Contents
The e s
senti
als . . . . . . . . . . . . . . . . . . . . . . . . 5
Exterior view . . . . . . . . . . . . . . . . . . . . . . . . . . . . 5
Exterior view . . . . . . . . . . . . . . . . . . . . . . . . . . . . 6
Interior view (left-hand drive) . . . . . . . . . . . . . . 7
Interior view (right-hand drive) . . . . . . . . . . . . . 8
How it works . . . . . . . . . . . . . . . . . . . . . . . . . . . . 9
Unlocking and locking . . . . . . . . . . . . . . . . . . . . 9
Before driving . . . . . . . . . . . . . . . . . . . . . . . . . . . 11
Airbags . . . . . . . . . . . . . . . . . . . . . . . . . . . . . . . . 14
Child seats . . . . . . . . . . . . . . . . . . . . . . . . . . . . . 16
Starting the vehicle . . . . . . . . . . . . . . . . . . . . . . 18
Lights and visibility . . . . . . . . . . . . . . . . . . . . . . 18
Easy Connect . . . . . . . . . . . . . . . . . . . . . . . . . . . 21
Driver information System . . . . . . . . . . . . . . . . . 23
Status display . . . . . . . . . . . . . . . . . . . . . . . . . . . 28
Cruise control . . . . . . . . . . . . . . . . . . . . . . . . . . . 32
Warning lamps . . . . . . . . . . . . . . . . . . . . . . . . . . 33
Gearbox lever . . . . . . . . . . . . . . . . . . . . . . . . . . . 35
Air conditioning . . . . . . . . . . . . . . . . . . . . . . . . . 37
Fluid Level control . . . . . . . . . . . . . . . . . . . . . . . 40
Emergencies . . . . . . . . . . . . . . . . . . . . . . . . . . . . 44
Fuses . . . . . . . . . . . . . . . . . . . . . . . . . . . . . . . . . . 44
Bulbs . . . . . . . . . . . . . . . . . . . . . . . . . . . . . . . . . . 45
Action in the event of a puncture . . . . . . . . . . . 45
Changing a wheel . . . . . . . . . . . . . . . . . . . . . . . 47
Snow chains . . . . . . . . . . . . . . . . . . . . . . . . . . . . 50
Emergency towing of the vehicle . . . . . . . . . . . 51
How to jump start . . . . . . . . . . . . . . . . . . . . . . . . 52
Changing the windscreen wiper blades . . . . . . 54
Safety . . . . . . . . . . . . . . . . . . . . . . . . . . . . . . . . 56
Safe driving . . . . . . . . . . . . . . . . . . . . . . . . . . . . 56
Safety first! . . . . . . . . . . . . . . . . . . . . . . . . . . . . . 56
Advice about driving . . . . . . . . . . . . . . . . . . . . . 56 Correct position of the vehicle occupants . . . . 57
Pedal area . . . . . . . . . . . . . . . . . . . . . . . . . . . . . . 61
Seat belts
. . . . . . . . . . . . . . . . . . . . . . . . . . . . . . 62
The whys and wherefores of seat belts . . . . . . . 62
How to properly adjust your seatbelt . . . . . . . . 65
Seat belt tensioners . . . . . . . . . . . . . . . . . . . . . . 66
Airbag system . . . . . . . . . . . . . . . . . . . . . . . . . . 67
Brief introduction . . . . . . . . . . . . . . . . . . . . . . . . 67
Airbag safety instructions . . . . . . . . . . . . . . . . . 70
Deactivating airbags . . . . . . . . . . . . . . . . . . . . . 72
Transporting children safely . . . . . . . . . . . . . . . 73
Safety for children . . . . . . . . . . . . . . . . . . . . . . . 73
Child seats . . . . . . . . . . . . . . . . . . . . . . . . . . . . . 75
Emergencies . . . . . . . . . . . . . . . . . . . . . . . . . . 76
Self-help . . . . . . . . . . . . . . . . . . . . . . . . . . . . . . . 76
Emergency equipment . . . . . . . . . . . . . . . . . . . . 76
Changing a wheel . . . . . . . . . . . . . . . . . . . . . . . 76
Tyre repairs . . . . . . . . . . . . . . . . . . . . . . . . . . . . . 77
Towing the vehicle . . . . . . . . . . . . . . . . . . . . . . . 79
Fuses and bulbs . . . . . . . . . . . . . . . . . . . . . . . . . 81
Fuses . . . . . . . . . . . . . . . . . . . . . . . . . . . . . . . . . . 81
Changing bulbs . . . . . . . . . . . . . . . . . . . . . . . . . 84
Changing the fog light bulbs . . . . . . . . . . . . . . . 88
Changing the rear lights (on the side panel) . . 88
Changing tail lights (on the rear lid) . . . . . . . . . 90
Changing the bulb on the number plate . . . . . . 92
Side turn signals . . . . . . . . . . . . . . . . . . . . . . . . 92
Operation . . . . . . . . . . . . . . . . . . . . . . . . . . . . . 95
Controls and displays . . . . . . . . . . . . . . . . . . . . 95
General instrument panel . . . . . . . . . . . . . . . . . 94
Instruments and warning lamps . . . . . . . . . . . . 96
Instruments . . . . . . . . . . . . . . . . . . . . . . . . . . . . 96
Control lamps . . . . . . . . . . . . . . . . . . . . . . . . . . . 100
Introduction to the Easy Connect system* . . . . 101
System settings (CAR)* . . . . . . . . . . . . . . . . . . . 101 Communications and multimedia
. . . . . . . . . . . 103
Steering wheel controls* . . . . . . . . . . . . . . . . . . 103
Multimedia . . . . . . . . . . . . . . . . . . . . . . . . . . . . . 108
Opening and closing . . . . . . . . . . . . . . . . . . . . . 108
Remote control . . . . . . . . . . . . . . . . . . . . . . . . . . 108
Keys . . . . . . . . . . . . . . . . . . . . . . . . . . . . . . . . . . . 109
Central locking system . . . . . . . . . . . . . . . . . . . . 111
Anti-theft alarm* . . . . . . . . . . . . . . . . . . . . . . . . 116
Rear lid . . . . . . . . . . . . . . . . . . . . . . . . . . . . . . . . 118
Controls for the windows . . . . . . . . . . . . . . . . . . 119
Lights and visibility . . . . . . . . . . . . . . . . . . . . . . 120
Lights . . . . . . . . . . . . . . . . . . . . . . . . . . . . . . . . . 120
Interior lights . . . . . . . . . . . . . . . . . . . . . . . . . . . 126
Visibility . . . . . . . . . . . . . . . . . . . . . . . . . . . . . . . 127
Windscreen wipers and windscreen wash-
ers . . . . . . . . . . . . . . . . . . . . . . . . . . . . . . . . . . . . 128
Mirr
ors . . . . . . . . . . . . . . . . . . . . . . . . . . . . . . . . . 130
Seats and head restraints . . . . . . . . . . . . . . . . . 131
Adjusting seats and head restraints . . . . . . . . . 131
Seat functions . . . . . . . . . . . . . . . . . . . . . . . . . . 132
Transport and practical equipment . . . . . . . . . 135
Practical equipment . . . . . . . . . . . . . . . . . . . . . . 135
Storing objects . . . . . . . . . . . . . . . . . . . . . . . . . . 140
Luggage compartment . . . . . . . . . . . . . . . . . . . . 141
Roof rack* . . . . . . . . . . . . . . . . . . . . . . . . . . . . . . 144
Air conditioning . . . . . . . . . . . . . . . . . . . . . . . . . 146
Heating and air conditioning . . . . . . . . . . . . . . . 146
Heating and fresh air . . . . . . . . . . . . . . . . . . . . . 148
Air conditioning (manual)* . . . . . . . . . . . . . . . . 148
Climatronic* (automatic air conditioning) . . . . 150
Driving . . . . . . . . . . . . . . . . . . . . . . . . . . . . . . . . 152
Starting and stopping the engine . . . . . . . . . . . 152
Brakes and brake servo systems . . . . . . . . . . . . 156
Braking and stability systems . . . . . . . . . . . . . . 158
Manual gearbox . . . . . . . . . . . . . . . . . . . . . . . . . 160
Automatic gearbox . . . . . . . . . . . . . . . . . . . . . . . 160
Run-in and economical driving . . . . . . . . . . . . . 165
3
Page 13 of 248
The essentials
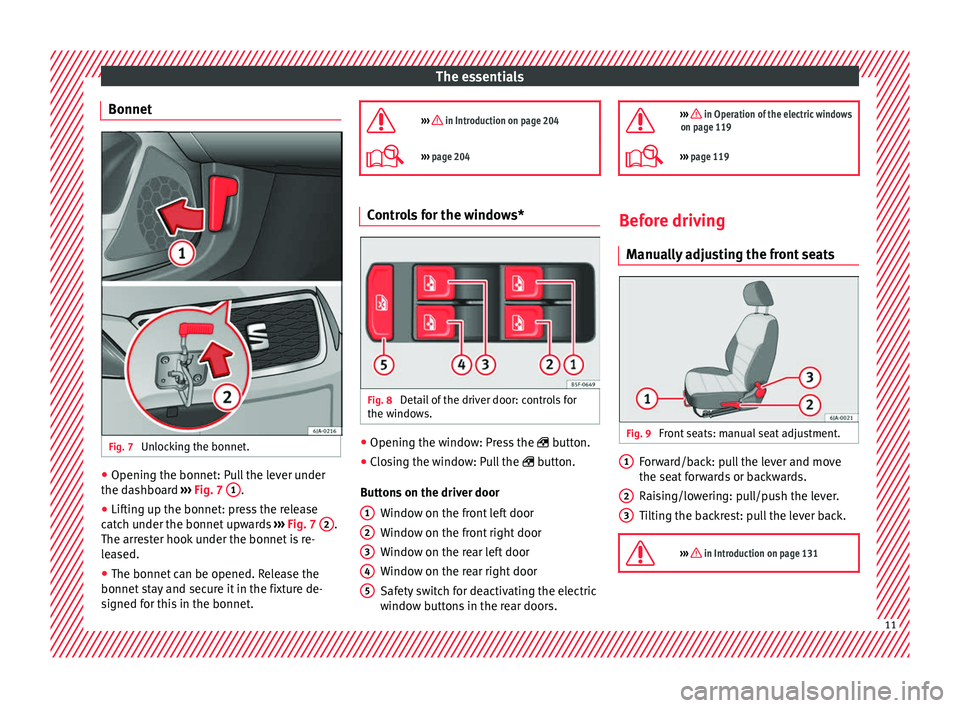
Bonnet Fig. 7
Unlocking the bonnet. ●
Opening the bonnet: Pull the lever under
the d a
shbo
ard ››› Fig. 7 1 .
● Lifting up the bonnet: press the release
c at
c
h under the bonnet upwards ››› Fig. 7 2 .
The arr e
s
ter hook under the bonnet is re-
leased.
● The bonnet can be opened. Release the
bonnet st
ay and secure it in the fixture de-
signed for this in the bonnet.
››› in Introduction on page 204
›››
page 204 Controls for the windows*
Fig. 8
Detail of the driver door: controls for
the w indo
w
s. ●
Opening the window: Press the butt
on.
● C
losing the window: Pull the button.
B
uttons on the driver door Window on the front left door
Window on the front right door
Window on the rear left door
Window on the rear right door
Safety switch for deactivating the electric
window buttons in the rear doors.
1 2
3
4
5
››› in Operation of the electric windows
on page 119
››› page 119 Before driving
M anua
l
ly adjusting the front seats Fig. 9
Front seats: manual seat adjustment. Forward/back: pull the lever and move
the se
at
f
orwards or backwards.
Raising/lowering: pull/push the lever.
Tilting the backrest: pull the lever back.
››› in Introduction on page 131 1
2
3
11
Page 14 of 248
The essentials
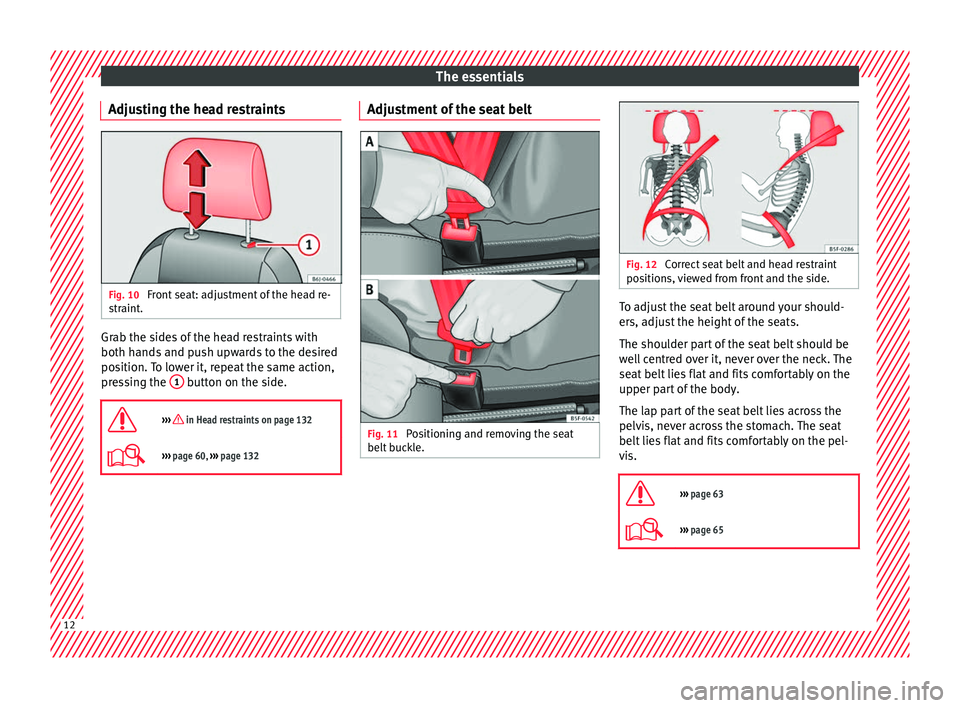
Adjusting the head restraints Fig. 10
Front seat: adjustment of the head re-
s tr
aint
. Grab the sides of the head restraints with
both h
and
s
and push upwards to the desired
position. To lower it, repeat the same action,
pressing the 1 button on the side.
››› in Head restraints on page 132
››› page 60, ››› page 132 Adjustment of the seat belt
Fig. 11
Positioning and removing the seat
belt b
uc
kle. Fig. 12
Correct seat belt and head restraint
pos ition
s, viewed from front and the side. To adjust the seat belt around your should-
er
s, a
dju
st the height of the seats.
The shoulder part of the seat belt should be
well centred over it, never over the neck. The
seat belt lies flat and fits comfortably on the
upper part of the body.
The lap part of the seat belt lies across the
pelvis, never across the stomach. The seat
belt lies flat and fits comfortably on the pel-
vis.
››› page 63
››› page 65 12
Page 15 of 248
The essentials
Seat belt tensioners During a collision, the seat belts on the front
seats
ar
e retracted automatically.
The tensioner can be triggered only once.
››› in Maintenance and disposal of belt
tensioners on page 67
››› page 66 Adjusting the exterior mirrors
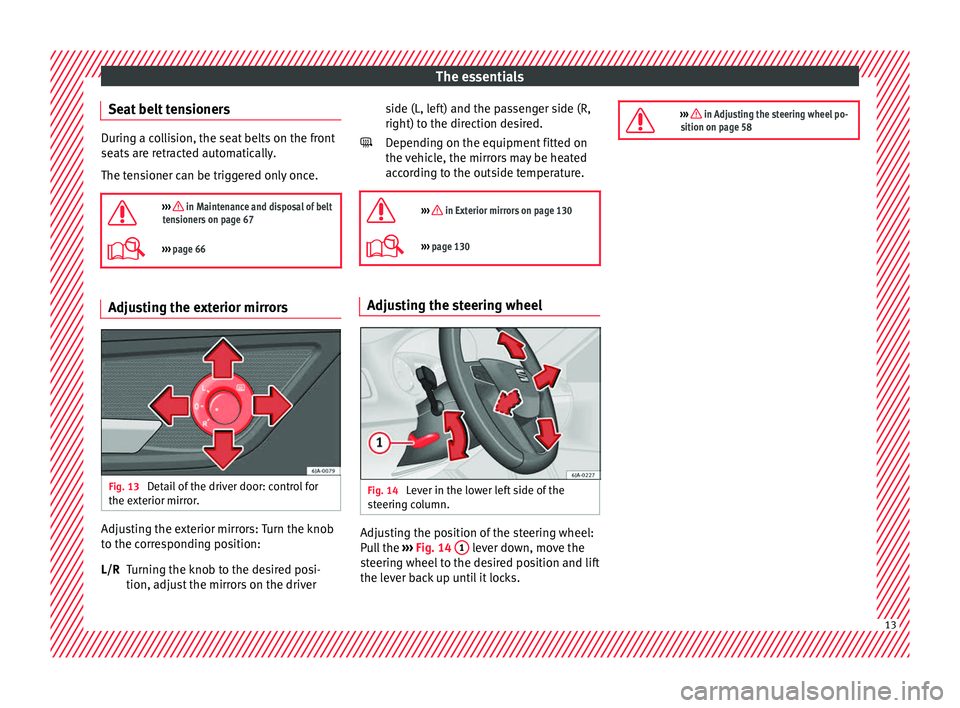
Fig. 13
Detail of the driver door: control for
the e xt
erior mirr
or. Adjusting the exterior mirrors: Turn the knob
t
o the c
orr
esponding position:
Turning the knob to the desired posi-
tion, adjust the mirrors on the driver
L/R side (L, left) and the passenger side (R,
right) to the direction de
sired.
Depending on the equipment fitted on
the vehicle, the mirrors may be heated
according to the outside temperature.
››› in Exterior mirrors on page 130
››› page 130 Adjusting the steering wheel
Fig. 14
Lever in the lower left side of the
s t
eerin
g column. Adjusting the position of the steering wheel:
P
u
l
l the ››› Fig. 14 1 lever down, move the
s t
eerin
g wheel to the desired position and lift
the lever back up until it locks.
››› in Adjusting the steering wheel po-
sition on page 58 13
Page 18 of 248
The essentials
Head-protection airbags* Fig. 20
Location of head-protection airbags. Fig. 21
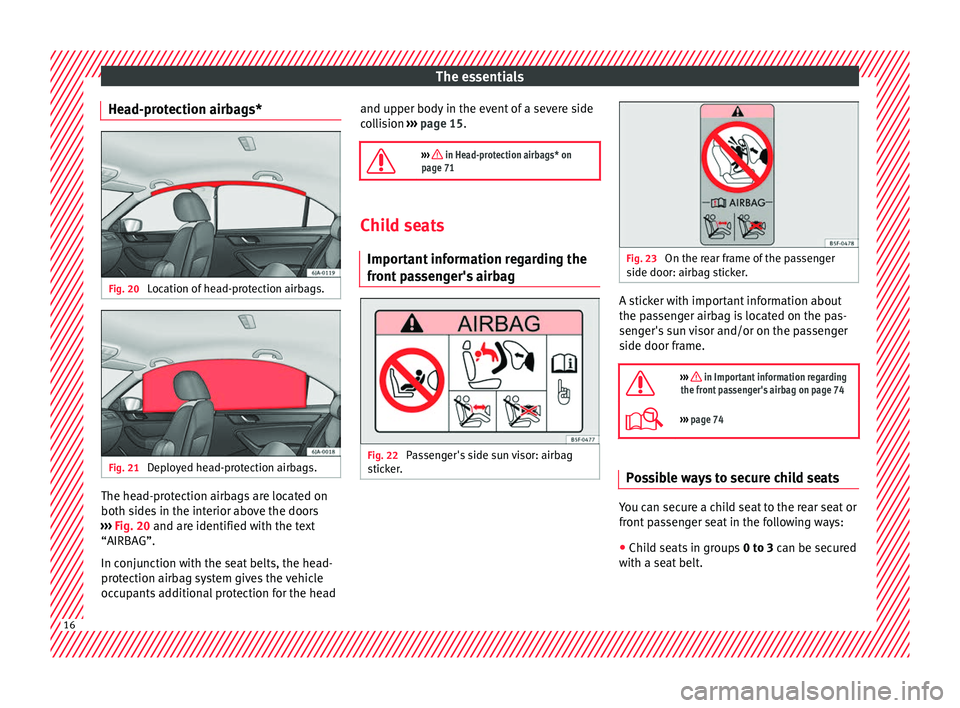
Deployed head-protection airbags. The head-protection airbags are located on
both s
ide
s
in the interior above the doors
››› Fig. 20 and are identified with the text
“AIRBAG”.
In conjunction with the seat belts, the head-
protection airbag system gives the vehicle
occupants additional protection for the head and upper body in the event of a severe side
col
lision ››› page 15.
››› in Head-protection airbags* on
page 71 Child seats
Important
information regarding the
front passenger's airbag Fig. 22
Passenger's side sun visor: airbag
s tic
k
er. Fig. 23
On the rear frame of the passenger
side door: airb ag s
ticker. A sticker with important information about
the p
a
s
senger airbag is located on the pas-
senger's sun visor and/or on the passenger
side door frame.
››› in Important information regarding
the front passenger's airbag on page 74
››› page 74 Possible ways to secure child seats
You can secure a child seat to the rear seat or
fr
ont
p
assenger seat in the following ways:
● Child seats in groups 0 to 3 c
an be secured
with a seat belt. 16
Page 19 of 248
The essentials
● Chi l
d se
ats for groups 0, 0+ and 1 can be
fastened without seatbelts, using the “ISO-
FIX” and Top Tether* system, using the “ISO-
FIX” and Top Tether* securing rings
››› page 17.
Weight
groupSeat locations
Front pas- senger a)Rear
outerRear
centre
Group 0
<10 kgU b)U/LU
Group 0+
<13 kgUb)U/LU
Group I
9-18 kgUb)U/LU
Group II/III
15-36 kgUb)UU
U: Suitable for universal approved restraining systems
for use in this age category (universal retention systems
are those fitted using the adult seat belt).
L: Suitable for retention systems using the “ISOFIX” and
Top Tether* anchors.
a)
Compliance with current national legislation and the manu-
facturer's instructions is required when using or installing child
seats.
b) Move the front passenger seat as far back as possible, as
high as possible and always disable the airbag.
The systems include the child restraint sys-
tem mounting with an upper retaining strap
(Top Tether) and lower anchoring points on
the seat.
››› in Safety instructions on page 75 Securing child seats with “ISOFIX”
and Top T
ether* Fig. 24
ISOFIX securing rings. Fig. 25
Top Tether* securing ring. Child seats with the “ISOFIX” or Top Tether*
sy
s
t
em can be secured quickly, easily and
safely on the rear outer seats. When removing or fitting the child seat,
ple
ase be sure to follow the manufacturer's
instructions.
● Move the rear seat as far to the rear as it
wil
l go.
● Press the child seat onto the “ISOFIX” re-
taining rin
gs until the child seat can be heard
to engage. If the child seat is equipped with
Top Tether* anchor points, secure it to the
correspondent ring. Observe the manufactur-
er's instructions.
● Pull on both sides of the child seat to en-
sure th
at it is secure.
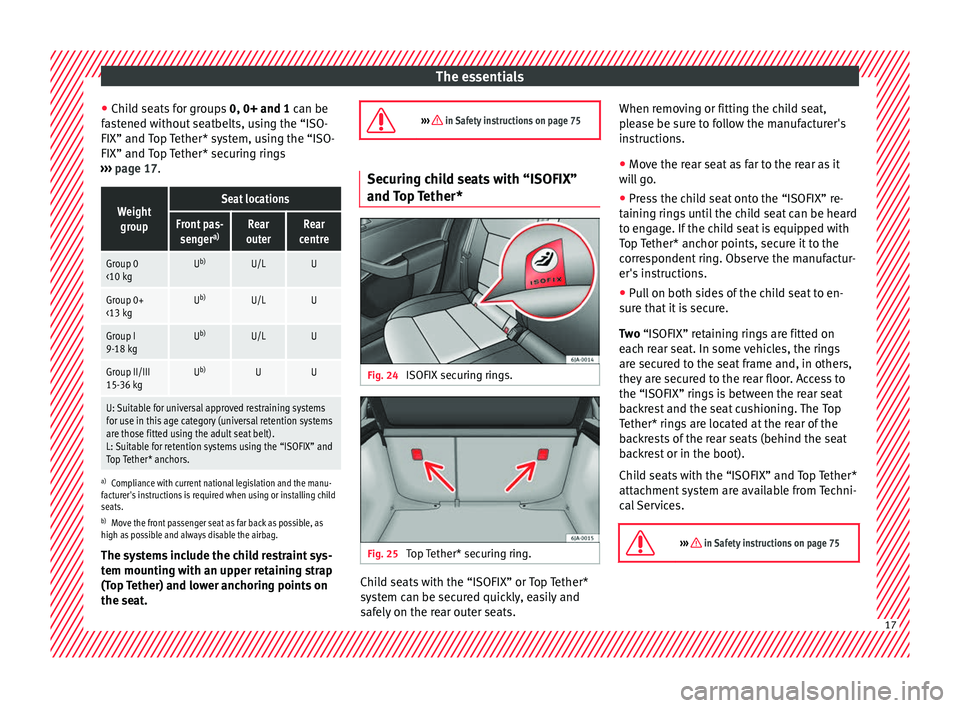
Two “ISOFIX” retaining rings are fitted on
each rear seat. In some vehicles, the rings
are secured to the seat frame and, in others,
they are secured to the rear floor. Access to
the “ISOFIX” rings is between the rear seat
backrest and the seat cushioning. The Top
Tether* rings are located at the rear of the
backrests of the rear seats (behind the seat
backrest or in the boot).
Child seats with the “ISOFIX” and Top Tether*
attachment system are available from Techni-
cal Services.
››› in Safety instructions on page 75 17
Page 58 of 248
Safety
Safety
Saf e driv
in
g
Safety first! This chapter contains important information,
tips, s
ug
gestions and warnings that you
should read and consider for both your own
safety and for your passengers' safety. WARNING
● This m
anual contains important informa-
tion about the operation of the vehicle, both
for the driver and the passengers. The other
sections of the on-board documentation also
contain further information that you should
be aware of for your own safety and for the
safety of your passengers.
● Ensure that the on-board documentation is
kept in the
vehicle at all times. This is espe-
cially important when lending or selling the
vehicle to another person. Advice about driving
B ef or
e setting off For your own safety and the safety of your
p
a
s
sengers, always note the following points
before every trip: –
Make s
ure that the vehicle's lights and turn
signals are working properly.
– Check tyre pressure.
– Ensure that all windows provide a clear and
good v
iew of the surroundings.
– Make sure all luggage is secured
›››
page 140.
– Make sure that no objects can interfere
with the pedal
s.
– Adjust front seat, head restraint and mir-
rors
properly according to your size.
– Ensure that the passengers in the rear
seats alw
ays have the head restraints in
the in-use position ››› page 60.
– Instruct passengers to adjust the head re-
straints
according to their height.
– Protect children with appropriate child
seats and pr
operly applied seat belts
››› page 73.
– Assume the correct sitting position. Instruct
your pa
ssengers also to assume a proper
sitting position ››› page 57.
– Fasten your seat belt securely. Instruct your
pas
sengers also to fasten their seat belts
properly ››› page 62. Factors influencing safety As a driver, you are responsible for yourself
and y
our p
assengers. When your concentra-
tion or driving safety is affected by any cir-
cumstance, you endanger yourself as well as
others on the road ››› , for this reason:
– Always pay attention to traffic and do not
get di
stracted by passengers or telephone
calls.
– Never drive when your driving ability is im-
paired (e.
g. by medication, alcohol, drugs).
– Observe traffic laws and speed limits.
– Always reduce your speed as appropriate
for r o
ad, traffic and weather conditions.
– When travelling long distances, take
break
s regularly - at least every two hours.
– If possible, avoid driving when you are tired
or stre
ssed. WARNING
When driving safety is impaired during a trip,
the risk of
injury and accidents increases. Safety equipment
Never put your safety or the safety of your
p
a
s
sengers in danger. In the event of an acci-
dent, the safety equipment may reduce the
56
Page 59 of 248
Safe driving
risk of injury. The following points cover part
of the s
af
ety equipment in your SEAT:
● three-point seat belts,
● belt tension limiters for the front and rear
side seats,
● B
elt tensioners for the front seats,
● Belt height adjustment for the front seats
● front airbags,
● side airbags in the front seat backrests,
● side airbags in the rear seat backrests*,
● head-protection airbags,
● active front head restraints*,
● “ISOFIX” anchor points for child seats in
the rear s
ide seats with the “ISOFIX” system,
● height-adjustable front head restraints,
● rear head restraints with in-use position
and non-use pos
ition,
● adjustable steering column.
The safety
equipment mentioned above
works together to provide you and your pas-
sengers with the best possible protection in
the event of an accident. However, these
safety systems can only be effective if you
and your passengers are sitting in a correct
position and use this equipment properly.
Safety is everyone's business! Correct position of the vehicle
occup
ants
Correct sitting position for the driver Fig. 72
The proper distance between driver
and s t
eerin
g wheel. Fig. 73
Correct head restraint position for the
driv er
. For your own safety and to reduce the risk of
injur
y
in the ev
ent of an accident, we recom- mend the following adjustments for the driv-
er:
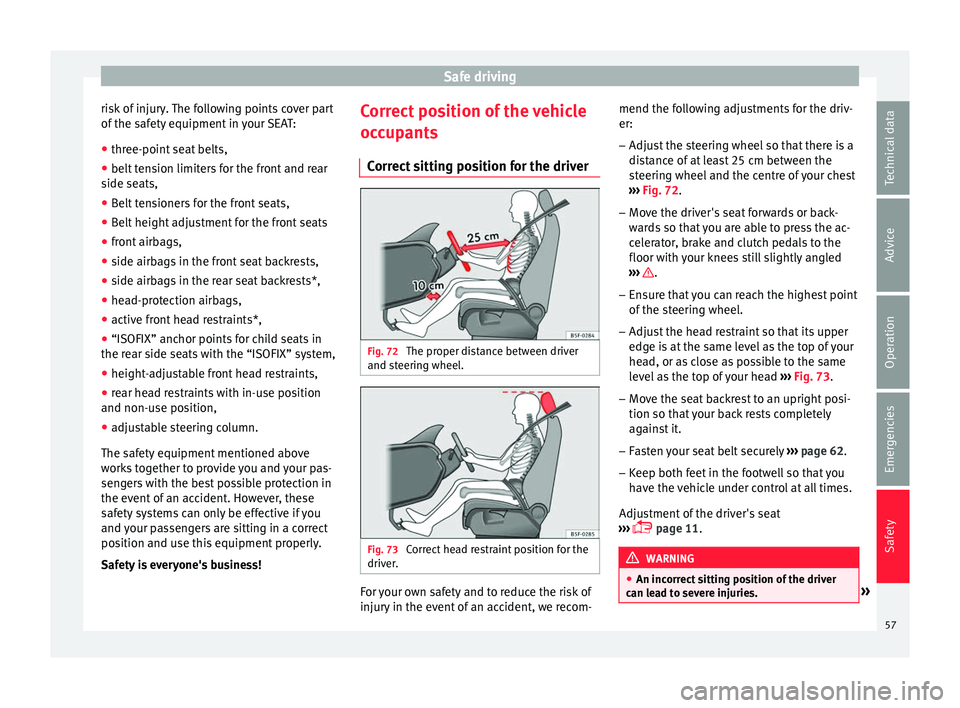
– Adjust the steering wheel so that there is a
dist
ance of at least 25 cm between the
steering wheel and the centre of your chest
››› Fig. 72.
– Move the driver's seat forwards or back-
ward
s so that you are able to press the ac-
celerator, brake and clutch pedals to the
floor with your knees still slightly angled
››› .
– Ensure that you can reach the highest point
of the s
t
eering wheel.
– Adjust the head restraint so that its upper
edge is
at the same level as the top of your
head, or as close as possible to the same
level as the top of your head ››› Fig. 73.
– Move the seat backrest to an upright posi-
tion so that
your back rests completely
against it.
– Fasten your seat belt securely ›››
page 62.
– Keep both feet in the footwell so that you
have the
vehicle under control at all times.
Adjustment of the driver's seat
››› page 11. WARNING
● An incorr ect
sitting position of the driver
can lead to severe injuries. » 57
Technical data
Advice
Operation
Emergencies
Safety
Page 61 of 248
Safe driving
●
Alw a
ys keep your feet in the footwell when
the vehicle is moving; never rest them on the
dash panel, out the window or on the seat. An
incorrect sitting position exposes you to an
increased risk of injury in case of a sudden
braking or an accident. If the airbag is trig-
gered, you could sustain severe injuries due
to an incorrect sitting position.
● To reduce the risk of injury to the front pas-
senger in ev
ents such as sudden braking ma-
noeuvres or an accident, never travel with the
backrest tilted far back! The airbag system
and seat belts can only provide optimal pro-
tection when the backrest is in an upright po-
sition and the front passenger is wearing his
or her seat belt properly. The further the seat
backrests are tilted to the rear, the greater
the risk of injury due to incorrect positioning
of the belt web or to the incorrect sitting po-
sition!
● Adjust the head restraint correctly in order
to achiev
e maximum protection. Correct sitting position for rear seat
p
a
s
sengers To reduce the risk of injury in the event of a
s
ud
den br
aking manoeuvre or an accident,
passengers on the rear seat bench must con-
sider the following:
– Sit up straight.
– Adjust the head restraint to the correct po-
sition ››
› page 60. –
Alwa
ys keep both feet in the footwell in
front of the rear seat.
– Fasten your seat belt securely ›››
page 62.
– Use an appropriate child restraint system
when you t
ake children in the vehicle
››› page 73. WARNING
● If the p a
ssengers in the rear seats are not
sitting properly, they could sustain severe in-
juries.
● Adjust the head restraint correctly in order
to achiev
e maximum protection.
● Seat belts can only provide optimal protec-
tion when seat b
ackrests are in an upright
position and the vehicle occupants are wear-
ing their seat belts correctly. If passengers In
the rear seats are not sitting in an upright po-
sition, the risk of injury due to incorrect posi-
tioning of the seat belt increases. Examples of incorrect sitting posi-
tion
s Seat belts can provide optimal protection on-
ly
when the belt
w
ebs are properly posi-
tioned. Incorrect sitting positions substan-
tially reduce the protective function of seat
belts and increase the risk of injury due to in-
correct seat belt position. As the driver, you
are responsible for all passengers, especially
children. –
Never allo
w anyone to assume an incorrect
sitting position in the vehicle while travel-
ling ››› .
The f o
l
lowing list contains examples of sit-
ting positions that could be dangerous for all
vehicle occupants. The list is not complete,
but we would like to make you aware of this
issue.
Therefore, whenever the vehicle is in motion:
● Never stand in the vehicle.
● Never stand on the seats.
● Never kneel on the seats.
● Never tilt your seat backrest far to the rear.
● Never lean against the dash panel.
● Never lie on the rear bench.
● Never sit on the front edge of a seat.
● Never sit sideways.
● Never lean out of a window.
● Never put your feet out of a window.
● Never put your feet on the dash panel.
● Never put your feet on the surface of a seat.
● Do not allow anyone to travel in the foot-
well
.
● Never travel without wearing the seat belt.
● Do not allow anyone to travel in the lug-
gage c
ompartment. »
59
Technical data
Advice
Operation
Emergencies
Safety
Page 62 of 248
Safety
WARNING
● Any inc
orrect sitting position increases the
risk of severe injuries.
● Sitting in an incorrect position exposes the
vehicl
e occupants to severe injuries if airbags
are triggered, by striking a vehicle occupant
who has assumed an incorrect sitting posi-
tion.
● Before the vehicle moves, assume the prop-
er sitting po
sition and maintain it throughout
the trip. Before every trip, instruct your pas-
sengers to sit properly and to stay in this po-
sition during the trip ››› page 57, Correct posi-
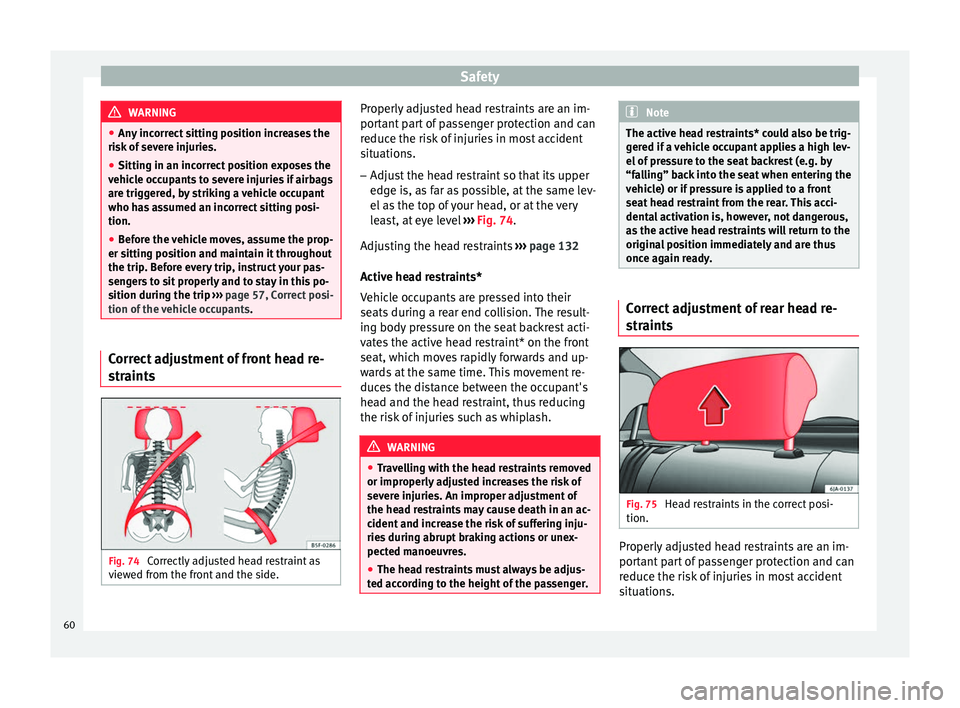
tion of the vehicle occupants .Correct adjustment of front head re-
s
tr
aint
s Fig. 74
Correctly adjusted head restraint as
v iew
ed fr
om the front and the side. Properly adjusted head restraints are an im-
por
t
ant
part of passenger protection and can
reduce the risk of injuries in most accident
situations.
– Adjust the head restraint so that its upper
edge is, a
s far as possible, at the same lev-
el as the top of your head, or at the very
least, at eye level ››› Fig. 74.
Adjusting the head restraints ››› page 132
Active head restraints*
Vehicle occupants are pressed into their
seats during a rear end collision. The result-
ing body pressure on the seat backrest acti-
vates the active head restraint* on the front
seat, which moves rapidly forwards and up-
wards at the same time. This movement re-
duces the distance between the occupant's
head and the head restraint, thus reducing
the risk of injuries such as whiplash. WARNING
● Trav
elling with the head restraints removed
or improperly adjusted increases the risk of
severe injuries. An improper adjustment of
the head restraints may cause death in an ac-
cident and increase the risk of suffering inju-
ries during abrupt braking actions or unex-
pected manoeuvres.
● The head restraints must always be adjus-
ted acc
ording to the height of the passenger. Note
The active head restraints* could also be trig-
ger ed if
a vehicle occupant applies a high lev-
el of pressure to the seat backrest (e.g. by
“falling” back into the seat when entering the
vehicle) or if pressure is applied to a front
seat head restraint from the rear. This acci-
dental activation is, however, not dangerous,
as the active head restraints will return to the
original position immediately and are thus
once again ready. Correct adjustment of rear head re-
s
tr
aint
s Fig. 75
Head restraints in the correct posi-
tion. Properly adjusted head restraints are an im-
por
t
ant
part of passenger protection and can
reduce the risk of injuries in most accident
situations.
60