brake SKODA CITIGO 2012 1.G Owner's Guide
[x] Cancel search | Manufacturer: SKODA, Model Year: 2012, Model line: CITIGO, Model: SKODA CITIGO 2012 1.GPages: 157, PDF Size: 3.9 MB
Page 77 of 157
What influences the driving safety?
First read and observe the introductory information and safety warn-
ings on page 74.
The driver is fully responsible for himself and his occupants. If your driving safety
is effected, you place yourself and the oncoming traffic at risk.
The following guidelines must therefore be observed. › Do not get distracted from concentrating on the traffic situation, e.g. by your
passengers or mobile phone calls.
› Never drive when your driving ability is impaired, e.g. through medication, alco-
hol, drugs.
› Keep to the traffic regulations and the permissible speed limit.
› Always adjust the driving speed to the road, traffic and weather conditions.
› Take regular breaks on long journeys – at least every two hours. ÐCorrect seated position
ä
Introduction
This chapter contains information on the following subjects:
Correct seated position for the driver 76
Correct seated position for the front passenger 76
Correct seated position for the occupants on the rear seats 76
Examples of an incorrect seated position 76
WARNING
■ The front seats and rear head restraints must always be adjusted to match
the body size, in order to offer an optimal protection for you and your occu-
pants.
■ Always assume the correct seated position before setting off and do not
change this position while driving. Also advise your passengers to adopt the
correct seated position and not to change this position while the car is mov-
ing.
■ If the occupant adopts an incorrect seated position, he is exposed to life-
threatening injuries, in case he is hit by a deployed airbag.
ä WARNING (Continued)
■ If the occupants on the rear seats are not sitting upright, the risk of injury is
increased due to incorrect routing of the seat belt.
■ The driver must maintain a distance of at least 25 cm to the steering wheel.
The front passenger must maintain a distance of at least 25 cm to the dash
panel. Not maintaining this minimum distance will mean that the airbag sys-
tem will not be able to properly protect you – hazard!
■ When driving, hold the steering wheel with both hands firmly on the outer
edge in the 9
o'clock and 3 o'clock position. Never hold the steering wheel in
the 12 o'clock position or in any other way (e.g. in the middle or inner edge of
the steering wheel). In such cases, you could severely injure the arms, hands
and head when the driver airbag is deployed.
■ The seat backrests must not be angled too far back when driving otherwise
this will affect proper operation of the seat belts and of the airbag system –
risk of injury!
■ Ensure that there are no objects in the driver's footwell as they may get
caught behind the pedals when driving or applying the braking. You would
then no longer be able to operate the clutch, brake or accelerate.
■ Always keep your feet in the footwell when the car is being driven – never
place your feet on the instrument panel, out of the window or on the surfaces
of the seats. You will be exposed to increased risk of injury if it becomes nec-
essary to apply the brake or in the event of an accident. If an airbag is de-
ployed, you may suffer fatal injuries when adopting an incorrect seated posi-
tion! Ð
75
Passive Safety
Page 82 of 157
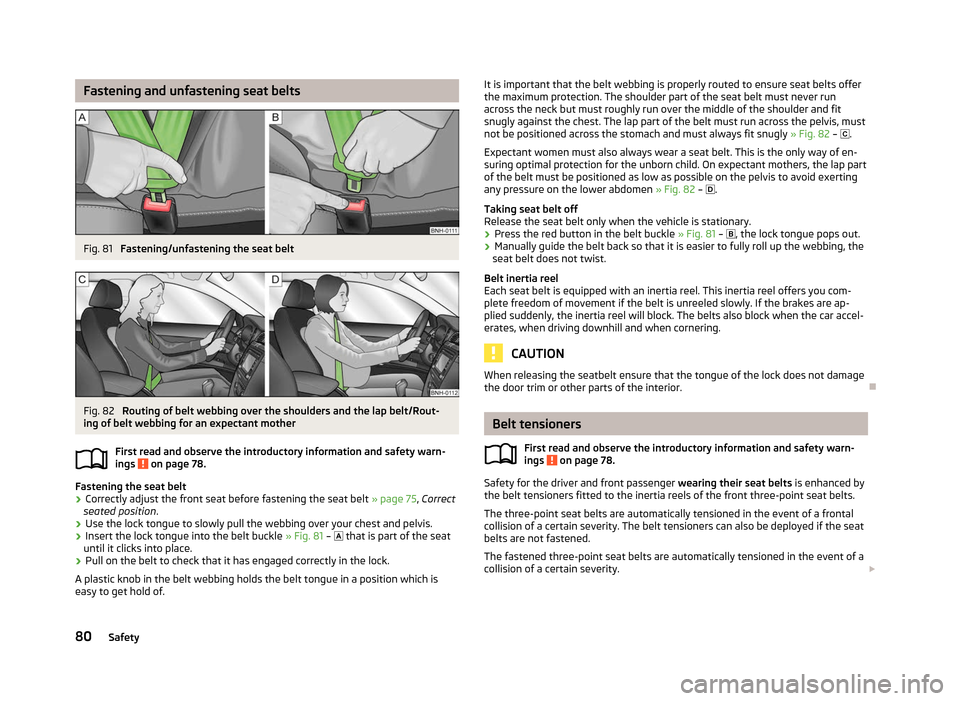
Fastening and unfastening seat belts
Fig. 81
Fastening/unfastening the seat belt Fig. 82
Routing of belt webbing over the shoulders and the lap belt/Rout-
ing of belt webbing for an expectant mother
First read and observe the introductory information and safety warn-
ings on page 78.
Fastening the seat belt
› Correctly adjust the front seat before fastening the seat belt
» page 75, Correct
seated position .
› Use the lock tongue to slowly pull the webbing over your chest and pelvis.
› Insert the lock tongue into the belt buckle
» Fig. 81 – that is part of the seat
until it clicks into place.
› Pull on the belt to check that it has engaged correctly in the lock.
A plastic knob in the belt webbing holds the belt tongue in a position which is
easy to get hold of.
ä It is important that the belt webbing is properly routed to ensure seat belts offer
the maximum protection. The shoulder part of the seat belt must never run
across the neck but must roughly run over the middle of the shoulder and fit
snugly against the chest. The lap part of the belt must run across the pelvis, must
not be positioned across the stomach and must always fit snugly
» Fig. 82 – .
Expectant women must also always wear a seat belt. This is the only way of en-
suring optimal protection for the unborn child. On expectant mothers, the lap part
of the belt must be positioned as low as possible on the pelvis to avoid exerting
any pressure on the lower abdomen » Fig. 82 – .
Taking seat belt off
Release the seat belt only when the vehicle is stationary.
› Press the red button in the belt buckle
» Fig. 81 – , the lock tongue pops out.
› Manually guide the belt back so that it is easier to fully roll up the webbing, the
seat belt does not twist.
Belt inertia reel
Each seat belt is equipped with an inertia reel. This inertia reel offers you com-
plete freedom of movement if the belt is unreeled slowly. If the brakes are ap-
plied suddenly, the inertia reel will block. The belts also block when the car accel-
erates, when driving downhill and when cornering. CAUTION
When releasing the seatbelt ensure that the tongue of the lock does not damage
the door trim or other parts of the interior. Ð Belt tensioners
First read and observe the introductory information and safety warn-
ings on page 78.
Safety for the driver and front passenger
wearing their seat belts is enhanced by
the belt tensioners fitted to the inertia reels of the front three-point seat belts.
The three-point seat belts are automatically tensioned in the event of a frontal
collision of a certain severity. The belt tensioners can also be deployed if the seat
belts are not fastened.
The fastened three-point seat belts are automatically tensioned in the event of a
collision of a certain severity. £
ä
80 Safety
Page 93 of 157
Driving Tips
Driving and the Environment
The first 1 500 km
New engine
The engine has to be run in during the first 1 500 kilometres.
Up to 1 000 kilometres › Do not drive faster than 3/4 of the maximum speed of the gear in use, i.e. 3/4 of
the maximum permissible engine speed.
› No full throttle.
› Avoid high engine speeds.
› Do not tow a trailer.
From 1 000 up to 1
500 kilometres
› Gradually
increase the power output of the engine up to the full speed of the
gear engaged, i.e. up to the maximum permissible engine speed.
During the first operating hours the engine has higher internal friction than later
until all of the moving parts have harmonized. The driving style which you adopt
during the first approx.1
500 kilometres plays a decisive part in the success of
running in your car.
Never drive at unnecessarily high engine speeds even after the running-in period
is complete. The maximum permissible engine speed is marked by the start of the
red scale area of the revolutions counter. On vehicles fitted with a manual gear-
box, at the very latest shift up into the next gear when the red area is reached.
During acceleration (depressing the accelerator) exceptionally high engine
speeds are automatically reduced, yet the engine is not protected against too
high engine speeds which are caused by incorrectly shifting down the gears re-
sulting in a sudden increase of the engine speeds above the permitted maximum
revolutions which can lead to engine damage.
For a vehicle fitted with a manual gearbox the converse situation also applies: Do
not drive at an engine speed that is too low. Shift down a gear when the engine
is no longer running smoothly. Observe the recommended gear » page 10, Recom-
mended gear . CAUTION
All the speed and engine revolution figures apply only when the engine is at its
normal operating temperature. Never rev up a cold engine when the vehicle is
stationary or when driving in individual gears. For the sake of the environment
Not driving at unnecessarily high engine revolutions and shifting to a higher gear
as early as possible are ways to minimise fuel consumption and operating noise
levels and protects the environment. Ð New tyres
New tyres have to be “
run in” since they do not offer optimal grip at first. Drive
especially carefully for the first 500 km or so. Ð New brake pads
New brake pads initially do not provide full braking efficiency. The brake pads
must initially be “run in
”. Drive especially carefully for the first 200 km or so. Ð Catalytic converter
Proper operation of the emission control system (catalytic converter) is of major
significance for driving your vehicle in an environmentally conscious way.
The following guidelines must be observed: › Vehicles fitted with a petrol engine must always be refuelled with unleaded
petrol » page 105, Unleaded petrol;
› Do not pour too much oil into the engine
» page 111, Checking the engine oil
level ;
› Do not switch off the ignition while driving.
If you drive your vehicle in a country in which unleaded petrol is not available, you
must have the catalytic converter replaced later when driving the vehicle into a
country in which use of a catalytic converter is mandatory. £
91
Driving and the Environment
Page 94 of 157
WARNING
■ In view of the high temperatures which can be produced in the catalytic con-
verter, the vehicle should be parked in such a way that the catalytic converter
cannot come into contact with easily flammable materials under the vehicle –
risk of fire!
■ Never use additional underbody protection or anti-corrosion agents for ex-
haust pipes, catalytic converters or heat shields – risk of fire! CAUTION
■ Never drive until the fuel tank is completely empty! The irregular supply of fuel
can cause misfiring, which can result in considerable damage to parts of the en-
gine and exhaust system. ■ Just filling the tank with leaded petrol once will damage the exhaust system! ÐEconomical and environmentally friendly driving
Introductory information
Your fuel consumption, any pollution of the environmental and the wear-and-tear
to the engine, brakes and tyres, depend essentially on three factors:
› your personal style of driving;
› the conditions under which your vehicle is operated;
› technical aspects.
The fuel economy by can be improved by 10
-15 % by always looking ahead and
driving in an economical way.
Fuel consumption is also be influenced by external factors which are beyond the
driver's control. Consumption increases during the winter or under difficult condi-
tions, on poor roads, etc.
Fuel consumption can vary considerably from the manufacturer's data, as a result
of outside temperatures, the weather and driving style.
The technical requirements for low fuel usage and economic efficiency of the ve-
hicle have already been built into the vehicle at the works. ŠKODA places a partic-
ular emphasis on minimising negative effects on the environment. It is necessary
to take note of the guidelines given in this chapter in order to make best use of
these characteristics and to maintain their effectiveness. The optimal engine speed should be obtained when accelerating, in order to
avoid a high fuel consumption and resonance of the vehicle.
Ð Looking ahead when driving
A vehicle's highest fuel consumption occurs when accelerating, therefore unnec-
essary accelerating and braking should be avoided. If looking ahead when driving,
less braking and consequently less accelerating are required. If possible, let your
vehicle coast to a stop, or use the engine brake, if you can see that the next set
of traffic lights is on red, for example. Ð Shifting to save energy
Fig. 91
Principle sketch: Fuel consump-
tion in litres/100 km depending
on the selected gear
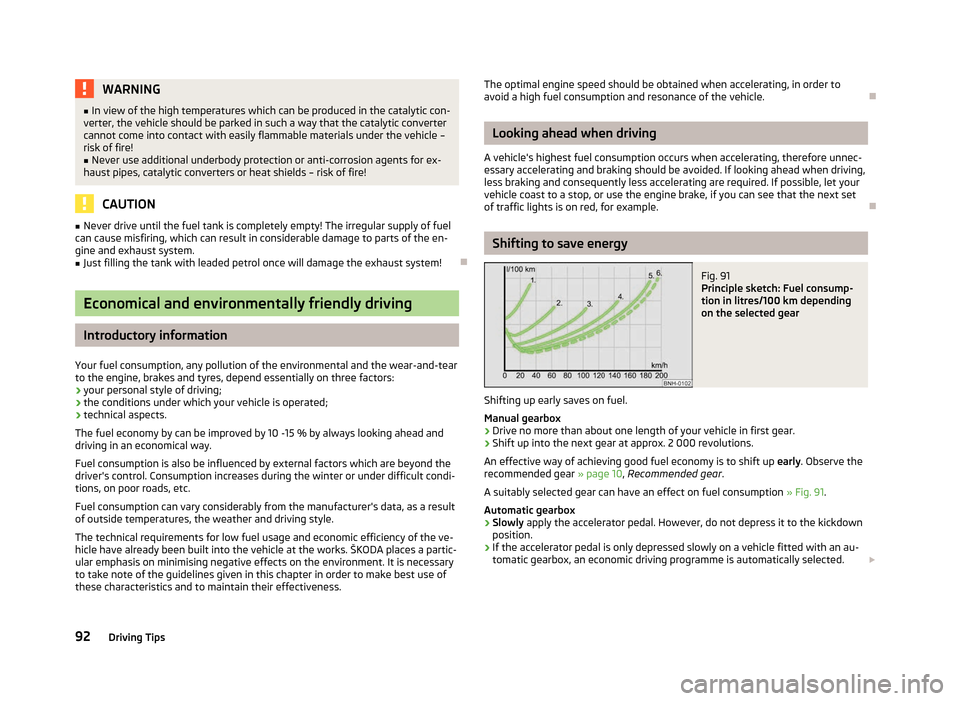
Shifting up early saves on fuel.
Manual gearbox › Drive no more than about one length of your vehicle in first gear.
› Shift up into the next gear at approx. 2
000 revolutions.
An effective way of achieving good fuel economy is to shift up early. Observe the
recommended gear » page 10, Recommended gear .
A suitably selected gear can have an effect on fuel consumption » Fig. 91.
Automatic gearbox › Slowly
apply the accelerator pedal. However, do not depress it to the kickdown
position.
› If the accelerator pedal is only depressed slowly on a vehicle fitted with an au-
tomatic gearbox, an economic driving programme is automatically selected.
£
92 Driving Tips
Page 98 of 157
Driving through water on the street
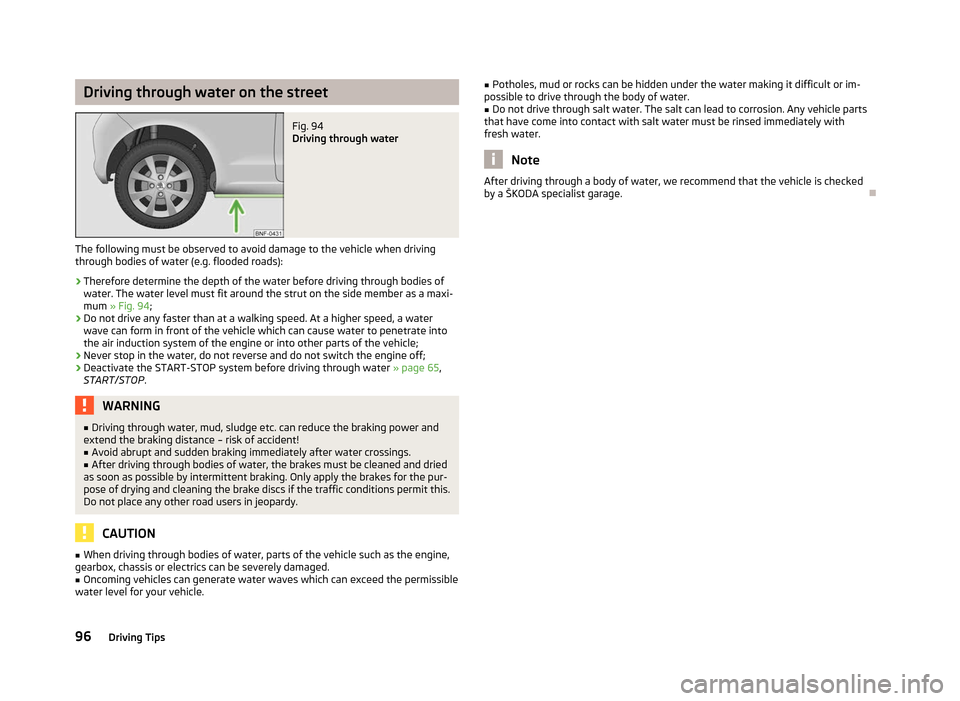
Fig. 94
Driving through water
The following must be observed to avoid damage to the vehicle when driving
through bodies of water (e.g. flooded roads):
› Therefore determine the depth of the water before driving through bodies of
water. The water level must fit around the strut on the side member as a maxi-
mum » Fig. 94;
› Do not drive any faster than at a walking speed. At a higher speed, a water
wave can form in front of the vehicle which can cause water to penetrate into
the air induction system of the engine or into other parts of the vehicle;
› Never stop in the water, do not reverse and do not switch the engine off;
› Deactivate the
START-STOP system before driving through water » page 65,
START/STOP. WARNING
■ Driving through water, mud, sludge etc. can reduce the braking power and
extend the braking distance – risk of accident!
■ Avoid abrupt and sudden braking immediately after water crossings.
■ After driving through bodies of water, the brakes must be cleaned and dried
as soon as possible by intermittent braking. Only apply the brakes for the pur-
pose of drying and cleaning the brake discs if the traffic conditions permit this.
Do not place any other road users in jeopardy. CAUTION
■ When driving through bodies of water, parts of the vehicle such as the engine,
gearbox, chassis or electrics can be severely damaged.
■ Oncoming vehicles can generate water waves which can exceed the permissible
water level for your vehicle. ■
Potholes, mud or rocks can be hidden under the water making it difficult or im-
possible to drive through the body of water. ■ Do not drive through salt water. The salt can lead to corrosion. Any vehicle parts
that have come into contact with salt water must be rinsed immediately with
fresh water. Note
After driving through a body of water, we recommend that the vehicle is checked
by a
ŠKODA specialist garage. Ð
96 Driving Tips
Page 99 of 157
General Maintenance
Taking care of and cleaning the vehicle
Taking care of your vehicle
ä
Introduction
This chapter contains information on the following subjects:
Washing the vehicle 98
Automatic car wash systems 98
Washing by hand 98
Washing with a high-pressure cleaner 98
Preserving and polishing the vehicle paintwork 99
Chrome parts 99
Paint damage 99
Plastic parts 99
De-icing windows and exterior mirrors 100
Radio reception 100
Headlight lenses 100
Rubber seals 100
Door lock cylinders 100
Wheels 101
Underbody protection 101
Protection of hollow spaces 101
Artificial leather and materials 101
Fabric covers on electrically heated seats 102
Natural leather 102
Seat belts 103
Regular and proper care help to retain the efficiency and value of your vehicle. It
may also be one of the requirements for the acceptance of warranty claims relat-
ing to corrosion damage and paint defects on the bodywork.
We recommend using care products from
ŠKODA Original Accessories that are
available from ŠKODA Service Partners. The instructions for use on the package
must be observed. WARNING
■ Care products may be harmful to your health if not used according to the in-
structions.
■ Always store care products in a safe place, out of the reach of children – risk
of poisoning! ■ When washing your vehicle in the winter: Water and ice in the brake system
can affect the braking efficiency – risk of accident! ■ Only wash the vehicle when the ignition is switched off – risk of accident!
■ Protect your hands and arms from sharp-edged metal parts when cleaning
the underfloor, the inside of the wheel housings or the wheel trims – risk of
cuts!
■ Air fresheners and scents can be hazardous to heath when the temperature
inside the vehicle is high. CAUTION
■ Be sure to check clothing for colourfastness to avoid any damage or visible
stains on the material (leather), panels and textiles.
■ Cleaners containing solvents can damage the material being cleaned.
■ Do not wash your vehicle in bright sunlight – risk of paint damage.
■ If washing the vehicle in the winter using a hose or high-pressure cleaner, en-
sure that the jet of water is not aimed directly at the locking cylinders or the
door/panel joints – risk of freezing!
■ Do not use any insect sponges, rough kitchen sponges or similar cleaning prod-
ucts – risk of damaging the surface of paintwork. ■ Do not stick any stickers on the inside of the rear windows, in the vicinity of the
heating elements. These may get damaged.
■ Do not clean the inside of the rear window with sharp-edged objects or corro-
sive and acidic cleaning agents – risk of damaging the heating elements.
■ Do not attach scents and air fresheners to the dashboard – risk of damage to
the dashboard.
■ To avoid damaging the parking aid sensors while cleaning with high-pressure
cleaners or steam jets, the sensors must only be directly sprayed for short periods
while a minimum distance of 10
cm must be observed.
■ Do not clean the roof trim with a brush – risk of damage to the trim surface. For the sake of the environment
■ Used cans of vehicle care products represent a special type of hazardous waste.
These must be disposed of in accordance with national legal regulations. ■ Only wash the vehicle at washing bays intended for this purpose. £
97
Taking care of and cleaning the vehicle
Page 103 of 157
Wheels
First read and observe the introductory information and safety warn-
ings on page 97.
Wheel rims
Also thoroughly wash the wheel rims when washing the vehicle on a regular ba-
sis. Regularly remove salt and brake abrasion from the wheel rims otherwise the
material will be affected. Damage to the paint layer on the wheel rims must be
touched up immediately.
Light alloy wheels
After washing thoroughly and treat the wheel rims with a protective product for
light alloy wheels. Products which cause abrasion must not be used to treat the
wheel rims. WARNING
Water, ice and grit in the brake system can affect the braking efficiency – risk
of accident! CAUTION
Severe layers of dirt on the wheels can also result in wheel imbalance. This may
show itself in the form of a wheel vibration which is transmitted to the steering
wheel which, in certain circumstances, can cause premature wear of the steering.
This means it is necessary to remove the dirt. Note
We recommend that any repairs to damaged paintwork are carried out by a
ŠKODA Service Partner. ÐUnderbody protection
First read and observe the introductory information and safety warn-
ings on page 97.
The underside of your vehicle is protected for life against chemical and mechani-
cal influences.ä
ä As damage to the
protective layer when driving cannot be ruled out completely,
we recommend that you inspect the protective layer on the underside of your ve-
hicle and on the chassis at specific intervals – preferably at the beginning and end
of the winter.
ŠKODA Service Partners have suitable spray products and the necessary equip-
ment available, and are familiar with the instructions for use. We therefore rec-
ommend that touch-up work or additional corrosion protection measures are car-
ried out by a ŠKODA Service Partner. WARNING
Never use additional underbody protection or anti-corrosion agents for ex-
haust pipes, catalytic converters or heat shields. When the engine reaches its
operating temperature, these substances might ignite – risk of fire! Ð Protection of hollow spaces
First read and observe the introductory information and safety warn-
ings on page 97.
All the cavities of your vehicle which are at risk from corrosion are protected for
life by a layer of protective wax applied in the factory.
This wax protection does not require to be inspected or re-treated. If any small
amount of wax flow out of the cavities at high temperatures, these must be re-
moved with a plastic scraper and the stains cleaned using a petroleum cleaner. WARNING
Safety regulations should be observed when using petroleum cleaner to re-
move wax – risk of fire! Ð Artificial leather and materials
First read and observe the introductory information and safety warn-
ings on page 97.
The artificial leather can be cleaned using a damp cloth. If this does not prove to
be adequate, these parts can only be treated with special
solvent-free plastic
cleaning and care products . £
ä
ä
101
Taking care of and cleaning the vehicle
Page 110 of 157
Regular inspections of gas systems
First read and observe the introductory information and safety warn-
ings on page 106.
Every two years, the following inspections must be carried out:
› Check solenoid valves on the gas tanks for proper function.
› Check natural gas tank and lines for leaks and fixing, if necessary look for dam-
ages.
› Check the condition of fuel filler cap, filler tube and sealing ring, clean sealing
ring if necessary. ÐSafe natural gas
First read and observe the introductory information and safety warn-
ings on page 106.
The safety concept of the natural gas system ensures safe operation. It is equip-
ped with the following security features.
› At each natural gas tank, there is a solenoid valve that closes automatically af-
ter turning off the ignition or when running in petrol mode.
› A thermal fuse prevents uncontrolled rise in pressure in the natural gas tank in
case of fire.
› A flow limiter prevents sudden emptying of the natural gas tank in case the
pressure system is damaged.
› All the attachment points and materials are designed for maximum safety. ÐNatural gas quality and consumption
First read and observe the introductory information and safety warn-
ings on page 106.
Natural gas is divided into quality groups H-gas and L-gas. The two types of gas
are subdivided according to their calorific value and nitrogen and carbon dioxide
contents. H-gas has a higher calorific value and lower nitrogen or carbon dioxide
content than L-gas.ä
ä
ä The higher the calorific value of natural gas, the lower is the consumption. How-
ever, the calorific value and the nitrogen and carbon dioxide contents can vary
within a quality group. Therefore, the consumption of the vehicle may even vary
when driving with only one natural gas quality (either only H-gas or L-gas).
The engine control of your vehicle automatically adjusts to the different natural
gas qualities. Therefore both natural gas qualities can be mixed in the fuel tank. It
is therefore not necessary to run the natural gas tank completely empty to fill up
another quality. Ð Engine compartment
ä
Introduction
This chapter contains information on the following subjects:
Opening and closing the bonnet 110
Engine compartment overview 110
Checking the engine oil level 111
Replenishing the engine oil 111
Changing engine oil 112
Coolant 112
Checking the coolant level 112
Replenishing the coolant 113
Radiator fan 113
Checking the brake fluid 113
Changing the brake fluid 114
Windscreen washer system 114
There is a risk of injuries, scalding, accidents and fire when working in the en-
gine compartment, e.g. inspecting and replenishing oil and other fluids. For this
reason, it is essential to comply with the warning instructions stated below and
with the general applicable rules of safety. The vehicle's engine compartment is
a hazardous area . £
108 General Maintenance
Page 111 of 157
WARNING
■ Never open the bonnet if you can see steam or coolant flowing out of the
engine compartment – risk of scalding! Wait until the steam or coolant has
stopped escaping.
■ Turn off the engine and withdraw the ignition key.
■ If the vehicle is fitted with a manual gearbox, move the gearshift lever into
Neutral, or if the vehicle is fitted with an automatic gearbox, move the selec-
tor lever into position P .
■ Firmly apply the handbrake.
■ Allow the engine to cool.
■ For safety reasons, the bonnet must always be properly closed when driving.
This is why after closing the bonnet, the lock must always be checked to en-
sure it has engaged properly. ■ If you notice that the lock is not properly engaged while driving, stop the ve-
hicle immediately and close the bonnet – risk of an accident!
■ Keep children clear of the engine compartment.
■ Do not touch any hot engine parts – risk of burns!
■ Never spill fluids on the hot engine. Such fluids (e.g. the antifreeze con-
tained in the coolant) may ignite!
■ Avoid short circuits in the electrical system – particularly on the vehicle's
battery.
■ Never touch the radiator fan while the engine is still warm. The fan might
suddenly start running! ■ Never open the end cover of the coolant expansion reservoir while the en-
gine is still warm. The cooling system is pressurized! ■ When opening the end cover of the coolant expansion reservoir, cover it
with a cloth to protect your face, hands and arms from hot steam or hot cool-
ant.
■ Do not leave any items such as cloths or tools in the engine compartment.
■ If you wish to work under the vehicle, you must secure the vehicle from roll-
ing away and support it with suitable supporting blocks: the car jack is not
sufficient for this – risk of injury! WARNING (Continued)
■ If any inspection work has to be carried out when the engine is running,
there is an additional risk from rotating parts (e.g. V-belt, alternator, radiator
fan) and the high-voltage ignition system. The following must also be ob-
served: ■Never touch the electric wiring on the ignition system.
■ Always make sure that no jewellery, loose clothing or long hair can get
caught in rotating engine parts – hazard! Always remove any jewellery, tie
back long hair and wear tight fitting clothing before completing any work.
■ Additionally, the following warning instructions must be observed if work
has to be carried out on the fuel or electrical system. ■Always disconnect the vehicle battery from the electrical system.
■ Do not smoke.
■ Never work near open flames.
■ Always have a functioning fire extinguisher nearby. CAUTION
Always top up using the correct specification of fluids. This may result in major
operating problems and also vehicle damage! For the sake of the environment
In view of the environmentally friendly disposal of fluids, the specials tools and
knowledge required for such work, we recommend that fluids are changed by a
Škoda
Service Partner as part of the inspection service. Note
■ If you have any questions regarding the fluids, visit a
ŠKODA Service Partner.
■ Fluids with the correct specifications can be purchased from ŠKODA Original Ac-
cessories. Ð
109
Inspecting and replenishing
Page 112 of 157
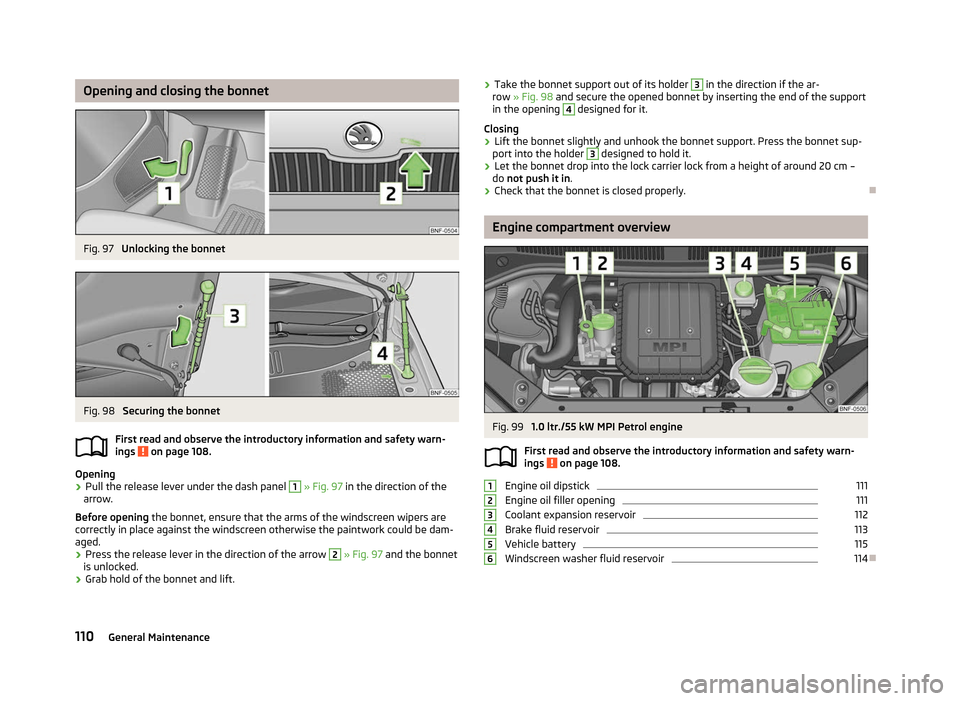
Opening and closing the bonnet
Fig. 97
Unlocking the bonnet Fig. 98
Securing the bonnet
First read and observe the introductory information and safety warn-
ings on page 108.
Opening
›
Pull the release lever under the dash panel 1
» Fig. 97 in the direction of the
arrow.
Before opening the bonnet, ensure that the arms of the windscreen wipers are
correctly in place against the windscreen otherwise the paintwork could be dam-
aged.
› Press the release lever in the direction of the arrow 2
» Fig. 97 and the bonnet
is unlocked.
› Grab hold of the bonnet and lift.
ä ›
Take the bonnet support out of its holder 3
in the direction if the ar-
row » Fig. 98 and secure the opened bonnet by inserting the end of the support
in the opening 4
designed for it.
Closing
› Lift the bonnet slightly and unhook the bonnet support. Press the bonnet sup-
port into the holder 3
designed to hold it.
› Let the bonnet drop into the lock carrier lock from a height of around 20
cm –
do not push it in .
› Check that the bonnet is closed properly. Ð Engine compartment overview
Fig. 99
1.0 ltr./55 kW MPI Petrol engine
First read and observe the introductory information and safety warn-
ings on page 108.
Engine oil dipstick 111
Engine oil filler opening 111
Coolant expansion reservoir 112
Brake fluid reservoir 113
Vehicle battery 115
Windscreen washer fluid reservoir 114
Ð
ä 1
2
3
4
5
6
110
General Maintenance