fuel consumption SKODA CITIGO 2012 1.G Owner's Manual
[x] Cancel search | Manufacturer: SKODA, Model Year: 2012, Model line: CITIGO, Model: SKODA CITIGO 2012 1.GPages: 157, PDF Size: 3.9 MB
Page 12 of 157
Avoid high engine speeds during the running-in period and before the engine has
warmed up to the operating temperature . For the sake of the environment
Shifting to a higher gear in good time helps to lower fuel consumption, minimises
operating noise levels, protects the environment and contributes to a longer life
and reliability of the engine. ÐCounter for distance driven
First read and observe the introductory information and safety warn-
ings on page 8.
The distance which you have driven with your vehicle is shown in kilometres (km).
In some countries the measuring unit
“mile” is used.
Reset button
To toggle between the odometer and the daily trip counter, briefly press the but-
ton 3
» Fig. 2 on page
8 or » Fig. 3 on page 8.
To reset the display of the daily trip counter, press button 3
for longer.
Daily trip counter (trip)
The daily trip counter indicates the distance which you have driven since it was
last reset - in steps of 100 metres or 1/10 of a mile.
Odometer
The odometer indicates the total distance in kilometres or miles which the vehicle
has been driven. ÐService Interval Display
First read and observe the introductory information and safety warn-
ings on page 8.
Before the next service interval, the message
appears for some seconds and
the remaining kilometres are indicated after switching on the ignition.
At the time of the service, an acoustic signal will sound and the message
ap-
pears for a few seconds after switching on the ignition. ä
ä Resetting Service Interval Display
The ŠKODA specialist garage:
› Resets the memory of the display after the appropriate inspection
› Adds an entry to the Service Schedule
› Affixes the sticker with the entry of the following service interval to the side of
the dashboard on the driver's side Note
■ Information is retained in the Service Interval Display even after the vehicle bat-
tery is disconnected. ■ If the instrument cluster is exchanged after a repair, the correct values must be
entered in the counter for the Service Interval Display. This work is carried out by
a ŠKODA specialist garage. ■ For more information on the service intervals » Service Plan. Ð Recommended gear
First read and observe the introductory information and safety warn-
ings on page 8.
An information for the engaged gear is shown in the display of the instrument
cluster.
In order to minimise the fuel consumption, a recommendation for shifting into an-
other gear is indicated in the display.
Show Importance
Optimal gear.
Recommends that you shift to a higher gear.
Recommends that you shift to a lower gear. CAUTION
The driver is always responsible for selecting the correct gear in different driving
situations, such as overtaking. Ð
ä
10 Using the system
Page 14 of 157
Note
All information in the memory 1 and 2 is erased if the battery of the vehicle is dis-
connected. ÐOperation
Fig. 7
Multifunction display: Control el-
ements
First read and observe the introductory information and safety warn-
ings on page 11.
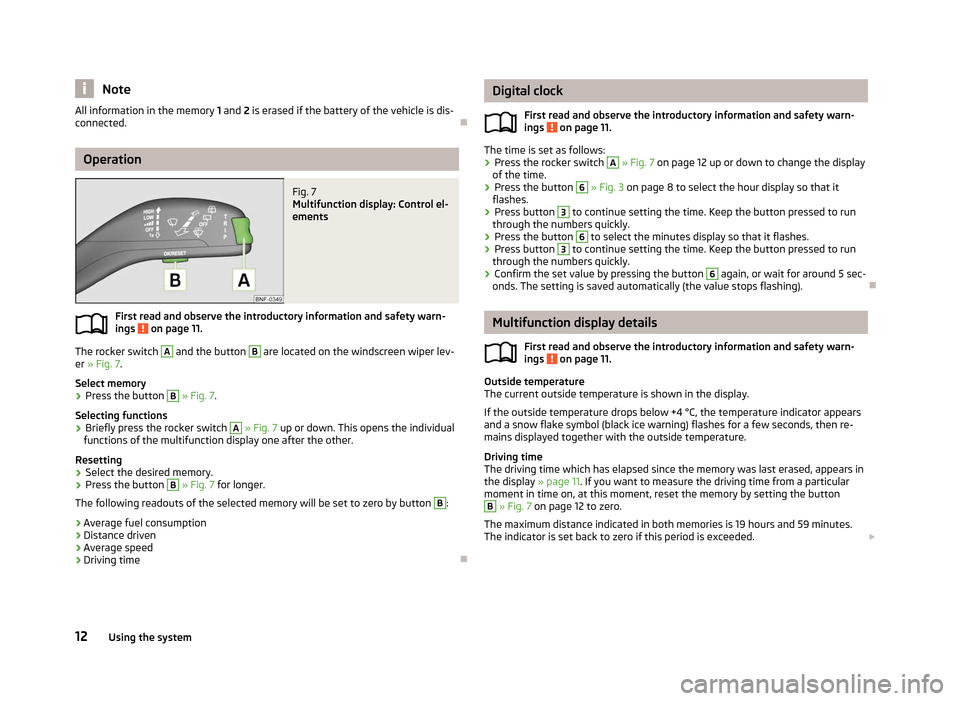
The rocker switch A
and the button B
are located on the windscreen wiper lev-
er »
Fig. 7.
Select memory
› Press the button B
» Fig. 7
.
Selecting functions
› Briefly press the rocker switch A
» Fig. 7 up or down. This opens the individual
functions of the multifunction display one after the other.
Resetting
› Select the desired memory.
› Press the button B
» Fig. 7
for longer.
The following readouts of the selected memory will be set to zero by button B
:
› Average fuel consumption
› Distance driven
› Average speed
› Driving time Ð
ä Digital clock
First read and observe the introductory information and safety warn-
ings on page 11.
The time is set as follows:
›
Press the rocker switch A
» Fig. 7
on page 12 up or down to change the display
of the time.
› Press the button 6
» Fig. 3
on page 8 to select the hour display so that it
flashes.
› Press button 3
to continue setting the time. Keep the button pressed to run
through the numbers quickly.
› Press the button 6
to select the minutes display so that it flashes.
› Press button 3
to continue setting the time. Keep the button pressed to run
through the numbers quickly.
› Confirm the set value by pressing the button 6
again, or wait for around 5 sec-
onds. The setting is saved automatically (the value stops flashing). Ð Multifunction display details
First read and observe the introductory information and safety warn-
ings on page 11.
Outside temperature
The current outside temperature is shown in the display.
If the outside temperature drops below +4 °C, the temperature indicator appears
and a snow flake symbol (black ice warning) flashes for a few seconds, then re-
mains displayed together with the outside temperature.
Driving time
The driving time which has elapsed since the memory was last erased, appears in
the display » page 11. If you want to measure the driving time from a particular
moment in time on, at this moment, reset the memory by setting the button B
» Fig. 7 on page
12 to zero.
The maximum distance indicated in both memories is 19 hours and 59 minutes.
The indicator is set back to zero if this period is exceeded. £
ä
ä
12 Using the system
Page 15 of 157
Current fuel consumption
The current fuel consumption level is shown in the display in litres/100
km1)
. You
can use this information to adapt your driving style to the desired fuel consump-
tion.
The display appears in litres/hour if the vehicle is stationary or driving at a low
speed 2)
.
Average fuel consumption
The average fuel consumption since the memory was last erased is shown in the
display in litres/100 km 1 )
» page 11. You can use this information to adapt your
driving style to the desired fuel consumption.
If you wish to determine the average fuel consumption over a certain period of
time, you must set the memory at the start of the new measurement to zero us-
ing the button B
» Fig. 7 on page 12. A zero appears in the display for the first
approx. 300 m you drive after erasing the memory.
The display is updated regularly while you are driving.
Range
The estimated range in kilometres is shown on the display. It indicates the dis-
tance you can still drive with your vehicle based on the level of fuel in the tank
and the same style of driving.
The display is shown in steps of 10
km. After lighting up of the warning light for
the fuel reserve the display is shown in steps of 5 km.
The fuel consumption over the last 50 km is used to calculate the range. The
range will increase if you drive in a more economical manner.
Distance travelled
The distance driven since the memory was last erased appears in the dis-
play » page 11. If you want to measure the distance travelled from a particular mo-
ment in time on, at this moment, reset the memory by setting the button B
» Fig. 7 on page
12 to zero.
The maximum distance indicated in both memories is 1 999 km. The indicator is
set back to zero if this period is exceeded. Average speed
The average speed since the memory was last erased is shown in the display
in km/hour
»
page 11. If you wish to determine the average speed over a certain
period of time, you must set the memory to zero at the start of the measurement
using the button B
on the windscreen wiper lever
» Fig. 7 on page 12.
After erasing the memory, no value appears in the display until you have driven
approx. 300 m.
The display is updated regularly while you are driving.
Current speed
The current speed which is identical to the display of the speedometer 1
»
Fig. 3
on page 8 is indicated on the display.
Coolant temperature
The current coolant temperature is shown in the display. Ð Warning against excessive speeds
First read and observe the introductory information and safety warn-
ings on page 11.
Adjust the speed limit while the vehicle is stationary
›
With button A
» Fig. 7
on page 12, choose the menu point Warning against ex-
cessive speeds .
› Press the button B
to activate the ability to set the speed limit (value flashes).
› Use the button A
to set the required speed limit, e.g. 50 km/h.
› Confirm the speed limit that was set with button B
, or wait approx. 5 seconds
until the setting is saved automatically (the value stops flashing).
This allows you to set the speed in 5
km/h intervals.
Adjusting the speed limit while the vehicle is moving
› With button A
» Fig. 7
on page 12, choose the menu point Warning against ex-
cessive speeds .
› Drive at the desired speed, e.g. 50 km/h.
› Press button B
to accept the current speed as the speed limit (the value flash-
es). £
ä
1)
On some models in certain countries, the display appears in kilometres/litre.
2) On some models in certain countries, the display appears in --,- kilometres/litres if the vehicle is sta-
tionary.
13
Instruments and warning lights
Page 35 of 157
Visibility
Rear window heater
Fig. 28
Switch for rear window heater
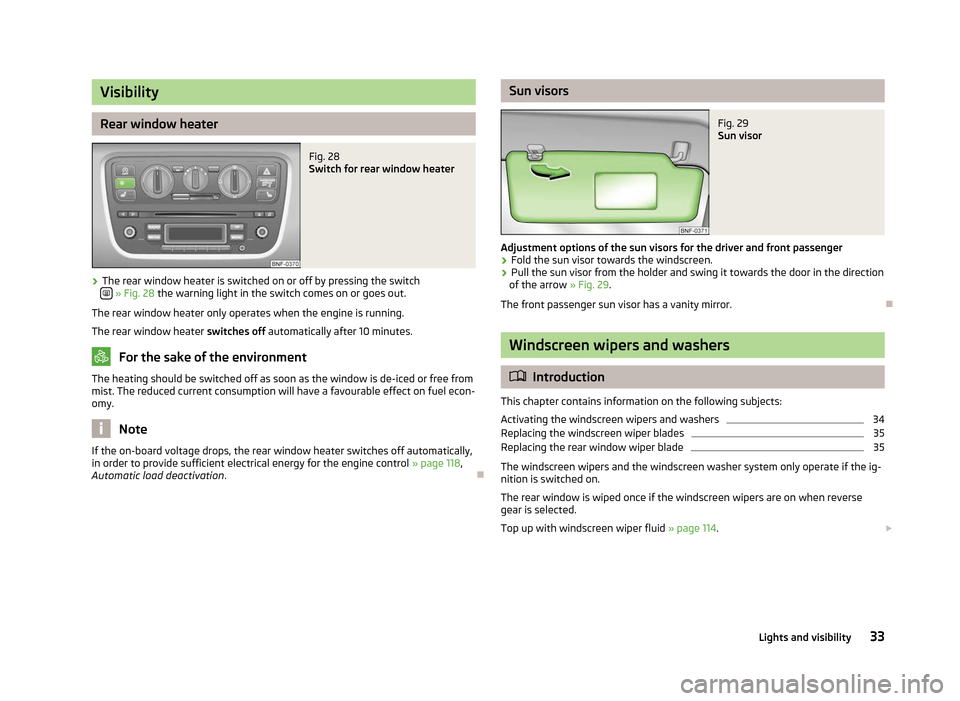
› The rear window heater is switched on or off by pressing the switch
» Fig. 28
the warning light in the switch comes on or goes out.
The rear window heater only operates when the engine is running.
The rear window heater switches off automatically after 10 minutes. For the sake of the environment
The heating should be switched off as soon as the window is de-iced or free from
mist. The reduced current consumption will have a favourable effect on fuel econ-
omy. Note
If the on-board voltage drops, the rear window heater switches off automatically,
in order to provide sufficient electrical energy for the engine control »
page 118,
Automatic load deactivation . Ð Sun visors
Fig. 29
Sun visor
Adjustment options of the sun visors for the driver and front passenger
› Fold the sun visor towards the windscreen.
› Pull the sun visor from the holder and swing it towards the door in the direction
of the arrow » Fig. 29.
The front passenger sun visor has a vanity mirror. Ð Windscreen wipers and washers
ä
Introduction
This chapter contains information on the following subjects:
Activating the windscreen wipers and washers 34
Replacing the windscreen wiper blades 35
Replacing the rear window wiper blade 35
The windscreen wipers and the windscreen washer system only operate if the ig-
nition is switched on.
The rear window is wiped once if the windscreen wipers are on when reverse
gear is selected.
Top up with windscreen wiper fluid » page 114. £
33
Lights and visibility
Page 46 of 157
CAUTION
Make sure that the luggage compartment cover is latched correctly into the side
holders 2
» Fig. 43 - risk of damaging the luggage compartment cover/luggage
compartment. ÐRoof rack system
ä
Introduction
This chapter contains information on the following subjects:
Attachment points for roof bars 44
Roof load 45
WARNING
■ The items which you transport on the roof bar system must be reliably at-
tached – risk of accident!
■ Always secure the load with appropriate and undamaged lashing straps or
tensioning straps.
■ Distribute the load evenly over the roof rack system.
■ The handling properties of your vehicle change when you transport heavy or
bulky items on the roof bar system as a result of the displacement of the cen-
tre of gravity and the increased wind attack area – risk of accident! The style
of driving and speed must therefore be adapted to the current circumstances. ■ Avoid abrupt and sudden driving/braking manoeuvres.
■ Adjust the speed and driving style to the visibility, weather, road and traffic
conditions. ■ The permissible roof load, permissible axle loads and gross permissible
weight of your vehicle must not be exceeded under any circumstances – risk
of accident! CAUTION
■ Only use roof rack systems approved by ŠKODA.
■ If other roof rack systems are used or if the roof bars are not fitted correctly,
any resulting damage to the vehicle is not covered by the warranty. It is therefore
essential that the supplied fitting instructions for the roof rack system are ob-
served. ■
On vehicles with a panoramic sliding roof, make sure that the tilted panoramic
sliding roof not strike any items which are transported. ■ Ensure that the luggage compartment lid does not hit the roof load when
opened.
■ The height of the vehicle changes after mounting a roof luggage rack system
and the load that is secured to it. Compare the vehicle height with available clear-
ances, such as underpasses and garage doors.
■ Always remove the roof luggage rack system before entering an automated car
wash. ■ Ensure the roof aerial is not impaired by the secured load. For the sake of the environment
The increased aerodynamic drag results in a higher fuel consumption. Ð Attachment points for roof bars
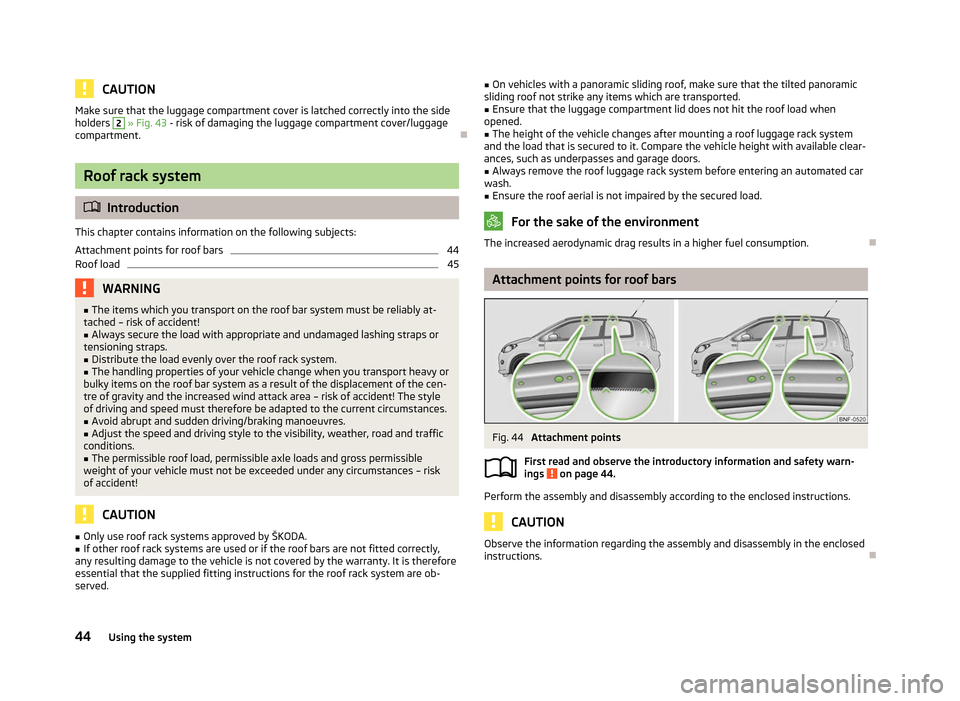
Fig. 44
Attachment points
First read and observe the introductory information and safety warn-
ings on page 44.
Perform the assembly and disassembly according to the enclosed instructions.
CAUTION
Observe the information regarding the assembly and disassembly in the enclosed
instructions. Ð
ä
44 Using the system
Page 53 of 157
Heating and air conditioning system
Heating and air conditioning system
Introductory information
The heating effect is dependent upon the coolant temperature, thus full heat
output only occurs when the engine has reached its operating temperature.
If the cooling system is switched on, the temperature and air humidity drops in
the vehicle. The well-being of the occupants of the car is enhanced as a result of
this particularly at high outside temperatures and a high air humidity. The system
prevents the windows misting up during the cold season of the year.
It is possible to briefly activate recirculated air mode to enhance the cooling ef-
fect.
Please refer to the information regarding the recalculated air mode for air-condi-
tioning » page 55.
The air inlet in front of the windscreen must be free of ice, snow or leaves to en-
sure that the heating and cooling system operates properly.
After switching on the cooling Condensation from the evaporator of the air condi-
tioning may drip down and form a puddle below the vehicle. This is quite normal
and not an indication of a leak! WARNING
■ For your own safety and that of other road users, ensure that all the win-
dows are free of ice, snow and misting. Please familiarize yourself about how
to correctly operate the heating and ventilation systems, how to demist and
defrost the windows, as well as with the cooling mode.
■ Do not leave recirculated air mode on over a longer period of time, as “stale”
air can cause fatigue of the driver and passengers, reduce attention levels and
also cause the windows to mist up. The risk of having an accident increases.
Switch off recirculated air mode as soon as the windows start to mist up. Note
■ The used air streams out through the vents in the luggage compartment.
■ We recommend that you do not smoke in the vehicle when the recirculating air
mode is operating since the smoke which is drawn at the evaporator from the in-
terior of the vehicle forms deposits in the evaporator of the air conditioning sys-
tem. This produces a permanent odour when the air conditioning system is oper-
ating which can only be eliminated through considerable effort and expense (re-
placement of compressor).
■ To ensure that the heating and air conditioning systems work properly, do not
block up the air outlet vents with any objects. Ð Using the air conditioning system economically
The compressor on the air conditioning system uses power from the engine when
in cooling mode which will effect the fuel consumption.
It recommended to open the windows or the doors of a vehicle for which the inte-
rior has been strongly heated through the effect of direct sunlight in order to al-
low the heated air to escape.
The cooling system should not be switched on while travelling when the window
is open.
If the desired interior temperature can also be achieved without activating the
cooling system, fresh air mode should be selected. For the sake of the environment
Pollutant emissions are also reduced when fuel is saved. Ð Operational problems
If the cooling system does not operate at outside temperatures higher than +5 °C,
there is a problem in the system. The reasons for this may be.
› One of the fuses has blown. Check the fuse and replace if necessary
»
page 138.
› The cooling system has switched off automatically for a short time because the
coolant temperature of the engine is too hot » page 13.
If you cannot rectify the functional fault yourself, or the cooling capacity decrea-
ses, the cooling system must be switched off. Visit a ŠKODA specialist garage. Ð
51
Heating and air conditioning system
Page 73 of 157
If a lower gear is selected, the gearbox does not shift down until there is no risk
of the engine overrevving.
If you operate the kickdown function, the gearbox shifts into a lower gear in line
with the vehicle speed and engine speed.
Note
The kickdown function is also available when manually shifting gears. ÐKickdown function
First read and observe the introductory information and safety warn-
ings on page 69.
The kickdown function provides you with maximum acceleration power.
When the accelerator pedal is fully depressed, the kickdown function is activated
in the desired driving program. This function has precedence over the driving pro-
gramme and serves for maximum acceleration of the vehicle when exploiting the
maximum power potential of the engine without taking into account the current
selector lever position ( D or Tiptronic M). The gearbox shifts down to one or sev-
eral gears in line with the driving state and the vehicle accelerates. The gearbox
does not shift up into the highest gear until the engine has reached its maximum
revolutions for this gear range. ÐDynamic shift programme
First read and observe the introductory information and safety warn-
ings on page 69.
The automatic gearbox of your car is controlled electronically. Shifting up and
down through the gears is performed automatically on the basis of pre-defined
driving programmes.
Adopting a moderate style of driving
will cause the gearbox to select the most
economical driving programme. Shifting up into a higher gear as soon as possible
and shifting down as late as possible will have a favourable effect on your fuel
consumption. ä
ä When adopting a
sporty style of driving with rapid movements of the accelerator
pedal combined with sharp acceleration, frequent changes in speed and exploit-
ing the top speed of the car, the gearbox will adjust to this style of driving once
the accelerator pedal (kickdown function) is depressed and will shift down earlier,
frequently by several gears in comparison to a moderate style of driving.
Selecting the most appropriate driving programme for the particular style of driv-
ing is a continuous process. Irrespective of this it is, however, possible to switch
or shift down into a dynamic shift programme by depressing the accelerator rap-
idly. The gearbox shifts down into a lower gear in accordance with the speed,
therefore enabling rapid acceleration (e.g. when overtaking) without the accelera-
tor pedal having to be depressed into the kickdown range. The original pro-
gramme will be reactivated to match your particular style of driving once the
gearbox has shifted up again.
When driving in hilly regions, the gears are selected to match uphill and downhill
sections. This avoids the gearbox frequently shifting up and down when negoti-
ating an uphill stretch. When driving downhill, it is possible to shift down into the
Tiptronic position M, in order to exploit the engine brake torque. Ð Operational faults
First read and observe the introductory information and safety warn-
ings on page 69.
Faults in the automatic gearbox
In the event of a fault in the automatic gearbox, warning lights may light up in the
instrument panel » page 18, Automatic gearbox .
In some instances, the gear may run in emergency mode. In this case, the vehicle
can only be driven at reduced speed.
The vehicle does not start off after engaging the selector lever position
If the vehicle does not start off, the problem may be that the selector lever is not
completely in the selected position. In such an instance, press the brake pedal
and put the selector lever into the required position. Note
If the automatic gearbox has a fault, seek help from a ŠKODA specialist garage
and fix the fault. Ð ä
71
Automatic gearbox
Page 93 of 157
Driving Tips
Driving and the Environment
The first 1 500 km
New engine
The engine has to be run in during the first 1 500 kilometres.
Up to 1 000 kilometres › Do not drive faster than 3/4 of the maximum speed of the gear in use, i.e. 3/4 of
the maximum permissible engine speed.
› No full throttle.
› Avoid high engine speeds.
› Do not tow a trailer.
From 1 000 up to 1
500 kilometres
› Gradually
increase the power output of the engine up to the full speed of the
gear engaged, i.e. up to the maximum permissible engine speed.
During the first operating hours the engine has higher internal friction than later
until all of the moving parts have harmonized. The driving style which you adopt
during the first approx.1
500 kilometres plays a decisive part in the success of
running in your car.
Never drive at unnecessarily high engine speeds even after the running-in period
is complete. The maximum permissible engine speed is marked by the start of the
red scale area of the revolutions counter. On vehicles fitted with a manual gear-
box, at the very latest shift up into the next gear when the red area is reached.
During acceleration (depressing the accelerator) exceptionally high engine
speeds are automatically reduced, yet the engine is not protected against too
high engine speeds which are caused by incorrectly shifting down the gears re-
sulting in a sudden increase of the engine speeds above the permitted maximum
revolutions which can lead to engine damage.
For a vehicle fitted with a manual gearbox the converse situation also applies: Do
not drive at an engine speed that is too low. Shift down a gear when the engine
is no longer running smoothly. Observe the recommended gear » page 10, Recom-
mended gear . CAUTION
All the speed and engine revolution figures apply only when the engine is at its
normal operating temperature. Never rev up a cold engine when the vehicle is
stationary or when driving in individual gears. For the sake of the environment
Not driving at unnecessarily high engine revolutions and shifting to a higher gear
as early as possible are ways to minimise fuel consumption and operating noise
levels and protects the environment. Ð New tyres
New tyres have to be “
run in” since they do not offer optimal grip at first. Drive
especially carefully for the first 500 km or so. Ð New brake pads
New brake pads initially do not provide full braking efficiency. The brake pads
must initially be “run in
”. Drive especially carefully for the first 200 km or so. Ð Catalytic converter
Proper operation of the emission control system (catalytic converter) is of major
significance for driving your vehicle in an environmentally conscious way.
The following guidelines must be observed: › Vehicles fitted with a petrol engine must always be refuelled with unleaded
petrol » page 105, Unleaded petrol;
› Do not pour too much oil into the engine
» page 111, Checking the engine oil
level ;
› Do not switch off the ignition while driving.
If you drive your vehicle in a country in which unleaded petrol is not available, you
must have the catalytic converter replaced later when driving the vehicle into a
country in which use of a catalytic converter is mandatory. £
91
Driving and the Environment
Page 94 of 157
WARNING
■ In view of the high temperatures which can be produced in the catalytic con-
verter, the vehicle should be parked in such a way that the catalytic converter
cannot come into contact with easily flammable materials under the vehicle –
risk of fire!
■ Never use additional underbody protection or anti-corrosion agents for ex-
haust pipes, catalytic converters or heat shields – risk of fire! CAUTION
■ Never drive until the fuel tank is completely empty! The irregular supply of fuel
can cause misfiring, which can result in considerable damage to parts of the en-
gine and exhaust system. ■ Just filling the tank with leaded petrol once will damage the exhaust system! ÐEconomical and environmentally friendly driving
Introductory information
Your fuel consumption, any pollution of the environmental and the wear-and-tear
to the engine, brakes and tyres, depend essentially on three factors:
› your personal style of driving;
› the conditions under which your vehicle is operated;
› technical aspects.
The fuel economy by can be improved by 10
-15 % by always looking ahead and
driving in an economical way.
Fuel consumption is also be influenced by external factors which are beyond the
driver's control. Consumption increases during the winter or under difficult condi-
tions, on poor roads, etc.
Fuel consumption can vary considerably from the manufacturer's data, as a result
of outside temperatures, the weather and driving style.
The technical requirements for low fuel usage and economic efficiency of the ve-
hicle have already been built into the vehicle at the works. ŠKODA places a partic-
ular emphasis on minimising negative effects on the environment. It is necessary
to take note of the guidelines given in this chapter in order to make best use of
these characteristics and to maintain their effectiveness. The optimal engine speed should be obtained when accelerating, in order to
avoid a high fuel consumption and resonance of the vehicle.
Ð Looking ahead when driving
A vehicle's highest fuel consumption occurs when accelerating, therefore unnec-
essary accelerating and braking should be avoided. If looking ahead when driving,
less braking and consequently less accelerating are required. If possible, let your
vehicle coast to a stop, or use the engine brake, if you can see that the next set
of traffic lights is on red, for example. Ð Shifting to save energy
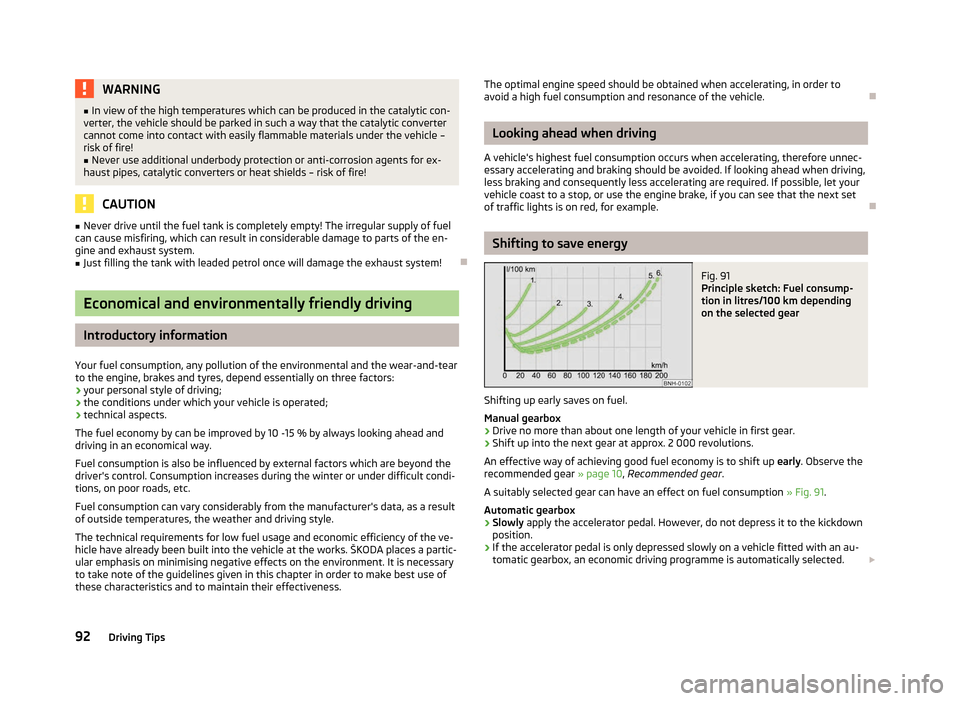
Fig. 91
Principle sketch: Fuel consump-
tion in litres/100 km depending
on the selected gear
Shifting up early saves on fuel.
Manual gearbox › Drive no more than about one length of your vehicle in first gear.
› Shift up into the next gear at approx. 2
000 revolutions.
An effective way of achieving good fuel economy is to shift up early. Observe the
recommended gear » page 10, Recommended gear .
A suitably selected gear can have an effect on fuel consumption » Fig. 91.
Automatic gearbox › Slowly
apply the accelerator pedal. However, do not depress it to the kickdown
position.
› If the accelerator pedal is only depressed slowly on a vehicle fitted with an au-
tomatic gearbox, an economic driving programme is automatically selected.
£
92 Driving Tips
Page 95 of 157
Note
Observe the recommended gear » page 10, Recommended gear .ÐAvoiding full throttle
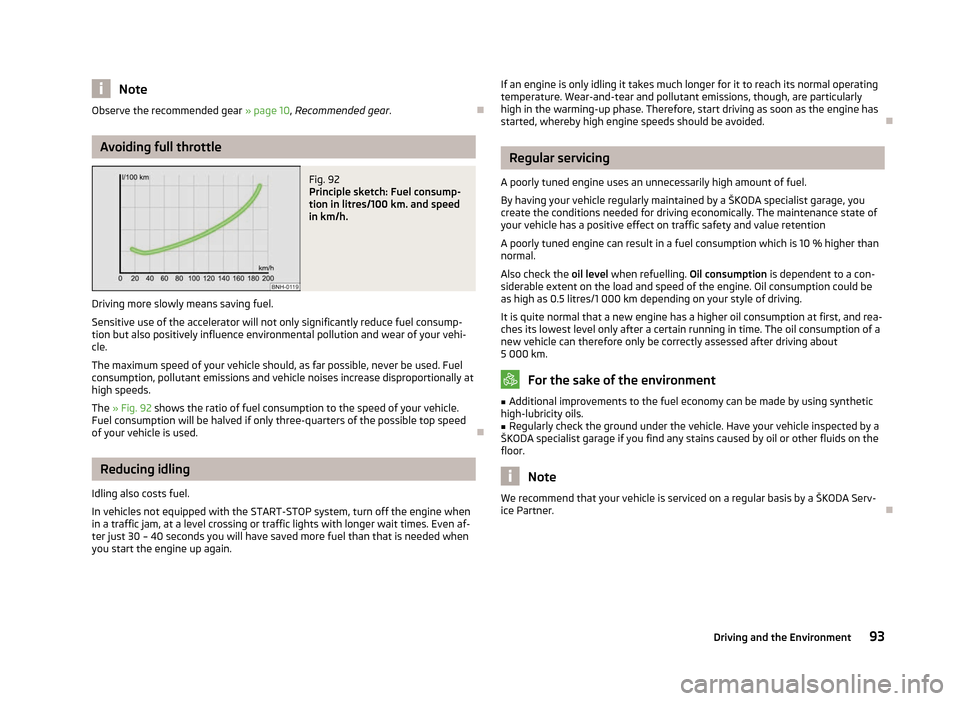
Fig. 92
Principle sketch: Fuel consump-
tion in litres/100 km. and speed
in km/h.
Driving more slowly means saving fuel.
Sensitive use of the accelerator will not only significantly reduce fuel consump-
tion but also positively influence environmental pollution and wear of your vehi-
cle.
The maximum speed of your vehicle should, as far possible, never be used. Fuel
consumption, pollutant emissions and vehicle noises increase disproportionally at
high speeds.
The » Fig. 92 shows the ratio of fuel consumption to the speed of your vehicle.
Fuel consumption will be halved if only three-quarters of the possible top speed
of your vehicle is used. ÐReducing idling
Idling also costs fuel.
In vehicles not equipped with the
START-STOP system, turn off the engine when
in a traffic jam, at a level crossing or traffic lights with longer wait times. Even af-
ter just 30 – 40 seconds you will have saved more fuel than that is needed when
you start the engine up again. If an engine is only idling it takes much longer for it to reach its normal operating
temperature. Wear-and-tear and pollutant emissions, though, are particularly
high in the warming-up phase. Therefore, start driving as soon as the engine has
started, whereby high engine speeds should be avoided.
Ð Regular servicing
A poorly tuned engine uses an unnecessarily high amount of fuel.
By having your vehicle regularly maintained by a ŠKODA
specialist garage, you
create the conditions needed for driving economically. The maintenance state of
your vehicle has a positive effect on traffic safety and value retention
A poorly tuned engine can result in a fuel consumption which is 10 % higher than
normal.
Also check the oil level when refuelling. Oil consumption is dependent to a con-
siderable extent on the load and speed of the engine. Oil consumption could be
as high as 0.5 litres/1 000 km depending on your style of driving.
It is quite normal that a new engine has a higher oil consumption at first, and rea-
ches its lowest level only after a certain running in time. The oil consumption of a
new vehicle can therefore only be correctly assessed after driving about
5 000 km. For the sake of the environment
■ Additional improvements to the fuel economy can be made by using synthetic
high-lubricity oils.
■ Regularly check the ground under the vehicle. Have your vehicle inspected by a
ŠKODA specialist garage if you find any stains caused by oil or other fluids on the
floor. Note
We recommend that your vehicle is serviced on a regular basis by a ŠKODA Serv-
ice Partner. Ð
93
Driving and the Environment